***
1. Understand springCloud
1.1. What is springCloud
Spring cloud is one of the projects under spring, Official website address: http://projects.spring.io/spring-cloud/
Spring is best at integration, taking the best framework in the world and integrating it into its own project.
Spring cloud is the same. It integrates some popular technologies and realizes functions such as configuration management, service discovery, intelligent routing, load balancing, fuse, control bus, cluster status and so on. The main components involved include:
Netflix:
- Eureka: Registration Center
- Zuul: service gateway
- Ribbon: load balancing
- Feign: service call
- Hystrix: fuse
2. Build a micro service scenario
2.1. Create parent project
In microservices, multiple projects need to be created at the same time. I first create a parent project, and then subsequent projects take this project as the parent to realize maven aggregation. In this way, you can see all projects in one window and simulate the microservice scenario. In actual development, each microservice is an independent project.
Then write POM XML dependency:
    <parent>
        <groupId>org.springframework.boot</groupId>
        <artifactId>spring-boot-starter-parent</artifactId>
        <version>2.1.3.RELEASE</version>
    </parent>

    <properties>
        <project.build.sourceEncoding>UTF-8</project.build.sourceEncoding>
        <project.reporting.outputEncoding>UTF-8</project.reporting.outputEncoding>
        <java.version>1.8</java.version>
        <spring-cloud.version>Greenwich.SR1</spring-cloud.version>
        <mapper.starter.version>2.1.4</mapper.starter.version>
        <mysql.version>8.0.27</mysql.version>
        <pageHelper.starter.version>1.2.5</pageHelper.starter.version>
    </properties>

    <dependencyManagement>
        <dependencies>
            <!-- springCloud -->
            <dependency>
                <groupId>org.springframework.cloud</groupId>
                <artifactId>spring-cloud-dependencies</artifactId>
                <version>${spring-cloud.version}</version>
                <type>pom</type>
                <scope>import</scope>
            </dependency>
            <!-- currency Mapper starter -->
            <dependency>
                <groupId>tk.mybatis</groupId>
                <artifactId>mapper-spring-boot-starter</artifactId>
                <version>${mapper.starter.version}</version>
            </dependency>
            <!-- mysql drive -->
            <dependency>
                <groupId>mysql</groupId>
                <artifactId>mysql-connector-java</artifactId>
                <version>${mysql.version}</version>
            </dependency>
        </dependencies>
    </dependencyManagement>
    <dependencies>
        <dependency>
            <groupId>org.projectlombok</groupId>
            <artifactId>lombok</artifactId>
        </dependency>
    </dependencies>

    <build>
        <plugins>
            <plugin>
                <groupId>org.springframework.boot</groupId>
                <artifactId>spring-boot-maven-plugin</artifactId>
            </plugin>
        </plugins>
    </build>
2.2. Service provider
Create a new project to provide the service of querying users
2.2. 1. Create module(userService)
Add dependency:
<dependencies>
        <dependency>
            <groupId>org.springframework.boot</groupId>
            <artifactId>spring-boot-starter-web</artifactId>
        </dependency>
        <dependency>
            <groupId>mysql</groupId>
            <artifactId>mysql-connector-java</artifactId>
        </dependency>
        <dependency>
            <groupId>tk.mybatis</groupId>
            <artifactId>mapper-spring-boot-starter</artifactId>
        </dependency>
    </dependencies>
2.2. 2. Write code
yml:
server:
  port: 8081
spring:
  datasource:
    url: jdbc:mysql://localhost:3306/makeke
    username: root
    password: root
    driver-class-name: com.mysql.jdbc.Driver
Startup class:
@SpringBootApplication
public class userServiceApplication {
    public static void main(String[] args) {
        SpringApplication.run(userServiceApplication.class,args);
    }
}
Entity class:
@Table(name = "user")
@Data
public class User {

    @Id
    @KeySql(useGeneratedKeys = true)
    private String id;
    private String name;
    private String age;
    private String mate;
    private String job;
}
mapper:
public interface UserMapper extends Mapper<User> {
}
service:
@Service
public class UserServiceImpl implements IUserService {

    @Autowired
    private UserMapper userMapper;

    @Override
    public User selectById(String id) {
        return userMapper.selectByPrimaryKey(id);;
    }
}
controller:
@RestController
@RequestMapping("/user")
public class UserController {

    @Autowired
    private IUserService userService;
    @GetMapping("/{id}")
    public User selectById(@PathVariable("id") String id){
        return userService.selectById(id);
    }
}
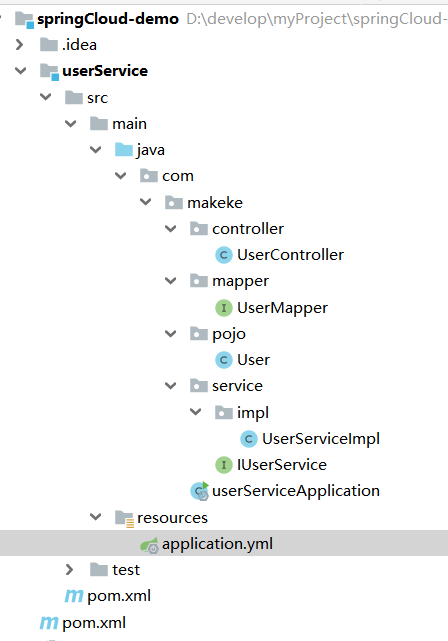
Project structure:
Start test:

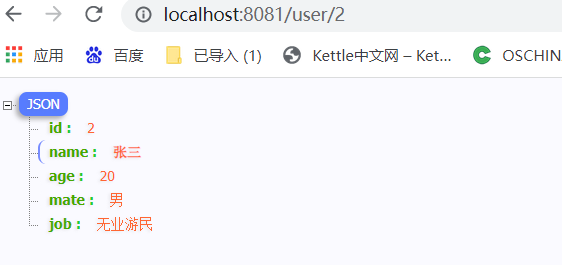
An error is reported when starting the project. The mapper is not found because the mapper package is not scanned. Start the project again after adding the annotation @ MapperScan("com. Make. Mapper") to the startup class:
2.3. Service caller
2.3. 1. Create module(userConsumer)
Add dependency:
<dependencies>
        <dependency>
            <groupId>org.springframework.boot</groupId>
            <artifactId>spring-boot-starter-web</artifactId>
        </dependency>
    </dependencies>
2.3. 2. Write code
Startup class
@SpringBootApplication
public class UserCustomerApplication {
    public static void main(String[] args) {
        SpringApplication.run(UserCustomerApplication.class,args);
    }

    //Create a restTemplate object for httpClient remote call
    @Bean
    public RestTemplate restTemplate() {
        RestTemplate restTemplate = new RestTemplate();
        //The default code is iso-8859-1 and changed to utf-8
        restTemplate.getMessageConverters().add(1,new StringHttpMessageConverter(Charset.forName("utf-8")));
        return restTemplate;
    }
}
Write the controller, directly call RestTemplate in the controller, and remotely access the service interface of userService:
@RestController
@RequestMapping("/consumer")
public class ConsumerController {

    @Autowired
    private RestTemplate restTemplate;

    @GetMapping("/{id}")
    public User selectById(@PathVariable("id") String id){
        return restTemplate.getForObject("http://127.0.0.1:8081/user/" + id,User.class);
    }
}
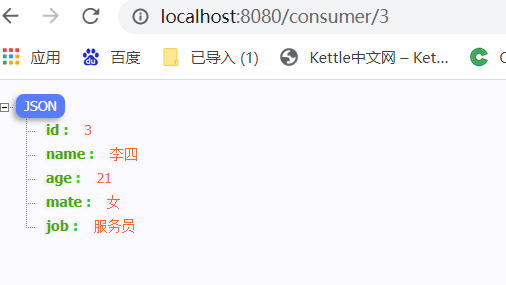
result:
2.4. problem
The calling of two services can be realized through httpClient technology, but this method has great problems
What's the problem?
- In the consumer, we hard code the url address into the code, which is not convenient for later maintenance
- The consumer needs to remember the address of the userService. If there is a change, it may not be notified, and the address will become invalid
- The consumer does not know the status of the userService, nor does it know that the service is down
- userService has only one service and does not have high availability
- Even if userservices form a cluster, consumer s need to achieve load balancing by themselves
In fact, the problems mentioned above are the problems that distributed services must face:
- Service management
- How to automatically register and discover
- How to realize status supervision
- How to implement dynamic routing
- How do services achieve load balancing
- How does the service solve the problem of disaster recovery
- How to realize unified configuration of services
Spring cloud provides solutions to the above problems
3.Eureka registry
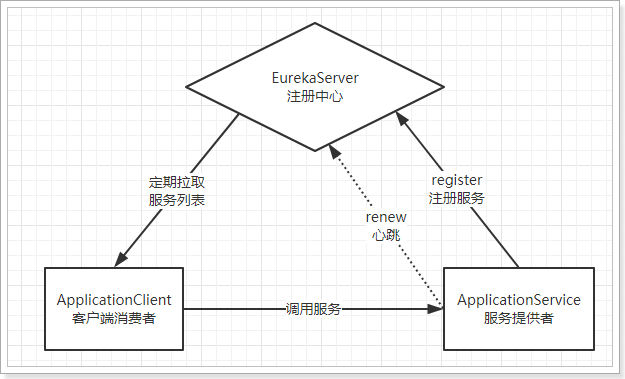
renewal: renewal
- Eureka server: a service registry (which can be a cluster) that exposes its own address.
- Provider: register your information (address, service name, etc.) with Eureka after startup, and renew the service contract regularly
- Consumer: the service caller will regularly go to Eureka to pull the service list, and then use the load balancing algorithm to select a service to call.
- Heartbeat (renewal): the provider periodically updates its status to Eureka through http
3.1. Write EurekaServer
Dependency:
    <dependencies>
        <dependency>
            <groupId>org.springframework.cloud</groupId>
            <artifactId>spring-cloud-starter-netflix-eureka-server</artifactId>
        </dependency>
    </dependencies>
Write startup class:
@SpringBootApplication
@EnableEurekaServer // Declare that the application is an Eureka server
public class EurekaServerApplication {
	public static void main(String[] args) {
		SpringApplication.run(EurekaServerApplication.class, args);
	}
}
Write configuration:
server:
  port: 10086
spring:
  application:
    name: eureka-server # The application name will be used as the service id (serviceId) in Eureka
eureka:
  client:
    service-url: # The address of EurekaServer is now your own address. If it is a cluster, you need to write the addresses of other servers.
      defaultZone: http://127.0.0.1:10086/eureka
    register-with-eureka: false # Don't register yourself
    fetch-registry: false #No pull service
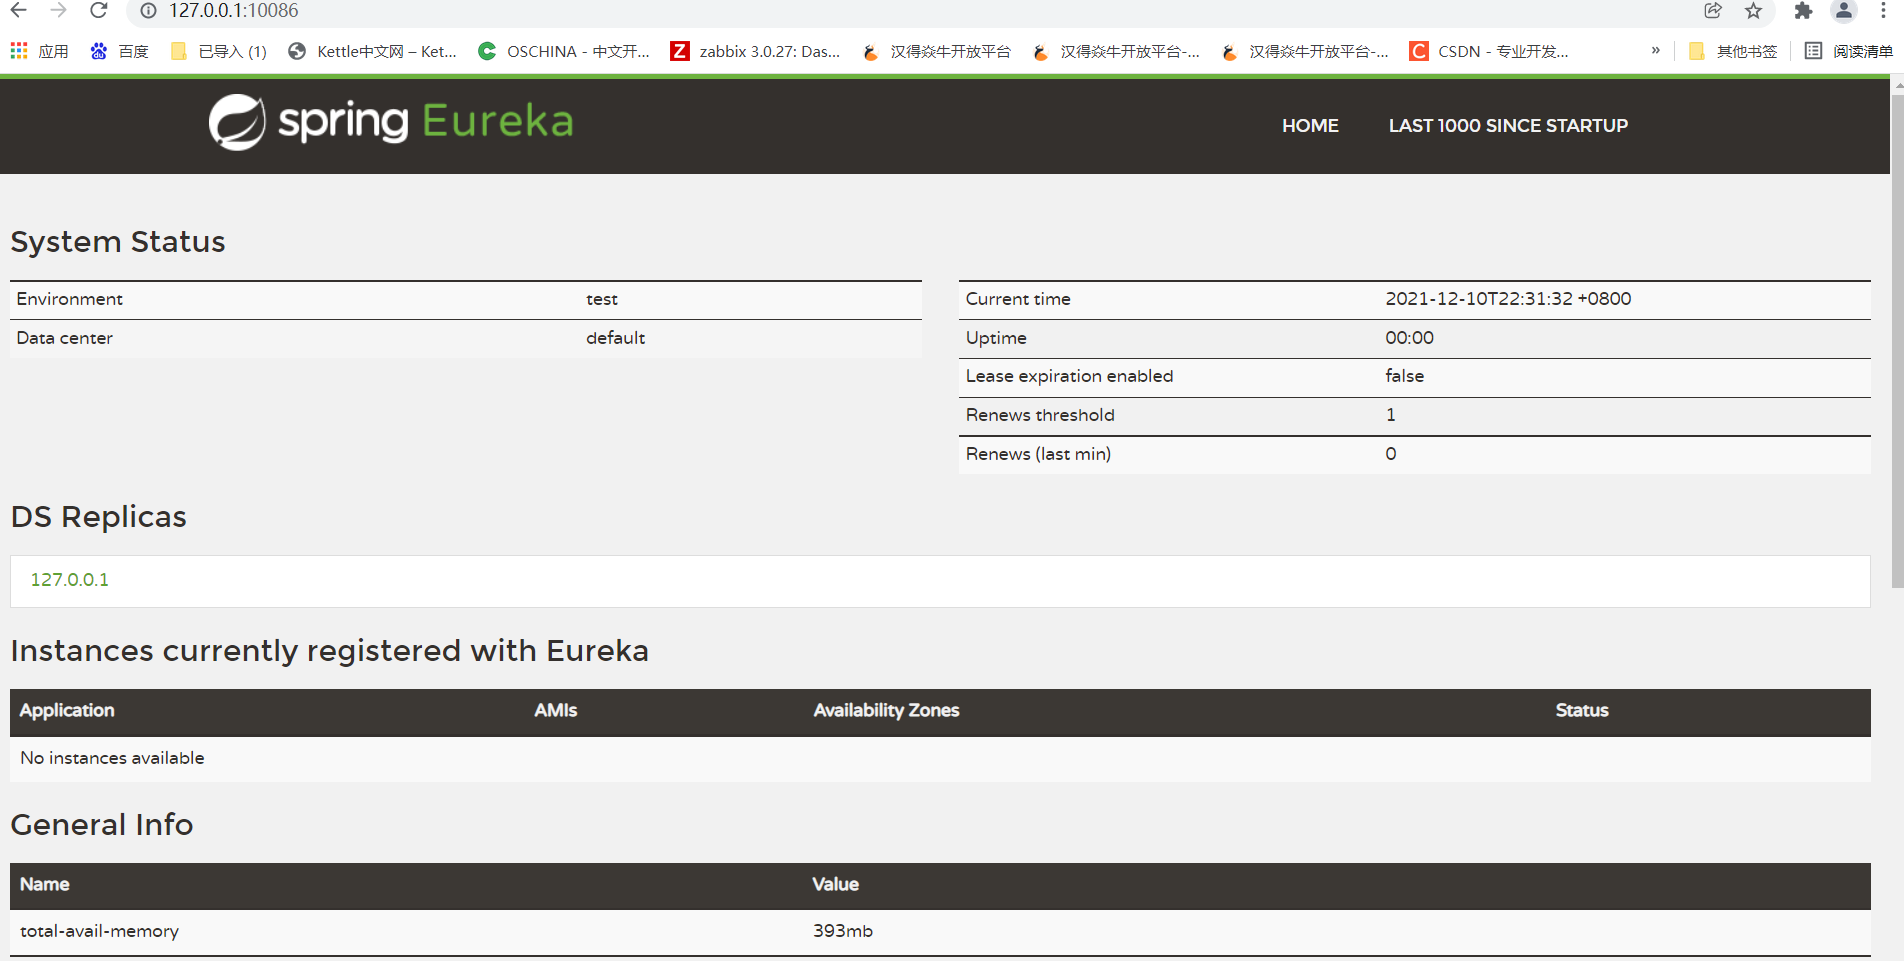
Start the service and access: http://127.0.0.1:10086
3.2. Service registration
Registering a service is to add Eureka's client dependency to the service. The client code will automatically register the service with Eureka server.
Add Eureka client dependency in userService module:
<!-- Eureka client -->
<dependency>
    <groupId>org.springframework.cloud</groupId>
    <artifactId>spring-cloud-starter-netflix-eureka-client</artifactId>
</dependency>
Enable Eureka client function on startup class
Enable Eureka client functionality by adding @ EnableDiscoveryClient
@SpringBootApplication
@MapperScan("com.makeke.mapper")
@EnableDiscoveryClient
public class UserServiceApplication {
    public static void main(String[] args) {
        SpringApplication.run(UserServiceApplication.class,args);
    }
}
Write configuration:
eureka:
  client:
    service-url: # EurekaServer address
      defaultZone: http://127.0.0.1:10086/eureka
Add spring application. Name attribute to specify the application name, which will be used as the id of the service in the future.
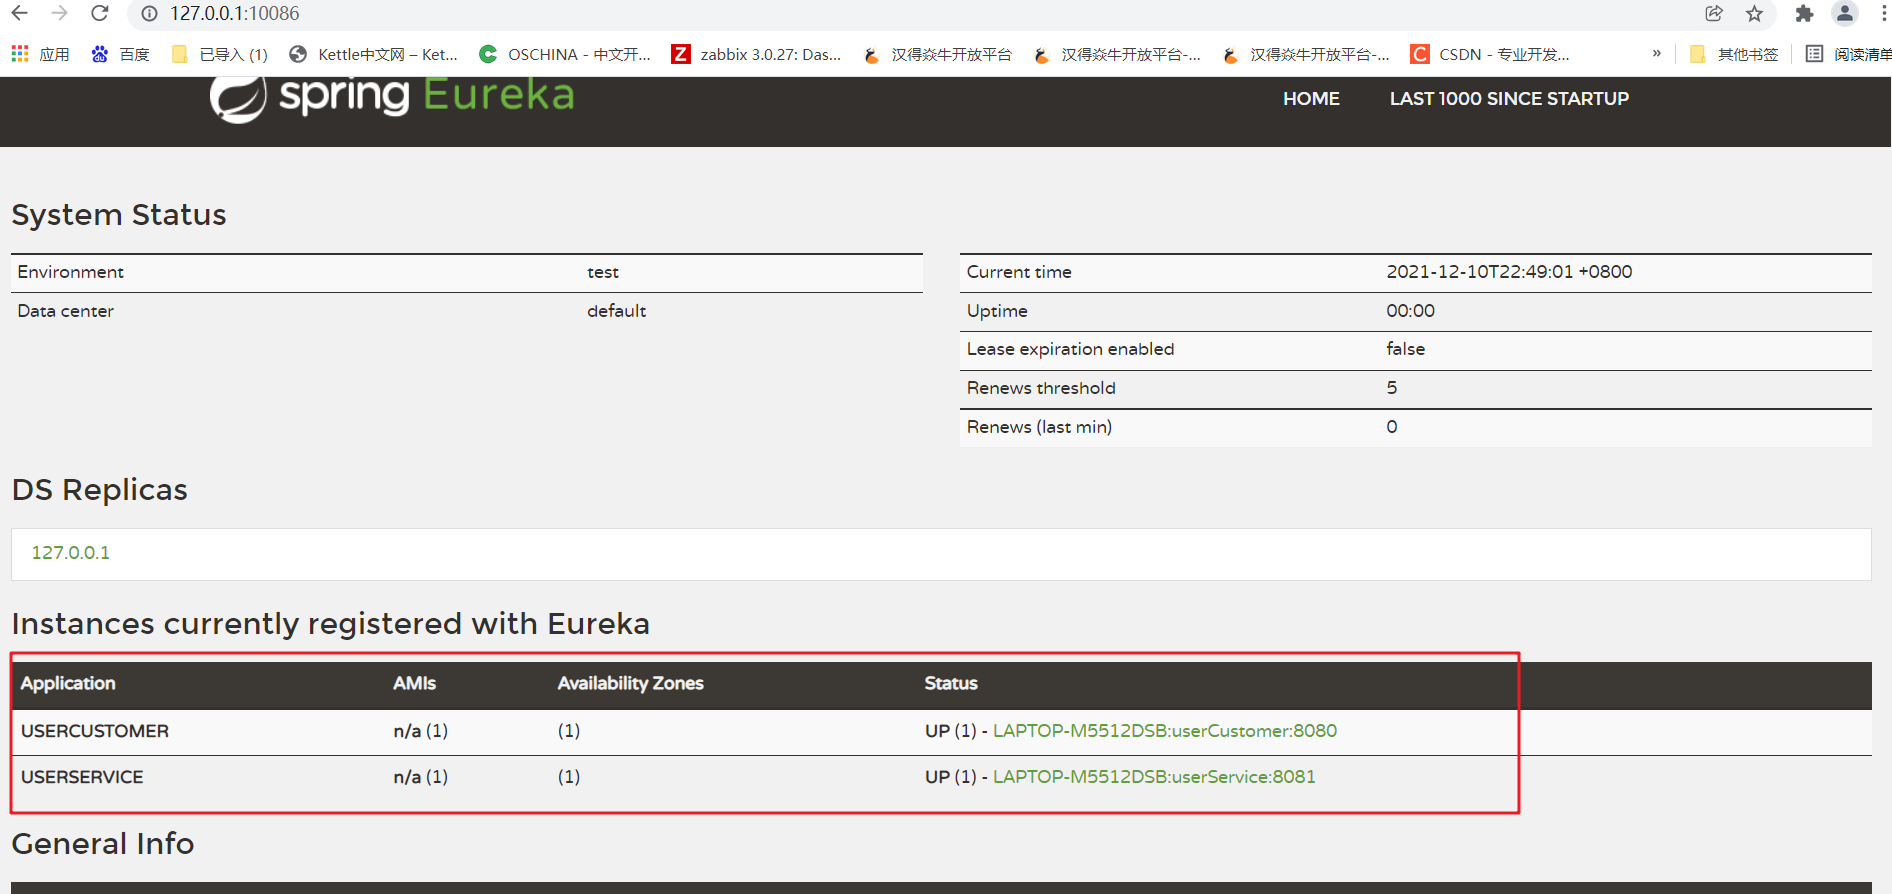
Restart project access: http://127.0.0.1:10086
3.3. Service discovery
Modify the calling end code and use the method of DiscoveryClient class to obtain the service instance according to the service name:
@RestController
@RequestMapping("/consumer")
public class ConsumerController {

    @Autowired
    private RestTemplate restTemplate;
    @Autowired
    private DiscoveryClient discoveryClient;

    @GetMapping("/{id}")
    public User selectById(@PathVariable("id") String id){
        List<ServiceInstance> userServiceList = discoveryClient.getInstances("userService");
        URI uri = userServiceList.get(0).getUri();
        return restTemplate.getForObject(uri +"/user/"+ id,User.class);
    }
}
3.4. Highly available EurekaServer
Multiple eurekaservers will also register as services. When the service provider registers with a node in EurekaServer cluster, the node will synchronize the service information to each node in the cluster, so as to realize high availability cluster. Therefore, no matter the client accesses any node in the Eureka Server cluster, it can obtain the complete service list information
Suppose we want to build two Eureka server clusters with ports 10086 and 10087 respectively
1) We modified the original EurekaServer configuration:
server:
  port: 10086 # port
spring:
  application:
    name: eureka-server # The application name will be displayed in Eureka
eureka:
  client:
    service-url: # Configure the addresses of other Eureka services instead of yourself, such as 10087
      defaultZone: http://127.0.0.1:10087/eureka
2) The other configuration is just the opposite:
server:
  port: 10087
spring:
  application:
    name: eureka-server # The application name will be used as the service id (serviceId) in Eureka
eureka:
  client:
    service-url: # The address of EurekaServer is now your own address. If it is a cluster, you need to write the addresses of other servers.
      defaultZone: http://127.0.0.1:10086/eureka
3) The client registers the service to the cluster
Since there is more than one EurekaServer, the service URL parameter needs to be changed when registering the service:
eureka:
  client:
    service-url: # EurekaServer address. Multiple addresses are separated by ','
      defaultZone: http://127.0.0.1:10086/eureka,http://127.0.0.1:10087/eureka
4) Start test:

- Service renewal:
After the registration service is completed, the service provider will maintain a heartbeat (regularly send a Rest request to EurekaServer) and tell EurekaServer: "I'm still alive". This is called renewal of service;
There are two important parameters that can modify the behavior of service renewal:
eureka:
  instance:
    lease-renewal-interval-in-seconds: 30
    lease-expiration-duration-in-seconds: 90
- Lease renewal interval in seconds: the interval of service renewal. The default is 30 seconds
- Lease expiration duration in seconds: the default value is 90 seconds
In other words, by default, the service will send a heartbeat to the registry every 30 seconds to prove that it is still alive. If no heartbeat is sent for more than 90 seconds, EurekaServer will consider the service down and remove it from the service list.