Structure forming
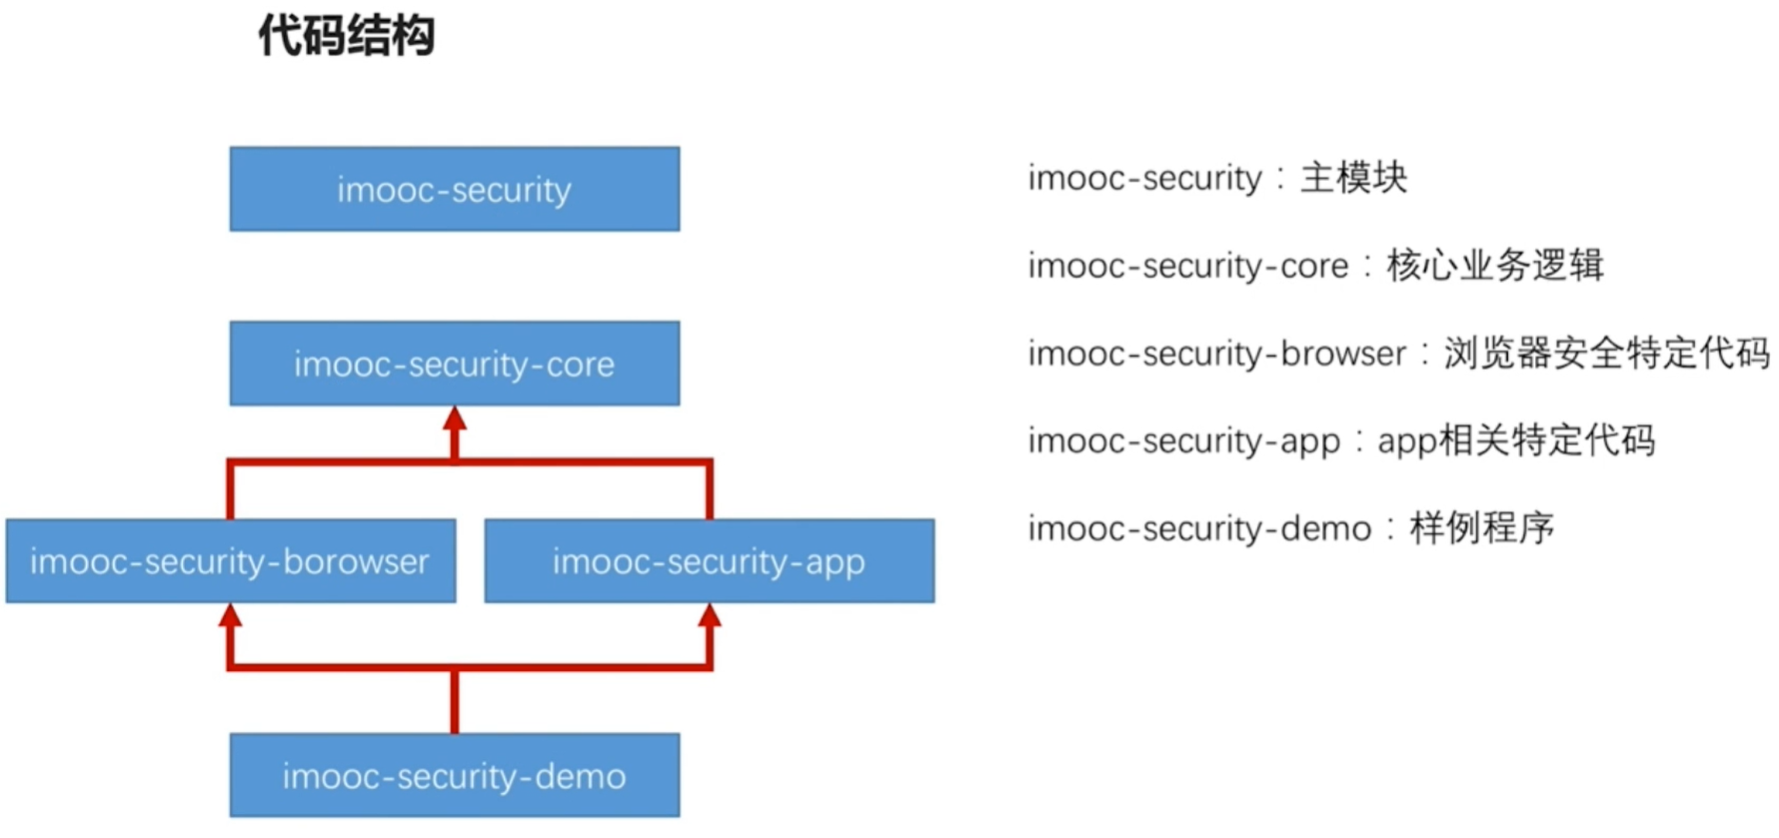
1. SpringSecurity

2. Introductory cases
Create a new SpringBoot project and add Security and Web dependencies
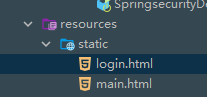
Create a new login and home page in resources – static
Start the project and visit localhost:8080/login to see the login page that appears (this page is generated by Security by default)
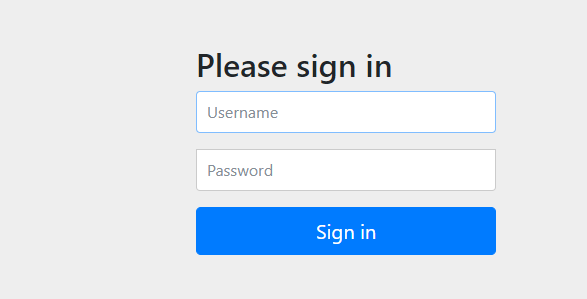
When the project is started, a string of login passwords will be output on the console

2.1 UserDetailsService interface
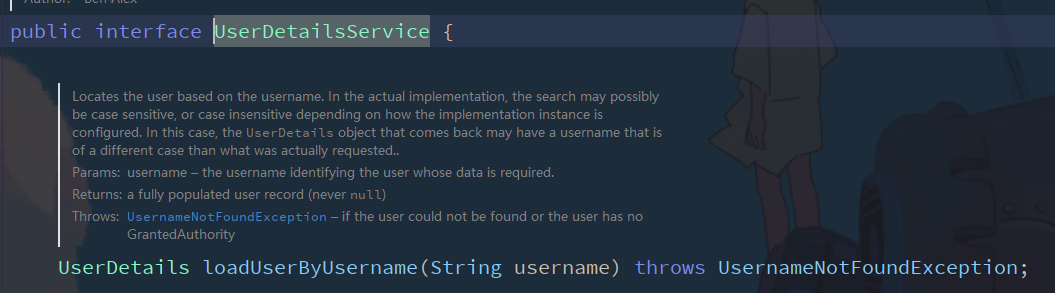
The user determines whether the user name exists
The Userdetails interface returned by UserDetailsService implements the following methods
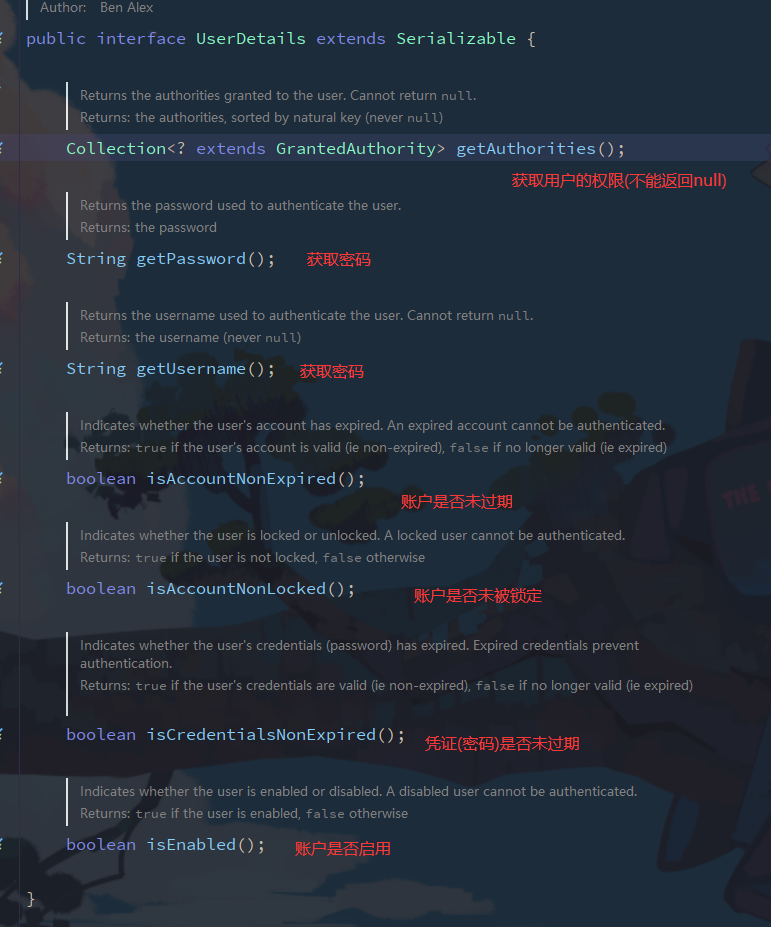
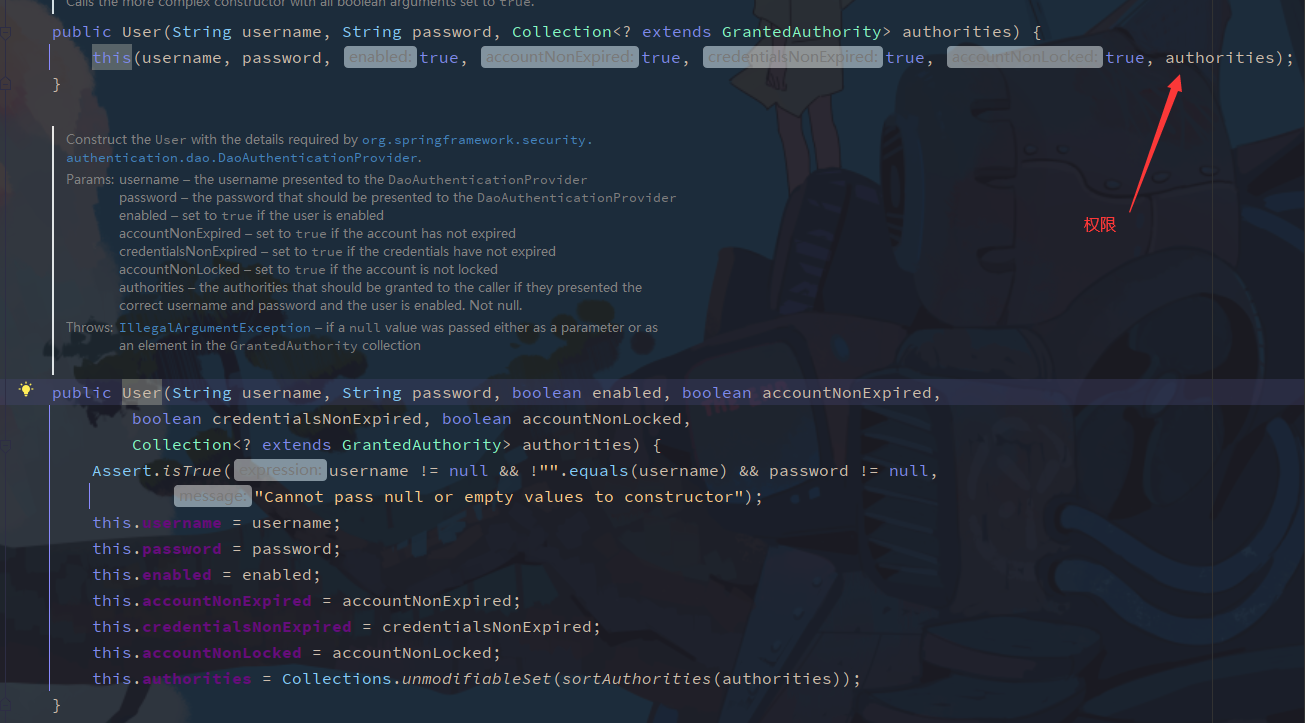
View the implementation class of UserDetails to see the User class

The essence is to query the database through loadUserByUsername in userdetailsservice, and then return the User name, password and permission information in UserDetails
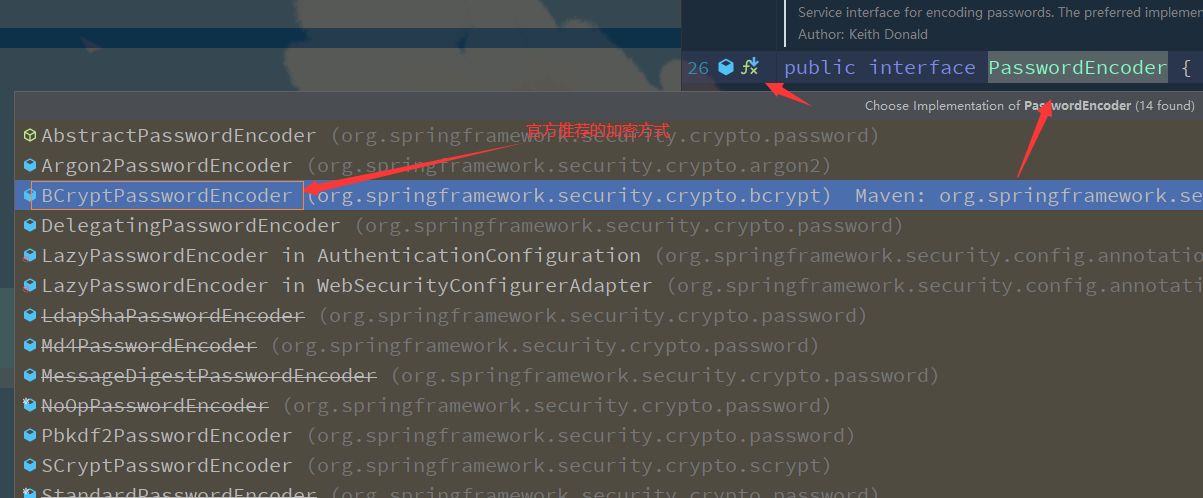
2.2 passwordEncoder interface
BCryptPasswordEncoder is the password parser officially recommended by Spring Security. It is usually used.
BCryptPasswordEncoder is a concrete implementation of bcrypt strong Hash method. It is a one-way encryption based on Hash algorithm. You can control the encryption strength through strength. The default value is 10
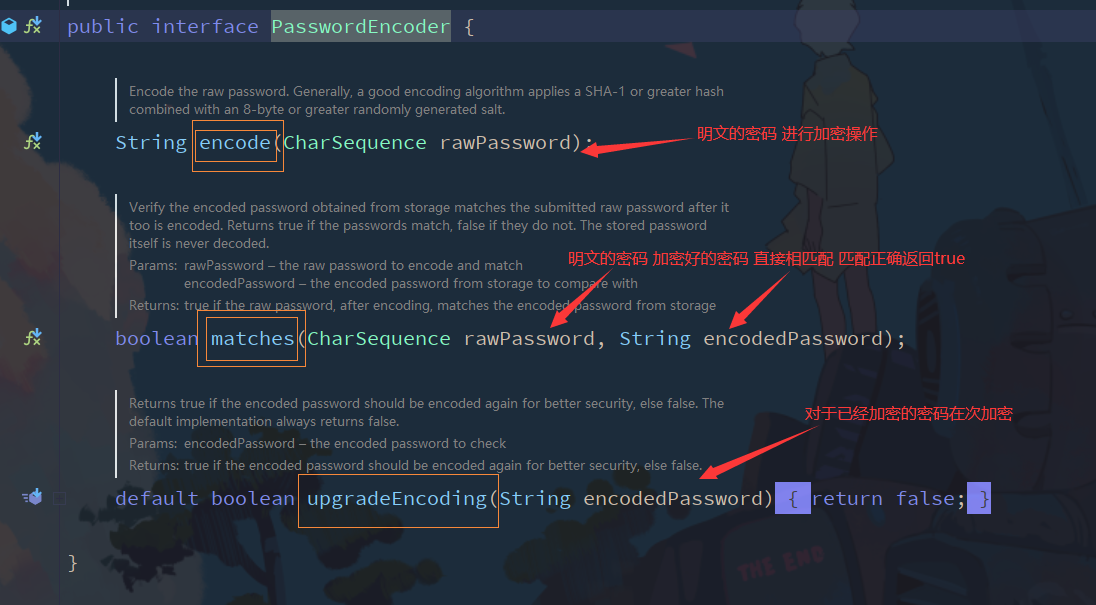
Password parser
You can see many implementation classes in its implementation classes, among which BCryptPasswordEncoder is officially recommended
test
@Test
void contextLoads() {
    BCryptPasswordEncoder pw = new BCryptPasswordEncoder();

    //encryption
    String encode = pw.encode("123");
    System.err.println(encode);

    //Compare passwords
    boolean matches = pw.matches("123", encode);
    System.err.println("==============");
    System.err.println(matches);
}

A random salt salt (equivalent to a random string) is added to make the encrypted ciphertext different each time
2.3 user defined login logic
When customizing the login logic, you need to use the UserDetailsService and PasswordEncoder explained earlier. However, Spring Security requires that there must be a PasswordEncoder instance in the container when performing custom login logic. Therefore, the new object cannot be directly.
Write SecurityConfig configuration class
/**
 * Security Configuration class
 */
@Configuration
public class SecurityConfig {

    @Bean
    public PasswordEncoder getPw(){
        return new BCryptPasswordEncoder();
    }
}
Writing implementation classes
UserServiceImpl.java
public class UserServiceImpl implements UserDetailsService {
@Autowired
private PasswordEncoder passwordEncoder;
@Override
public UserDetails loadUserByUsername(String username) throws UsernameNotFoundException {
//1. Query the database according to the user name. If there is no UsernameNotFoundException exception thrown
if (!"admin".equals(username)){
throw new UsernameNotFoundException("user name does not exist");
}
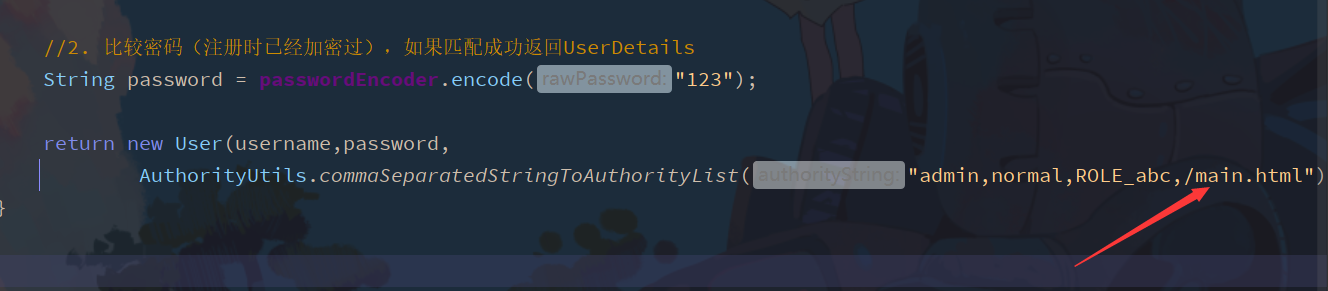
//2. Compare passwords (encrypted during registration). If the matching is successful, return UserDetails
String password = passwordEncoder.encode("123");
return new User(username,password,
AuthorityUtils.commaSeparatedStringToAuthorityList("admin,normal"));
}
}
2.4 custom login page
- Login page login html
<!doctype html>
    <html>
    <head>
    <meta charset="utf-8">
    <title>login interface</title>
    <style>
    html {
    background-color: #B5DEF2;
}

.wrapper {
    margin: 140px 0 140px auto;
    width: 884px;
}

.loginBox {
    background-color: #F0F4F6;
    /*Upper divcolor*/
    border: 1px solid #BfD6E1;
    border-radius: 5px;
    color: #444;
    font: 14px 'Microsoft YaHei', 'Microsoft YaHei ';
    margin: 0 auto;
    width: 388px
}

.loginBox .loginBoxCenter {
    border-bottom: 1px solid #DDE0E8;
    padding: 24px;
}

.loginBox .loginBoxCenter p {
    margin-bottom: 10px
}

.loginBox .loginBoxButtons {
    /*background-color: #F0F4F6;*/
    /*Lower divcolor*/
    border-top: 0px solid #FFF;
    border-bottom-left-radius: 5px;
    border-bottom-right-radius: 5px;
    line-height: 28px;
    overflow: hidden;
    padding: 20px 24px;
    vertical-align: center;
    filter: alpha(Opacity=80);
    -moz-opacity: 0.5;
    opacity: 0.5;
}

.loginBox .loginInput {
    border: 1px solid #D2D9dC;
    border-radius: 2px;
    color: #444;
    font: 12px 'Microsoft YaHei', 'Microsoft YaHei ';
    padding: 8px 14px;
    margin-bottom: 8px;
    width: 310px;
}

.loginBox .loginInput:FOCUS {
    border: 1px solid #B7D4EA;
    box-shadow: 0 0 8px #B7D4EA;
}

.loginBox .loginBtn {
    background-image: -moz-linear-gradient(to bottom, blue, #85CFEE);
    border: 1px solid #98CCE7;
    border-radius: 20px;
    box-shadow: inset rgba(255, 255, 255, 0.6) 0 1px 1px, rgba(0, 0, 0, 0.1) 0 1px 1px;
    color: #444;
    /*Sign in*/
    cursor: pointer;
    float: right;
    font: bold 13px Arial;
    padding: 10px 50px;
}

.loginBox .loginBtn:HOVER {
    background-image: -moz-linear-gradient(to top, blue, #85CFEE);
}

.loginBox a.forgetLink {
    color: #ABABAB;
    cursor: pointer;
    float: right;
    font: 11px/20px Arial;
    text-decoration: none;
    vertical-align: middle;
    /*Forget password*/
}

.loginBox a.forgetLink:HOVER {
    color: #000000;
    text-decoration: none;
    /*Forget password*/
}

.loginBox input#remember {
    vertical-align: middle;
}

.loginBox label[for="remember"] {
    font: 11px Arial;
}
</style>
    </head>
    <body>
    <div class="wrapper">
        <form action="/login" method="post">
        <div class="loginBox">
            <div class="loginBoxCenter">
                <p><label>user name:</label></p>
                <!--autofocus Specifies that the button should automatically get focus when the page is loaded. -->
                <!-- placeholder Provides a prompt that describes the expected value of the input field-->
                <p><input type="text" id="text" name="username" class="loginInput" autofocus="autofocus" required="required" autocomplete="off" placeholder="Please enter email address/cell-phone number" value="" /></p>
                    <!-- required Specify that the input fields must be filled in before submission-->
                    <p><label>password:</label></p>
                    <p><input type="password" id="password" name="password" class="loginInput" required="required" placeholder="Please input a password" value="" /></p>
                        <p><a class="forgetLink" href="#"> forgot your password</a></p>
                            <input id="remember" type="checkbox" name="remember" />
                            <label for="remember">Remember login status</label>
                                </div>
                                <div class="loginBoxButtons">


                                    <button class="loginBtn">Sign in</button>
                                        <div> New user registration</div>
                                        </div>
                                        </div>
                                        </form>
                                        </div>

                                        </body>
                                        </html>
Submit the form as action="/login"
And create a new main page main html
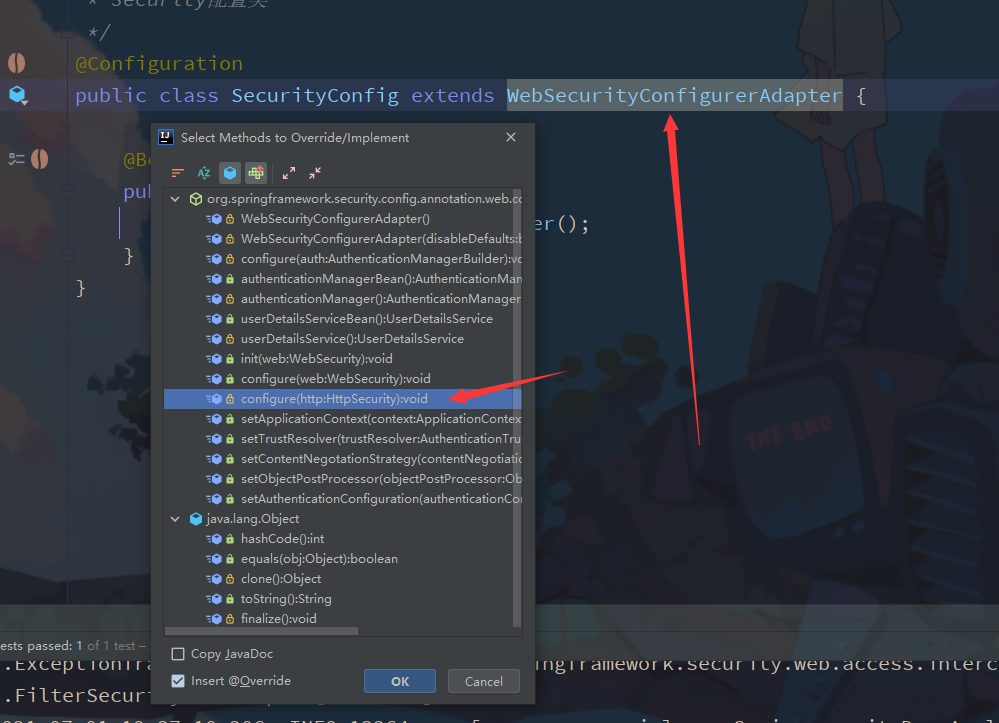
- Change permission information in SecurityConfig
/**
* Security Configuration class
*/
@Configuration
public class SecurityConfig extends WebSecurityConfigurerAdapter {
@Bean
public PasswordEncoder getPw(){
return new BCryptPasswordEncoder();
}
@Override
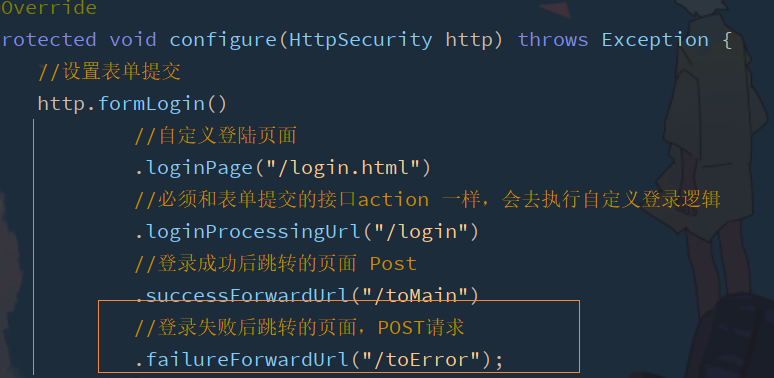
protected void configure(HttpSecurity http) throws Exception {
//Set up form submission
http.formLogin()
//Custom landing page
.loginPage("/login.html")
//It must be the same as the interface action of form submission, and will execute custom login logic
.loginProcessingUrl("/login")
//Jump to the page Post after successful login
.successForwardUrl("/toMain");
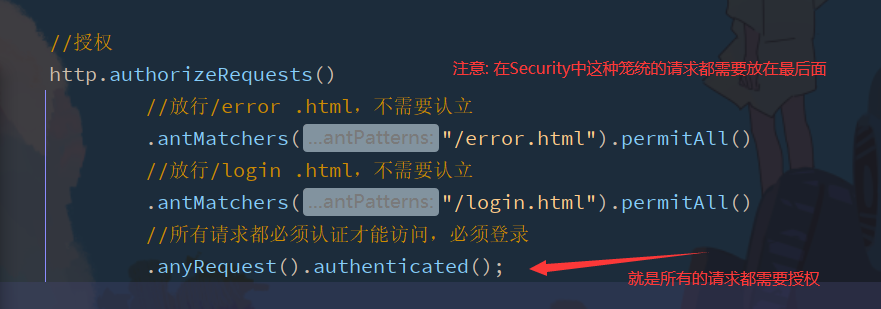
//to grant authorization
http.authorizeRequests()
//Release / login HTML, no need to recognize
.antMatchers("/login.html").permitAll()
//All requests must be authenticated to access and must be logged in
.anyRequest().authenticated();
//Turn off csrf protection
http.csrf().disable();
}
}
- controller jump
@RequestMapping("/toMain")
public String main(){
    return "redirect:main.html";
}
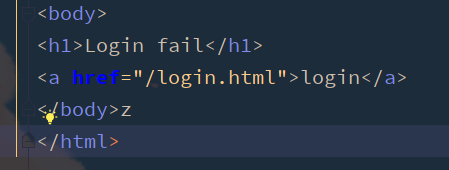
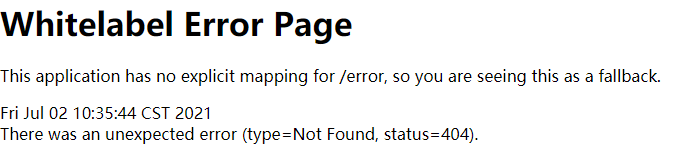
2.5 custom error page
After login failure, there is no page Jump, and the url becomes
Simply write the login failure page error html
Add configuration class information
Add controller jump path
@RequestMapping("/toError")
public String error(){
    return "redirect:error.html";
}
Release the error page in the configuration class information

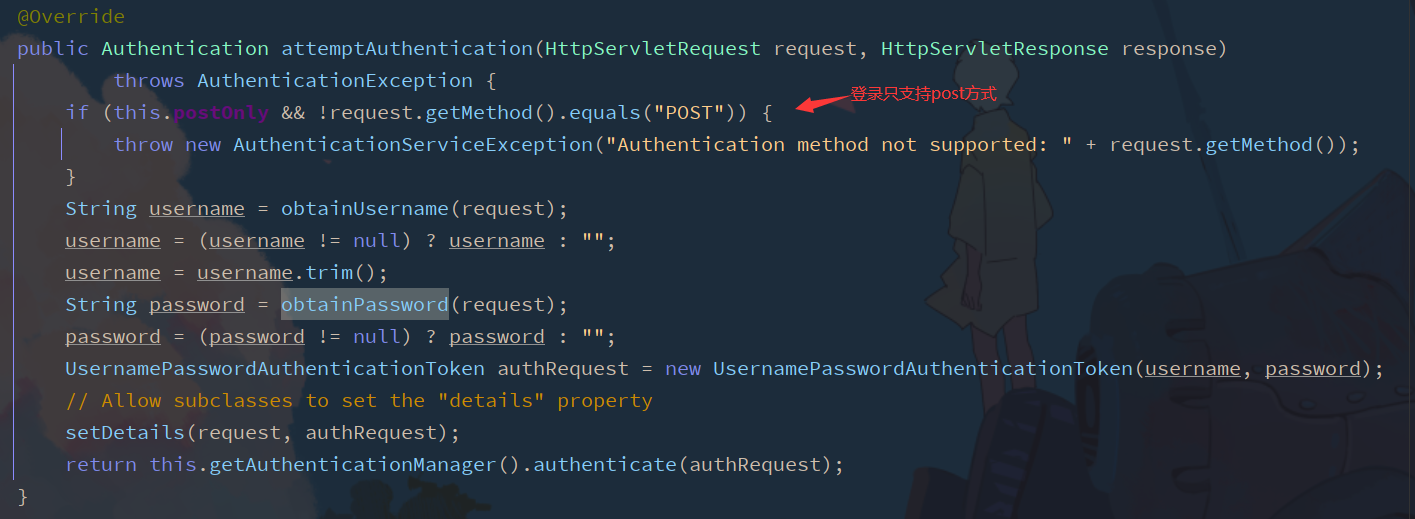
2.6 setting parameter name of request account and password
Username and password filter UsernamePasswordAuthenticationFilter class
test
-
Change the page parameter to the value you want to pass

-
Add configuration information to the configuration class to correspond the user name and password
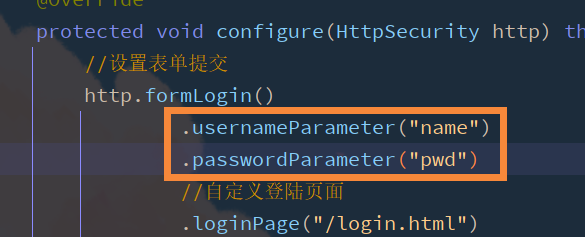
The default user name and password parameters are username and password
2.7 user defined login succeeded (processor)
If you want to log in successfully and jump to the page of station b, you will be prompted with an error
see. successForwardUrl("http://www.bilibili.com Successforwardurl method in '')

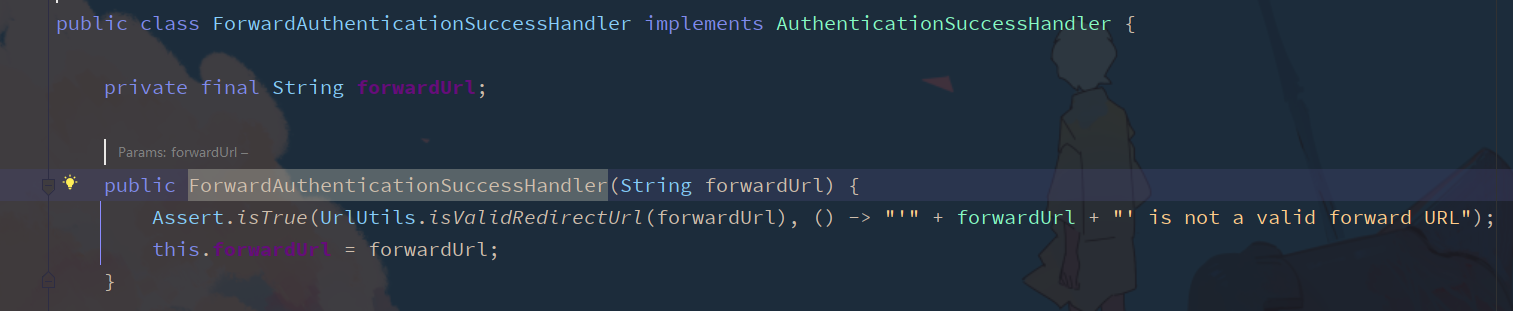
Custom implementation authentication jump AuthenticationSuccessHandler interface
- MyAuthenticationSuccessHandler.java
public class MyAuthenticationSuccessHandler implements AuthenticationSuccessHandler {

    public MyAuthenticationSuccessHandler(String url) {
        this.url = url;
    }

    private String url;

    @Override
    public void onAuthenticationSuccess(HttpServletRequest request, HttpServletResponse response, Authentication authentication) throws IOException, ServletException {
        response.sendRedirect(url);
    }
}
-
Configure the forwarding URL after successful login
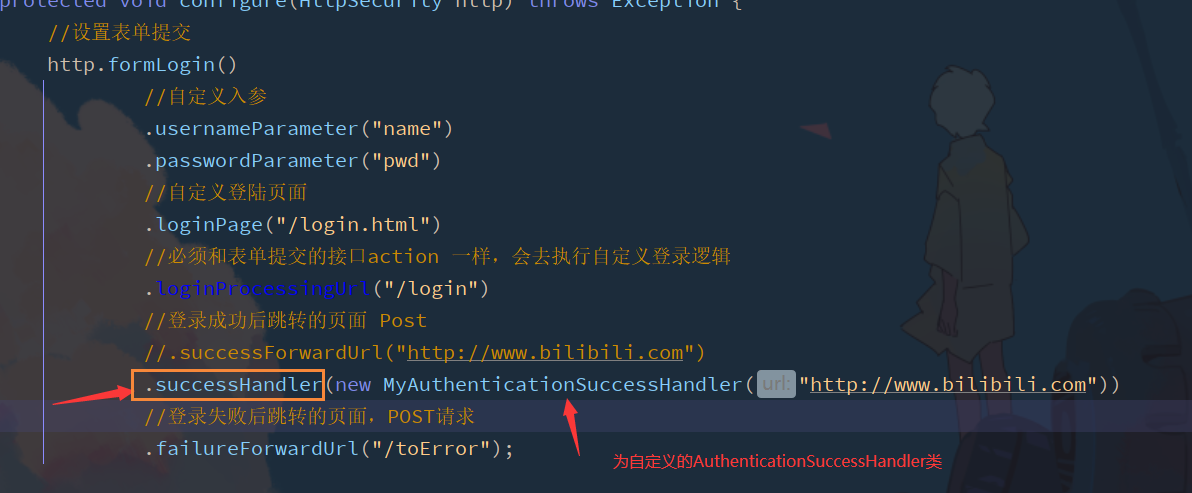
The onAuthenticationSuccess method overridden in the custom MyAuthenticationSuccessHandler class can obtain the user's information in the authentication parameters

2.8 custom login failure (processor)
Similar to when login is successful
Create a custom interface MyAuthenticationFailureHandler
public class MyAuthenticationFailureHandler implements AuthenticationFailureHandler {
    private String url;
    public MyAuthenticationFailureHandler(String url) {
        this.url = url;
    }

    @Override
    public void onAuthenticationFailure(HttpServletRequest request, HttpServletResponse response, AuthenticationException exception) throws IOException, ServletException {
        response.sendRedirect(url);
    }}
Modify configuration class

3. Authorization
Detailed explanation of anyRequest
In the previous authentication process, we have used anyRequest() to indicate that all requests match. Generally, this method will be used, and all settings need to be authenticated.
Detailed explanation of ant matchers
The method is defined as follows
public C antMatchers(String... antPatterns)
Parameters are non directional parameters, and each parameter is an ant expression used to match URL rules
- ?: Match one character
- *: matches 0 or more characters
- **: matches 0 or more directories
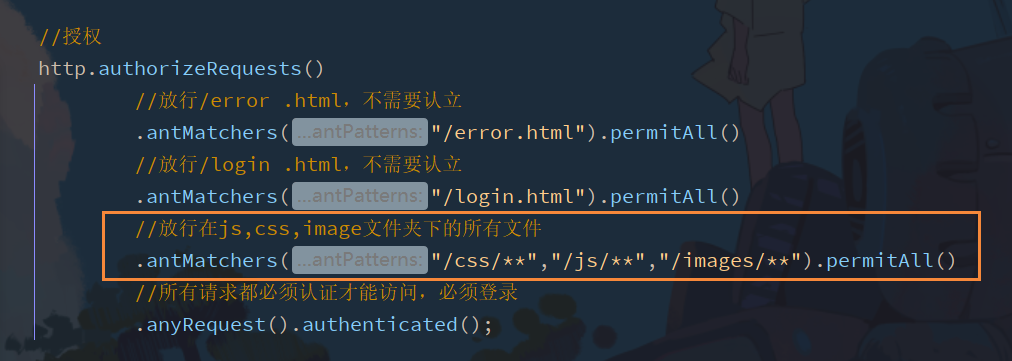
In actual projects, all static resources are generally released, such as all script files under js files
.antMatchers("/js/**","/css/**").permitAll()
Or another matching method is as long as it is js is released at the end
.antMatchers("**/*.js").permitAll()
Detailed explanation of regexMatchers

Looking at the regexMatchers method, you can see that there are two implementation methods
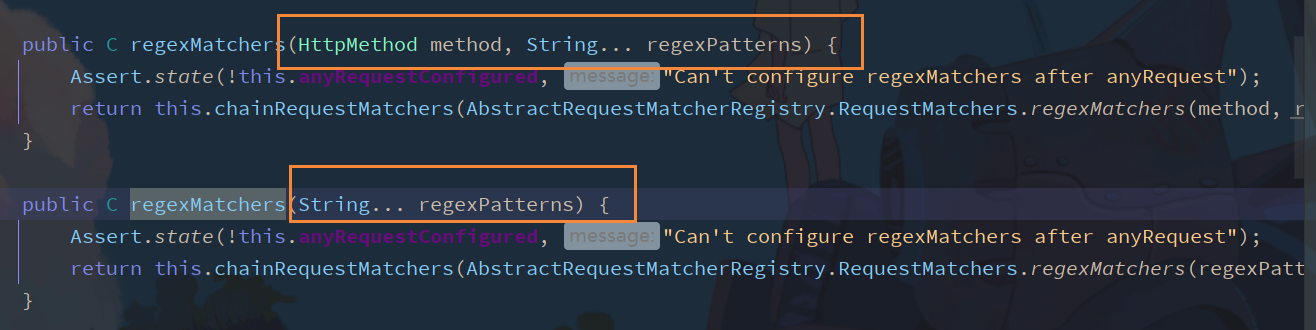
The previous method in the two parameter method is an enumeration class that defines the request type
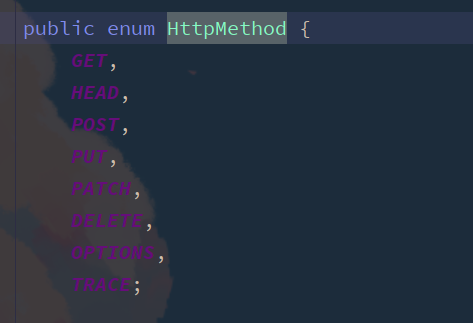

Specify the request method to access the resource
Detailed explanation of mvcMatchers

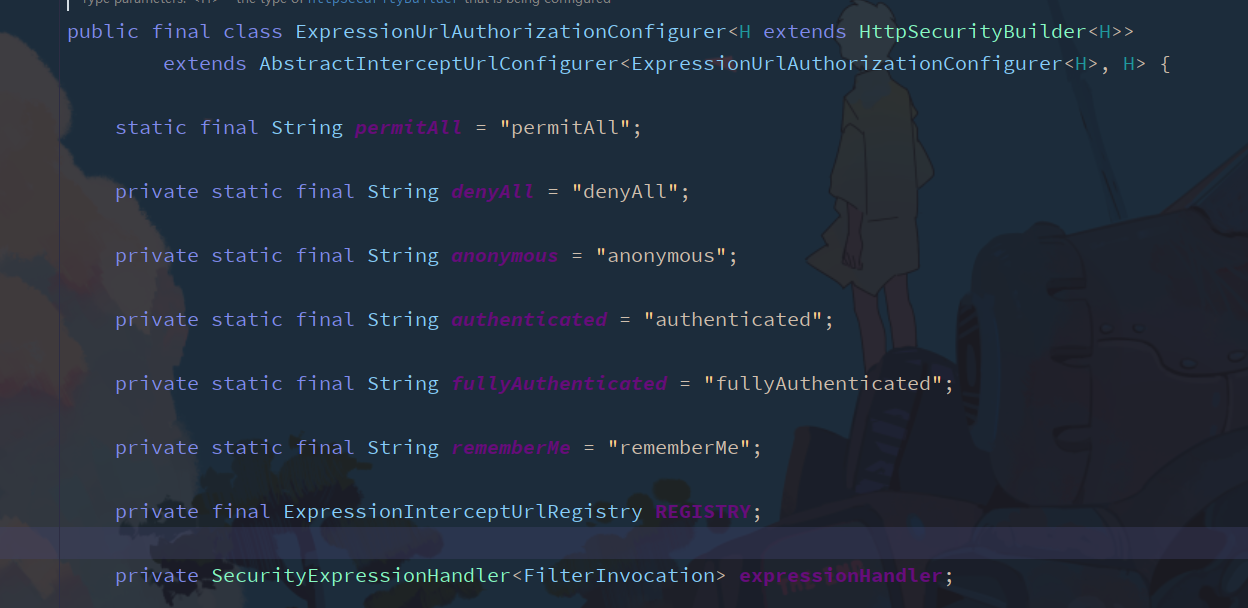
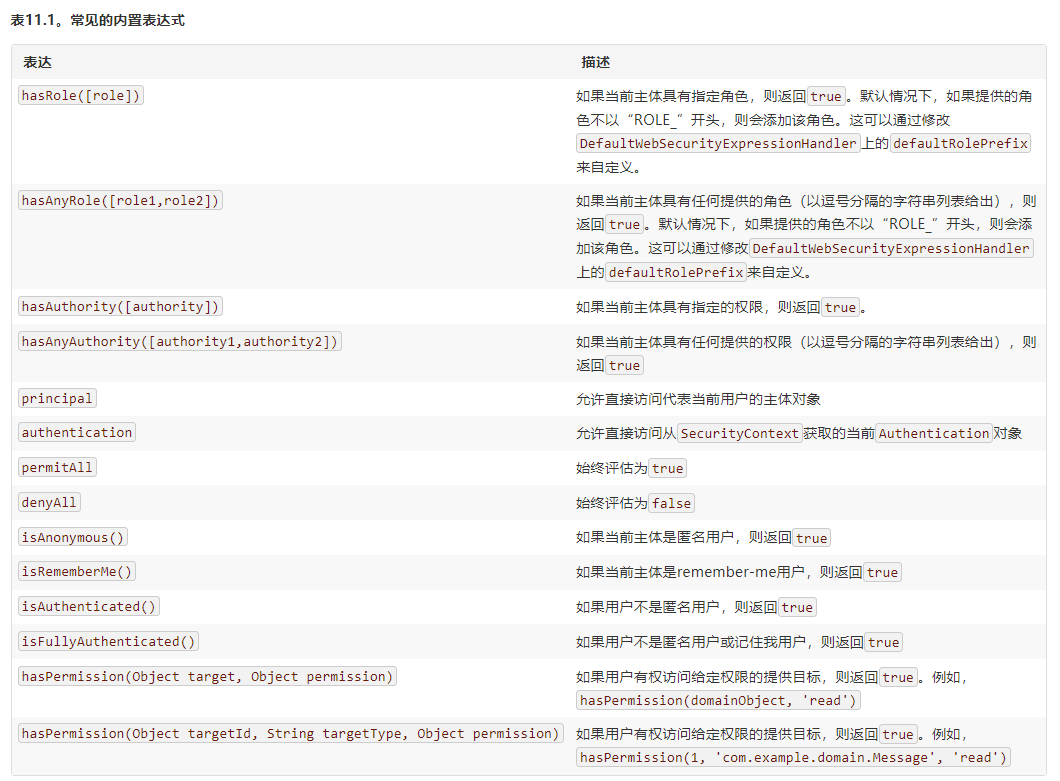
3.1 control of built-in permissions
3.2 role permission judgment
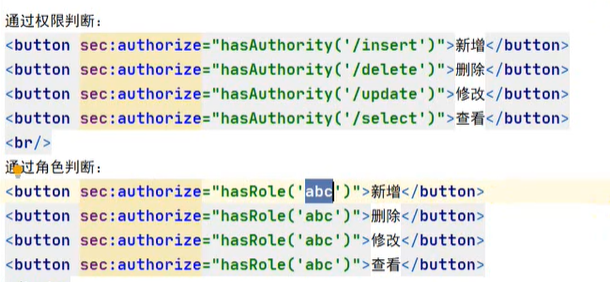
In addition to the built-in permission control explained earlier. Many other permission controls are also supported in Spring Security. These methods are generally used to judge whether the user has specific requirements after the user has been authenticated.
hasAuthority(String) permission
Judge whether the User has specific permission. The User's permission is specified when creating the User object in the User-defined login logic. In the following figure, admin and normal are User permissions. Admin and normal are strictly case sensitive.
-
Configure permissions
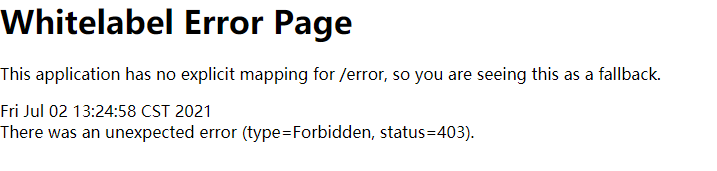
//Permission control, strictly case sensitive
.antMatchers("/main1.html").hasAnyAuthority("admin")
//Set multiple permissions. If the user has the first permission in front, admin does not have it, the latter can also access it
.antMatchers("/main1.html").hasAnyAuthority("admin","amd")
When defining the user at the beginning, the admin user is given admin permission. When the permission is changed to unauthorized permission, 403 is displayed
hasRole(String) role
Determine whether the user is the role
-
Add user role in UserServiceImpl
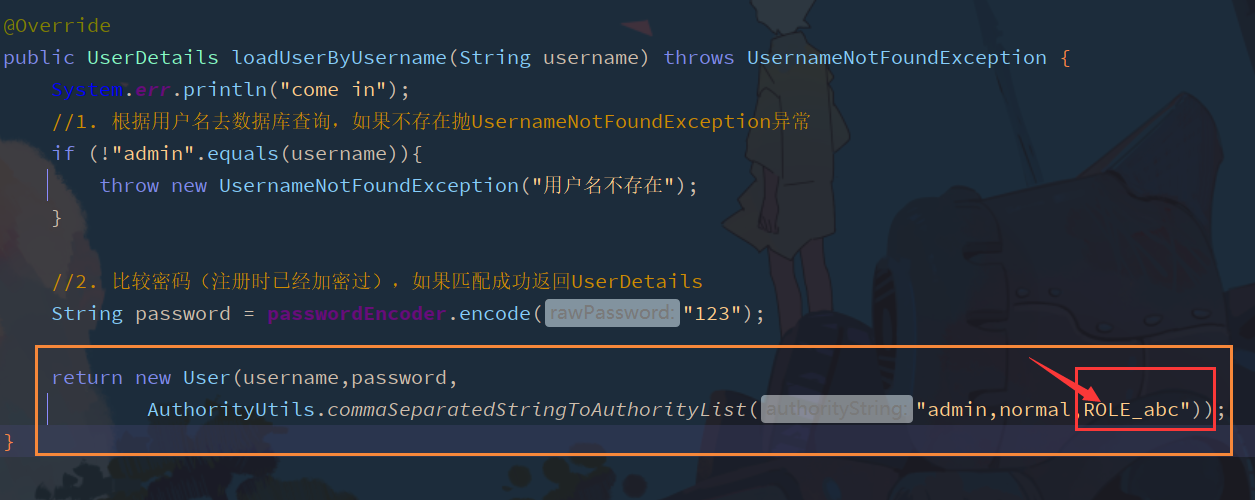
ROLE has been_ abc will be automatically set to this ROLE at the beginning
//The abc1 role is required to access this path
.antMatchers("/main1.html").hasRole("abc1")
//Set up multiple roles. As long as one role wants to match, it can be accessed
.antMatchers("/main1.html").hasAnyRole("abc","aaa")
hasIpAddress(String) IP address
Determine access rights based on IP
.antMatchers("/main1.html").hasIpAddress("127.0.0.2")
3.3 user defined 403 processing scheme
-
Since 403 is due to insufficient permissions, customize MyAccessDeniedHandler and implement the AccessDeniedHandler interface
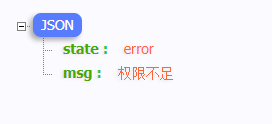
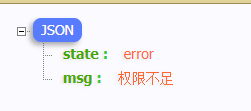
@Componentpublic
class MyAccessDeniedHandler implements AccessDeniedHandler {
    @Override
    public void handle(HttpServletRequest request, HttpServletResponse response, AccessDeniedException accessDeniedException) throws IOException, ServletException {
        //Response status code
        response.setStatus(HttpServletResponse.SC_FORBIDDEN);
        //Return JSON format
        response.setHeader("Content-Type","application/json;charset=utf-8");
        PrintWriter writer = response.getWriter();
        writer.write("{\"state\":\"error\",\"msg\":\"Insufficient permissions\"}");
        writer.flush();
        writer.close();
    }
}
Note that the @ Component annotation is added to allow spring to manage
-
Configure in configuration class
//First inject this class
@Autowired
MyAccessDeniedHandler myAccessDeniedHandler;

//Configure the scheme http exceptionHandling()
.accessDeniedHandler(myAccessDeniedHandler);
-
Test access
When the permission is insufficient, a custom JSON string will appear
3.4 expression based access control
access() method use
In fact, the underlying implementation of the login user permission judgment learned before is to call access (expression)
You can use access() to achieve the same functions as the previous permission control
Similar to the previous writing
.antMatchers("/main1.html").access("hasRole('abc')")
3.4.1 user defined access() method
-
Create MyService interface
public interface MyService { boolean hasPermission(HttpServletRequest request, Authentication authentication); } -
Create implementation class
@Servicepublic class MyServiceImpl implements MyService { @Override public boolean hasPermission(HttpServletRequest request, Authentication authentication) { //Get principal data object obj = authentication getPrincipal(); // Instanceof is a reserved keyword for Java. Its function is to test whether the object on its left is an instance of the class on its right, and return the boolean data type// Judge whether the principal belongs to userdetails if (obj instanceof userdetails) {/ / obtain the corresponding permission userdetails userdetails = (userdetails) obj; collection <? Extensions grantedauthority > authorities = userdetails. Getauthorities(); / / judge whether the requested URI is in the permission return authorities.contains(new SimpleGrantedAuthority(request.getRequestURI())); } return false; }} -
Configure permissions

-
test
This is because the URI obtained by the jump page after login jump is / main HTML, so you need to add configuration permission to the user in UserServiceImpl
3.4.2 annotation based access control
Some access control annotations are provided in Spring Security. These annotations are unavailable by default and need to be enabled through @ EnableGlobalMethodSecurity.
If the set conditions allow, the program will execute normally. If not allowed, 500 will be reported
These annotations can be written to the Service interface or method, or to the Controller or Controller's method. Usually, it is written on the Controller method to control whether the interface URL is allowed to be accessed.
@Secured
@Secured is specifically used to determine whether it has a ROLE. It can be written on a method or class, and the parameters are represented by ROLE_ start

-
Open annotation
Add @ EnableGlobalMethodSecurity(securedEnabled = true) to the startup class
-
Add @ Secured annotation on controller method
@RequestMapping("/toMain")
@Secured("ROLE_abc")
public String main(){
    return "redirect:main.html";
}
@PreAuthorized / @ PostAuthorize
@PreAuthorized/@PostAuthorize are method or class level annotations
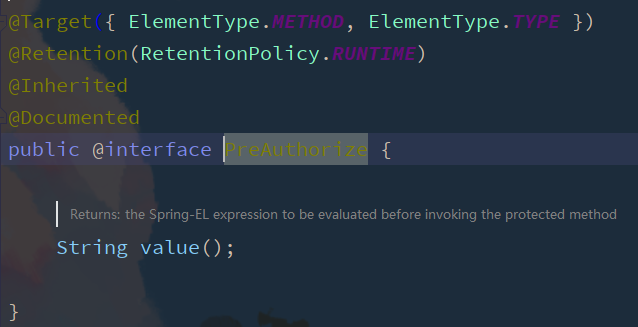
- @PreAuthorize means that the access method or class judges the permission before execution. In most cases, this annotation is used. The values of the annotation parameters and the access() method parameters are the same, which are permission expressions
- PostAuthorize means to judge the permission after the execution of a method or class. This annotation is rarely used
-
Add EnableGlobalMethodSecurity(prePostEnabled = true) to the startup class
-
Add annotation @ PreAuthorize on controller method
@PreAuthorize("hasRole('abc')")
public String main(){
    return "redirect:main.html";
}
3.5 memberme function realization
In Spring Security, Remember Me is the "Remember Me" function. Users only need to add the Remember Me check box when logging in, and the value is true. Spring Security will automatically store user information in the data source, so they can access it without logging in in in the future
Add dependency
When Spring Security implements the member me function, the underlying implementation relies on spring JDBC, so spring JDBC needs to be imported. In the future, we will use the mybatis framework rather than directly import spring JDBC. Therefore, when importing the mybatis initiator here, we also need to add a MySQL driver
 <!--mybatis-->
<dependency>
    <groupId>org.mybatis.spring.boot</groupId>
    <artifactId>mybatis-spring-boot-starter</artifactId>
    <version>2.1.3</version>
</dependency>
<dependency>
    <groupId>mysql</groupId>
    <artifactId>mysql-connector-java</artifactId>
    <version>8.0.25</version>
</dependency>
Write data source information
spring:	datasource:
	driver-class-name: com.mysql.cj.jdbc.Driver
	url: jdbc:mysql://localhost:3306/study_demo?useUnicode=true&characterEncoding=utf-8&allowMultiQueries=true&useSSL=false&serverTimezone=Asia/Shanghai
	username: root
	password: 123456
Add SecurityConfig configuration class
http. rememberMe(). Tokenrepository(), where an object is required in tokenrepository()

Check that this is an interface and click the implementation class

Select jdbc
Add in configuration class
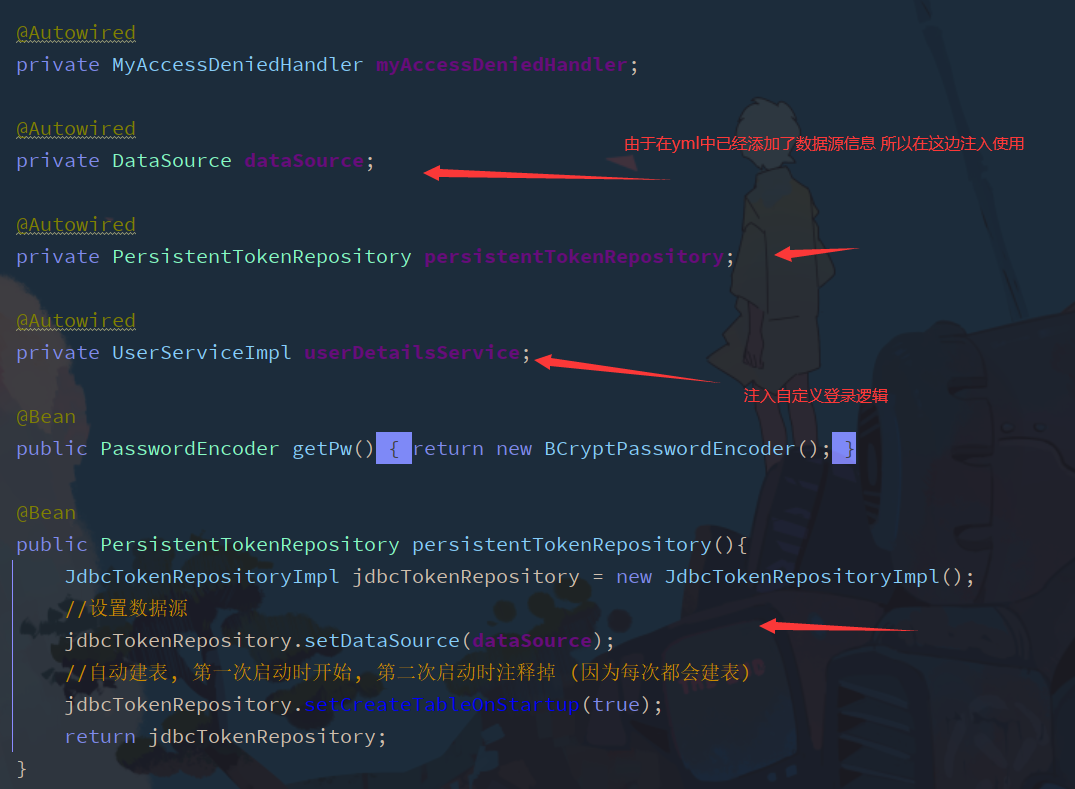
Set remember me
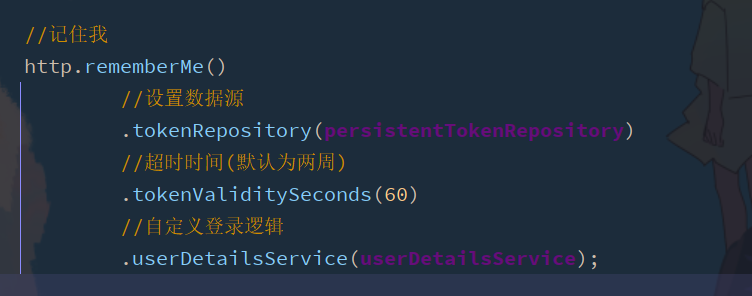
The setting page remembers that the value of my name attribute is remember me

You can see that the bound database has automatically generated tables

After the table is generated, you need to turn off the automatic creation table in the configuration
4. Use in Thymeleaf
Spring Securitl can control the display effect in some view technologies. For example: JSP or thymeleaf. Thymeleaf is often used as the view presentation technology in projects that are not separated from the front and back and use Spring Boot.
Thymeleaf supports Spring Security in thymeleaf extras springsecurityx. The latest version is 5. Therefore, you need to add the dependency of this jar package and the dependency of thymeleaf in the project..
<!--thymeleaf springSecurity5-->
<dependency>
    <groupId>org.thymeleaf.extras</groupId>
    <artifactId>thymeleaf-extras-springsecurity5</artifactId>
</dependency>
<dependency>
    <groupId>org.springframework.boot</groupId>
    <artifactId>spring-boot-starter-thymeleaf</artifactId>
</dependency>
Introduce Thymeleaf namespace and security namespace in html page
<html lang="en" xmlns="http://www.w3.org/1999/xhtml"
      xmlns:th="http://www.thymeleaf.org"
      xmlns:sec="http://www.thymeleaf.org/thymeleaf-extras-springsecurity5">
test
Create a template in the templates directory
<!DOCTYPE html>
<html lang="en" xmlns="http://www.w3.org/1999/xhtml"
xmlns:th="http://www.thymeleaf.org"
xmlns:sec="http://www.thymeleaf.org/thymeleaf-extras-springsecurity5">
<head>
<meta charset="UTF-8">
<title>Title</title>
</head>
<body>
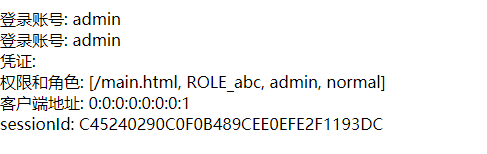
Login account: <span sec:authentication="name"></span> <br/>
Login account: <span sec:authentication="principal.username"></span> <br/>
voucher: <span sec:authentication="credentials"></span> <br/>
Permissions and roles: <span sec:authentication="authorities"></span> <br/>
Client address: <span sec:authentication="details.remoteAddress"></span> <br/>
sessionId: <span sec:authentication="details.sessionId"></span> <br/>
</body>
</html>
Add view control
@GetMapping("/demo")
public String demo(){
    return "demo";
}
5. Log out
Users only need to send a / logout exit request to the spring security project
Add / logout hyperlink to the page
<a href="/logout">Log out</a>
For better results, exit configuration is usually added. The default exit url is / logout. After successful exit, jump to / login?logout

What happens after exiting and connecting? logout needs to be configured if you want to remove it
http.logout()
    .logoutSuccessUrl("/login.html");
6. CSRF
This line of code has been stored in the configuration class before, http csrf. Disable() if the user cannot be authenticated without this line of code, this line of code means to turn off CSRF protection
6.1 what is CSRF
CSRF (Cross Site Request Forgery) cross site request forgery, also known as "OneClick Attack" or Session Riding. It is an illegal request to access a trusted site by forging a user's request.
Cross domain: as long as the network protocol, ip address and port are different, it is a cross domain request.
When the client interacts with the service, because the http protocol itself is a stateless protocol, cookies are introduced to record the client identity. The session id is stored in the cookie to identify the client. In the case of cross domain, the session id may be maliciously hijacked by a third party. When a request is sent to the server through this session id, the server will think that the request is legal, and many unexpected things may happen.
CSRF in Spring Security
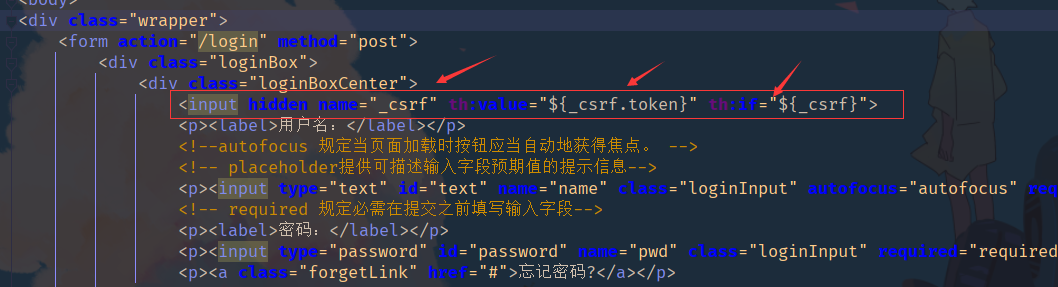
Starting from Spring Security4, csrf protection is enabled by default. Requests are intercepted by default. Perform csrf processing. In order to ensure that other third-party websites are not accessed, csrf requires to carry the parameter name when accessing_ The csrf value is the content of the token (the token is generated at the server). If the token matches the token of the server successfully, the access is normal.
test
-
Close csrf new login page template
-
Add to form_ csrf
-
Configure Controller
@GetMapping("/showLogin") public String showLogin(){ return "login"; } -
Release showConfig in SecurityConfig
After successful login, it can be seen that the Headers in the request carry_ csrf

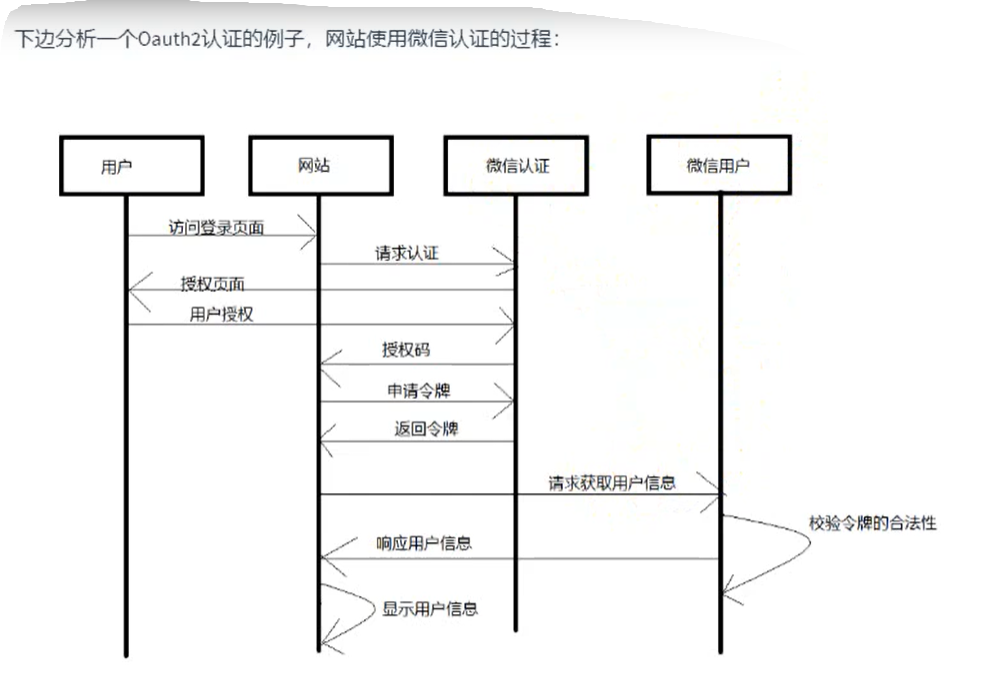
7. Oauth2 certification
introduce
The third-party authentication technical scheme is mainly to solve the general standard problem of authentication protocol, because to realize cross system authentication, each system must follow a certain interface protocol.
OAUTH protocol provides a secure, open and simple standard for user resource authorization. At the same time, any third party can use OAUTH authentication service, and any service provider can implement its own OAUTH authentication service, so OAUTH is open. The industry provides various implementations of OAUTH, such as PHP, JavaScript, Java, Ruby and other language development packages, which greatly saves programmers' time, so OAUTH is simple. Many Internet services, such as Open API, and many large companies, such as Google, Yahoo and Microsoft, provide OAUTH authentication services, which is enough to show that OAUTH standard has gradually become the standard of open resource authorization.
The Oauth protocol has now grown to 2.5% O version, 1 O version is too complex, 2 O version has been widely used.
Oauth2 protocol authentication process
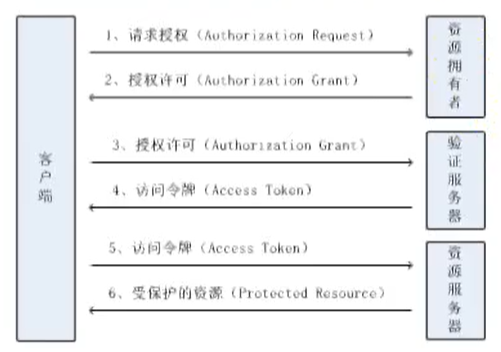
role
client
It does not store resources. It needs to request the resources of the resource server through the authorization of the resource owner, such as Android client, Web client (browser), wechat client, etc.
Resource owner
It is usually a user or an application, that is, the owner of the resource.
Authorization server (also known as authentication server)
It is used to authenticate the identity owned by resources and authorize access to resources. To access resources, the client needs to be authorized by the resource owner through the authentication server.
Resource server
A server that stores resources. For example, the website user management server stores website user information, the website album server stores user album information, and the wechat resource service stores wechat user information. The client finally accesses the resource server to obtain resource information.
Common terms
- Client credentials: the client LD and password of the client are used to authenticate the client.
- Tokens: the access token issued by the authorization server after receiving the customer's request
- Scopes: when a client requests an access token, the resource owner additionally specifies the subdivision permission 3.1.4 Token type
Token type
- Authorization code: it is only used for authorization code and authorization type. It is used to exchange access token and refresh token
- Access token: used to directly access protected resources on behalf of a user or service
- Refresh token: used to authorize the server to obtain a refresh access token
- BearerToken: whoever gets the Token can access resources, similar to cash
- Proof of Possession(PoP) Token: you can verify whether the client has explicit ownership of the Token
advantage
More secure, the client does not contact the user password, and the server is easier to focus on protection, widely spread and continuously adopted
Short life and encapsulated token
Resource server and authorization server are decoupled, centralized authorization is implemented, and client is simplified
HTTP/JSON is friendly and easy to request and pass token s. Consider a variety of client architecture scenarios
Customers can have different levels of trust
shortcoming
- The protocol framework is too broad, resulting in poor compatibility and interoperability of various implementations
- It's not an authentication protocol. It doesn't tell you any user information by itself
Authorization mode
-
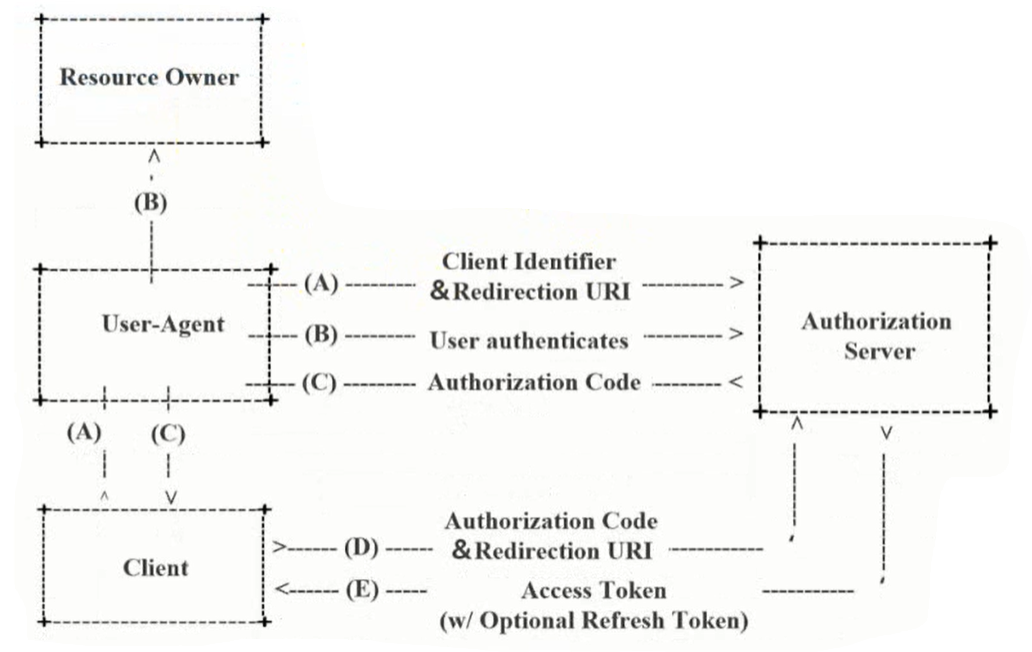
Authorization code mode
-
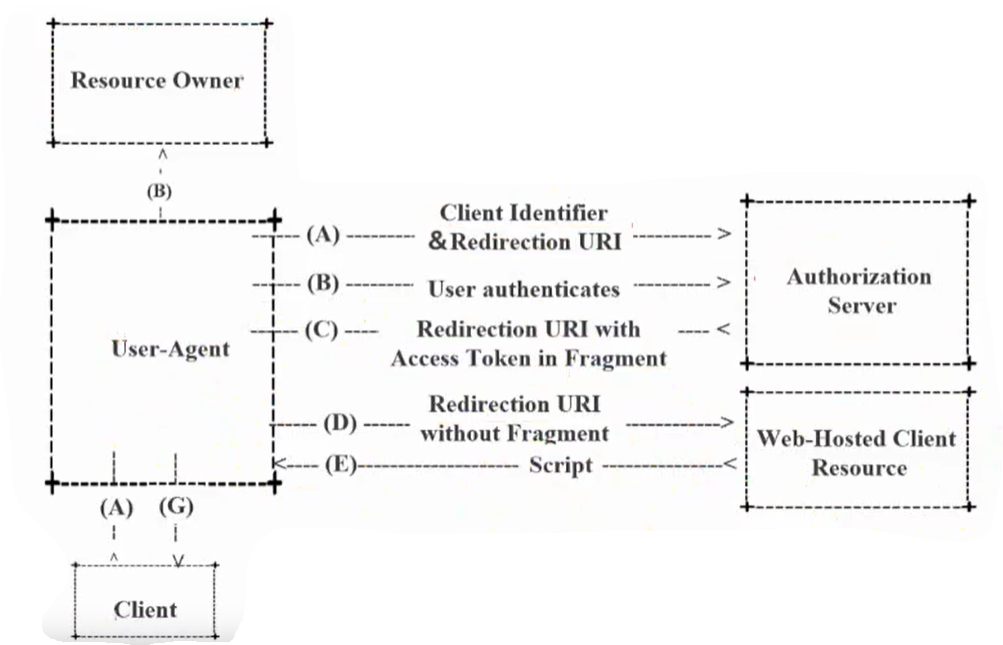
Simplified authorization mode
-
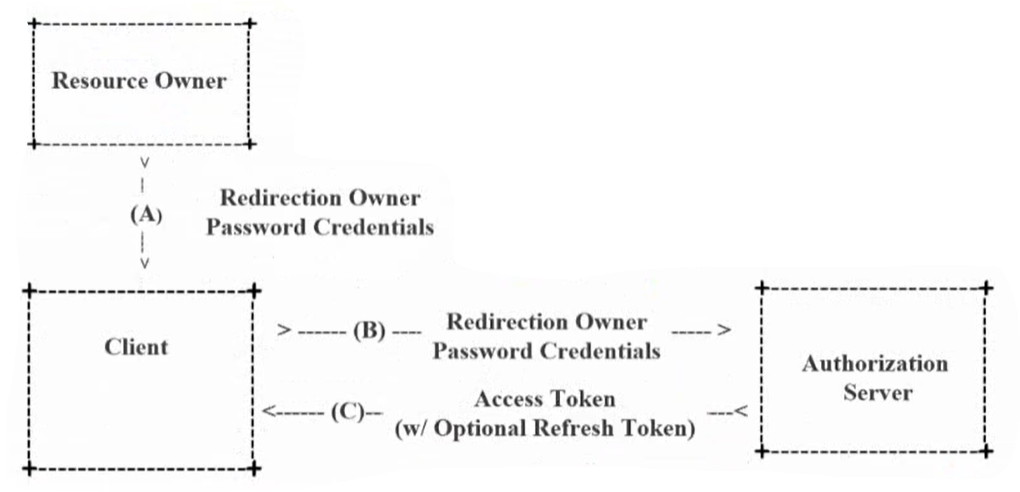
Password mode
-
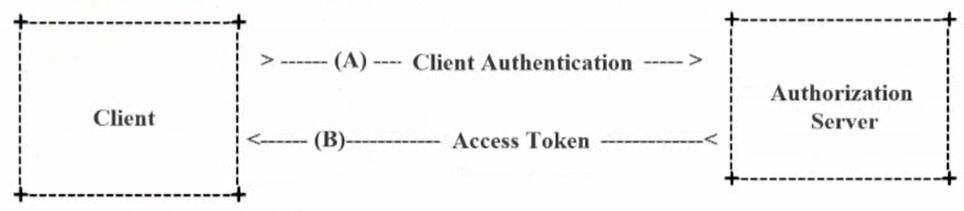
Client mode
-
refresh token

8. SpringSecurity Oauth2
Authorization server
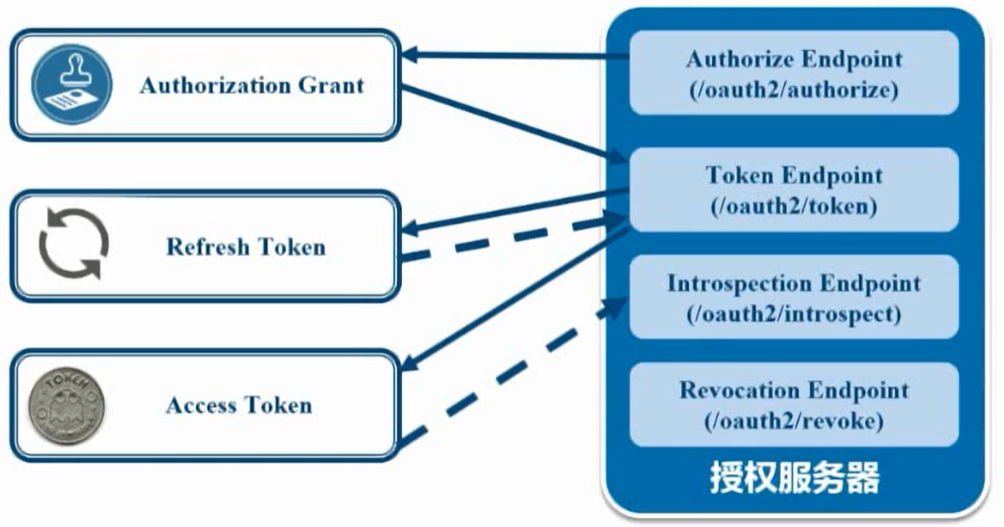
- Authorize Endpoint: authorization breakpoint to authorize
- Token Endpoint: the Token Endpoint that gets the corresponding token after authorization
- Introduction endpoint: verify the endpoint and verify the legitimacy of the Token
- Revocation Endpoint: revocates endpoint and revokes authorization
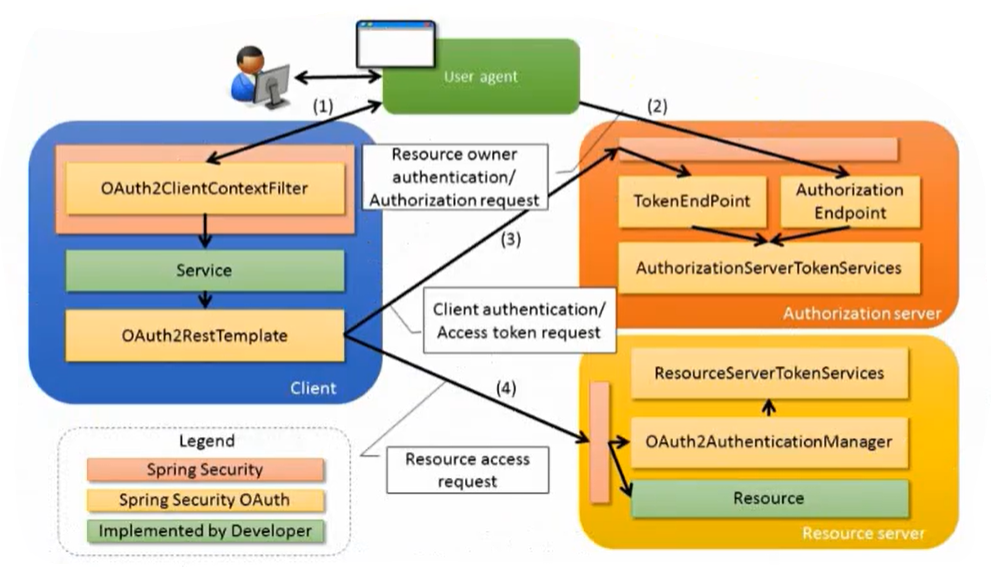
Spring Security Oauth2 architecture
8.1 Spring Security Oauth2 authorization code mode
- Create project import dependency
< version > 2.1.3 is used for the springboot version here RELEASE</version>
If the version does not correspond, the project will not run
<properties>
    <java.version>1.8</java.version>
    <spring-cloud.version>Greenwich.SR2</spring-cloud.version>
</properties>
<dependencies>
   <dependency>
    <groupId>org.springframework.boot</groupId>
    <artifactId>spring-boot-starter</artifactId>
   </dependency>

   <dependency>
    <groupId>org.springframework.boot</groupId>
    <artifactId>spring-boot-starter-test</artifactId>
    <scope>test</scope>
   </dependency>

   <dependency>
    <groupId>org.springframework.cloud</groupId>
    <artifactId>spring-cloud-starter-oauth2</artifactId>
   </dependency>

   <dependency>
    <groupId>org.springframework.cloud</groupId>
    <artifactId>spring-cloud-starter-security</artifactId>
   </dependency>

   <dependency>
    <groupId>org.springframework.boot</groupId>
    <artifactId>spring-boot-starter-web</artifactId>
   </dependency>
  </dependencies>

 <dependencyManagement>
   <dependencies>
    <dependency>
    <groupId>org.springframework.cloud</groupId>
    <artifactId>spring-cloud-dependencies</artifactId>
    <version>${spring-cloud.version}</version>
    <type>pom</type>
    <scope>import</scope>
    </dependency>
   </dependencies>
  </dependencyManagement>

<build>
   <plugins>
    <plugin>
    <groupId>org.springframework.boot</groupId>
    <artifactId>spring-boot-maven-plugin</artifactId>
    </plugin>
   </plugins>
</build>
Create a User pojo entity class to implement the UserDetails interface
public class User implements UserDetails {

    private String username;
    private String password;
    private List<GrantedAuthority> authorities;

    public User(String username, String password, List<GrantedAuthority> authorities) {
        this.username = username;
        this.password = password;
        this.authorities = authorities;
    }

    @Override
    public Collection<? extends GrantedAuthority> getAuthorities() {
        return authorities;
    }

    @Override
    public String getPassword() {
        return password;
    }

    @Override
    public String getUsername() {
        return username;
    }

    @Override
    public boolean isAccountNonExpired() {
        return true;
    }

    @Override
    public boolean isAccountNonLocked() {
        return true;
    }

    @Override
    public boolean isCredentialsNonExpired() {
        return true;
    }

    @Override
    public boolean isEnabled() {
        return true;
    }
}
Create UserService to implement UserDetailsService interface
@Service
public class UserService implements UserDetailsService {

    @Autowired
    private PasswordEncoder passwordEncoder;

    @Override
    public UserDetails loadUserByUsername(String username) throws UsernameNotFoundException {

        String password = passwordEncoder.encode("123456");
        return new User(username,password, AuthorityUtils.commaSeparatedStringToAuthorityList("admin"));

    }
}
Configure SecurityConfig information
@Configuration
@EnableWebSecurity
public class SecurityConfig extends WebSecurityConfigurerAdapter {

    @Override
    protected void configure(HttpSecurity http) throws Exception {
        http.authorizeRequests()
                //Release the following path
                .antMatchers("/oauth/**","/login/**","/logout/**")
                .permitAll()
                //The remaining requests need to be authenticated
                .anyRequest()
                .authenticated()
                .and()
                //All form requests are released
                .formLogin()
                .permitAll()
                .and()
                //Turn off csrf
                .csrf().disable();

    }

    @Bean
    public PasswordEncoder passwordEncoder(){
        return new BCryptPasswordEncoder();
    }
}
For the convenience of demonstration, the resource server and authorization server are configured together
Configure authorization server
public class AuthorizationServerConfig extends AuthorizationServerConfigurerAdapter {
@Autowired
private PasswordEncoder passwordEncoder;
@Override
public void configure(ClientDetailsServiceConfigurer clients) throws Exception {
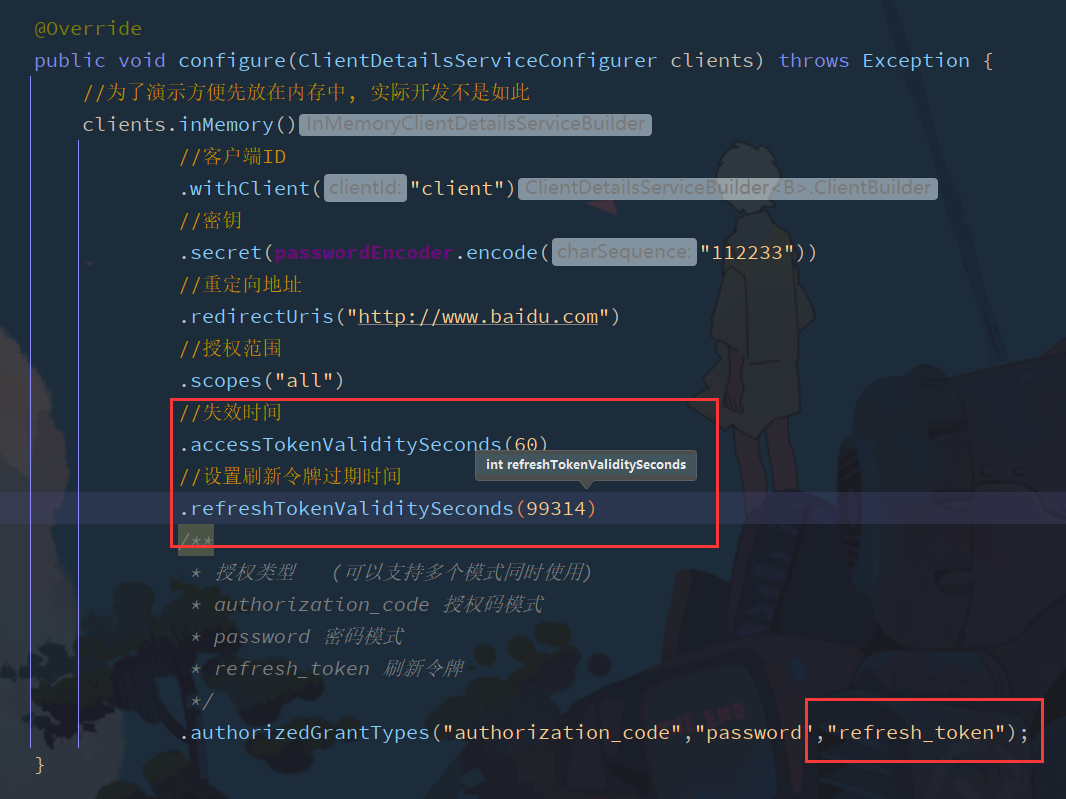
//For the convenience of demonstration, it is put in memory first, which is not the case in actual development
clients.inMemory()
//client ID
.withClient("client")
//secret key
.secret(passwordEncoder.encode("112233"))
//Redirect address
.redirectUris("http://www.baidu.com")
//Scope of authorization
.scopes("all")
/**
* Authorization type
* authorization_code Authorization code mode
*/
.authorizedGrantTypes("authorization_code");
}
}
Configure resource server
@Configuration
@EnableResourceServer
public class ResourceServerConfig extends ResourceServerConfigurerAdapter {
    @Override
    public void configure(HttpSecurity http) throws Exception {
        http.authorizeRequests()
                .anyRequest()
                .authenticated()
                .and()
                .requestMatchers()
                .antMatchers("/user/**");
    }
}
Configure Controller
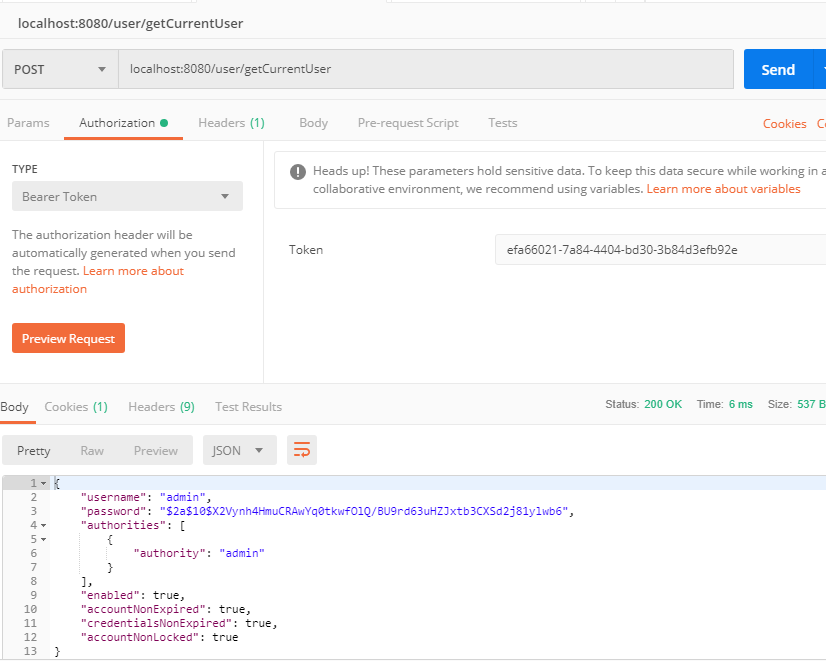
@RestController
@RequestMapping("/user")
public class UserController {
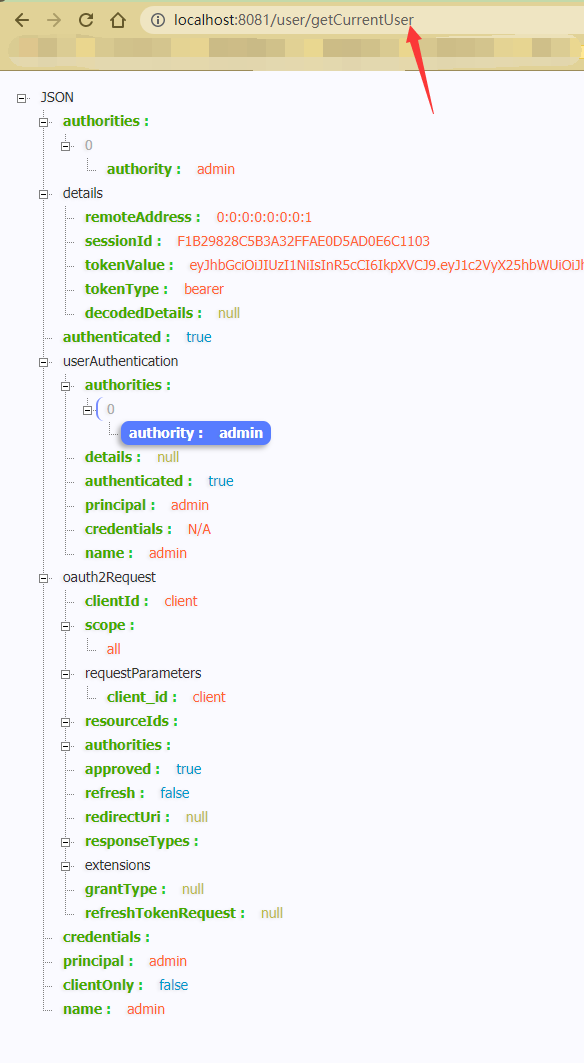
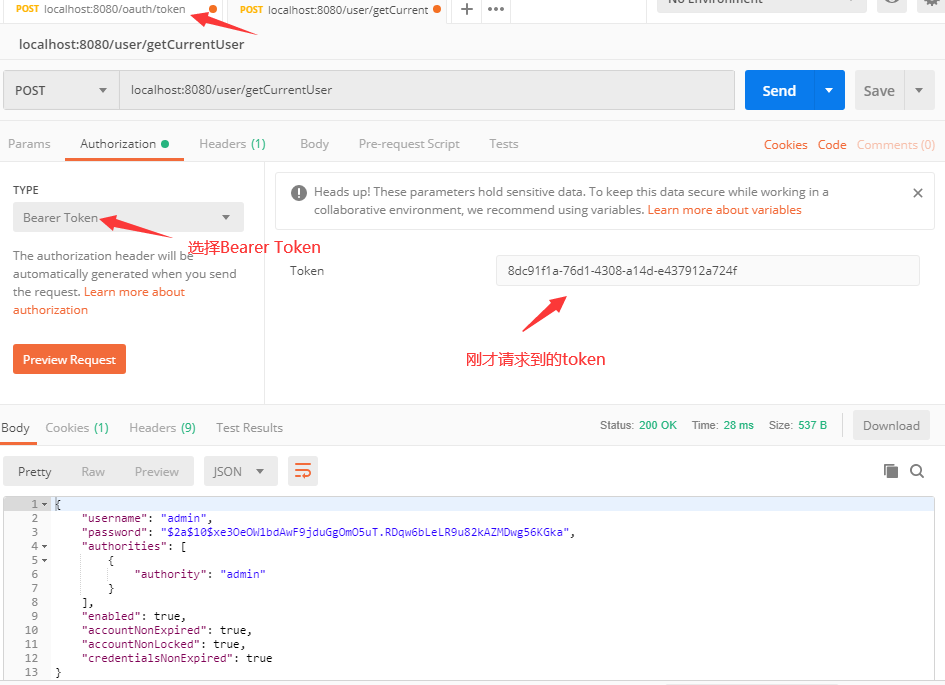
@RequestMapping("/getCurrentUser")
public Object getCurrentUser(Authentication authentication){
return authentication.getPrincipal();
}
}
test
- Obtain authorization code
http://localhost:8080/oauth/authorize?response_type=code&client_id=admin&redirect_uri=http://www.baidu.com&scope=all
Since the defined client ID is client, the client_ Change id = admin to client
Log in and jump to the server
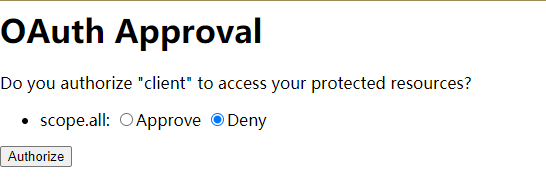
Select allow to jump to the specified page
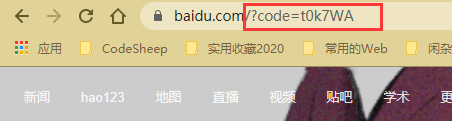
Get token code=t0k7WA
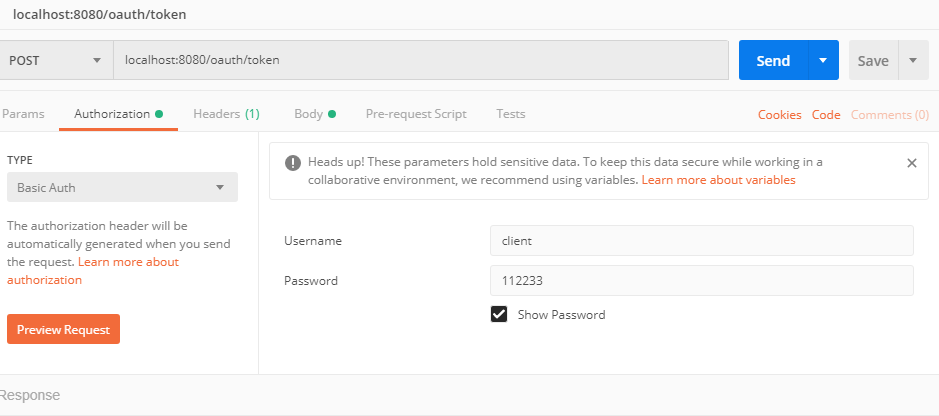
Obtain the token according to the authorization code (Post request)
- Get token
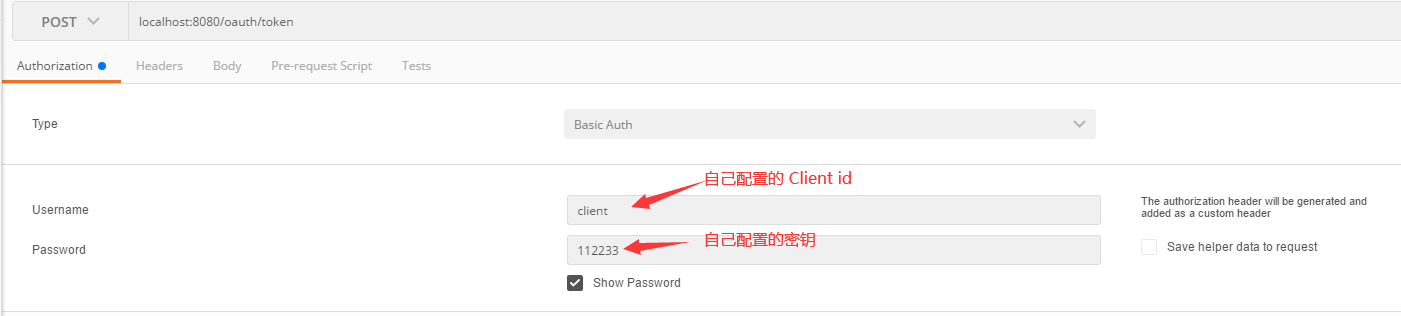
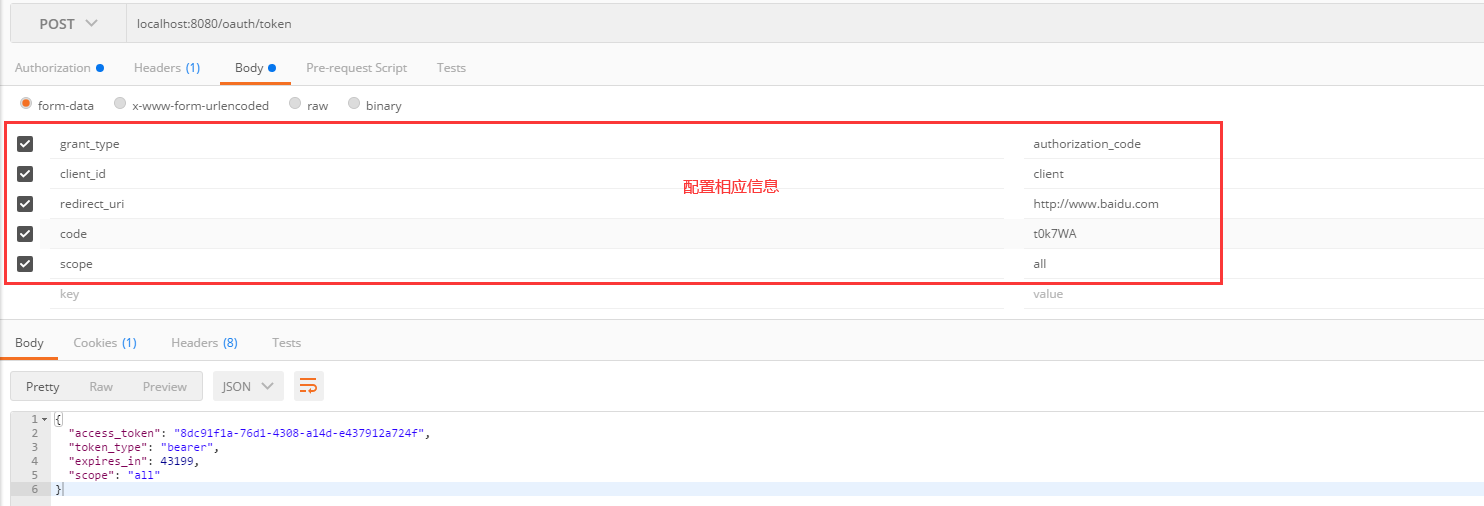
Information to be added in the body
- grant_type: authorization type, fill in authorization_code, indicating authorization code mode
- Code: authorization code is the authorization code just obtained. Note: the authorization code is invalid after being used only once and needs to be applied again.
- client_id: client ID
- redirect_uri: the jump url when applying for authorization code, which must be the same as the redirect used when applying for authorization code_ Uri consistent.
- Scope: authorization scope.
If authentication fails, the server will return 401
- Use token to get the current user information
8.2 password mode
-
Configure the authentication manager in SecurityConfig
@Bean public AuthenticationManager authenticationManager() throws Exception { return super.authenticationManager(); } -
Override the configuration in authorization service configuration AuthorizationServerConfig
@Configuration
@EnableAuthorizationServer
public class AuthorizationServerConfig extends AuthorizationServerConfigurerAdapter {

    @Autowired
    private PasswordEncoder passwordEncoder;

    @Autowired
    private AuthenticationManager authenticationManager;

    @Autowired
    private UserService userService;

    @Override
    public void configure(ClientDetailsServiceConfigurer clients) throws Exception {
        //For the convenience of demonstration, it is put in memory first, which is not the case in actual development
        clients.inMemory()
                //client ID
                .withClient("client")
                //secret key
                .secret(passwordEncoder.encode("112233"))
                //Redirect address
                .redirectUris("http://www.baidu.com")
                //Scope of authorization
                .scopes("all")
                /**
                 * Authorization type (multiple modes can be used simultaneously)
                 * authorization_code Authorization code mode
                 * password Password mode
                 */
                .authorizedGrantTypes("authorization_code","password");
    }

	/**
     * Password mode
     * @param endpoints
     * @throws Exception
     */
    @Override
    public void configure(AuthorizationServerEndpointsConfigurer endpoints) throws Exception {
            endpoints.authenticationManager(authenticationManager)
                    .userDetailsService(userService);
    }
}
test
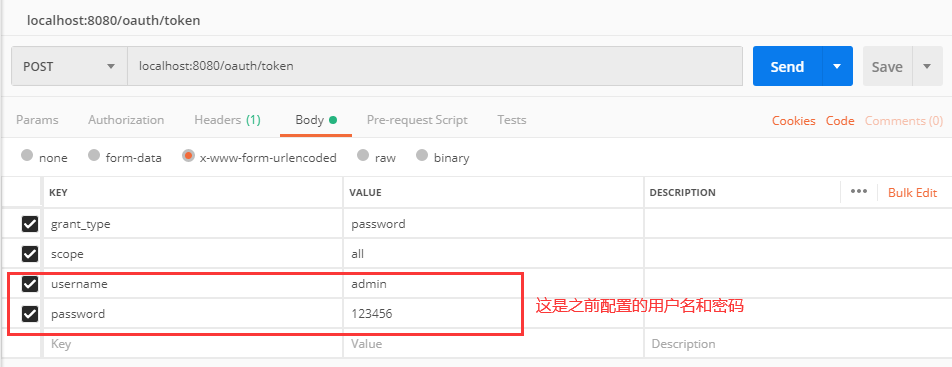
Send new token
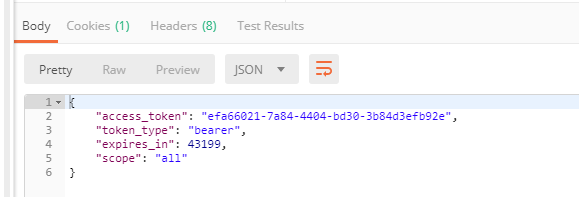
Add the token to the request to get
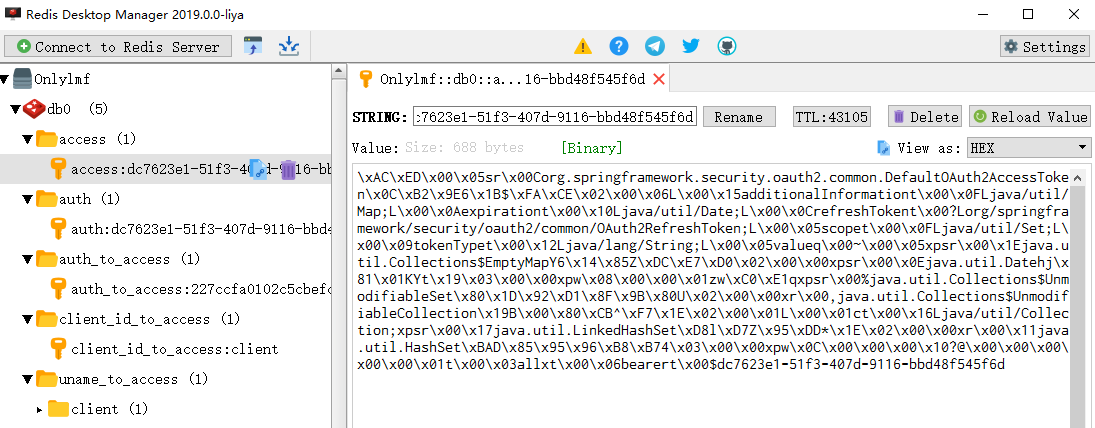
8.3 storing token s in Redis
Previously, the token was stored directly in memory, which is unreasonable in the production environment. Next, it is transformed to be stored in Redis
1. Add dependency and configuration
pom.xml
<dependency>
    <groupId>org.springframework.boot</groupId>
    <artifactId>spring-boot-starter-data-redis</artifactId>
    <version>2.1.9.RELEASE</version>
</dependency>

<!--commons-pool2 Object pool dependency-->
<dependency>
    <groupId>org.apache.commons</groupId>
    <artifactId>commons-pool2</artifactId>
</dependency>
Configure redis configuration information in Application
# Redis
spring:
  redis:
    host: 127.0.0.1
2. Create RedisConfig
@Configuration
public class RedisConfig {

    @Autowired
    private RedisConnectionFactory redisConnectionFactory;

    @Bean
    public TokenStore redisTokenStore(){
        return new RedisTokenStore(redisConnectionFactory);
    }
}
3. Configure in the password mode in AuthorizationServerConfig
@Autowired
@Qualifier("redisTokenStore")
private TokenStore tokenStore;

/**
 * Password mode
 * @param endpoints
 * @throws Exception
 */
    @Override
    public void configure(AuthorizationServerEndpointsConfigurer endpoints) throws Exception {
            endpoints.authenticationManager(authenticationManager)
                    .userDetailsService(userService)
                    .tokenStore(tokenStore);
    }
4. Test and send the request in password mode in postman
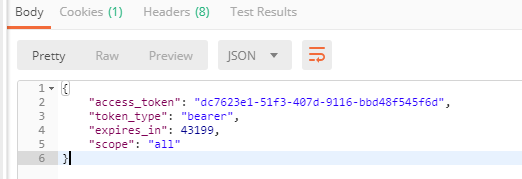
You can see it in Redis
9. JWT
9.1 common authentication mechanisms
HTTP Basic Auth
The simple explanation of HTTP Basic Auth is to provide the user's username and password every time the API is requested. In short, Basic Auth is the simplest authentication method used with the RESTful API. It only needs to provide the username and password. However, due to the risk of exposing the username and password to the third-party client, it is less and less used in the production environment. Therefore, when developing open restful APIs, try to avoid using HTTP Basic Auth.
Cookie Auth
Cookie authentication mechanism is to create a session object on the server side and a cookie object on the browser side of the client side for one request authentication; The state management is realized by matching the cookie object brought by the client with the session object on the server. By default, cookies are deleted when we close the browser. However, you can modify the expiration time of the cookie to make the cookie valid for a certain period of time.
OAuth
OAuth (Open Authorization) is an open authorization standard that allows a user to allow a third-party application to access the user's private resources (such as photos, videos and contact lists) stored on a web service without providing the user name and password to the third-party application. For example, the website logs in through wechat and microblog, which is mainly used for third-party login.
OAuth allows users to provide a token instead of a user name and password to access their data stored in a specific service provider. Each token authorizes a specific third-party system (e.g., video editing website) to access specific resources (e.g., only videos in an album) within a specific time period (e.g., the next 2 hours). In this way, OAuth allows users to authorize third-party websites to access some specific information they store in another service provider, rather than all content.
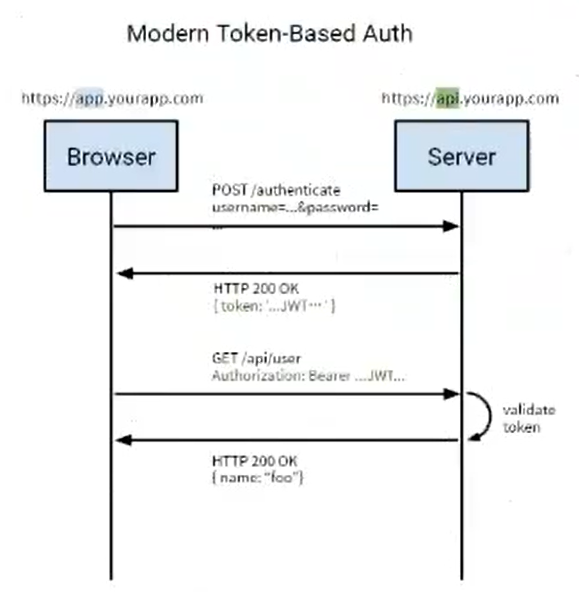
Token Auth
Using the Token based authentication method, the server does not need to store the user's login record. The general process is as follows:
- The client requests login with user name and password
- The server receives a request to verify the user name and password
- After the verification is successful, the server will issue a Token and then send the Token to the client
- After receiving the Token, the client can store it, for example, in a Cookie
- Each time the client requests resources from the server, it needs to bring the Token issued by the server
- The server receives the request, and then verifies the Token carried in the client request. If the verification is successful, it returns the requested data to the client
It is safer than the first method, saves server resources more than the second method, and is lighter than the third method
Specifically: the advantages of Token Auth (what are the advantages of Token mechanism over Cookie mechanism?)
- Support cross domain access: cookies do not allow domain access, which does not exist for the Token mechanism. The premise is that the transmitted user authentication information is transmitted through the HTTP header! I
- Stateless (also known as · server extensible line): the Token mechanism does not need to store session information on the server, because the Token itself contains all logins
The user's information only needs to store the status information in the client's cookie or local media - More applicable to CON: you can request all the data of your server (such as javascript, HTML, pictures, etc.) through the content distribution network, and your service
Just provide API at the end - Decoupling: there is no need to bind to a specific authentication scheme. Token s can be generated anywhere, as long as you can call them when your API is called
- More suitable for mobile applications: when your client is a native platform (iOS, Android, Windows 10, etc.), cookies are not supported (you need to process them through the Cookie container). At this time, it will be much easier to adopt the Token authentication mechanism.
- CSRF: since you no longer rely on cookies, you don't need to consider the prevention of CSRF (Cross Site Request Forgery).
- Performance the round-trip time of a network (query session information through the database) is much more time-consuming than the Token verification and parsing of an HMACSHA256j calculation
- No special treatment is required for the login page. If you use Protractor for function test, no special treatment is required for the login page
- Based on standardization, your API can adopt the standardized JSON Web Token(JWT), which has been supported by multiple back-end libraries (. NET, Ruby, Java, Python, PHP) and companies
9.2 introduction to JWT
What is JWT
JSON Web Token (JWT) is an open industry standard (RFC 7519). It defines a brief and self-contained protocol format for transmitting json objects between communication parties. The transmitted information can be verified and trusted by digital signature. JWT can use HMAC algorithm or RSA public / private key pair to sign to prevent tampering
Advantages of JWT token:
1. jwt be based on json,Very easy to parse.
2. Rich content can be customized in the token, which is easy to expand.
3. Through asymmetric encryption algorithm and digital signature technology, JWT Tamper proof, high security.
4. Resource service usage JWT Authorization can be completed without relying on authentication services.
Disadvantages:
1. The JWT token is long and occupies a large storage space.
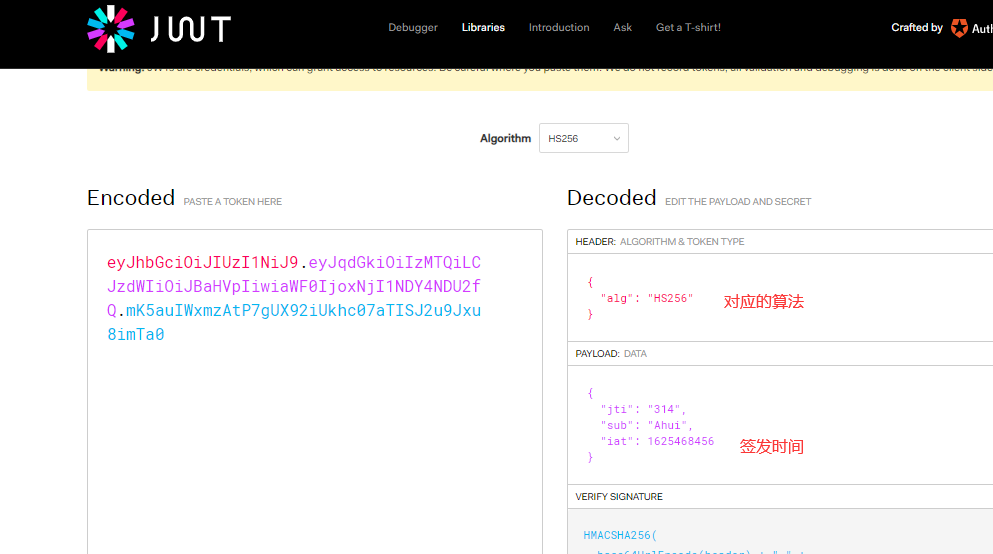
JWT composition
A JWT is actually a string. It consists of three parts: header, payload and signature
1. Header:
The header is used to describe the most basic information about the JWT, such as its type (i.e. JWT) and the algorithm used for signature (such as HMAC SHA256 or RSA). This can also be represented as a JSON object.
{
    "alg":"HS256",
    "typ":"JWT"
}
- typ: is the type
- alg: signature algorithm. The algorithm used here is HS256 algorithm
We BASE64 encode the json string in the header
Base64 is a representation of binary data based on 64 printable characters. Since the 6th power of 2 is equal to 64, every 6 bits are a unit corresponding to a printable character. Three bytes have 24 bits, corresponding to four Base64 units, that is, three bytes need to be represented by four printable characters. JDK provides very convenient BASE64Encoder and BASE64Decoder, which can easily complete Base64 based encoding and decoding.
2. Load (Payload)
The second part is the load, which is the place to store effective information. The name seems to refer specifically to the goods carried on the aircraft. These valid information includes three parts:
- Declaration registered in the standard (recommended but not mandatory)
iss: jwt Issuer
sub: jwt Target users
aud: receive jwt Party of
exp: jwt Expiration time of, The expiration time must be greater than the issuing time
nbf: Define before what time, Should jwt Are not available
iat: jwt Date of issue
jti: jwt Unique identity of, Mainly used as a disposable token,To avoid replay attacks
-
Public statement
Any information can be added to the public statement. Generally, the user's relevant information or other necessary information required by the business can be added However, it is not recommended to add sensitive information because this part can be decrypted on the client
-
Private declaration
Private declaration is a declaration jointly defined by providers and consumers. It is generally not recommended to store sensitive information, because base64 is symmetrically decrypted, which means that this part of information can be classified as plaintext information.
This refers to the custom claim. For example, the name in the following example belongs to the custom claim. The difference between these claims and the claims specified in the JWT standard lies in: the claims specified in the JWT. After receiving the JWT, the receiver of the JWT knows how to verify the claims of these standards (whether they can be verified or not); private claims will not be verified unless the receiver is explicitly told to verify these claims and rules.
{
    "sub":"123456",
    "name":"ahui",
    "iat":"12133333",
}
Where sub is a standard declaration and name is a custom declaration (public or private)
Then it is base64 encoded to get the second part of jwt
Don't put some sensitive information in the statement
3. Visa and signature
The third part of jwt is a visa information, which consists of three parts:
-
Header (after Base64)
-
Payload (after Base64)
-
Secret (salt, be sure to keep it secret)
This part requires base64 encrypted header and base64 encrypted payload The string formed by the connection is then encrypted by salt secret combination through the encryption method declared in the header, and then the third part of jwt is formed:
Use these three parts Join into a complete string to form the final jwt
Note: secret is saved on the server side, and jwt issuance is also generated on the server side. Secret is used for jwt issuance and jwt verification. Therefore, it is the private key of your server side and should not be revealed in any scenario. Once the client knows this secret, it means that the client can sign jwt it
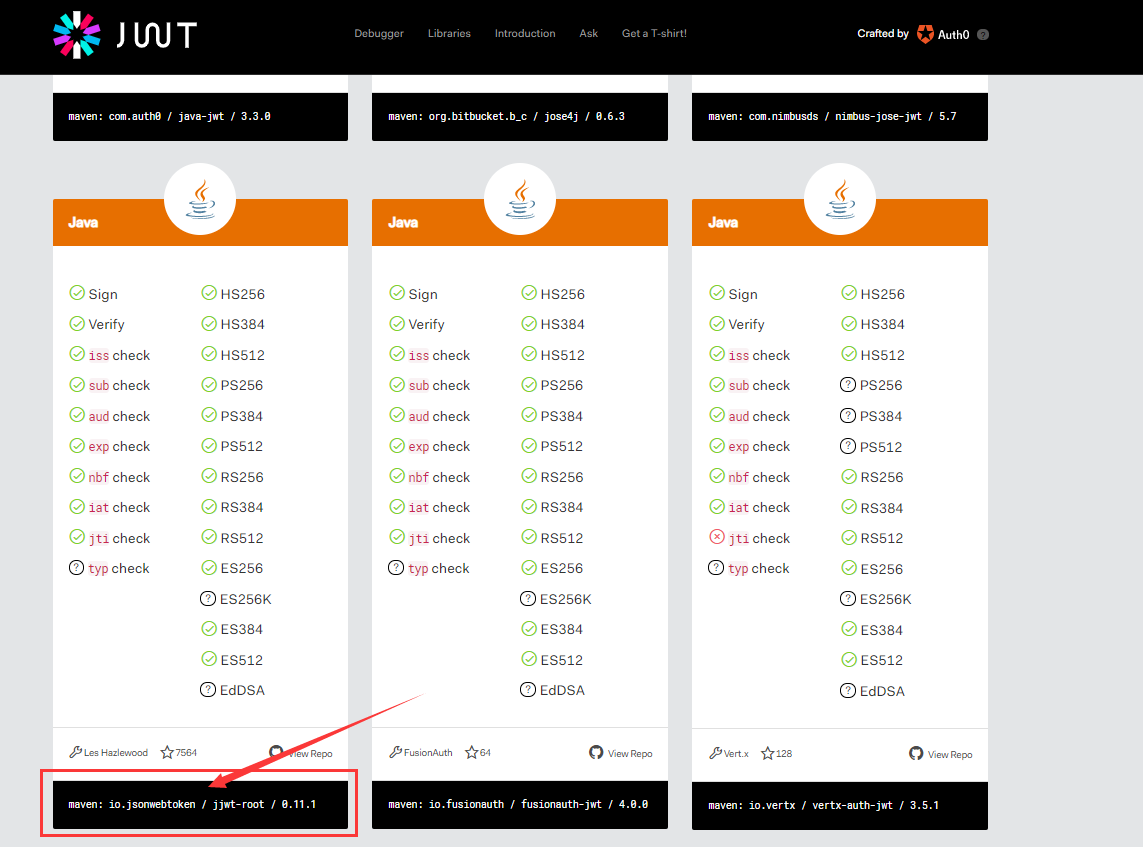
9.3 JJWT introduction
JJWT is a Java library that provides end-to-end JWT creation and validation. Always free and open source (Apache License, version 2.0), JJWT is easy to use and understand. It is designed as a smooth interface centered on architecture, hiding most of its complexity.
Create project tests and use JJWT to generate JWT
1. Create a new boot project for testing
Import pom dependencies
<dependencies>
        <dependency>
            <groupId>org.springframework.boot</groupId>
            <artifactId>spring-boot-starter-web</artifactId>
        </dependency>

        <dependency>
            <groupId>org.springframework.boot</groupId>
            <artifactId>spring-boot-starter-test</artifactId>
            <scope>test</scope>
            <exclusions>
                <exclusion>
                    <groupId>org.junit.vintage</groupId>
                    <artifactId>junit-vintage-engine</artifactId>
                </exclusion>
            </exclusions>
        </dependency>

        <!--jwt rely on-->
        <dependency>
            <groupId>io.jsonwebtoken</groupId>
            <artifactId>jjwt</artifactId>
            <version>0.9.1</version>
        </dependency>
</dependencies>
Create test class generation jwt
/**
     * Generate jwt
     */
    @Test
    public void testJwt() {
        JwtBuilder jwtBuilder = Jwts.builder()
                //Unique ID{"id":"314"}
                .setId("314")
                //Received user {"sub":"Ahui"}
                .setSubject("Ahui")
                //Issued on {"iat": "....}
                .setIssuedAt(new Date())
                //Signature algorithm, and key
                .signWith(SignatureAlgorithm.HS256, "xxxx");
        //Issue token
        String token = jwtBuilder.compact();
        System.err.println(token);
    }

Decrypted in jwt
Or use separated base64 to de encode and decrypt
Verification and parsing of token
We have just created a token. In the web application, this operation is performed by the server and sent to the client. The client needs to carry this token when sending a request to the server next time (it's like holding a ticket). The server should parse the information in the token (such as user id) when receiving this token, Query the database according to this information and return the corresponding results.
/**
* Parse token
*/
@Test
public void testParseToken(){
String token = "eyJhbGciOiJIUzI1NiJ9.eyJqdGkiOiIzMTQiLCJzdWIiOiJBaHVpIiwiaWF0IjoxNjI1NDY4ODM0fQ.aH0QUMEQwyeZc6Ab3cBzckF5t3TC-3KnvRjPJu_XtiI";
Claims claims = (Claims) Jwts.parser()
//The key must be consistent with that set at the time of issuance
.setSigningKey("xxxx")
.parse(token)
.getBody();
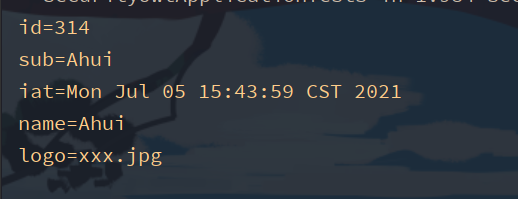
System.err.println("id=" + claims.getId());
System.err.println("sub=" + claims.getSubject());
System.err.println("iat=" + claims.getIssuedAt());
}
}
Set token expiration time
In many cases, we do not want the issued token to be permanent (the token in the previous section is permanent), so we can add an expiration time for the token. Reason: the server does not record the token sent from the server, so there is a disadvantage that the server cannot actively control the immediate invalidation of a token.
Test:
/**
* Build jwt (with expiration time and start time)
*/
@Test
public void testJwtHasExpire() {
//current time
long date = System.currentTimeMillis();
//Failure time
long exp = date + 60 * 1000;
JwtBuilder jwtBuilder = Jwts.builder()
//Unique ID{"id":"314"}
.setId("314")
//Received user {"sub":"Ahui"}
.setSubject("Ahui")
//Issued on {"iat": "....}
.setIssuedAt(new Date())
//Signature algorithm, and key
.signWith(SignatureAlgorithm.HS256, "xxxx")
//Set expiration time
.setExpiration(new Date(exp));
//Issue token
String token = jwtBuilder.compact();
System.err.println(token);
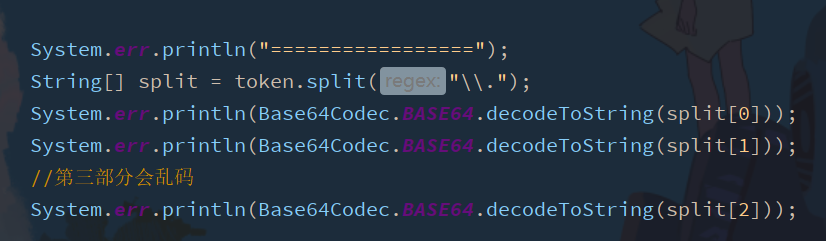
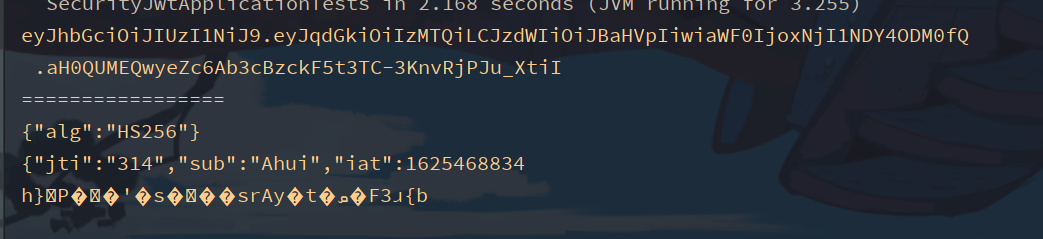
System.err.println("=================");
String[] split = token.split("\\.");
System.err.println(Base64Codec.BASE64.decodeToString(split[0]));
System.err.println(Base64Codec.BASE64.decodeToString(split[1]));
//The third part will be garbled
System.err.println(Base64Codec.BASE64.decodeToString(split[2]));
}
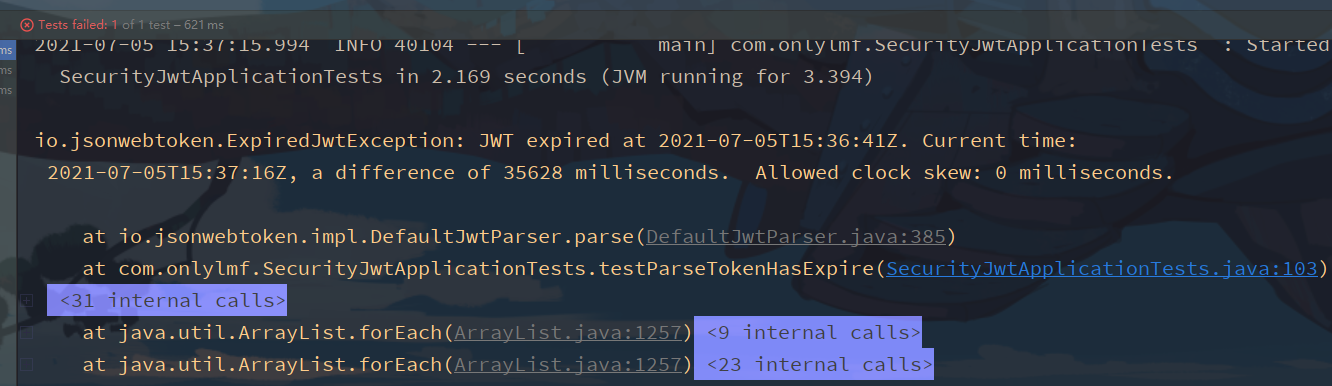
This is equivalent to adding the expiration time configuration
//current time
long date = System.currentTimeMillis();
//Failure time
long exp = date + 60 * 1000;

//Set expiration time
.setExpiration(new Date(exp));
It can be parsed within one minute, and exceptions will be thrown after one minute
Custom claims
Add a custom claim to the configuration
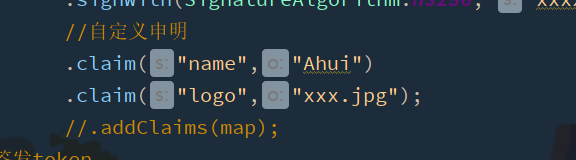
Get after decoding

10. Spring securityoauth2 integrates JWT
Use the previous redis integration project for testing
Because jwt is stateless, redis is not required, so delete the dependency and configuration test first
1. Add jwt configuration information
JwtTokenStoreConfig.java
@Configuration
public class JwtTokenStoreConfig {

    @Bean
    public TokenStore jwtTokenStore(){
        return new JwtTokenStore(jwtAccessTokenConverter());
    }

    @Bean
    public JwtAccessTokenConverter jwtAccessTokenConverter(){
        JwtAccessTokenConverter jwtAccessTokenConverter = new JwtAccessTokenConverter();
        //Set jwt key
        jwtAccessTokenConverter.setSigningKey("test_key");
        return jwtAccessTokenConverter;
    }
}
2. Add configuration information in authorizationserverconfig
@Configuration
@EnableAuthorizationServer
public class AuthorizationServerConfig extends AuthorizationServerConfigurerAdapter {

    @Autowired
    private PasswordEncoder passwordEncoder;

    @Autowired
    private AuthenticationManager authenticationManager;

    @Autowired
    private UserService userService;

    @Autowired
    @Qualifier("jwtTokenStore")
    private TokenStore tokenStore;

    @Autowired
    private JwtAccessTokenConverter jwtAccessTokenConverter;


    @Override
    public void configure(ClientDetailsServiceConfigurer clients) throws Exception {
        //For the convenience of demonstration, it is put in memory first, which is not the case in actual development
        clients.inMemory()
                //client ID
                .withClient("client")
                //secret key
                .secret(passwordEncoder.encode("112233"))
                //Redirect address
                .redirectUris("http://www.baidu.com")
                //Scope of authorization
                .scopes("all")
                /**
                 * Authorization type (multiple modes can be used simultaneously)
                 * authorization_code Authorization code mode
                 * password Password mode
                 */
                .authorizedGrantTypes("authorization_code","password");
    }

    /**
     * Password mode
     * @param endpoints
     * @throws Exception
     */
    @Override
    public void configure(AuthorizationServerEndpointsConfigurer endpoints) throws Exception {
            endpoints.authenticationManager(authenticationManager)
                    .userDetailsService(userService)
                    //Convert accessToken to JwtToken
                    .tokenStore(tokenStore)
                    .accessTokenConverter(jwtAccessTokenConverter);
    }
}
3. Test with Postman
Still use password mode
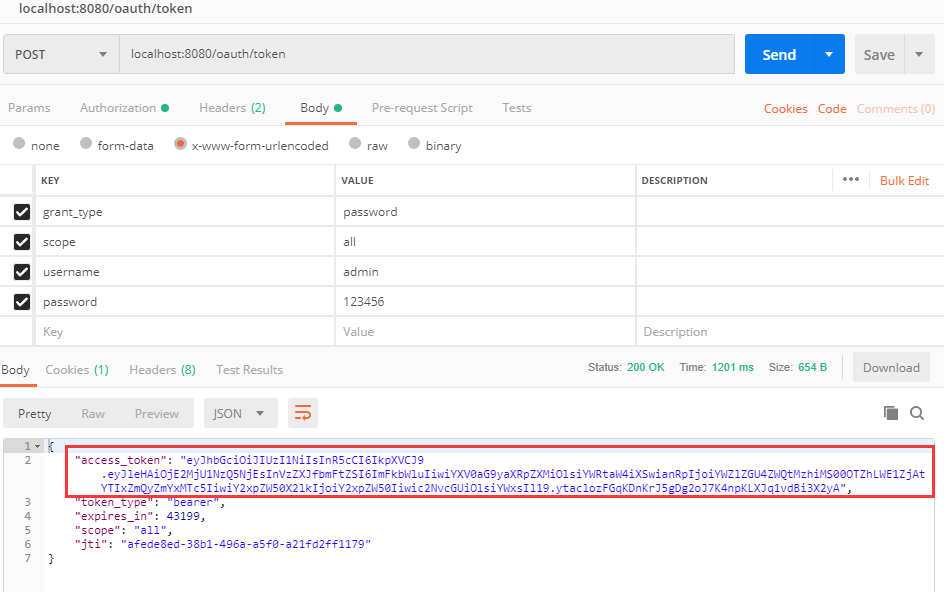
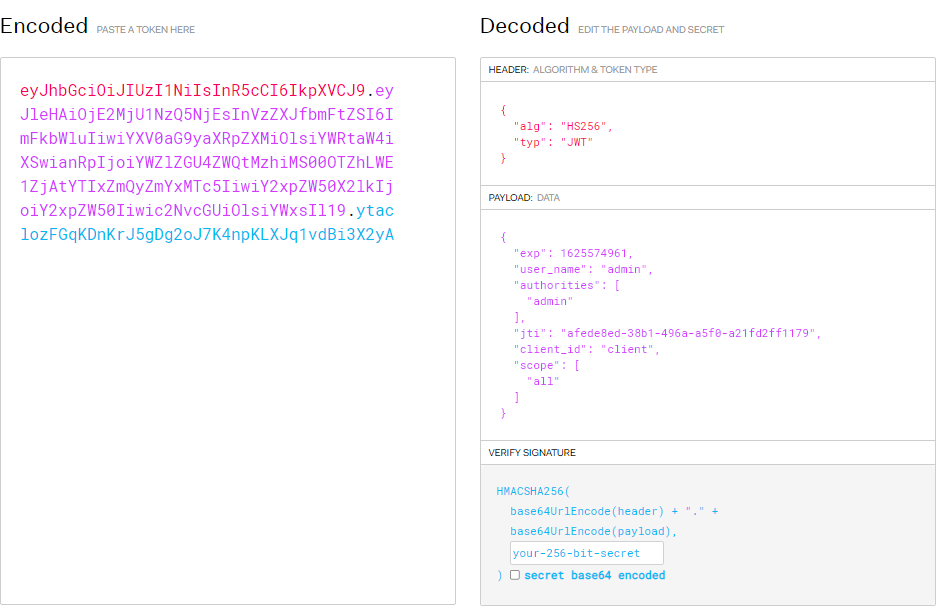
It can be decoded on the Jwt official website
10.1 expand JWT storage content
Create a new JwtTokenEnhancer extended memory class
JwtTokenEnhancer.java
/**
 * Expand JWT storage content
 */
public class JwtTokenEnhancer implements TokenEnhancer {
    @Override
    public OAuth2AccessToken enhance(OAuth2AccessToken oAuth2AccessToken, OAuth2Authentication oAuth2Authentication) {

        Map<String, Object> map = new HashMap<>();
        map.put("enhance","enhance info");
        //Force oAuth2AccessToken to DefaultOAuth2AccessToken type
        ((DefaultOAuth2AccessToken)oAuth2AccessToken).setAdditionalInformation(map);

        return oAuth2AccessToken;
    }
}
You can see that the parameter OAuth2AccessToken is an interface, and the DefaultOAuth2AccessToken in its implementation class contains a setAdditionalInformation method

The required parameter is a Map
Configure in JwtTokenStoreConfig
@Bean
public JwtTokenEnhancer jwtTokenEnhancer(){
    return new JwtTokenEnhancer();
}
**Configure tokenEnhancer in AuthorizationServerConfig * *
Add tokenEnhancer and check this method. You can know that this is an interface to find its implementation class
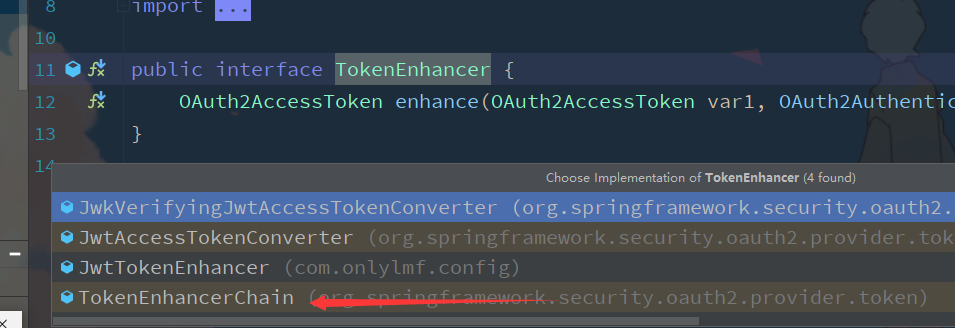
So you need to prepare the implementation class
Inject JwtTokenEnhancer
@Autowired
private JwtTokenEnhancer jwtTokenEnhancer;
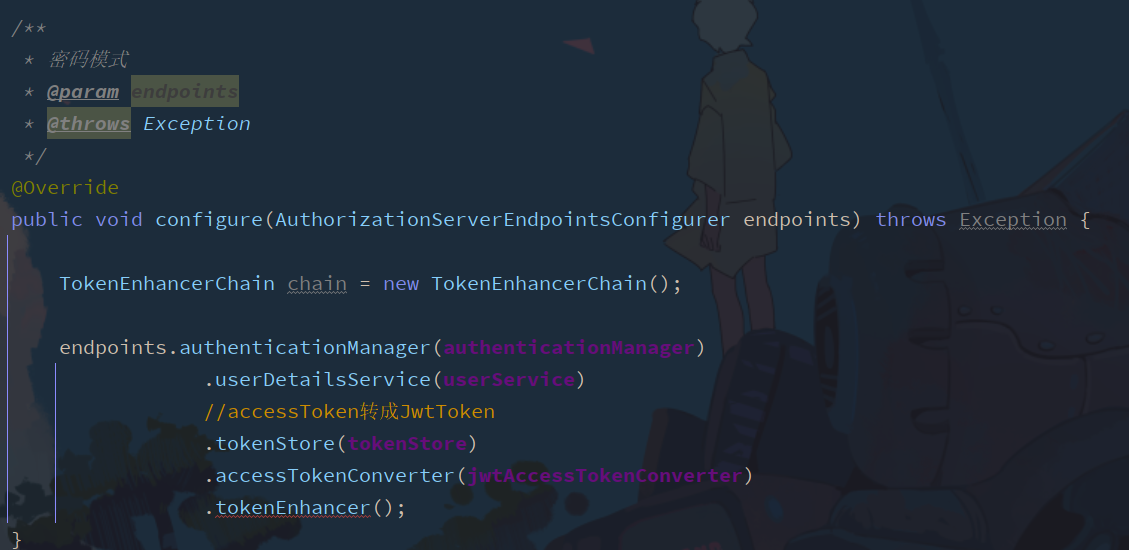
Final code
@Autowired
private JwtTokenEnhancer jwtTokenEnhancer;

	/**
     * Password mode
     * @param endpoints
     * @throws Exception
     */
    @Override
    public void configure(AuthorizationServerEndpointsConfigurer endpoints) throws Exception {
        //Set Jwt enhancements
        TokenEnhancerChain chain = new TokenEnhancerChain();
        List<TokenEnhancer> delegates = new ArrayList<>();
        delegates.add(jwtTokenEnhancer);
        delegates.add(jwtAccessTokenConverter);
        chain.setTokenEnhancers(delegates);

        endpoints.authenticationManager(authenticationManager)
                    .userDetailsService(userService)
                    //Convert accessToken to JwtToken
                    .tokenStore(tokenStore)
                    .accessTokenConverter(jwtAccessTokenConverter)
                    //Set Jwt enhancements
                    .tokenEnhancer(chain);
    }
}
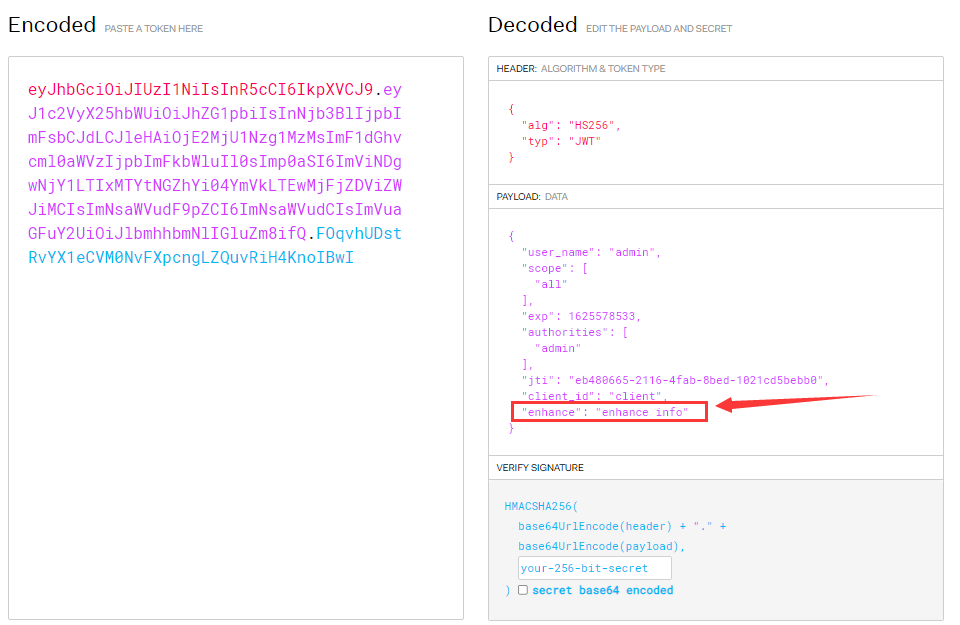
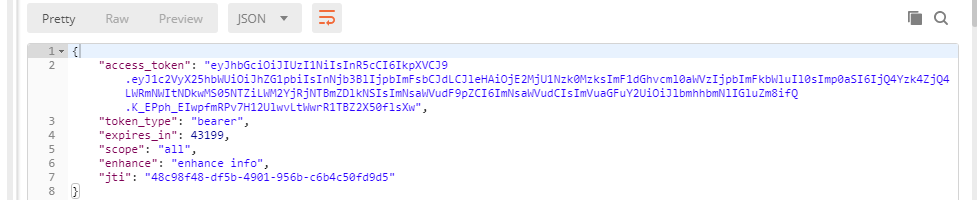
test
Use postman to send the obtained token to the official website for decoding and viewing
10.2 parsing Jwt content
1. Add jwt dependency
<!--jwt-->
<dependency>
    <groupId>io.jsonwebtoken</groupId>
    <artifactId>jjwt</artifactId>
    <version>0.9.1</version>
</dependency>
2. Modify UserController
@RequestMapping("/getCurrentUser")
    public Object getCurrentUser(Authentication authentication, HttpServletRequest httpServletRequest){
		 //Get Authorization in request header
        String header = httpServletRequest.getHeader("Authorization");
        //Intercept the token in Authorization
        String token = header.substring(header.lastIndexOf("bearer") + 7);
        return Jwts.parser()
                .setSigningKey("test_key".getBytes(StandardCharsets.UTF_8))
                .parseClaimsJws(token)
                .getBody();
    }
3. Use postman for testing
-
First, use the previous password mode to obtain the token
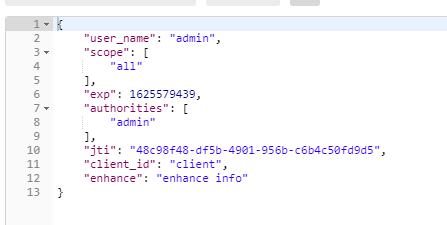
-
Parsing by jwt token

10.3 refresh token
Configure in AuthorizationServerConfig
Configure expiration time and refresh Token Mode
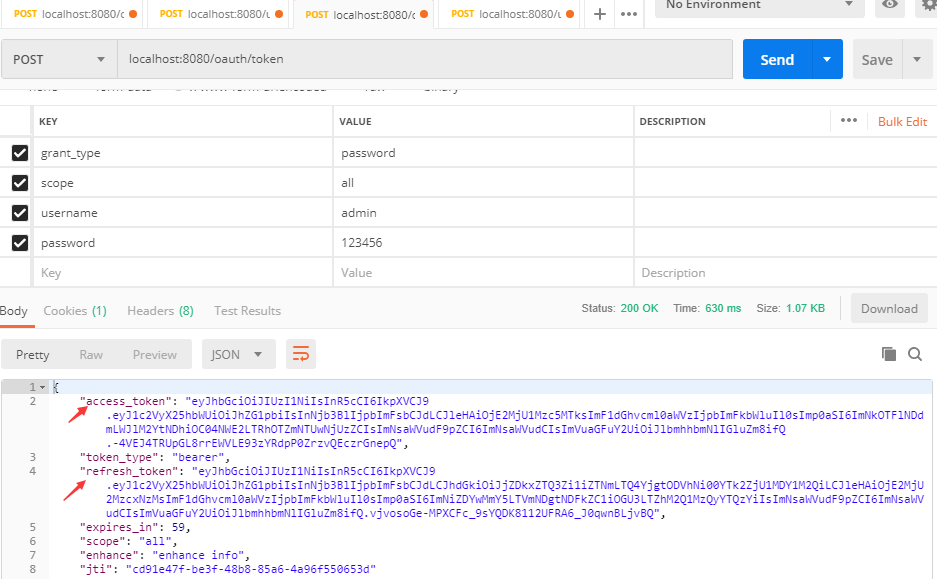
test
Using postman to get the token, you can see that there is an additional refresh token
To test, open a test refresh token
Fill in the Authorization and body tests to get a new token
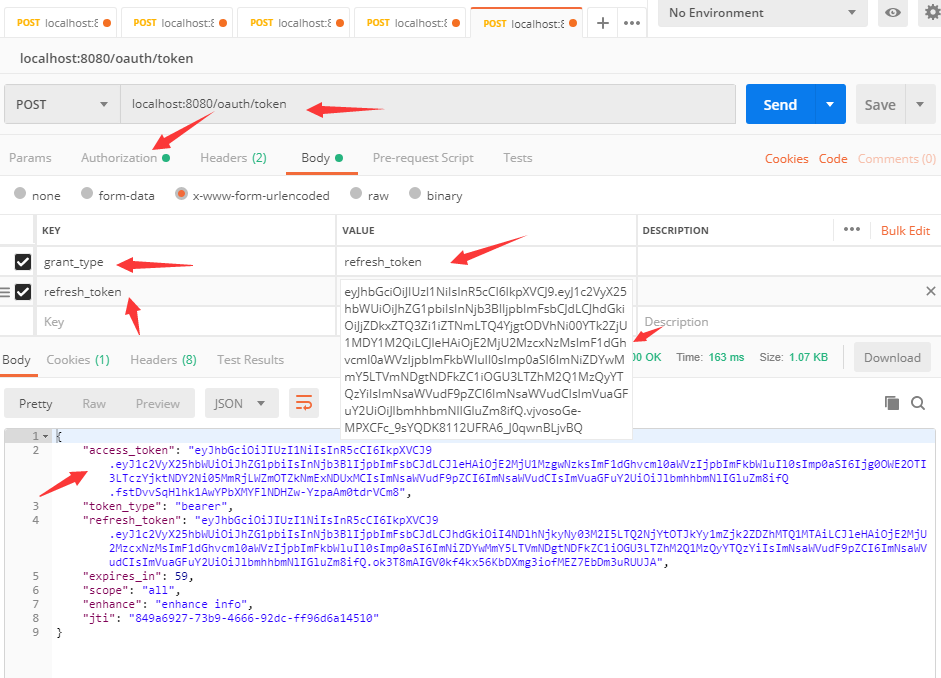
It can then be accessed with the new token
11. Single sign on
What is Single Sign On? The full name of Single Sign On is Single Sign On (hereinafter referred to as SSO), which means that if you log in to one system in a multi system application group, you can be authorized in all other systems without logging in again, including Single Sign On and single sign off
11.1 integrated SSO based on springSecurityOauth2
Use the above items as the authentication server (as the authentication system in the single sign on system)
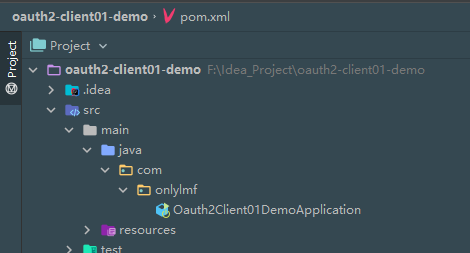
Create the corresponding springboot client for testing
- Import dependency on client
<parent>
        <groupId>org.springframework.boot</groupId>
        <artifactId>spring-boot-starter-parent</artifactId>
        <version>2.1.3.RELEASE</version>
        <relativePath/> <!-- lookup parent from repository -->
    </parent>
    <groupId>com.onlylmf</groupId>
    <artifactId>oauth2-client01-demo</artifactId>
    <version>0.0.1-SNAPSHOT</version>
    <name>oauth2-client01-demo</name>
    <description>Demo project for Spring Boot</description>
    <properties>
        <java.version>1.8</java.version>
        <spring-cloud.version>Greenwich.SR2</spring-cloud.version>
    </properties>
    <dependencies>
        <dependency>
            <groupId>org.springframework.boot</groupId>
            <artifactId>spring-boot-starter</artifactId>
        </dependency>

        <dependency>
            <groupId>org.springframework.boot</groupId>
            <artifactId>spring-boot-starter-web</artifactId>
            <version>2.3.1.RELEASE</version>
        </dependency>

        <dependency>
            <groupId>org.springframework.cloud</groupId>
            <artifactId>spring-cloud-starter-oauth2</artifactId>
        </dependency>

        <dependency>
            <groupId>org.springframework.cloud</groupId>
            <artifactId>spring-cloud-starter-security</artifactId>
        </dependency>

        <!--jwt-->
        <dependency>
            <groupId>io.jsonwebtoken</groupId>
            <artifactId>jjwt</artifactId>
            <version>0.9.1</version>
        </dependency>

        <dependency>
            <groupId>org.springframework.boot</groupId>
            <artifactId>spring-boot-starter-test</artifactId>
            <scope>test</scope>
        </dependency>

        <!--commons-pool2 Object pool dependency-->
        <dependency>
            <groupId>org.apache.commons</groupId>
            <artifactId>commons-pool2</artifactId>
        </dependency>
    </dependencies>

    <dependencyManagement>
        <dependencies>
            <dependency>
                <groupId>org.springframework.cloud</groupId>
                <artifactId>spring-cloud-dependencies</artifactId>
                <version>${spring-cloud.version}</version>
                <type>pom</type>
                <scope>import</scope>
            </dependency>
        </dependencies>
    </dependencyManagement>

    <build>
        <plugins>
            <plugin>
                <groupId>org.springframework.boot</groupId>
                <artifactId>spring-boot-maven-plugin</artifactId>
            </plugin>
        </plugins>
    </build>
- to configure
Write configuration file
server:
  port: 8081
  #Prevent Cookie conflicts, which will cause login authentication to fail
  servlet:
    session:
      cookie:
        name: OAUTH2-CLIENT-SESSIONID01


#Authorization server address
oauth2-server-url: http://localhost:8080

#Configuration corresponding to the authorization server
security:
  oauth2:
    client:
      client-id: client
      client-secret: 112233  #The key configured by your own server
      user-authorization-uri: ${oauth2-server-url}/oauth/authorize #Obtain authorization code
      access-token-uri: ${oauth2-server-url}/oauth/token #Get accessToken
    resource:
      jwt:
        key-uri: ${oauth2-server-url}/oauth/token_key #Get jwt token
Login interface
Enable sso single sign on

- Configure on the server side
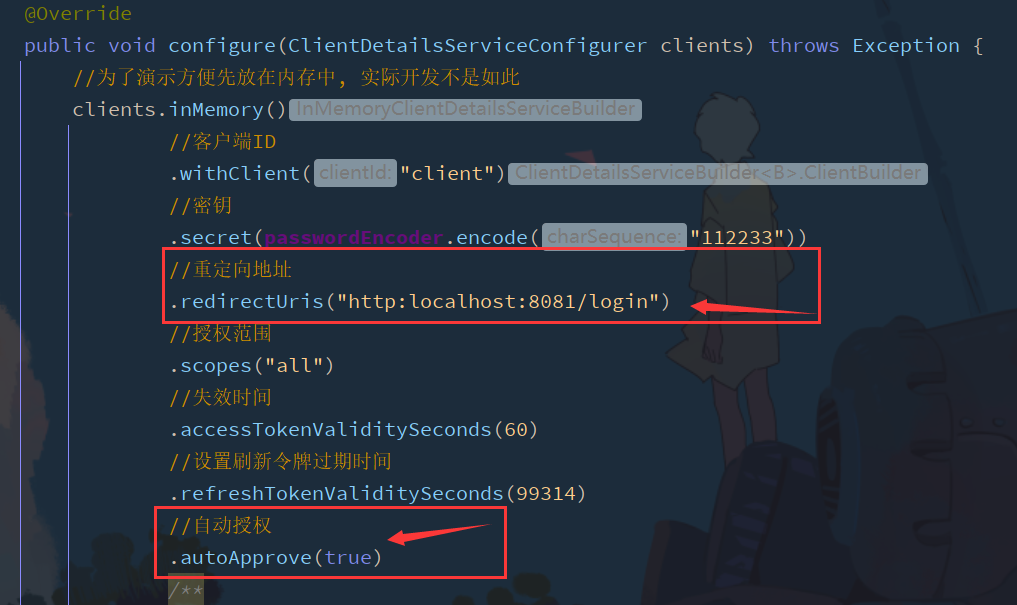
Modify the redirection address to the client login interface
Configure authentication information

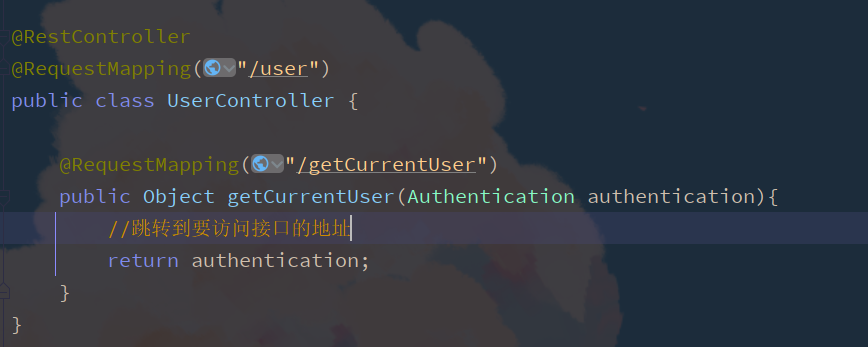
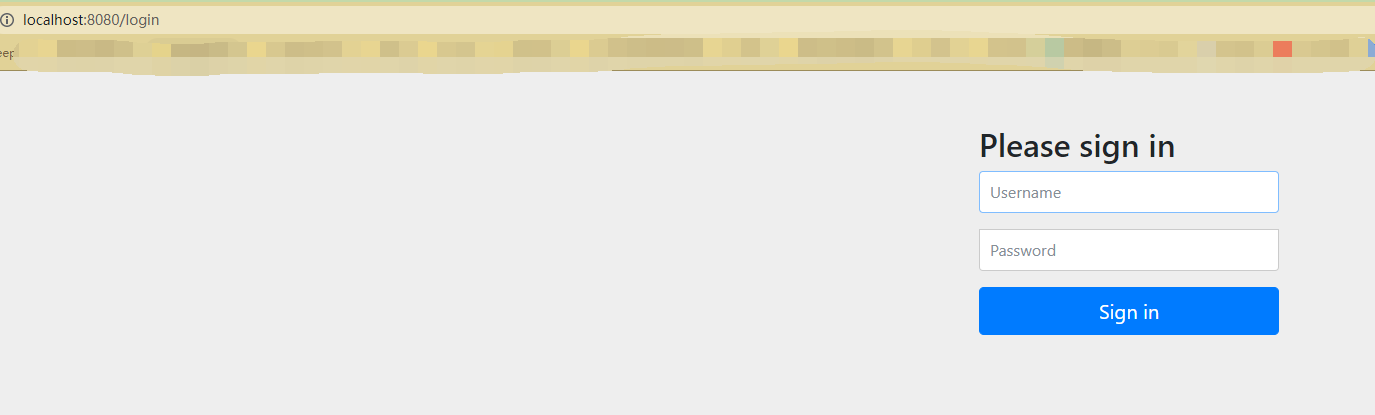
- Test access
-
visit

Jump to by default
Login invokes the login logic of UserDetailsService defined by the server before
Because automatic authorization is set on the server autoApprove(true)