1. Linux Foundation
1.1 User Type
- root user
A special administrative account
Also known as superuser
root is close to full system control
Almost unlimited capacity for system damage
Do not log on as root unless necessary - Normal (Unprivileged) User
Limited permissions
Limited capacity to cause damage
1.2 terminal
Device terminal: keyboard, mouse, display
1.2.1 Terminal Type
- Console Terminal: /dev/console
- Serial Terminal: /dev/ttyS#
- Virtual terminals: tty:teletypewriters, /dev/tty#, TTY can have n, Ctrl+Alt+F#
- Graphics terminal: startx, xwindows
CentOS 6: Ctrl + Alt + F7
CentOS 7: Which terminal is started, which virtual terminal is located - Pseudo terminal: pty:pseudo-tty, /dev/pts/#e.g. SSH remote connection
1.2.2 View current terminal devices
tty command to view the current terminal
Example:
[root@Centos-8 ~]# tty
/dev/pts/1

dws@ubuntu1804:~$ tty
/dev/pts/0
1.3 Interactive Interface
Interactive interface: After starting a terminal, attach an interactive application to the terminal device
1.3.1 Interactive interface type
- GUI: Graphic User Interface
X protocol, window manager, desktop
Desktop:
GNOME (C, Graphics Library gtk),
KDE (C++, Graphics Library qt)
XFCE (Lightweight Desktop) - CLI: Command Line Interface
shell program
1.3.2 What is a shell
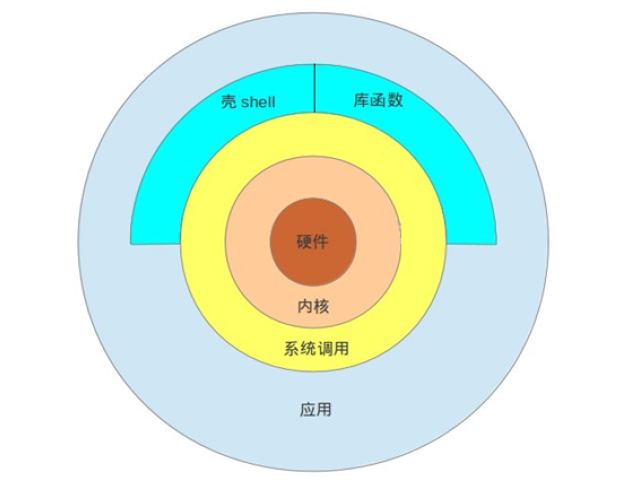
Shell is the user interface for Linux systems and provides an interface for users to interact with the kernel. It receives commands from the user and
Put it into the kernel to execute
The Shell is also known as the command interpreter for LINUX, and the Shell itself is a program. User input
The command line is disassembled into the command name and parameter. Next, the program to be executed is found based on the command name, and the executed program is initially executed
And then pass the parameters just resolved to the program and execute
shell is an advanced programming language that provides functions in development languages such as variables, functions, conditional judgments, loops, and so on.
Shell is a program, so it can be replaced by a variety of shells developed by any user
1.3.3 Various Shells
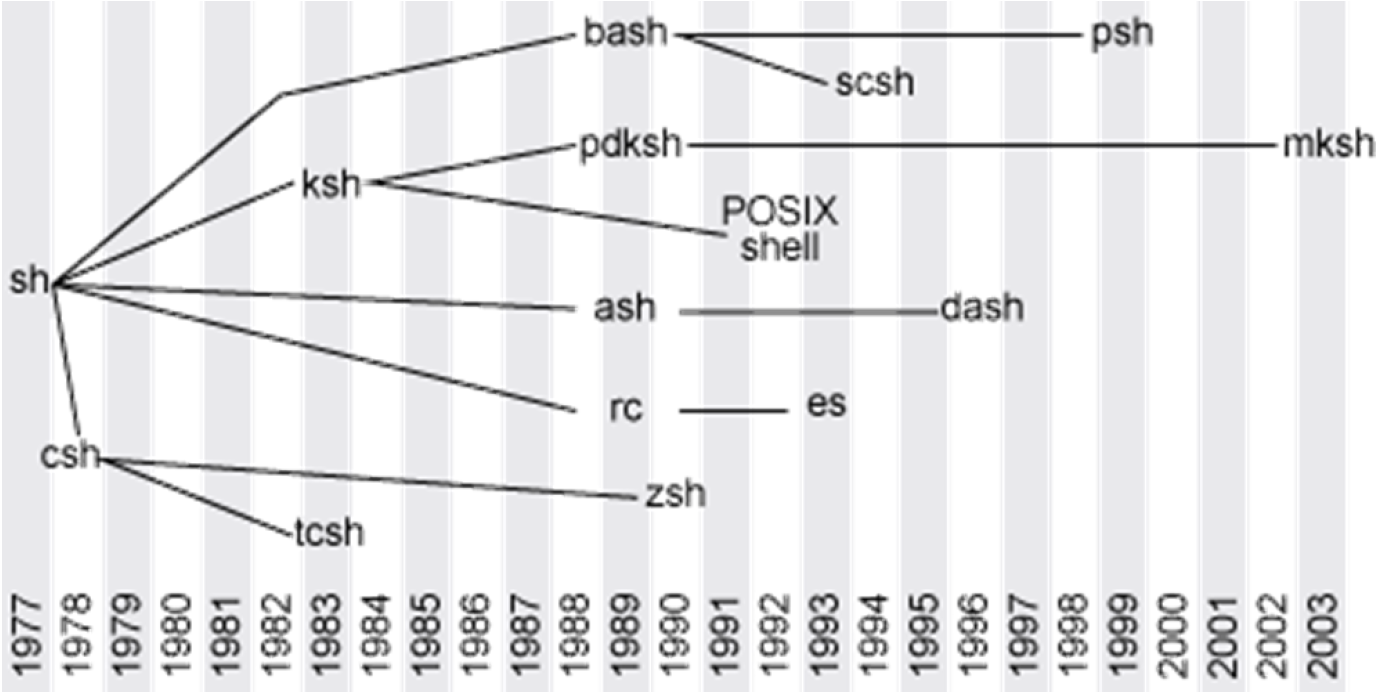
- sh: Steve Bourne
- bash:Bourne-Again Shell, GPL, CentOS and Ubuntu are used by default
- csh:c shell, C language style
- tcsh
- ksh:Korn Shell, AIX default shell
- zsh:MacOS default shell
1.3.4 bash shell
GNU Bourne-Again Shell(bash) is one of the important tool software in the GNU program and is currently a Linux standard shell compatible with sh
Show the shell currently in use
[root@Centos-8 ~]# echo ${SHELL}
/bin/bash

dws@ubuntu1804:~$ echo ${SHELL}
/bin/bash
1.4 Set Host Name
# Provisional Effectiveness
hostname  NAME

#Long lasting, supports Centos7 and Ubuntu 18.04 and above
hostnamectl set-hostname NAME
Example:
[root@Centos-8 ~]# hostname bj-yz-k8s-node1-100-10.magedu.local
Be careful:
- Underlining is not supported for hostnames, but horizontal lines are supported, using letters, horizontal lines, or combinations of numbers
- Some software has special requirements for host names
Example:
[root@Centos-8 ~]# hostnamectl set-hostname centos8.1
[root@Centos-8 ~]# systemctl restart postfix
Job for postfix.service failed because the control process exited with error code.
See "systemctl status postfix.service" and "journalctl -xe" for details.

1.5 Command prompt
After you log in to Linux, the default system command prompt is individualized and does not clearly distinguish between production and test environments, resulting in misoperation. You can avoid this low-level error by modifying the PS1 variable to personalize the prompt format.
Example: #Administrator$Ordinary User
#Centos default prompt
[root@Centos-8 ~]#
[user@centos8 ~]$

#Ubuntu default prompt
root@ubuntu1804:~#
dws@ubuntu1804:~$
Show prompt format
[root@Centos-8 ~]# echo $PS1
[\u@\h \W]\$

root@ubuntu1804:~# echo $PS1
\[\e]0;\u@\h: \w\a\]${debian_chroot:+($debian_chroot)}\u@\h:\w\$
Modify prompt format example
[root@Centos-8 ~]#PS1="\[\e[1;5;41;33m\][\u@\h \W]\\$\[\e[0m\]"
[root@Centos-8 ~]#PS1="\[\e[1;32m\][\t \[\e[1;33m\]\u\[\e[35m\]@\h\[\e[1;31m\] \W\[\e[1;32m\]]\[\e[0m\]\\$"


Prompt format description:
- e Controller033
- \C u rrent User
- \h Host Name Abbreviation
- \H host name
- \w Current Working Directory
- \W Current Working Directory Base Name
- \t 24-hour time format
- \T 12-hour time format
- ! Command History Number
- #History of commands after boot-up
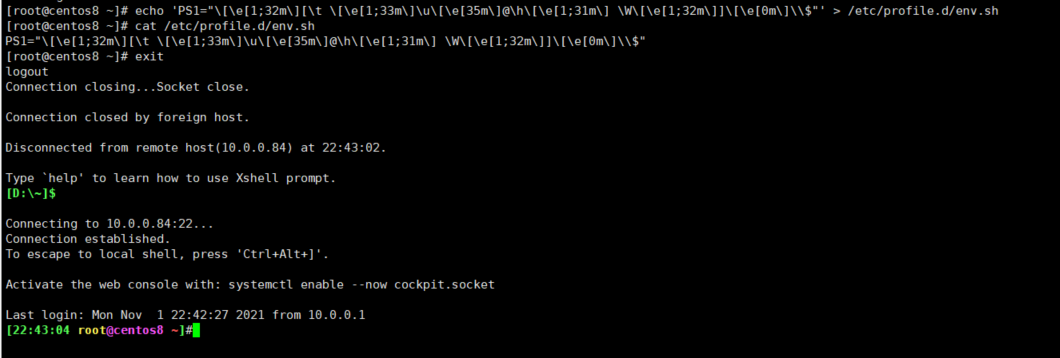
Example: Implement persistent save prompt format on the CentOS system
[root@centos8 ~]# echo 'PS1="\[\e[1;32m\][\t \[\e[1;33m\]\u\[\e[35m\]@\h\[\e[1;31m\]\W\[\e[1;32m\]]\[\e[0m\]\\$"' > /etc/profile.d/env.sh
[root@centos8 ~]# cat /etc/profile.d/env.sh
PS1="\[\e[1;32m\][\t \[\e[1;33m\]\u\[\e[35m\]@\h\[\e[1;31m\] \W\[\e[1;32m\]]\[\e[0m\]\\$"
 Example: Implement the Ubuntu system persist prompt format
root@ubuntu1804:~# echo "PS1='\[\e[1;35m\][\u@\h \W]\\$\[\e[0m\]'" >> .bashrc
root@ubuntu1804:~# tail -1 .bashrc
PS1='\[\e[1;35m\][\u@\h \W]\$\[\e[0m\]'

1.6 Executing commands
1.6.1 Execute command process
Enter the command and ask the shell program to find the executable program or code that corresponds to the typed command, which is then analyzed and submitted to the kernel to allocate resources to run it
Two types of commands that can be executed in a 1.6.2 shell
- Internal command: A command provided by a shell that automatically loads and resides in memory after a user logs in
- External command: There is a corresponding executable file in the file system path, which is loaded from disk into memory when the command is executed, and deleted from memory after execution
Distinguish whether the specified command is internal or external
type COMMAND
Example: Check to see if there are corresponding internal and external commands
[root@centos8 ~]#type -a echo
echo is a shell builtin
echo is /usr/bin/echo

1.6.2.1 Internal command correlation
help internal command list
EnableManage Internal Commands
- enable cmd to enable internal commands
- enable-n cmd disable internal commands
- enable-n View all disabled internal commands
1.6.2.2 Executing external commands
View the external command path:
which -a
which --skip-alias
whereis
Hash Cache Table
The initial hash table of the system is empty. When an external command is executed, the command is searched from the PATH path by default, and the path of the command is recorded in the hash table. When the command is used again, the shell interpreter first looks at the hash table, and if it does not exist, it looks under the PATH path. Using hash cache tables can greatly increase the call rate of commands
Common usage of hash commands
- Hash Display hash cache
- Hash-l Displays hash cache, which can be used as input
- Hash-p path name aliases the command full path to name
- Hash-t name Print Cache Name Path
- Hash-d name clear name cache
- Hash-r Clear Cache
1.6.3 Command Alias
For long, frequently executed commands, you can define them as short aliases to facilitate execution of command aliases that display all available command aliases for the current shell process
alias
Define the alias NAME, which is equivalent to executing the command VALUE
alias NAME='VALUE'
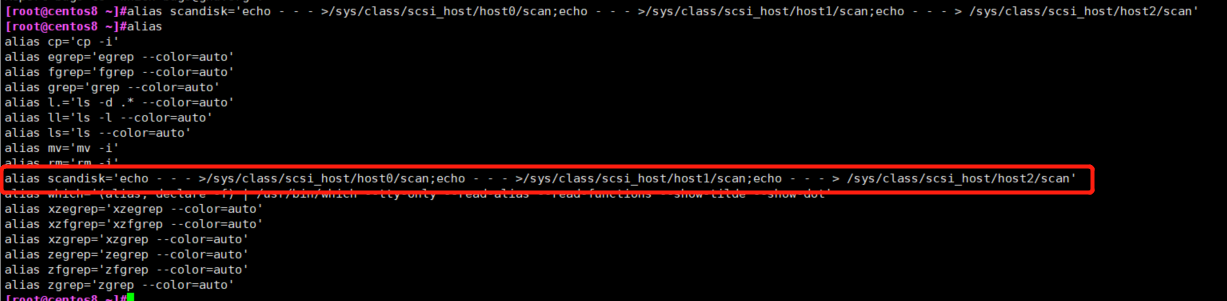
Example: Scan for new disks
[root@centos8 ~]#alias scandisk='echo - - - >/sys/class/scsi_host/host0/scan;echo - - - >/sys/class/scsi_host/host1/scan;echo - - - > /sys/class/scsi_host/host2/scan'
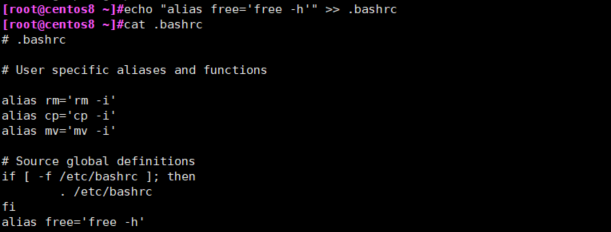
 Example: persist aliases
[root@centos8 ~]#echo "alias free='free -h'" >> .bashrc
[root@centos8 ~]#cat .bashrc
# .bashrc

# User specific aliases and functions

alias rm='rm -i'
alias cp='cp -i'
alias mv='mv -i'

# Source global definitions
if [ -f /etc/bashrc ]; then
	. /etc/bashrc
fi
alias free='free -h'
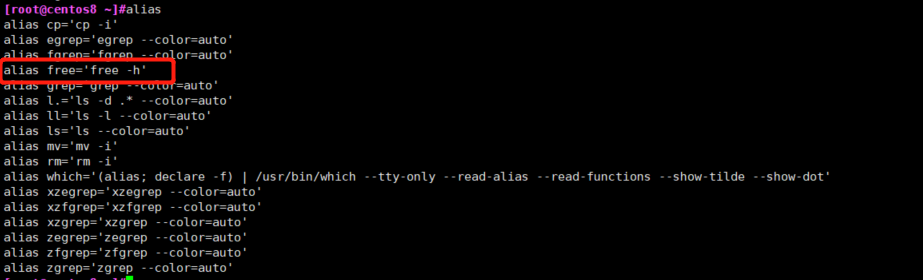
Log out and log on after setup to take effect
 Undo Alias: unalias
unalias [-a] name [name ...]
Unalias-a #Cancel all aliases
Note: Aliases defined on the command line are valid only for the current shell process; If you want to be permanently valid, you need to define it in the configuration file
- For current users only: ~/.bashrc
- Valid for all users: /etc/bashrc
The new configuration given by editing the configuration will not take effect immediately, and the bash process reads the configuration file again
source /path/to/config_file
. /path/to/config_file
If the alias has the same name as the original command, you can use the
\ALIASNAME
"ALIASNAME"
'ALIASNAME'
command ALIASNAME
/path/commmand #Applicable only to external commands
1.6.4 Command Format
COMMAND [OPTIONS...] [ARGUMENTS...]
COMMAND [COMMAND] [COMMAND] ...
Options: To enable or turn off one or some of the functions of a command
- Short options: UNIX style options, -c for example: -l, -h
- Long option: GNU style option, - word for example: - all, --human
- BSD Style Options: One letter, for example: a, use relatively few
Parameters: The object of the command, such as file name, user name, etc.
Example:
[root@centos8 ~]#id -u user
1000

[root@centos8 ~]#ls -a
.   anaconda-ks.cfg  .bash_logout   .bashrc  .config  .dbus    Documents  .esd_auth      initial-setup-ks.cfg  Music     .pki    .tcshrc    Videos
..  .bash_history    .bash_profile  .cache   .cshrc   Desktop  Downloads  .ICEauthority  .local                Pictures  Public  Templates  .Xauthority
[root@centos8 ~]#ls -all
total 48
dr-xr-x---. 15 root root 4096 Oct 31 21:25 .
dr-xr-xr-x. 18 root root  236 Oct 25 22:45 ..
-rw-------.  1 root root 1442 Oct 25 22:55 anaconda-ks.cfg
-rw-------.  1 root root 1398 Nov  1 23:05 .bash_history
-rw-r--r--.  1 root root   18 May 11  2019 .bash_logout
-rw-r--r--.  1 root root  176 May 11  2019 .bash_profile
-rw-r--r--.  1 root root  197 Nov  1 23:03 .bashrc
drwx------. 10 root root  236 Oct 31 21:19 .cache
drwx------. 11 root root  215 Oct 31 21:19 .config
-rw-r--r--.  1 root root  100 May 11  2019 .cshrc
drwx------.  3 root root   25 Oct 25 23:02 .dbus
drwxr-xr-x.  2 root root    6 Oct 31 21:18 Desktop
drwxr-xr-x.  2 root root    6 Oct 31 21:18 Documents
drwxr-xr-x.  2 root root    6 Oct 31 21:18 Downloads
-rw-------.  1 root root   16 Oct 31 21:18 .esd_auth
-rw-------.  1 root root  310 Oct 31 21:18 .ICEauthority
-rw-r--r--.  1 root root 1806 Oct 25 23:33 initial-setup-ks.cfg
drwx------.  3 root root   19 Oct 31 21:18 .local
drwxr-xr-x.  2 root root    6 Oct 31 21:18 Music
drwxr-xr-x.  2 root root    6 Oct 31 21:18 Pictures
drwxr-----.  3 root root   19 Oct 31 21:18 .pki
drwxr-xr-x.  2 root root    6 Oct 31 21:18 Public
-rw-r--r--.  1 root root  129 May 11  2019 .tcshrc
drwxr-xr-x.  2 root root    6 Oct 31 21:18 Templates
drwxr-xr-x.  2 root root    6 Oct 31 21:18 Videos
-rw-------.  1 root root   56 Oct 31 21:25 .Xauthority

[root@centos8 ~]#free -h
              total        used        free      shared  buff/cache   available
Mem:          1.7Gi       434Mi       430Mi       9.0Mi       925Mi       1.2Gi
Swap:         2.0Gi       1.0Mi       2.0Gi
[root@centos8 ~]#free -human
free: invalid option -- 'u'

Usage:
 free [options]

Options:
 -b, --bytes         show output in bytes
     --kilo          show output in kilobytes
     --mega          show output in megabytes
     --giga          show output in gigabytes
     --tera          show output in terabytes
     --peta          show output in petabytes
 -k, --kibi          show output in kibibytes
 -m, --mebi          show output in mebibytes
 -g, --gibi          show output in gibibytes
     --tebi          show output in tebibytes
     --pebi          show output in pebibytes
 -h, --human         show human-readable output
     --si            use powers of 1000 not 1024
 -l, --lohi          show detailed low and high memory statistics
 -t, --total         show total for RAM + swap
 -s N, --seconds N   repeat printing every N seconds
 -c N, --count N     repeat printing N times, then exit
 -w, --wide          wide output

     --help     display this help and exit
 -V, --version  output version information and exit

For more details see free(1).


[root@centos8 ~]#ps a
    PID TTY      STAT   TIME COMMAND
   3352 tty1     Ss+    0:00 /sbin/agetty -o -p -- \u --noclear tty1 linux
  47468 pts/0    Ss     0:00 -bash
  47604 pts/0    R+     0:00 ps a
Be careful:
- Separate multiple options and multiple parameters and commands with white space characters
- Cancel and end command execution: Ctrl+c, Ctrl+d
- Multiple commands can be separated by the';'symbol
- A command can be divided into multiple lines with \
1.7 Common Commands
1.7.1 View hardware information
1.7.1.1 View CPU
lscpu command to view cpu Information
Cat/proc/cpuinfo can also be seen
Example:
[root@CentOS-8 ~]#lscpu
Architecture:        x86_64
CPU op-mode(s):      32-bit, 64-bit
Byte Order:          Little Endian
CPU(s):              4
On-line CPU(s) list: 0-3
Thread(s) per core:  1
Core(s) per socket:  2
Socket(s):           2
NUMA node(s):        1
Vendor ID:           GenuineIntel
CPU family:          6
Model:               142
Model name:          Intel(R) Core(TM) i5-8250U CPU @ 1.60GHz
Stepping:            10
CPU MHz:             1800.001
BogoMIPS:            3600.00
Hypervisor vendor:   VMware
Virtualization type: full
L1d cache:           32K
L1i cache:           32K
L2 cache:            256K
L3 cache:            6144K
NUMA node0 CPU(s):   0-3
Flags:               fpu vme de pse tsc msr pae mce cx8 apic sep mtrr pge mca cmov pat pse36 clflush mmx fxsr sse sse2 ss ht syscall nx pdpe1gb rdtscp lm constant_tsc arch_perfmon nopl xtopology tsc_reliable nonstop_tsc cpuid pni pclmulqdq ssse3 fma cx16 pcid sse4_1 sse4_2 x2apic movbe popcnt tsc_deadline_timer xsave avx f16c rdrand hypervisor lahf_lm abm 3dnowprefetch cpuid_fault invpcid_single pti ssbd ibrs ibpb stibp fsgsbase tsc_adjust bmi1 avx2 smep bmi2 invpcid mpx rdseed adx smap clflushopt xsaveopt xsavec xsaves arat md_clear flush_l1d arch_capabilities

[root@CentOS-8 ~]#cat /proc/cpuinfo
1.7.1.2 View memory size
[root@CentOS-8 ~]#free
              total        used        free      shared  buff/cache   available
Mem:        1996236      781604      720956       10824      493676     1038368
Swap:       2097148           0     2097148
[root@CentOS-8 ~]#cat /proc/meminfo
MemTotal:        1996236 kB
MemFree:          721196 kB
MemAvailable:    1038608 kB
Buffers:            3276 kB
Cached:           422136 kB
SwapCached:            0 kB
Active:           424028 kB
Inactive:         348408 kB
Active(anon):     349048 kB
Inactive(anon):     8800 kB
Active(file):      74980 kB
Inactive(file):   339608 kB
Unevictable:           0 kB
Mlocked:               0 kB
SwapTotal:       2097148 kB
SwapFree:        2097148 kB
Dirty:                 4 kB
Writeback:             0 kB
AnonPages:        328796 kB
Mapped:           191304 kB
Shmem:             10824 kB
KReclaimable:      68264 kB
Slab:             213252 kB
SReclaimable:      68264 kB
SUnreclaim:       144988 kB
KernelStack:        8848 kB
PageTables:        23732 kB
NFS_Unstable:          0 kB
Bounce:                0 kB
WritebackTmp:          0 kB
CommitLimit:     3095264 kB
Committed_AS:    1748092 kB
VmallocTotal:   34359738367 kB
VmallocUsed:           0 kB
VmallocChunk:          0 kB
Percpu:            96256 kB
HardwareCorrupted:     0 kB
AnonHugePages:    129024 kB
ShmemHugePages:        0 kB
ShmemPmdMapped:        0 kB
HugePages_Total:       0
HugePages_Free:        0
HugePages_Rsvd:        0
HugePages_Surp:        0
Hugepagesize:       2048 kB
Hugetlb:               0 kB
DirectMap4k:      212864 kB
DirectMap2M:     1884160 kB
DirectMap1G:           0 kB
1.7.1.3 View hard drives and partitions
[root@CentOS-8 ~]#lsblk
NAME   MAJ:MIN RM  SIZE RO TYPE MOUNTPOINT
sda      8:0    0   20G  0 disk
├─sda1   8:1    0    1G  0 part /boot
├─sda2   8:2    0   10G  0 part /
├─sda3   8:3    0    2G  0 part [SWAP]
├─sda4   8:4    0    1K  0 part
└─sda5   8:5    0    7G  0 part /home
sr0     11:0    1  8.6G  0 rom
[root@CentOS-8 ~]#cat /proc/partitions
major minor  #blocks  name

   8        0   20971520 sda
   8        1    1048576 sda1
   8        2   10485760 sda2
   8        3    2097152 sda3
   8        4          1 sda4
   8        5    7337984 sda5
  11        0    9047040 sr0
1.7.2 View system version information
1.7.2.1 View system architecture
root@ubuntu2004:~# arch
x86_64

[root@centos8 ~]# arch
x86_64

[root@rhel5 ~]# arch
i686
1.7.2.2 View Kernel Version
[root@centos8 ~]#uname -r
4.18.0-147.el8.x86_64

[root@centos7 ~]#uname -r
3.10.0-1062.el7.x86_64

[root@centos6 ~]# uname -r
2.6.32-754.el6.x86_64

[root@ubuntu1804 ~]#uname -r
4.15.0-29-generic
1.7.2.3 View operating system release
#CentOS8 View Release Version
[root@CentOS-8 ~]#cat /etc/redhat-release
CentOS Linux release 8.3.2011

[15:29:52 root@CentOS-8 ~]#cat /etc/os-release
NAME="CentOS Linux"
VERSION="8"
ID="centos"
ID_LIKE="rhel fedora"
VERSION_ID="8"
PLATFORM_ID="platform:el8"
PRETTY_NAME="CentOS Linux 8"
ANSI_COLOR="0;31"
CPE_NAME="cpe:/o:centos:centos:8"
HOME_URL="https://centos.org/"
BUG_REPORT_URL="https://bugs.centos.org/"
CENTOS_MANTISBT_PROJECT="CentOS-8"
CENTOS_MANTISBT_PROJECT_VERSION="8"

[15:32:30 root@CentOS-8 ~]#lsb_release -a
LSB Version:    :core-4.1-amd64:core-4.1-noarch
Distributor ID: CentOS
Description:    CentOS Linux release 8.3.2011
Release:        8.3.2011
Codename:       n/a

#Ubuntu View Release Version
du@ubuntu1804:~$ cat /etc/os-release
NAME="Ubuntu"
VERSION="18.04.5 LTS (Bionic Beaver)"
ID=ubuntu
ID_LIKE=debian
PRETTY_NAME="Ubuntu 18.04.5 LTS"
VERSION_ID="18.04"
HOME_URL="https://www.ubuntu.com/"
SUPPORT_URL="https://help.ubuntu.com/"
BUG_REPORT_URL="https://bugs.launchpad.net/ubuntu/"
PRIVACY_POLICY_URL="https://www.ubuntu.com/legal/terms-and-policies/privacy-policy"
VERSION_CODENAME=bionic
UBUNTU_CODENAME=bionic

du@ubuntu1804:~$ cat /etc/issue
Ubuntu 18.04.5 LTS \n \l

du@ubuntu1804:~$ lsb_release -a
No LSB modules are available.
Distributor ID: Ubuntu
Description:    Ubuntu 18.04.5 LTS
Release:        18.04
Codename:       bionic
Example: View OS version
[root@centos8 ~]#lsb_release -is
CentOS
[root@centos8 ~]#lsb_release -cs
Core
[root@centos8 ~]#lsb_release -rs
8.2.2004

[root@centos7 ~]#lsb_release -is
CentOS
[root@centos7 ~]#lsb_release -cs
Core
[root@centos7 ~]#lsb_release -rs
7.9.2009

[root@centos6 ~]#lsb_release -is
CentOS
[root@centos6 ~]#lsb_release -cs
Final
[root@centos6 ~]#lsb_release -rs
6.10

root@ubuntu2004:~# lsb_release -is
Ubuntu
root@ubuntu2004:~# lsb_release -cs
focal
root@ubuntu2004:~# lsb_release -rs
20.04

[root@ubuntu1804 ~]#lsb_release -is
Ubuntu
[root@ubuntu1804 ~]#lsb_release -cs
bionic
[root@ubuntu1804 ~]#lsb_release -rs
18.04
1.7.3 Time and date
Two Clocks for Linux
- System Clock: By how often the Linux kernel works on the CPU
- Hardware clock: motherboard
Related Commands
- date Display and Set System Time
Example:
[root@CentOS-8 ~]#date +%s
1619336385
[root@CentOS-8 ~]#date -d @`date +%s`
Sun Apr 25 15:40:34 CST 2021

[root@CentOS-8 ~]#date -d @1619336385
Sun Apr 25 15:39:45 CST 2021

[root@CentOS-8 ~]#date -d @1619336385 +%F_%T
2021-04-25_15:39:45
- Clock, hwclock: Display hardware clock
-s, --hctosys corrects system clock based on hardware clock
-w, --systohc corrects hardware clock based on system clock
Example:
[root@centos8 ~]#ll /usr/sbin/clock
lrwxrwxrwx. 1 root root 7 Apr 25  2021 /usr/sbin/clock -> hwclock
Time zone:
/etc/localtime
Example:
[root@centos8 ~]#timedatectl set-timezone Asia/Shanghai

[root@centos8 ~]#timedatectl status
               Local time: Mon 2020-07-27 17:20:56 CST
           Universal time: Mon 2020-07-27 09:20:56 UTC
                 RTC time: Mon 2020-07-27 09:20:56
               Time zone: Asia/Shanghai (CST, +0800)
System clock synchronized: yes
             NTP service: active
         RTC in local TZ: no

[root@centos8 ~]#ll /etc/localtime
lrwxrwxrwx. 1 root root 35 Dec 11 11:19 /etc/localtime ->
../usr/share/zoneinfo/Asia/Shanghai

root@ubuntu1804:~# cat /etc/timezone
Asia/Shanghai
Show calendar:
cal –y
Example:
[15:41:25 root@CentOS-8 ~]#cal 9 1752
   September 1752
Su Mo Tu We Th Fr Sa
       1  2 14 15 16
17 18 19 20 21 22 23
24 25 26 27 28 29 30
1.7.4 Shutdown and Restart
Shutdown:
- halt
- poweroff
restart
reboot
-f: Force, do not call shutdown
-p: cut off the power supply
Shut down or restart: shutdown
shutdown [OPTION]... [TIME] [MESSAGE]
-r: reboot
-h: halt
-c: cancel
TIME: No specification, default equivalent to + 1 (CentOS7)
- now: immediately, equivalent to + 0
- +#: Relative time representation, after a few minutes; For example, +3
- hh:mm: Absolute time, specifying the specific time
1.7.5 User Logon Information View Command
- whoami: Show current logged-in valid users
- who: All current logon sessions on the system
- w: All current logon sessions and actions of the system
1.7.6 Text Editing
- The nano tool can edit text easily and is suitable for beginners
- The gedit tool is a graphical tool
Example: Create a login prompt file/etc/motd
Reference site links: link.
[root@CentOS-8 ~]#cat /etc/motd
1.7.7 Session Management
A typical way to use a command line is to open a terminal window (hereinafter referred to as a window) and type commands into it. This temporary interaction between the user and the computer is called a "session"
An important feature of a session is that the window is linked to the process it initiates. Open the window and start the session; Close the window, the session ends, and the process within the session ends, whether running or not.
A typical example is that SSH logs on to a remote computer and opens a remote window to execute commands. At this time, the network is suddenly disconnected. When you log on again, you cannot find the last command executed. Because the last SSH session was terminated, the processes inside disappeared. To solve this problem, sessions and windows can be "unbound": when the window closes, the session does not terminate, but continues to run until later needed, before the session "binds" other windows
Terminal multiplexer software is the "unbind" tool for sessions and windows, separating them completely.
(1) It allows multiple sessions to be accessed simultaneously in a single window. This is useful for running multiple command line programs at the same time.
(2) It allows new windows to "access" existing sessions.
(3) It allows multiple connection windows per session, so that multiple people can share sessions in real time.
(4) It also supports arbitrary vertical and horizontal splitting of windows.
Similar terminal multiplexers include Screen, Tmux
1.7.7.1 screen
Session management, such as creating a new session, sharing a session, and so on, can be achieved using screen.
Note: CentOS7 is from the base source and CentOS8 is from the epel source
Example: Install screen
#CentOS7 installation screen
[root@centos7 ~]#yum -y install screen

#CentOS8 Install screen
[root@centos8 ~]#dnf -y install epel-release
[root@centos8 ~]#dnf -y install screen
Common use of screen command:
- Create a new screen session
screen –S [SESSION] - Join screen session
screen –x [SESSION] - Exit and close screen session
exit - Peel off the current screen session
Ctrl+a,d - Show all open screen sessions
screen -ls - Restore a screen session
screen -r [SESSION]
1.7.7.2 tmux
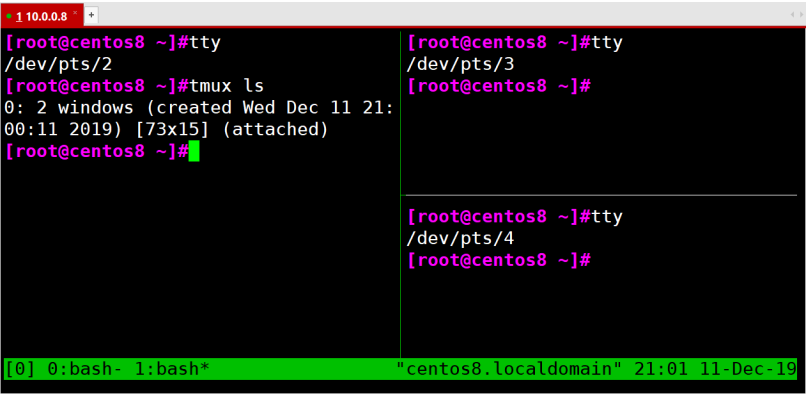
Tmux is a terminal multiplexer, similar to screen, but easier to use and more powerful
Tmux is the "unbind" tool for sessions and windows, separating them completely, with the following functions
- It allows multiple sessions to be accessed simultaneously in a single window. This is useful for running multiple command line programs at the same time.
- It allows new windows to "access" existing sessions.
- It allows multiple connection windows per session, so multiple people can share sessions in real time.
- It also supports arbitrary vertical and horizontal splitting of windows
install
yum install tmux
Startup and Exit
[root@centos8 ~]#tmux
[root@centos8 ~]#exit
logout
The mux window has a large number of shortcuts. All shortcuts are called up by the prefix key. The default prefix key is Ctrl+b, that is, press Ctrl+b before the shortcut takes effect. The shortcut to the help command is Ctrl+b? Then, press the q key to exit help
New Session
The first window that starts Tmux is numbered 0, the second window is numbered 1, and so on. These windows correspond to sessions 0 and 1. Using numbers to distinguish sessions is less intuitive and a better way is to name the session. The following command creates a new session with the specified name.
tmux new -s <session-name>
tmux ls or Ctrl+b,s can view all current Tmux sessions
tmux ls
tmux list-session
Separate Sessions
In the Tmux window, pressing Ctrl+b d or typing the tmux detach command separates the current session from the window.
tmux detach
Access Session
The tmux attach command is used to re-connect to an existing session.
tmux attach -t <session-name>
Example:
tmux attach -t 0
Kill Session
The tmux kill-session command is used to kill a session.
tmux kill-session -t <session-name>
Switch Sessions
The tmux switch command is used to switch sessions
tmux switch -t <session-name>
Windows can be divided into pane s, each running different commands
Upper and lower panes
tmux split-window
ctrl+b,"
Left and right panes
tmux split-window -h
ctrl+b,%
Pane Shortcut
Ctrl+b %: Divide left and right panes
Ctrl+b ": Divide the upper and lower panes
Ctrl+b <arrow key>: The cursor switches to another pane.<arrow key>Is the direction key to the pane to which you want to switch, for example, to the lower pane, press the direction key↓
Ctrl+b ;: Switch cursor to previous pane
Ctrl+b o: The cursor switches to the next pane.
Ctrl+b {: Move Current Pane Left
Ctrl+b }: Move Current Pane Right
Ctrl+b Ctrl+o: Move Current Pane Up
Ctrl+b Alt+o: Move Current Pane Down
Ctrl+b x: Close the current pane
Ctrl+b !: Split the current pane into separate windows
Ctrl+b z: The current pane is displayed in full screen and will return to its original size if used again
Ctrl+b Ctrl+<arrow key>: Size the pane in the direction of the arrow
Ctrl+b q: Display pane number
Window Management
In addition to dividing a window into panes, Tmux also allows new windows to be created
New Window
The tmux new-window command is used to create a new window
tmux new-window
Create a new window with the specified name
tmux new-window -n <window-name>
switch windows
tmux select-window command to switch windows
Switch to a specified number of windows
tmux select-window -t <window-number>
Switch to window with specified name
tmux select-window -t <window-name>
Window Shortcut
Ctrl+b c: Create a new window, and the status bar displays information about multiple windows.
Ctrl+b p: Switch to the previous window (in the order on the status bar).
Ctrl+b n: Switch to the next window.
Ctrl+b <number>: Switch to the specified number of windows, where the<number>Is the window number on the status bar
Ctrl+b w: Select a window from a list
Ctrl+b ,: Window Rename
List all shortcuts and their corresponding Tmux commands
tmux list-keys
List all Tmux commands and their parameters
tmux list-commands
1.7.8 Output Information echo
1.7.8.1 echo Basic Usage
The echo command can output subsequent characters
Function: Display characters, echo will send the input string to standard output. Output strings are separated by white space characters with a line break at the end
Grammar:
echo [-neE][Character string]
Options:
- -E (default) does not support \interpretive function
- -n does not wrap lines automatically
- -e Enables the interpretation of the \character
Display variables:
echo "$VAR_NAME" #Replace with variable value, weak reference
echo '$VAR_NAME' #Variable will not be replaced, strong reference
Enable the command option -e, which will be specially handled if the following characters appear in the string rather than as normal text output
- \a Warning sound
- \b Backspace
- \c with no line break at the end
- Neo e escape, equivalent to Neo 3
- \n Wraps and the cursor moves to the beginning of the line
- \r Enter, where the cursor moves to the beginning of the line but does not wrap
- \t Insert ta b
- \Insert\Character
- \0nnn Inserts the ASCII character represented by NNN (octal)
- \xHH Inserts the ASCII number represented by HH (hexadecimal) (man 7 ascii)
Example:
[root@centos8 ~]#echo -e 'a\x0Ab'
a
b
[root@centos8 ~]#echo -e '\033[43;31;1;5mmagedu\e[0m'
magedu

[root@centos8 ~]#echo -e '\x57\x41\x4E\x47'
WANG

[root@centos8 ~]#echo \$PATH
$PATH

[root@centos8 ~]#echo \
[root@centos8 ~]#echo \\
\
[root@centos8 ~]#echo \\\
>
[root@centos8 ~]#echo \\\\
\\

[root@centos8 ~]#echo "$PATH"
/usr/local/sbin:/usr/local/bin:/usr/sbin:/usr/bin:/root/bin
[root@centos8 ~]#echo '$PATH'
$PATH
1.7.8.2 echo Advanced Usage
In the terminal, ANSI defines an Escape screen control code for screen display
Characters with colors in the following format:
"\033[Character Background Color;Font color m Character string\033[0m"
Neodymium 3[30m-Neodymium 3[37m Set Foreground Color
3[40m-3[47m Set Background Color
#Character background color range: 40--47
40:black
41:red
42:green
43:yellow
44:blue
45:purple
46:Dark green
47:white
#Font color: 30--37
30: black
31: red
32: green
33: yellow
34: blue
35: purple
36: Dark green
37: white
Adding color is only one of the following control codes. Here are some common ANSI control codes:
\033[0m Close all properties
\033[1m Set high brightness
\033[4m Underline
\033[5m Twinkle
\033[7m Inverse
\033[8m Blanking
\033[nA Move cursor up n That's ok
\033[nB Move cursor down n That's ok
\033[nC Move cursor right n column
\033[nD Move Cursor Left n column
\033[x;yH Set cursor position x That's ok y column
\033[2J Clear screen
\033[K Clear from cursor to end of line
\033[s Save Cursor Position
\033[u restore cursor position
\033[?25l hide cursor
\033[?25h Show cursor
\033[2J\033[0;0H Clear screen and set cursor on top
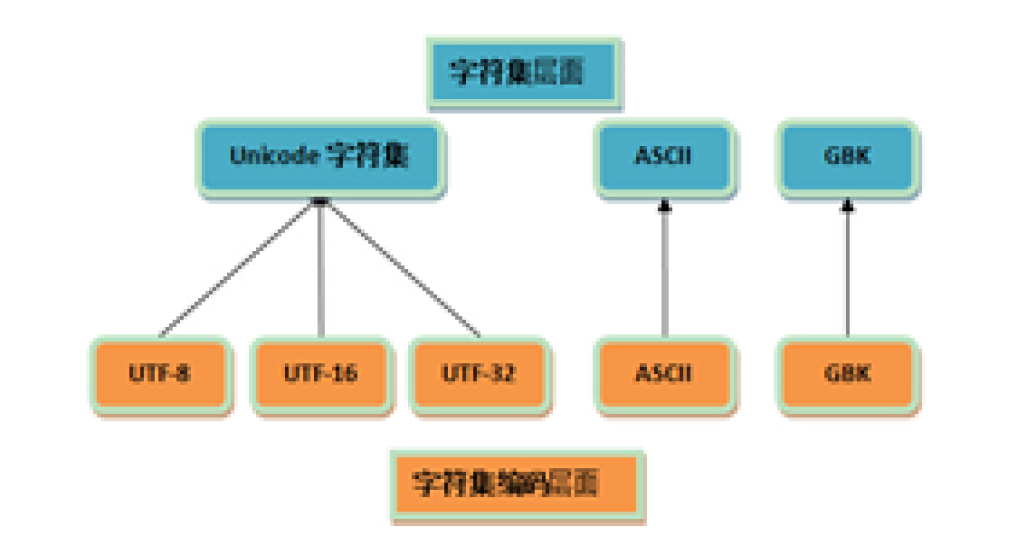
1.8 Character Set and Encoding
In many cases, the two concepts of character set and encoding are often confused, but they are different. Character set and character set encoding are two concepts at different levels
charset is the abbreviation of character set, i.e. character set, the corresponding relationship between binary and character, regardless of the final form of storage
Encoding is the abbreviation of charset encoding, or character set encoding, or encoding, which implements how characters are converted to actual binary for storage or vice versa. Encoding determines the size of space used.
1.8.1 ASCII code
Inside the computer, all information is ultimately a binary value. In the 1960s, the United States formulated a set of character codes that unify the relationship between English characters and binary bits, ASCII (American Standard Code for Information)
Interchange code
The ASCII code specifies a total of 128 characters, taking up the last 7 bits of a byte, and the first uniform 0
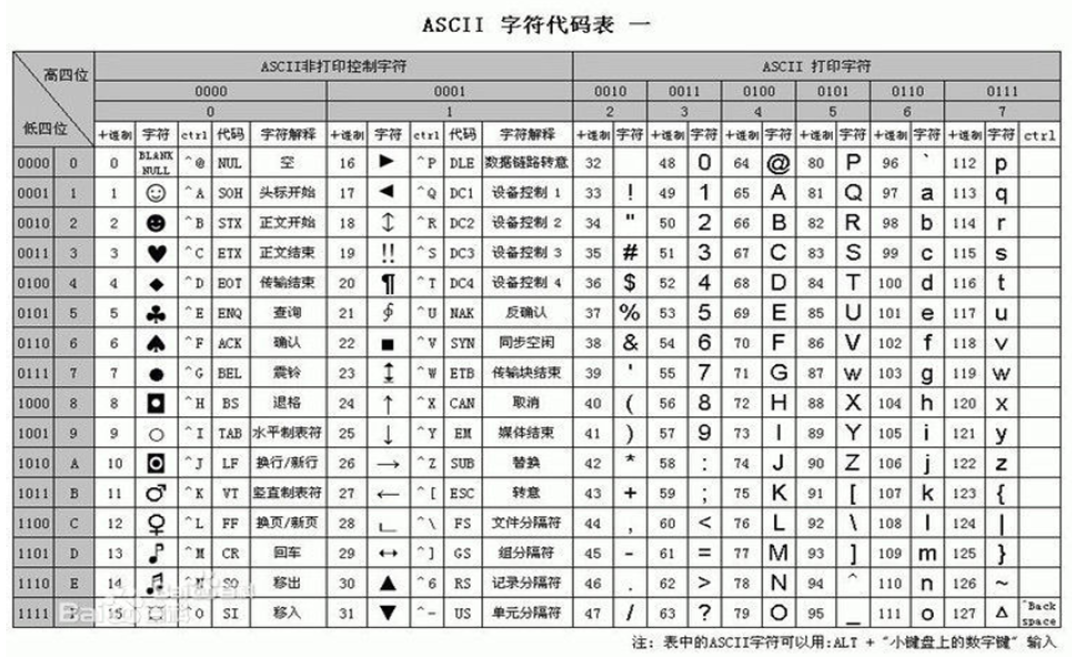
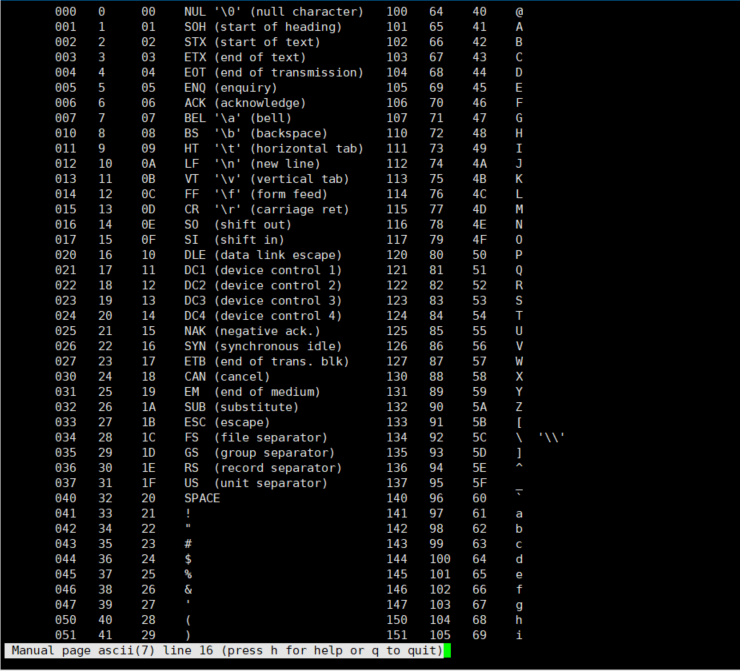
Example: View the ASCII table
[root@centos8 ~]#dnf -y install man-pages
[root@centos8 ~]#man ascii
1.8.2 Unicode
Since computers were invented by Americans, only 127 letters were first encoded into computers, namely ASCII encoding. However, it is clear that one byte in Chinese is not enough, at least two bytes are required, and they cannot conflict with ASCII encoding. Therefore, China has formulated GB2312 encoding for encoding Chinese.
There are hundreds of languages all over the world, and Japan has compiled Japanese into Shift_ In JIS, when Korean is coded into Euc-kr, conflicts will inevitably arise between countries with their own standards. As a result, confusing codes will appear in mixed-language texts.
To represent all characters in all languages in the world. Each symbol is given a unique coded number, and Unicode is a large collection that can now hold more than one million symbols. Unicode is just a character set that specifies the binary code for each character, but there is no rule on how the binary code is stored.
Unicode encoding scheme
- UTF-8: variable length, 1 to 4 bytes
- UTF-16: variable length, 2 or 4 bytes
- UTF-32: Fixed length, 4 bytes
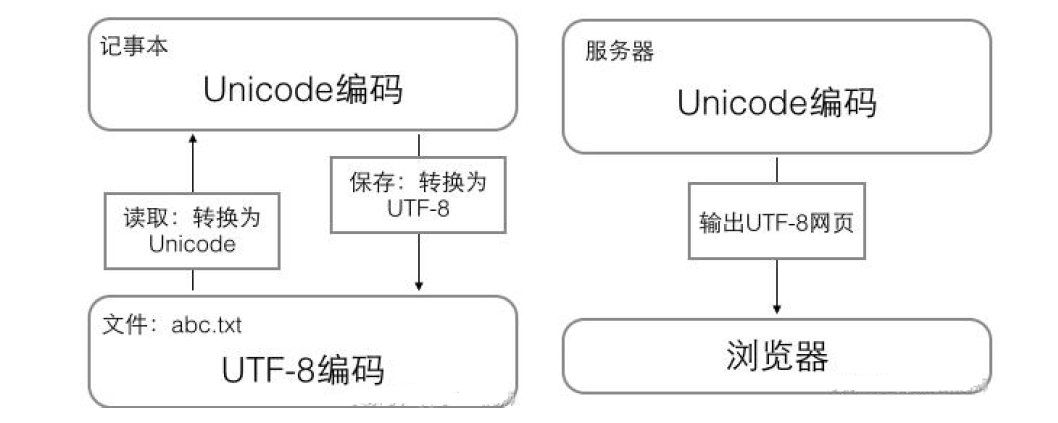
UTF-8 is currently the most widely used Unicode encoding method in the Internet, with variable-length storage. Use 1 - 4 bytes to represent a character, depending on the length of the character. The coding rules are as follows:
For a single byte character, the first bit is set to zero, and the next seven bits correspond to the Unicode code code for that character. Therefore, for characters 0-127 in English, they are identical to ASCII codes. This means that documents with ASCII codes can be opened with UTF-8 encoding
For characters that need to be represented by N bytes (N > 1), the first N bit of the first byte is set to 1, the N + 1 bit is set to 0, the first two of the remaining N - 1 bytes are set to 10, and the remaining binary bits are populated with the Unicode code code code of the character
Code conversion and query:
https://home.unicode.org/
https://unicode.yunser.com/unicode
http://www.chi2ko.com/tool/CJK.htm
https://www.bejson.com/convert/unicode_chinese/
https://javawind.net/tools/native2ascii.jsp?action=transform
http://tool.oschina.net/encode
http://web.chacuo.net/charsetescape
Unicode and UTF-8
| Unicode symbol range (hexadecimal) | UTF-8 Encoding Binary) |
|---|---|
| 0000 0000-0000 007F | 0xxxxxxx |
| 0000 0080-0000 07FF | 110xxxxx 10xxxxxx |
| 0000 0800-0000 FFFF | 1110xxxx 10xxxxxx 10xxxxxx |
| 0001 0000-0010 FFFF | 11110xxx 10xxxxxx 10xxxxxx 10xxxxxx |
Example: Unicode to UTF-8
"Han's Unicode Code 0 x6C49(110 110001 001001),Requires three bytes of storage in the format 1110 xxxx 10xxxxxx 10xxxxxx,Fill the corresponding format in turn from back to front x,polymeric x With 0, we get UTF-8 Code 1100110 10110001 10001001

"Horse's Unicode Code 0 x9A6C(1001 101001 101100),Requires three bytes of storage in the format 1110 xxxx 10xxxxxx 10xxxxxx,Fill the corresponding format in turn from back to front x,polymeric x With 0, we get UTF-8 Code 1101001 10101001 10101100
Example: Modify LANG variable to implement Chinese language prompt
[root@centos7 ~]#xxx
bash: xxx: command not found...
[root@centos7 ~]#echo $LANG
en_US.UTF-8
[root@centos7 ~]#LANG=zh_CN.UTF-8
[root@centos7 ~]#echo $LANG
zh_CN.UTF-8
[root@centos7 ~]#xxx
bash: xxx: Command not found...
1.9 Command line extensions and enclosed collections
1.9.1 Command Line Extensions: ``` and $()
Print the output of one command to the parameters of another command
$(COMMAND) or `COMMAND`
Example: Compare the differences among'',', ``
[root@centos8 ~]#echo "echo $HOSTNAME"
echo centos8.localdomain
[root@centos8 ~]#echo 'echo $HOSTNAME'
echo $HOSTNAME
[root@centos8 ~]#echo `echo $HOSTNAME`
centos8.localdomain

#Conclusion:
Single quotation mark: strong quotation,Six parents do not recognize, variables and commands do not recognize, as ordinary strings,"Silliest"
Double Quotes: Weak References,Can't recognize commands, can recognize variables,"Semi-foolish"
Reverse single quotation mark: the contents must be commands that can be executed and have output information,Variables and commands are recognized, and the contents of the inverted single quotes are executed as commands, which are handed over to commands that invoke the inverted single quotes to continue,"The smartest"
Example:
[root@centos8 data]#echo "This system's name is $(hostname)"
This system's name is centos8.magedu.org
[root@centos8 data]#echo "I am `whoami`"
I am root
[root@centos8 data]#touch $(date +%F).log
[root@centos8 data]#ls
2019-12-13.log
[root@centos8 data]#ll
total 0
-rw-r--r--. 1 root root 0 Dec 13 09:16 2019-12-13.log
[root@centos8 data]#touch `date +%F`.txt
[root@centos8 data]#ll
total 0
-rw-r--r--. 1 root root 0 Dec 13 09:16 2019-12-13.log
-rw-r--r--. 1 root root 0 Dec 13 09:17 2019-12-13.txt
[root@centos8 data]#touch `hostname`-`date +%F`.log
[root@centos8 data]#ll
total 0
-rw-r--r--. 1 root root 0 Dec 13 09:16 2019-12-13.log
-rw-r--r--. 1 root root 0 Dec 13 09:17 2019-12-13.txt
-rw-r--r--. 1 root root 0 Dec 13 09:18 centos8.magedu.org-2019-12-13.log
[root@centos8 ~]#touch `date +%F_%H-%M-%S`.log
[root@centos8 ~]#touch `date -d '-1 day' +%F`.log
Examples: $() and ``
[root@centos8 ~]#ll `echo `date +%F`.txt`
-bash: .txt: command not found
ls: cannot access 'date': No such file or directory
ls: cannot access '+%F': No such file or directory

[root@centos8 ~]#ll $(echo $(date +%F).txt)
-rw-r--r-- 1 root root 0 Mar 20 09:55 2020-03-20.txt

[root@centos8 ~]#ll `echo $(date +%F).txt`
-rw-r--r-- 1 root root 0 Mar 20 09:55 2020-03-20.txt

[root@centos8 ~]#ll $(echo `date +%F`.txt)
-rw-r--r-- 1 root root 0 Mar 20 09:55 2020-03-20.txt
1.9.2 Bracket extension: {}
{} Simplifies the printing of duplicate strings
Example:
{Element 1,Element 2,Element 3}
{Element 1..Element 2}
echo file{1,3,5} The results are: file1 file3 file5
rm -f file{1,3,5}
echo {1..10}
echo {a..z}
echo {1..10..2}
echo {000..20..2}
Example:
[root@centos8 ~]#echo {000..20..2}
000 002 004 006 008 010 012 014 016 018 020

[root@centos8 ~]#echo {a..z..2}
a c e g i k m o q s u w y

[root@centos8 ~]#echo {A..z}
A B C D E F G H I J K L M N O P Q R S T U V W X Y Z [ ] ^ _ ` a b c d e f g h i
j k l m n o p q r s t u v w x y z
Example: Turn off and enable {} extensions
[root@centos8 ~]#echo $-
himBHs
[root@centos8 ~]#echo {1..10}
1 2 3 4 5 6 7 8 9 10
[root@centos8 ~]#set +B
[root@centos8 ~]#echo $-
himHs
[root@centos8 ~]#echo {1..10}
{1..10}
[root@centos8 ~]#set -B
[root@centos8 ~]#echo $-
himBHs
[root@centos8 ~]#echo {1..10}
1 2 3 4 5 6 7 8 9 10
1.10 tab key completion
The tab key completes commands and paths, improves input efficiency and avoids errors
1.10.1 Command Completion
- Internal commands:
- External commands: bash searches each path from left to right for a file named after a given command name based on the path defined by the PATH environment variable. The first command found is the one to execute
- Subcommand completion of command, need to install bash-completion
Note: The string given by the user has only one unique corresponding command, complete it directly, otherwise Tab will give the list again
Example:
[root@centos8 ~]#nmcli connection 2TAB
add delete edit help load monitor show
clone down export import modify reload up
1.10.2 Path Completion
Use the string given by the user as the beginning of the path and search for the file name that starts with the specified string in its specified parent directory If only: Complete it directly, otherwise: Tab gives the list again
1.10.3 Double-click Tab
- command 2Tab All Subcommands or File Completion
- string2Tab starts with string
- /2Tab Displays all directories below the root directory, including hidden directories
- . /2Tab Subdirectories under current directory, including hidden directories
- *2Tab Subdirectories under current directory, excluding hidden directories
- ~2Tab All Users List
- $2Tab All Variables
- @2Tab/etc/hosts record (centos7 not supported)
- =2Tab is equivalent to ls-A (centos7 does not support it)
1.11 Command Line History
When a command is executed, the command executed is recorded in memory by default
When the user exits normally, the command history in memory is stored in the corresponding history file, defaulting to ~/.bash_history
When you log in to the shell, commands recorded in the command history file are read and loaded into memory
New commands executed after logging into the shell will only be recorded in the memory cache; These commands "append" to the command history file when the user exits normally
Use command history. It can be used to repeat commands and improve input efficiency
Command:history
history [-c] [-d offset] [n]
history -anrw [filename]
history -ps arg [arg...]
- -c:Empty Command History
- -d offset: Delete the offset command specified in history
- N:Show the most recent n histories
- -a: append the new command history list executed by this session to the history file
- -r: Read the history file and attach it to the history list
- -w: Save the history list to the specified history file
- -n: Read a line-to-history list that has not been read in the history file
- -p: Expand the history parameter to multiple lines, but there is no history list
- -s: Expand the history parameter into a line, appended to the history list
Command History Related Environment Variables
HISTSIZE: Number of bars in command history
HISTFILE: Specify a history file, defaulting to~/.bash_history
HISTFILESIZE: Number of command history files that record history
HISTTIMEFORMAT="%F %T `whoami`" Show time and user
HISTIGNORE="str1:str2*:..." ignore str1 Command, str2 Beginning History
HISTCONTROL: Control how command history is recorded

ignoredups Is the default value, ignores duplicate commands, is continuous and identical to "duplicate"
ignorespace Ignore all commands that start with blanks
ignoreboth Amount to ignoredups, ignorespace Combination
erasedups Remove duplicate commands
Persist Variables
- The above variables can be stored as / etc/profile or ~/.bash_in the form of export variable name= "value" Profile
Example:
[root@centos8 ~]#cat .bash_profile
# .bash_profile

# Get the aliases and functions
if [ -f ~/.bashrc ]; then
. ~/.bashrc
fi

# User specific environment and startup programs

PATH=$PATH:$HOME/bin

export PATH
export HISTCONTROL=ignoreboth
export HISTTIMEFORMAT="%F %T "

[root@centos8 ~]#history
1 2019-12-13 08:39:05 ls /data
2 2019-12-13 08:39:05 date
3 2019-12-13 08:39:05 vie0
4 2019-12-13 08:39:05 nano .bash_profile
5 2019-12-13 08:39:05 exit
1.12 Call Command Line History
#Repeat the previous command method
 Repeat the previous command using the up arrow key and return
 Press !! And Enter
 input !-1 And Enter
 Press Ctrl+p And Enter

!:0 Execute the previous command (remove parameters)
!n implement history Command Output Corresponding Sequence Number n Command of
!-n implement history Last in History n Commands
!string Repeat the previous one to string"Beginning Command
!?string Repeat the previous inclusion string Command of
!string:p Print command history instead of execution
!$:p Print Output !$ (The last parameter of the previous command)
!*:p Print Output !*(Contents of all parameters of the previous command)
^string Delete the first of the previous commands string
^string1^string2 Put the first of the previous commands string1 Replace with string2
!:gs/string1/string2 Put all in the previous command string1 Replace all with string2
 Use up(Up) and down(Down) key to browse up and down previously entered commands
ctrl-r To search for commands in command history
(reverse-i-search)`':
Ctrl+g: Exit from historical search mode

#To call the last parameter of the previous command again
!$ Express
Esc, . click Esc Release the key and click . key
Alt+ . Press and hold Alt Key while clicking . key

command !^ Using the first parameter of the previous command command Parameters
command !$ Using the last parameter of the previous command command Parameters
command !* Using all the parameters of the previous command command Parameters
command !:n Using the first command n Parameters to do command Parameters
command !n:^ Call No. n First parameter of a command
command !n:$ Call No. n Last parameter of a command
command !n:m Call No. n Article 1 of the Command m Parameters
command !n:* Call No. n All parameters of a bar command
command !string:^ Search from command history to string Start the command and get its first argument
command !string:$ Search from command history to string Beginning Command,And get its last parameter
command !string:n Search from command history to string Start with the command and get its first n Parameters
command !string:* Search from command history to string Start the command and get all its parameters
Shortcut keys for 1.13 bash
Ctrl + l Clear screen, equivalent to clear command
Ctrl + o Execute the current command and display it again
Ctrl + s Block screen output, lock
Ctrl + q Allow screen output, unlock
Ctrl + c Termination command
Ctrl + z Pending Command
Ctrl + a Moves the cursor to the beginning of the command line, equivalent to Home
Ctrl + e Moves the cursor to the end of the command line, equivalent to End
Ctrl + f Move the cursor one character to the right
Ctrl + b Move the cursor one character to the left
Alt + f Move the cursor one word end to the right
Alt + b Move the cursor one word to the left
Ctrl + xx Move the cursor between the beginning of the command line and the cursor
Ctrl + u Delete from cursor to beginning of command line
Ctrl + k Delete from cursor to end of command line
Alt + r Delete the current entire line
Ctrl + w Delete from cursor to left to beginning of word
Alt + d Delete from cursor to right to end of word
Ctrl + d Delete a character at the cursor
Ctrl + h Delete a character before the cursor
Ctrl + y Paste deleted characters after cursor
Alt + c Change from cursor to right to capitalized words
Alt + u From the cursor, change the right word to uppercase
Alt + l From the cursor, change the right word to lowercase
Ctrl + t Swap character positions at and before the cursor
Alt + t Swap cursor and previous word positions
Alt + # Repeat the specified character when prompted to enter it#second
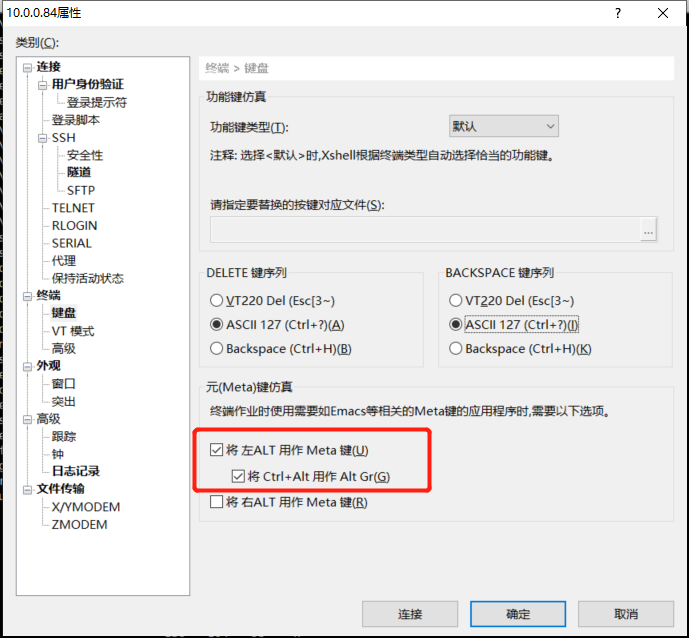
Note: Alt shortcuts often conflict with other software
Example: Start the alt key in the xshell
2. Get help
The ability to get help determines the ability of the technology!
Multi-level help
- whatis
- command --help
- man and info
- /usr/share/do c/
- Red Hat documentation ,Ubuntu documentation
- Software Project Website
- Other websites
- search
2.1 whatis
whatis uses a database to display a brief description of the command
This tool is not available immediately after the system has just been installed and requires a database to be built before it can be used
Execute the following command to generate the database
#After CentOS version 7
mandb
#Prior to CentOS version 6
makewhatis
Example:
[root@centos8 ~]#whatis cal
cal (1) - display a calendar
cal (1p) - print a calendar
[root@centos8 ~]#man -f cal
cal (1) - display a calendar
cal (1p) - print a calendar
Example:
[root@centos8 ~]#whatis ls
ls: nothing appropriate.
#Generate man related database
[root@centos8 ~]#mandb
Processing manual pages under /usr/share/man...
Updating index cache for path `/usr/share/man/mann'. Wait...done.
Checking for stray cats under /usr/share/man...
...ellipsis...
0 old database entries were purged.
[root@centos8 ~]#whatis ls
ls (1) - list directory contents
2.2 View help for commands
2.2.1 Internal Command Help
- help COMMAND
- man bash
Example:
[root@centos8 ~]#type history
history is a shell builtin
[root@centos8 ~]#help history
history: history [-c] [-d offset] [n] or history -anrw [filename] or history -ps
arg [arg...]
    Display or manipulate the history list.

    Display the history list with line numbers, prefixing each modified
    entry with a `*'. An argument of N lists only the last N entries.

    Options:
       -c clear the history list by deleting all of the entries
       -d offset delete the history entry at position OFFSET.

       -a append history lines from this session to the history file
       -n read all history lines not already read from the history file and                 append them to the history list
       -r read the history file and append the contents to the history list
       -w write the current history to the history file
       -p perform history expansion on each ARG and display the result without             storing it in the history list
       -s append the ARGs to the history list as a single entry
    If FILENAME is given, it is used as the history file. Otherwise,
    if HISTFILE has a value, that is used, else ~/.bash_history.

    If the HISTTIMEFORMAT variable is set and not null, its value is used as a       format string for strftime(3) to print the time stamp associated with each       displayed history entry. No time stamps are printed otherwise.

    Exit Status:
    Returns success unless an invalid option is given or an error occurs.
2.2.2 External commands and software help
- COMMAND--help or COMMAND-h
- Use man manual:man COMMAND
- Info page: info COMMAND
- Help documentation for the program itself: README, INSTALL, ChangeLog
- Program Official Documentation
- Related websites, such as: Technical Forum
- Search Engines
2.3 - help or - h options for external commands
Displays a summary of usage and a list of parameters, most commands use, but not all
Example:
[root@centos8 ~]#date --help
Usage: date [OPTION]... [+FORMAT]
  or: date [-u|--utc|--universal] [MMDDhhmm[[CC]YY][.ss]]
Display the current time in the given FORMAT, or set the system date.

[root@centos8 ~]#cal -h
Usage:
  cal [options] [[[day] month] year]
  cal [options] <timestamp|monthname>

[root@centos8 ~]#openssl --help
Invalid command '--help'; type "help" for a list.

[root@centos8 ~]#date -h
date: invalid option -- 'h'
Try 'date --help' for more information.

[root@centos8 ~]#shutdown -h
Shutdown scheduled for Fri 2020-03-20 08:26:27 CST, use 'shutdown -c' to cancel.
Format description:
- [] Indicates optional
- CAPS or <>Data representing change
- ...for a list
- x |y| z means "x or Y or z"
- -abc means-a-b-c
- {} denotes grouping
Practice:
1. Display the current time in 2016-06-18 10:20:30
2. The day before display is the day of the week
3. Set the current date to 2019-08-07 06:05:10
1,Display the current time in 2016-06-18 10:20:30
[root@centos8 ~]#date "+%Y-%m-%d %H:%M:%S"
2021-11-02 23:25:33

2,Show the day before yesterday is the day of the week
[root@centos8 ~]#date -d '-2 day' +%A
Sunday

3,Set the current date to 2019-08-07 06:05:10
[root@centos8 ~]#date -s "08/07/2019 06:05:10"
Wed Aug  7 06:05:10 CST 2019
2.4 man command
Man provides command help files, manual pages stored in/usr/share/man
Almost every command has man's Page
Chinese man needs to install packages
- man-pages
- man-pages-zh-CN
man Page Grouping
Different types of help are called different "chapters" and are collectively referred to as Linux manuals, man 1 man
- 1: User commands
- 2: System Calls
- 3:C Library Call
- 4: Equipment Files and Special Files
- 5: Profile format
- 6: Game
- 7: Miscellaneous
- 8: Commands to manage classes
- 9:Linux Kernel API
Configuration file for man command:
#Profiles for CentOS 6 Pre-version man
/etc/man.config
#Configuration file for CentOS post-7 man
/etc/man_db.conf
#Configuration file for ubuntu man
/etc/manpath.config
Format:
MANPATH /PATH/TO/SOMEWHERE #Indicates the man file search location
You can also search the manual page for COMMAND commands in a specified location and display it
man -M /PATH/TO/SOMEWHERE COMMAND
View man manual page
man [OPTION...] [SECTION] PAGE...
man [chapter] keyword
man help paragraph description
- NAME name and brief description
- SYNOPSIS Usage Format Description
- [] Optional content
- <>Required Content
- a|b alternative
- {} Grouping
- ... the same content can appear multiple times
- DESCRIPTION DESCRIPTION DESCRIPTION DESCRIPTION
- OPTIONS option description
- EXAMPLES example
- FILES Related Files
- AUTHOR Author
- COPYRIGHT Version Information
- REPORTING BUGS bug information
- SEE ALSO Other Help Reference
man command operation method: using less command implementation
- space, ^v, ^f, ^F:Flip the screen to the end of the file
- b, ^b: flip to the beginning of the file
- d, ^d: flip half screen to the end of the file
- u, ^u: flip half screen to the beginning of the file
- RETURN, ^N, e, ^E or j or ^J: Roll to the end of the file
- y or ^Y or ^P or k or ^K: flip to the beginning of the file
- q:Exit
- #: Jump to line #
- 1G: Back to the beginning of the file
- G: Flip to the end of the file
- /KEYWORD
Search from the current location to the end of the file using the string specified by KEYWORD as the keyword; Case insensitive
n: Next
N: Last - ?KEYWORD
Search from the current location to the beginning of the file using the string specified by KEYWORD as the keyword; Case insensitive
n: same direction as search command, next
N: Reverse to search command, previous
Common Options
- List all Help
man -a keyword
- Search man Manual
#List all matching pages using the whatis database
man -k keyword
- Equivalent to whatis
man -f keyword
- Path to print man help file
man -w [chapter] keyword
Example:
[root@centos8 ~]#dnf install man-pages
[root@centos8 ~]#man -w 1 passwd
/usr/share/man/man1/passwd.1.gz
[root@centos8 ~]#whatis passwd
openssl-passwd (1ssl) - compute password hashes
passwd (1) - update user's authentication tokens
[root@centos8 ~]#man 1ssl openssl-passwd
[root@centos8 ~]#dnf install man-pages
[root@centos8 ~]#man 7 ascii
[root@centos8 ~]#man 7 utf8
Example: View passwd-related commands and files, man help file path
[root@centos8 ~]#whereis passwd
passwd: /usr/bin/passwd /etc/passwd /usr/share/man/man1/passwd.1.gz /usr/share/man/man5/passwd.5.gz
Example:
1. When a local character terminal logs on, display the current logon terminal number, host name and current time in addition to the original information.
2. Automatically shut down at 18:30 today and prompt the user
1,When a native character terminal logs on, it displays the current logon terminal number, host name and current time in addition to the original information.
[root@lianxi01 ~ ]# cat /etc/issue
\S
Kernel \r on an \m Hostname:\n TTY:\l Time:\t

2,Automatically shut down at 18:30 today and prompt the user
[root@centos8 ~]#shutdown -P 18:30 "Shut down at 18:30"
Shutdown scheduled for Wed 2019-08-07 18:30:00 CST, use 'shutdown -c' to cancel.

2.5 info
man is commonly used for Command Reference and GNU tool info is suitable for general document reference
No parameters, list all pages
info pages are structured like a website
Each page is divided into "nodes"
Before Link Node*
info command format
info [ command ]
Navigation info page
- Arrow keys, PgUp, PgDn navigation
- Tab key moves to next link
- d Display Theme Directory
- Home Displays Topic
- Enter into the selected link
- n/p/u/l Enter Down/Front/Upper/Last Link
- s Text Search
- q Exit info
2.6 The official usage guide provided by the command itself
/usr/share/doc
Subdirectories of most installed packages, including instructions on how they work
Common Documentation: README INSTALL CHANGES
Location not suitable for documents elsewhere
Profile Example
Documentation in HTML/PDF/PS format
Authorization Details
2.7 Official Documentation for Systems and Third Party Applications
2.7.1 Get help with online documentation
http://www.github.com
https://www.kernel.org/doc/html/latest/
http://httpd.apache.org
http://www.nginx.org
https://mariadb.com/kb/en
https://dev.mysql.com/doc/
http://tomcat.apache.org
https://jenkins.io/zh/doc/
https://kubernetes.io/docs/home/
https://docs.openstack.org/train/
http://www.python.org
http://php.net
2.7.2 Official Linux online documentation and knowledge base
Installation guides, deployment guides, virtualization guides, and more are available from the official documentation disc or website of the distribution
http://kbase.redhat.com
http://www.redhat.com/docs
http://access.redhat.com
https://help.ubuntu.com/lts/serverguide/index.html
http://tldp.org
2.7.3 Red Hat Global Technical Support Services
rhn.redhat.com or local satellite server/proxy server
RHN accounts are RHN users with whom they are registered and network management based
SosreportTool to collect log information on all systems and automatically compress it into a compact package to facilitate technical support and Red Hat Global Support to provide a basis for problem analysis
Example:
[root@centos8 ~]#dnf -y install sos
[root@centos8 ~]# sosreport
sosreport (version 3.6)
This command will collect diagnostic and configuration information from
this CentOS Linux system and installed applications.

An archive containing the collected information will be generated in /var/tmp/sos.8fs1kg3w and may be provided to a CentOS support
representative.

Any information provided to CentOS will be treated in accordance with
the published support policies at:

https://wiki.centos.org/

The generated archive may contain data considered sensitive and its
content should be reviewed by the originating organization before being
passed to any third party.

No changes will be made to system configuration.

Press ENTER to continue, or CTRL-C to quit.

Please enter the case id that you are generating this report for []: 2

  Setting up archive ...
  Setting up plugins ...
  Running plugins. Please wait ...

  Finishing plugins [Running: processor]
  Finished running plugins
Creating compressed archive...

Your sosreport has been generated and saved in:
   /var/tmp/sosreport-centos8-2-2020-03-20-xllummc.tar.xz

The checksum is: ffbbe6fa9f009f4024e272fbce500bff

Please send this file to your support representative.

[root@centos8 sysconfig]#ll /var/tmp/sosreport-centos8-2-2020-03-20-
xllummc.tar.xz
-rw------- 1 root root 4409596 Mar 20 18:57 /var/tmp/sosreport-centos8-2-2020-
03-20-xllummc.tar.xz
[root@centos8 sysconfig]#cd
[root@centos8 ~]#ll /var/tmp/sosreport-centos8-2-2020-03-20-xllummc.tar.xz
2.8 Websites and Searches
http://www.google.com
Openstack filetype:pdf
rhca site:redhat.com/docs
http://bing.com
http://www.baidu.com
http://www.slideshare.net