preface
SRGAN network is a network that uses GAN network to realize image super-resolution reconstruction. After training the network. Only the Generator is used to reconstruct low resolution images. The network structure mainly uses generators and discriminators. The training process is not very stable. It is generally used for image reconstruction of satellite images and remote sensing images.
Here we use the high resolution data set (DIV2K)
Dataset download link: https://pan.baidu.com/s/1UBle5Cu74TRifcAVz14cDg Extraction code: luly
github code address: uploading
1, SRGAN
1. Training steps
The training idea of SRGAN network is shown in the figure below:
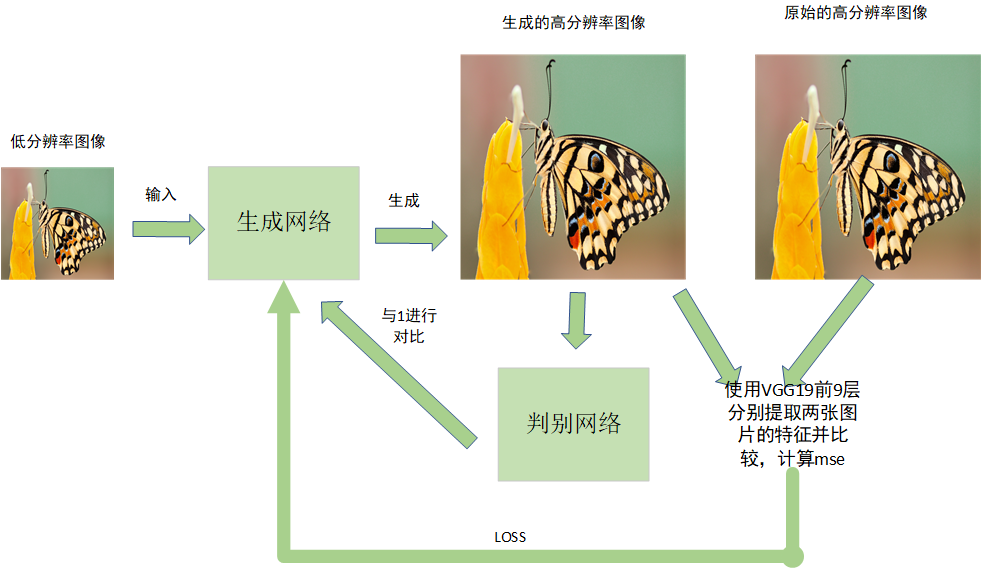
The training steps are as follows:
(1) The low resolution is input to the generation network to generate a high-resolution image.
(2) The discrimination network of high-resolution image input is used to distinguish true and false, and compared with 0 and 1
(3) The original high-resolution image and the generated high-resolution image are extracted with the first 9 layers of VGG19 respectively, and the extracted features are calculated as loss.
(4) . return loss to the generator to continue training.
This is the training process of SRGAN. Next, we will implement the above steps one by one.
2. Generator
The network structure of the generator is shown in the following figure:

The generator is mainly composed of two parts. The first part is the residual block (Red Square in the figure), and the second part is the up sampling part (blue square in the figure) to enlarge the image.
Residual block: contains a convolution of two 3x3
Upsampling: implemented using UpSampling2D
The generator code is as follows:
Since the whole SRGAN is defined as a class, I will unload the parameters that do not appear in the annotation
def build_generator(self):

        def residual_block(layer_input, filters):
            """Residual block described in paper #Residual block ''“
            d = Conv2D(filters, kernel_size=3, strides=1, padding='same')(layer_input)
            d = Activation('relu')(d)
            d = BatchNormalization(momentum=0.8)(d)
            d = Conv2D(filters, kernel_size=3, strides=1, padding='same')(d)
            d = BatchNormalization(momentum=0.8)(d)
            d = Add()([d, layer_input])
            return d

        def deconv2d(layer_input):
            """Layers used during upsampling #Upsampling block ''“
            u = UpSampling2D(size=2)(layer_input)
            u = Conv2D(256, kernel_size=3, strides=1, padding='same')(u)
            u = Activation('relu')(u)
            return u

        # Low resolution image input
        # self.lr_shape the size of the low resolution image
        img_lr = Input(shape=self.lr_shape)

        # Pre-residual block
        c1 = Conv2D(64, kernel_size=9, strides=1, padding='same')(img_lr)
        c1 = Activation('relu')(c1)

        # Propogate through residual blocks
        # The self.gf generator uses the number of fast residuals
        r = residual_block(c1, self.gf)
        for _ in range(self.n_residual_blocks - 1):
            r = residual_block(r, self.gf)

        # Post-residual block
        c2 = Conv2D(64, kernel_size=3, strides=1, padding='same')(r)
        c2 = BatchNormalization(momentum=0.8)(c2)
        c2 = Add()([c2, c1])

        # Upsampling
        #Up sampling
        u1 = deconv2d(c2)
        u2 = deconv2d(u1)

        # Generate high resolution output
        gen_hr = Conv2D(self.channels, kernel_size=9, strides=1, padding='same', activation='tanh')(u2)

        return Model(img_lr, gen_hr)
3. Discriminator
The discriminator is mainly used to judge whether the generated picture is true or false. Compared with 0 and 1, 1 represents true picture and 0 represents false picture. Here, 0 and 1 are the desired vectors related to the output size of the discriminator, rather than a simple 0,1 discriminator network. The results are as follows:
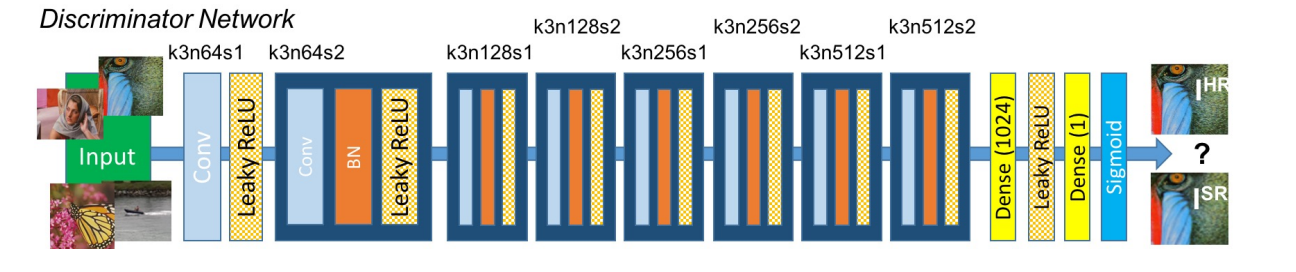
The discrimination network is composed of blocks containing convolution, BN and LeakyRelu activation functions, and finally outputs 1 or 0, which is actually equivalent to a binary classification network. The code is as follows:
 def build_discriminator(self):
        #Here self.df =64
        def d_block(layer_input, filters, strides=1, bn=True):
            """Discriminator layer #The discriminator mainly contains the convolution block ""“
            d = Conv2D(filters, kernel_size=3, strides=strides, padding='same')(layer_input)
            d = LeakyReLU(alpha=0.2)(d)
            if bn:
                d = BatchNormalization(momentum=0.8)(d)
            return d

        # Input img
        #self.hr_shape size of high resolution picture
        d0 = Input(shape=self.hr_shape)

        d1 = d_block(d0, self.df, bn=False)
        d2 = d_block(d1, self.df, strides=2)
        d3 = d_block(d2, self.df*2)
        d4 = d_block(d3, self.df*2, strides=2)
        d5 = d_block(d4, self.df*4)
        d6 = d_block(d5, self.df*4, strides=2)
        d7 = d_block(d6, self.df*8)
        d8 = d_block(d7, self.df*8, strides=2)

        d9 = Dense(self.df*16)(d8)
        d10 = LeakyReLU(alpha=0.2)(d9)
        validity = Dense(1, activation='sigmoid')(d10)

        return Model(d0, validity)```
The network is mainly divided into generator and discriminator, which confront each other during training in order to achieve a good balance.
2, Other preparations
1. Data reading
During training, we will enlarge 128x128 images into 512x512 images. The purpose of generating network is to ensure that the enlarged images are still clear.
In the data reading process, the 512x512 picture of the picture reshape is used as the supervision data, and the 128x128 picture is used as the training data. The reading code is as follows:
import scipy
from glob import glob
import numpy as np
import matplotlib.pyplot as plt
import scipy.misc
import cv2
#======================
# Used to read high-resolution data sets
#======================
#Data preprocessing, the original image is processed into small and large images
class DataLoader():
    #Initialization, the size of the reconstructed clear image
    def __init__(self, dataset_name, img_res=(128, 128)):
        self.dataset_name = dataset_name
        self.img_res = img_res
    #Read data from folder
    def load_data(self, batch_size=1, is_testing=False):
        data_type = "train" if not is_testing else "test"

        path = glob('./datasets/%s/train/*' % (self.dataset_name))

        #Randomly select pictures for training. There may be many pictures
        batch_images = np.random.choice(path, size=batch_size)

        imgs_hr = []
        imgs_lr = []
        for img_path in batch_images:
            img = self.imread(img_path)

            #Calculate reduced data
            h, w = self.img_res
            low_h, low_w = int(h / 4), int(w / 4)

            #Zoom out the picture
            img_hr = cv2.resize(img, self.img_res)
            img_lr = cv2.resize(img, (low_h, low_w))

            # If training = > do random flip, if it is a training mode, flip and enhance the data
            if not is_testing and np.random.random() < 0.5:
                img_hr = np.fliplr(img_hr)
                img_lr = np.fliplr(img_lr)

            imgs_hr.append(img_hr)
            imgs_lr.append(img_lr)

        #Normalized 0-255255 / 127.5 = 2, between 0-2, - 1 is normalized to - 1 to 1
        imgs_hr = np.array(imgs_hr) / 127.5 - 1.
        imgs_lr = np.array(imgs_lr) / 127.5 - 1.

        return imgs_hr, imgs_lr #Matrix, matrix in the list

    #Read pictures and convert them to RGB
    def imread(self, path):
         img =cv2.imread(path)
         return cv2.cvtColor(img, cv2.COLOR_BGR2RGB)
2.VGG19 feature extraction
Using the first 9 layers of VGG19 pre trained to extract features, there will be errors in the original code, and the error prompt is shown in this blog [error]
Change the code as follows:
 def build_vgg(self):
        # VGG model is established, only the features of layer 9 are used
        vgg = VGG19(weights="imagenet",input_shape=self.hr_shape,include_top=False)
        return Model(vgg.input, outputs=vgg.layers[9].output)
4. Complete code of training process
from re import S
import cv2
from keras.datasets import mnist
from keras.layers import Input, Dense, Reshape, Flatten, Dropout, Concatenate
from keras.layers import BatchNormalization, Activation, ZeroPadding2D, Add
from keras.layers.advanced_activations import PReLU, LeakyReLU
from keras.layers.convolutional import UpSampling2D, Conv2D
from keras.applications import VGG19
from keras.models import Sequential, Model
from keras.optimizers import Adam
import datetime
import matplotlib.pyplot as plt
import sys
from data_loader import DataLoader
import numpy as np
import os
class SRGAN():
    def __init__(self):
        # Input shape
        self.channels = 3
        self.lr_height = 128                 # Low resolution height
        self.lr_width = 128                  # Low resolution width
        self.lr_shape = (self.lr_height, self.lr_width, self.channels)
        self.hr_height = self.lr_height*4   # High resolution height
        self.hr_width = self.lr_width*4     # High resolution width
        self.hr_shape = (self.hr_height, self.hr_width, self.channels)

        # Number of residual blocks in the generator
        self.n_residual_blocks = 16

        optimizer = Adam(0.0002, 0.5)

        # VGG19 extract features
        self.vgg = self.build_vgg()
        self.vgg.trainable = False
        self.vgg.compile(loss='mse',
            optimizer=optimizer,
            metrics=['accuracy'])

        #Data path
        self.dataset_name = 'DIV'
        self.data_loader = DataLoader(dataset_name=self.dataset_name,
                                      img_res=(self.hr_height, self.hr_width))

        # The output dimension facilitates the construction of 0,1 matrix and the discriminator calculates the loss
        patch = int(self.hr_height / 2**4)
        self.disc_patch = (patch, patch, 1)

        # Number of convolution kernels of generator and discriminator
        self.gf = 64
        self.df = 64

        # Configuration build discriminator mse loss
        self.discriminator = self.build_discriminator()
        self.discriminator.compile(loss='mse',
            optimizer=optimizer,
            metrics=['accuracy'])

        # generator
        self.generator = self.build_generator()

        # High and low resolution shape
        img_hr = Input(shape=self.hr_shape)
        img_lr = Input(shape=self.lr_shape)

        # The generator generates fake pictures
        fake_hr = self.generator(img_lr)

        # feature extraction
        fake_features = self.vgg(fake_hr)

       #The discriminator is not trained at first
        self.discriminator.trainable = False


        validity = self.discriminator(fake_hr)

        self.combined = Model([img_lr, img_hr], [validity, fake_features])
        self.combined.compile(loss=['binary_crossentropy', 'mse'],
                              loss_weights=[1e-3, 1],
                              optimizer=optimizer)


    def build_vgg(self):
        # VGG model is established, only the features of layer 9 are used
        vgg = VGG19(weights="imagenet",input_shape=self.hr_shape,include_top=False)
        return Model(vgg.input, outputs=vgg.layers[9].output)

    def build_generator(self):

        def residual_block(layer_input, filters):
            """Residual block described in paper"""
            d = Conv2D(filters, kernel_size=3, strides=1, padding='same')(layer_input)
            d = Activation('relu')(d)
            d = BatchNormalization(momentum=0.8)(d)
            d = Conv2D(filters, kernel_size=3, strides=1, padding='same')(d)
            d = BatchNormalization(momentum=0.8)(d)
            d = Add()([d, layer_input])
            return d

        def deconv2d(layer_input):
            """Layers used during upsampling"""
            u = UpSampling2D(size=2)(layer_input)
            u = Conv2D(256, kernel_size=3, strides=1, padding='same')(u)
            u = Activation('relu')(u)
            return u

        # Low resolution image input
        img_lr = Input(shape=self.lr_shape)

        # Pre-residual block
        c1 = Conv2D(64, kernel_size=9, strides=1, padding='same')(img_lr)
        c1 = Activation('relu')(c1)

        # Propogate through residual blocks
        r = residual_block(c1, self.gf)
        for _ in range(self.n_residual_blocks - 1):
            r = residual_block(r, self.gf)

        # Post-residual block
        c2 = Conv2D(64, kernel_size=3, strides=1, padding='same')(r)
        c2 = BatchNormalization(momentum=0.8)(c2)
        c2 = Add()([c2, c1])

        # Upsampling
        u1 = deconv2d(c2)
        u2 = deconv2d(u1)

        # Generate high resolution output
        gen_hr = Conv2D(self.channels, kernel_size=9, strides=1, padding='same', activation='tanh')(u2)

        return Model(img_lr, gen_hr)

    def build_discriminator(self):
        #Here self.df =64
        def d_block(layer_input, filters, strides=1, bn=True):
            """Discriminator layer"""
            d = Conv2D(filters, kernel_size=3, strides=strides, padding='same')(layer_input)
            d = LeakyReLU(alpha=0.2)(d)
            if bn:
                d = BatchNormalization(momentum=0.8)(d)
            return d

        # Input img
        d0 = Input(shape=self.hr_shape)

        d1 = d_block(d0, self.df, bn=False)
        d2 = d_block(d1, self.df, strides=2)
        d3 = d_block(d2, self.df*2)
        d4 = d_block(d3, self.df*2, strides=2)
        d5 = d_block(d4, self.df*4)
        d6 = d_block(d5, self.df*4, strides=2)
        d7 = d_block(d6, self.df*8)
        d8 = d_block(d7, self.df*8, strides=2)

        d9 = Dense(self.df*16)(d8)
        d10 = LeakyReLU(alpha=0.2)(d9)
        validity = Dense(1, activation='sigmoid')(d10)

        return Model(d0, validity)

    def train(self, epochs, batch_size=1, sample_interval=50):

        start_time = datetime.datetime.now()

        for epoch in range(epochs):

            # ----------------------
            #  Training generator
            # ----------------------

            # Load data
            imgs_hr, imgs_lr = self.data_loader.load_data(batch_size)

            # Generating high resolution data from low resolution data
            fake_hr = self.generator.predict(imgs_lr)
            # 0,1
            valid = np.ones((batch_size,) + self.disc_patch)
            fake = np.zeros((batch_size,) + self.disc_patch)

            # Calculate loss
            d_loss_real = self.discriminator.train_on_batch(imgs_hr, valid)
            d_loss_fake = self.discriminator.train_on_batch(fake_hr, fake)
            d_loss = 0.5 * np.add(d_loss_real, d_loss_fake)

            # ------------------
            #  Training generator
            # ------------------

            # Sample images and their conditioning counterparts
            imgs_hr, imgs_lr = self.data_loader.load_data(batch_size)

            # The generators want the discriminators to label the generated images as real
            valid = np.ones((batch_size,) + self.disc_patch)

            # vgg19 feature extraction
            image_features = self.vgg.predict(imgs_hr)

            # generator
            g_loss = self.combined.train_on_batch([imgs_lr, imgs_hr], [valid, image_features])

            elapsed_time = datetime.datetime.now() - start_time
            # Plot the progress
            print ("%d time: %s" % (epoch, elapsed_time))

            # If at save interval => save generated image samples
            if epoch % sample_interval == 0:
                self.sample_images(epoch)
                self.generator.save('weights/epoch%s'%str(epoch)+'.h5')

    def sample_images(self, epoch):
        os.makedirs('images/%s' % self.dataset_name, exist_ok=True)
        r, c = 2, 2

        imgs_hr, imgs_lr = self.data_loader.load_data(batch_size=2, is_testing=True)
        fake_hr = self.generator.predict(imgs_lr)
        #-----------------------------------------------
        # This is mainly because when the pictures read by opencv are displayed in plt,
        # The color will be wrong. This is mainly to solve this problem
        #--------------------------------------------------
        imgs_lr = 0.5 * imgs_lr + 0.5
        fake_hr = 0.5 * fake_hr + 0.5
        imgs_hr = 0.5 * imgs_hr + 0.5

        # Save generated images and the high resolution originals
        titles = ['Generated', 'Original']
        fig, axs = plt.subplots(r, c)
        cnt = 0
        for row in range(r):
            for col, image in enumerate([fake_hr, imgs_hr]):
                axs[row, col].imshow(image[row])
                axs[row, col].set_title(titles[col])
                axs[row, col].axis('off')
            cnt += 1
        fig.savefig("images/%s/%d.png" % (self.dataset_name, epoch))
        plt.close()

        # Save low resolution images for comparison
        for i in range(r):
            fig = plt.figure()
            plt.imshow(imgs_lr[i])
            fig.savefig('images/%s/%d_lowres%d.png' % (self.dataset_name, epoch, i))
            plt.close()

if __name__ == '__main__':
    gan = SRGAN()
    gan.train(epochs=30000, batch_size=2, sample_interval=200)
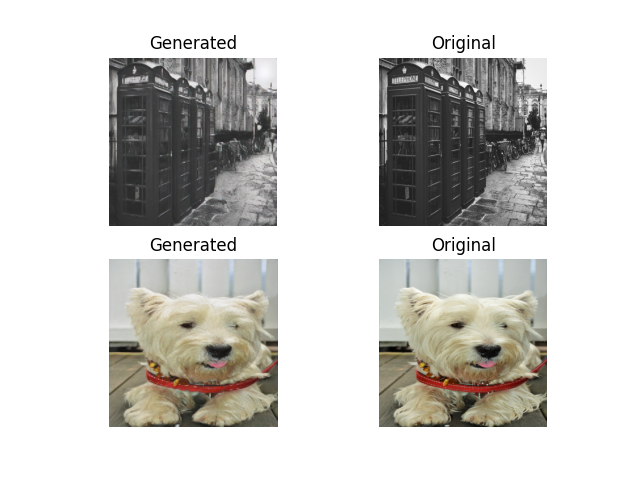
During training, such pictures will appear in the image directory
Low resolution map:
(original image on the right, generated image on the left):
5. Prediction process
The prediction process only needs a generator, and there is no need to limit the picture size. Take out the generator and use it alone:
#Generator code
from keras.layers import Input
from keras.layers import BatchNormalization, Activation, Add
from keras.layers.convolutional import UpSampling2D, Conv2D
from keras.models import  Model
def build_generator():
    def residual_block(layer_input, filters):
        d = Conv2D(filters, kernel_size=3, strides=1, padding='same')(layer_input)
        d = Activation('relu')(d)
        d = BatchNormalization(momentum=0.8)(d)
        d = Conv2D(filters, kernel_size=3, strides=1, padding='same')(d)
        d = BatchNormalization(momentum=0.8)(d)
        d = Add()([d, layer_input])
        return d

    def deconv2d(layer_input):
        u = UpSampling2D(size=2)(layer_input)
        u = Conv2D(256, kernel_size=3, strides=1, padding='same')(u)
        u = Activation('relu')(u)
        return u

    img_lr = Input(shape=[None,None,3])
    # In the first part, the low resolution image will go through a convolution + RELU function after entering
    c1 = Conv2D(64, kernel_size=9, strides=1, padding='same')(img_lr)
    c1 = Activation('relu')(c1)

    # In the second part, after 16 residual network structures, each residual network contains two convolution + standardization + RELU and one residual edge.
    r = residual_block(c1, 64)
    for _ in range(15):
        r = residual_block(r, 64)

    # The third part, the upper sampling part, enlarges the length and width. After two upper sampling, it becomes 4 times of the original to improve the resolution.
    c2 = Conv2D(64, kernel_size=3, strides=1, padding='same')(r)
    c2 = BatchNormalization(momentum=0.8)(c2)
    c2 = Add()([c2, c1])
    u1 = deconv2d(c2)
    u2 = deconv2d(u1)
    gen_hr = Conv2D(3, kernel_size=9, strides=1, padding='same', activation='tanh')(u2)

    return Model(img_lr, gen_hr)
Forecast part code:
from srgan import SRGAN
from PIL import Image
import cv2
import numpy as np
import matplotlib.pyplot as plt
from generator_model import build_generator
before_image = Image.open(r"Female_person.jpg")
gen_model = build_generator()
gen_model.load_weights('weights\epoch14800.h5')
# gen_model.summary()
new_img = Image.new('RGB', before_image.size, (128, 128, 128))
new_img.paste(before_image)
# plt.imshow(new_img)
# plt.show()

new_image = np.array(new_img)/127.5 - 1
# Three dimensional becomes four-dimensional because the input of neural network is four-dimensional
new_image = np.expand_dims(new_image, axis=0)  # [batch_size,w,h,c]
fake = (gen_model.predict(new_image)*0.5 + 0.5)*255
#Convert pictures in the form of np array into unit8, and convert data into graphs
fake = Image.fromarray(np.uint8(fake[0]))

fake.save("out.png")
titles = ['Generated', 'Original']
plt.subplot(1, 2, 1)
plt.imshow(before_image)
plt.subplot(1, 2, 2)
plt.imshow(fake)
plt.show()
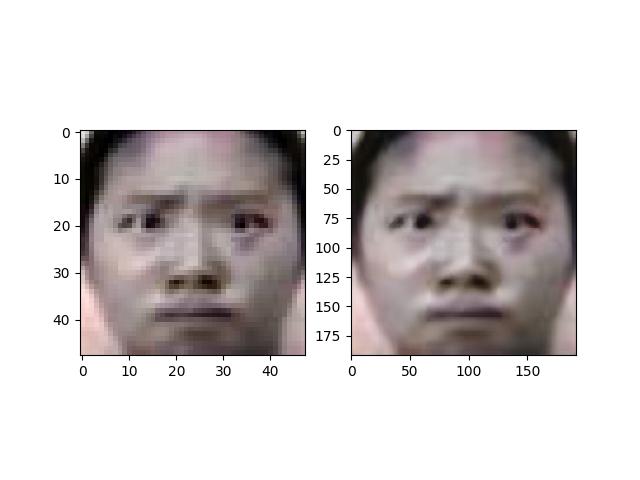
Reconstruction effect:
summary
No!