catalogue
1. What is SSH? 2. SSH consists of "client" and "server" software 3. SSH authentication mechanism (detailed illustration) 4. Demonstrate remote copy 5. Configure password free login: folders related to password free login / root/.ssh 6. Verify that the configuration is successful
1. What is SSH?
SSH is the abbreviation of secure shell (Secure Shell Protocol). In short, SSH is just a network protocol used for encrypted login between computers. many ftp, pop and telnet are inherently insecure because they transmit passwords and data in clear text on the network, which can be easily intercepted by people with ulterior motives. SSH is designed to provide security protocols for remote login sessions and other network services.
2. SSH consists of "client" and "server" software
the server is a daemon (sshd), which runs in the background and responds to connection requests from clients. the client includes ssh programs and other applications such as scp (remote copy), slogin (remote login), sftp (secure file transfer). Note: whoever is connected is regarded as a server. for example, I installed two virtual machines bigdata 111 and bigdata 112. If bigdata 111 wants to connect bigdata 112, it needs to use the sshd process in bigdata 112. At this time, bigdata 111 can be regarded as a client and bigdata 112 as a server. If the client (bigdata 111) wants to connect to the server (bigdata 112), the sshd daemon of the server (bigdata 112) will respond to the connection request from the client (bigdata 111).
"have access to netstat -nltp Commands, viewing sshd Port number and process number."
netstat -nltp

"ps Command to view sshd The process number of the."
ps aux | grep ssh
3. SSH authentication mechanism
from the perspective of the client, SSH provides two levels of security authentication.
1) Password based security authentication
as long as you know the other party's account and password (password), you can log in to the remote host. However, when building a cluster, it is necessary to transmit between multiple virtual machines. If you have to enter a password every time, it is very troublesome.
2) Security verification based on secret key

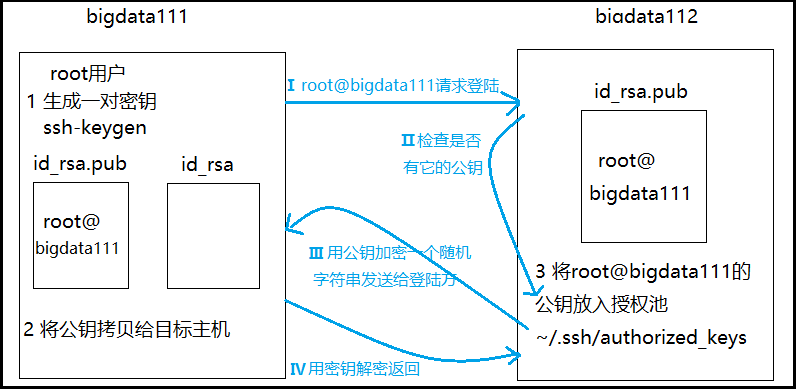
Principle description of black parts 1, 2 and 3 in the above figure: the client becomes a pair of keys (public key and private key). The private key is kept by itself. The public key is copied to the target host remotely (whoever you want to log in remotely is the target host), and the public key is placed in the authorization pool of the target host. why authorization pool? you can compare it to a large pool in real life. Since it is a pool, it can certainly hold many things. It can accept not only the public key sent by bigdata 111, but also the public key sent by other machines. If anyone wants to log in to me, just plug the public key directly into my authorization pool. Principle description of blue parts I, II, III and IV in the above figure: after completing the above operation of sending the public key, when the client bigdata 111 requests to log in to the server bigdata 112, the server II checks whether the public key exists. If the public key exists, the server III encrypts the public key with a random string and returns it to the client. After receiving the encrypted public key, the client IV decrypts it with its own private key and returns it to the server. If it can be decrypted correctly (the decrypted string is consistent with the encrypted string), the login request is allowed. The operating principle of secret free login is as follows: after knowing the above principle, secret free login is very simple. generate a pair of keys on the client, and then send the public key to the authorization pool on the server. It's OK.
4. Demonstrate remote copy

first, delete the things in bigdata 112 for demonstration. (if you are not sure whether it is safe to do so, you can [take a snapshot] first, and then make an error. Once an error occurs, you can restore the original appearance.)
[root@bigdata112 ~]# rm -rf *
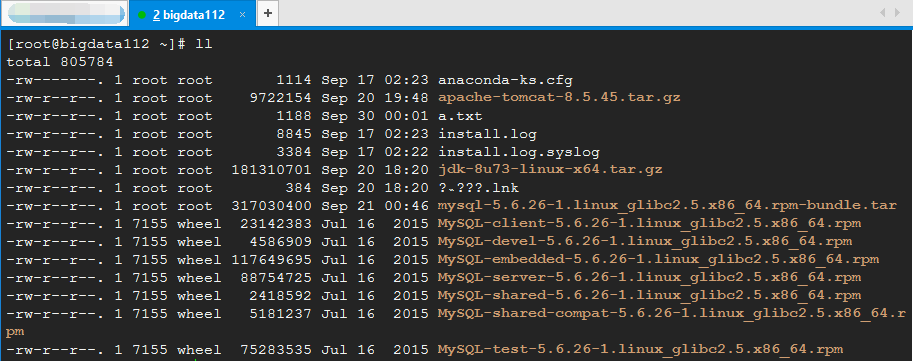
After deletion, you can see that there is nothing else in the / root home directory in bigdata 112.

next, create a a.txt file in bigdata111 as follows:

Requirements: send the a.txt file in bigdata 111 to bigdata 112!!! The remote copy command is as follows:
[root@bigdata111 ~]# scp -r a.txt root@bigdata112:~/
Special note 1: scp command is used for remote copy; a.txt is the file we want to copy; root@bigdata112 Indicates that we want to copy the file to the root user of bigdata112 machine;: The path is written later, which means that we want to copy it to the home directory of the root user of bigdata 112. Special note 2: because we configured the host mapping of bigdata 112 in the vim /etc/hosts directory of bigdata 111. Therefore, I can write 192.168.2.112 as bigdata112. If you do not configure host mapping, you need to write it as "SCP - R a.txt" root@192.168.2.112 :~/”.
The first time you make a remote copy (without any configuration), the following query appears:
[root@bigdata111 ~]# scp -r a.txt root@bigdata112:~/
Are you sure you want to continue connecting (yes/no)?    yes
root@bigdata112's password:   ******
Here, we write yes, and then enter the login password ******* of bigdata 112 set by ourselves. Finally, we go to bigdata 112 to see if there is a "a.txt" file.

Pay attention to such a detail: when we send a file remotely, if we send it again, we find that we will not ask you "Are you sure you want to continue connecting (yes/no)?" but directly ask you to enter the password. Why?
[root@bigdata111 ~]# scp -r a.txt root@bigdata112:~/
Are you sure you want to continue connecting (yes/no)?    yes
root@bigdata112's password:   ******
a.txt
 # Send again
[root@bigdata111 ~]# scp -r a.txt root@bigdata112:~/
root@bigdata111's password: ******
a.txt
Reason: there is a hidden file ". ssh". Let's go to this directory first:
[root@bigdata111 ~]# cd .ssh/
[root@bigdata111 .ssh]# ll
total 4
-rw-r--r--. 1 root root 798 Sep 30 00:19 known_hosts
As can be seen from the above, there is a file known_hosts. When I send files remotely for the first time, I will automatically create such a known on the client_ Hosts file, the IP address of the server (bigdata 112) is equivalent to registering with the client (bigdata 111). When you send it remotely again, you won't ask whether you are yes or no. When we delete the file and you send it remotely, we will ask you yes or no again.
5. Configure password free login: folders related to password free login / root/.ssh

The steps of password free login configuration are as follows:
1) Create key pair: SSH keygen
[root@bigdata111 .ssh]# ssh-keygen
Generating public/private rsa key pair.
Enter file in which to save the key (/root/.ssh/id_rsa):
Enter passphrase (empty for no passphrase):
Enter same passphrase again:
Your identification has been saved in /root/.ssh/id_rsa.
Your public key has been saved in /root/.ssh/id_rsa.pub.
The key fingerprint is:
e1:ba:be:ee:23:cc:91:9f:9b:71:36:b6:84:91:b6:dc root@bigdata112
The key's randomart image is:
+--[ RSA 2048]----+
|                 |
|                 |
|        .        |
|       o .       |
|     .+ S        |
|    oo *         |
|   o o*.E        |
|    + +O o       |
|     =O+.        |
+-----------------+
Note: after entering SSH keygen, click Enter three times in succession (no need to Enter anything). When the above occurs Figure, representing the success of creating the key pair. At the same time, we can check that there are several more file IDS in this directory_ rsa,id_rsa.pub.
[root@bigdata111 .ssh]# ll
total 12
-rw-------. 1 root root 1675 Sep 30 00:39 id_rsa
-rw-r--r--. 1 root root  397 Sep 30 00:39 id_rsa.pub
-rw-r--r--. 1 root root  798 Sep 30 00:19 known_hosts
2) Send the public key to the authorization pool of another machine
let's check the files in the ". ssh" directory of bigdata 112 first
"be careful ll Parameters in-a You can save all files in the folder.The first file is displayed"
[root@bigdata112 ~]# ll -a
total 68
dr-xr-x---.  4 root root  4096 Sep 30 00:22 .
dr-xr-xr-x. 22 root root  4096 Sep 29 18:45 ..
-rw-r--r--.  1 root root    81 Sep 30 00:48 a.txt
-rw-------.  1 root root 10420 Sep 29 23:30 .bash_history
-rw-r--r--.  1 root root    18 May 20  2009 .bash_logout
-rw-r--r--.  1 root root   176 May 20  2009 .bash_profile
-rw-r--r--.  1 root root   176 Sep 23  2004 .bashrc
-rw-r--r--.  1 root root   100 Sep 23  2004 .cshrc
-rw-------.  1 root root   125 Sep 30 00:03 .mysql_history
-rw-------.  1 root root   312 Sep 21 05:14 .mysql_secret
drwxr-xr-x.  2 root root  4096 Sep 20 19:33 .oracle_jre_usage
drwx------.  2 root root  4096 Sep 30 00:39 .ssh
-rw-r--r--.  1 root root   129 Dec  4  2004 .tcshrc
-rw-------.  1 root root  5900 Sep 29 22:45 .viminfo
[root@bigdata112 ~]# cd .ssh
[root@bigdata112 .ssh]# ll
total 0
As can be seen from the above, the ". ssh" directory of bigdata 112 is currently empty. After we send the public key to the authorization pool of another machine:
[root@bigdata111 ~]# ssh-copy-id 192.168.2.112
root@192.168.2.112's password: ******
Now try logging into the machine, with "ssh '192.168.2.112'", and check in:

  .ssh/authorized_keys

to make sure we haven't added extra keys that you weren't expecting.
For the first transmission, enter the login password of 192.168.2.112. When the above results appear, the transmission is successful.
Check the files in the ". ssh" directory of bigdata 112 again.
[root@bigdata112 .ssh]# ll
total 4
-rw-------. 1 root root  397 Sep 30 00:52 authorized_keys
As you can see, there is one more authorized here_ Keys file.
6. Verify that the configuration is successful
we have configured SSH password free login above. Here, we send the a.txt file from bigdata111 to bigdata112 again to see if we need to enter the password. first, switch the path to the upper directory / root directory of ". ssh":
[root@bigdata111 ~]# cd ~
then, send it remotely using the following command:
[root@bigdata111 ~]# scp -r a.txt root@bigdata112:~/
The authenticity of host 'bigdata112 (192.168.2.112)' can't be established.
RSA key fingerprint is 78:8c:77:14:bc:76:1a:83:dc:84:9f:f5:52:3b:b1:4c.
Are you sure you want to continue connecting (yes/no)? yes
Warning: Permanently added 'bigdata112' (RSA) to the list of known hosts.
a.txt                                                                         100%    3     0.0KB/s   00:00
[root@bigdata111 ~]# scp -r a.txt root@bigdata112:~/
a.txt
as can be seen from the above, the first time we send, we only ask whether it is yes or no. when we send it again, we don't need to enter the password once. finally, we can try to log in to bigdata 112 remotely in bigdata 111.
[root@bigdata111 ~]# ssh bigdata112
Last login: Sun Sep 29 22:47:11 2019 from bigdata111
[root@bigdata112 ~]# exit
logout
Connection to bigdata112 closed.
[root@bigdata111 ~]#
as you can see, we didn't enter the password either. After switching to bigdata 112, you can log out using exit. So far, it's done, isn't it Happy!!!