1. What types of remote login are available
At present, remote login is mainly divided into text interface and graphic interface.
- Text interface plaintext transmission: Telnet, RSH, etc.
- Text interface encryption: mainly SSH, which has basically replaced Telnet and RSH.
- Graphic interfaces: XDMCP, VNC, XRDP, etc. are common.
Plaintext and encrypted transmission of data
Plaintext transmission: it means that network experts can directly see the transmitted content after obtaining the transmitted data packet with tcpdump and other tools.
Encrypted transmission: it means that the data is encrypted before transmission. If someone obtains the data packet, he will see the encrypted garbled code.
2. Using SSH services
The ssh service of the current server is enabled by default, so we can use it directly. Special note: in the default state, ssh protocol itself provides two server functions.
- One is a server that uses Shell for remote connection similar to Telnet, that is, SSH
- The other is SFTP server similar to FTP service, which provides more secure FTP service.
1. Restart ssh service:
[root@192 ~]# systemctl restart  sshd
[root@192 ~]# netstat -anpt | grep ssh
tcp        0      0 0.0.0.0:22              0.0.0.0:*               LISTEN      1175/sshd
tcp        0      0 192.168.91.159:22       192.168.91.1:50906      ESTABLISHED 1146/sshd: root@pts
tcp6       0      0 :::22                   :::*                    LISTEN      1175/sshd
[root@192 ~]#
2. Log in to the server using ssh
[root@www ~]#  SSH [- F] [- O parameter item] [- p informal port] [account @] IP [instruction]
 Options and parameters:
     -f : Need to cooperate with the later [instructions] ,Send an instruction directly without logging in to the remote host;
     -o Parameter items: the main parameter items are: ConnectTimeout=Seconds: the number of seconds to wait online to reduce the waiting time
                               StrictHostKeyChecking=[yes|no|ask]: The default is ask,To make public key Active participation known_hosts ,Can be set to no Just.
     -p : If your sshd The service starts on an informal port (22),This item is required;
     [instructions] : Without logging in to the remote host, send instructions directly. But with -f The meaning is different.

 # 1. Method of directly online login to the other host (take login to this host as an example):
 [root@www ~]# ssh 127.0.0.1
 The authenticity of host '127.0.0.1 (127.0.0.1)' can't be established.
 RSA key fingerprint is
eb:12:07:84:b9:3b:3f:e4:ad:ba:f1:85:41:fc:18:3b.
 Are you sure you want to continue connecting (yes/no)? yes
 Warning: Permanently added '127.0.0.1' (RSA) to the list of known hosts.
 root@127.0.0.1's password: <==Enter here root Just use your password!
 Last login: Mon Jul 25 11:36:06 2011 from 192.168.1.101
 [root@www ~]# Exit < = = leave this ssh Online
 # Since no account is added after ssh, the current account is used to log in to the remote server by default
Generally, "SSH login account @ ip" should be used for SSH, but when the remote login user and the user we are using are the same name, we can directly ssh ip.
3. Why enter yes when logging in
When you log in to a server for the first time, he will ask if you want to connect?
- yes: he will write the fingerprint code (public key) of the service you want to log in to ~ / ssh/known_ Under the hosts file. Then let you enter the password, and then you can enter the text interface.
- no: exit directly.
It's annoying. I don't want to enter or I use scripts. Do you want me to enter yes? The ssh -o parameter will help you solve this problem.
 [root@www ~]# ssh -o StrictHostKeyChecking=no   root@localhost
 Warning: Permanently added 'localhost' (RSA) to the list of known hosts.
 root@localhost's password:
 # As shown above, I won't ask you yes or no! Directly write ~ / ssh/known_hosts when
 Yes!
Can I give instructions to another server on this service, and then return the results to me.
[root@192 ~]# ssh 192.168.91.159 date
root@192.168.91.159's password:
2022 Sunday, January 9, 2016:42:29 CST
[root@192 ~]#
I want to give instructions to another server without returning results to me
[root@www ~]# ssh -f student@192.168.91.159  find / &> ~/find1.log
 # At this point, you will immediately log out of 192.168.91.159, but the find command will run on the remote server itself!
4. ssh ip failed to log in
There are many kinds of situations. I have encountered two more.
- Prompt message: port 22 is broken or port 22 is rejected, but it can be ping ed. In this case, the address may be occupied. Check that your subnet mask is correct.
- If the server changes ip, this will happen when you want to log in again.
Explain the reasons for the second case:
During the first ssh ip remote login, the host will write the fingerprint code of the remote server to ~ / ssh/known_ Under hosts, when you log in again after changing the ip, and the host checks that the fingerprint code is wrong, it will feel that it is a malicious host and refuse to log in.
terms of settlement:
- Edit ~ / ssh/known_hosts file, find this record and delete it. (recommended)
3. Introduction to connection encryption technology used in ssh
At present, the common network packet encryption technology is usually "asymmetric secret key encryption technology". The main difference between symmetric encryption technology and asymmetric encryption technology is whether to use the same key.
Asymmetric secret key encryption technology: it is mainly a project of encryption and decryption through two different keys, namely public key and private key. Because these two keys are used to encrypt and decrypt data, in the connection in the same direction, the two keys are paired, and the public key and private key generated by each server are different.
- Public Key: it is provided to the remote host for data encryption, that is, I will give the Public Key to whoever wants it, but you must encrypt my Public Key when sending messages to me.
- Private Key: the data encrypted by the remote host using your public key can be decrypted by using the Private Key on the local side. Because the Private Key is very important, the Private Key cannot flow out and can only be protected on its own host.
Encryption process
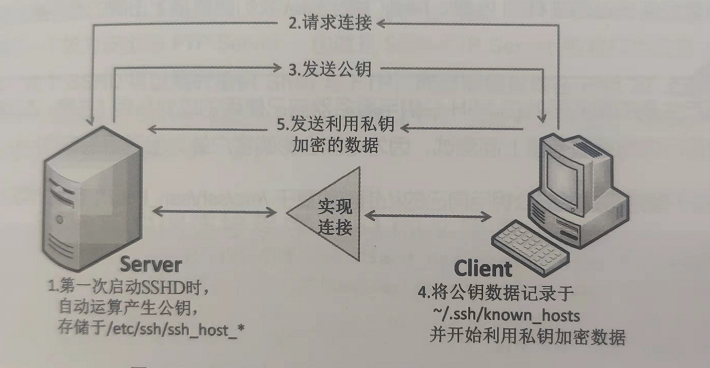
- The server establishes a public key file: every time the sshd service is started, the service will take the initiative to find / etc/ssh/ssh_host*
If there are no public key files when the system is just installed, sshd will take the initiative to calculate the required public key files and calculate the server's own needs
The private key file to be; - Client active online requirements: if the client wants to go online to the ssh server, it needs to use the appropriate
Client programs, including ssh, pietty and other client programs; - The server sends the public key file to the client: after receiving the client's request, the server will send the first one
The public key file obtained in step is transmitted to the client for use (at this time, it should be transmitted in clear code. Anyway, the public key is the original public key
For everyone!); - The client records / compares the public key data of the server and randomly calculates its own public and private keys: if the client
If you connect to this server once, the public key data of the server will be recorded in the user's home directory of the client
~/. ssh/known_hosts . If the public key data of the server has been recorded, the client will compare
Check whether the received record is different from the previous record. If this public key data is accepted, the calculation of the customer will begin
The client's own public-private key data; - Return the client's public key data to the server: the user transmits his public key to the server. this
The server has the server's private key and the client's public key, while the client has the server
The server's public key and the client's own private key, you will see that the online server and client
The key system (public key + private key) is different, so it is called asymmetric key system. - Start bidirectional encryption and decryption: (1) server to client: when the server transmits data, take the user's public key
Send after encryption. After receiving it, the client decrypts it with its own private key; (2) Client to server: client
When transmitting data, it is encrypted with the public key of the server and sent out. After the server receives it, it decrypts it with the server's private key.
4. Enable telnet
Node-2 is upgraded, and node-1 can log in to node-2
1. Log in Telnet first to prevent upgrade failure
Installing telnet service on node-2
yum -y install xinetd telnet-server
Telnet server is managed by xinetd. Xinetd needs to be installed. Telnet.com is started here Socket instead of Telnet service. By default, the PAM module restricts the root from telnet to telnet server. If telnet reports login error, you can comment out the following files;
2. Start service
systemctl enable xinetd.server
systemctl enable telnet.socket
systemctl start telnet.socket
systemctl start xinetd.service
3. Testing
[root@192 ~]# telnet 192.168.91.183
Trying 192.168.91.183...
Connected to 192.168.91.183.
Escape character is '^]'.

Kernel 3.10.0-1160.el7.x86_64 on an x86_64
192 login: root
Password:
Login incorrect

192 login: jiaofan
Password:
Last login: Sun Jan  9 17:35:30 from 192.168.91.159
[jiaofan@192 ~]$ sudo sh
[sudo] jiaofan Password for:
sh-4.2# bash
[root@192 jiaofan]#