1,Servlet + MVC
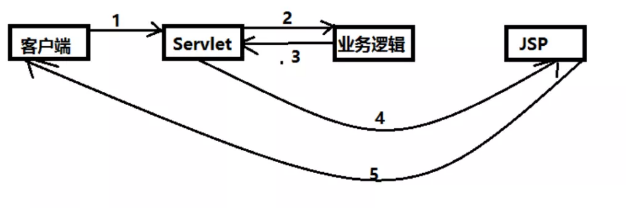
1. Functions of Servlet:
1. Servlet receives the user request and calls the corresponding business method
2. After the business processing is completed, the returned result is passed to Serlvet
3. The Servlet turns to the JSP according to the returned information, and the JSP renders the page
5. Give the newly rendered page to the front end accordingly
2. MVC architecture function analysis
Controller:
① Get form data
② Call business logic
③ Go to the specified page
Model:
① Business logic
② Status of saved data
View:
① Display page
The advantage of MVC model is to improve the reusability, flexibility, maintainability and scalability of the code, and solve the non unity of JSP responsibilities in JSP and business logic model.
3. What MVC framework should do
1. Mapping URLs to java classes or java class methods
2. Encapsulate user data
3. Processing request -- calling related business processing -- encapsulating response data
4. Render the corresponding data to the page
Note:
Common MVC server frameworks include Struts, Spring MVC, Framework and JSF,
Common front-end MVC frameworks include vue, angularjs, react and backbone
Patterns of MVC evolution: MVP, MVVM, etc
2. What is Spring MVC
1. Introduction
Spring MVC is a part of the Spring Framework and a lightweight Web framework based on Java to implement MVC.
View official documents: https://docs.spring.io/spring/docs/5.2.0.RELEASE/spring-framework-reference/web.html#spring-web
Spring MVC advantages:
① Lightweight and easy to learn
② Efficient
③ Good compatibility with Spring and seamless combination
④ Contract greater than configuration
⑤ Powerful, simple and flexible
The core of Spring MVC:
Spring's web framework is designed around the dispatcher servlet of scheduling servlet.
Important technologies in Spring MVC:
Restful style, exception handling, localization, internationalization, data validation, type conversion, interceptor, etc
2. DispatcherServlet, the central controller of Spring MVC
Spring's web framework is designed around dispatcher servlet. The purpose of dispatcher servlet is to distribute requests to different processors.
Starting from Spring 2.5, users using Java 5 or above can adopt annotation based controller declaration.
Like many other MVC frameworks, the Spring MVC framework is request driven, dispatching requests and providing other functions around a central Servlet
Dispatcher Servlet is an actual Servlet
The principle of spring MVC is shown in the following figure:
When a request is initiated, the front controller intercepts the request, generates a proxy request according to the request parameters, finds the actual controller corresponding to the request, processes the request, creates a data model, accesses the database, and responds to the model to the central controller. The controller renders the view result using the model and view, and returns the result to the central controller, Then return the result to the requester.
Schematic diagram of DispatcherServet
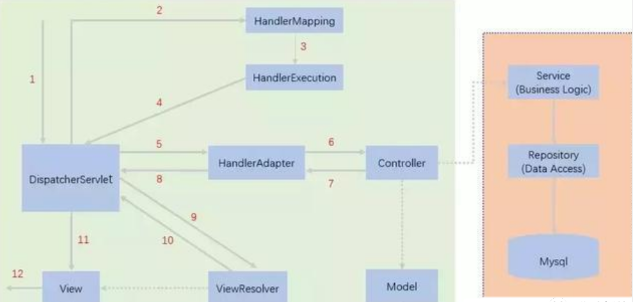
Briefly analyze the execution process
-
Dispatcher servlet represents the front controller and is the control center of the whole spring MVC. The user sends a request, and the dispatcher servlet receives the request and intercepts the request.
-
We assume that the requested url is: http://localhost:8080/SpringMVC/hello
As above, the url is divided into three parts:
http://localhost:8080 Server domain name
Spring MVC is a web site deployed on the server
hello indicates the controller
Through analysis, the above url is expressed as: request the hello controller of the spring MVC site located on the server localhost:8080.
-
HandlerMapping is processor mapping. DispatcherServlet calls HandlerMapping, which looks up the Handler according to the request url.
-
HandlerExecution refers to a specific Handler. Its main function is to find the controller according to the url. The controller found by the url above is: hello.
-
HandlerExecution passes the parsed information to DispatcherServlet, such as parsing controller mapping.
-
HandlerAdapter represents the processor adapter, which executes the Handler according to specific rules.
-
The Handler lets the specific Controller execute.
-
The Controller returns the specific execution information to the HandlerAdapter, such as ModelAndView.
-
The HandlerAdapter passes the logical name or model of the view to the dispatcher servlet.
-
DispatcherServlet calls the view resolver to resolve the logical view name passed by the HandlerAdapter.
-
The view parser passes the parsed logical view name to the dispatcher servlet.
-
The view of the dispatcher parser is parsed according to the view of the dispatcher parser.
-
The final view is presented to the user.
3. How to build spring MVC
Configuration version
1. Import the corresponding package in maven project
<dependency>
            <groupId>junit</groupId>
            <artifactId>junit</artifactId>
            <version>4.12</version>
            <scope>test</scope>
        </dependency>
        <dependency>
            <groupId>org.springframework</groupId>
            <artifactId>spring-webmvc</artifactId>
            <version>5.3.3</version>
        </dependency>
        <dependency>
            <groupId>javax.servlet</groupId>
            <artifactId>servlet-api</artifactId>
            <version>2.5</version>
        </dependency>
        <dependency>
            <groupId>javax.servlet.jsp</groupId>
            <artifactId>jsp-api</artifactId>
            <version>2.1.3-b06</version>
        </dependency>
        <dependency>
            <groupId>javax.servlet</groupId>
            <artifactId>jstl</artifactId>
            <version>1.2</version>
        </dependency>
        <dependency>
            <groupId>org.projectlombok</groupId>
            <artifactId>lombok</artifactId>
            <version>1.16.10</version>
        </dependency>
2. Configure web xml
<?xml version="1.0" encoding="UTF-8"?>
<web-app xmlns="http://xmlns.jcp.org/xml/ns/javaee"
        xmlns:xsi="http://www.w3.org/2001/XMLSchema-instance"
        xsi:schemaLocation="http://xmlns.jcp.org/xml/ns/javaee http://xmlns.jcp.org/xml/ns/javaee/web-app_4_0.xsd"
        version="4.0">

   <!--1.register DispatcherServlet-->
   <servlet>
       <servlet-name>springmvc</servlet-name>
       <servlet-class>org.springframework.web.servlet.DispatcherServlet</servlet-class>
       <!--Associate a springmvc Configuration file for:[servlet-name]-servlet.xml-->
       <init-param>
           <param-name>contextConfigLocation</param-name>
           <param-value>classpath:springmvc-servlet.xml</param-value>
       </init-param>
       <!--Startup level-1-->
       <load-on-startup>1</load-on-startup>
   </servlet>

   <!--/ Match all requests; (excluding.jsp)-->
   <!--/* Match all requests; (including.jsp)-->
   <servlet-mapping>
       <servlet-name>springmvc</servlet-name>
       <url-pattern>/</url-pattern>
   </servlet-mapping>

</web-app>
3. Write the configuration file of spring MVC! Name: SpringMVC servlet xml
<?xml version="1.0" encoding="UTF-8"?>
<beans xmlns="http://www.springframework.org/schema/beans"
      xmlns:xsi="http://www.w3.org/2001/XMLSchema-instance"
      xsi:schemaLocation="http://www.springframework.org/schema/beans
       http://www.springframework.org/schema/beans/spring-beans.xsd">

    <!--Add processor mapper and processor adapter-->
    <bean class="org.springframework.web.servlet.handler.BeanNameUrlHandlerMapping"/>
    <bean class="org.springframework.web.servlet.mvc.SimpleControllerHandlerAdapter"/>


    <!--Add view parser
        obtain ModelAndView Data, and through the name in the data, add the pre suffix to render the data to the page
    -->
    <bean class="org.springframework.web.servlet.view.InternalResourceViewResolver" id="internalResourceViewResolver">

        <property name="prefix" value="/WEB-INF/jsp/"/>
        <property name="suffix" value=".jsp"/>
    </bean>

    <!-- A processor instance -->
    <bean id="/hello" class="com.llj.controller.ControllerTest"></bean>

</beans>
4. Write the Controller, which can implement the Controller interface or add notes; Return to ModelAndView
//Note: Here we import the Controller interface first
public class HelloController implements Controller {

   public ModelAndView handleRequest(HttpServletRequest request, HttpServletResponse response) throws Exception {
       //ModelAndView models and views
       ModelAndView mv = new ModelAndView();

       //Encapsulate the object and put it in ModelAndView. Model
       mv.addObject("msg","HelloSpringMVC!");
       //Encapsulate the view to jump to and put it in ModelAndView
       mv.setViewName("hello"); //: /WEB-INF/jsp/hello.jsp
       return mv;
  }

}
5. Give your class to the SpringIOC container and register the bean
<!--Handler-->
<bean id="/hello" class="com.kuang.controller.HelloController"/>
6. Write the page to jump to
<%@ page contentType="text/html;charset=UTF-8" language="java" %>
<html>
<head>
   <title>LLJ</title>
</head>
<body>
${msg}
</body>
</html>
In case of problems:
Solution 1: check whether the console lacks jar package
Solution 2: check whether there is a lack of lib dependency in the idea release
Annotated version
1,pom.xml brings in relevant dependencies and adds resource filtering
<dependencies>
        <dependency>
            <groupId>junit</groupId>
            <artifactId>junit</artifactId>
            <version>4.12</version>
            <scope>test</scope>
        </dependency>
        <dependency>
            <groupId>org.springframework</groupId>
            <artifactId>spring-webmvc</artifactId>
            <version>5.3.3</version>
        </dependency>
        <dependency>
            <groupId>javax.servlet</groupId>
            <artifactId>servlet-api</artifactId>
            <version>2.5</version>
        </dependency>
        <dependency>
            <groupId>javax.servlet.jsp</groupId>
            <artifactId>jsp-api</artifactId>
            <version>2.1.3-b06</version>
        </dependency>
        <dependency>
            <groupId>javax.servlet</groupId>
            <artifactId>jstl</artifactId>
            <version>1.2</version>
        </dependency>
        <dependency>
            <groupId>org.projectlombok</groupId>
            <artifactId>lombok</artifactId>
            <version>1.16.10</version>
        </dependency>
    </dependencies>
    <!--stay build Medium configuration resources To prevent the failure of resource export-->
    <build>
        <resources>
            <resource>
                <directory>src/main/resources</directory>
                <filtering>true</filtering>
                <includes>
                    <include>**/*.xml</include>
                    <include>**/*.properties</include>
                </includes>
            </resource>
            <resource>
                <directory>src/main/java</directory>
                <filtering>true</filtering>
                <includes>
                    <include>**/*.xml</include>
                    <include>**/*.properties</include>
                </includes>
            </resource>
        </resources>

    </build>
2. Configure web xml
<?xml version="1.0" encoding="UTF-8"?>
<web-app xmlns="http://xmlns.jcp.org/xml/ns/javaee"
        xmlns:xsi="http://www.w3.org/2001/XMLSchema-instance"
        xsi:schemaLocation="http://xmlns.jcp.org/xml/ns/javaee http://xmlns.jcp.org/xml/ns/javaee/web-app_4_0.xsd"
        version="4.0">

   <!--1.register servlet-->
   <servlet>
       <servlet-name>SpringMVC</servlet-name>
       <servlet-class>org.springframework.web.servlet.DispatcherServlet</servlet-class>
       <!--Specified by initialization parameters SpringMVC The location of the configuration file is associated-->
       <init-param>
           <param-name>contextConfigLocation</param-name>
           <param-value>classpath:springmvc-servlet.xml</param-value>
       </init-param>
       <!-- Start sequence: the smaller the number, the earlier the start -->
       <load-on-startup>1</load-on-startup>
   </servlet>

   <!--All requests will be rejected springmvc intercept -->
   <servlet-mapping>
       <servlet-name>SpringMVC</servlet-name>
       <url-pattern>/</url-pattern>
   </servlet-mapping>

</web-app>
/Difference between and / *: < URL pattern > / < / url pattern > will not match jsp, only for the requests we write; Namely: jsp will not enter the DispatcherServlet class of spring< URL pattern > / * < / url pattern > will match * jsp, when returning to the jsp view, it will enter the DispatcherServlet class of spring again, resulting in a 404 error because the corresponding controller cannot be found.
-
-
Pay attention to the web XML version problem, to the latest version!
-
Register DispatcherServlet
-
The configuration file associated with spring MVC
-
The startup level is 1
-
The mapping path is / [do not use / *, it will 404]
-
3. Add spring MVC configuration file
<?xml version="1.0" encoding="UTF-8"?>
<beans xmlns="http://www.springframework.org/schema/beans"
       xmlns:xsi="http://www.w3.org/2001/XMLSchema-instance"
       xmlns:context="http://www.springframework.org/schema/context"
       xmlns:mvc="http://www.springframework.org/schema/mvc"
       xsi:schemaLocation="http://www.springframework.org/schema/beans
       http://www.springframework.org/schema/beans/spring-beans-4.2.xsd
    http://www.springframework.org/schema/mvc
    http://www.springframework.org/schema/mvc/spring-mvc-4.2.xsd
    http://www.springframework.org/schema/context
    http://www.springframework.org/schema/context/spring-context-4.2.xsd">

    <!--Automatically scan the package to make the comments under the specified package effective, and IOC Unified container management-->
    <context:component-scan base-package="com.llj.controller"></context:component-scan>
    <!--Give Way SpringMVC No longer process static resources
            Static resources  .css   .js    .html     .mp3 etc.
    -->
    <mvc:default-servlet-handler />

    <!--support mvc Annotation driven
        stay springmvc Generally used in@RequestMapping Annotation to complete the mapping relationship
        Want to use@RequestMapping The annotation takes effect,
            Context registration is required DefaultAnnotationHandlerMapping and AnnotationMethodHandlerAdapter example
            These two instances are handled at the class level and method level respectively
            and annotation-driver Configure us to automatically complete the injection of the above two instances
    -->
    <mvc:annotation-driven/>

    <!--Configure view parser-->
    <bean class="org.springframework.web.servlet.view.InternalResourceViewResolver"
            id="internalResourceViewResolver">
        <property name="prefix" value="/WEB-INF/jsp/"></property>
        <property name="suffix" value=".jsp"></property>
    </bean>

</beans>
4. Create Controller
@Controller
public class HelloController {

    @RequestMapping("/hello")
    public String hello(Model model){

        //Encapsulate data
        model.addAttribute("msg","stay model Data encapsulated in msg");
        return "hello";
    }
    @RequestMapping("/buy")
    public String buy(Model model){

        //Encapsulate data
        model.addAttribute("msg","shopping");
        return "hello";
    }
    @RequestMapping("/sell")
    public String sell(Model model){

        //Encapsulate data
        model.addAttribute("msg","Selling goods");
        return "hello";
    }
    @RequestMapping("/admin/hello")
    public String InterHello(Model model){
        model.addAttribute("msg","interhello");
        return "hello";
    }
}
- @The Controller is used to automatically scan the Spring IOC container during initialization;
-
@RequestMapping is to map the request path. Here, because there are mappings on classes and methods, the access should be / HelloController/hello;
-
The purpose of declaring Model type parameters in the method is to bring the data in the Action to the view;
-
The result returned by the method is the name of the view hello, and the prefix in the configuration file becomes WEB-INF / JSP / hello jsp.
5. Create / WEB-INF / JSP / Hello jsp
<%@ page contentType="text/html;charset=UTF-8" language="java" %>
<html>
<head>
   <title>SpringMVC</title>
</head>
<body>
${msg}
</body>
</html>
Three major components that must be configured to use spring MVC:
Processor mapper, processor adapter, view parser
Generally, we only need to manually configure the view parser, while the processor mapper and processor adapter only need to turn on the annotation driver, eliminating a large section of xml configuration
4. RestFul style
1. Concept
Restful is a style of resource positioning and resource operation. It's not a standard or agreement, it's just a style. The software designed based on this style can be more concise, more hierarchical, and easier to implement caching and other mechanisms.
2. Function
Resources: all things on the Internet can be abstracted as resources
Resource operation: use POST, DELETE, PUT and GET to operate resources with different methods.
Add, delete, modify and query respectively.
3. Operate resources in traditional way: achieve different effects through different parameters! Single method, post and get
http://127.0.0.1/item/queryItem.action?id=1 Query, GET
http://127.0.0.1/item/saveItem.action New, POST
http://127.0.0.1/item/updateItem.action Update, POST
http://127.0.0.1/item/deleteItem.action?id=1 Delete, GET or POST
4. Using RESTful operation resources: different effects can be achieved through different request methods! As follows: the request address is the same, but the function can be different!
http://127.0.0.1/item/1 Query, GET
http://127.0.0.1/item New, POST
http://127.0.0.1/item Update, PUT
http://127.0.0.1/item/1 DELETE
Example:
@Controller
public class RestFulController {

   //Map access path
   @RequestMapping("/commit/{p1}/{p2}")
   public String index(@PathVariable int p1, @PathVariable int p2, Model model){

       int result = p1+p2;
       //Spring MVC will automatically instantiate a Model object to pass values to the view
       model.addAttribute("msg", "result:"+result);
       //Return to view location
       return "test";

  }

}
5. Use the method property to specify the request type
It is used to restrict the type of request and narrow the request range.
Specify the type of request predicate, such as GET, POST, HEAD, OPTIONS, PUT, PATCH, DELETE, TRACE, etc
//The mapped access path must be a POST request
@RequestMapping(value = "/hello",method = {RequestMethod.POST})
public String index2(Model model){
   model.addAttribute("msg", "hello!");
   return "test";
}
6. @ RequestMapping annotation
The @ RequestMapping annotation of Spring MVC can handle HTTP requests, such as GET, PUT, POST, DELETE and PATCH.
All address bar requests will be of HTTP GET type by default.
Method level annotation variants are as follows: combined annotation
@GetMapping
@PostMapping
@PutMapping
@DeleteMapping
@PatchMapping
@GetMapping is a combined annotation, which is often used!
It acts as a shortcut to @ RequestMapping(method =RequestMethod.GET).
5. Data Jump
Set the ModelAndView object and jump to the specified page according to the name of the view and the view parser
5.1,ServletAPI
By setting the servlet API, no view parser is required
1. Output through HttpServletResponse
2. Redirection via HttpServletResponse
3. Forward through HttpServletResponse
@Controller
public class MyController {

    @RequestMapping("/result/t1")
    public void test1(HttpServletRequest req, HttpServletResponse rep) throws IOException {
        rep.getWriter().print("I am LLJ!!!");
    }

    @RequestMapping("/result/t2")
    public void test2(HttpServletRequest req, HttpServletResponse rep) throws IOException {
        rep.sendRedirect("/index.jsp");
    }
    @RequestMapping("/result/t3")
    public void test3(HttpServletRequest req, HttpServletResponse rep) throws IOException, ServletException {
        req.setAttribute("msg","/result/t3");
        req.getRequestDispatcher("/WEB-INF/jsp/test.jsp").forward(req,rep);
    }
}
5.2,SpringMVC
  //Spring MVC no view parser
@Controller
public class ResultSpringMVC1 {
    @RequestMapping("/mvc/t1")
    public String test1(){
        //forward
        return "/index.jsp";
    }

    @RequestMapping("/mvc/t2")
    public String test2(){
        //forward
        return "forward:/index.jsp";
    }

    @RequestMapping("/mvc/t3")
    public String test3(){
        //redirect
        return "redirect:/index.jsp";
    }
}

 // With view parser
@Controller
public class ResultSpringMVC2 {
   @RequestMapping("/rsm2/t1")
   public String test1(){
       //forward
       return "test";
  }

   @RequestMapping("/rsm2/t2")
   public String test2(){
       //redirect
       return "redirect:/index.jsp";
       //return "redirect:hello.do"; //hello.do for another request/
  }

}
6. Data processing
1. Through ModelAndView
public class sjclController implements Controller {
    @Override
    public ModelAndView handleRequest(HttpServletRequest request, HttpServletResponse response) throws Exception {

        ModelAndView modelAndView = new ModelAndView();

        //Set the name of the View and process it through the dispatcher servlet
        modelAndView.setViewName("text");

        //Set up Web servlet. View of type view
        modelAndView.setView(new View() {
            @Override
            public void render(Map<String, ?> model, HttpServletRequest request, HttpServletResponse response) throws Exception {

            }
        });

        //Add a separate value or key value value to ModelAndView
        modelAndView.addObject("msg","llj");

        //Add a map < string, Object > in ModelAndView
        HashMap<String, Object> map = new HashMap();
        modelAndView.addAllObjects(map);
        return modelAndView;
    }
}
2. Through ModelMap or Model
@Controller
public class ModelMapController {
    @RequestMapping("/hello")
    public String text1(@RequestParam("username") String name, ModelMap model){
        model.addAttribute("name",name);
        Object name1 = model.getAttribute("name");
        System.out.println(name1);
        return "test";
    }
}


@RequestMapping("/ct2/hello")
public String hello(@RequestParam("username") String name, Model model){
   //Encapsulates the data to be displayed in the view
   //Equivalent to req setAttribute("name",name);
   model.addAttribute("msg",name);
   System.out.println(name);
   return "test";
}
3. Garbled code problem
Solution 1:
Adding a character set filter to an xml file
<filter>
   <filter-name>encoding</filter-name>
   <filter-class>org.springframework.web.filter.CharacterEncodingFilter</filter-class>
   <init-param>
       <param-name>encoding</param-name>
       <param-value>utf-8</param-value>
   </init-param>
</filter>
<filter-mapping>
   <filter-name>encoding</filter-name>
   <url-pattern>/*</url-pattern>
</filter-mapping>
Solution 2:
1. Modify tomcat configuration file: set code!
<Connector URIEncoding="utf-8" port="8080" protocol="HTTP/1.1"
          connectionTimeout="20000"
          redirectPort="8443" />
2. Custom filter
/**
*Filter to solve all the garbled codes of get and post requests
*/
public class GenericEncodingFilter implements Filter {

   @Override
   public void destroy() {
  }

   @Override
   public void doFilter(ServletRequest request, ServletResponse response,FilterChain chain) throws IOException, ServletException {
/ / handle the character encoding of the response
       HttpServletResponse myResponse=(HttpServletResponse) response;
       myResponse.setContentType("text/html;charset=UTF-8");

/ / transform to protocol related objects
       HttpServletRequest httpServletRequest = (HttpServletRequest) request;
/ / enhanced request packaging
       HttpServletRequest myrequest = new MyRequest(httpServletRequest);
       chain.doFilter(myrequest, response);
  }

   @Override
   public void init(FilterConfig filterConfig) throws ServletException {
  }

}

//Custom request object, wrapper class of HttpServletRequest
class MyRequest extends HttpServletRequestWrapper {

   private HttpServletRequest request;
/ / whether to encode the tag
   private boolean hasEncode;
/ / define a constructor that can be passed into the HttpServletRequest object to decorate it
   public MyRequest(HttpServletRequest request) {
       super(request);// super must write
       this.request = request;
  }

/ / override the methods that need to be enhanced
   @Override
   public Map getParameterMap() {
/ / get the request method first
       String method = request.getMethod();
       if (method.equalsIgnoreCase("post")) {
/ / post request
           try {
/ / handle post garbled code
               request.setCharacterEncoding("utf-8");
               return request.getParameterMap();
          } catch (UnsupportedEncodingException e) {
               e.printStackTrace();
          }
      } else if (method.equalsIgnoreCase("get")) {
/ / get request
           Map<String, String[]> parameterMap = request.getParameterMap();
if (! hasEncode) {/ / make sure that the get manual encoding logic runs only once
               for (String parameterName : parameterMap.keySet()) {
                   String[] values = parameterMap.get(parameterName);
                   if (values != null) {
                       for (int i = 0; i < values.length; i++) {
                           try {
/ / handle get garbled code
                               values[i] = new String(values[i]
                                      .getBytes("ISO-8859-1"), "utf-8");
                          } catch (UnsupportedEncodingException e) {
                               e.printStackTrace();
                          }
                      }
                  }
              }
               hasEncode = true;
          }
           return parameterMap;
      }
       return super.getParameterMap();
  }

/ / take a value
   @Override
   public String getParameter(String name) {
       Map<String, String[]> parameterMap = getParameterMap();
       String[] values = parameterMap.get(name);
       if (values == null) {
           return null;
      }
       return values[0]; / / retrieve the first value of the parameter
  }

/ / take all values
   @Override
   public String[] getParameterValues(String name) {
       Map<String, String[]> parameterMap = getParameterMap();
       String[] values = parameterMap.get(name);
       return values;
  }
}
Then on the web Configure this filter in XML!
The problem of garbled code needs more attention at ordinary times. The unified coding UTF-8 should be set wherever possible!
Next SSM integration!!!