This paper is the Kubernetes continuous deployment workflow, which is summarized step by step from zero basis through the author's own practice. The article begins with the preparation of tools in the early stage, and then proceeds to the final deployment of repository, testing, mirror building, pipeline building. All the work processes are shown in the article one by one, which will be of great significance to users who want to have full automatic and continuous delivery pipeline.

In a long, long time ago job, my task was to switch the old LAMP stack to Kubernetes. At that time, my boss was always chasing new technology, thinking that it would take only a few days to complete the iteration of old and new technology - since we didn't even know the working mechanism of containers at that time, we had to say that the idea of the boss was really bold.
After reading official documents and searching for a lot of information, we began to feel overwhelmed - there were many new concepts to learn: pod, container, replica, etc. For me, Kubernetes seems to be designed for a group of smart developers.
Then I did what I often do in this situation: learn by practice. Through a simple example, we can understand the complex problems very well, so I completed the whole deployment process step by step.
Finally, we did it, although it was far from the required week - we spent nearly a month creating three clusters, including their development, testing and production.
In this article, I'll describe in detail how to deploy applications to Kubernetes. After reading this article, you will have an efficient Kubernetes deployment and continuous delivery workflow.
Continuous Integration and Delivery
Continuous integration is the practice of building and testing each application update. By doing a small amount of work, errors can be detected earlier and solved immediately.
Once the integration is complete and all the tests pass, we can add continuous delivery to the automated release and deployment process. Projects that use CI/CD can be released more frequently and reliably.
We will use Semaphore, a fast, powerful and easy-to-use continuous integration and delivery (CI/CD) platform that automates all processes:
1. Installation project dependencies
2. Running Unit Testing
3. Building a Docker Image
4. Push Mirror to Docker Hub
5. One-click Kubernetes deployment
For applications, we have a Ruby Sinatra microservice that exposes some HTTP endpoints. The project already contains everything needed for deployment, but still requires some components.
Preparation
Before you start, you need to log in to Github and Semphore accounts. In addition, you need to log in to Docker Hub for subsequent easy pull or push Docker images.
Next, you need to install some tools on your computer:
-
Git: Processing code
-
curl: The Swiss Army Knife of the Internet
-
kubectl: Remote control of your cluster
Of course, don't forget Kubernetes. Most cloud providers provide this service in various forms, so choose the one that suits your needs. The bottom-end machine configuration and cluster size are large enough to run our example app. I like to start with a cluster of three nodes, but you can use a cluster of only one node.
Once the cluster is ready, download the kubeconfig file from your vendor. Some allow you to download directly from their web console, while others require help programs. We need this file to connect to the cluster.
With this, we can start. The first thing to do is the fork repository.
Fork repository
In this article, fork will use the demo application.
-
Visit the semaphore-demo-ruby-kubernetes repository and click the Fork button at the top right
-
Click the Clone or download button and copy the address
-
Replication repository: $git clone https://github.com/your_repository_path...
Connecting a new repository with Semaphore
1. Log in to your emaphore
2. Click on the link in the sidebar to create a new project
3. Click the Add Repository button next to your repository
Using Semaphore test
Continuous integration makes testing interesting and efficient. A perfect CI pipeline can create a fast feedback loop to detect errors before causing any losses. Our project comes with some ready-made tests.
Open the initial pipeline file at. semaphore/semaphore.yml and quickly view it. This pipeline describes all the steps Semaphore should follow to build and test applications. It starts with the version and name.
version: v1.0
name: CI
Next comes agent, a virtual machine that powers job. We can choose from three types:
agent:
  machine:
    type: e1-standard-2
    os_image: ubuntu1804
Block, task, and job define the actions to be performed in each step of the pipeline. In emaphore, blocks run sequentially, while jobs in blocks run in parallel. The pipeline consists of two blocks, one for library installation and one for running tests.
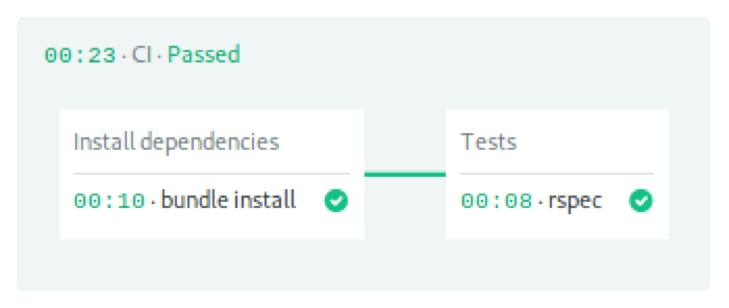
The first block downloaded and installed Ruby gems.
- name: Install dependencies
  task:
    jobs:
      - name: bundle install
        commands:
          - checkout
          - cache restore gems-$SEMAPHORE_GIT_BRANCH-$(checksum Gemfile.lock),gems-$SEMAPHORE_GIT_BRANCH,gems-master
          - bundle install --deployment --path .bundle
          - cache store gems-$SEMAPHORE_GIT_BRANCH-$(checksum Gemfile.lock) .bundle
Checkout copies the code in Github. Since each job runs in a fully isolated machine, we must rely on caching to store and retrieve files between jobs.
blocks:
  - name: Install dependencies
    task:
      jobs:
        - name: bundle install
          commands:
            - checkout
            - cache restore gems-$SEMAPHORE_GIT_BRANCH-$(checksum Gemfile.lock),gems-$SEMAPHORE_GIT_BRANCH,gems-master
            - bundle install --deployment --path .bundle
            - cache store gems-$SEMAPHORE_GIT_BRANCH-$(checksum Gemfile.lock) .bundle
The second block is tested. Note that we reused the checkout and cache code to put the initial file into job. The last command is used to start the RSpec test suite.
- name: Tests
  task:
    jobs:
      - name: rspec
        commands:
          - checkout
          - cache restore gems-$SEMAPHORE_GIT_BRANCH-$(checksum Gemfile.lock),gems-$SEMAPHORE_GIT_BRANCH,gems-master
          - bundle install --deployment --path .bundle
          - bundle exec rspec
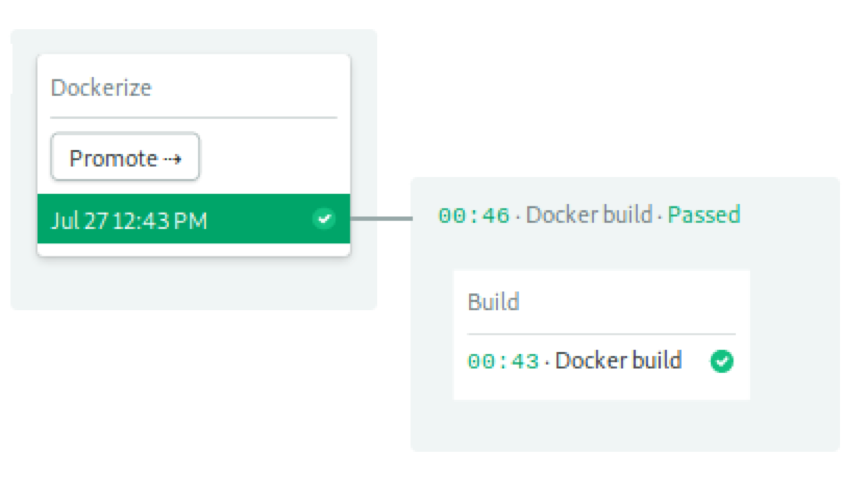
In the last part, let's look at Promotion. Promotion can connect pipelines under certain conditions to create complex workflows. After all job s are completed, we use auto_promote_on to start the next pipeline.
promotions:
  - name: Dockerize
    pipeline_file: docker-build.yml
    auto_promote_on:
      - result: passed
The workflow continues to execute the next pipeline.
Building Docker Mirror
We can run anything on Kubernetes as long as it's packaged in a Docker image. In this section, we will learn how to build a mirror.
Our Docker image will contain the application code, Ruby, and all libraries. Let's first look at Dockerfile:
FROM ruby:2.5

RUN apt-get update -qq && apt-get install -y build-essential

ENV APP_HOME /app
RUN mkdir $APP_HOME
WORKDIR $APP_HOME

ADD Gemfile* $APP_HOME/
RUN bundle install --without development test

ADD . $APP_HOME

EXPOSE 4567

CMD ["bundle", "exec", "rackup", "--host", "0.0.0.0", "-p", "4567"]
Dockerfile is like a detailed recipe that contains all the steps and commands required to build a container image:
1. Start with a pre-built ruby image
2. Install build tools using apt-get
3. Copy Gemfile because it has all the dependencies
4. Install them with bundle s
5. Copy the source code of app
6. Define listening ports and start commands
We will bake our production image in the Smarphore environment. However, if you want a quick test on your computer, enter:
$ docker build . -t test-image
Use Docker to run and expose internal port 4567 to start the server locally:
$ docker run -p 4567:4567 test-image
You can now test an available HTTP endpoint:
$ curl -w "\n" localhost:4567
hello world :))
Add Docker Hub account to Semaphore
Semaphore has a secure mechanism to store sensitive information, such as passwords, tokens, or keys. In order to push the image into your DockerHub image repository, you need to create a Secret with your username and password:
-
Open your Semaphore
-
In the left navigation bar, click Secret
-
Click on Creat New Secret
-
The name of Secret should be Dockerhub, type in the login information (shown below) and save it.
Building Docker Pipeline
The pipeline starts building and push mirrors Docker Hub, which has only one block and one job:

This time, we need to use better performance because Docker tends to consume more resources. We chose the middle-end machine e1-standard-4 with four CPU s, 8GB RAM and 35GB disk space:
version: v1.0
name: Docker build
agent:
  machine:
    type: e1-standard-4
    os_image: ubuntu1804
The build block is started by logging in to Docker Hub, and the username and password can be imported from the secret we just created. After login, Docker has direct access to the mirror warehouse.
The next command is docker pull, which tries to pull the latest image. If mirrors are found, Docker may be able to reuse some of these layers to speed up the build process. Without the latest mirrors, there's no need to worry, just take a little longer to build.
Finally, we push a new image. Note that here we use the SEMAPHORE_WORKFLOW_ID variable to mark the image.
blocks:
  - name: Build
    task:
      secrets:
        - name: dockerhub
      jobs:
      - name: Docker build
        commands:
          - echo "${DOCKER_PASSWORD}" | docker login -u "${DOCKER_USERNAME}" --password-stdin
          - checkout
          - docker pull "${DOCKER_USERNAME}"/semaphore-demo-ruby-kubernetes:latest || true
          - docker build --cache-from "${DOCKER_USERNAME}"/semaphore-demo-ruby-kubernetes:latest -t "${DOCKER_USERNAME}"/semaphore-demo-ruby-kubernetes:$SEMAPHORE_WORKFLOW_ID .
          - docker images
          - docker push "${DOCKER_USERNAME}"/semaphore-demo-ruby-kubernetes:$SEMAPHORE_WORKFLOW_ID
When the mirror is ready, we enter the project delivery phase. We will extend our Semaphore pipeline with manual promotion s.
promotions:
  - name: Deploy to Kubernetes
    pipeline_file: deploy-k8s.yml
To do the first automatic build, push:
$ touch test-build
$ git add test-build
$ git commit -m "initial run on Semaphore"
$ git push origin master
Once the mirror is ready, we can enter the deployment phase.
Deployment to Kubernetes
Automated deployment is Kubernetes'strong point. All we need to do is to tell the cluster our final expected state, and it will be responsible for the rest.
However, before deployment, you must upload the kubeconfig file to Semaphore.
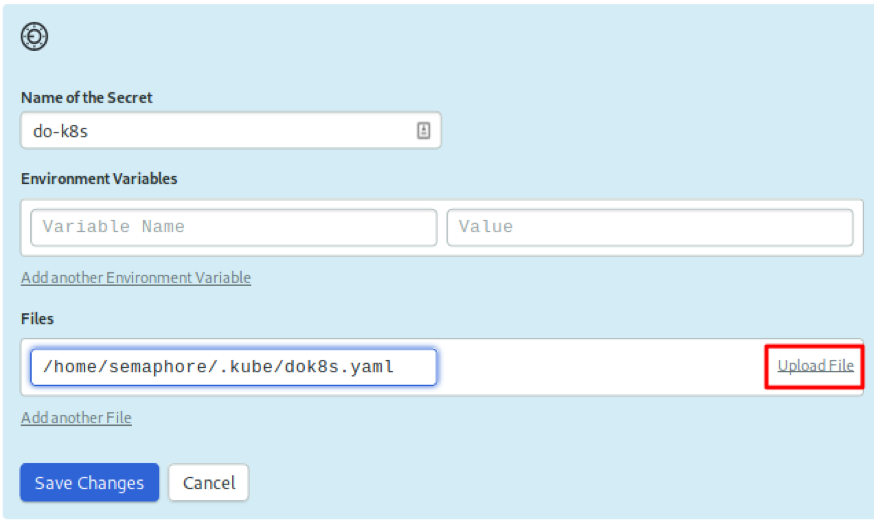
Upload Kubeconfig to Semaphore
We need a second secret: the kubeconfig of the cluster. This file grants administrative access to it. Therefore, we do not want to check files into the repository.
Create a secret named do-k8s and upload the kubeconfig file to / home/semaphore/.kube/dok8s.yaml:
Deployment List
Although Kubernetes is already a container orchestration platform, we do not directly manage containers. In fact, the smallest unit of deployment is pod. A pod is like a group of inseparable friends who always go to the same place together. Therefore, it is necessary to ensure that the container in the pod runs on the same node and has the same IP. They can start and stop synchronously, and because they run on the same machine, they can share resources.
The problem with pods is that they can start and stop at any time, and we can't be sure that they will be assigned to pod IP. To forward the user's http traffic, a common IP and a load balancer are also needed, which is responsible for tracking the traffic of the pod and forwarding client.
Open the file at deploymente.yml. This is a list of deploying our application, which is separated into two resources by three dash es. First, deploy resources:
apiVersion: apps/v1
kind: Deployment
metadata:
  name: semaphore-demo-ruby-kubernetes
spec:
  replicas: 1
  selector:
    matchLabels:
      app: semaphore-demo-ruby-kubernetes
  template:
    metadata:
      labels:
        app: semaphore-demo-ruby-kubernetes
    spec:
      containers:
        - name: semaphore-demo-ruby-kubernetes
          image: $DOCKER_USERNAME/semaphore-demo-ruby-kubernetes:$SEMAPHORE_WORKFLOW_ID
There are several concepts that need to be clarified:
-
Resources have a name and several labels to organize
-
Spec defines the final desired state, and template is the model used to create Pod.
-
Replica sets the number of copies of the pod to be created. We often set it to the number of nodes in the cluster. Since we used three nodes, I changed this command line to replicas:3
The second resource is services. It binds to port 80 and forwards HTTP traffic to the deployed pod:
---

apiVersion: v1
kind: Service
metadata:
  name: semaphore-demo-ruby-kubernetes-lb
spec:
  selector:
    app: semaphore-demo-ruby-kubernetes
  type: LoadBalancer
  ports:
    - port: 80
      targetPort: 4567
Kubernetes matches selector s with tags to connect services to pod s. Therefore, we have many services and deployments in the same cluster and connect them as needed.
Deployment pipeline
We are now in the final stage of CI/CD configuration. At this point, we have a CI pipeline defined in semaphore.yml and a Docker pipeline defined in docker-build.yml. In this step, we will deploy to Kubernetes.
Open the deployment pipeline at.semaphore/deploy-k8s.yml:
version: v1.0
name: Deploy to Kubernetes
agent:
  machine:
    type: e1-standard-2
    os_image: ubuntu1804
Two job s form the final assembly line:
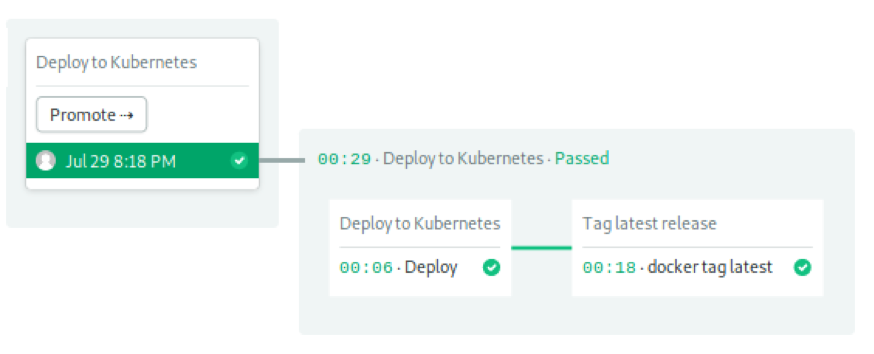
Job 1 started deploying. After importing the kubeconfig file, envsubst replaces the placeholder variable in deployment.yaml with its actual value. Then, kubectl apply sends the list to the cluster.
blocks:
  - name: Deploy to Kubernetes
    task:
      secrets:
        - name: do-k8s
        - name: dockerhub

      env_vars:
        - name: KUBECONFIG
          value: /home/semaphore/.kube/dok8s.yaml

      jobs:
      - name: Deploy
        commands:
          - checkout
          - kubectl get nodes
          - kubectl get pods
          - envsubst < deployment.yml | tee deployment.yml
          - kubectl apply -f deployment.yml
Job 2 Tags mirrors as up-to-date so that we can use them as caches in the next run.
- name: Tag latest release
  task:
    secrets:
      - name: dockerhub
    jobs:
    - name: docker tag latest
      commands:
        - echo "${DOCKER_PASSWORD}" | docker login -u "${DOCKER_USERNAME}" --password-stdin
        - docker pull "${DOCKER_USERNAME}"/semaphore-demo-ruby-kubernetes:$SEMAPHORE_WORKFLOW_ID
        - docker tag "${DOCKER_USERNAME}"/semaphore-demo-ruby-kubernetes:$SEMAPHORE_WORKFLOW_ID "${DOCKER_USERNAME}"/semaphore-demo-ruby-kubernetes:latest
        - docker push "${DOCKER_USERNAME}"/semaphore-demo-ruby-kubernetes:latest
This is the last step in the workflow.
Deployment of applications
Let's teach our Sinatra application to sing. Add the following code to the App class in app.rb:
get "/sing" do
  "And now, the end is near
   And so I face the final curtain..."
end
Push the modified file to Github:
$ git add .semaphore/*
$ git add deployment.yml
$ git add app.rb
$ git commit -m "test deployment"
$ git push origin master
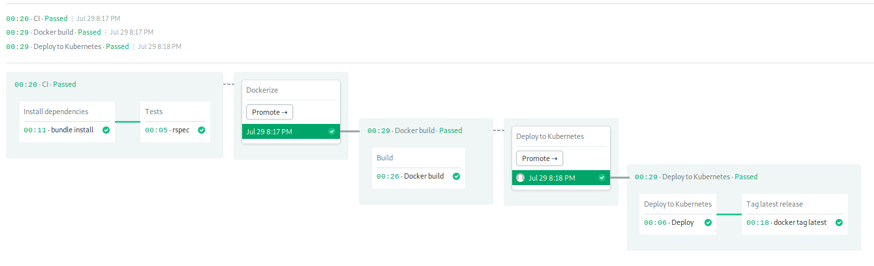
By the time the docker build pipeline is complete, you can check Semaphore's progress:
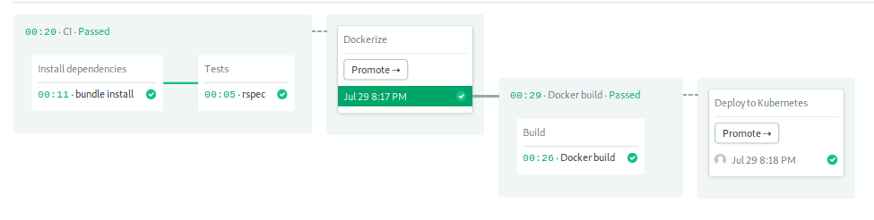
It's time to deploy and click the Promote button to see if it works:
We've got a good start. Let's look at Kubernetes now. We can use kubectl to check the deployment status. The initial state is three required pod s and is zero available:
$ kubectl get deployments
NAME                             DESIRED   CURRENT   UP-TO-DATE   AVAILABLE   AGE
semaphore-demo-ruby-kubernetes   3         0         0            0           15m
A few seconds later, the pod has started and reconciliation has been completed:
$ kubectl get deployments
NAME                             DESIRED   CURRENT   UP-TO-DATE   AVAILABLE   AGE
semaphore-demo-ruby-kubernetes   3         3         3            3           15m
get all to get the general state of the cluster, which shows pod, service, deployment, and replica:
$ kubectl get all
NAME                                                  READY   STATUS    RESTARTS   AGE
pod/semaphore-demo-ruby-kubernetes-7d985f8b7c-454dh   1/1     Running   0          2m
pod/semaphore-demo-ruby-kubernetes-7d985f8b7c-4pdqp   1/1     Running   0          119s
pod/semaphore-demo-ruby-kubernetes-7d985f8b7c-9wsgk   1/1     Running   0          2m34s


NAME                                        TYPE           CLUSTER-IP    EXTERNAL-IP    PORT(S)        AGE
service/kubernetes                          ClusterIP      10.12.0.1              443/TCP        24m
service/semaphore-demo-ruby-kubernetes-lb   LoadBalancer   10.12.15.50   35.232.70.45   80:31354/TCP   17m


NAME                                             DESIRED   CURRENT   UP-TO-DATE   AVAILABLE   AGE
deployment.apps/semaphore-demo-ruby-kubernetes   3         3         3            3           17m

NAME                                                        DESIRED   CURRENT   READY   AGE
replicaset.apps/semaphore-demo-ruby-kubernetes-7d985f8b7c   3         3         3       2m3
Service IP is displayed after pod. For me, the load balancer is assigned to external IP 35.232.70.45. You need to change it to the one assigned to you by your provider, and then we'll try a new server.
$ curl -w "\n" http://YOUR_EXTERNAL_IP/sing
Now, it's not far from the end.
Victory is at hand
When you use the right CI/CD solution, deploying to Kubernetes is not that difficult. You now have a fully automated continuous delivery pipeline for Kubernetes.
Here are some suggestions for you to fork on Kubernetes and play semaphore-demo-ruby-kubernetes:
-
Create a staging cluster
-
Build a deployment container and run tests in it
-
Extending projects with more microservices