Study and Use of Elasticsearch
1. Use of VMware Workstation software
VMware Workstation is a powerful desktop virtual computer software that provides the best solution for users to simultaneously run different operating systems on a single desktop and develop, test, and deploy new applications.VMware Workstation can simulate a complete network environment on a single physical machine, as well as a portable virtual machine, which is more flexible and advanced than other virtual computer software on the market.
Download Installation
Official download too slow, direct Baidu search VMware Workstation Get the download address.Downloaded foolish installation, not to mention here, installation keys can also Baidu Acquisition A valid VMware Workstation 12 key 5A02H-AU243-TZJ49-GTC7K-3C61N is given here.
Install CentOS Virtual Machine
First go to the official CentOS website to download the CentOS image file. Official address In general, DVD ISO is selected. When you click on DVD ISO, there will be a large number of download addresses. For the download speed, it is best to select from the Actual Country list.Note that x84_64 represents a 64-bit operating system when you select a mirror.
- In VMware Workstation, click File > New, select Typical, and click Next.

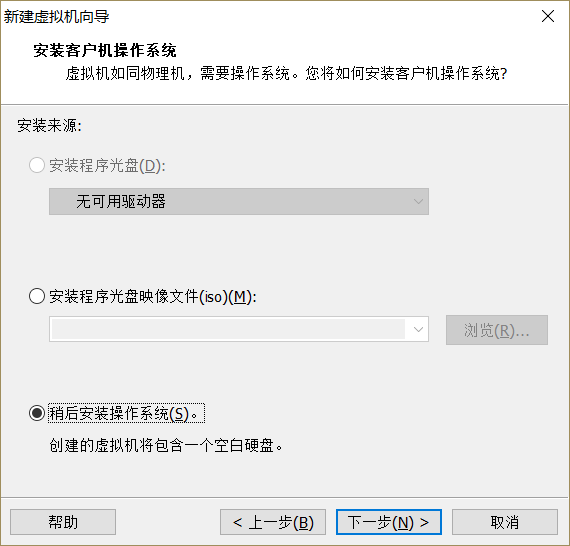
- Choose to install the operating system later and click Next
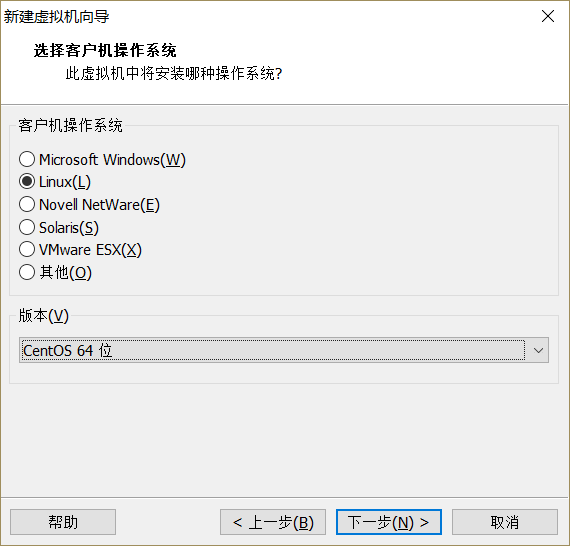
- Select Linux, version CentOS64 bit, click Next
- Fill in the virtual machine name and select the virtual machine location, click Next
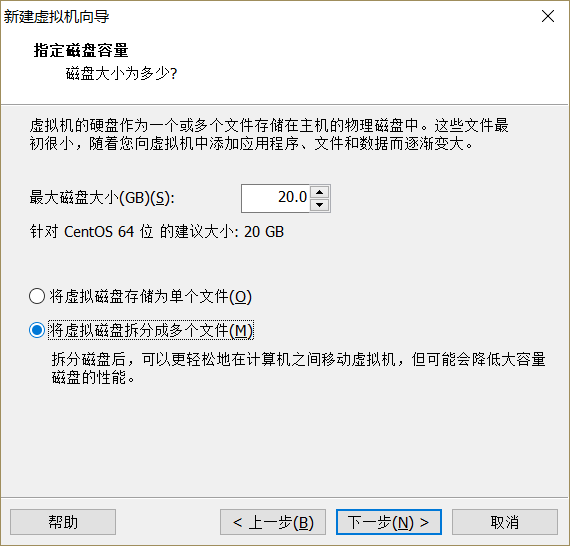
- Allocate 20G of space for the virtual machine, choose to split the virtual machine disk into multiple files, and click Next
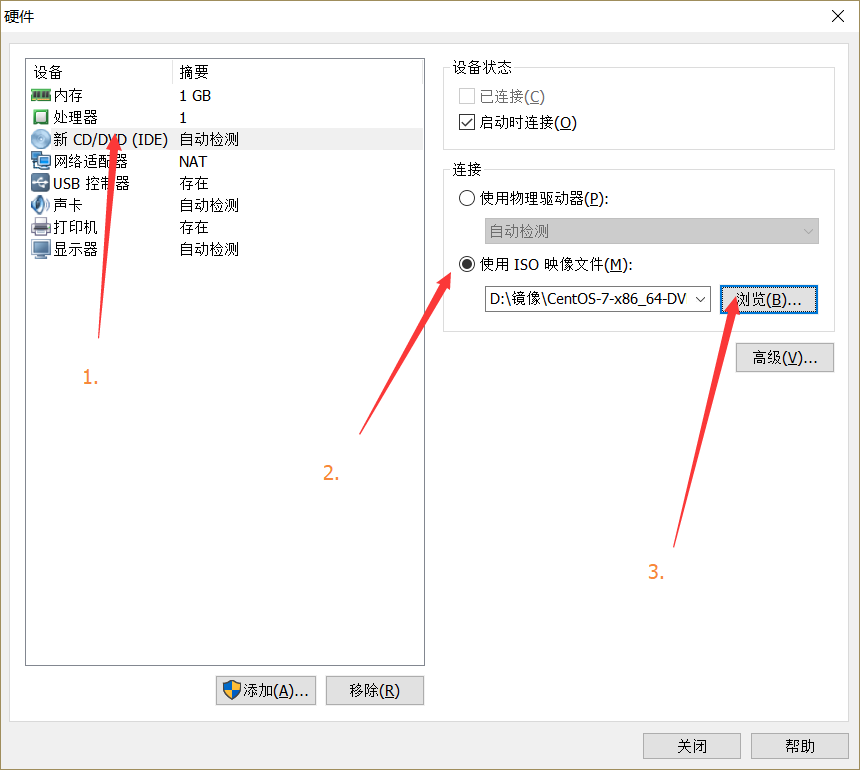
- Click Custom Hardware, select CD/DVD on the left, use ISO image file on the right, click Browse, select previously downloaded CentOS image file, click Close, and click Finish.
- So far, we have found that we have already created a virtual machine in VMware Workstation. Just Click to turn on the virtual machine and install it step by step.
2. Connect virtual machines using Xshell
Because switching to the host is too tedious when using a virtual machine in VMware Workstation and transferring operation files is too cumbersome, we choose to use Xshell and Xftp to operate the virtual machine.
1. Download and install Xshell and Xftp.
2. Open the Xshell, select File > New, fill in the name.Execute the command ip addr in the virtual machine to get the virtual machine IP address, fill in the Xshell host options, and click OK.
3. After prompting for a username password, type it to create it.
4. Open the main window of the connection, select Window > Transfer the new file in the menu bar, then open Xftp for file transfer and operation.
3. Install Java Environment
- Go to the official website to download jdk8 first Download Address , click Accept License Agreement first, and then select the appropriate installation package for your operating system in the list below.Since the author did not use a virtual machine, but installed the CentOS system in the Raspberry Pie, which is an ARM architecture, the author downloaded jdk-8u144-linux-arm32-vfp-hflt.tar.gz.If 64-bit CentOS is installed in the virtual machine, download jdk-8u144-linux-x64.tar.gz.
- Execute the Create Folder command
mkdir /usr/java
And transfer the downloaded file here to execute the decompression command
tar -zxvf jdk-8u144-linux-x64.tar.gz
Modify environment variables later
vi /etc/profile
Join at the bottom
JAVA_HOME=/usr/java/jdk1.8.0_144
CLASSPATH=.:$JAVA_HOME/lib.tools.jar
PATH=$JAVA_HOME/bin:$PATH
export JAVA_HOME CLASSPATH PATH- Test the Java runtime environment and display the version number as normal
java -version4. Install Elasticsearch
- go Elasticsearch website Download the Elasticsearch installation package, note the tar format.
- Execute the Create Folder command
mkdir /usr/software- And transfer the downloaded file here to execute the decompression command
tar -zxvf elasticsearch-5.5.1.tar.gz- Execute the run command and Elasticsearch will start normally if there are no problems
/usr/software/elasticsearch-5.5.1/bin/elasticsearch
The author uses raspberry pie with only 1 G of memory, whereas elasticsearch starts jvm's memory configuration with 2G by default, requiring modification of the configuration file
vi /usr/software/elasticsearch-5.5.1/config/jvm.options
take
-Xms2G
-Xmx2G
Change to
-Xms512M
-Xmx512M
Or smaller. - After startup, we found that only 127.0.0.1:9200 or localhost:9200 can be used for access, not native IP access. Elasticsearch bound the IP run and modified the configuration file
vi /usr/software/elasticsearch-5.5.1/config/elasticsearch.yml
join
network.host: 0.0.0.0
- More startup errors are detailed in http://blog.csdn.net/u012246178/article/details/63253531
- If you find that you cannot access the port using another machine, execute the command to open the port
firewall-cmd --zone=public --add-port=9200/tcp --permanent

firewall-cmd --reload
5. Install Elasticsearch-head
- Start with git clone
git://github.com/mobz/elasticsearch-head.git- Execute the following command to start
cnpm install
grunt server- Modify the elasticsearch.yml configuration file to join
http.cors.enabled: true
http.cors.allow-origin: "*"- Open Browser Access http://localhost:9100
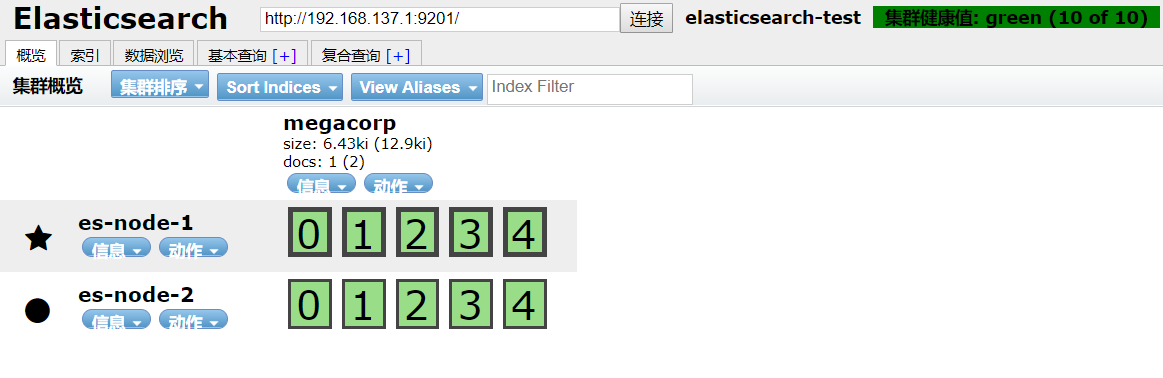
- Enter http://localhost:9201/Click Connection in the top input box
6. Configure Cluster Multi-Node Physical Connections
The authors set up two server two-node clusters using Raspberry-Pie Centos and Windows hosts as follows:
- First write the raspberry pie to the Centos system, and connect the raspberry pie network socket directly to the Windows host network socket (if the Windows host uses a network cable, you need to purchase a usb Ethernet port converter, which is the way I use it).
- Open the network adapter, right-click on the network connected to the Internet, select Properties, switch to the Sharing tab, and share this network with the raspberry pie network (be careful to identify the network here, don't share it incorrectly):
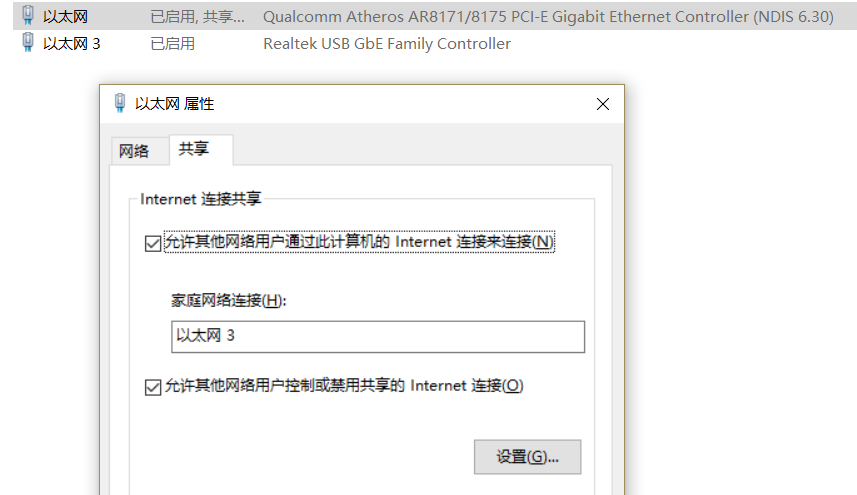
When I connect to the Internet network, the raspberry pie is on Ethernet 3. - Turn on CMD, enter ipconfig, find that the IP of raspberry pie network changes to 192.167.137.1, enter
arp -a
The most special one found in the 192.168.137.1 list of interfaces is the IP address of the raspberry pie (you may need to unplug the raspberry pie cable again)
Interface: 192.168.137.1 --- 0xe
  Internet Address Physical Address Type
  192.168.137.90 b8-27-eb-6f-23-b6 Static
  192.168.137.255 ff-ff-ff-ff-ff-ff static
  224.0.0.2 01-00-5e-00-00-02 Static
  224.0.0.22 01-00-5e-00-00-16 Static
  224.0.0.251 01-00-5e-00-00-fb Static
  224.0.0.252 01-00-5e-00-00-fc Static
  239.255.255.250 01-00-5e-7f-ff-fa Static
  255.255.255.255 ff-ff-ff-ff-ff-ff static
Author here is 192.168.137.90
7. Install and configure Elasticsearch on the raspberry pie
Connect the raspberry pie using the Xshell tool, install Java and Elasticsearch and start using the methods described earlier.Data can be obtained by accessing 192.168.137.90:9200 on a Windows host.
We need to set up two hosts so that the Windows host is the master node.
Modify profile on raspberry pie
vi /usr/software/elasticsearch-5.5.1/config/elasticsearch.ymlThe main changes are as follows:
cluster.name: elasticsearch-test
node.name: es-node-2
node.master: false
http.port: 9202
discovery.zen.ping.unicast.hosts: ["192.168.137.1", "192.168.137.90"]
discovery.zen.minimum_master_nodes: 1
cluster.name is configured with a cluster name and requires two hosts to be identical
node.name is configured with a node name and requires two hosts to be different
node.master is configured to be a master node, where we only have two hosts
http.port is configured with an external port, which needs to be added to the firewall after it is configured here, as described earlier
discovery.zen.ping.unicast.hosts is a configuration that searches for the IP address of a host after startup, requiring the master node, where we also connect to our own IP
discovery.zen.minimum_master_nodes has the smallest master node configured, and when connected to a master node that is less than this configuration, searches continue
The configuration files on the raspberry pie are as follows:
# ======================== Elasticsearch Configuration =========================
#
# NOTE: Elasticsearch comes with reasonable defaults for most settings.
#       Before you set out to tweak and tune the configuration, make sure you
#       understand what are you trying to accomplish and the consequences.
#
# The primary way of configuring a node is via this file. This template lists
# the most important settings you may want to configure for a production cluster.
#
# Please consult the documentation for further information on configuration options:
# https://www.elastic.co/guide/en/elasticsearch/reference/index.html
#
# ---------------------------------- Cluster -----------------------------------
#
# Use a descriptive name for your cluster:
#
#cluster.name: my-application

cluster.name: elasticsearch-test

#
# ------------------------------------ Node ------------------------------------
#
# Use a descriptive name for the node:
#
#node.name: node-1
node.name: es-node-2
node.master: false
#
# Add custom attributes to the node:
#
#node.attr.rack: r1
#
# ----------------------------------- Paths ------------------------------------
#
# Path to directory where to store the data (separate multiple locations by comma):
#
#path.data: /path/to/data
#
# Path to log files:
#
#path.logs: /path/to/logs
#
# ----------------------------------- Memory -----------------------------------
#
# Lock the memory on startup:
#
#bootstrap.memory_lock: true

bootstrap.memory_lock: false
bootstrap.system_call_filter: false

#
# Make sure that the heap size is set to about half the memory available
# on the system and that the owner of the process is allowed to use this
# limit.
#
# Elasticsearch performs poorly when the system is swapping the memory.
#
# ---------------------------------- Network -----------------------------------
#
# Set the bind address to a specific IP (IPv4 or IPv6):
#
#network.host: 192.168.0.1

network.host: 0.0.0.0


http.cors.enabled: true
http.cors.allow-origin: "*"

#
# Set a custom port for HTTP:
#
#http.port: 9200

http.port: 9202

#
# For more information, consult the network module documentation.
#
# --------------------------------- Discovery ----------------------------------
#
# Pass an initial list of hosts to perform discovery when new node is started:
# The default list of hosts is ["127.0.0.1", "[::1]"]
#
#discovery.zen.ping.unicast.hosts: ["host1", "host2"]
discovery.zen.ping.unicast.hosts: ["192.168.137.1", "192.168.137.90"]
#
# Prevent the "split brain" by configuring the majority of nodes (total number of master-eligible nodes / 2 + 1):
#
#discovery.zen.minimum_master_nodes: 3
discovery.zen.minimum_master_nodes: 1
#
# For more information, consult the zen discovery module documentation.
#
# ---------------------------------- Gateway -----------------------------------
#
# Block initial recovery after a full cluster restart until N nodes are started:
#
#gateway.recover_after_nodes: 3
#
# For more information, consult the gateway module documentation.
#
# ---------------------------------- Various -----------------------------------
#
# Require explicit names when deleting indices:
#
#action.destructive_requires_name: true
8. Install and configure Elasticsearch on the Windows host
It is easier to install Elasticsearch on Windows by downloading the compressed package and decompressing it directly.
Modify the configuration file on the Windows host as follows:
cluster.name: elasticsearch-test
node.name: es-node-1
node.master: true
http.port: 9201
discovery.zen.ping.unicast.hosts: ["192.168.137.1", "192.168.137.90"]
discovery.zen.minimum_master_nodes: 1
transport.publish_host: 192.168.137.1
Unlike raspberry pie, here is an additional transport.publish_host configuration.This configuration configures cluster communication IP. Since Windows hosts have multiple IPs, Elasticsearch may start with an external network IP, while discovery.zen.ping.unicast.hosts has an internal network IP configured, so this configuration is added here in case the raspberry party cannot find it.
The overall configuration file is as follows:
# ======================== Elasticsearch Configuration =========================
#
# NOTE: Elasticsearch comes with reasonable defaults for most settings.
#       Before you set out to tweak and tune the configuration, make sure you
#       understand what are you trying to accomplish and the consequences.
#
# The primary way of configuring a node is via this file. This template lists
# the most important settings you may want to configure for a production cluster.
#
# Please consult the documentation for further information on configuration options:
# https://www.elastic.co/guide/en/elasticsearch/reference/index.html
#
# ---------------------------------- Cluster -----------------------------------
#
# Use a descriptive name for your cluster:
#
#cluster.name: my-application
cluster.name: elasticsearch-test
#
# ------------------------------------ Node ------------------------------------
#
# Use a descriptive name for the node:
#
#node.name: node-1
node.name: es-node-1
node.master: true
#
# Add custom attributes to the node:
#
#node.attr.rack: r1
#
# ----------------------------------- Paths ------------------------------------
#
# Path to directory where to store the data (separate multiple locations by comma):
#
#path.data: /path/to/data
#
# Path to log files:
#
#path.logs: /path/to/logs
#
# ----------------------------------- Memory -----------------------------------
#
# Lock the memory on startup:
#
#bootstrap.memory_lock: true
#
# Make sure that the heap size is set to about half the memory available
# on the system and that the owner of the process is allowed to use this
# limit.
#
# Elasticsearch performs poorly when the system is swapping the memory.
#
# ---------------------------------- Network -----------------------------------
#
# Set the bind address to a specific IP (IPv4 or IPv6):
#
#network.host: 192.168.0.1

network.host: 0.0.0.0

#
# Set a custom port for HTTP:
#
#http.port: 9200
http.port: 9201
http.cors.enabled: true
http.cors.allow-origin: "*"
#
# For more information, consult the network module documentation.
#
# --------------------------------- Discovery ----------------------------------
#
# Pass an initial list of hosts to perform discovery when new node is started:
# The default list of hosts is ["127.0.0.1", "[::1]"]
#

transport.publish_host: 192.168.137.1

#discovery.zen.ping.unicast.hosts: ["host1", "host2"]
discovery.zen.ping.unicast.hosts: ["192.168.137.1", "192.168.137.90"]
#
# Prevent the "split brain" by configuring the majority of nodes (total number of master-eligible nodes / 2 + 1):
#
#discovery.zen.minimum_master_nodes: 3
discovery.zen.minimum_master_nodes: 1
#
# For more information, consult the zen discovery module documentation.
#
# ---------------------------------- Gateway -----------------------------------
#
# Block initial recovery after a full cluster restart until N nodes are started:
#
#gateway.recover_after_nodes: 3
#
# For more information, consult the gateway module documentation.
#
# ---------------------------------- Various -----------------------------------
#
# Require explicit names when deleting indices:
#
#action.destructive_requires_name: true
9. Start the cluster
Start Elasticsearch on the Windows host and the raspberry pie and find the following errors in the raspberry pie:
[2017-08-17T02:24:32,335][INFO ][o.e.d.z.ZenDiscovery] [es-node-2] failed to send join request to master [{es-node-1}{5kORGViKQBik0FmauUr09w}{OOrQG-h4QTG2105cDKDRjg}{192.168.137.1}{192.168.137.1:9300}], reason [RemoteTransportException[[es-node-1][192.168.137.1:9300][internal:discovery/zen/join]]; nested: ConnectTransportException[[es-node-2][192.168.137.90:9300] connect_timeout[30s]]; nested: IOException[Connection timed out: no further information: 192.168.137.90/192.168.137.90:9300]; nested: IOException[Connection timed out: no further information]; ]
Analyzing the problem, we see the IP of the Windows host in the error message, indicating that we have searched for it, but there is a connection exception. Look carefully why we are connecting port 9300. Are we not configuring port 9201?Baidu found that the communication between clusters is using port 9300. At this time, it is possible that port 9300 is no longer open in the raspberry pie. Perform the following commands in the raspberry pie
firewall-cmd --zone=public --add-port=9300/tcp --permanent
firewall-cmd --reload
The raspberry pie was found to be correct.Two nodes were found using Elasticsearch-head connection 192.168.137.1:9201