Objectives of information security protection
Confidentiality
Integrity
Usability
Controllability
Non repudiation
Safety protection link
Physical security: environment of various equipment / hosts and machine rooms
System security: the operating system of a host or device
Application Security: various network services and Applications
Network security: control of network access, firewall rules
Data security: information backup and recovery, encryption and decryption
Management safety: various supporting norms, processes and methods
Security attack: STRIDE
Spoofing
[root@centos7 ~]# yum install telnet    #install
[root@centos7 ~]# telnet 127.0.0.1 25   #Send a fake email
Trying 127.0.0.1...
Connected to 127.0.0.1.
Escape character is '^]'.
220 centos7.localdomain ESMTP Postfix
hello
502 5.5.2 Error: command not recognized
mail from: mayun@alibaba.com          #Mailer
250 2.1.0 Ok
rcpt to: wangzhipeng                  #Mail recipient
250 2.1.5 Ok
data                                  #Input content
354 End data with <CR><LF>.<CR><LF>
hi,wang                               #content
I am mayun
welcome to alibab
.                                     #end
250 2.0.0 Ok: queued as 7652F4239442
quit                                  #sign out
221 2.0.0 Bye
Connection closed by foreign host.
[root@centos7 ~]# su - wangzhipeng    #Switch users
Last login: Thu Jun  4 13:05:13 CST 2020 on pts/0
[wangzhipeng@centos7 ~]$ mail
Heirloom Mail version 12.5 7/5/10.  Type ? for help.
"/var/spool/mail/wangzhipeng": 1 message 1 new   #mail
>N  1 mayun@alibaba.com     Thu Jun  4 13:02  15/491
& 1                                 #View content
Message  1:
From mayun@alibaba.com  Thu Jun  4 13:02:05 2020
Return-Path: <mayun@alibaba.com>
X-Original-To: wangzhipeng
Delivered-To: wangzhipeng@centos7.localdomain
Date: Thu,  4 Jun 2020 13:00:48 +0800 (CST)
From: mayun@alibaba.com
Status: R

hi,wang
I am mayun
welcome to alibab
Tampering
Repudiation denial
Information Disclosure
[root@centos7 ~]# yum install telnet-server
[root@centos7 ~]# systemctl start telnet.socket
[root@CentOS6 ~]# telnet 192.168.8.40
Denial of Service
Elevation of Privilege
Symmetric encryption
Symmetric encryption: encryption and decryption use the same key
DES: Data Encryption Standard,56bits
3DES:
AES: Advanced (128, 192, 256bits)
Blowfish,Twofish
IDEA,RC6,CAST5
characteristic:
1. Encryption and decryption use the same key, high efficiency
2. Divide the original data into fixed size blocks and encrypt them one by one
Defect:
1. Too many keys
2. Key distribution
3. Data source cannot be confirmed
Asymmetric encryption
Based on a pair of public key / key pairs
• encrypt one of the key pairs and decrypt the other
Public key: public key
Secret key: keep it by yourself and ensure its privacy; secret key
Features: encrypt data with public key, only the private key matched with it can be used for decryption; and vice versa
Function:
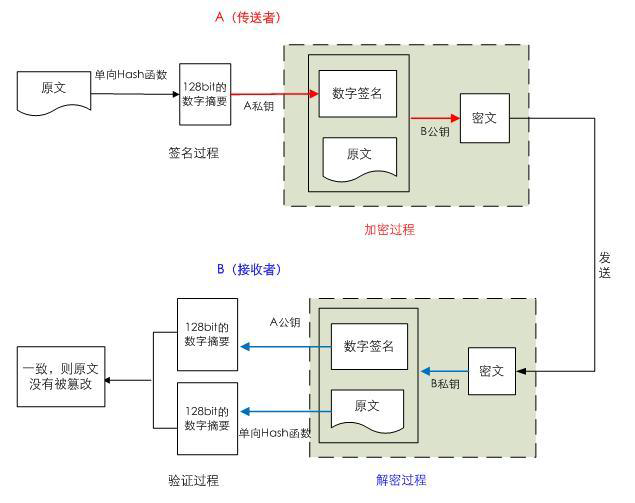
· digital signature: mainly to let the receiver confirm the identity of the sender
Symmetric key exchange: the sender encrypts a symmetric key with the public key of the other party and sends it to the other party
Implement digital signature:
• sender
Generate public key / key pair: P and S
Public key P, secret key S
Use key S to encrypt message M
Send to recipient s
• recipients
Use the sender's public key to decrypt M=P(S(M))
Data encryption: suitable for encrypting small data
Implement encryption:
• recipients
Generate public key / key pair: P and S
Public key P, secret key S
• sender
Encrypting message M with recipient's public key
Send P(M) to receiver
• recipients
Use key S to decrypt: M=S(P(M))
Disadvantages: long key, inefficient encryption and decryption
Algorithm:
RSA (encryption, digital signature)
DSA (digital signature)
ELGamal
Implementation of digital signature and encryption
A–Pb(Sa(M))----B-Pa(Sb(Pb(Sa(M))))
One way hash
Reduce any data to a fixed size "fingerprint"
• any length input
• fixed length output
• if the data is modified, the fingerprint will also change ("no conflict")
• unable to regenerate data from fingerprint ("one way")
Function: data integrity
Common algorithms
md5: 128bits,sha1: 160bits,sha224 ,sha256,sha384,sha512
Common tools
•md5sum | sha1sum [ --check ] file
•openssl,gpg
•rpm -V
md5sum/sha1sum
[root@centos6 ~]#md5sum /etc/passwd
092d54e226b787a4230d235a8bc2f798  /etc/passwd
[root@centos6 ~]#md5sum /etc/fstab
7c44bfc46698657debaf15d1a8ef1770  /etc/fstab
[root@centos6 ~]#md5sum /etc/fstab >md5.log
[root@centos6 ~]#md5sum -c md5.log
/etc/fstab: OK
[root@centos6 ~]#echo >>/etc/fstab
[root@centos6 ~]#md5sum -c md5.log
/etc/fstab: FAILED
md5sum: WARNING: 1 of 1 computed checksum did NOT match
[root@centos6 ~]#vim /etc/fstab
[root@centos6 ~]#md5sum -c md5.log
/etc/fstab: OK
If you encrypt the original text once, it will take a lot of time to decrypt, not often used
Symmetric encryption combined with asymmetric encryption
gpg implementation of symmetric encryption
##A computer
[root@centos6 ~]# gpg -c passwd
[root@centos6 ~]# scp passwd.gpg 192.168.20.20:/data
##B computer
[root@centos6 ~]# gpg -d passwd.gpg    #Output screen only
[root@centos6 ~]# gpg -o passwd -d passwd.gpg    #Decrypt to passwd
Asymmetric encryption by gpg
##host A
[root@centos6 ~]# gpg --gen-key     #Generate wangge public key
[root@centos6 ~]# gpg --list-keys    #List keys
/root/.gnupg/pubring.gpg
------------------------
pub   2048R/B1E4F768 2020-06-04
uid                  wangge
sub   2048R/E845C612 2020-06-04
[root@centos6 ~]#ll /root/.gnupg
total 24
drwx------. 2 root root 4096 Jun  4 20:13 private-keys-v1.d
-rw-------. 1 root root 1165 Jun  4 20:23 pubring.gpg    #Public key
-rw-------. 1 root root 1165 Jun  4 20:23 pubring.gpg~
-rw-------. 1 root root  600 Jun  4 20:23 random_seed
-rw-------. 1 root root 2543 Jun  4 20:23 secring.gpg    #Private key
-rw-------. 1 root root 1280 Jun  4 20:23 trustdb.gpg
[root@centos6 ~]#gpg -a --export -o wangge.pubkey     #Generate public key
root@centos6 ~]#ls
anaconda-ks.cfg  install.log  install.log.syslog  md5.log  passwd  wangge.pubkey
[root@centos6 ~]#scp wangge.pubkey 192.168.20.14:/data   #Send public key to host B
root@centos6 ~]#gpg -o passwd -d /root/passwd.gpg    #decrypt


##host B
[root@centos6 ~]# gpg --gen-key     #Generate public key
[root@centos6 ~]# gpg --list-keys
[root@centos6 ~]# gpg --list-keys
[root@centos6 ~]# gpg --import /data/wangge.pubkey    #Import wangge public key
gpg: key B1E4F768: public key "wangge" imported
gpg: key DBCE41FE: public key "admin" imported
gpg: Total number processed: 2
gpg:               imported: 2  (RSA: 2)
[root@centos6 ~]# gpg --list-keys    #see
[root@centos6 ~]# gpg -e -r wangge passwd    #Encryption with gongge public key
[root@centos6 ~]# ls
anaconda-ks.cfg  install.log  install.log.syslog  passwd  passwd.gpg
[root@centos6 ~]# scp passwd.gpg 192.168.20.20:/root      #Send to host A
[root@centos6 ~]# gpg --delete-secret-keys zhang    #Delete private key
[root@centos6 ~]# gpg --delete-keys wangge    #Delete public key
openssl
[root@localhost ~]# rpm -q openssl
openssl-1.0.2k-19.el7.x86_64
[root@localhost ~]# rpm -ql openssl
/usr/bin/openssl
Symmetric encryption
[root@localhost /data]# cp /etc/passwd passwd
[root@localhost /data]# openssl enc -e -des3 -a -in passwd -out passwd.enc
enter des-ede3-cbc encryption password:
Verifying - enter des-ede3-cbc encryption password:
[root@localhost /data]# ls
passwd  passwd.enc
[root@localhost /data]# openssl enc -e -des3 -a -in passwd -out passwd.enc
enter des-ede3-cbc encryption password:
bad password read
[root@localhost /data]# openssl enc -d -des3 -a -in passwd.enc -out passwd.log
enter des-ede3-cbc decryption password:
[root@localhost /data]# ls
passwd  passwd.enc  passwd.log
[root@localhost /data]# md5sum passwd passwd.log
b60622a951744b710cdcfbf35495d0d1  passwd
b60622a951744b710cdcfbf35495d0d1  passwd.log
User password
md5sum, sha1sum, sha224sum,sha256sum,sha512sum
[root@localhost /data]# md5sum passwd
b60622a951744b710cdcfbf35495d0d1  passwd
[root@localhost /data]# md5sum passwd.log
b60622a951744b710cdcfbf35495d0d1  passwd.log
[root@localhost /data]# md5sum passwd
b60622a951744b710cdcfbf35495d0d1  passwd
[root@localhost /data]# openssl dgst -md5 passwd
MD5(passwd)= b60622a951744b710cdcfbf35495d0d1
###The hash value of the same file is easy to crack. The hash value changes after adding salt
[root@localhost /data]# openssl passwd -1 -salt wang    #hash the input password
Password:
$1$wang$.4i2cdKzZ4iuygULQQqbR1
[root@localhost /data]# openssl passwd -1 -salt wang   #Same salt, same hash
Password:
$1$wang$.4i2cdKzZ4iuygULQQqbR1
[root@localhost /data]# openssl passwd -1 -salt wan
Password:
$1$wan$u7jA2OGE14aAvEvp8LLgD0
random number
NUM: indicates the number of bytes. Use - hex. Each character is hexadecimal, equivalent to 4-bit binary. The number of characters is NUM*2
[root@localhost /data]# openssl rand -base64 12
XDdxAuQm4KWaabBQ
[root@localhost /data]# openssl rand -base64 4
PqiGmQ==
[root@localhost /data]# openssl rand -base64 3
S4mj
[root@localhost /data]# openssl rand -base64 6
unp31v48
[root@localhost /data]# openssl rand -base64 5
Ilxbf6I=
[root@localhost /data]# echo ab |base64
YWIK
[root@localhost /data]# echo abc |base64
YWJjCg==
###When it is a multiple of 3, there is no =, = to complement the random number 3 bits (8 bytes / bit) 24 bytes, base64 encodes 6 bytes as one bit, 24 bytes as four digits, only the common divisor of 6 and 8 bytes 24 bytes (3 bits) multiple, there is no need to be incomplete, when the remainder is not enough, fill 0 at the last, display=
[root@localhost /data]# openssl rand -hex 12
75511ae27b7608118daee1d8
[root@localhost /data]# openssl rand -hex 4
93f881b6
###-Hex hex, four bytes are 1 bit, twice the number 12
Asymmetric encryption
[root@localhost /data]# (umask 066;(umask 066;openssl genrsa -out test.key -des 2048)
Generating RSA private key, 2048 bit long modulus
...+++
...+++
e is 65537 (0x10001)
Enter pass phrase for test.key:
Verifying - Enter pass phrase for test.key:
# Encryption, generating 2048 bit private key with des encryption
[root@localhost /data]# openssl rsa -in test.key -out test1.key   #decrypt
Enter pass phrase for test.key:
writing RSA key
[root@localhost /data]# (umask 066;openssl genrsa -out test2.key  2048)  #Generate private key directly
Generating RSA private key, 2048 bit long modulus
.................................+++
...........................+++
e is 65537 (0x10001)
[root@localhost /data]# openssl rsa -in test1.key  -pubout -out test1.key.pub   #Export public key
writing RSA key
[root@localhost /data]# openssl rsa -in test2.key  -pubout -out test2.key.pub
writing RSA key
Random number generator
/dev/random: return random number from entropy pool only; random number exhausted, blocking
/Dev / random: return random number from entropy pool; when the random number is exhausted, the software will generate pseudo-random number, non blocking
[root@localhost /data]# Cat / dev / random | Base64 fast
[root@localhost /data]# cat /dev/random |base64
Experiment: issuing certificate based on private CA
[root@localhost /data]# cat /etc/pki/tls/openssl.cnf
[ CA_default ]
dir		      = /etc/pki/CA	     	# Where everything is kept
certs		  = $dir/certs	    	# Where the issued certs are kept   #Issued certificate
crl_dir		  = $dir/crl	    	# Where the issued crl are kept
database	  = $dir/index.txt  	# database index file.   #Build certificate index database file
#unique_subject	= no			    # Set to 'no' to allow creation of
			            	    	# several ctificates with same subject.
new_certs_dir = $dir/newcerts		# default place for new certs.

certificate	  = $dir/cacert.pem 	# The CA certificate      #Self signed
serial		  = $dir/serial 		# The current serial number  #Specifies the serial number of the first issued certificate
crlnumber	  = $dir/crlnumber	    # the current crl number   #Specify the serial number of the first revocation certificate
					                # must be commented out to leave a V1 CRL
crl		      = $dir/crl.pem 		# The current CRL
private_key	  = $dir/private/cakey.pem# The private key    #Private key
RANDFILE	  = $dir/private/.rand	# private random number file
[ policy_match ]
countryName	        	= match    (Match) the information required to be filled in shall follow the CA Setting information must be consistent
stateOrProvinceName 	= match
organizationName	    = match
organizationalUnitName	= optional (Optional) optional, with CA Setting information can be inconsistent
commonName	        	= supplied (Provided) this application information must be completed
emailAddress	    	= optional
hostA  The server
1,establish CA
[root@localhost /etc/pki/CA]# (umask 066;openssl genrsa -out private/cakey.pem 4096)  #Generate private key
[root@localhost /etc/pki/CA]# openssl req -new -x509 -key private/cakey.pem -out cacert.pem -days 3650   #Generate self signed certificate
## days - New: generate new certificate signing request - x509: special for CA to generate self signed certificate - key: the private key file used when generating the request
[root@localhost /etc/pki/CA]# openssl x509 -in cacert.pem -noout -text   #View Certificate
[root@localhost /etc/pki/CA]# sz cacert.pem   #Download to win with the suffix of crt. You can view the graphic certificate
[root@localhost /etc/pki/CA]# touch index.txt  #create a file
[root@localhost /etc/pki/CA]# touch serial
[root@localhost /etc/pki/CA]# echo 01 >/etc/pki/CA/serial    #Write certificate number


hostB  Client
[root@centos6 /data/apps]# (umask 066;openssl genrsa -out app.key 1024)   #Generate private key
[root@centos6 /data/apps]# openssl req -new -key app.key -out app.csr   #Generate private CA
[root@centos6 /data/apps]# scp /data/apps/app.csr 192.168.10.6:/data  #To hostA

hostA
[root@localhost /etc/pki/CA]# openssl ca -in /data/app.csr -out certs/app.crt -days 100
[root@localhost /etc/pki/CA]# openssl ca cat index.txt   #see
V	200914094628Z		01	unknown	/C=CN/ST=chongqing/L=chongqing/O=magedu
V	200914094729Z		02	unknown	/C=CN/ST=chongqing/L=Newbury/O=wang
[root@localhost /etc/pki/CA]# cat serial
03
[root@localhost /etc/pki/CA]# md5sum certs/app.crt newcerts/02.pem    #Same file
b36c40682ff4a37a1045ac206f3250eb  certs/app.crt
b36c40682ff4a37a1045ac206f3250eb  newcerts/02.pem
[root@localhost /etc/pki/CA]# openssl ca -status 01    #View status
Using configuration from /etc/pki/tls/openssl.cnf
01=Valid (V)


hostC
[root@localhost ~]# (umask 066;openssl genrsa -out app.key 1024)   #Generate private key
Generating RSA private key, 1024 bit long modulus
...................................................................++++++
..++++++
e is 65537 (0x10001)
[root@localhost ~]# openssl req -new -key app.key -out app.csr    #Generate private CA
#The organization is different. An error will be reported when hostA is issued
[root@localhost ~]# scp app.csr 192.168.10.7:/data

hostA
[root@localhost /etc/pki/CA]# openssl ca -in /data/app.csr -out certs/app2.crt -days 100
Using configuration from /etc/pki/tls/openssl.cnf
unable to load number from /etc/pki/CA/serial
error while loading serial number
140423971010448:error:0D066096:asn1 encoding routines:a2i_ASN1_INTEGER:short line:f_int.c:210:
#Different organizations report errors. Change the match value of the related value to optional or policy = policy_ Change match to policy_anything
[root@localhost /etc/pki/CA]# cat index.txt.attr   #Multiple certificates can be issued when it is no
unique_subject = yes

[root@localhost /etc/pki/CA]# openssl ca -revoke newcerts/01.pem    #Revocation
Using configuration from /etc/pki/tls/openssl.cnf
Revoking Certificate 01.
Data Base Updated
[root@localhost /etc/pki/CA]# cat index.txt   #Change to R after viewing revocation
R	200914094628Z	200606095140Z	01	unknown	/C=CN/ST=chongqing/L=chongqing/O=magedu
V	200914094729Z		02	unknown	/C=CN/ST=chongqing/L=Newbury/O=wang
[root@localhost /etc/pki/CA]# echo 01 > /etc/pki/CA/crlnumber   #Specify the number of the first revocation certificate
[root@localhost /etc/pki/CA]# openssl ca -gencrl -out crl.pem    #Update certificate revocation list
Using configuration from /etc/pki/tls/openssl.cnf
[root@localhost /etc/pki/CA]# openssl crl -in crl.pem -noout -text   #View crl file
SSH
-p port: the port on which the remote server listens
-b: Specify the source IP of the connection
-v: Debug mode
-C: Compression mode
-10: Support x11 forwarding
-t: Forced pseudo tty assignment
When the user connects to the ssh server remotely, the ssh server / etc / SSH / SSH will be copied_ host* key.pub (the default value of CentOS7 is ssh_host_ecdsa_key.pub )The public key in the file to ~. / SSH / know of the client_ Hosts. The next time you connect, the corresponding private key will be automatically matched. If not, the connection will be rejected
[root@localhost /etc/pki/CA]# rpm -ql openssh-server   #service
/usr/sbin/sshd
/usr/lib/systemd/system/sshd.service
[root@localhost /etc/pki/CA]# rpm -ql openssh-clients   #client
/usr/bin/ssh
[root@localhost /etc/pki/CA]# systemctl status sshd   #View service status
[root@localhost /etc/pki/CA]# ssh 192.168.10.6
The authenticity of host '192.168.10.6 (192.168.10.6)' can't be established.
RSA key fingerprint is SHA256:AOfgf9A2HYCSI1N4vzYwa+j3hg6HbWCYlD6YQWS/9MI.
RSA key fingerprint is MD5:7d:c9:8b:a3:b5:03:b0:2a:fc:8e:5b:43:b5:35:5f:e5.
Are you sure you want to continue connecting (yes/no)?
#Keep the hash value of the client for the first connection, and do not enter yes later,
[root@localhost ~]# cat .ssh/known_ Client hash value saved by hosts (/ etc/ssh/ssh_host_rsa_key.pub )
##If a replacement computer requires a connection, remove the known_ The hash value of the hosts related IP is enough

[root@localhost ~]# ssh wang@192.168.10.6 ls  #Follow the command directly and exit after execution
wang@192.168.10.6\'s password:
Desktop
Documents
[root@localhost ~]# cat /etc/ssh/sshd_config |grep Port  #Modify default port
#Port 22

[root@localhost ~]# ip a a 192.168.10.70 dev ens34  #Add virtual IP
[root@localhost ~]# ssh wang@192.168.10.6 -p 22 -b 192.168.10.70  #-p specify port - b specify login IP
[wang@centos6 ~]$ ss -nt   #View connections
State       Recv-Q Send-Q                                 Local Address:Port                                   Peer Address:Port
ESTAB       0      168                                     192.168.10.6:22                                    192.168.10.70:38705

A------->B-------->C----->D
A Cannot connect directly D When:
//1, A connect B connect C connect D
//2, ssh -t B ssh -t C ssh D One command connection
Public key exchange on first connection
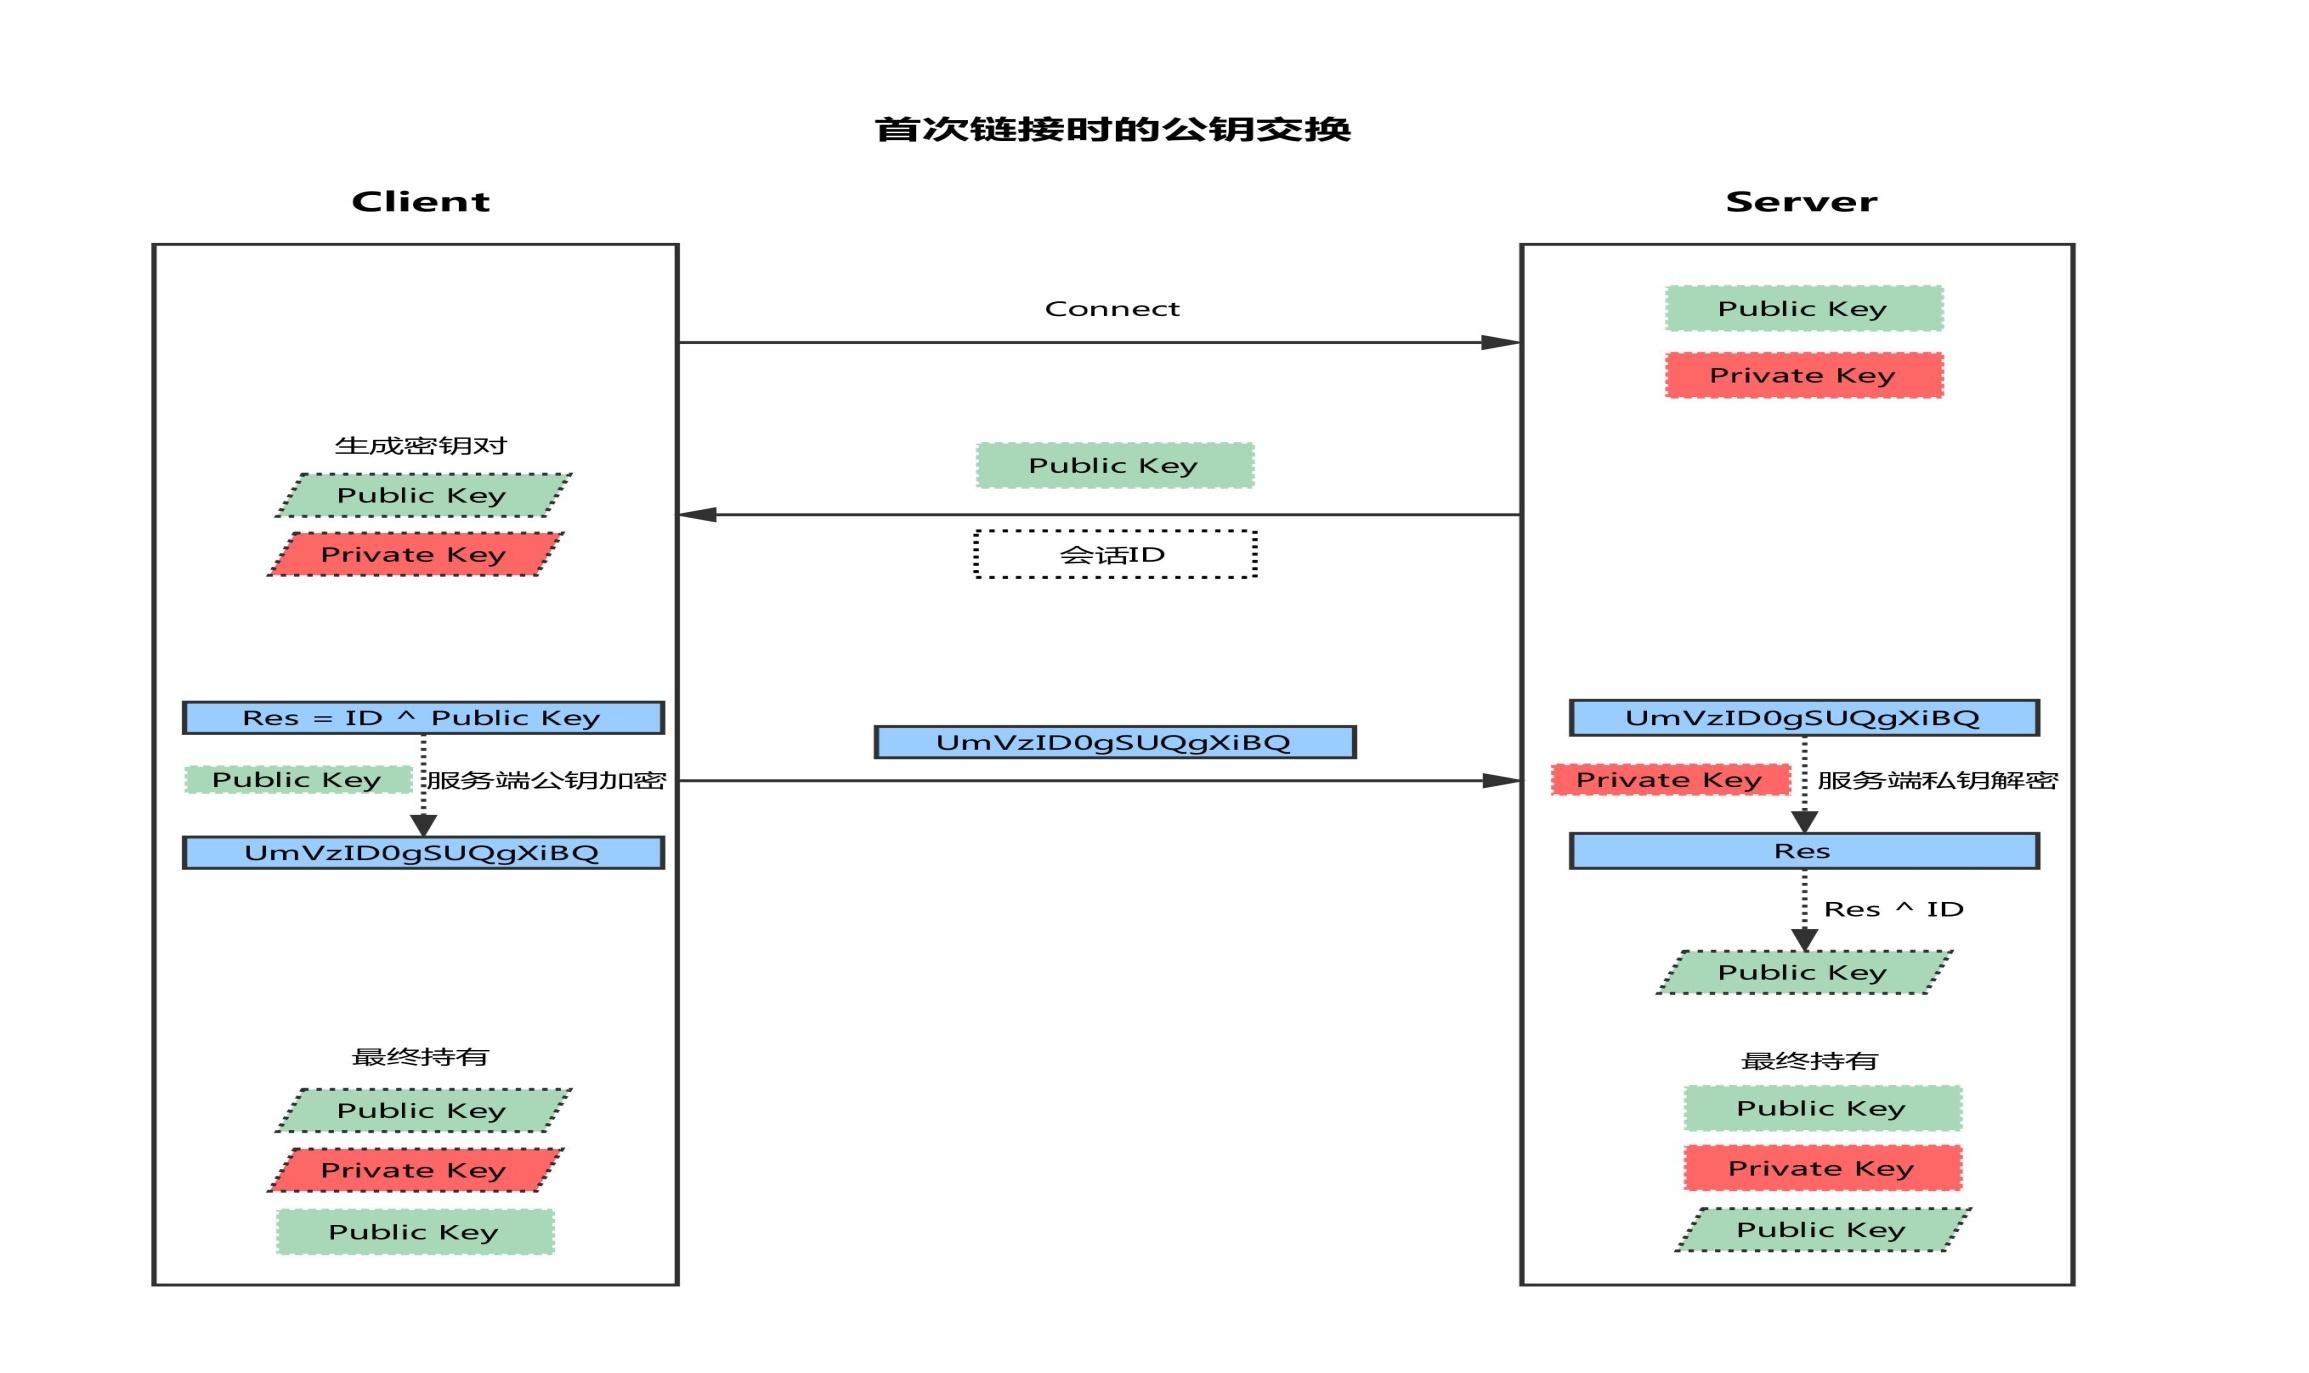
The client initiates a link request
The server returns its own public key and a session ID (in this step, the client gets the server public key)
The client generates the key pair
The client uses its own public key XOR session ID to calculate a value of Res and encrypt it with the public key of the server
The client sends the encrypted value to the server, and the server decrypts it with the private key to get Res
The server uses the decrypted value Res exclusive or session ID to calculate the client's public key (in this step, the server gets the client's public key)
Ultimately: each party holds three secret keys, one for its own public key, one for private key, and the other's public key. All subsequent communications will be encrypted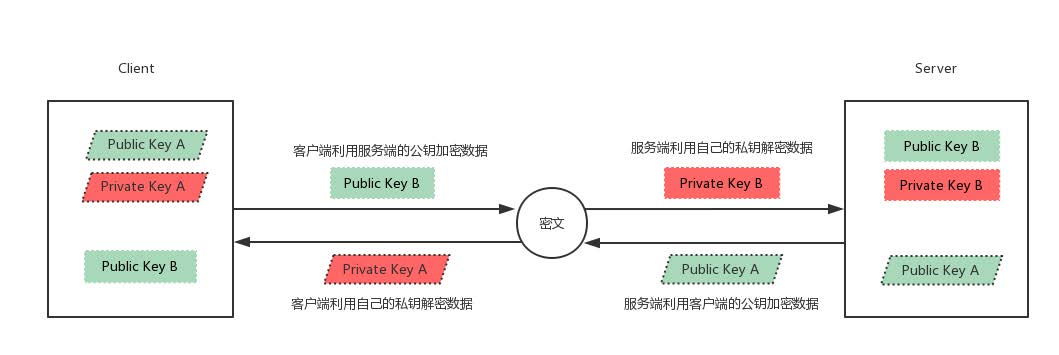
Password based login verification
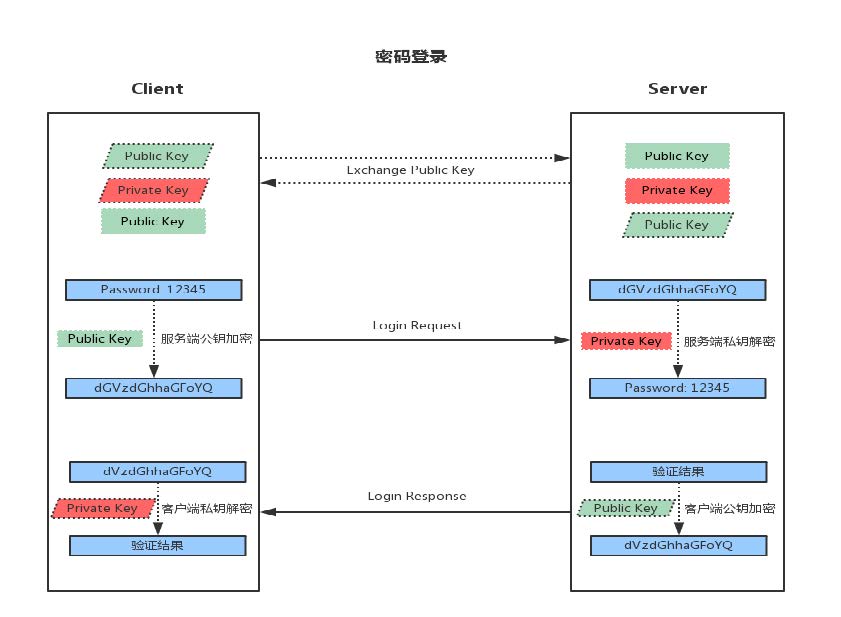
1. When the client initiates the ssh request, the server will send its public key to the user
2. The user will encrypt the password according to the public key sent by the server
3. The encrypted information is returned to the server, which decrypts it with its own private key. If the password is correct, the user logs in successfully
key based login verification
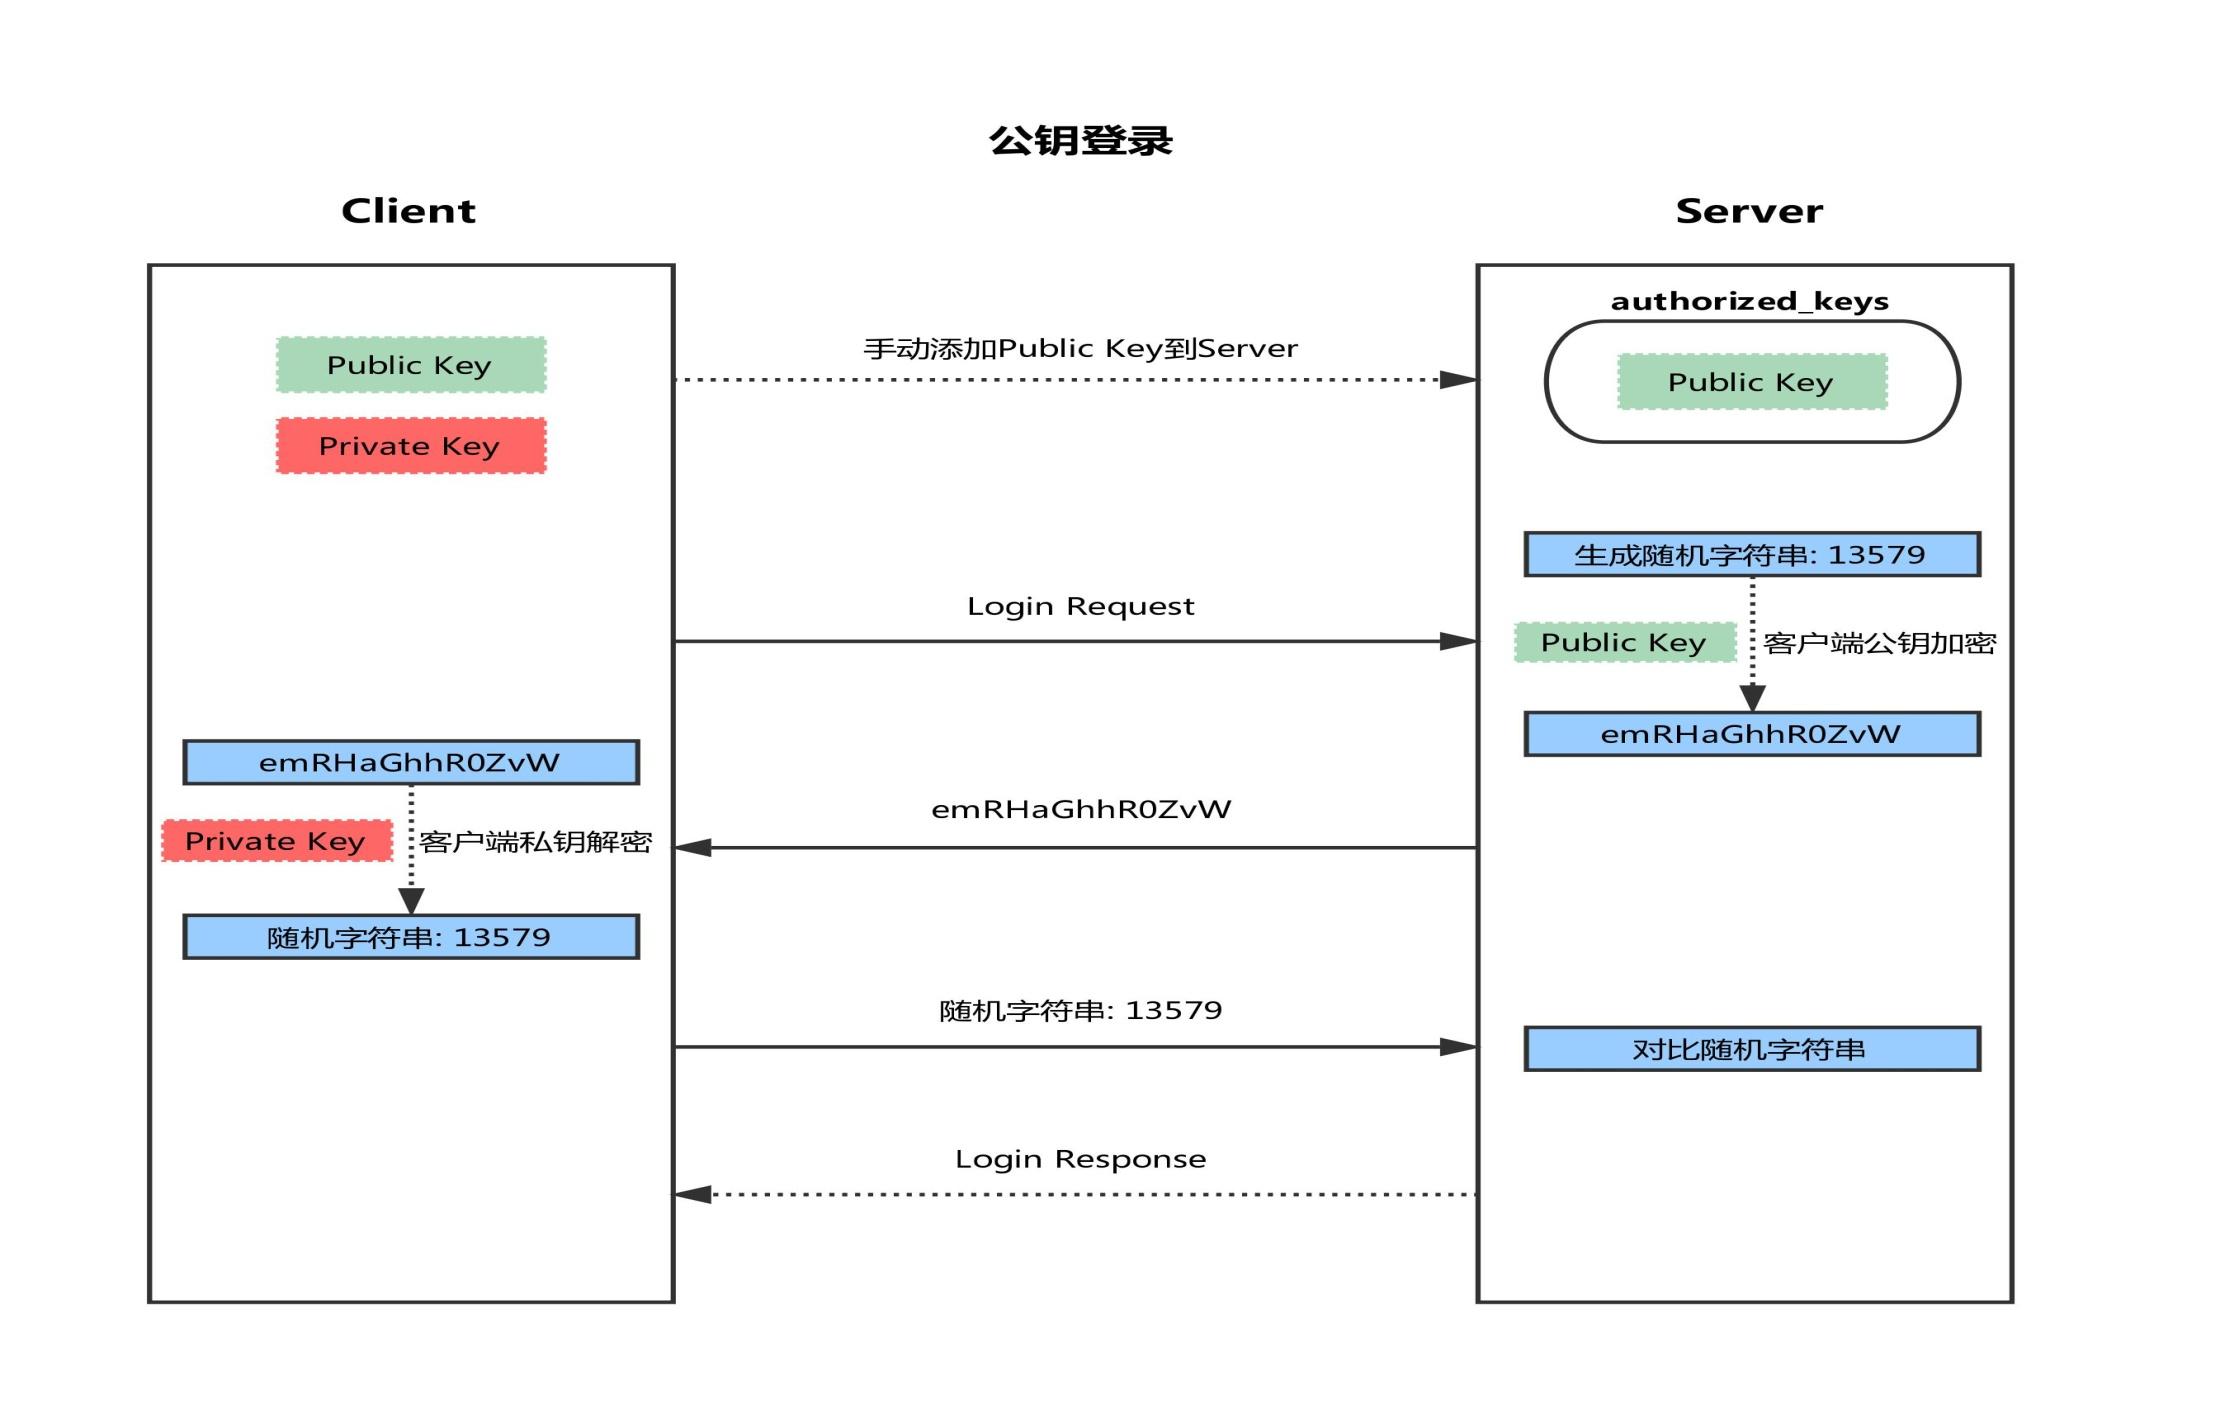
Firstly, a pair of SSH keygen is generated at the client
Copy the public key SSH copy ID of the client to the server
3. When the client sends a connection request again, including ip and user name
4. After receiving the client's request, the server will go to authorized_ Search in keys, if there are responding IP and users, a string will be randomly generated, for example: magedu
5. The server encrypts the public key copied from the client and sends it to the client
6. After receiving the message from the server, the client will use the private key to decrypt, and then send the decrypted string to the server
7. After receiving the string sent by the client, the server compares it with the previous string. If it is consistent, password free login is allowed
Experiment: ssh verification based on key
[wang@centos6 ~]$ ssh-keygen   #-Tspecify algori t hm des
Generating public/private rsa key pair.   #Default rsa algorithm
Enter file in which to save the key (/home/wang/.ssh/id_rsa):
[wang@centos6 ~/.ssh]$ ssh-copy-id -i id_rsa.pub root@192.168.10.7
[wang@centos6 ~]$ ssh root@192.168.10.7   #Value to login, do not enter password
Last login: Sat Jun  6 19:28:22 2020 from 192.168.10.6
 hi,dangerous!
[wang@centos6 ~]$ scp /etc/fstab root@192.168.10.7:/data/fstab.bak   #Direct login
fstab                                                                                            100%  899     0.9KB/s   00:00
The key based login does not need to be verified. If the private key is lost, it is very dangerous (someone can log in), so you can add a password to the private key
[root@centos6 ~]# ssh-keygen -p         #Private key plus password
[root@centos6 ~]# ssh-keygen -p -f .ssh/id_rsa   #-f specifies the private key
[root@centos6 ~]# ssh 192.168.10.7
Enter passphrase for key '/root/.ssh/id_rsa':
But after the key is added with a password, it is too troublesome to input the password (it can be the same) every time. It can be used as an agent to let the agent remember the password, and no longer input the password every time when logging in
[root@centos6 ~]# ssh-agent bash   #Enable agent
 hi,dangerous!
[root@centos6 ~]# ps aux |grep ssh     #View service SSH agent
root       2217  0.0  0.0  66288  1212 ?        Ss   08:14   0:00 /usr/sbin/sshd
root      31302  0.0  0.2 102132  4164 ?        Ss   11:40   0:00 sshd: root@pts/2
root      31858  0.0  0.0  57336   760 ?        Ss   14:55   0:00 ssh-agent bash
root      31869  0.0  0.0 103328   860 pts/2    S+   14:55   0:00 grep ssh
[root@centos6 ~]# ssh-add    #Add password
Enter passphrase for /root/.ssh/id_rsa:
Identity added: /root/.ssh/id_rsa (/root/.ssh/id_rsa)
[root@centos6 ~]# ssh 192.168.10.7   #Direct login
Last login: Sun Jun  7 16:52:42 2020 from 192.168.10.16
 hi,dangerous!
XSHELL login based on key authentication
Tool options - new user secret key generation Wizard - properties - public key - save as file - export to desktop
root@localhost ~]# cat id_rsa_2048.pub >> .ssh/authorized_keys
Experiment: expect script based on key
To manage multiple devices, the password of the device to be managed should be consistent with that of the user
[root@centos6 /data]# cat hosts.txt
192.168.10.6
192.168.10.7
192.168.10.17
[root@centos6 /data]# vim sshkey_expect.sh
ssh-keygen -t rsa -P "" -f /root/.ssh/id_rsa &>/dev/null && echo "ssh key is created"
rpm -q expect &>/dev/null || yum -y install expect &>/dev/null
while read ip ;do
expect <<EOF
set timeout 20
spawn ssh-copy-id -i /root/.ssh/id_rsa.pub root@$ip
expect {
	"yes/no" { send "yes\n";exp_continue }
	"password" { send "a!111111\n" }
}
expect eof
EOF
echo "$ip is ready"
done <hosts.txt
[root@centos6 /data]# bash -n sshkey_expect.sh    #Check grammar
Experiment: multiple devices boarding each other
The above method can only manage multiple devices with one client. The following method needs to realize mutual management of multiple devices (all devices use the same key)
[root@centos6 /data]# ssh-keygen -t rsa -P "" -f /root/.ssh/id_rsa
[root@centos6 /data]# ssh-copy-id -i /root/.ssh/id_rsa.pub 127.0.0.1
[root@centos6 /data]# scp -r /root/.ssh 192.168.10.6:/root/
[root@centos6 /data]# scp -r /root/.ssh 192.168.10.7:/root/
[root@centos6 /data]# scp -r /root/.ssh 192.168.10.17:/root/
scp
-C compressed data stream
-r recursive replication
-p keep the attribute information of the original file
-q silent mode
-P PORT indicates the listening port of remote host
[root@localhost ~]# scp /etc/fstab 192.168.10.17:/data  #Upload local fstab to remote
fstab                                                                                            100%  595   236.8KB/s   00:00
[root@localhost ~]# scp 192.168.10.17:/etc/fstab /data   #Download remote fstab to local
fstab                                                                                            100%  595     1.0MB/s   00:00
[root@localhost ~]# scp 192.168.10.17:/etc/fstab 192.168.10.6:/data  #Copy one to another
[root@centos6 /data]# scp -r /data 192.168.10.17:/data
id_rsa                                                                                           100% 1675     1.6KB/s   00:00
sshkey_expect.sh                                                                                 100%  737     0.7KB/s   00:00
hosts.txt                                                                                        100%   40     0.0KB/s   00:00
[root@centos6 /data]# echo >>hosts.txt     #modify
[root@centos6 /data]# scp -r /data 192.168.10.17:/data
id_rsa                                                                                           100% 1675     1.6KB/s   00:00
sshkey_expect.sh                                                                                 100%  737     0.7KB/s   00:00
hosts.txt                                                                                        100%   41     0.0KB/s   00:00
When scp copies files, it will copy them completely. After modifying files, it will copy them completely. The efficiency is too low. rsync can copy based on attributes
rsync
Faster than scp, only copying different files, mainly for data synchronization
Common options:
-n simulate the replication process
-v display detailed process
-r recursively copy the tree
-p permission reserved
-Tretain timestamp
-g keep group information
-o keep owner information
-l copy the soft link file itself (default)
-L copy the file pointed by the soft link file
-A archive, equivalent to – rlptgoD, but not ACL (- a) and SELinux attributes (- X)
[root@centos6 /data]# rsync -av /data 192.168.10.17:/data
sending incremental file list
data/
data/hosts.txt
data/id_rsa
data/sshkey_expect.sh
data/lost+found/
[root@centos6 /data]# echo >>hosts.txt
[root@centos6 /data]# rsync -av /data 192.168.10.17:/data
sending incremental file list
data/hosts.txt
rsync -av /etc server1:/tmp copy directory and files under directory. Note that "/" cannot be added when copying directory
rsync -av /etc/ server1:/tmp only copies files in the directory
Experiment: backup every ten minutes
[root@centos6 /data]# cat rsync.sh
rsync -av /var/www/html root@192.168.10.17:/data
[root@centos6 /data]# crontab -e   #Edit scheduled task: back up every 10 minutes
*/10 * * * * /data/rsync.sh
[root@centos6 /data]# crontab -l    #View scheduled tasks
*/10 * * * * /data/rsync.sh
sftp
Basically not used
[root@centos6 /data]# sftp 192.168.10.7
Connecting to 192.168.10.7...
sftp> ls
anaconda-ks.cfg           id_rsa_2048               id_rsa_2048.pub           initial-setup-ks.cfg      reset.sh
sftp> help    #view help
pssh
Usage: pssh [OPTIONS] command [...]
Written based on python, it can execute commands on multiple servers (less than 50), and can also copy files. It provides multiple parallel tools based on ssh and scp
-h: Host file list, content format "[user@]host[:port]"
-H: Host string, content format "[user@]host[:port]"
-A: Manual password mode
-i: Internal processing information output of each server
-l: User name for login
-p: Number of concurrent threads [optional]
-o: Output file directory [optional]
-e: Error output file [optional]
-t: TIMEOUT setting, 0 unlimited [optional]
-O: SSH options
-P: Print out server return information
-v: Detailed mode
[root@centos6 /data]# yum -y install pssh
[root@centos6 /data]# pssh -H "192.168.10.7" -H "192.168.10.17" -A -i hostname   #-H IP can be abbreviated - A enter password manually
[root@centos6 /data]# pssh -H "192.168.10.7 192.168.10.17" -A -i hostname   #Same effect
###The password can only be entered once. Therefore, all managed host users and passwords must be the same, based on key authentication management
[root@centos6 /data]# pssh -H "192.168.10.7 192.168.10.17"-i hostname
[root@centos6 /data]# pssh -h hosts.txt -i hostname
[root@centos6 /data]# pssh -h hosts.txt -i sed -i 's#SELINUX=enforcing#SELINUX=disabled#' /etc/selinux/config   #Modify selinux
[root@centos6 /data]# pssh -h hosts.txt -i -o /data/ hostname  #-o output saved in directory
[root@centos6 /data]# ls
192.168.10.17  192.168.10.6  192.168.10.7
[root@centos6 /data]# rpm -ql pssh
/usr/bin/pnuke
/usr/bin/prsync
/usr/bin/pscp.pssh
/usr/bin/pslurp
/usr/bin/pssh
pdsh: Parallel remote shell program is a multithreaded remote shell client that can execute commands on multiple remote hosts in parallel. pdsh can use several different remote shell services, including the standard "rsh", Kerberos IV, and ssh
mussh: Multihost SSH wrapper is a shell script that allows you to execute commands or scripts on multiple hosts through ssh using one command. mussh can use ssh agent and RSA / DSA key to reduce password input
Note: the above tools are included in the EPEL source
pscp.pssh
Bulk copy local files to remote hosts
[root@centos6 /data]# pscp.pssh -h hosts.txt /data/sshkey_expect.sh /data  #Put the local sshkey_expect.sh Copy to remote host dataxia
[1] 18:18:47 [SUCCESS] 192.168.10.6
[2] 18:18:47 [SUCCESS] 192.168.10.17
[3] 18:18:52 [SUCCESS] 192.168.10.7
[root@centos6 /data]# pscp.pssh -H 192.168.10.7 /root/test/curl.sh /app/
[root@centos6 /data]# pscp.pssh -H 192.168.10.7 /root/f1.sh /root/f2.sh /app/  #Copy f1, f2 to app
[root@centos6 /data]# pscp.pssh -H 192.168.10.7 -r /root/test/ /app/  #Copy test directory to app
pslurp
Bulk copy files from remote host to local
-L specifies the directory to download from the remote host to the local storage. Local is the name after downloading to the local
-r recursively copying directories
[root@centos6 /data]# pslurp -h hosts.txt -L /data/ /etc/passwd pass.txt  #Download renamed pass.txt
[1] 18:25:53 [SUCCESS] 192.168.10.7
[2] 18:25:53 [SUCCESS] 192.168.10.17
l[3] 18:25:58 [SUCCESS] 192.168.10.6
[root@centos6 /data]# ls
192.168.10.17  192.168.10.6  192.168.10.7
Port forwarding
-L localport:remotehost:remotehostport sshserver
-f enable in background
-N do not open remote shell, waiting
-g enable gateway function
host A remote machine
host B Telnet server (company)
host C SSH server (company)
When a accesses B, it cannot be connected directly due to security needs (Telnet is not encrypted). A connects C (forms an encrypted tunnel) and then forwards it to B for security connection
data -- localhost:9527 -- localhost:XXXXX -- sshsrv:22 -- sshsrv:YYYYY -- telnetsrv:23
Experiment: implement ssh port forwarding remote connection telnet (local forwarding, external connection internal)
host B(192.168.8.40)
[root@localhost ~]# yum install telnet-server -y   #Installation services
[root@localhost ~]# systemctl start telnet.socket
[root@localhost ~]# iptables -A INPUT -s 192.168.8.30 -j REJECT

host A(192.168.8.50)
[root@centos6 /data]# telnet 192.168.10.7
[root@centos6 /data]# ssh -L 9527:192.168.8.40:23 192.168.8.30 -fN  #9527 bit random port (not used)
[root@centos6 /data]# telnet 192.168.10.7 9527


host C(192.168.8.30)
[root@localhost ~]#yum install telnet-server -y
Experiment: implement ssh port to forward remote connection mail
host B
[root@centos7 ~]# ss -ntl
LISTEN     0      100                  127.0.0.1:25                                       *
[root@centos7 yum.repos.d]# vim /etc/postfix/main.cf
inet_interfaces = all
#inet_interfaces = $myhostname
#inet_interfaces = $myhostname, localhost
#inet_interfaces = localhost
[root@centos7 ~]# systemctl restart postfix.service
[root@centos7 ~]# ss -ntl
LISTEN     0      100                          *:25                                       *

host A
[root@bogon ~]# ssh -L 9500:192.168.8.40:25 192.168.8.30 -fN
[root@bogon ~]# telnet 127.0.0.1 9500
Trying 127.0.0.1...
Connected to 127.0.0.1.
Escape character is '^]'.
220 centos7.localdomain ESMTP Postfix
hello a.com
502 5.5.2 Error: command not recognized
mail from: wangzhipeng
250 2.1.0 Ok
rcpt to: mayun@alibaba.com
250 2.1.5 Ok
data
354 End data with <CR><LF>.<CR><LF>
hi,wang
i am mayun
.
250 2.0.0 Ok: queued as 1C8864239457
quit
221 2.0.0 Bye
Connection closed by foreign host.
Sometimes the firewall does not allow external connection, so C can be the client, A is the server, and C can be connected internally to A to realize remote access. At this time, C needs to be configured
Experiment: realize ssh port forwarding and remote connection telnet (remote forwarding, internal connection and external connection)
-R sshserverport:remotehost:remotehostport sshserver
ssh –R 9527:telnetsrv:23 –Nf sshsrv
Let sshsrv listen for the access of port 9527. If there is any access, it will forward the request to the local ssh client through ssh service after encryption, and then forward it to the local ssh client after local decryption telnetsrv:23
Data --- sshsrv:9527 --- sshsrv:22 --- localhost:XXXXX --- localhost:YYYYY --- telnetsrv:23
host C
[root@centos7 ~]# ssh -R 9400:192.168.8.40:23 192.168.8.50 -fN

host A
[root@bogon ~]# telnet 127.0.0.1 9400
Experiment: port forwarding remote connection httpd
host B
[root@centos7 ~]# yum install httpd
[root@centos7 ~]# systemctl start httpd.service
[root@centos7 ~]# echo "welcome to magedu" > /var/www/html/index.html

host A
[root@bogon ~]# killall ssh
[root@bogon ~]# telnet 127.0.0.1 9500
Trying 127.0.0.1...
Connected to 127.0.0.1.
Escape character is '^]'.
GET / HTTP/1.1    #Visit the web page
host: 1.2.2.2

HTTP/1.1 200 OK
Date: Mon, 08 Jun 2020 04:57:06 GMT
Server: Apache/2.4.6 (CentOS)
Last-Modified: Mon, 08 Jun 2020 04:51:52 GMT
ETag: "12-5a78b5e965c3d"
Accept-Ranges: bytes
Content-Length: 18
Content-Type: text/html; charset=UTF-8

welcome to magedu     #Web content
Experiment: dynamic port forwarding (proxy server realizes Internet http)
host B(Internet server 192.168.10.17)
[root@localhost ~]# yum install httpd
[root@localhost ~]# systemctl start httpd
[root@localhost ~]# echo "welcome to google" > /var/www/html/index.html
[root@localhost ~]# systemctl stop firewalld
[root@localhost ~]# iptables -A INPUT -s 192.168.10.1 -p tcp --dport 80 -j REJECT


host A(Client domestic 192.168.10.16)
[root@centos6 ~]# ssh -D 9527 192.168.10.7 -fNg
[root@centos6 ~]# curl --socks5 127.0.0.1:9527 http://192.168.10.17
welcome to google
[root@centos6 ~]# service iptables stop

host C(ssh Server foreign 192.168.10.7)
It's too complex. You need 2 devices. You can combine host A and host C to do this
host C
[root@localhost ~]# ssh -D 9527 192.168.10.7 -fNg
[root@localhost ~]# systemctl stop firewalld.service
Browser proxy settings - Settings > show advanced settings >Change proxy settings >"LAN settings" ---- proxy server advanced "---- sockets 192.168.10.16 9527 and 192.168.10.17 9527
sshd server configuration
[root@localhost ~]# rpm -qlf `which sshd`
/etc/ssh/sshd_config     #Master profile
Common parameters:
Port default 22
ListenAddress ip
LoginGraceTime 2m
PermitRootLogin yes
StrictModes yes check the owner, permissions, etc. of the. ssh / file
MaxAuthTries 6
MaxSessions 10 maximum sessions for the same connection
PubkeyAuthentication yes can be authenticated
PermitEmptyPasswords no empty password
PasswordAuthentication yes
GatewayPorts no
ClientAliveInterval in seconds
ClientAliveCountMax default 3
UseDNS yes convert web address and IP address
GSSAPIAuthentication yes speed can be changed to no
MaxStartups unauthenticated connection maximum, default 10
Banner /path/file
Ways to restrict users who can log in:
AllowUsers user1 user2 user3 ා only user1 user2 user3 login is allowed
DenyUsers
AllowGroups
DenyGroups
optimization
[root@localhost ~]# vim /etc/ssh/sshd_config
UseDNS no
GSSAPIAuthentication no
[root@localhost ~]# systemctl restart sshd
[root@localhost ~]# tail /var/log/secure -f   #View ssh login log
[root@localhost ~]# man sshd_config   #Query help
[root@localhost ~]# lastb    #Query recently logged in users
Compile and install dropbear
host A
[root@localhost ~]# yum install gcc -y
[root@localhost /data]# tar xvf dropbear-2019.78.tar.bz2    #Unpacking
[root@localhost /data]# cd dropbear-2019.78/
[root@localhost /data/dropbear-2019.78]# cat README    #Read the manual
To run the server, you need to generate server keys, this is one-off:
./dropbearkey -t rsa -f dropbear_rsa_host_key
[root@localhost /data/dropbear-2019.78]# cat INSTALL    #Read the installation instructions
[root@localhost /data/dropbear-2019.78]# ./configure --help      #view help
[root@localhost /data/dropbear-2019.78]# ./configure --prefix=/apps/dropbear
[root@localhost /data/dropbear-2019.78]# yum list |grep zlib    #Error report search related bag
[root@localhost /data/dropbear-2019.78]# yum install zlib-devel -y    #Error reporting installation
[root@localhost /data/dropbear-2019.78]#  make PROGRAMS="dropbear dbclient dropbearkey dropbearconvert scp"
[root@localhost /data/dropbear-2019.78]# make PROGRAMS="dropbear dbclient dropbearkey dropbearconvert scp" install
[root@localhost ~]# PATH=/apps/dropbear/sbin:/apps/dropbear/bin:$PATH    #Change variable
[root@localhost /apps/dropbear]# mkdir /etc/dropbear/
[root@localhost /apps/dropbear]# dropbearkey -t rsa -f /etc/dropbear/dropbear_rsa_host_key
[root@localhost /apps/dropbear]# dropbear -p 9500    #Background operation, foreground operation dropbear - P: 2222 - F – E
[root@localhost /apps/dropbear]# dbclient 127.0.0.1   #connect
[root@localhost /apps/dropbear]# ssh 127.0.0.1 -p 9500    #connect
[root@localhost /apps/dropbear]# scp /data/file1 192.168.10.6:/data    #Copy file error
/usr/bin/dbclient: No such file or directory
lost connection
[root@localhost /apps/dropbear]# ln -s /apps/dropbear/bin/dbclient /usr/bin/dbclient   #Create a soft connection
[root@localhost /apps/dropbear]# scp /data/file1 192.168.10.6:/data
root@192.168.10.6's password:
[root@localhost /apps/dropbear]# ll /usr/bin/dbclient    #View properties
lrwxrwxrwx 1 root root 27 Jun  9 20:10 /usr/bin/dbclient -> /apps/dropbear/bin/dbclient
[root@localhost /apps/dropbear]# rm -rf /apps /etc/dropbear/ /data/dropbear-2019.78 /data/dropbear-2019.78.tar.bz2    #Delete all
[root@localhost /apps/dropbear]# scp /data/file1 192.168.10.6:/data   #report errors
-bash: /apps/dropbear/bin/scp: No such file or directory
[root@localhost /apps/dropbear]# which scp   #normal
/usr/bin/scp
[root@localhost /apps/dropbear]# hash  #hash cache
hits	command
   4	/apps/dropbear/bin/scp
[root@localhost /apps/dropbear]# hash -d scp   #Delete related cache - r clear all caches
AIDE
AIDE is an intrusion detection tool. Its main purpose is to check the integrity of files. Those files on the audit computer have been changed
AIDE can construct a database of specified files, which uses aide.conf As its profile. AIDE database can save various attributes of files, including permission, inode number, user, group, file size, mtime, CTime, atime, increased size and connection
[root@localhost /apps/dropbear]# yum install aide -y
[root@localhost /apps/dropbear]# rpm -qi aide
[root@localhost /apps/dropbear]# rpm -ql aide
/etc/aide.conf        #configuration file
/usr/sbin/aide        #command
/var/lib/aide         #Sample library
/var/log/aide         #journal
[root@localhost /apps/dropbear]# cat /etc/aide.conf
FIPSR = p+i+n+u+g+s+m+c+acl+selinux+xattrs+sha256
[root@localhost /apps/dropbear]# aide -i    #Initialize the sample library (according to / etc/aide.conf )
[root@localhost /apps/dropbear]# vim /etc/aide.conf  #Create a policy, delete the default policy
TEST = p+md5+u+g
/data/fi   TEST       # ! ignore
[root@localhost /apps/dropbear]# aide -i    #Initialize sample library
[root@localhost /data]# echo >> fi    #Modify file
[root@localhost /data]# echo >> file1
[root@localhost /data]# mv /var/lib/aide/aide.db.new.gz /var/lib/aide/aide.db.gz    #Modify sample library name (compare only after modification)
[root@localhost /data]# aide --check    #inspect
[root@localhost /data]# aide --update     #Update sample library (rebuild aide.db.new.gz, the name needs to be modified in the next check, so it can be compared with the previous file, only the corresponding file name needs to be modified.)
sudo
Sudo can authorize the specified user to run some commands on the specified host. If unauthorized users attempt to use sudo, they will be prompted to contact the administrator
Sudo can provide logs to record each user's sudo operation
sudo provides configuration files for system administrators, allowing system administrators to centrally manage user permissions and hosts used
sudo uses the time stamp file to complete a system similar to "ticket checking". By default, it stores "tickets" with a current of 5 minutes
[root@localhost /data]# rpm -ql sudo
/etc/sudoers         #configuration file
/etc/sudoers.d       #configuration file
/usr/bin/sudo        #command
/usr/bin/sudoedit    #Related orders
/usr/sbin/visudo     #Related orders
/var/db/sudo         #log file
The configuration file supports the use of wildcard glob
? any single character
*Match any length character
[wxc] matches one of the characters
[! wxc] characters other than these three
\x escape
[[alpha]] letter example: / bin/ls [[alpha]]*
Authorization rules
Format of authorization rules:
User login host = (on behalf of user) command
user host=(runas) command
Example:
root ALL=(ALL) ALL
Format Description:
user: the identity of the person who runs the command
host: through which hosts
(runas): as which user
command: which commands to run
/etc/sudoers
[root@localhost ~]# cat /etc/sudoers
root	ALL=(ALL) 	ALL      #user
%wheel	ALL=(ALL)	ALL      #group

[wang@localhost ~]$ mount /dev/sr0 /mnt/    #No permission
mount: only root can do that
[root@localhost ~]# vim /etc/sudoers
wang 192.168.10.17=(root) /bin/mount /dev/sr0 /mnt
[wang@localhost ~]$ sudo mount /dev/sr0 /mnt/     #Unable to mount, inconsistent with the command
[wang@localhost ~]$ sudo mount /dev/sr0 /mnt      #Mount (order must be consistent)
## Errors will be reported during vim editing. The command visudo can be edited

[root@localhost ~]# visudo
%wheel        ALL=(ALL)       NOPASSWD: ALL    #Enable group
[root@localhost ~]# visudo -c       #Grammar check
[root@localhost ~]# groupmems -g wheel -a wang     #Add wang to the group wheel
[wang@localhost ~]$ sudo cat /etc/shadow         #wang can be an administrator after adding sudo
[wang@localhost ~]$ sudo vim /etc/passwd      #Change the root permission to normal and wang to administrator
//Because root ALL=(ALL) 	ALL Existence can sudo vim /etc/passwd Change back, if not root Invalid authority
[root@localhost ~]# usermod -aG wheel wang    #Add wang to the group wheel
[root@localhost ~]# gpasswd -d wang wheel      #Remove wang from the wheel
Removing user wang from group wheel
[root@localhost ~]# groupmems -g  wheel -l       #View wheel members
When Ubuntu is installed, the user wang can execute the root command and edit it here. Add the user to sudo group
/etc/sudoers.d/*
[root@localhost ~]# cat /etc/sudoers
## Read drop-in files from /etc/sudoers.d (the # here does not mean a comment)
#includedir /etc/sudoers.d     #By default, / etc/sudoers.d is started without modification
[root@localhost ~]# cat /etc/sudoers.d/test
wang ALL=   ALL      #wang can do anything (second ALL omitted)
[wang@localhost ~]$ sudo useradd mage
[wang@localhost ~]$ sudo vim /etc/sudoers.d/test
[wang@localhost ~]$ sudo cat /etc/sudoers.d/test
wang ALL=   ALL
mage ALL=(wang) ALL
[root@localhost ~]# echo magedu |passwd --stdin mage
[mage@localhost ~]$ sudo -u wang cat /etc/passwd     #No permission
[mage@localhost ~]$ sudo -u wang sudo cat /etc/passwd    #Have permission (in the name of wang, view with root permission)
[root@localhost ~]# cat /etc/sudoers.d/test
wang ALL=   ALL
mage ALL=  /usr/bin/sudoedit     #Authorized editor / etc/sudoers
mage ALL=  /bin/cat /var/log/messages*     #Originally authorized to view the log, but there was a bug
[mage@localhost ~]$ cat /var/log/messages /etc/passwd /etc/passwd    #As long as the following files can be viewed (* is a wildcard, representing any length of characters)
User and runas:
username
#uid
%group_name
%#gid
user_alias|runas_alias
host:
ip or hostname
network(/netmask)
host_alias
command:
command name
directory
sudoedit
Cmnd_Alias
[root@localhost ~]# cat /etc/sudoers.d/test
User_Alias NETADMIN= wang,mage        #Define alias
Cmnd_Alias NETCMD = /usr/sbin/ip
NETADMIN ALL=(root) NETCMD

User_Alias SYSADER=wang,mage,%admins
User_Alias DISKADER=tom
Host_Alias SERS=www.magedu.com,172.16.0.0/24
Runas_Alias OP=root
Cmnd_Alias SYDCMD=/bin/chown,/bin/chmod
Cmnd_Alias DSKCMD=/sbin/parted,/sbin/fdisk
SYSADER SERS= SYDCMD,DSKCMD
DISKADER ALL=(OP) DSKCMD

User_Alias ADMINUSER = adminuser1,adminuser2
Cmnd_Alias ADMINCMD = /usr/sbin/useradd,/usr/sbin/usermod, /usr/bin/passwd [a-zA-Z]*, !/usr/bin/passwd root
ADMINUSER ALL=(root) NOPASSWD:ADMINCMD,PASSWD:/usr/sbin/userdel

Defaults:wang runas_default=tom
wang ALL=(tom,jerry) ALL    #Mainly tom, supplemented by jerry. When not writing, the default login is tom

wang 192.168.1.6,192.168.1.8=(root) /usr/sbin/,!/usr/sbin/useradd
sudo – i – u wang switch identity
sudo [-u user] COMMAND
-V display version information and other configuration information
-u user defaults to root
-l. Ll list the commands available and disabled for the user on the host
-v. extend the password validity for 5 minutes and update the time stamp
-k clear the time stamp (1970-01-01), and input the password again next time
-k is similar to - k, but also delete the timestamp file
-b execute instructions in the background
-p change prompt for password
Example: - p "password on% h for user% p:"
TCP_Wrappers
Help reference: man 5 hosts_access,man 5 hosts_options
Inspection sequence: hosts.allow , hosts.deny (allowed by default)
Note: once the previous rules match, they will take effect directly and will not continue
Basic syntax:
daemon_list@host: client_list [ :options :option... ]
Daemon_list@host format
Binary name of a single application, not a service name, such as vsftpd
Comma or space separated list of application file names, such as: sshd,vsftpd
ALL means ALL accept tcp_wrapper controlled service program
The host has multiple IP S, which can be controlled by @ hostIP
Client Client_list format
Comma or space separated list of clients
Based on IP address: 192.168.10.1 192.168.1
Based on host name: www.magedu.com .magedu.com Less use
Based on network / mask: 192.168.0.0/255.255.255.0
Based on net/prefixlen: 192.168.1.0/24 (CentOS7)
Based on network group (NIS domain): @ mynetwork
Built in ACL: ALL, LOCAL, KNOWN, UNKNOWN, PARANOID
Use of Excel:
Example:
vsftpd: 172.16. EXCEPT 172.16.100.0/24 EXCEPT 172.16.100.1
[root@CentOS6 ~]# cat /etc/hosts.allow    #configuration file
[root@CentOS6 ~]# cat /etc/hosts.deny
[root@CentOS6 security]# cat /etc/hosts.allow    #Only 30 addresses can log in
sshd:192.168.8.30
[root@CentOS6 security]# cat /etc/hosts.deny
sshd:ALL
PAM
General configuration file / etc/pam.conf format
application type control module-path arguments
Special configuration file / etc/pam.d / * format
type control module-path arguments
[root@CentOS6 security]# ls /lib64/security/      #modular
[root@CentOS6 security]# ls /etc/pam.d/           #Application module specific profile
[root@CentOS6 security]# ls /etc/security/        #Environment settings
[root@CentOS6 security]# cat /etc/pam.d/reboot
auth       sufficient	pam_rootok.so    #Format, parameters can be added after complex time base
Using PAM requires calling libpam.so library
[root@CentOS6 security]# ldd `which passwd` |grep libpam
	libpam_misc.so.0 => /lib64/libpam_misc.so.0 (0x00007f1ae668b000)
	libpam.so.0 => /lib64/libpam.so.0 (0x00007f1ae5a88000)
Authentication and authorization of Auth account
Account is a non authentication function related to account management. For example, it is used to limit / allow the user's access time to a service, the current effective system resources (how many users can there be at most), and restrict the user's location (for example, the root user can only log in from the console)
Password: password complexity checking mechanism when user modifies password
Session users need to perform some additional operations before obtaining services or after using services, such as recording information of opening / closing data, monitoring directory, etc
-type means that modules that cannot be loaded because they are missing will not be recorded in the system log, which is useful for modules that are not always installed on the system
required: one vote veto means that the module must return success to pass the authentication. However, if the module returns failure, the failure result will not be immediately notified to the user. Instead, the failure result will be returned to the application program after all modules in the same type have been executed, which is a necessary condition
Requirement: one vote veto, the module must return success to pass the authentication, but once the module returns failure, it will not execute any modules within the same type, but directly return control to the application. Is a necessary condition
Sufficiency: one pass indicates that the module returns successfully. It is not necessary to execute other modules within the same type. However, if the module fails to return, it is a sufficient condition
Optional: indicates that this module is optional, its success will not play a key role in identity authentication, and its return value is generally ignored
include: call configuration information defined in other configuration files
[root@centos7 pam.d]# grep pam_shell *
vmtoolsd:auth       required         pam_shells.so
vmtoolsd:account    required         pam_shells.so
####Viewing help is only allowed in / etc/shells
http://www.linux-pam.org/Linux-PAM-html/sag-pam_shells.html
pam_shells is a PAM module that only allows access to the system if the users shell is listed in /etc/shells
####
[root@centos7 pam.d]# vim sshd
auth       required     pam_shells.so   #Forced login (/ etc/shells to login)

[root@centos7 pam.d]# cat /etc/shells    #see
/bin/sh
/bin/bash
/usr/bin/sh
/usr/bin/bash
/bin/tcsh
/bin/csh
[root@centos7 pam.d]# vim /etc/shells    #Delete / bin/csh
[root@centos7 pam.d]# chsh -s /bin/csh wangzhipeng modify the default shell
[root@centos7 ~]# ssh wangzhipeng@192.168.10.30    #Unable to log in

[root@centos7 pam.d]# tail -f /var/log/secure    #View ssh log locally
Jun 11 11:29:38 centos7 sshd[9513]: Failed password for wangzhipeng from 192.168.8.40 port 51668 ssh2
[root@centos7 pam.d]# vim /etc/shells    #Modify the shell and log in
pam_securetty.so
pam_ Secure is a PAM module that allows root logins only if the user is logging in on a "secure" TTY, as defined by the listing in / etc / secure
[root@centos7 pam.d]# cat /etc/securetty    #View terminal
console
vc/1
vc/2
vc/3

[root@centos7 pam.d]# grep pam_securetty.so *
login:auth [user_unknown=ignore success=ok ignore=ignore default=bad] pam_securetty.so
remote:auth       required     pam_securetty.so    #remote calls the module
[wangzhipeng@centos7 ~]$ telnet 192.168.8.30    #Unable to log in
[root@centos7 pam.d]# tail -f /var/log/secure
Jun 11 13:12:52 centos7 login: pam_securetty(remote:auth): access denied: tty 'pts/2' is not secure !   #Prompt error no pts/2
[root@centos7 ~]# vim /etc/securetty can log in after modifying and adding pts/2
pam_nologin.so
pam_nologin is a PAM module that prevents users from logging into the system when /var/run/nologin or /etc/nologin exists
[root@centos7 pam.d]# touch /etc/nologin
[root@centos7 pam.d]# grep pam_nologin *
sshd:account    required     pam_nologin.so
[root@centos7 pam.d]# echo wangzhipeng >> /etc/nologin

[wangzhipeng@centos7 ~]$ ssh wangzhipeng@192.168.8.30   #Access failed
Authentication failed.

[root@centos7 pam.d]# rm -f /etc/nologin    #Can be accessed after deletion
pam_limits.so
Function: to limit the available resources at the user level, such as the number of files that can be opened, the number of processes that can be run, and the available memory space
Configuration file / etc/security/limits.conf, /etc/security/limits.d/*.conf
Format < domain > < type > < item > < value >
What objects to apply
Username single user
@All users in the group
- All users
Types of restrictions
Soft limit, which can be modified by ordinary users themselves
Hard hard limit, which is set by root user and enforced by kernel
- Both are limited at the same time
Limited resources
The maximum number of files that nofile can open at the same time. The default is 1024
The maximum number of processes that nproc can run at the same time. The default is 1024
Specify specific values
[root@centos7 ~]# yum install httpd
[root@centos7 ~]# systemctl start httpd
[root@centos7 ~]# echo 'welcome to wang' > /var/www/html/index.html
[root@centos7 ~]# systemctl stop firewalld.service

[root@CentOS6 pam.d]# rpm -q httpd-tools   #install
[root@CentOS6 pam.d]# ab -c 100 -n 2000 http://192.168.8.40/m.txt × number of test process links
[root@centos7 pam.d]# ulimit -a    #View connections
open files                      (-n) 1024
[root@centos7 pam.d]# ulimit -n 1000    #Temporary modification of the number of connections, permanent modification to be written to the file
###Commonly used to test the maximum performance of network server

[root@centos7 ~]# vim /etc/security/limits.conf
wangzhipeng   -  nproc  4    #Maximum processes no more than 4
[root@centos7 ~]# pgrep -u wangzhipeng     #View the number of processes
[root@CentOS6 pam.d]# ssh wangzhipeng@192.168.8.40    #Remote login