Installation environment
- Operating system: CentOS Linux release 7.5.1804 (Core)
- Database version: Oracle Database 11g Enterprise Edition Release 11.2.0.4.0 - 64bit Production
Oracle installation package
- Link: https://pan.baidu.com/s/1AfUe0fuRJU7Epk3h56EPkQ
- Extraction code: xumw
Installation requirements
- Physical memory: 2G
- Switching partition: 4G
Use tools
- Xshell 6
- Xmanager 6
- navicat 12
Installation steps
1. Operating system configuration
Execute under root:
(1) Edit the file / etc/security/limits.conf
vi /etc/security/limits.conf
Press the i key to enter the editing mode and add the following contents
oracle soft nproc 2047
oracle hard nproc 16384
oracle soft nofile 1024
oracle hard nofile 65536
After editing, press Esc and Enter: wq!, Press Enter to save and exit
(2) , edit the file / etc/sysctl.conf
vi /etc/sysctl.conf
Press the i key to enter the editing mode and add the following contents
#This parameter determines the maximum number of file handles allowed in the system. The file handle setting represents the number of files that can be opened in the linux system
fs.file-max = 6815744
# This parameter limits concurrent outstanding requests and should be set to avoid I/O subsystem failure
fs.aio-max-nr = 1048576
# The total number of pages of shared memory that can be used
kernel.shmall = 2097152
# The maximum value of a single shared memory segment (cannot exceed its own memory size. The value set here is 2G)
kernel.shmmax = 2147483648
# This parameter is the maximum number of shared memory segments. It is recommended to use the default value of 4096
kernel.shmmni = 4096
kernel.sem = 250 32000 100 128
# Usable range of IP4 port
net.ipv4.ip_local_port_range = 9000 65500
# The default value for socket receive buffer size
net.core.rmem_default = 4194304
# Maximum socket receive buffer size
net.core.rmem_max = 4194304
# Default value for socket send buffer size
net.core.wmem_default = 262144
# Maximum socket send buffer size
net.core.wmem_max = 1048576
After editing, press Esc and Enter: wq!, Press Enter to save and exit
(3) . make the / etc/sysctl.conf configuration take effect immediately
sysctl -p
(4) Edit the file / etc/pam.d/login
vi /etc/pam.d/login
Press the i key to enter the editing mode and add the following contents
session required pam_limits.so
After editing, press Esc and Enter: wq!, Press Enter to save and exit
Note: if the operating system is CentOS 6, it needs to be added
session required /lib/security/pam_limits.so
(5) , edit the file / etc/profile
vi /etc/profile
Press the i key to enter the editing mode and add the following contents
if [ $USER = "oracle" ]; then
if [ $SHELL = "/bin/ksh" ]; then
ulimit -p 16384
ulimit -n 65536
else
ulimit -u 16384 -n 65536
fi
fi
After editing, press Esc and Enter: wq!, Press Enter to save and exit
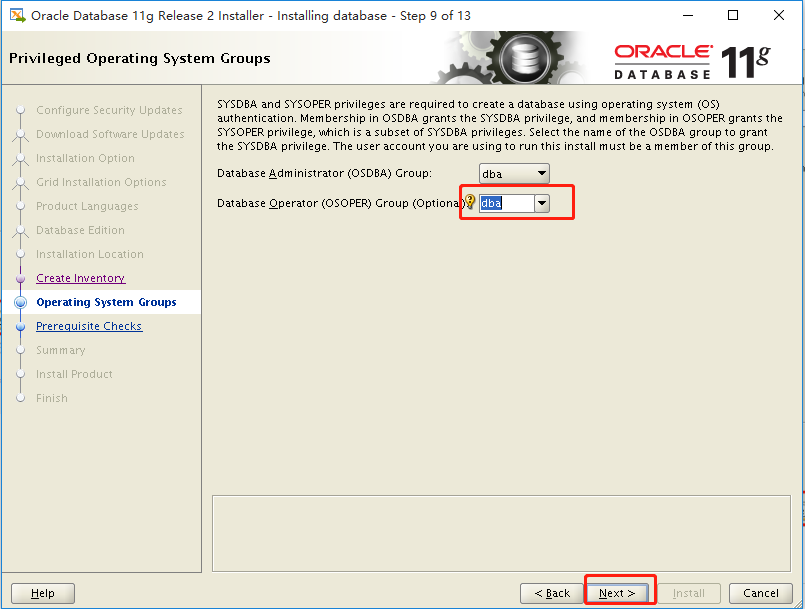
(6) , add user groups and users
groupadd oinstall
groupadd dba
useradd -g oinstall -g dba -m oracle
passwd oracle
passwd oracle is used to set the oracle user password, which can be customized. I use 123456 here
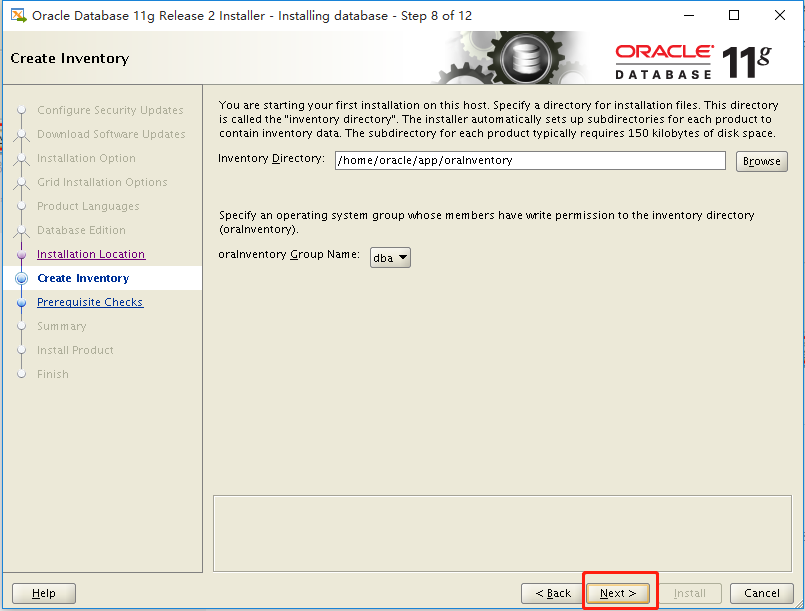
(7) Create database software directory and data file storage directory, and the location of the directory
mkdir /home/oracle/app
mkdir /home/oracle/app/oracle
mkdir /home/oracle/app/oradata
mkdir /home/oracle/app/oracle/product
(8) . change the directory owner to be owned by Oracle users
chown -Rf oracle:oinstall /home/oracle/app
(9) . install Oracle 11g dependency package
yum -y install gcc make binutils gcc-c++ compat-libstdc++-33 elfutils-libelf-devel elfutils-libelf-devel-static elfutils-libelf-devel ksh libaio libaio-devel numactl-devel sysstat unixODBC unixODBC-devel pcre-devel
(10) . view firewall status
systemctl status firewalld
If the firewall is turned on, turn it off: systemctl stop firewalld
If you do not want to close, you can add the corresponding port to the rule
If you do not need a firewall, you can turn off the firewall self startup service: systemctl disable firewalld
2. Install desktop visualizer xmmanager
(1) Installation and operation environment
Check whether it is installed: rpm -qa | grep xorg
yum -y install xorg-x11-server-utils
yum -y install xdpyinfo
yum install -y xterm
(2) . install vncserver
Check if: rpm -qa | grep vnc is installed
yum install tigervnc-server
(3) , start vncserver
vncserver
The password needs to be set for the first startup, and the execution results are as follows:
[root@192 ~]# vncserver

You will require a password to access your desktops.

Password:
Password must be at least 6 characters - try again
Password:
Verify:
Would you like to enter a view-only password (y/n)? y
Password:
Verify:
xauth:  file /root/.Xauthority does not exist

New '192.168.124.12:1 (root)' desktop is 192.168.124.12:1

Creating default startup script /root/.vnc/xstartup
Creating default config /root/.vnc/config
Starting applications specified in /root/.vnc/xstartup
Log file is /root/.vnc/192.168.124.12:1.log
It can be seen that the vnc connection address is 192.168.124.12:1
To close vnc, use the command: vncserver - Kill: 1
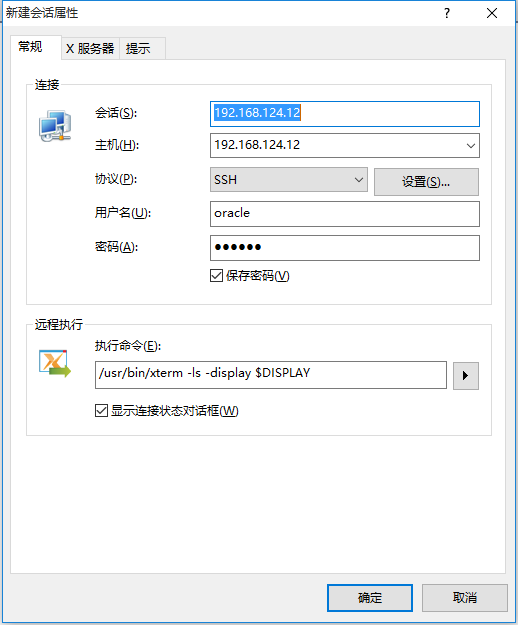
(4) , connect using xmmanager
Open xmmanager to create a new Xstart session. If there is no xmmanager tool, you need to download and install it yourself
The oracle user is used here to connect, because the oracle user must be used to perform the installation operation later
Execute the command to set: / usr/bin/xterm -ls -display $DISPLAY
The following interface pops up after connection, indicating success
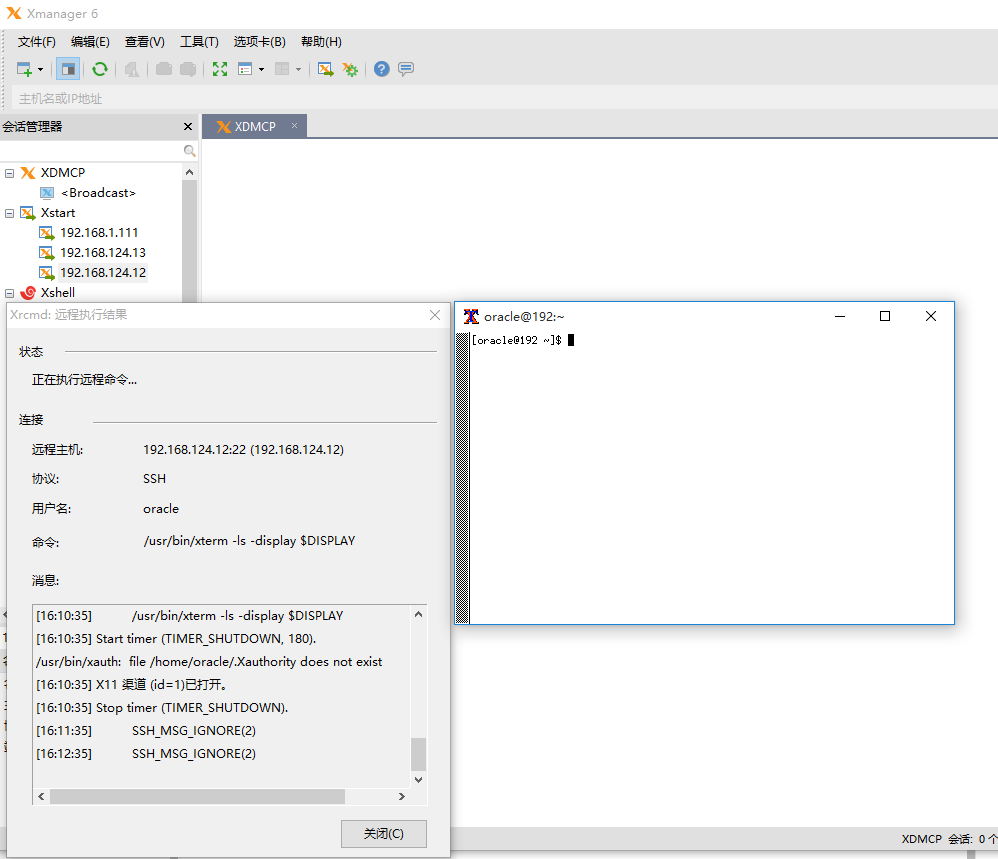
If not, you can switch to DISPLAY under oracle user settings
su oracle
export DISPLAY=192.168.124.12:1
Check whether the setting is successful
echo $DISPLAY
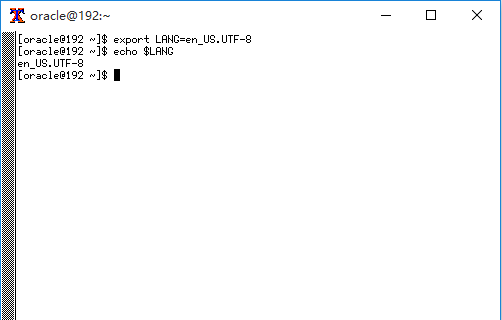
To avoid garbled code in the installation interface, execute the following code in the xstart command window
export LANG=en_US.UTF-8
As shown in the figure
3. Configuring environment variables for oracle users
Use the xshell tool to switch to the oracle user edit file. bash_profile
su oracle
vi ~/.bash_profile
Press the i key to enter the editing mode and add the following contents
export ORACLE_BASE=/home/oracle/app
export ORACLE_HOME=$ORACLE_BASE/oracle/product/11.2.0/dbhome_1
export ORACLE_SID=orcl
export PATH=$PATH:$HOME/bin:$ORACLE_HOME/bin
export LD_LIBRARY_PATH=$ORACLE_HOME/lib:/usr/lib
After editing, press Esc and Enter: wq!, Press Enter to save and exit
4. Install Oracle 11g
Upload the installation package of oracle 11g to oracle user directory (/ home/oracle) or other directories through ftp, as long as the location can be found during installation
[oracle@192 ~]$ cd /home/oracle/
[oracle@192 ~]$ ll
 Total consumption 2487400
drwxr-xr-x. 4 oracle oinstall         35 11 June 16-15:40 app
-rw-r--r--. 1 root   root     1395582860 11 June 16:33 p13390677_112040_Linux-x86-64_1of7.zip
-rw-r--r--. 1 root   root     1151304589 11 June 16:32 p13390677_112040_Linux-x86-64_2of7.zip
-rw-r--r--. 1 root   root         202853 11 June 16:40 pdksh-5.2.14-37.el5_8.1.i386.rpm
(1) . unzip the installation package
unzip p13390677_112040_Linux-x86-64_1of7.zip && unzip p13390677_112040_Linux-x86-64_2of7.zip
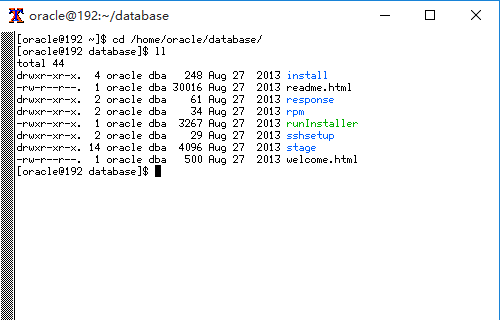
The extracted file is placed in the database directory
[oracle@192 ~]$ ll
 Total consumption 2487400
drwxr-xr-x. 4 oracle oinstall         35 11 June 16-15:40 app
drwxr-xr-x. 7 oracle dba             136 8 July 27, 2013 database
(2) . perform installation
Using the xstart command window, switch to the database directory
Execute installation command
./runInstaller
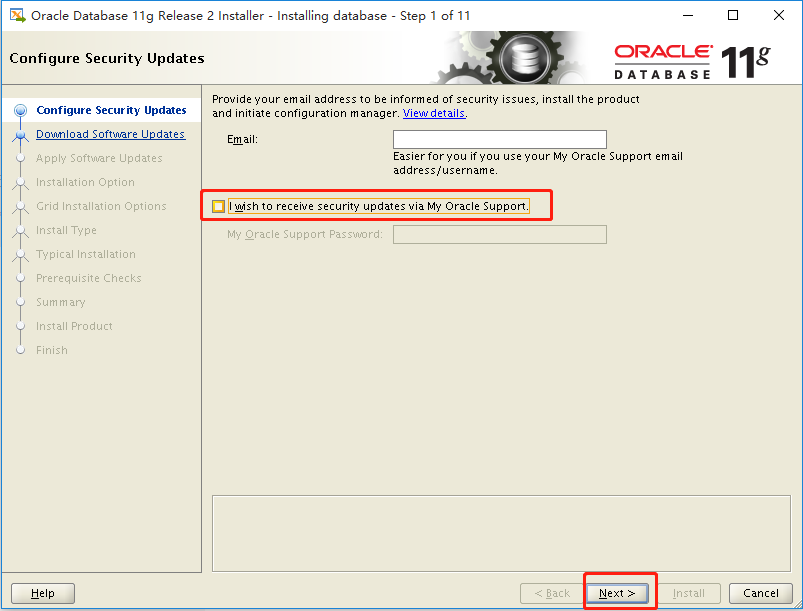
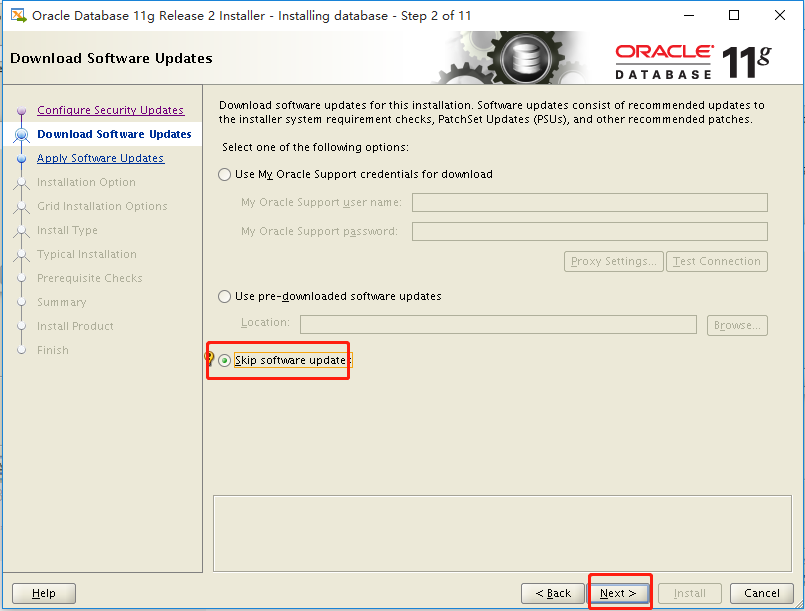
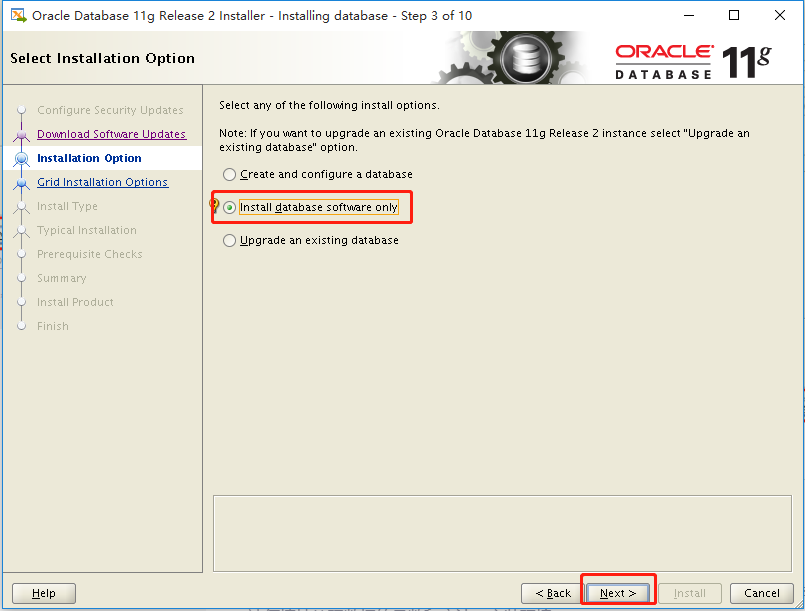
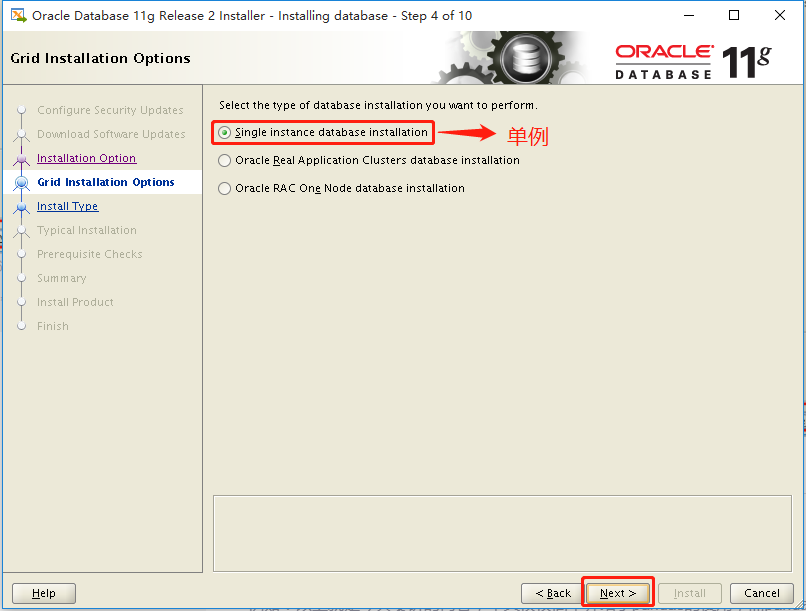
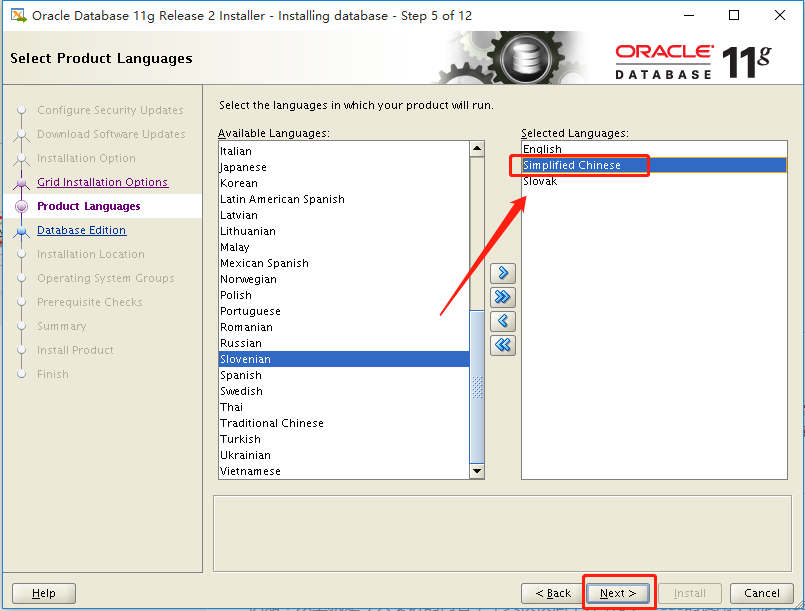
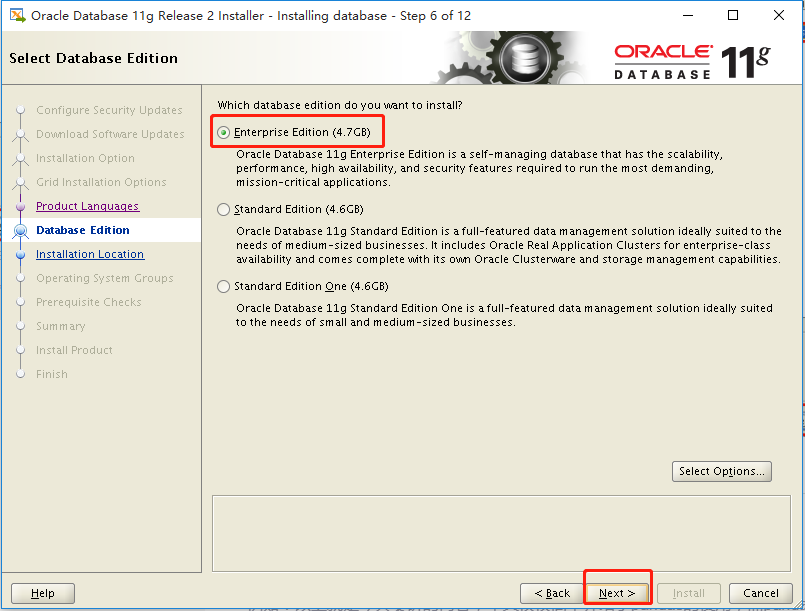
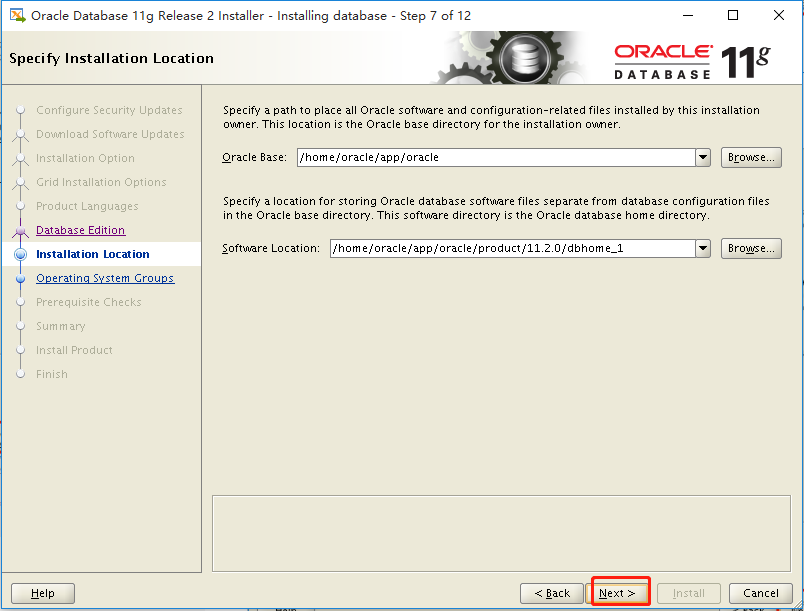
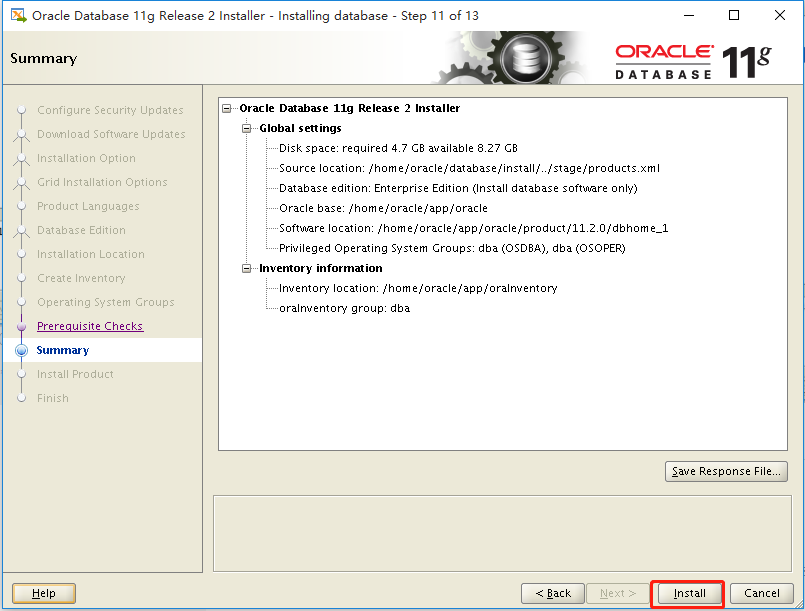
After execution, the installation interface will pop up and follow my steps to install
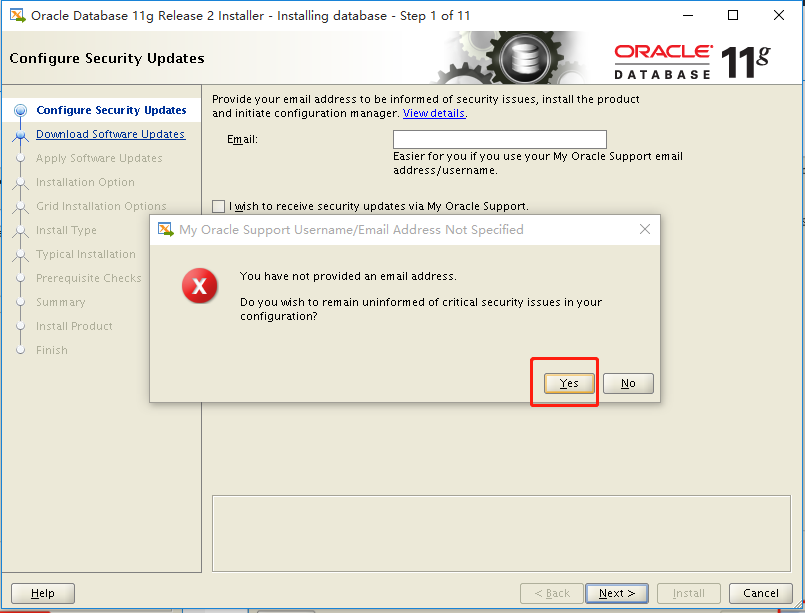
Uncheck I wish to receive security updates via My Oracle Support
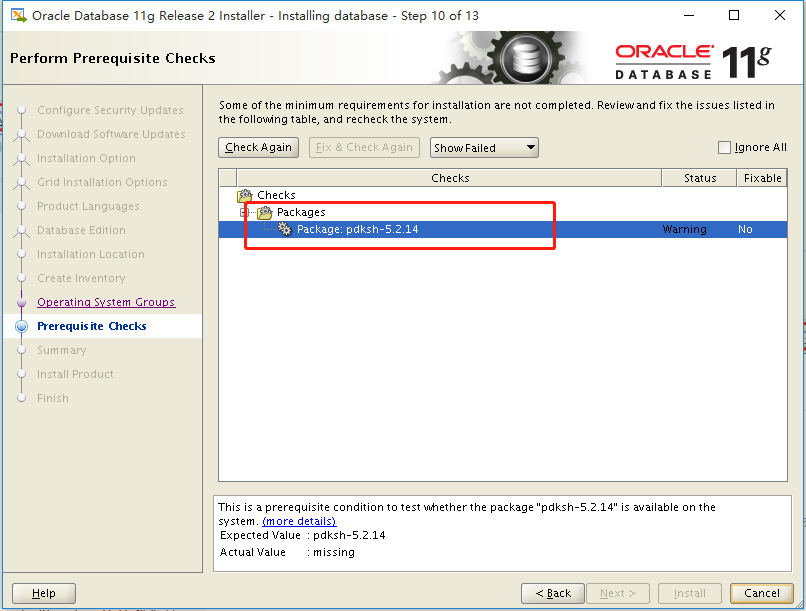
When there is such a lack of package, you need to find the corresponding package on the Internet and install it through the root user
Query whether a package is installed, but the version is different. Query command: rpm --all --query prefix*
For example:
[root@192 oracle]# rpm --all --query libaio*
libaio-devel-0.3.109-13.el7.x86_64
libaio-0.3.109-13.el7.x86_64
Install a package using rpm – ivh xxx.rpm --nodeps --force (where – nodeps --force stands for mandatory installation, which is used when the installation using rpm – ivh xxx.rpm is unsuccessful). For example, pdksh-5.2.14 is missing. Execute the following command to install
rpm -ivh pdksh-5.2.14-37.el5_8.1.i386.rpm --nodeps --force
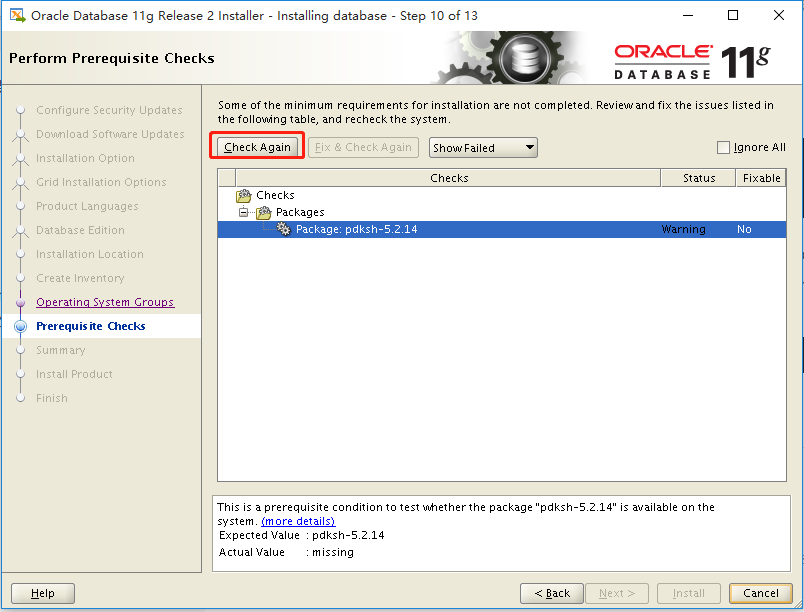
After installation, find the installation interface and click check Again
Error in invoking target 'agent nmhs' of makefile
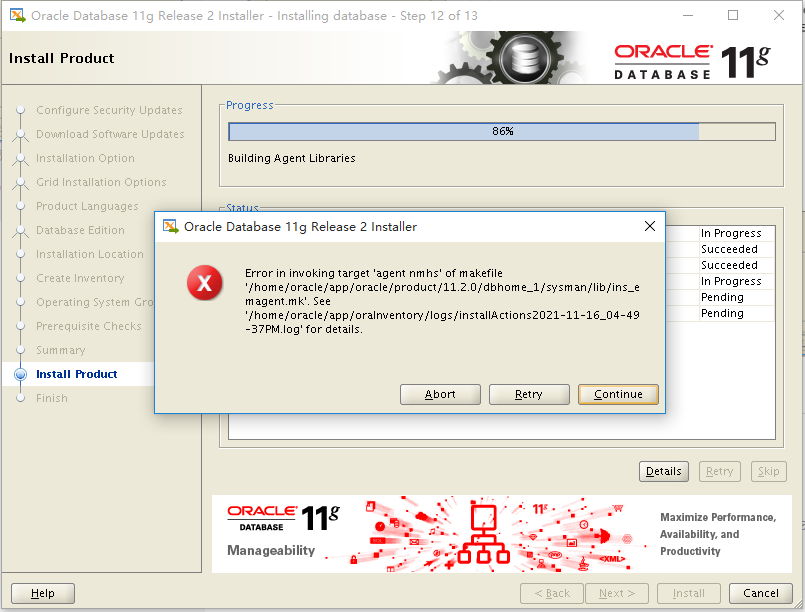
Solution: use the root user to add the parameters linking the libnnz11 Library in the makefile
cd $ORACLE_HOME/sysman/lib
You can use the command: echo $ORACLE_HOME view directory
If not, use the command: source / home / Oracle /. Bash_ Environment variables under profile refresh
Then execute the following command to back up before modifying
cd /home/oracle/app/oracle/product/11.2.0/dbhome_1/sysman/lib
cp ins_emagent.mk ins_emagent.mk.bak
vi ins_emagent.mk
Note: vi ins_emagent.mk enter edit mode without pressing the i key
Enter the command / NMECTL, find the following position, and then press i key to enter the editing mode
$(SYSMANBIN)emdctl:
        $(MK_EMAGENT_NMECTL)
Add -lnnz11 after this code, as follows
$(SYSMANBIN)emdctl:
        $(MK_EMAGENT_NMECTL) -lnnz11
After editing, press Esc and Enter: wq!, Press Enter to save and exit
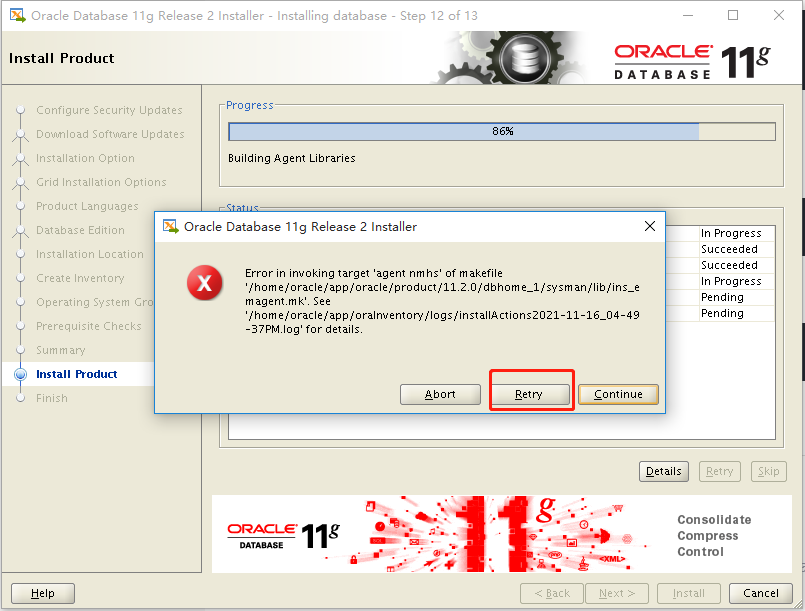
After modification, return to the installation interface and click Retry
When the following interface appears
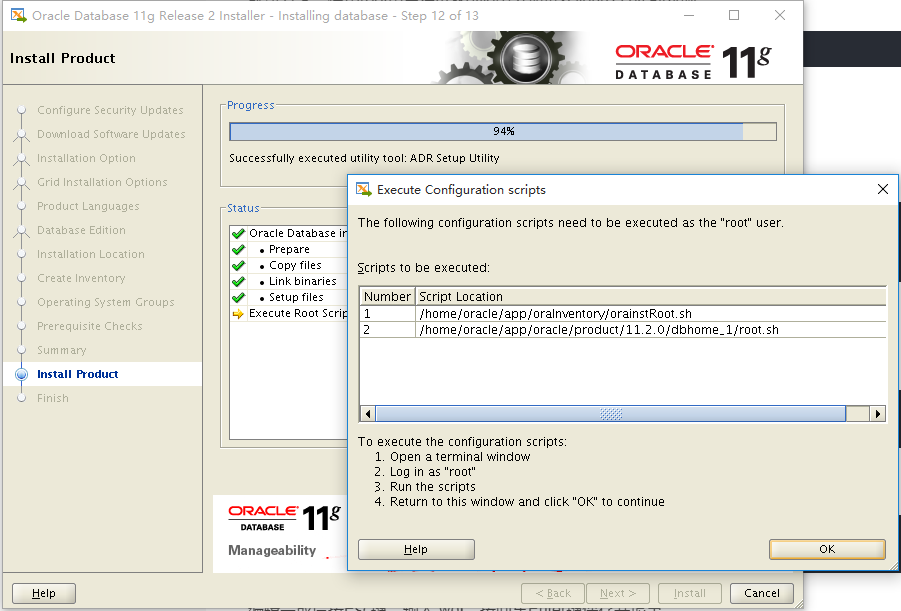
Use root to execute those two commands in any directory
/home/oracle/app/oraInventory/orainstRoot.sh
/home/oracle/app/oracle/product/11.2.0/dbhome_1/root.sh
As follows:
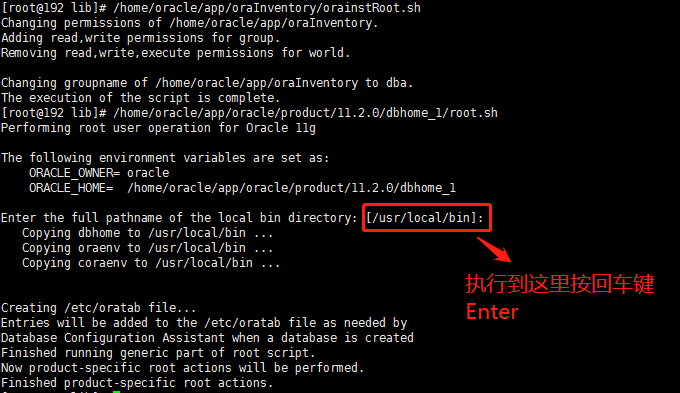
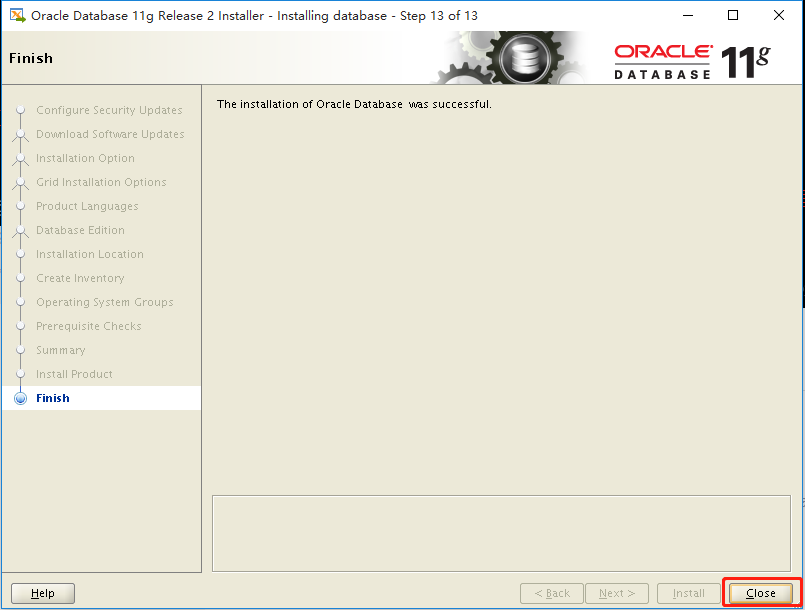
After execution, click ok on the interface, and then click close
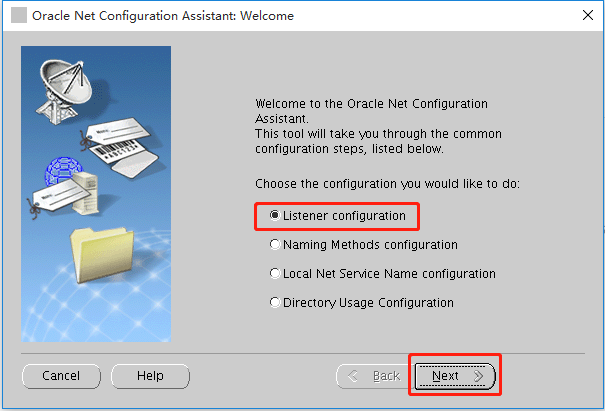
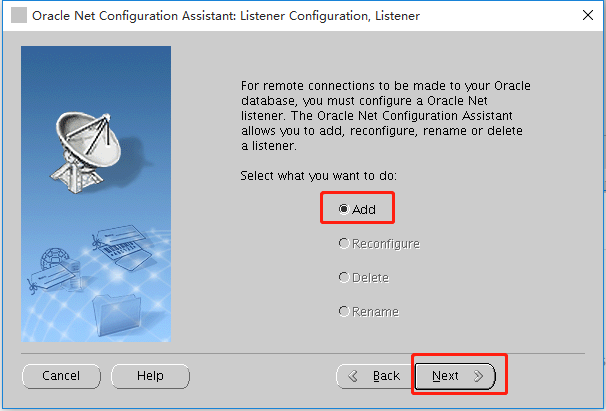
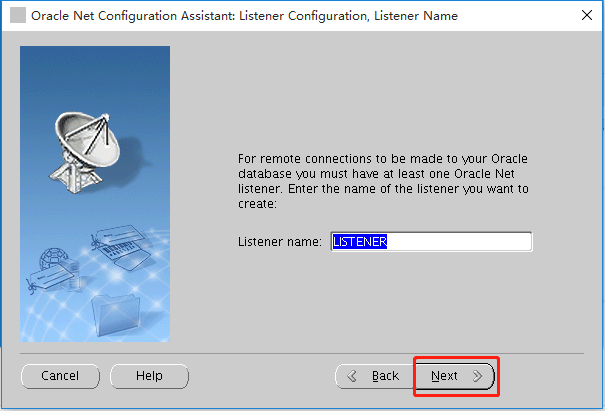
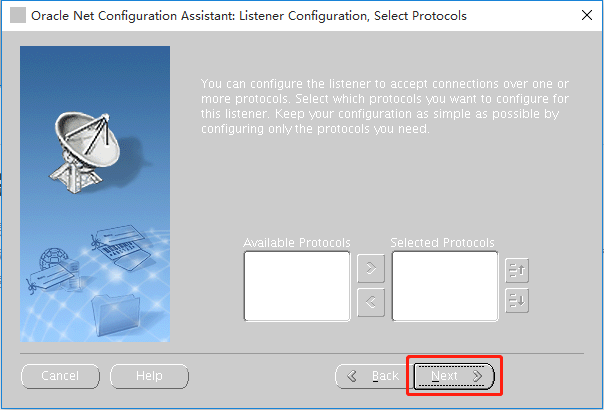
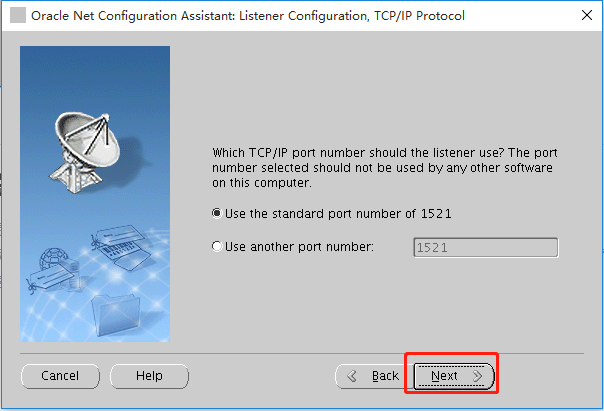
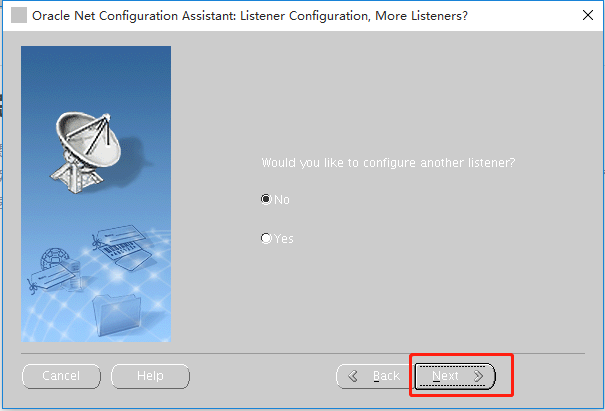
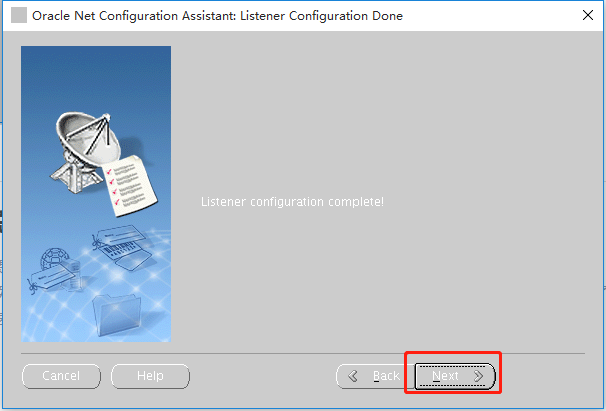
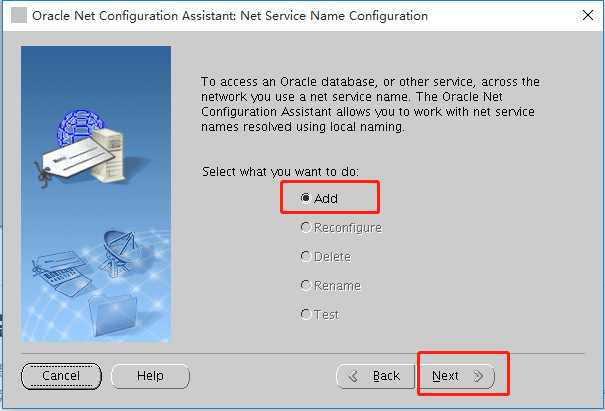
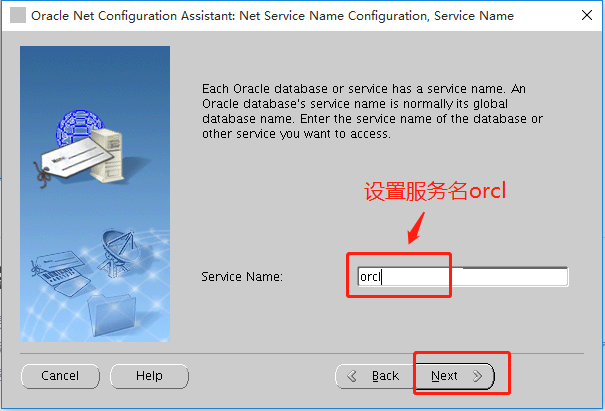
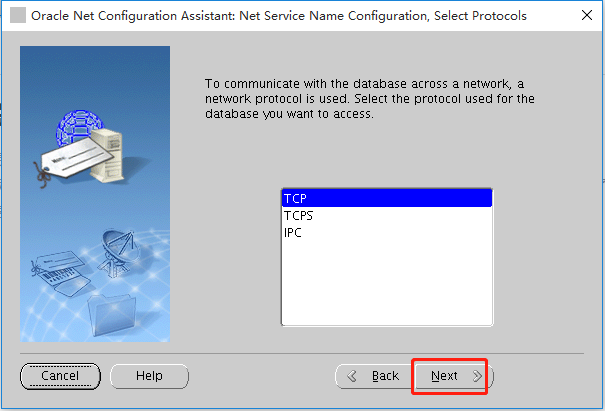
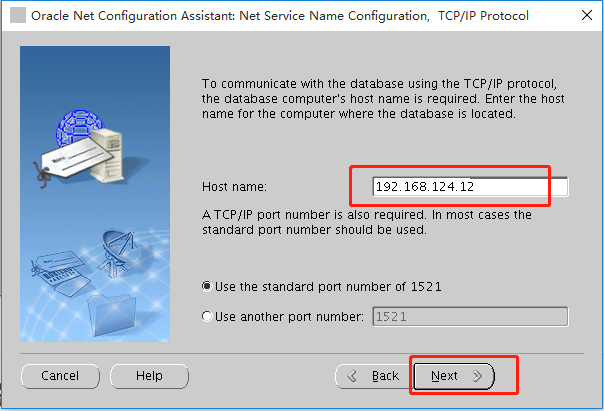
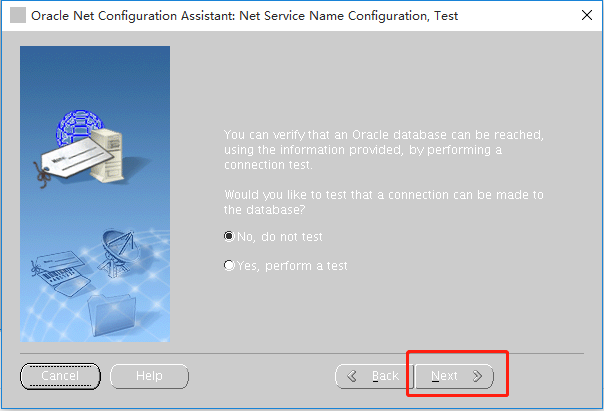
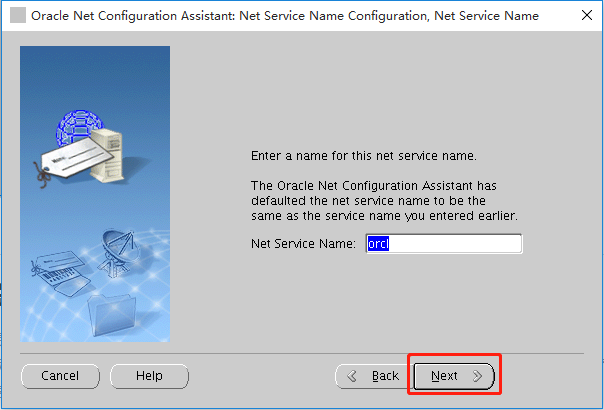
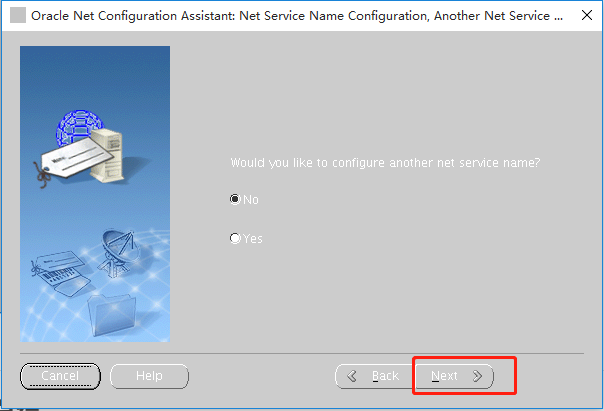
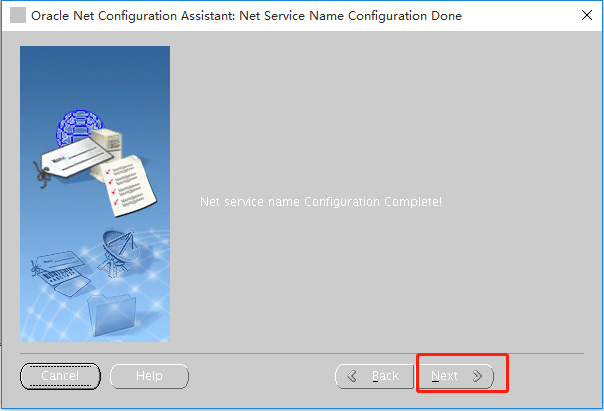
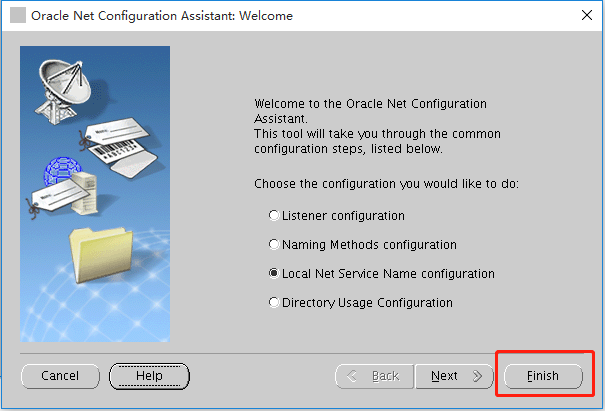
(3) Configure, monitor and service
Execute the command in the Xstart command window
netca
If - bash: netca: command not found appears
Most of the reason is that the environment variables are not refreshed. Execute the command: source /home/oracle/.bash_profile
The following interface pops up and follow my steps

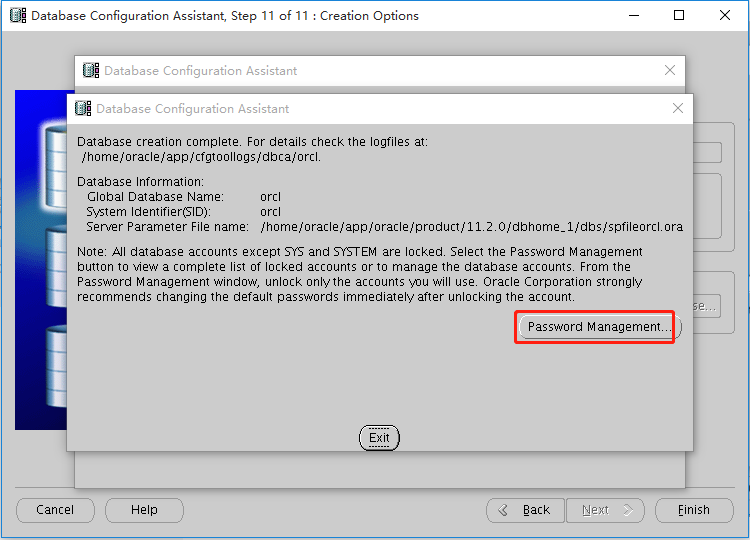
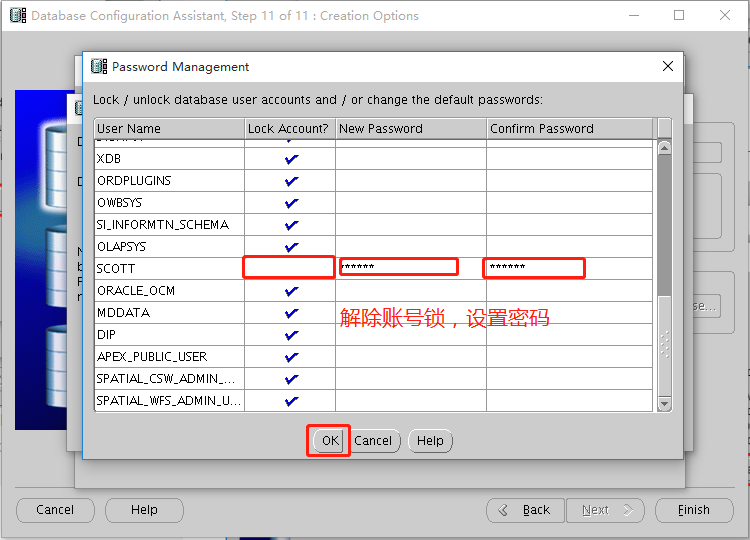
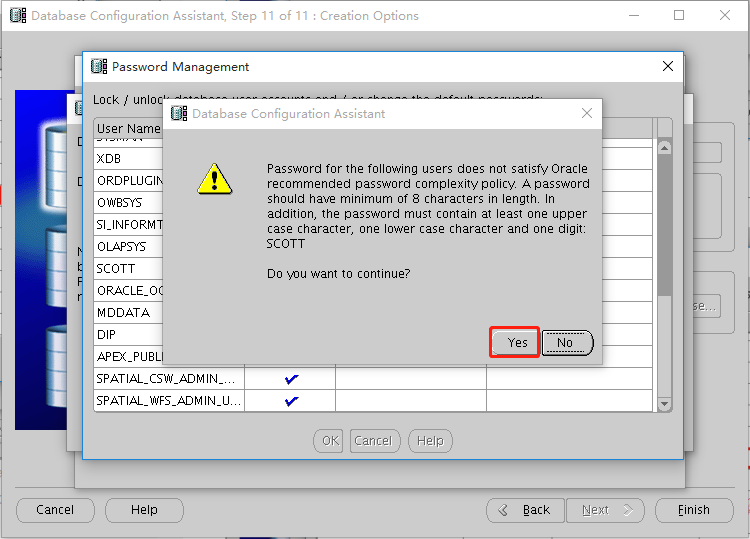
(4) Create an oracle instance
Execute the command in the Xstart command window
dbca
The following interface pops up and follow my steps
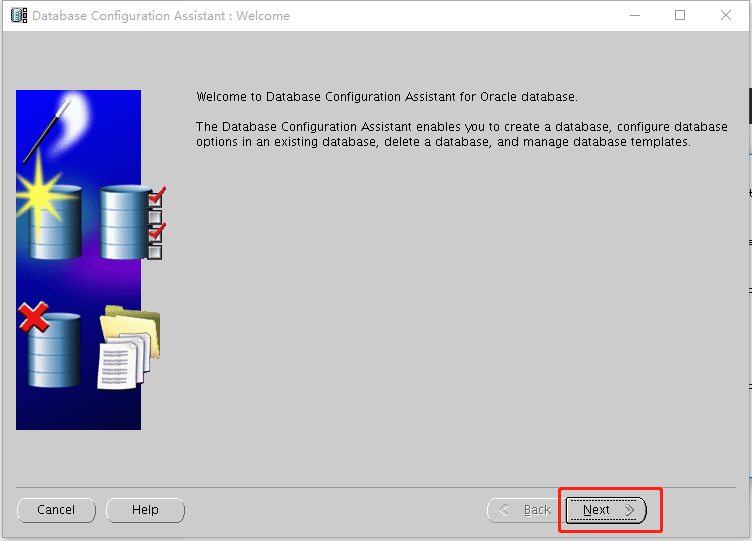
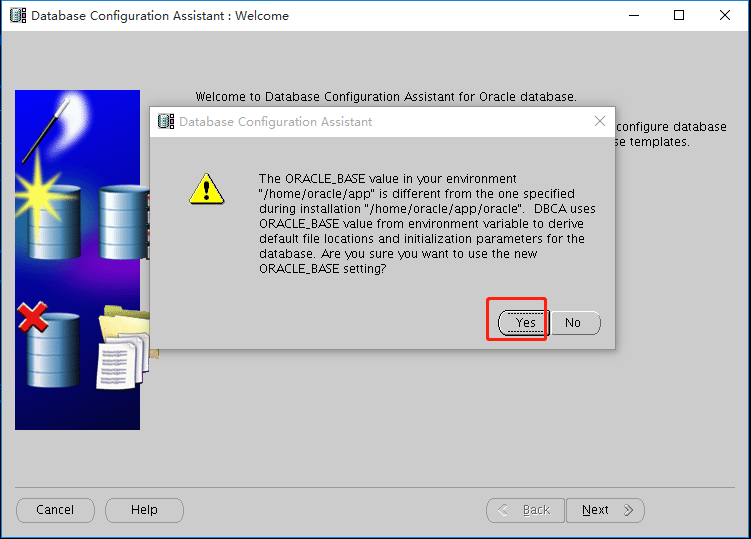
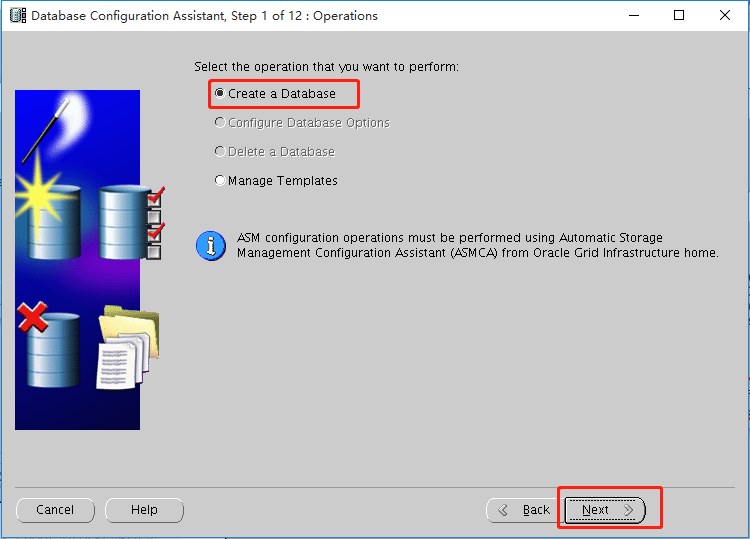
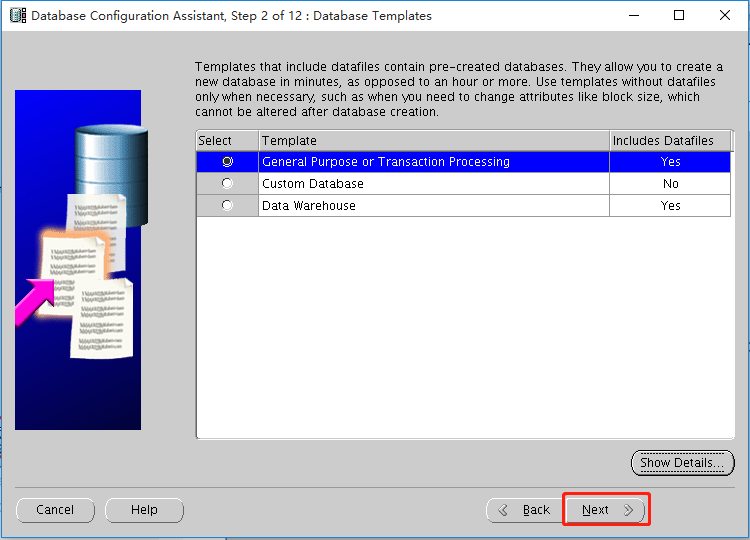
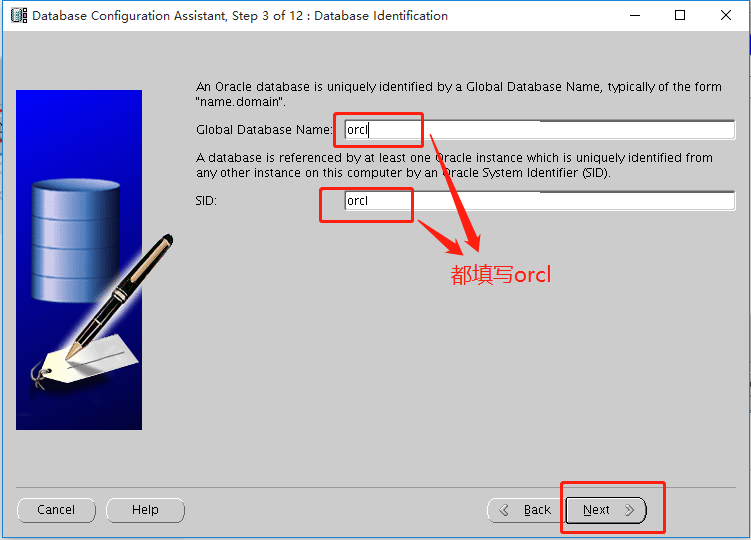
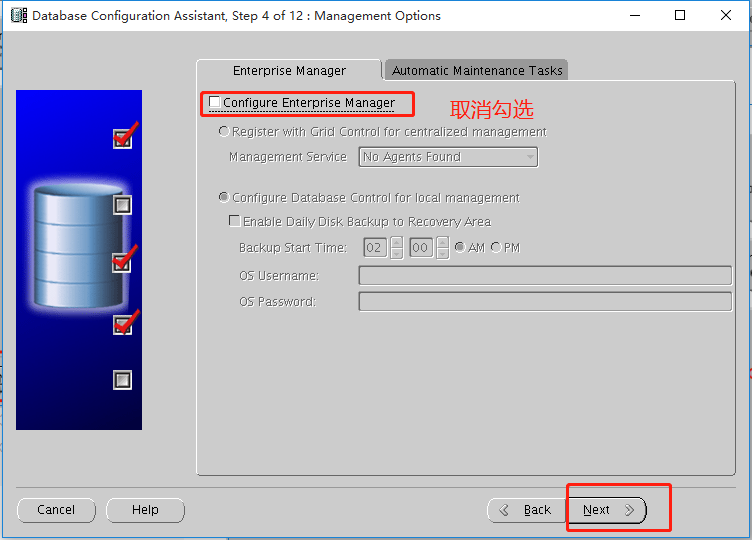
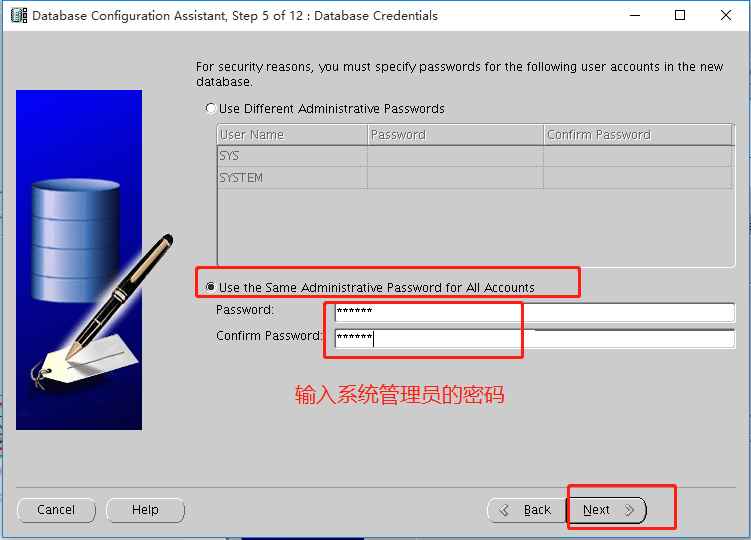
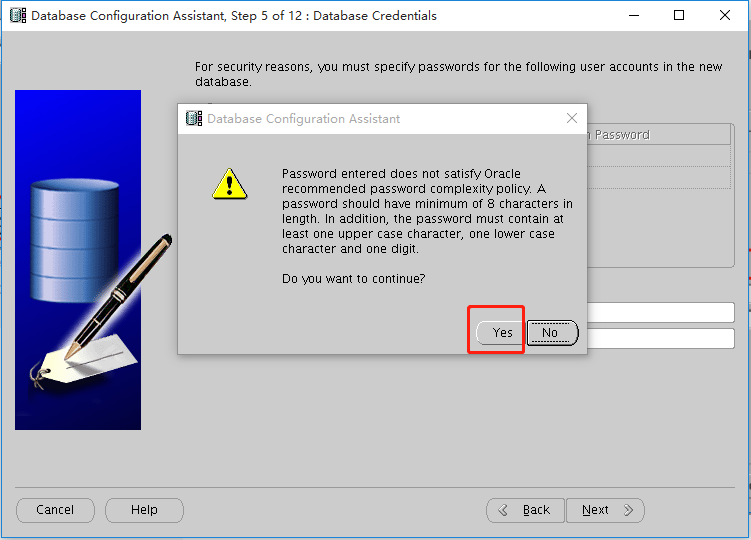
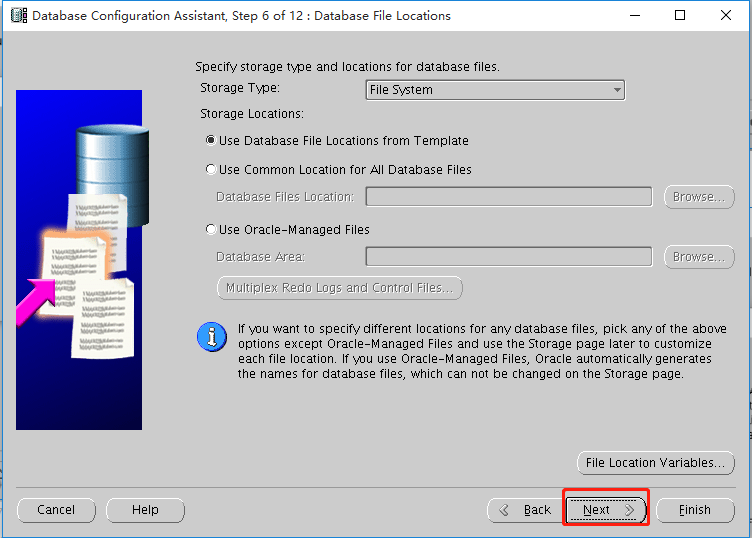
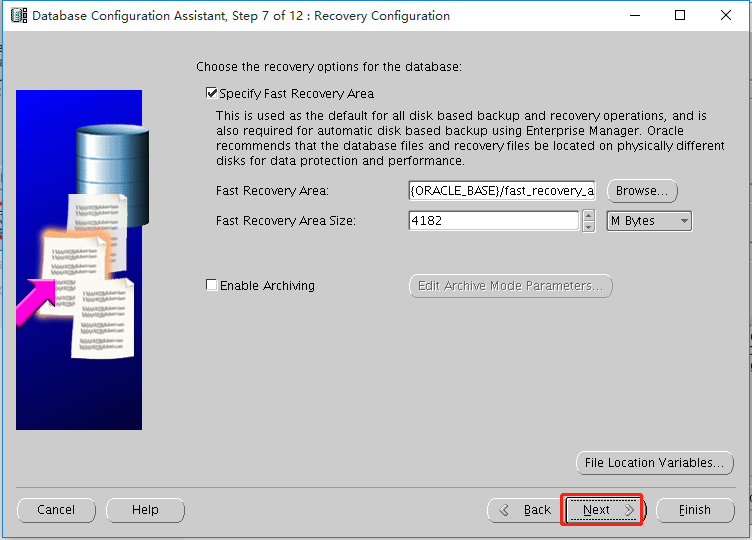
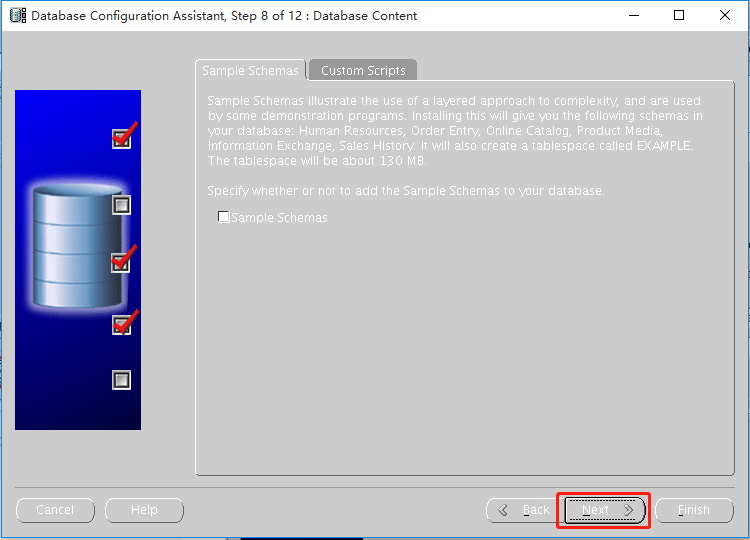
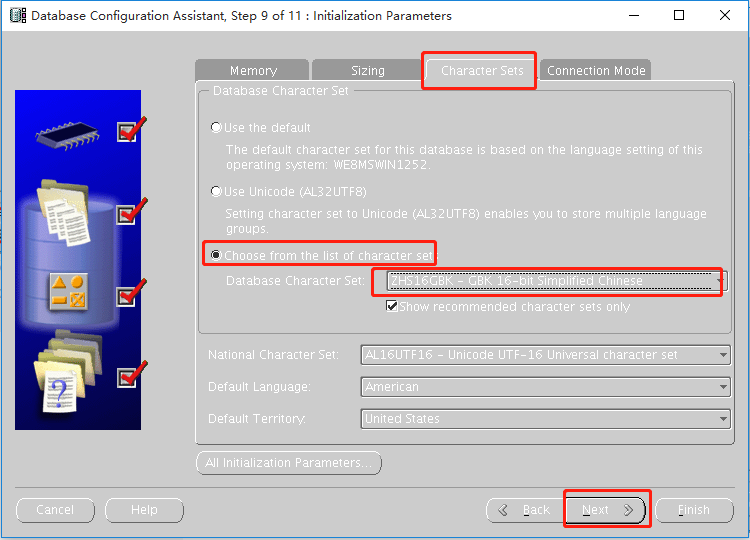
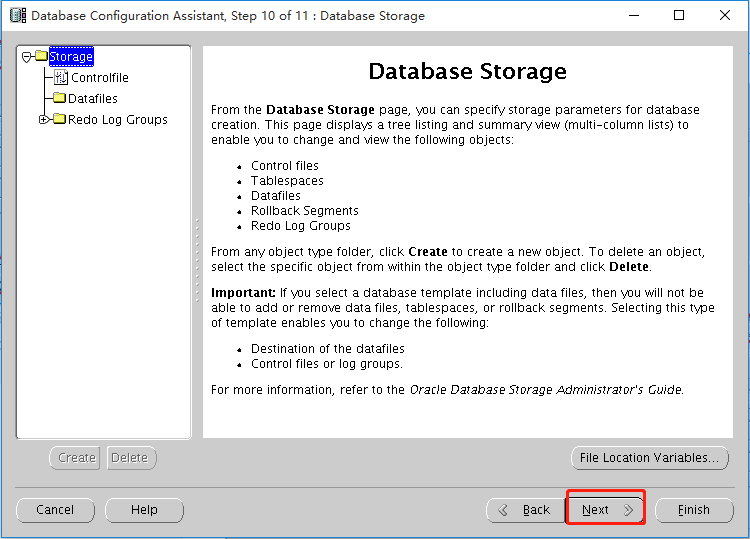
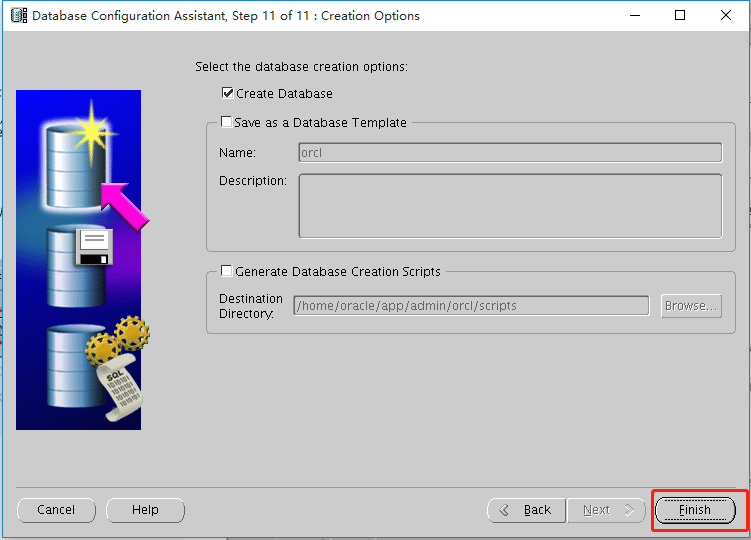
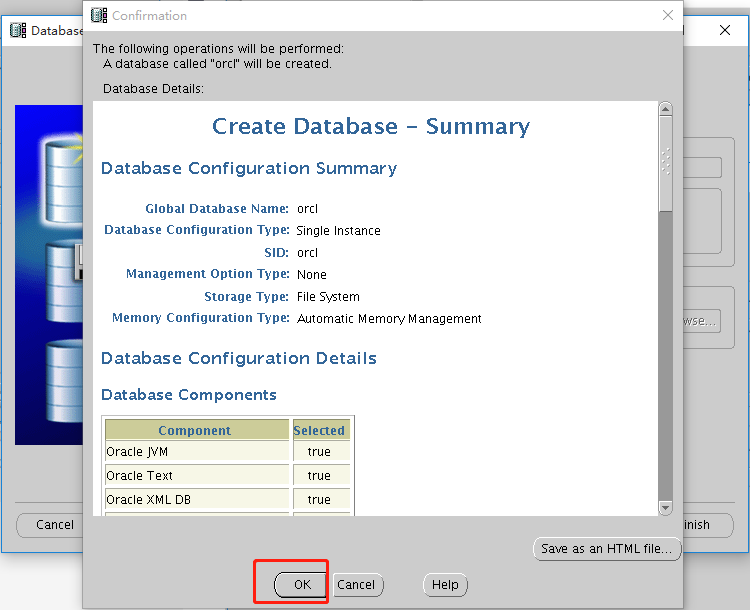
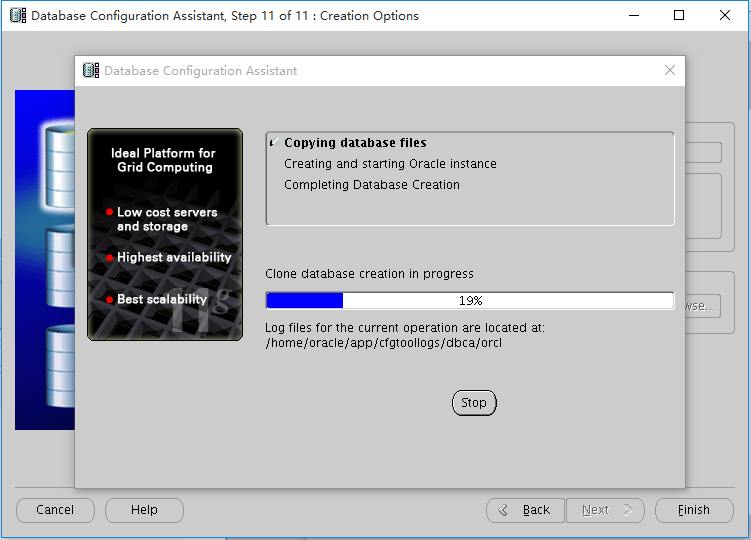
Then wait two or three minutes
5. Start listening
Note: the following database related operations are performed by oracle users
View listening status
lsnrctl status
Stop listening
lsnrctl stop
lsnrctl start
lsnrctl start
6. Restart database
Note: the following database related operations are performed by oracle users
Connect with administrator account
sqlplus sys/password as sysdba
Note: password is the password set when creating an oracle instance
close database
shutdown
Start database
startup
View oracle version
select * from v$version;
sign out
quit
The operation is as follows:
[oracle@192 database]$ sqlplus sys/password as sysdba

SQL*Plus: Release 11.2.0.4.0 Production on Tue Nov 16 22:33:49 2021

Copyright (c) 1982, 2013, Oracle.  All rights reserved.


Connected to:
Oracle Database 11g Enterprise Edition Release 11.2.0.4.0 - 64bit Production
With the Partitioning, OLAP, Data Mining and Real Application Testing options

SQL> shutdown
Database closed.
Database dismounted.
ORACLE instance shut down.

SQL> startup
ORACLE instance started.

Total System Global Area  759943168 bytes
Fixed Size		    2257112 bytes
Variable Size		  499126056 bytes
Database Buffers	  255852544 bytes
Redo Buffers		    2707456 bytes
Database mounted.
Database opened.

SQL> select * from v$version;

BANNER
--------------------------------------------------------------------------------
Oracle Database 11g Enterprise Edition Release 11.2.0.4.0 - 64bit Production
PL/SQL Release 11.2.0.4.0 - Production
CORE	11.2.0.4.0	Production
TNS for Linux: Version 11.2.0.4.0 - Production
NLSRTL Version 11.2.0.4.0 - Production

SQL> quit
Disconnected from Oracle Database 11g Enterprise Edition Release 11.2.0.4.0 - 64bit Production
With the Partitioning, OLAP, Data Mining and Real Application Testing options
7. Connect to database
Connect oracle with navicat
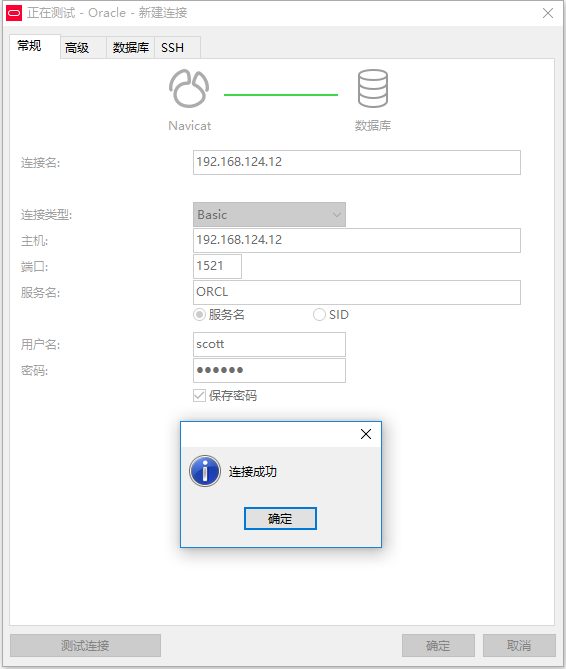
Fill in the connection information, click test connection, and a prompt box for successful connection will pop up. Congratulations on your successful installation!!!