Chapter 5. Document Structure
As we mentioned by chance, SVG allows you to separate the structure of a document from its representation. In this chapter, we will compare and contrast the two, discuss the appearance of the document in more detail, and then show some SVG elements that can make the document structure clearer, easier to read and easier to maintain.
Structure and Presentation
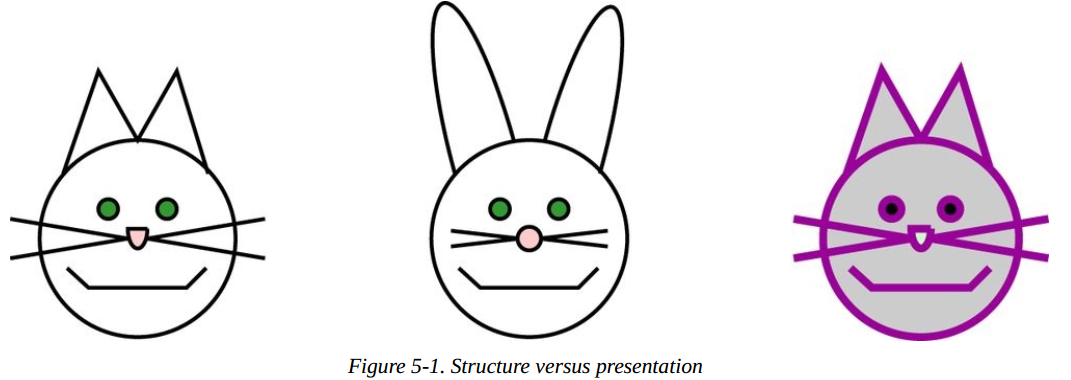
As mentioned in Chapter 1, in Basic Shapes, the purpose of XML is to provide a way to organize data and separate this structure from its visual presentation. Think about the cat in that chapter. You recognize it as a cat because its structure, geometry, position and size constitute the drawing. If we want to make structural changes, such as shortening its beard, making its nose rounder, making its ears longer, and making the end of the ear smoother. This structure, therefore, tells you what graphics are
This is not to say that the information of visual style is not important; If we draw the cat with thick purple lines and gray interior, he will be recognized as a cat, but its appearance will not be so pleasing to the eye. The difference is shown in Figure 5-1. XML encourages you to separate structure from presentation; Unfortunately, many discussions about XML emphasize structure and ignore presentation. We will correct this error by detailing how to specify presentation in SVG.
Using Styles with SVG
SVG provides four ways to specify the appearance of various aspects of a graph: inline styles, internal stylesheets, external stylesheets, and presentation attributes. Let's check each one in turn.
Inline Styles
Example 5-1 uses inline styles. This is how we use appearance information at present. We set the value of the style attribute as a series of visual attributes, which are described in detail in the Anatomy of a Style in Appendix B.
Example5-1:Use of inline styles
<circle cx="20" cy="20" r="10" style="stroke: black; stroke-width: 1.5; fill: blue; fill-opacity: 0.6"/>
Internal Stylesheets
You don't need to put your styles in each SVG element; You can create an internal stylesheets to collect styles for public use, which can be applied to all places where a specific element appears,
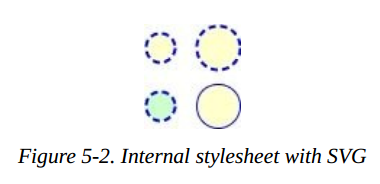
Or use named classes to apply styles to specific elements. Example 5-2 sets an internal stylesheets, which will draw a circle with light blue double dashed lines, and the inside of the circle is filled with light yellow.
This stylesheet is written in the < defs > element, which I will discuss in the next chapter.
This example then draws some circles. These circles are in the second row of Figure 5-2 and have inline styles that override the specification in the internal style sheet.
Example5-2. Use of internal stylesheet
<svg width="200px" height="200px" viewBox="0 0 200 200"
xmlns="http://www.w3.org/2000/svg">
<defs>
<style type="text/css"><![CDATA[
  circle {
    fill: #ffc;
    stroke: blue;
    stroke-width: 2;
    stroke-dasharray: 5 3
  }
]]></style>
</defs>
<circle cx="20" cy="20" r="10"/>
<circle cx="60" cy="20" r="15"/>
<circle cx="20" cy="60" r="10" style="fill: #cfc"/>
<circle cx="60" cy="60" r="15"
style="stroke-width: 1; stroke-dasharray: none;"/>
</svg>
External Stylesheets
If you want to apply a set of styles to multiple SVG documents, you can copy the set of internal stylesheets and paste them into each document to be applied. This method, of course, if you need it
Making global changes to all documents is impractical for a large number of documents. Instead, you should take out all the information of the < style > start and end tag home (excluding <! [CDTA [and]] >).
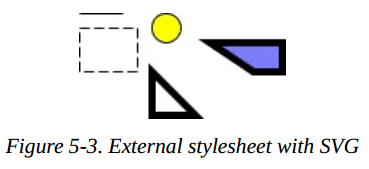
Then it is saved to an external file, which becomes an external stylesheet. Example 5-3 shows an external stylesheet saved in a file named
ext_style.css file. This style uses a series of selectors, including *, which sets a default value for all elements without other styles. Together with SVG, it generates Figure 5-3
Example 5-3.External stylesheet
* { fill:none; stroke: black; } /* default for all elements */

rect { stroke-dasharray: 7 3; }

circle.yellow { fill: yellow; }

.thick { stroke-width: 5; }

.semiblue { fill:blue; fill-opacity: 0.5; }
Example 5-4 shows a complete SVG document (including <? XML...? >, <? XML stylesheet...? > and <! DOCTYPE >) and references to external style sheets.
Example 5-4. SVG file that references an external stylesheet
<?xml version="1.0"?>
<?xml-stylesheet href="ext_style.css" type="text/css"?>
<!DOCTYPE svg PUBLIC "-//W3C//DTD SVG 1.1//EN"
"http://www.w3.org/Graphics/SVG/1.1/DTD/svg11.dtd">
<svg xmlns="http://www.w3.org/2000/svg"
width="200px" height="200px" viewBox="0 0 200 200">
<line x1="10" y1="10" x2="40" y2="10"/>
<rect x="10" y="20" width="40" height="30"/>
<circle class="yellow" cx="70" cy="20" r="10"/>
<polygon class="thick" points="60 50, 60 80, 90 80"/>
<polygon class="thick semiblue"
points="100 30, 150 30, 150 50, 130 50"/>
</svg>
Note: the rendering of inline styles is almost always faster than that of internal stylesheets or external stylesheets; Stylesheets
And classes increase the rendering time, which depends on the speed of query and parsing. However, stylesheets are easier to maintain, with smaller file sizes and caches, making file loading faster.
Presentation Attributes
Although most SVG documents will use styles to represent information, SVG allows you to specify this information in the form of appearance attributes. If the following representation is not used:
<circle cx="10" cy="10" r="5" style="fill: red; stroke:black; stroke-width: 2;"/>
You can write each attribute as an attribute:
<circle cx="10" cy="10" r="5" fill="red" stroke="black" stroke-width="2"/>
If you think this is a mixture of structure and presentation, you are right. Appearance properties do come in handy, but when you create an SVG document by converting an XML data source to SVG.
You will see it in Chapter 15. In these cases, it is easier to create a separate attribute for each appearance attribute than to create a separate style attribute content. If your presentation environment does not support style sheets,
You may also need to use appearance properties.
Appearance properties are at the bottom of the priority list. Any style specified by inline style, internal stylesheet, or external stylesheet will be overwritten
The style specified by the presentation attribute, although the presentation attribute overrides the inherited style. In the following SVG document, the circle will be filled in red instead of green:
<svg width="200" height="200" xmlns="http://www.w3.org/2000/svg">
  <defs>
      <style type="text/css"><![CDATA[ circle { fill: red; } ]]></style>
  </defs>
<circle cx="20" cy="20" r="15" fill="green"/>
</svg>
Once again, using style attributes or style sheets should always be your first choice. Style sheets allow you to combine a series of complex fill and brush features,
It is applied to all elements in the document that have this effect, without requiring each element to have a duplicate information. This ability and flexibility of style sheets allows you to change the look and feel of multiple documents with minimal effort
Major adjustments.
Grouping and Referencing Objects
Although we can define any painting as a group of indistinguishable shapes and lines, most non abstract art is composed of a group of shapes and lines,
These lines constitute recognizable named objects.
The <g> element
<g> Element gathers all its child elements into a group, and usually has an ID attribute to specify a unique name for the group. Each group may also have its own < title > and < desc >,
To provide representation for text-based XML applications, or presentation when it is not possible. Many SVG rendering clients, when you hover over any graphics in the group,
A prompt message is displayed with the text of the < title > element. Readers in front of the screen will see the contents of the < title > element and the < desc > element.
In addition to conceptual clarity, this also comes from the ability to group and record objects, and the < g > element also provides symbolic convenience. Any style specified in the beginning < g > tag will be applied to the in the group
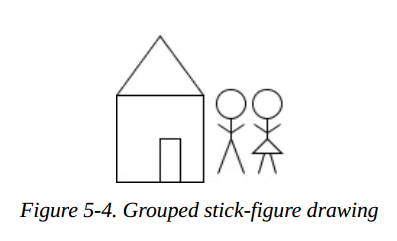
All child elements. In example 5-5, we don't have to copy style="fill:none; stroke:black;" on each element shown in Figure 5-4. You can also nest one group in another,
Although you won't see any examples before Chapter 6.
Element is similar to the Group Object function in programs such as Adobe Illustrator. It also provides functions similar to the layer concept in such programs; Layers are also groups of associated objects.
Example 5-5.Simple use of the g element
<svg width="240px" height="240px" viewBox="0 0 240 240" xmlns="http://www.w3.org/2000/svg">
<title>Grouped Drawing</title>
<desc>Stick-figure drawings of a house and people</desc>
<g id="house" style="fill: none; stroke: black;">
    <desc>House with door</desc>
    <rect x="6" y="50" width="60" height="60"/>
    <polyline points="6 50, 36 9, 66 50"/>
    <polyline points="36 110, 36 80, 50 80, 50 110"/>
</g>
<g id="man" style="fill: none; stroke: black;">
    <desc>Male human</desc>
    <circle cx="85" cy="56" r="10"/>
    <line x1="85" y1="66" x2="85" y2="80"/>
    <polyline points="76 104, 85 80, 94 104" />
    <polyline points="76 70, 85 76, 94 70" />
</g>
<g id="woman" style="fill: none; stroke: black;">
    <desc>Female human</desc>
    <circle cx="110" cy="56" r="10"/>
    <polyline points="110 66, 110 80, 100 90, 120 90, 110 80"/>
    <line x1="104" y1="104" x2="108" y2="90"/>
    <line x1="112" y1="90" x2="116" y2="104"/>
    <polyline points="101 70, 110 76, 119 70" />
</g>
</svg>
The <use> Element
Complex graphics often contain duplicate elements. For example, each page of a product brochure may have a company logo in the upper left and lower right corners. If you draw this brochure in a graphic design program, you just need to
Draw the logo once, package its elements together, and then copy and paste it to other places to use. The < use > element in SVG provides you with groups similar to copy and paste functions,
You have passed the < g > element or any individual graphic element (for example, if you want a complex polygon shape, you only need to define it once).
Once you have defined a group of graphic objects, you can show them again. You just need to specify the group you want to reuse through the < use > tag and set its URI to the xlink:href attribute,
And specify the x and y coordinates of the position where the (0,0) point of the group should be moved. (we will see another way to achieve this effect in Chapter 6, in the chapter of The translate Transformation.)
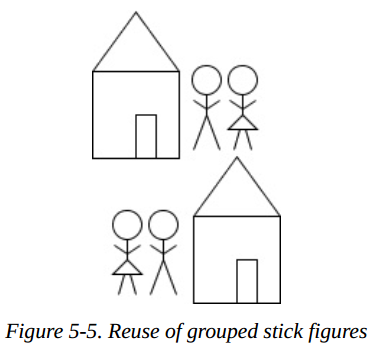
Therefore, in order to create another house and set up these characters, as shown in Figure 5-5, you only need to place these lines in front of the end tag < / SVG >:
<use xlink:href="#house" x="70" y="100"/>
<use xlink:href="#woman" x="-80" y="100"/>
<use xlink:href="#man" x="-30" y="100"/>
The <defs> Element
You may have noticed some defects in the previous example:
- To decide where to put the reused men and girls, mathematically you need to know the original location and use it as a basis. Instead of using a simple number, such as zero.
- The color of the house fill and brush will be related to the original image and cannot be overwritten by < use >. That means you can't make a row of colorful houses.
- This document draws three groups: women, men and houses. You can't "save them", just draw a group of houses or a group of people.
The < defs > element (definition element definitions) solves these problems. By placing grouped objects between the start and end < defs > tags. You instruct SVG to define them without displaying them.
In the SVG specification, in fact, it is recommended that you put all the objects you want to reuse in the < defs > element, so that the SVG viewer working in the streaming environment can be more flexible
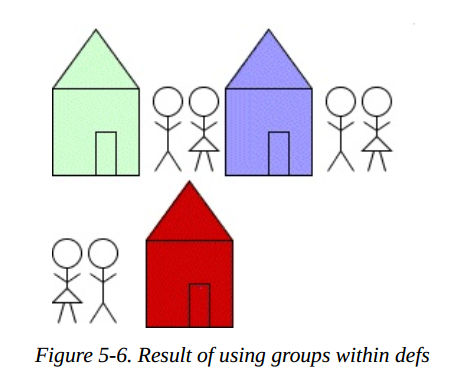
Process data effectively. In example 5-6, the house, man and woman are defined at the original coordinates (0,0) in the upper left corner, and the house is not set with any color. Because these groups will be placed in the < defs > element,
They are not immediately drawn on the screen. Instead, it serves as a template for future use. We also created another house called couple, which fouled and used the man and woman groups.
(note that the front half of the bottom of figure 5-6 cannot use couple because it uses a different arrangement.)
<svg width="240px" height="240px" viewBox="0 0 240 240"
  xmlns="http://www.w3.org/2000/svg">
  <title>Grouped Drawing</title>
  <desc>Stick-figure drawings of a house and people</desc>
  <defs>
    <g id="house" style="stroke: black;">
      <desc>House with door</desc>
      <rect x="0" y="41" width="60" height="60"/>
      <polyline points="0 41, 30 0, 60 41"/>
      <polyline points="30 101, 30 71, 44 71, 44 101"/>
    </g>
    <g id="man" style="fill: none; stroke: black;">
      <desc>Male stick figure</desc>
      <circle cx="10" cy="10" r="10"/>
      <line x1="10" y1="20" x2="10" y2="44"/>
      <polyline points="1 58, 10 44, 19 58"/>
      <polyline points="1 24, 10 30, 19 24"/>
    </g>
    <g id="woman" style="fill: none; stroke: black;">
      <desc>Female stick figure</desc>
      <circle cx="10" cy="10" r="10"/>
      <polyline points="10 20, 10 34, 0 44, 20 44, 10 34"/>
      <line x1="4" y1="58" x2="8" y2="44"/>
      <line x1="12" y1="44" x2="16" y2="58"/>
      <polyline points="1 24, 10 30, 19 24" />
    </g>
    <g id="couple">
      <desc>Male and female stick figures</desc>
      <use xlink:href="#man" x="0" y="0"/>
      <use xlink:href="#woman" x="25" y="0"/>
    </g>
  </defs>
  <!-- make use of the defined groups -->
  <use xlink:href="#house" x="0" y="0" style="fill: #cfc;"/>
  <use xlink:href="#couple" x="70" y="40"/>
  <use xlink:href="#house" x="120" y="0" style="fill: #99f;"/>
  <use xlink:href="#couple" x="190" y="40"/>
  <use xlink:href="#woman" x="0" y="145"/>
  <use xlink:href="#man" x="25" y="145"/>
  <use xlink:href="#house" x="65" y="105" style="fill: #c00;"/>
</svg>
The < use > element is not limited to using objects from its file; The xlink:href attribute can specify any valid file or URI. This makes it possible to collect a set of common elements in one SVG file and selectively use them from other files. For example, you can create a file called identity.svg, which contains all the identification graphics to be used in your structure:
<g id="company_mascot">
    <!-- drawing of company mascot -->
</g>
<g id="company_logo" style="stroke: none;">
   <polygon points="0 20, 20 0, 40 20, 20 40" style="fill: #696;"/>
   <rect x="7" y="7" width="26" height="26" style="fill: #c9c;"/>
</g>
<g id="partner_logo">
   <!-- drawing of company partner's logo -->
</g>
Then reference them in the following way:
<use xlink:href="identity.svg#company_logo" x="200" y="200"/>
Warning: not all SVG viewers support external references, especially web browsers, for security reasons. Some browsers (especially Internet Explorer) currently do not support external file references at all.
Others only allow the < use > element to refer to files from the same domain name or the same network service. It is specially configured to allow cross origin use.
The <symbol> Element
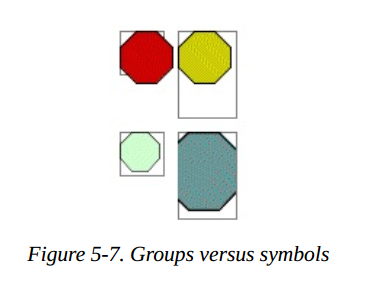
The < symbol > element provides another way to group elements. Unlike the < g > element, < symbol > element is never displayed, so you don't have to include it in the < defs > specification.
However, this is a habit, because symbol is actually something you define for later use. Symbol can also specify the viewBox and preservespectratio attributes by adding
The element adds width and height attributes to allow a symbol to adapt to the size of the viewport. Example 5-7 shows that for a simple group (the top two octagons), the
Width and height properties, but width and height are used when displaying the symbol. In Figure 5-7, the octagon at the bottom right is cut off because the preservespectratio is set
It's slice< The rect > element is used to display the coordinates used each time.
Example 5-7. Symbols versus groups
<svg width="200px" height="200px" viewBox="0 0 200 200"
  xmlns="http://www.w3.org/2000/svg">
  <title>Symbols vs. groups</title>
  <desc>Use</desc>
  <defs>
    <g id="octagon" style="stroke: black;">
      <desc>Octagon as group</desc>
      <polygon points="
36 25, 25 36, 11 36, 0 25,
0 11, 11 0, 25 0, 36 11"/>
    </g>
    <symbol id="sym-octagon" style="stroke: black;"
      preserveAspectRatio="xMidYMid slice" viewBox="0 0 40 40">
      <desc>Octagon as symbol</desc>
      <polygon points="
36 25, 25 36, 11 36, 0 25,
0 11, 11 0, 25 0, 36 11"/>
    </symbol>
  </defs>
  <g style="fill:none; stroke:gray">
    <rect x="40" y="40" width="30" height="30"/>
    <rect x="80" y="40" width="40" height="60"/>
    <rect x="40" y="110" width="30" height="30"/>
    <rect x="80" y="110" width="40" height="60"/>
  </g>
  <use xlink:href="#octagon" x="40" y="40" width="30" height="30"
    style="fill: #c00;"/>
  <use xlink:href="#octagon" x="80" y="40" width="40" height="60"
    style="fill: #cc0;"/>
  <use xlink:href="#sym-octagon" x="40" y="110" width="30" height="30"
    style="fill: #cfc;"/>
  <use xlink:href="#sym-octagon" x="80" y="110" width="40" height="60"
    style="fill: #699;"/>
</svg>
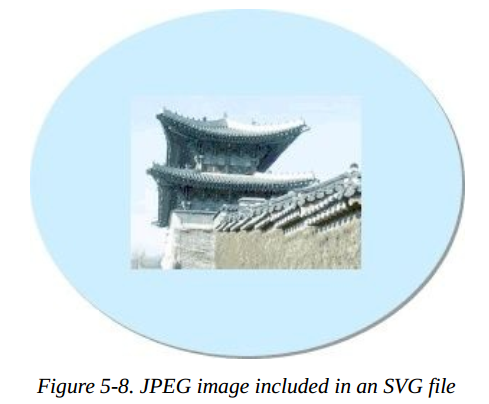
The <image> Element
< use > makes it difficult for you to reuse a part of an SVG file. The < Image > element contains a complete SVG file or grid file. If you are importing an SVG file, the x, y, width and height attributes create a view window drawn by referencing the file. If you include a mesh file, it will be scaled to use the rectangular area specified by the attribute value. Svg specification requires the viewer to support JPEG and PNG grid files at the same time; The viewer may support other files. For example, most browsers will delay GIF. Example 5-8 shows how to include JPEG images using SVG. The results are shown in Figure 5-8.
Example 5-8. Use of the image element
<svg width="310px" height="310px" viewBox="0 0 310 310"
  xmlns="http://www.w3.org/2000/svg">
  <ellipse cx="154" cy="154" rx="150" ry="120" style="fill: #999999;"/>  <!-- 1 -->
  <ellipse cx="152" cy="152" rx="150" ry="120" style="fill: #cceeff;"/> <!-- 2 -->
  <image xlink:href="kwanghwamun.jpg"
    x="72" y="92"
    width="160" height="120"/>  <!-- 3,4,5 -->
</svg>
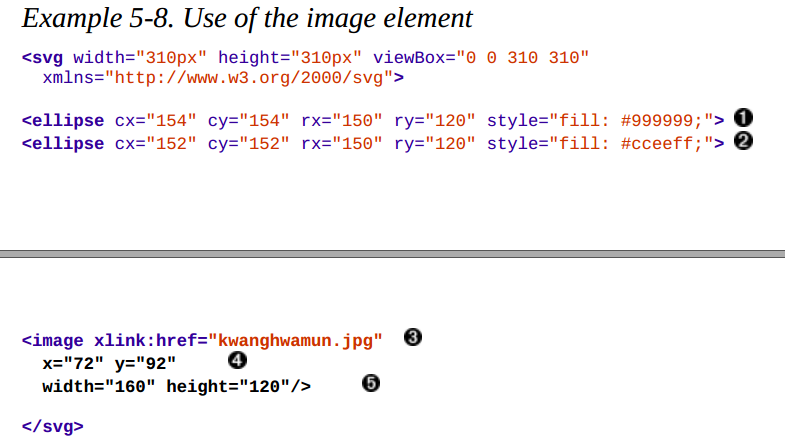
- Note 1: create a gray ellipse to simulate a shadow.
- Note 2: create the main blue ellipse, which appears above the gray ellipse because it appears after the gray ellipse.
- Note 3: specify the URI of the file to be imported through xlink:href.
- Note 4: specify the upper left corner of the image by x and y.
- Note 5: specify the scale of the picture to be scaled through width and height.
The < Image > element can have a preserveAspectRatio attribute to indicate what to do when the size of the image file does not match the width and height of the element. The default value is: xMidYMid meet. The image will be scaled to fit and centered on the rectangular area you specify (refer to the Preserving Aspect Ratio chapter). If you include an SVG file, you can add the keyword defer (such as defer xMidYMin meet) at the beginning of the preservespectratio value; If the included image has the preserveAspectRatio attribute, this attribute is used.
- [7] In Chapter 11, we'll see another way to create a drop shadow in Creating a Drop Shadow.