1, About Swagger
In short, Swagger is a tool to help background developers dynamically generate interface documents in front and back-end separated projects, so that background developers do not have to write interface documents, which greatly saves the time of background developers.
2, Swagger quick start
Swagger is generally integrated in the SpringBoot project, so we need to configure it in the SpringBoot project.
- Import coordinate dependency in pom file: the first coordinate is the dependency of Swagger; The second is the dependency of Swagger UI, which is used to display interface documents using visual UI.
        <!--Swagger rely on-->
        <dependency>
            <groupId>io.springfox</groupId>
            <artifactId>springfox-swagger2</artifactId>
            <version>2.9.2</version>
        </dependency>
        <!--Swagger-ui rely on-->
        <dependency>
            <groupId>io.springfox</groupId>
            <artifactId>springfox-swagger-ui</artifactId>
            <version>2.9.2</version>
        </dependency>
- Create an entity class: for testing
public class People {

    private int id;
    private String name;
    private String address;

    public int getId() {
        return id;
    }
    public void setId(int id) {
        this.id = id;
    }
    public String getName() {
        return name;
    }
    public void setName(String name) {
        this.name = name;
    }
    public String getAddress() {
        return address;
    }
    public void setAddress(String address) {
        this.address = address;
    }
}
- Create Controller for testing
@Controller
public class DemoController {
    @RequestMapping("test")
    @ResponseBody
    public People getPeople(int id, String name, String address){
        People people = new People();
        people.setId(id);
        people.setName(name);
        people.setAddress(address);
        return people;
    }
}
- Annotate the startup class of SpringBoot with @ EnableSwagger2
- Pass after operation http://ip:port/swagger-ui.html can access the swagger UI page, which is generated with the help of swagger UI tool. The effects are as follows:

Click demo controller to see the test interface we just wrote. Just because we did not specify how the interface is requested, it generates documents of different request methods for this interface.
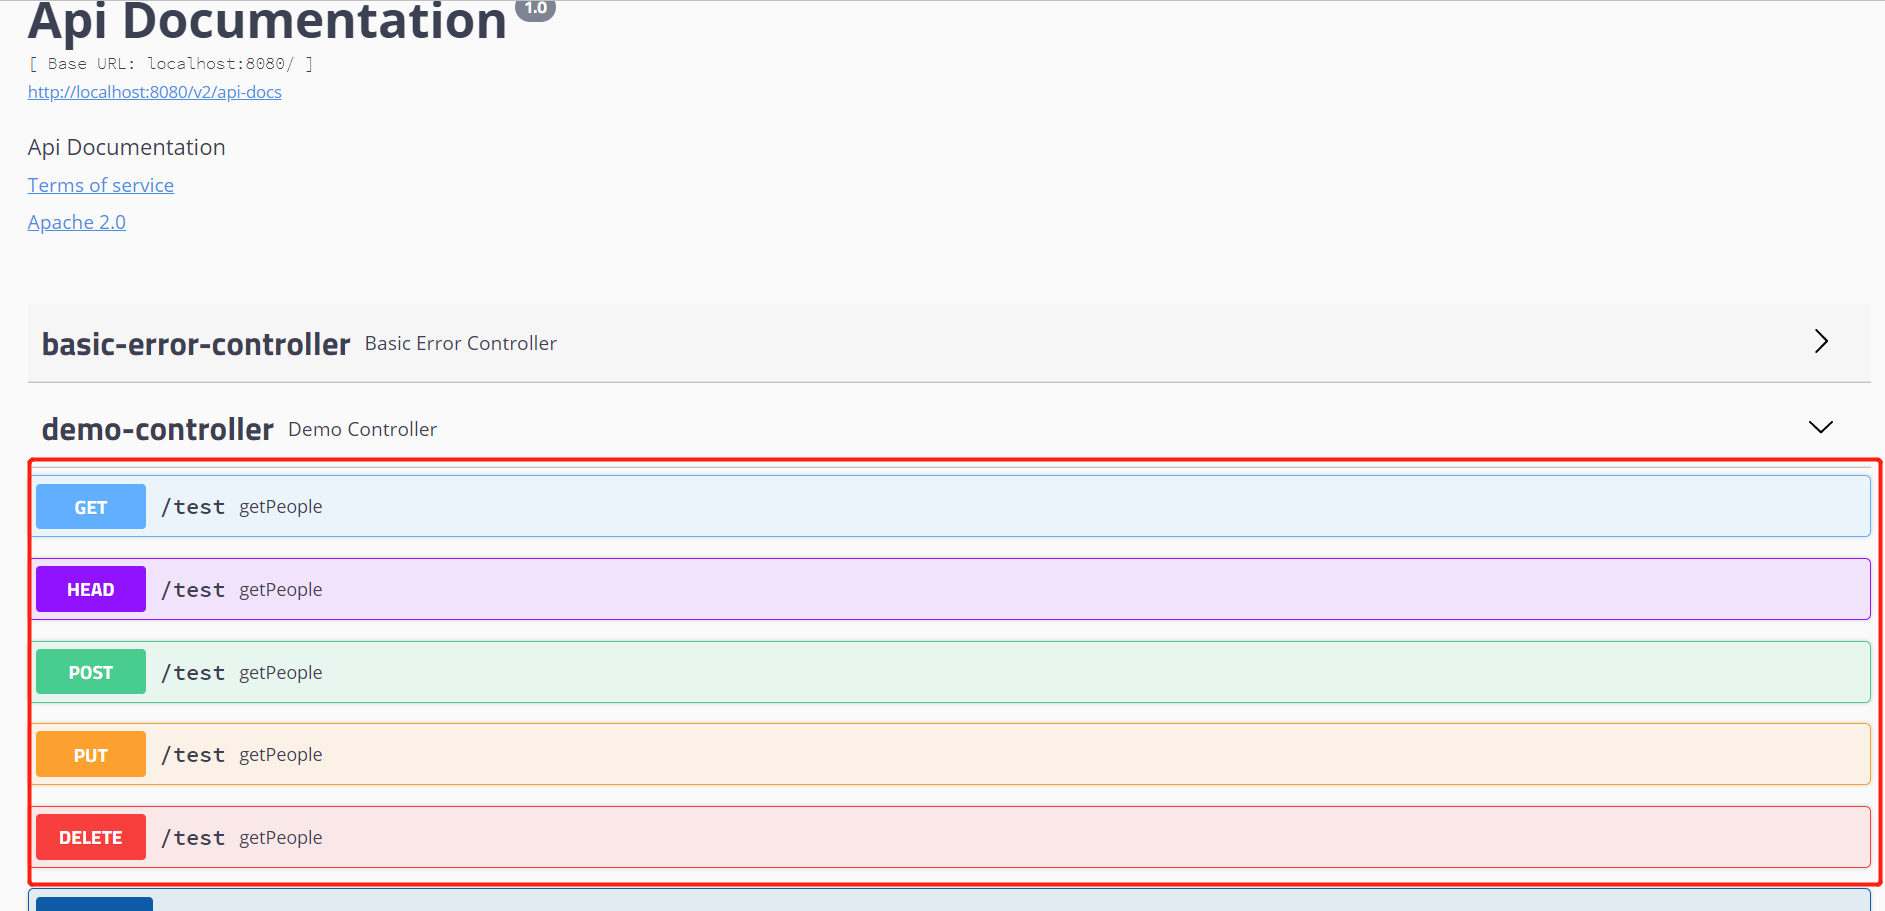
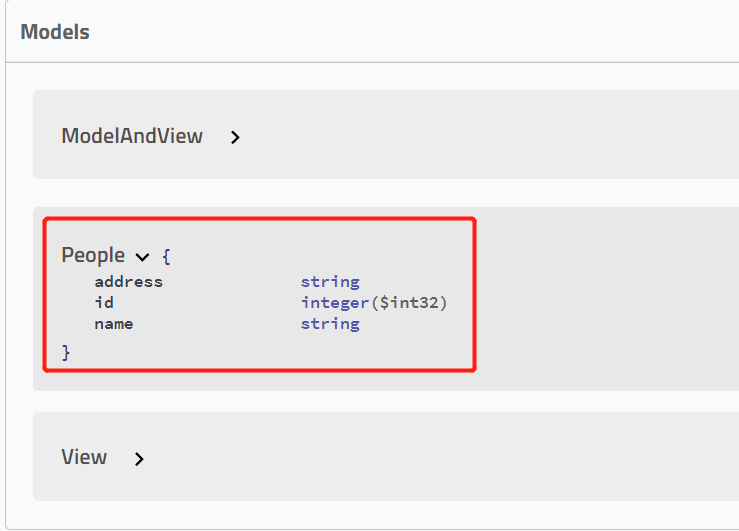
The Model also has the entity class we wrote. Because the return value of our interface is this entity class, we can scan it.
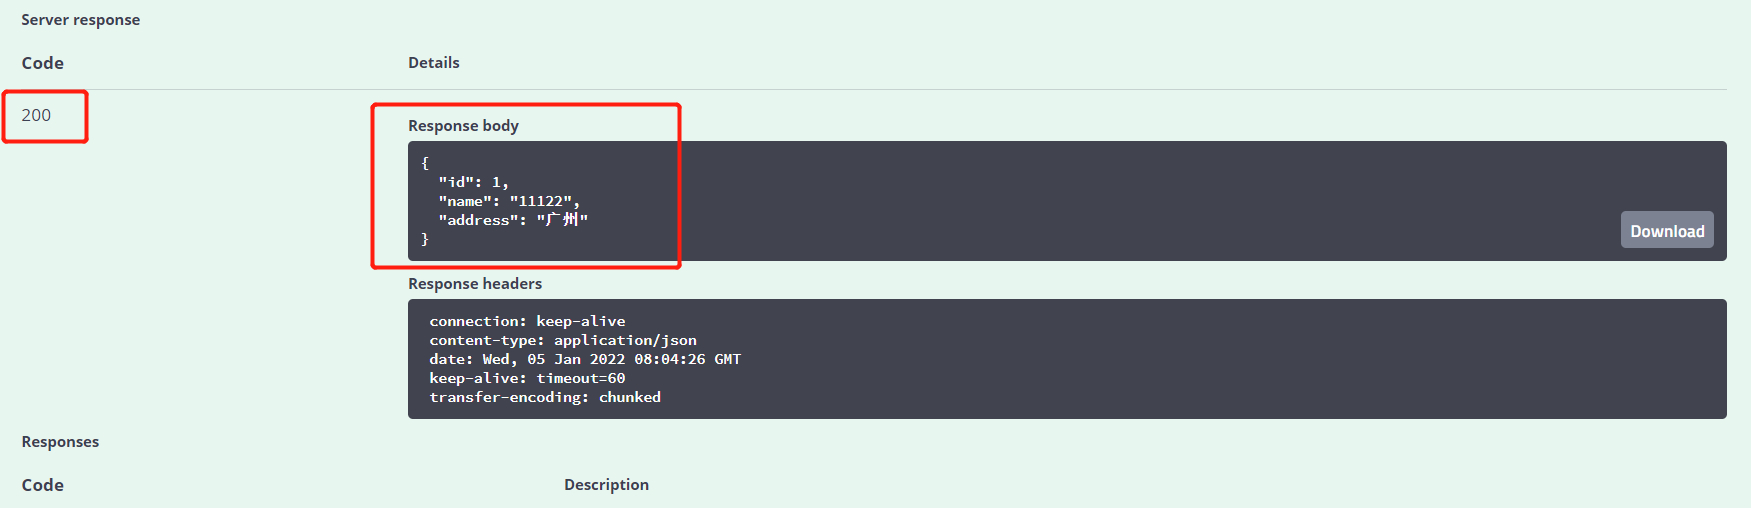
- Request interface using Swagger
Click an interface to enter the interface, and then click try it out
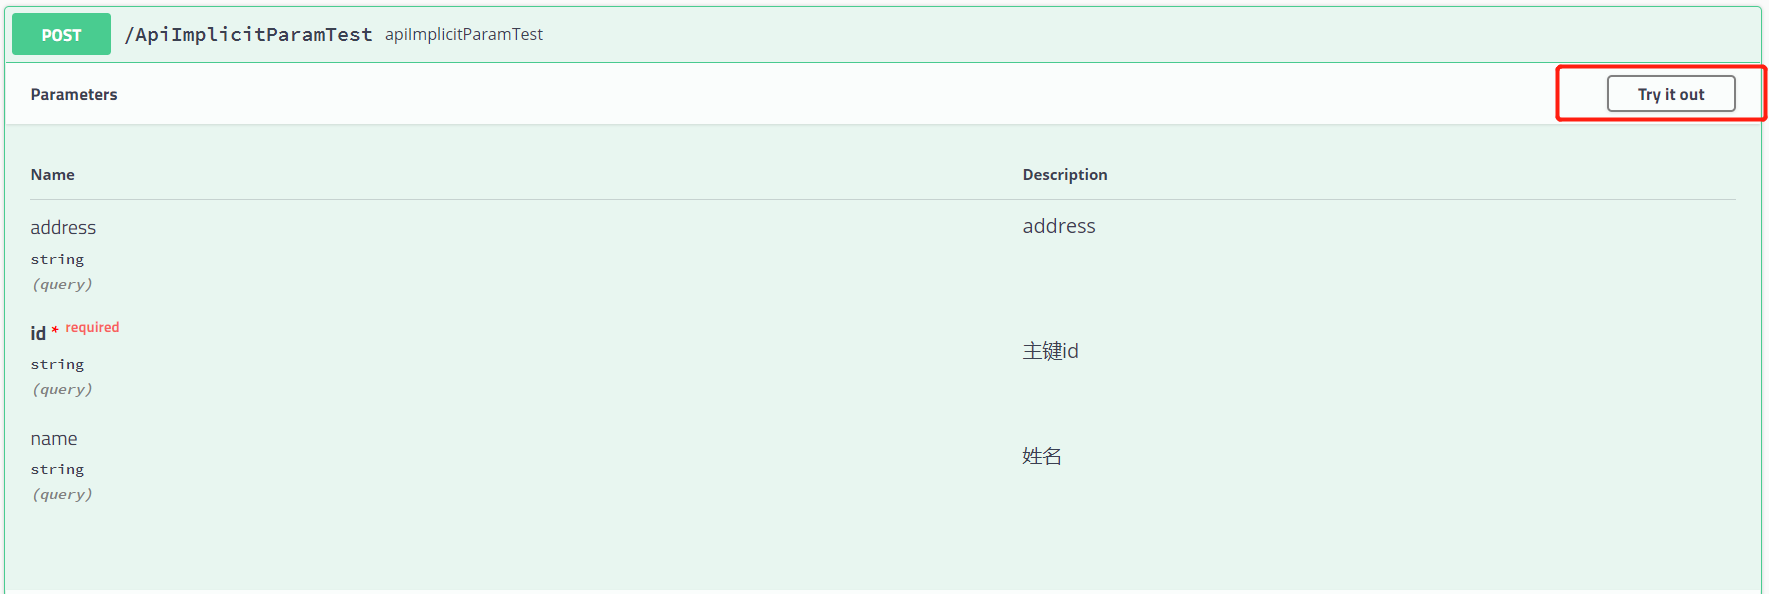
Input parameters for operation
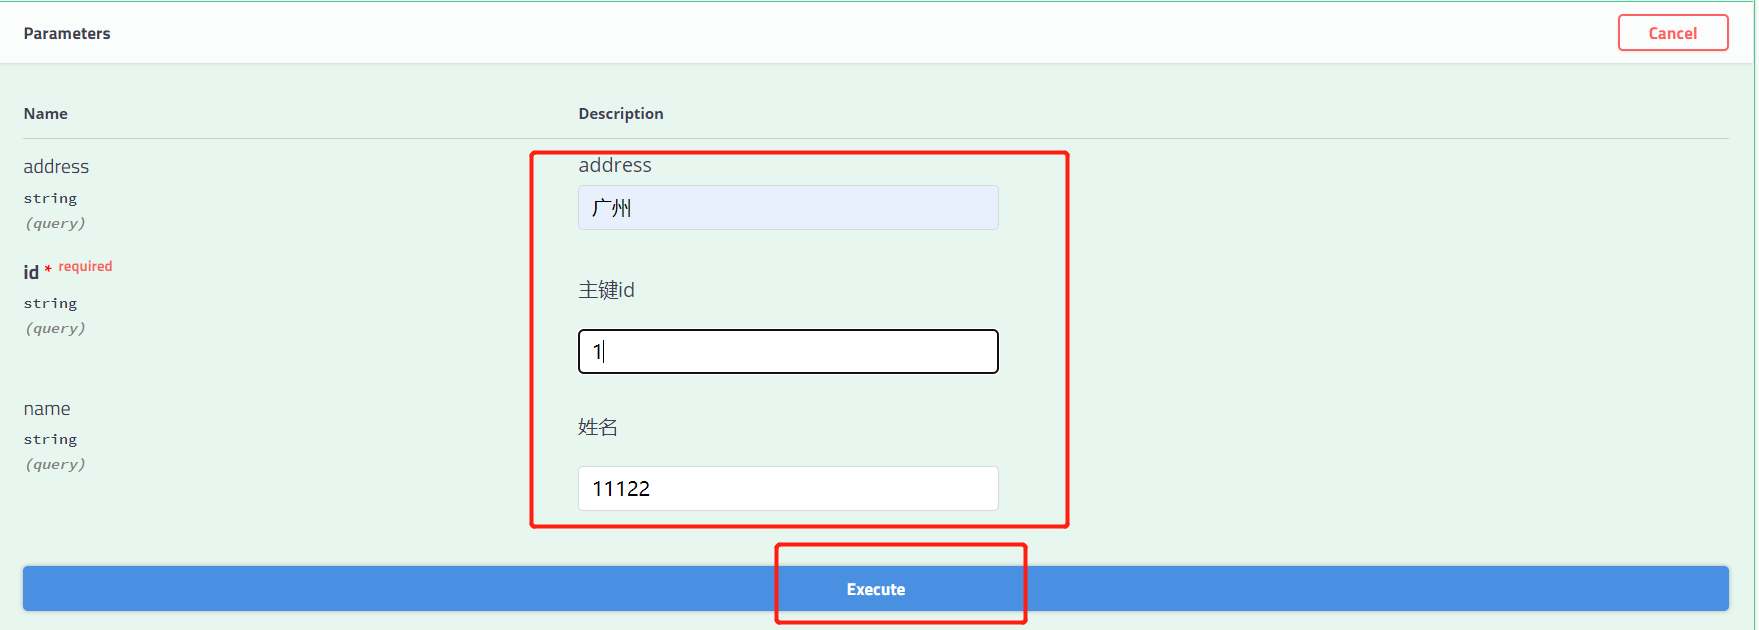
View returned results
At this point, the quick start is over
3, Swagger configuration
1. Basic configuration information
- Introduction to basic objects and methods:
Docket: summary object, which describes the information of the file through the object configuration.
ApiInfo: set info in the description file. Parameter type ApiInfo
select(): returns the ApiSelectorBuilder object. You can create a Docket object by calling build() from the object
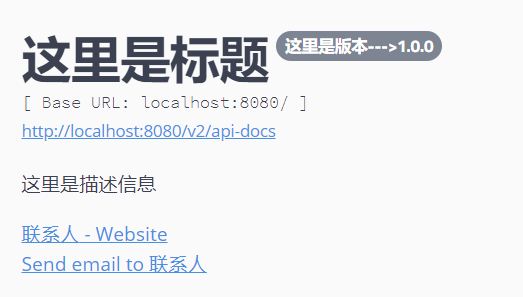
ApiInfo Builder: ApiInfo builder. - Write configuration class:
@Configuration
public class SwaggerConfig {

    @Bean
    public Docket docket(){
        return new Docket(DocumentationType.SWAGGER_2)
                //getApiInfo() is the following method to configure information in the returned object of this method
                .apiInfo(getApiInfo())
                .select()
                .build();
    }

    private ApiInfo getApiInfo(){
        return new ApiInfoBuilder().title("Here is the title")
                                   .description("Here is the description information")
                                   .version("Here is the version--->1.0.0")
                                   .contact(new Contact("contacts","http://www.baidu.com","116@qq.com"))
                .build();
    }
}
The effects are as follows:
2. Set scanned packages
You can set the scanned packages through the apis method
    @Bean
    public Docket docket(){
        return new Docket(DocumentationType.SWAGGER_2)
                //getApiInfo() is the following method to configure information in the returned object of this method
                .apiInfo(getApiInfo())
                .select()
                //Scan only the configured package
                .apis(RequestHandlerSelectors.basePackage("com.example.swaggerdemo.controller"))
                .build();
    }
3. Configure the path of the document to be generated through regular expression
    @Bean
    public Docket docket(){
        return new Docket(DocumentationType.SWAGGER_2)
                //getApiInfo() is the following method to configure information in the returned object of this method
                .apiInfo(getApiInfo())
                .select()
                //Only when the matching path meets such rules can the interface document be generated
                .paths(PathSelectors.regex("/test/*"))
                .build();
    }
This means that only interfaces starting with / test will generate documents
4, Swagger common notes
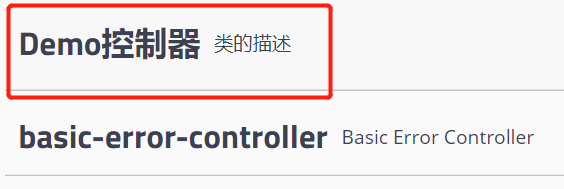
- Api:
- @Api is an annotation on a class. Controls the content of interface information generated by the whole class.
- tags: name of the class. You can have multiple values that represent multiple copies.
- Description: the description is out of date.
@Controller
@Api(tags={"Demo controller"},description = "Class description")
public class DemoController {
}
- ApiOperation:
- @ApiOperation is written on the method and describes the method as a whole
- value: interface description
- notes: prompt information
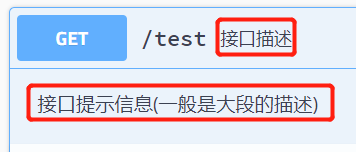
@ApiOperation(value = "Interface description",notes = "Interface prompt information(It is usually a long description)")
- ApiParam:
- @ApiParam is written before the method parameter. It is used to describe the parameter or whether it is required.
- Name: parameter name
- value: parameter description
- Required: is it required
public People getPeople(int id, @ApiParam(name = "Parameter name",value = "Parameter description",required = true) String name, String address){}

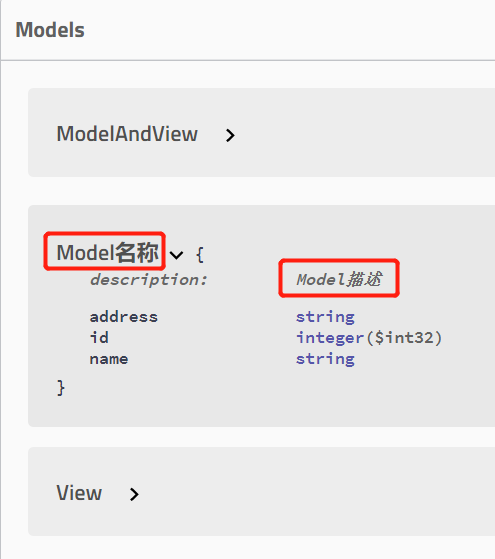
- ApiModel:
- @ApiModel is an annotation on a class, which mainly applies Model, that is, this annotation is generally written on an entity class.
- value: name
- Description: description
@ApiModel(value = "Model name",description = "Model describe")
public class People {
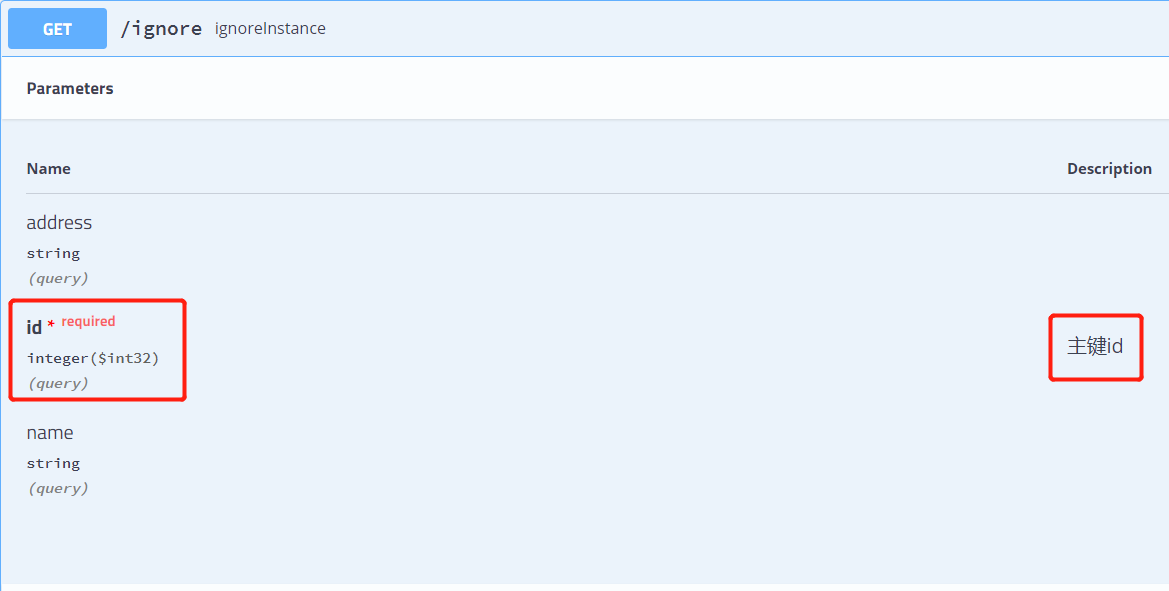
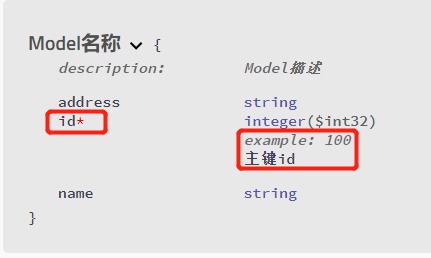
- ApiModelProperty:
- @ApiModelProperty can be used on the properties of a class. Used to define the contents of this field when the object is used as a parameter.
- value: description
- Name: override attribute name
- Required: is it required
- example: sample content
- hidden: whether to hide.
For example, in this case, people is the parameter of the method
    @RequestMapping("ignore")
    @ResponseBody
    public People ignoreInstance(People people){
        return people;
    }
Annotate the id field
public class People {
    @ApiModelProperty(value = "Primary key id",name = "id",required = true,example = "100")
    private int id;
    private String name;
    private String address;
}
Effect in interface:
Effect in Model:
- ApiIgnore
- @ApiIgnore is used on a method or class or parameter to indicate that the method or class is ignored.
- ApiImplicitParam
- @ApiImplicitParam is used in methods to represent individual request parameters. The overall function is similar to @ ApiParam.
- Name: attribute name
- value: description
- Required: is it required
- paramType: attribute type
- dataType: data type
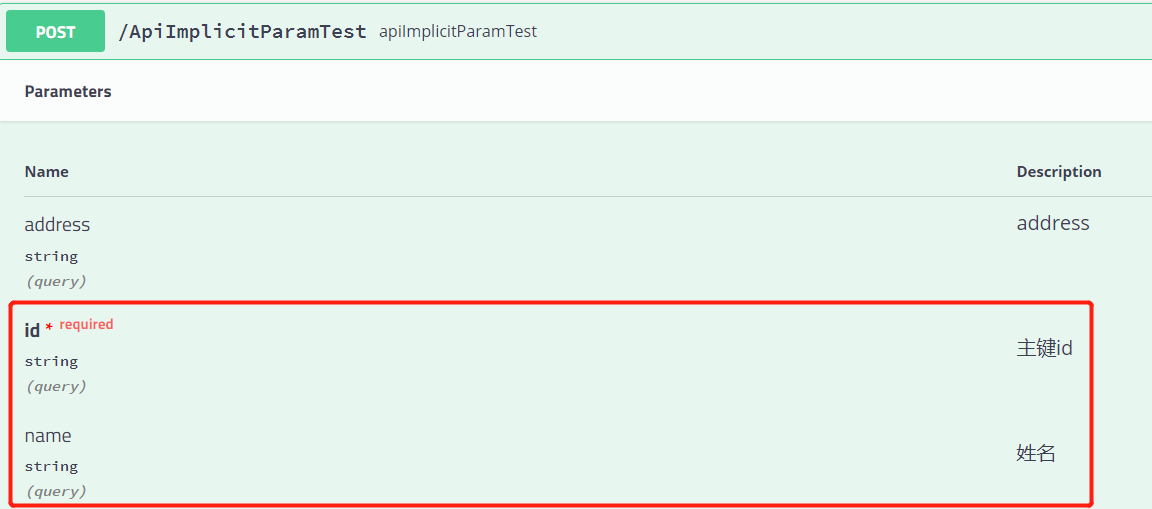
    @ApiImplicitParam(name = "id",value = "Primary key id",required = true,dataType = "",paramType = "")
    @RequestMapping("ApiImplicitParamTest")
    @ResponseBody
    public People apiImplicitParamTest(int id, String name, String address){
        People people = new People();
        people.setId(id);
        people.setName(name);
        people.setAddress(address);
        return people;
    }

You can also add information of multiple attributes at the same time
    @ApiImplicitParams(value = {
         @ApiImplicitParam(name = "id",value = "Primary key id",required = true,dataType = "string",paramType = "query")
        ,@ApiImplicitParam(name = "name",value = "full name",required = false)}
    )
    @RequestMapping("ApiImplicitParamTest")
    @ResponseBody
    public People apiImplicitParamTest(int id, String name, String address){
        People people = new People();
        people.setId(id);
        people.setName(name);
        people.setAddress(address);
        return people;
    }