To be honest, the MVP mode or design idea has come out for a long time, and now the latest use of MVVM design mode, constantly for the beginning, still need to move forward step by step. After all, you can't eat like a fat man.
I am a senior, and I am currently working as an intern. In fact, I have been contacting and studying MVP for a long time. During this period, I have asked my old friends on the Internet to help me write MVPDemo, and I have seen many project source codes from GitHub. I have also seen their design ideas and so on. However, for MVP implementation reference ah, how to transfer data in the past is very confusing. I've also seen Google's official Demo, and it's not as easy to understand as other simple Demos. So this time, I combined my own small Demo and understanding to tell the full story of MVP in my eyes. I hope I can help you. If there are any mistakes, I hope you guys can give us more advice.
Source code is attached at the end of the paper.
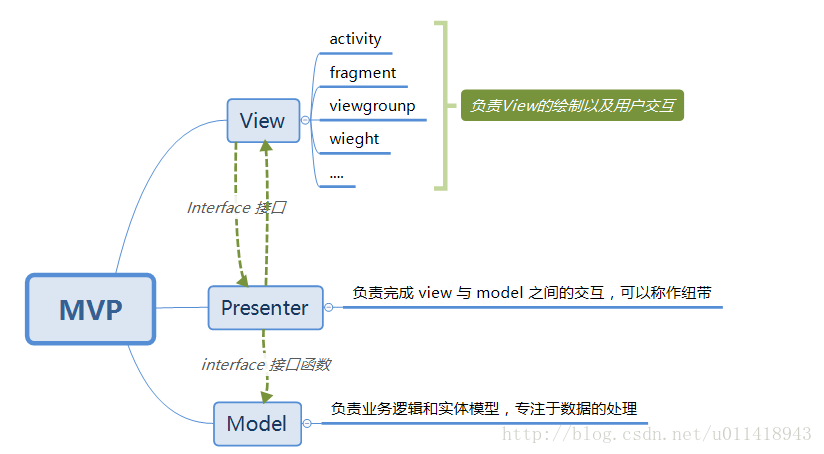
Not much to say, I stole this picture.
Actually, I don't talk much about the benefits of MVP, so there are a few points to go.
1. Loose coupling
2. Convenient unit testing
3. The code is clean and easy to modify.
4. Wait a minute.
First, I will show you the structure of my project catalogue.
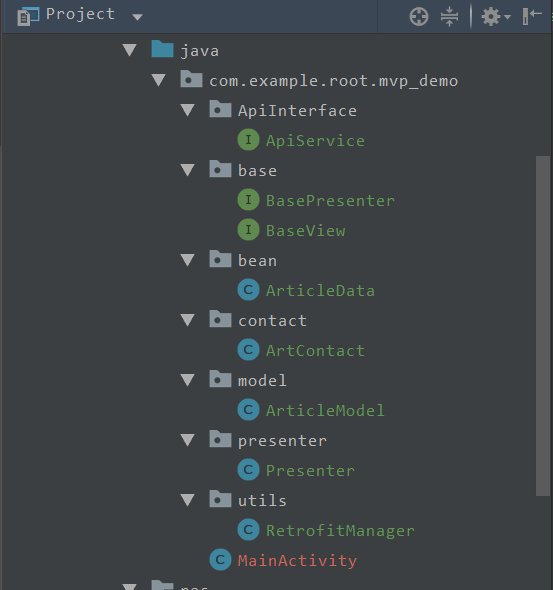
ApiService directory: There are methods for requesting interfaces
package com.example.root.mvp_demo.ApiInterface;

import com.example.root.mvp_demo.bean.ArticleData;

import io.reactivex.Observable;
import retrofit2.http.GET;
import retrofit2.http.Path;

/**
 * author:Jiwenjie
 * email:Jiwenjie97@gmail.com
 * time:2018/10/21
 * desc: Functional Interface for Combining Retrofit with RxJava
 * version:1.0
 */
public interface ApiService {
    @GET("/article/list/{page}/json")
    Observable<ArticleData> getArticle(@Path("page") int page);
}
This should be understandable, because I request the network to use RxJava + Retrofit, so here is the beginning of Observable, if it is only a simple Retrofit, then it can be changed to Call, other changes do not need to be made.
tips: One thing to note here is the difference between @Path and @Query. The former is to add parameters in the middle of the URL. The code above indicates that the parameters that need to be replaced by @Path are wrapped in the links with {} and the names need to correspond. The latter belongs to the splicing parameters, that is, when the URL input is completed, it is finally passed? The parameters that are connected with and. Believe that I said very clearly, if you can't understand, you will understand by looking at the URL format you often write.
Base directory: BaseView and BasePresenter are stored here, which is your habit. I often put BaseActivity, BaseFragment and so on under the Base directory.
package com.example.root.mvp_demo.base;

/**
 * author:Jiwenjie
 * email:Jiwenjie97@gmail.com
 * time:2018/10/21
 * desc:
 * version:1.0
 */
public interface BasePresenter {
    void start();
    void destroy();
}
BaseView
package com.example.root.mvp_demo.base;

/**
 * author:Jiwenjie
 * email:Jiwenjie97@gmail.com
 * time:2018/10/21
 * desc:
 * version:1.0
 */
public interface BaseView {

}
I define empty implementations for BaseView and onStart and onDestroy methods for Presenter. Needless to say, I believe everyone can understand.
bean directory: store entity classes
contact directory: contract directory, where contract classes are stored. A common interface of APP is a contract class, which is also recommended by Google.
package com.example.root.mvp_demo.contact;

import com.example.root.mvp_demo.base.BasePresenter;
import com.example.root.mvp_demo.base.BaseView;
import com.example.root.mvp_demo.bean.ArticleData;

/**
 * author:Jiwenjie
 * email:Jiwenjie97@gmail.com
 * time:2018/10/21
 * desc:Contracts for Home Page Articles
 * version:1.0
 */
public class ArtContact {

    public interface ArtView extends BaseView {
        void setData(ArticleData data);
    }

    public interface ArtPresenter extends BasePresenter {
        void requestData();
    }

}
As the name implies, it's like signing a contract, which View corresponds to which Presenter. It's important to note that View is a link. Activity or Fragment is required to implement the View when it is specifically used, and then the parameters are passed to Presenter. Do the operation in Presenter.
Utls directory: Look at the utils directory before looking at the Model directory, which encapsulates the network request method
package com.example.root.mvp_demo.utils;

import com.example.root.mvp_demo.ApiInterface.ApiService;

import java.util.concurrent.TimeUnit;

import okhttp3.OkHttpClient;
import okhttp3.logging.HttpLoggingInterceptor;
import retrofit2.CallAdapter;
import retrofit2.Converter;
import retrofit2.Retrofit;
import retrofit2.adapter.rxjava2.RxJava2CallAdapterFactory;
import retrofit2.converter.gson.GsonConverterFactory;

/**
 * author:Jiwenjie
 * email:Jiwenjie97@gmail.com
 * time:2018/10/21
 * desc: Util for network requests
 * version:1.0
 */
public class RetrofitManager {

    private static ApiService apiService;

    private static OkHttpClient okHttpClient;
    private static Converter.Factory gsonConverterFactory = GsonConverterFactory.create();
    private static CallAdapter.Factory rxJaveCallAdapterFactory = RxJava2CallAdapterFactory.create();
    private static HttpLoggingInterceptor interceptor = new HttpLoggingInterceptor();

    private static OkHttpClient getClient() {
        // You can set the level of request filtering, body, basic, headers

        interceptor.setLevel(HttpLoggingInterceptor.Level.BODY);

        return okHttpClient = new OkHttpClient.Builder()
                .addInterceptor(interceptor)    // Log, all request responses are visible
                .connectTimeout(60L, TimeUnit.SECONDS)
                .readTimeout(60L, TimeUnit.SECONDS)
                .writeTimeout(60L, TimeUnit.SECONDS)
                .build();
    }

    public static ApiService getApiService() {
        if (apiService == null) {
            Retrofit retrofit = new Retrofit.Builder()
                    .client(getClient())
                    .baseUrl("http://www.wanandroid.com/")
                    .addConverterFactory(gsonConverterFactory)
                    .addCallAdapterFactory(rxJaveCallAdapterFactory)
                    .build();

            apiService = retrofit.create(ApiService.class);
        }
        return apiService;
    }
}
I believe that some children's shoes that know about Retrofit know that the implementation of Retrofit is OkHttp wrapped with a layer of parts that can connect with RxJava, so the Client here uses OkHttp Client. The interface uses Hongyang God's Android interface. Let's say that Old Brother Hongyang has gone to the top job, envy in capitals. Everyone knows that the headline treatment is good and demanding.
You can expand on what I wrote. PS: Actually, here's about getting APiService to modify the extensions, using generics and Class es to deal with them instead. This allows you to pass in parameters directly when the Model calls. If I write this way, each interface has to implement a method that is too repetitive.
Model directory: The part of the model that stores data for specific operations
package com.example.root.mvp_demo.model;

import com.example.root.mvp_demo.bean.ArticleData;
import com.example.root.mvp_demo.utils.RetrofitManager;

import io.reactivex.Observable;
import io.reactivex.android.schedulers.AndroidSchedulers;
import io.reactivex.schedulers.Schedulers;

/**
 * author:Jiwenjie
 * email:Jiwenjie97@gmail.com
 * time:2018/10/21
 * desc: MVP model in
 * version:1.0
 */
public class ArticleModel {

    // Get the model of the technical article on the home page
    public Observable<ArticleData> getArtData(int page) {
        return RetrofitManager.getApiService().getArticle(page)
                .subscribeOn(Schedulers.io())
                .unsubscribeOn(Schedulers.io())
                .observeOn(AndroidSchedulers.mainThread());
    }

}
In fact, whether in MVP or MVC mode, the model is in the operation of the data part, which remains unchanged for thousands of years. I haven't seen the MVVM yet, I don't know much about it. I just know that it seems to have added a View Model, so it should be the same.
This above from 22 lines to 24 lines of code is the function of RxJava, chain call, can be said to be overwhelming. What he means is that the IO thread is used when the observer requests the network for data, so the IO thread is used when the observer unbinds. The observer runs on the UI thread. This shows the power of one-line code switching in threads. Anyway, let me lose.
If you don't know about these children's shoes, you can search them online.
This article is well written.
Presenter directory: store specific Prsenter implementations
We all know that we need to hold a reference to Presenter in Activity or Fragment and operate on data and View in Presenter, so we need to define a class to implement the Presenter interface.
package com.example.root.mvp_demo.presenter;

import android.content.Context;
import android.util.Log;
import android.widget.Toast;

import com.example.root.mvp_demo.model.ArticleModel;
import com.example.root.mvp_demo.bean.ArticleData;
import com.example.root.mvp_demo.contact.ArtContact;

import io.reactivex.disposables.Disposable;
import io.reactivex.functions.Consumer;

/**
 * author:Jiwenjie
 * email:Jiwenjie97@gmail.com
 * time:2018/10/21
 * desc: The actual Presenter, where you need to hold references to View and Model,
 * Get the data through the model, and display the data in the model.
 * version:1.0
 */
public class Presenter implements ArtContact.ArtPresenter {

    private Context mContext;
    private ArticleModel mModel;
    private ArtContact.ArtView mView;

    // Prevent memory leak
    protected Disposable disposable;

    // Initialization section
    public Presenter(Context context, ArtContact.ArtView view) {
        this.mContext = context;
        this.mView = view;
        mModel = new ArticleModel();
    }

    @Override
    public void requestData() {
        destroy();
        disposable = mModel.getArtData(0)
                .subscribe(new Consumer<ArticleData>() {
                    @Override
                    public void accept(ArticleData articleData) throws Exception {
                        Toast.makeText(mContext, "Data Acquisition Success", Toast.LENGTH_SHORT).show();
                        mView.setData(articleData);
                    }
                }, new Consumer<Throwable>() {
                    @Override
                    public void accept(Throwable throwable) throws Exception {
                        Toast.makeText(mContext, "Data acquisition failure", Toast.LENGTH_SHORT).show();
                    }
                });
    }

    @Override
    public void start() {
        Log.i("Presenter", "Start getting data");
    }

    @Override
    public void destroy() {
        if (disposable != null && !disposable.isDisposed()) {
            disposable.dispose();
        }
    }
}
Here I have written notes, I believe that everyone can understand, if not understand, you can trust or Google, if not, Baidu. Note that here I pass the parameter is 0, fixed write-to-death, you need to modify when you actually use it, change to the form of variables on OK.
MainActivity
The key point has come, the key point has come, and what we have said before is all paving the way, but we need to use it concretely. Look at the layout first. Nothing to say, a TextView and a Button.
<?xml version="1.0" encoding="utf-8"?>
<android.support.constraint.ConstraintLayout xmlns:android="http://schemas.android.com/apk/res/android"
    xmlns:app="http://schemas.android.com/apk/res-auto"
    xmlns:tools="http://schemas.android.com/tools"
    android:layout_width="match_parent"
    android:layout_height="match_parent"
    tools:context=".MainActivity">

    <TextView
        android:id="@+id/tv_content"
        android:layout_width="match_parent"
        android:layout_height="wrap_content"
        android:text="Hello World!"
        android:textSize="20dp"
        app:layout_constraintLeft_toLeftOf="parent"
        app:layout_constraintRight_toRightOf="parent"
        app:layout_constraintTop_toTopOf="parent" />

    <Button
        android:id="@+id/btn_start"
        android:layout_width="match_parent"
        android:layout_height="wrap_content"
        android:text="start"
        android:textSize="18dp"
        app:layout_constraintTop_toBottomOf="@id/tv_content" />

</android.support.constraint.ConstraintLayout>
Here we recommend the layout of constraints, which is really very useful, and a search on the Internet will be able to meet. It's really several layers of pages nested in one layer. It is strongly recommended if there is a requirement for optimizing performance. But if you don't ask for it, it's OK, because it's a bit of a hassle to write, at least Id, you have to think about a lot of non-repetition.
MainActivity source code
package com.example.root.mvp_demo;

import android.support.v7.app.AppCompatActivity;
import android.os.Bundle;
import android.view.View;
import android.widget.Button;
import android.widget.TextView;

import com.example.root.mvp_demo.bean.ArticleData;
import com.example.root.mvp_demo.contact.ArtContact;
import com.example.root.mvp_demo.presenter.Presenter;

public class MainActivity extends AppCompatActivity implements ArtContact.ArtView {

    private Button btn_start;
    private TextView tv_content;

    private Presenter presenter;

    @Override
    protected void onCreate(Bundle savedInstanceState) {
        super.onCreate(savedInstanceState);
        setContentView(R.layout.activity_main);

        initView();

        initEvent();
    }

    private void initView() {
        btn_start = findViewById(R.id.btn_start);
        tv_content = findViewById(R.id.tv_content);
        presenter = new Presenter(getApplicationContext(), this);
    }

    private void initEvent() {
        btn_start.setOnClickListener(new View.OnClickListener() {
            @Override
            public void onClick(View v) {
                presenter.start();
                presenter.requestData();
            }
        });
    }

    @Override
    public void setData(ArticleData data) {
        tv_content.setText(data.getData().getDatas().toString());
    }

    @Override
    protected void onDestroy() {
        super.onDestroy();
        presenter.destroy();
    }
}
The interface of View in contract class is implemented, the method is rewritten, and the reference of Presenter is controlled. Initialize Presenter with View
Past is passed as a parameter. That's the general process. Maybe it will be easy. I always didn't understand at first, but now I can understand everything. I hope this article can help you:
Source code respectfully: https://github.com/jiwenjie/MVP_Demo