In this tutorial, you will learn how to build people counters using OpenCV and Python. Using OpenCV, we will calculate the number of people entering or leaving the department store in real time.
In the first part of today's blog post, we will discuss how to use both to create more accurate people counters. After that, we will look at the directory structure of the project and then implement the entire people count project. Finally, we will examine the results of applying OpenCV's population statistics to actual videos.
1. Understand object detection and object tracking
Before continuing with the rest of this tutorial, you must understand the fundamental difference between object detection and object tracking.
When we apply object detection, we are determining the position of an object in the image / frame. Compared with target tracking algorithms, target detectors are usually computationally more expensive and therefore slower. Examples of target detection algorithms include Haar cascade, HOG + linear support vector machine (HOG + Linear SVM) and target detectors based on deep learning, such as fast r-cnn, YOLO and Single Shot detectors (SSD).
On the other hand, the object tracker will accept the input (x, y) coordinates of the object's position in the image and will:
- 1. Assign a unique ID to this specific object
- 2. When moving around the object in the next frame (gradient, etc.) according to the properties of the object in the video, the object is predicted to move around the next frame
Examples of object tracking algorithms include MedianFlow, MOSSE, GOTURN, kernel correlation filter and discriminant correlation filter.
2. Combine object detection and object tracking
High precision target tracker combines the concepts of target detection and target tracking into one algorithm, which is usually divided into two stages:
- 1. Phase 1 detection: in the detection phase, we are running a more computationally expensive object tracker to (1) detect whether new objects enter our field of vision, and (2) see if we can find objects "lost" in the tracking phase. For each detected object, we use the new bounding box coordinates to create or update the object tracker. Due to the higher computational cost of our target detector, we only run this stage once every N frames.
- 2. Phase 2 tracking: when we are not in the "detection" phase, we are in the "tracking" phase. For each object we detect, we create an object tracker to track the movement of the object around the frame. Our target tracker should be faster and more efficient than the target detector. We will continue tracking until we reach frame N, and then run our target detector again. Then repeat the whole process.
The advantage of this hybrid method is that we can apply highly accurate object detection methods without too much computational burden. We will implement such a tracking system to establish our personnel counters.
The advantage of this hybrid method is that we can apply highly accurate object detection methods without too much computational burden. We will implement such a tracking system to establish our personnel counters.
3. Project structure
Let's review the project structure of today's blog post. After obtaining the code, you can use the tree command to check the directory structure:
$ tree --dirsfirst
.
├── pyimagesearch
│   ├── __init__.py
│   ├── centroidtracker.py
│   └── trackableobject.py
├── mobilenet_ssd
│   ├── MobileNetSSD_deploy.caffemodel
│   └── MobileNetSSD_deploy.prototxt
├── videos
│   ├── example_01.mp4
│   └── example_02.mp4
├── output
│   ├── output_01.avi
│   └── output_02.avi
└── people_counter.py
The two most important directories:
- 1.pyimagesearch /: This module contains centroid tracking algorithm. The "combined object tracking algorithm" section introduces the centroid tracking algorithm.
- 2.mobilenet_ssd /: contains Caffe deep learning model files.
The core of today's project is people_counter.py script - this is where we will spend most of our time. Today we will also review trackableobject Py script.
4. Combined with object tracking algorithm
To implement our people counter, we will use both OpenCV and dlib. We use OpenCV for standard computer vision / image processing functions and deep learning object detector for population statistics.
Then we will use dlib to implement the relevant filters. We can also use OpenCV here; However, for this project, the dlib object tracking implementation is easier to use.
In addition to the object tracking implementation of dlib, we will also use the centroid tracking implementation. Reviewing the entire centroid tracking algorithm is beyond the scope of this blog post, but I provide a brief overview below.
In step #1, we accept a set of bounding boxes and calculate their corresponding centroids (i.e. the center of the bounding box):
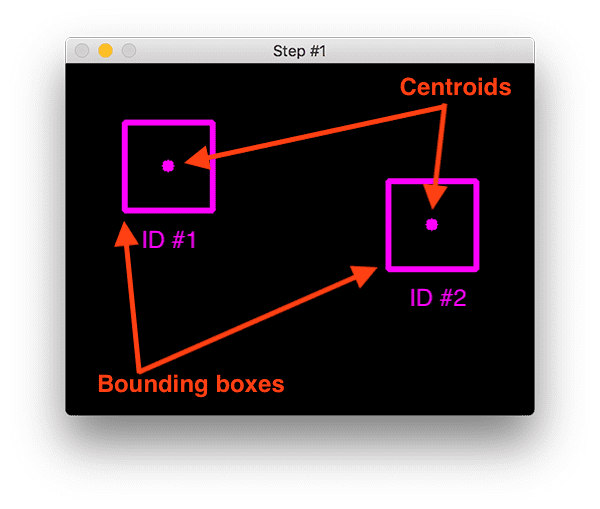
To build a simple object trace using Python through a centroid script, the first step is to accept the bounding box coordinates and use them to calculate the centroid.
The bounding box itself can be provided in any of the following ways:
- 1. Target detector (such as HOG + Linear SVM, fast r-cnn, SSDs, etc.)
- 2. Or object tracker (e.g. correlation filter)
In the figure above, you can see that we have two objects to track in the initial iteration of the algorithm.
In step # 2, we calculate the Euclidean distance between any new centroid (yellow) and the existing centroid (purple):
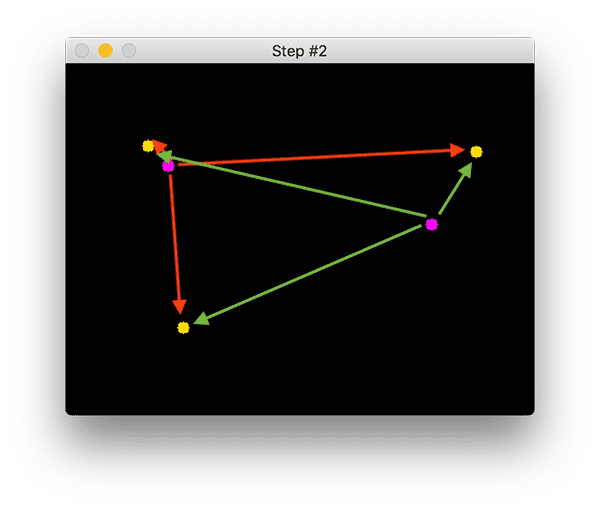
There are three objects in this image. We need to calculate the Euclidean distance between each pair of original centroids (purple) and new centroids (yellow).
The centroid tracking algorithm assumes that the centroid pair with the minimum Euclidean distance between them must be the same object ID.
In the example image above, we have two existing centroids (purple) and three new centroids (yellow), which means that a new object has been detected (because there is a new centroid compared with the old centroid).
Then the arrow indicates that the Euclidean distance between all purple centroids and all yellow centroids is calculated. Once we have the Euclidean distance, we will try to associate the object ID in step #3:
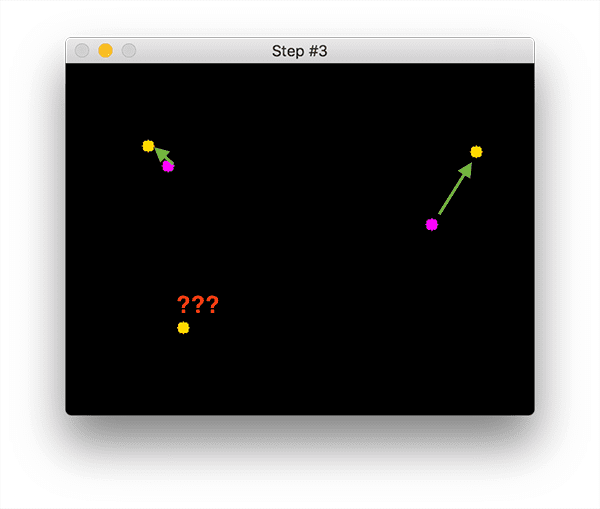
You can see that our centroid tracker has chosen to associate centroids that minimize their respective Euclidean distances. But what about the point in the lower left corner? It has nothing to do with anything - what should we do? To answer this question, we need to perform steps #4 to register a new object:

Registration means that we add new objects to our list of tracked objects by:
- 1. Assign it a new object ID
- 2. Store the centroid of the bounding box coordinates of the new object
If the object is lost or out of view, we can simply unregister the object (step #5).
5. Create traceable objects
In order to track and calculate the objects in the video stream, we need a simple method to store information about the object itself, including:
- Object ID
- The previous center of mass (so we can easily calculate the direction of object movement)
- Whether the object has been counted
To achieve all these goals, we can define a TrackableObject instance -- Open TrackableObject Py file and insert the following code:
class TrackableObject:
	def __init__(self, objectID, centroid):
		# store the object ID, then initialize a list of centroids
		# using the current centroid
		self.objectID = objectID
		self.centroids = [centroid]
		# initialize a boolean used to indicate if the object has
		# already been counted or not
		self.counted = False
The TrackableObject constructor accepts objectID + centroid and stores them. The centroids variable is a list because it will contain the centroid position history of the object. The constructor also initializes counted to False, indicating that the object has not been counted.
6. Use OpenCV + Python to implement our personnel counter
# import the necessary packages
from pyimagesearch.centroidtracker import CentroidTracker
from pyimagesearch.trackableobject import TrackableObject
from imutils.video import VideoStream
from imutils.video import FPS
import numpy as np
import argparse
import imutils
import time
import dlib
import cv2
We first import the necessary packages:
- From the pyimagesearch module, we import custom CentroidTracker and TrackableObject classes.
- imutils. The VideoStream and FPS modules in video will help us use the webcam and calculate the estimated frames per second (FPS) throughput.
- We need the OpenCV convenience of imutils.
- The dlib library will be used for its associated tracker implementation.
- OpenCV will be used for deep neural network reasoning, opening video files, writing video files, and displaying output frames on our screen.
Now that all tools are within reach, let's parse the command line parameters:
# construct the argument parse and parse the arguments
ap = argparse.ArgumentParser()
ap.add_argument("-p", "--prototxt", required=True,
	help="path to Caffe 'deploy' prototxt file")
ap.add_argument("-m", "--model", required=True,
	help="path to Caffe pre-trained model")
ap.add_argument("-i", "--input", type=str,
	help="path to optional input video file")
ap.add_argument("-o", "--output", type=str,
	help="path to optional output video file")
ap.add_argument("-c", "--confidence", type=float, default=0.4,
	help="minimum probability to filter weak detections")
ap.add_argument("-s", "--skip-frames", type=int, default=30,
	help="# of skip frames between detections")
args = vars(ap.parse_args())
We have six command line parameters that allow us to pass information from the terminal to our staff counter script at run time:
- --Prototype XT: the path where Cafe deploys the prototype XT file.
- --Model: Caffe pre trains the path of CNN model.
- --Input: optional input video file path. If no path is specified, your webcam will be used.
- --Output: optional output video path. If no path is specified, the video will not be recorded.
- --confidence: the default value is 0.4, which is the minimum probability threshold to help filter out weak detection.
- --Skip frames: the number of frames to skip before running our DNN detector again on the tracked object. Keep in mind that object detection is computationally expensive, but it does help our tracker reassess the objects in the frame. By default, we skip 30 frames between detecting objects using the OpenCV DNN module and our CNN single detector model.
Now our script can dynamically process command line parameters at runtime. Let's prepare our SSD:
# initialize the list of class labels MobileNet SSD was trained to detect
CLASSES = ["background", "aeroplane", "bicycle", "bird", "boat",
	"bottle", "bus", "car", "cat", "chair", "cow", "diningtable",
	"dog", "horse", "motorbike", "person", "pottedplant", "sheep",
	"sofa", "train", "tvmonitor"]
# load our serialized model from disk
print("[INFO] loading model...")
net = cv2.dnn.readNetFromCaffe(args["prototxt"], args["model"])
First, we will initialize CLASSES -- the list of CLASSES supported by SSD. We are only interested in the "human" class, but you can also calculate other moving objects.
We load a pre trained MobileNet SSD for detecting objects (but again, we are only interested in detecting and tracking people, not any other class).
We can initialize our video stream:
# if a video path was not supplied, grab a reference to the webcam
if not args.get("input", False):
	print("[INFO] starting video stream...")
	vs = VideoStream(src=0).start()
	time.sleep(2.0)
# otherwise, grab a reference to the video file
else:
	print("[INFO] opening video file...")
	vs = cv2.VideoCapture(args["input"])
First, we deal with the use of webcam video streaming. Otherwise, we will capture frames from the video file. Before starting the cyclic frame, we still have some initialization to perform:
# initialize the video writer (we'll instantiate later if need be)
writer = None
# initialize the frame dimensions (we'll set them as soon as we read
# the first frame from the video)
W = None
H = None
# instantiate our centroid tracker, then initialize a list to store
# each of our dlib correlation trackers, followed by a dictionary to
# map each unique object ID to a TrackableObject
ct = CentroidTracker(maxDisappeared=40, maxDistance=50)
trackers = []
trackableObjects = {}
# initialize the total number of frames processed thus far, along
# with the total number of objects that have moved either up or down
totalFrames = 0
totalDown = 0
totalUp = 0
# start the frames per second throughput estimator
fps = FPS().start()
The remaining initializations include:
- Writer: our video writer. If we are writing a video, we will instantiate this object later.
- W and H: our frame size. We need to insert these into CV2 In videowriter.
- ct: our CentroidTracker.
- Trackers: stores a list of dlib related trackers.
- trackableObjects: map the objectID to the dictionary of trackableObjects.
- totalFrames: the total number of frames processed.
- totalDown and totalUp: the total number of objects / people moving down or up.
- fps: our frame per second estimator for benchmarking.
Now that all our initializations have been handled, let's cycle through the incoming frames:
# loop over frames from the video stream
while True:
	# grab the next frame and handle if we are reading from either
	# VideoCapture or VideoStream
	frame = vs.read()
	frame = frame[1] if args.get("input", False) else frame
	# if we are viewing a video and we did not grab a frame then we
	# have reached the end of the video
	if args["input"] is not None and frame is None:
		break
	# resize the frame to have a maximum width of 500 pixels (the
	# less data we have, the faster we can process it), then convert
	# the frame from BGR to RGB for dlib
	frame = imutils.resize(frame, width=500)
	rgb = cv2.cvtColor(frame, cv2.COLOR_BGR2RGB)
	# if the frame dimensions are empty, set them
	if W is None or H is None:
		(H, W) = frame.shape[:2]
	# if we are supposed to be writing a video to disk, initialize
	# the writer
	if args["output"] is not None and writer is None:
		fourcc = cv2.VideoWriter_fourcc(*"MJPG")
		writer = cv2.VideoWriter(args["output"], fourcc, 30,
			(W, H), True)
We start the cycle. At the top of the loop, we grab the next frame. If we have reached the end of the video, we will jump out of the loop.
Frame preprocessing. This includes resizing and swapping color channels because dlib requires rgb images. We get the frame size for the video writer. If the output path is provided through the command line parameter, we will instantiate the video writer from there.
Now let's use SSD to detect people:
	# initialize the current status along with our list of bounding
	# box rectangles returned by either (1) our object detector or
	# (2) the correlation trackers
	status = "Waiting"
	rects = []
	# check to see if we should run a more computationally expensive
	# object detection method to aid our tracker
	if totalFrames % args["skip_frames"] == 0:
		# set the status and initialize our new set of object trackers
		status = "Detecting"
		trackers = []
		# convert the frame to a blob and pass the blob through the
		# network and obtain the detections
		blob = cv2.dnn.blobFromImage(frame, 0.007843, (W, H), 127.5)
		net.setInput(blob)
		detections = net.forward()
We initialize the state to Waiting. Possible states include:
- Waiting: in this state, we are waiting for detection and tracking personnel.
- Detecting: we are using MobileNet SSD to detect personnel.
- Tracking: people are tracked in frames. We are calculating totalUp and totalDown.
Our rects list will be populated by detection or tracking. We continue to initialize rects.
It is important to understand that the computational cost of deep learning object detectors is very high, especially when you run them on the CPU.
In order to avoid running our target detector on each frame and speed up our tracking pipeline, we will skip n frames (set by the command line parameter -- skip frames, where 30 is the default). Only every N frames will we use SSD for object detection. Otherwise, we will just track the moving object in the middle.
Using the modulus operator, we ensure that the code in the if statement is executed every N frames. After entering the if statement, we will update the status to Detecting. Then we initialize the new tracker list.
Next, we will use object detection for reasoning. We first create a blob from the image, and then transfer the blob through the network to obtain detection. Now we will walk through each detection, hoping to find the object belonging to the person class:
		# loop over the detections
		for i in np.arange(0, detections.shape[2]):
			# extract the confidence (i.e., probability) associated
			# with the prediction
			confidence = detections[0, 0, i, 2]
			# filter out weak detections by requiring a minimum
			# confidence
			if confidence > args["confidence"]:
				# extract the index of the class label from the
				# detections list
				idx = int(detections[0, 0, i, 1])
				# if the class label is not a person, ignore it
				if CLASSES[idx] != "person":
					continue
Loop testing, we continue to gain confidence and filter out results that do not belong to humans.
Now we can calculate a bounding box for each person and start correlation tracking:
				# compute the (x, y)-coordinates of the bounding box
				# for the object
				box = detections[0, 0, i, 3:7] * np.array([W, H, W, H])
				(startX, startY, endX, endY) = box.astype("int")
				# construct a dlib rectangle object from the bounding
				# box coordinates and then start the dlib correlation
				# tracker
				tracker = dlib.correlation_tracker()
				rect = dlib.rectangle(startX, startY, endX, endY)
				tracker.start_track(rgb, rect)
				# add the tracker to our list of trackers so we can
				# utilize it during skip frames
				trackers.append(tracker)
Calculate our box. Then instantiate our dlib related tracker, and then transfer the bounding box coordinates of the object to dlib Rectangle to store the result as rect. Then we start tracking and attach the tracker to the tracker list. This is the encapsulation of all operations we perform every N frames! Let's deal with the typical operation of tracing in else block:
	# otherwise, we should utilize our object *trackers* rather than
	# object *detectors* to obtain a higher frame processing throughput
	else:
		# loop over the trackers
		for tracker in trackers:
			# set the status of our system to be 'tracking' rather
			# than 'waiting' or 'detecting'
			status = "Tracking"
			# update the tracker and grab the updated position
			tracker.update(rgb)
			pos = tracker.get_position()
			# unpack the position object
			startX = int(pos.left())
			startY = int(pos.top())
			endX = int(pos.right())
			endY = int(pos.bottom())
			# add the bounding box coordinates to the rectangles list
			rects.append((startX, startY, endX, endY))
Most of the time, it doesn't happen in frame skipping multiples. In the meantime, we will use the tracker to track objects instead of applying detection. We began to traverse the available trackers. We continue to update the status to Tracking and get the object location. We extract the location coordinates and fill in the information in our rects list. Now let's draw a horizontal visualization line (people must pass through it to be tracked) and use the centroid tracker to update the centroid of our object:
	# draw a horizontal line in the center of the frame -- once an
	# object crosses this line we will determine whether they were
	# moving 'up' or 'down'
	cv2.line(frame, (0, H // 2), (W, H // 2), (0, 255, 255), 2)
	# use the centroid tracker to associate the (1) old object
	# centroids with (2) the newly computed object centroids
	objects = ct.update(rects)
We draw a horizontal line and we will use it to visualize people "crossing" - once people cross this line, we will increase their respective counters, and then we use CentroidTracker instantiation to accept rects lists, whether they are generated through object detection or object tracking. Our centroid tracker associates the object ID with the object location. In the next code block, we will review the logic of a person moving up or down in a frame:
	# loop over the tracked objects
	for (objectID, centroid) in objects.items():
		# check to see if a trackable object exists for the current
		# object ID
		to = trackableObjects.get(objectID, None)
		# if there is no existing trackable object, create one
		if to is None:
			to = TrackableObject(objectID, centroid)
		# otherwise, there is a trackable object so we can utilize it
		# to determine direction
		else:
			# the difference between the y-coordinate of the *current*
			# centroid and the mean of *previous* centroids will tell
			# us in which direction the object is moving (negative for
			# 'up' and positive for 'down')
			y = [c[1] for c in to.centroids]
			direction = centroid[1] - np.mean(y)
			to.centroids.append(centroid)
			# check to see if the object has been counted or not
			if not to.counted:
				# if the direction is negative (indicating the object
				# is moving up) AND the centroid is above the center
				# line, count the object
				if direction < 0 and centroid[1] < H // 2:
					totalUp += 1
					to.counted = True
				# if the direction is positive (indicating the object
				# is moving down) AND the centroid is below the
				# center line, count the object
				elif direction > 0 and centroid[1] > H // 2:
					totalDown += 1
					to.counted = True
		# store the trackable object in our dictionary
		trackableObjects[objectID] = to
We first traverse the bounding box coordinates of the updated object id. We try to get TrackableObject for the current objectID. If the TrackableObject of the objectID does not exist, we will create one. Otherwise, a TrackableObject already exists, so we need to find out whether the object (person) moves up or down.
To do this, we obtain the y coordinate values of all centroid positions before a given object. Then, the direction is calculated by taking the difference between the current centroid position and the average of all previous centroid positions.
The reason why we take the mean value is to ensure that our direction tracking is more stable. If we only store the previous centroid position of this person, we may have the wrong direction count. Remember, target detection and tracking algorithms are not "magic" - sometimes they predict a boundary box that may deviate slightly from your expectations; Therefore, by taking the mean, we can make our people calculate more accurately.
If the TrackableObject has not been counted, we need to determine whether it is ready to be counted by:
- 1. Check whether the direction is negative (indicating that the object moves upward) and the centroid is above the centerline. In this case, we add totalUp.
- 2. Or check whether the direction is positive (indicating that the object is moving downward) and the center of mass is below the centerline. If this is true, we add totalDown.
Finally, we store the TrackableObject in the trackableObjects dictionary so that we can get and update it when we capture the next frame.
The next three code blocks deal with:
- Display (draw and write text to frame)
- Writes frames to video files on disk (if present -- output command line parameter)
- Capture key
- clear
First, we will draw some information on the framework for visualization:
		# draw both the ID of the object and the centroid of the
		# object on the output frame
		text = "ID {}".format(objectID)
		cv2.putText(frame, text, (centroid[0] - 10, centroid[1] - 10),
			cv2.FONT_HERSHEY_SIMPLEX, 0.5, (0, 255, 0), 2)
		cv2.circle(frame, (centroid[0], centroid[1]), 4, (0, 255, 0), -1)
	# construct a tuple of information we will be displaying on the
	# frame
	info = [
		("Up", totalUp),
		("Down", totalDown),
		("Status", status),
	]
	# loop over the info tuples and draw them on our frame
	for (i, (k, v)) in enumerate(info):
		text = "{}: {}".format(k, v)
		cv2.putText(frame, text, (10, H - ((i * 20) + 20)),
			cv2.FONT_HERSHEY_SIMPLEX, 0.6, (0, 0, 255), 2)
Here, we overlay the following data on the frame:
- ObjectID: the ID of each object.
- centroid: the center of the object will be represented by a point created by filling a circle.
- info: including totalUp, totalDown and status
Then we will write the frame to the video file (if necessary) and process the key:
	# check to see if we should write the frame to disk
	if writer is not None:
		writer.write(frame)
	# show the output frame
	cv2.imshow("Frame", frame)
	key = cv2.waitKey(1) & 0xFF
	# if the `q` key was pressed, break from the loop
	if key == ord("q"):
		break
	# increment the total number of frames processed thus far and
	# then update the FPS counter
	totalFrames += 1
	fps.update()
In this code block, we:
- If necessary, write the frame to the output video file
- Display frames and process keys. If q is pressed, we will jump out of the frame processing cycle.
- Update our fps counter
Now it's time to clean up:
# stop the timer and display FPS information
fps.stop()
print("[INFO] elapsed time: {:.2f}".format(fps.elapsed()))
print("[INFO] approx. FPS: {:.2f}".format(fps.fps()))
# check to see if we need to release the video writer pointer
if writer is not None:
	writer.release()
# if we are not using a video file, stop the camera video stream
if not args.get("input", False):
	vs.stop()
# otherwise, release the video file pointer
else:
	vs.release()
# close any open windows
cv2.destroyAllWindows()
In order to complete the script, we display FPS information to the terminal, release all pointers and close all open windows.
7. Complete code
- 1.people_counter.py
from pyimagesearch.centroidtracker import CentroidTracker
from pyimagesearch.trackableobject import TrackableObject
from imutils.video import VideoStream
from imutils.video import FPS
import numpy as np
import argparse
import imutils
import time
import dlib
import cv2


# Construct parameters and parse parameters
ap = argparse.ArgumentParser()
ap.add_argument("-p", "--prototxt", required=True,
	help="path to Caffe 'deploy' prototxt file")
ap.add_argument("-m", "--model", required=True,
	help="path to Caffe pre-trained model")
ap.add_argument("-i", "--input", type=str,
	help="path to optional input video file")
ap.add_argument("-o", "--output", type=str,
	help="path to optional output video file")
ap.add_argument("-c", "--confidence", type=float, default=0.4,
	help="minimum probability to filter weak detections")
ap.add_argument("-s", "--skip-frames", type=int, default=30,
	help="# of skip frames between detections")
args = vars(ap.parse_args())

# Initialize class label list
CLASSES = ["background", "aeroplane", "bicycle", "bird", "boat",
	"bottle", "bus", "car", "cat", "chair", "cow", "diningtable",
	"dog", "horse", "motorbike", "person", "pottedplant", "sheep",
	"sofa", "train", "tvmonitor"]
# Load our serialization model from disk
print("[INFO] loading model...")
net = cv2.dnn.readNetFromCaffe(args["prototxt"], args["model"])

# If no video path is provided, get a reference to your webcam
if not args.get("input", False):
	print("[INFO] starting video stream...")
	vs = VideoStream(src=0).start()
	time.sleep(2.0)
# Otherwise, get a reference to the video file
else:
	print("[INFO] opening video file...")
	vs = cv2.VideoCapture(args["input"])

# Initialize the video writer (we will instantiate it later if necessary)
writer = None
# Initialize frame sizes (we'll set them as soon as we read the first frame from the video)
W = None
H = None
# Instantiate our centroid tracker, and then initialize a list to store each dlib related tracker,
# Each TrackableObject is mapped to a unique dictionary ID
ct = CentroidTracker(maxDisappeared=40, maxDistance=50)
trackers = []
trackableObjects = {}
# Initializes the total number of frames processed so far and the total number of objects moved up or down
totalFrames = 0
totalDown = 0
totalUp = 0
# Start FPS evaluator
fps = FPS().start()

# Frames in a cyclic video stream
while True:
	# If we are reading data from VideoCapture or VideoStream, grab the next frame and process it
	frame = vs.read()
	frame = frame[1] if args.get("input", False) else frame
	# If we are watching the video and we don't grab the frame, we have reached the end of the video
	if args["input"] is not None and frame is None:
		break
	# Adjust the maximum width of the frame to 500 pixels (the less data we have, the faster we can process it),
	# The frame is then converted from BGR to RGB for dlib
	frame = imutils.resize(frame, width=500)
	rgb = cv2.cvtColor(frame, cv2.COLOR_BGR2RGB)
	# If the frame sizes are empty, set them
	if W is None or H is None:
		(H, W) = frame.shape[:2]
	# If we should write the video to disk, please initialize the writer
	if args["output"] is not None and writer is None:
		fourcc = cv2.VideoWriter_fourcc(*"MJPG")
		writer = cv2.VideoWriter(args["output"], fourcc, 30,
			(W, H), True)


	# Initializes the current state and a rectangular list of bounding boxes returned by (1) our object detector or (2) the associated tracker
	status = "Waiting"
	rects = []
	# Check whether we should run more computationally intensive target detection methods to help our tracker
	if totalFrames % args["skip_frames"] == 0:
		# Set the state and initialize our new object tracker set
		status = "Detecting"
		trackers = []
		# Convert the frame into blob and transfer the blob through the network to obtain the detection result
		blob = cv2.dnn.blobFromImage(frame, 0.007843, (W, H), 127.5)
		net.setInput(blob)
		detections = net.forward()

		# Cycle test results
		for i in np.arange(0, detections.shape[2]):
			# Extract confidence (i.e. probability) related to prediction
			confidence = detections[0, 0, i, 2]
			# Filter out weak detection by requiring minimum confidence
			if confidence > args["confidence"]:
				# Extract the index of the class label from the detection list
				idx = int(detections[0, 0, i, 1])
				# If the class tag is not human, ignore it
				if CLASSES[idx] != "person":
					continue
				# Calculate the (x, y) coordinates of the object bounding box
				box = detections[0, 0, i, 3:7] * np.array([W, H, W, H])
				(startX, startY, endX, endY) = box.astype("int")
				# Construct a dlib rectangular object using the bounding box coordinates, and then start the dlib correlation tracker
				tracker = dlib.correlation_tracker()
				rect = dlib.rectangle(startX, startY, endX, endY)
				tracker.start_track(rgb, rect)
				# Add the tracker to our list of trackers so that we can use it during frame skipping
				trackers.append(tracker)

	# Otherwise, we should use target tracker instead of target detector to obtain higher FPS
	else:
		# Traversal tracker
		for tracker in trackers:
			# Set the status of the system to track rather than wait or detect
			status = "Tracking"
			# Update the tracker and get the updated location
			tracker.update(rgb)
			pos = tracker.get_position()
			# Unpack location object
			startX = int(pos.left())
			startY = int(pos.top())
			endX = int(pos.right())
			endY = int(pos.bottom())
			# Adds bounding box coordinates to the rectangular list
			rects.append((startX, startY, endX, endY))

	# Draw a horizontal line in the center of the frame - once an object passes through this line, we will determine whether they are moving "up" or "down".
	cv2.line(frame, (0, H // 2), (W, H // 2), (0, 255, 255), 2)
	# Use the centroid tracker to associate (1) the old object centroid with (2) the newly calculated object centroid
	objects = ct.update(rects)

	# Loop through the tracked object
	for (objectID, centroid) in objects.items():
		# Check whether there is a traceable object in the current object ID
		to = trackableObjects.get(objectID, None)
		# If there are no existing traceable objects, create one
		if to is None:
			to = TrackableObject(objectID, centroid)
		# Otherwise, there is a traceable object, so we can use it to determine the direction
		else:
			# *The difference between the y coordinate of the current * centroid and the average value of the * previous * centroid
			# Will tell us in which direction the object is moving ("up" is negative and "down" is positive)
			y = [c[1] for c in to.centroids]
			direction = centroid[1] - np.mean(y)
			to.centroids.append(centroid)
			# Check whether the object has been counted
			if not to.counted:
				# If the direction is negative (indicating that the object moves upward) and the center of mass is above the center line, the object is calculated
				if direction < 0 and centroid[1] < H // 2:
					totalUp += 1
					to.counted = True
				# If the direction is positive (indicating that the object is moving downward) and the center of mass is below the centerline, the object is calculated
				elif direction > 0 and centroid[1] > H // 2:
					totalDown += 1
					to.counted = True
		# Store traceable objects in our dictionary
		trackableObjects[objectID] = to

		# Draws the ID and centroid of the object on the output frame
		text = "ID {}".format(objectID)
		cv2.putText(frame, text, (centroid[0] - 10, centroid[1] - 10),
			cv2.FONT_HERSHEY_SIMPLEX, 0.5, (0, 255, 0), 2)
		cv2.circle(frame, (centroid[0], centroid[1]), 4, (0, 255, 0), -1)
	# Build the tuple of information we will display on the frame
	info = [
		("Up", totalUp),
		("Down", totalDown),
		("Status", status),
	]
	# Traverse the information tuples and draw them on our frame
	for (i, (k, v)) in enumerate(info):
		text = "{}: {}".format(k, v)
		cv2.putText(frame, text, (10, H - ((i * 20) + 20)),
			cv2.FONT_HERSHEY_SIMPLEX, 0.6, (0, 0, 255), 2)


	# Check whether we should write frames to disk
	if writer is not None:
		writer.write(frame)
	# Display output frame
	cv2.imshow("Frame", frame)
	key = cv2.waitKey(1) & 0xFF
	# If the 'q' key is pressed, the cycle is interrupted
	if key == ord("q"):
		break
	# Increase the total number of frames processed so far, and then update the FPS counter
	totalFrames += 1
	fps.update()

# Stop the timer and display FPS information
fps.stop()
print("[INFO] elapsed time: {:.2f}".format(fps.elapsed()))
print("[INFO] approx. FPS: {:.2f}".format(fps.fps()))
# Check if we need to release the video writer pointer
if writer is not None:
	writer.release()
# If we don't use video files, please stop the camera video streaming
if not args.get("input", False):
	vs.stop()
# Otherwise, release the video file pointer
else:
	vs.release()
# Close all open windows
cv2.destroyAllWindows()
- 2.centroidtracker.py
(1) Centroid tracker is one of the most reliable trackers.
(2) For the sake of simplicity, surround the centroid of the tracker.
(3) That is, the bounding box is the (x, y) coordinates of the object in the image.
(4) Once our SSD gets the coordinates, the tracker calculates the centroid (Center) of the bounding box. In other words, it is the center of the object.
(5) Then, each detected specific object is assigned a unique ID to track the frame sequence.
from scipy.spatial import distance as dist
from collections import OrderedDict
import numpy as np

class CentroidTracker:
	def __init__(self, maxDisappeared=50, maxDistance=50):
		# Initialize the next unique object ID and use two ordered dictionaries to track the mapping of a given object ID to its centroid,
		# And the number of consecutive frames it is marked "disappear"
		self.nextObjectID = 0
		self.objects = OrderedDict()
		self.disappeared = OrderedDict()

		# Stores the maximum number of consecutive frames a given object is allowed to be marked as "disappeared" until we need to unregister the object from the trace
		self.maxDisappeared = maxDisappeared

		# Store the maximum distance between centroids to associate objects - if the distance is greater than this maximum distance, we start marking objects as "disappeared"
		self.maxDistance = maxDistance

	def register(self, centroid):
		# When registering an object, we use the next available object ID to store the centroid
		self.objects[self.nextObjectID] = centroid
		self.disappeared[self.nextObjectID] = 0
		self.nextObjectID += 1

	def deregister(self, objectID):
		# To unregister the object ID, we delete the object ID from their respective dictionaries
		del self.objects[objectID]
		del self.disappeared[objectID]

	def update(self, rects):
		# Check whether the rectangular list of input bounding box is empty
		if len(rects) == 0:
			# Loop through any existing trace objects and mark them as gone
			for objectID in list(self.disappeared.keys()):
				self.disappeared[objectID] += 1

				# If we have reached the maximum number of consecutive frames that a given object is marked to disappear, we unregister it
				if self.disappeared[objectID] > self.maxDisappeared:
					self.deregister(objectID)

			# Return early because there is no centroid or tracking information to update
			return self.objects

		# Initializes the input centroid array of the current frame
		inputCentroids = np.zeros((len(rects), 2), dtype="int")

		# Circular bounding box rectangle
		for (i, (startX, startY, endX, endY)) in enumerate(rects):
			# The centroid is derived using bounding box coordinates
			cX = int((startX + endX) / 2.0)
			cY = int((startY + endY) / 2.0)
			inputCentroids[i] = (cX, cY)

		# If we don't currently track any objects, get the input centroids and register each of them
		if len(self.objects) == 0:
			for i in range(0, len(inputCentroids)):
				self.register(inputCentroids[i])

		# Otherwise, we are currently tracking the object, so we need to try to match the input centroid with the existing object centroid
		else:
			# Get a set of object ID s and corresponding centroids
			objectIDs = list(self.objects.keys())
			objectCentroids = list(self.objects.values())

			# Calculate the distance between each pair of object centroids and the input centroids separately - our goal is to match the input centroids with the existing object centroids
			D = dist.cdist(np.array(objectCentroids), inputCentroids)

			# In order to perform this matching, we must (1) find the minimum value in each row,
			# Then (2) sort the row indexes according to their minimum value so that the row with the minimum value is located at * front of the index list*
			rows = D.min(axis=1).argsort()

			# Next, we perform similar processing on columns by finding the minimum value in each column,
			# Then sort using the previously calculated row index list
			cols = D.argmin(axis=1)[rows]

			# To determine whether we need to update, register, or unregister an object, we need to track the row and column indexes we have checked
			usedRows = set()
			usedCols = set()

			# Cyclic traversal (row, column) index tuple combination
			for (row, col) in zip(rows, cols):
				# If we have checked row or column values before, ignore it
				if row in usedRows or col in usedCols:
					continue

				# If the distance between centroids is greater than the maximum distance, do not associate two centroids to the same object
				if D[row, col] > self.maxDistance:
					continue

				# Otherwise, get the object ID of the current row, set its new centroid, and reset the disappeared counter
				objectID = objectIDs[row]
				self.objects[objectID] = inputCentroids[col]
				self.disappeared[objectID] = 0

				# Indicates that we have checked each row and column index separately
				usedRows.add(row)
				usedCols.add(col)

			# Calculate row and column indexes that we have not checked
			unusedRows = set(range(0, D.shape[0])).difference(usedRows)
			unusedCols = set(range(0, D.shape[1])).difference(usedCols)

			# If the number of object centroids is equal to or greater than the number of input centroids,
			# We need to check and see if some of these objects may have disappeared
			if D.shape[0] >= D.shape[1]:
				# Circular unused row index
				for row in unusedRows:
					# Get the object ID of the corresponding row index and increase the disappearing counter
					objectID = objectIDs[row]
					self.disappeared[objectID] += 1

					# Check whether the number of consecutive frames of an object is marked "disappear" to log off the object
					if self.disappeared[objectID] > self.maxDisappeared:
						self.deregister(objectID)

			# Otherwise, if the number of input centroids is greater than the number of existing object centroids, we need to register each new input centroid as a traceable object
			else:
				for col in unusedCols:
					self.register(inputCentroids[col])

		# Returns a collection of traceable objects
		return self.objects
- 3.trackableobject.py
class TrackableObject:
	def __init__(self, objectID, centroid):
		# Store the object ID and initialize the centroid list with the current centroid
		self.objectID = objectID
		self.centroids = [centroid]

		# Initializes a Boolean value indicating whether the object has been counted
		self.counted = False
8. Operation results
Open the terminal and execute the following commands:
python people_counter.py --prototxt mobilenet_ssd/MobileNetSSD_deploy.prototxt \
	--model mobilenet_ssd/MobileNetSSD_deploy.caffemodel \
	--input videos/example_01.mp4 --output output/output_01.avi
Our personnel count is counting the following:
- Entering the Department Store (Part 2)
- Number of people leaving (Part 1)
At the end of the first video, you will see seven people entering and three leaving.
In addition, check the terminal output and you will find that our human counter can run in real time, up to 34 frames per second. Although we are using deep learning object detector to detect people more accurately.
Our 34 FPS frame rate is achieved through our two-stage process: detecting people every 30 frames, and then applying a faster and more effective object tracking algorithm in all frames in between.
9. Improve our people counter application
To build our OpenCV staff counter, we used dlib's correlation tracker. This method is easy to use and requires very little code.
However, our implementation is a bit inefficient -- in order to track multiple objects, we need to create multiple instances of the associated tracker object. Then, when we need to calculate the position of the object in the subsequent frame, we need to traverse all N object trackers and obtain the updated position.
All these calculations will take place in the main execution thread of our script, thus reducing our FPS rate.
Therefore, a simple way to improve performance is to use dlib's multi object tracker to increase our FPS rate by 45%! Note: OpenCV also implements multi object tracking, but not multi process (at least at the time of writing). OpenCV's multi object method is certainly easier to use, but it doesn't help much in this case without multi-processing power.
For example, if you don't have a GPU based tracker, you can gain faster tracking speed at the expense of a GPU based tracker.
BONUS
A few days ago github See an improved version on:
- The main goal is to use the project as a business perspective that can be expanded at any time.
- Use case: count the number of people in stores / buildings / shopping centers in real time.
- If the number exceeds the upper limit, an alarm will be sent to the staff.
- Automate features and optimize real-time streams for better performance (using threads).
- As a measure to carry out footprint analysis and deal with COVID-19 to some extent.
Reference catalogue
https://pyimagesearch.com/2018/08/13/opencv-people-counter/
https://github.com/saimj7/People-Counting-in-Real-Time