preface
stay Last article on TCA In, we saw the operation mode of a Feature in TCA through overview, and tried to implement a minimum Feature and its test. In this article, we will continue to go deep into the processing of Binding in TCA and the method of using Environment to decouple dependencies from reducer.
If you want to follow, you can directly use the last state after completing the exercise in the previous article, or from here Get start code.
About binding
The difference between binding and normal state
In the last article, we implemented the process of "click button" - > "send Action" - > "update State" - > "trigger UI update", which solves the problem of "State driven UI". However, in addition to simply "updating UI through State", SwiftUI also supports Binding a State to a control by using @ Binding in the opposite direction, so that the UI can change a State without our code. In SwiftUI, we can find this mode on almost all controls that both represent State and accept input. For example, TextField accepts Binding of String < String >, Toggle accepts Binding of Bool < Bool >, etc.
When we give a state to other views through Binding, the view has the ability to change the state directly. In fact, this violates the provisions of TCA that the state can only be changed in reducer. For Binding, TCA adds a method to convert the state to a "special Binding relationship" for View Store. Let's try to change the Text displaying numbers in the Counter example to a TextField that can accept direct input.
Implementing a single binding in TCA
First, add the corresponding ability to accept a string value to set count for CounterAction and counterReducer:
enum CounterAction {
  case increment
  case decrement
+ case setCount(String)
  case reset
}

let counterReducer = Reducer<Counter, CounterAction, CounterEnvironment> {
  state, action, _ in
  switch action {
  // ...
+ case .setCount(let text):
+   if let value = Int(text) {
+     state.count = value
+   }
+   return .none
  // ...
}.debug()
Next, replace the original Text in the body with the following TextField:
var body: some View {
  WithViewStore(store) { viewStore in
    // ...
-   Text("\(viewStore.count)")
+   TextField(
+     String(viewStore.count),
+     text: viewStore.binding(
+       get: { String($0.count) },
+       send: { CounterAction.setCount($0) }
+     )
+   )
+     .frame(width: 40)
+     .multilineTextAlignment(.center)
      .foregroundColor(colorOfCount(viewStore.count))
  }
}
viewStore. The binding method accepts two parameters, get and send, which are generic functions related to the current View Store and the bound view type. After specialization (converting generics to concrete types in this context):
- Get: (counter) - > string is responsible for providing data for the object View (textfield here).
- Send: (string) - > counteraction is responsible for converting the value newly sent by View into an action understandable by View Store, and sending it to trigger counterReducer.
After the counterReducer receives the setCount event given by binding, we will return to the standard TCA cycle of using the reducer to update the status and drive the UI.
In the traditional SwiftUI, when we get a state binding through the $symbol, we actually call its projectedValue. And viewstore Binding internally wraps the View Store itself into an observadobject, and then sets the input get and send to binding through the user-defined projectedValue. Internally, it maintains the state through internal storage and hides this detail; Externally, it sends out the change of state through action. Capturing this change and updating it accordingly, and finally setting the new state to binding through get again is something that developers need to ensure.
Simplified code
Do a little Refactoring: now the binding get is from $0 String generated by count, state. In reducer The setting of count also needs to be converted from string to Int. We extract the parts related to the Mode and View representation and put them into an extension of the Counter as the View Model:
extension Counter {
  var countString: String {
    get { String(count) }
    set { count = Int(newValue) ?? count }
  }
}
Replace the converted String part in reducer with countString:
let counterReducer = Reducer<Counter, CounterAction, CounterEnvironment> {
  state, action, _ in
  switch action {
  // ...
  case .setCount(let text):
-   if let value = Int(text) {
-     state.count = value
-   }
+   state.countString = text
    return .none
  // ...
}.debug()
In Swift 5.2, KeyPath can be used as a function, so we can use \ counter The type of countstring is regarded as (counter) - > string. At the same time, in Swift 5.3 enum case can also be used as a function , you can think of counteraction Setcount has type (string) - > counteraction. Both meet the requirements of the two parameters of binding, so you can further simplify the part of creating binding:
// ...
  TextField(
    String(viewStore.count),
    text: viewStore.binding(
-     get: { String($0.count) },
+     get: \.countString,
-     send: { CounterAction.setCount($0) }
+     send: CounterAction.setCount
    )
  )
// ...
Finally, don't forget to do it for me setCount add test!
Multiple binding values
If there are multiple binding values in a Feature, using the method in the example, we need to add an action every time, and then send it in binding. This is the same template code. The @ BindableState and BindableAction are designed in TCA to simplify the writing of multiple bindings. Specifically, there are three steps:
- Add @ BindableState for the variables in the State that need to be bound to the UI.
- Declare the Action as BindableAction, and then add a "special" case binding (bindingaction < counter >).
- Handle this in Reducer Bind and add binding() call.
It's faster to code directly:
// 1
struct MyState: Equatable {
+ @BindableState var foo: Bool = false
+ @BindableState var bar: String = ""
}

// 2
- enum MyAction {
+ enum MyAction: BindableAction {
+   case binding(BindingAction<MyState>)
}

// 3
let myReducer = //...
  // ...
+ case .binding:
+   return .none
}
+ .binding()
After such an operation, we can use the method similar to the standard SwiftUI in View, and use $to get the projected value for Binding:
struct MyView: View {
  let store: Store<MyState, MyAction>
  var body: some View {
    WithViewStore(store) { viewStore in
+     Toggle("Toggle!", isOn: viewStore.binding(\.$foo))
+     TextField("Text Field!", text: viewStore.binding(\.$bar))
    }
  }
}
In this way, even if there are multiple binding values, we only need to use one The binding action can be mapped. This code works because BindableAction requires a function with a signature of bindingaction < state > - > self and a name of binding:
public protocol BindableAction {
  static func binding(_ action: BindingAction<State>) -> Self
}
Again, with the new Swift feature of using enum case as a function, the code can be very simple and elegant.
Environmental value
Figure guessing game
Back to the Counter example. Now that there is a way to input numbers, it's better to play a little game of guessing numbers!
Guess the number: the program randomly selects a number between - 100 and 100. The user enters a number, and the program judges whether this number is a randomly selected number. If not, return "too big" or "too small" as feedback and ask the user to continue trying to enter the next number to guess.
The simplest method is to add an attribute in Counter to hold the random number:
struct Counter: Equatable {
  var count: Int = 0
+ let secret = Int.random(in: -100 ... 100)
}
Check the relationship between count and secret and return the answer:
extension Counter {
  enum CheckResult {
    case lower, equal, higher
  }

  var checkResult: CheckResult {
    if count < secret { return .lower }
    if count > secret { return .higher }
    return .equal
  }
}
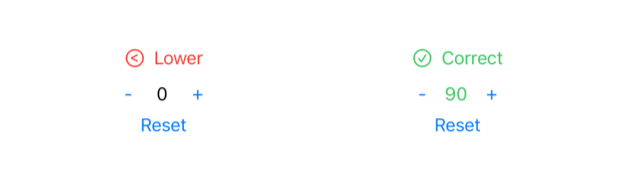
With this model, we can display a Label representing the result in the view by using checkResult:
struct CounterView: View {
  let store: Store<Counter, CounterAction>
  var body: some View {
    WithViewStore(store) { viewStore in
      VStack {
+       checkLabel(with: viewStore.checkResult)
        HStack {
          Button("-") { viewStore.send(.decrement) }
          // ...
  }

  func checkLabel(with checkResult: Counter.CheckResult) -> some View {
    switch checkResult {
    case .lower:
      return Label("Lower", systemImage: "lessthan.circle")
        .foregroundColor(.red)
    case .higher:
      return Label("Higher", systemImage: "greaterthan.circle")
        .foregroundColor(.red)
    case .equal:
      return Label("Correct", systemImage: "checkmark.circle")
        .foregroundColor(.green)
    }
  }
}
Finally, we can get such a UI:
External dependency
When we use this UI to "Mask" the answer, although the Reset button can Reset the guess to zero, it can't reopen a game for us. Of course, it's a little boring. Let's try changing the Reset button to the New Game button.
We have defined it in UI and CounterAction The reset behavior is to rename:
enum CounterAction {
  // ...
- case reset
+ case playNext
}

struct CounterView: View {
  // ...
  var body: some View {
    // ...
-   Button("Reset") { viewStore.send(.reset) }
+   Button("Next") { viewStore.send(.playNext) }
  }
}
Then handle this situation in counterReducer,
struct Counter: Equatable {
  var count: Int = 0
- let secret = Int.random(in: -100 ... 100)
+ var secret = Int.random(in: -100 ... 100)
}

let counterReducer = Reducer<Counter, CounterAction, CounterEnvironment> {
  // ...
- case .reset:
+ case .playNext:
    state.count = 0
+   state.secret = Int.random(in: -100 ... 100)
    return .none
  // ...
}.debug()
Run the app and observe the output of reducer debug(). You can see that everything is normal! Great.
Running tests with Cmd + U at any time is a habit that everyone should develop. At this time, we can find that the test compilation failed. The final task is to revise the original reset test, which is also very simple:
func testReset() throws {
- store.send(.reset) { state in
+ store.send(.playNext) { state in
    state.count = 0
  }
}
However, the running result of the test will probably fail!
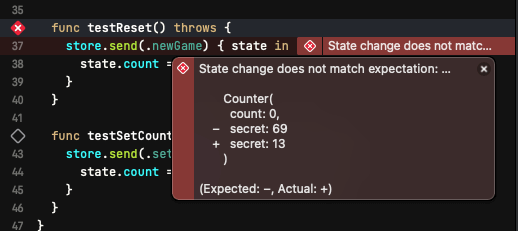
This is because playNext now not only resets the count, but also randomly generates a new secret. The TestStore compares the state at the end of the send closure with the real state operated by the reducer and asserts that the former does not set an appropriate secret, resulting in that they are not equal, so the test fails.
We need a stable way to ensure the success of the test.
Use environment values to resolve dependencies
In TCA, in order to ensure testability, the reducer must be a pure function: that is, the combination of the same input (state, action and environment) must be able to give the same input (the output here is state and effect, and we will contact the effect role in the later article).
let counterReducer = // ... {

  state, action, _ in
  // ...
  case .playNext:
    state.count = 0
    state.secret = Int.random(in: -100 ... 100)
    return .none
  //...
}.debug()
I'm dealing with it During playNext, Int.random obviously cannot guarantee that every call will give the same result, which is also the reason why reducer cannot be tested. The concept of Environment in TCA is to deal with such external dependencies. If the external state is dependent inside the reducer (for example, Int.random here uses the systemrandomnumbergenerator that automatically selects random seeds), we can inject this state through the Environment so that the actual app and unit test can use different environments.
First, update the CounterEnvironment and add an attribute to hold the randomly generated Int method.
struct CounterEnvironment {
+ var generateRandom: (ClosedRange<Int>) -> Int
}
Now the compiler needs us to add the setting of generateRandom to the original CounterEnvironment(). We can directly create a CounterEnvironment with Int.random during generation:
CounterView(
  store: Store(
    initialState: Counter(),
    reducer: counterReducer,
-   environment: CounterEnvironment()
+   environment: CounterEnvironment(
+     generateRandom: { Int.random(in: $0) }
+   )
  )
)
A more common and concise approach is to define a set of environments for CounterEnvironment and then transfer them to the corresponding places:
struct CounterEnvironment {
  var generateRandom: (ClosedRange<Int>) -> Int

+ static let live = CounterEnvironment(
+   generateRandom: Int.random
+ )
}

CounterView(
  store: Store(
    initialState: Counter(),
    reducer: counterReducer,
-   environment: CounterEnvironment()
+   environment: .live
  )
)
Now, in reducer, you can use the injected environment value to achieve the same result as the original:
let counterReducer = // ... {
- state, action, _ in
+ state, action, environment in
  // ...
  case .playNext:
    state.count = 0
-   state.secret = Int.random(in: -100 ... 100)
+   state.secret = environment.generateRandom(-100 ... 100)
    return .none
  // ...
}.debug()
Everything is ready, back to the original purpose - to ensure that the test can pass smoothly. In test target, create one in a similar way Test environment:
extension CounterEnvironment {
  static let test = CounterEnvironment(generateRandom: { _ in 5 })
}
Now, when generating TestStore, use Test, and then generate an appropriate Counter as a new state when asserting, and the test can pass successfully:
store = TestStore(
  initialState: Counter(count: Int.random(in: -100...100)),
  reducer: counterReducer,
- environment: CounterEnvironment()
+ environment: .test
)

store.send(.playNext) { state in
- state.count = 0
+ state = Counter(count: 0, secret: 5)
}
In the store In the closure of send, we now directly set a new Counter for state and specify all expected properties. You can also separate two lines here and write it as state Count = 0 and state Secret = 5, the test can also pass. You can choose either method, but in complex cases, you tend to choose the complete assignment: in the test, we want to compare the difference between the expected state and the actual state through assertion, rather than re implement the logic in reducer. This may lead to confusion, because when the test fails, you need to check whether the problem is caused by the reducer itself or the operation state in the test code.
Other common dependencies
In addition to the random series, any external dependency that breaks the pure function characteristics of reducer with the change of the calling Environment (including time, place, various external states, etc.) should be included in the category of Environment. Common examples are the generation of UUID, the acquisition of current Date, the acquisition of a running queue (such as main queue), the use of Core Location to obtain current location information, the network framework responsible for sending network requests, and so on.
Some of them can be completed synchronously, such as Int.random in the example; Others take some time to get results, such as obtaining location information and sending network requests. For the latter, we often convert it into an Effect. We will discuss Effect in the next article.
practice
If you don't follow this article to update the code, you can here Find the starting code for the following exercise. Reference implementations can be found in here Found.
Add a Slider
Using the keyboard and plus and minus signs to control the Counter is good, but adding a Slider will be more interesting. Please add a Slider for CounterView to control our number guessing game together with TextField and "+" "-" Button.
The expected UI is roughly as follows:
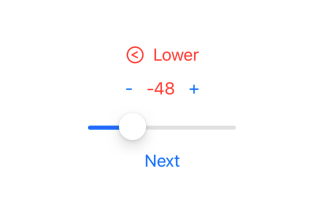
Don't forget to write the test!
Improve Counter and record more information
In order to develop the following functions, we need to update the Counter model. First, add some meta information to each puzzle, such as puzzle ID:
Add the following attributes to Counter and make it meet the requirements of Identifiable:
- struct Counter: Equatable {
+ struct Counter: Equatable, Identifiable {
    var count: Int = 0
    var secret = Int.random(in: -100 ... 100)

+   var id: UUID = UUID()
  }
When starting a new round of the game, remember to update the id. And don't forget to write the test!