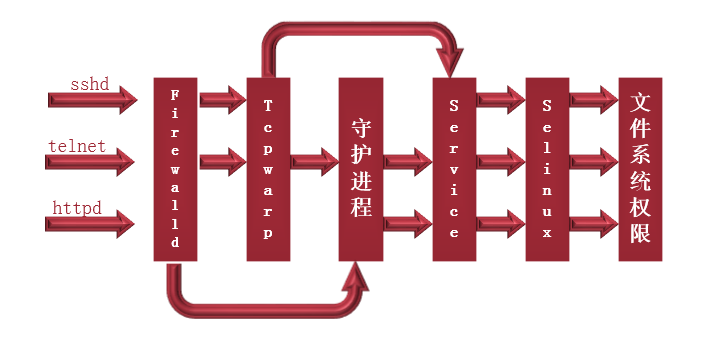
Service startup process:
Tcp warp:
1.Tcp warp is managed by xinetd
2. support libwarp.so module service: we can use ldd to view
ldd `which sshd`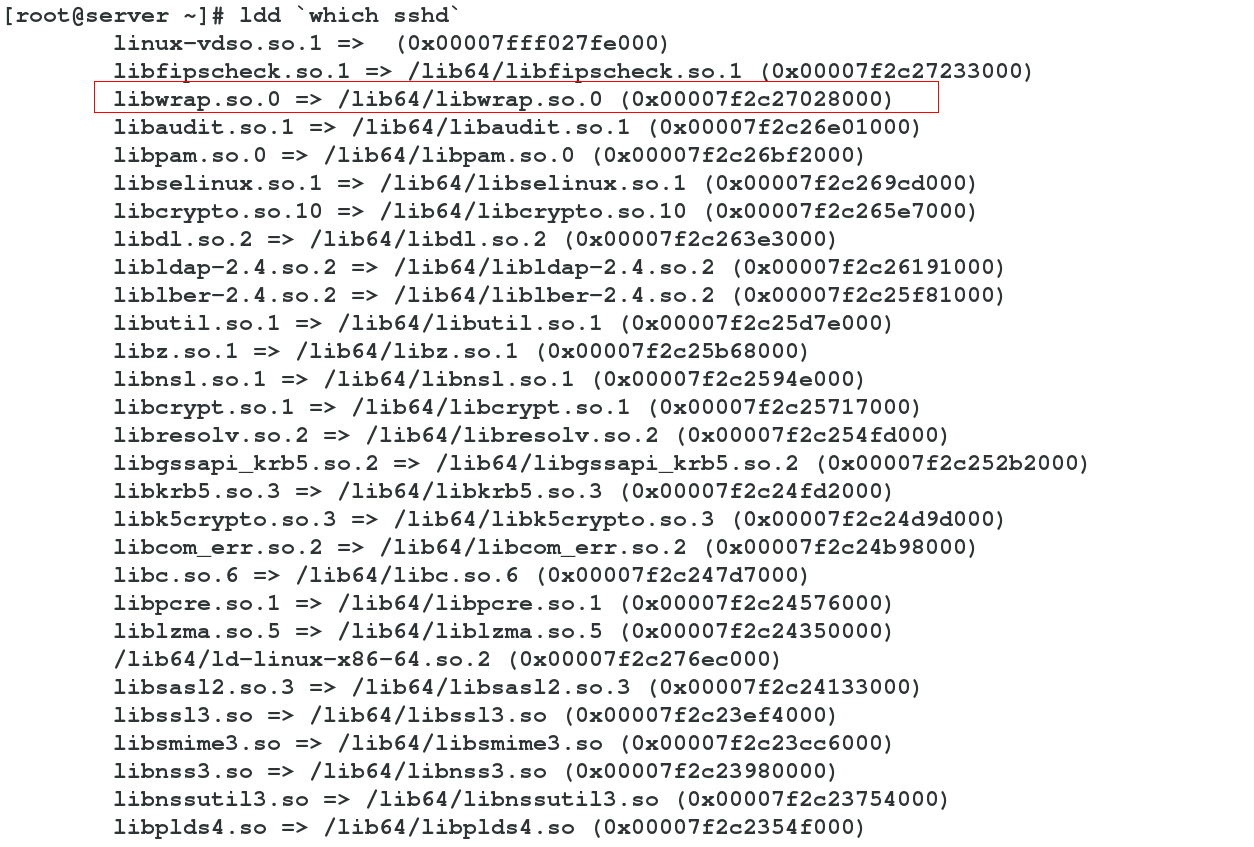
vim /etc/hosts.deny
ALL:ALL ###Everyone refused to connect
vim /etc/hosts.allow
sshd:172.25.254. EXCEPT 172.25.254.225 ###It is found that in addition to 172.25.254.225, the connection is not possible, so it is not difficult to see that the deny file is reading the allow file when reading first
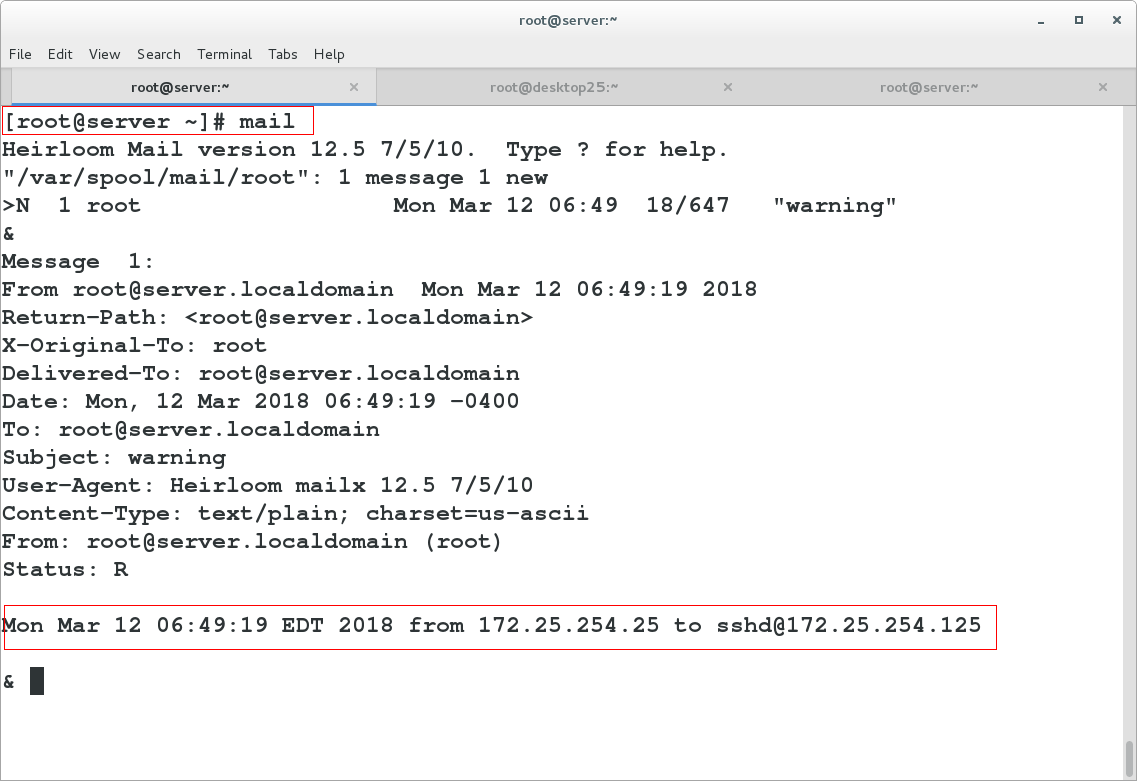
vim /etc/hosts.allow
sshd:172.25.254. :spawn echo `date` from %c to %s | mail -s warning root
mail ###You can see the login email
sshd:172.25.254. :spawn echo `date` from %c to %s >/dev/pts/1 ###Automatic prompt for ssh connection, man 5 /etc/hosts.allow You have mail in /var/spool/mail/root
Daemon
 yum install xinetd.x86_64 telnet-server telnet -y
 vim /etc/hosts.deny                                     ###Clear ALL: ALL. When it is not cleared, telnet cannot connect
 vim /etc/xinetd.d/telnet
 service telnet
 {
        socket_type = stream
        protocol = tcp
        user = root
        server = /usr/sbin/in.telnetd
        disable = no                                     ###no: open
        flags = REUSE                                    ###Always try to connect
        wait = no
 }
 systemctl restart xinetd.service
 chkconfig                                              ###Check whether the service is on
 [root@server xinetd.d]# telnet localhost               ###root is available
 Trying ::1...
 Connected to localhost.
 Escape character is '^]'.

 Kernel 3.10.0-123.el7.x86_64 on an x86_64
 desktop login: student
 Password:
 Last login: Wed Mar  7 07:57:17 on pts/0
xinetd settings
In this way, all daemons can be changed, and these settings can also be added to a separate configuration file, for example, / etc/xinetd.conf/telnet forms the limit of a separate service
 vim /etc/xinetd.conf                                ###Restrictions on all services
 13        enabled         =                         ###YES: open service, NO: close service
 14        disabled        =                         ###YES: close service, NO: Open Service
 23        no_access       = 172.25.254.225          ###Blacklist
 24        only_from       = 172.25.254.25           ###White list
 25        max_load        = 5                       ###Cannot access when 5% of resources are occupied
 26        cps             = 1 3                     ###The maximum concurrency is 1 and the waiting time is 3s
 27        instances       = 2                       ###maximum connection
 28        per_source      = 2                       ###Maximum connections of the same IP
 systemctl restart xinetd.service                    ###You can view help through man 5 xinetd.conf
ISCSI services
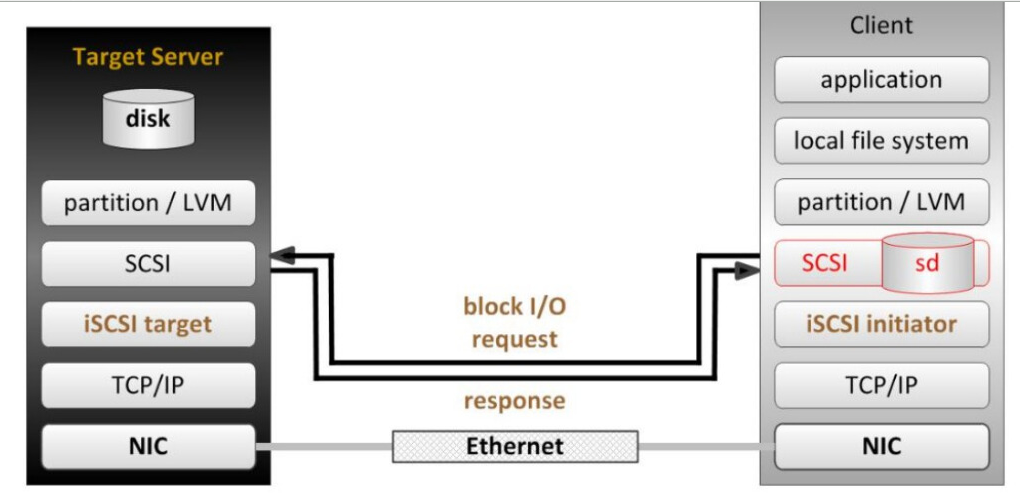
In this way, we can achieve storage system consolidation through iscsi services
Virtual machine: 172.25.254.125 (server)
fdisk /dev/vdb ###Divide 1G / dev/vdb1 from the inside to do the experiment
partprobe
yum install -y targetcli.noarch
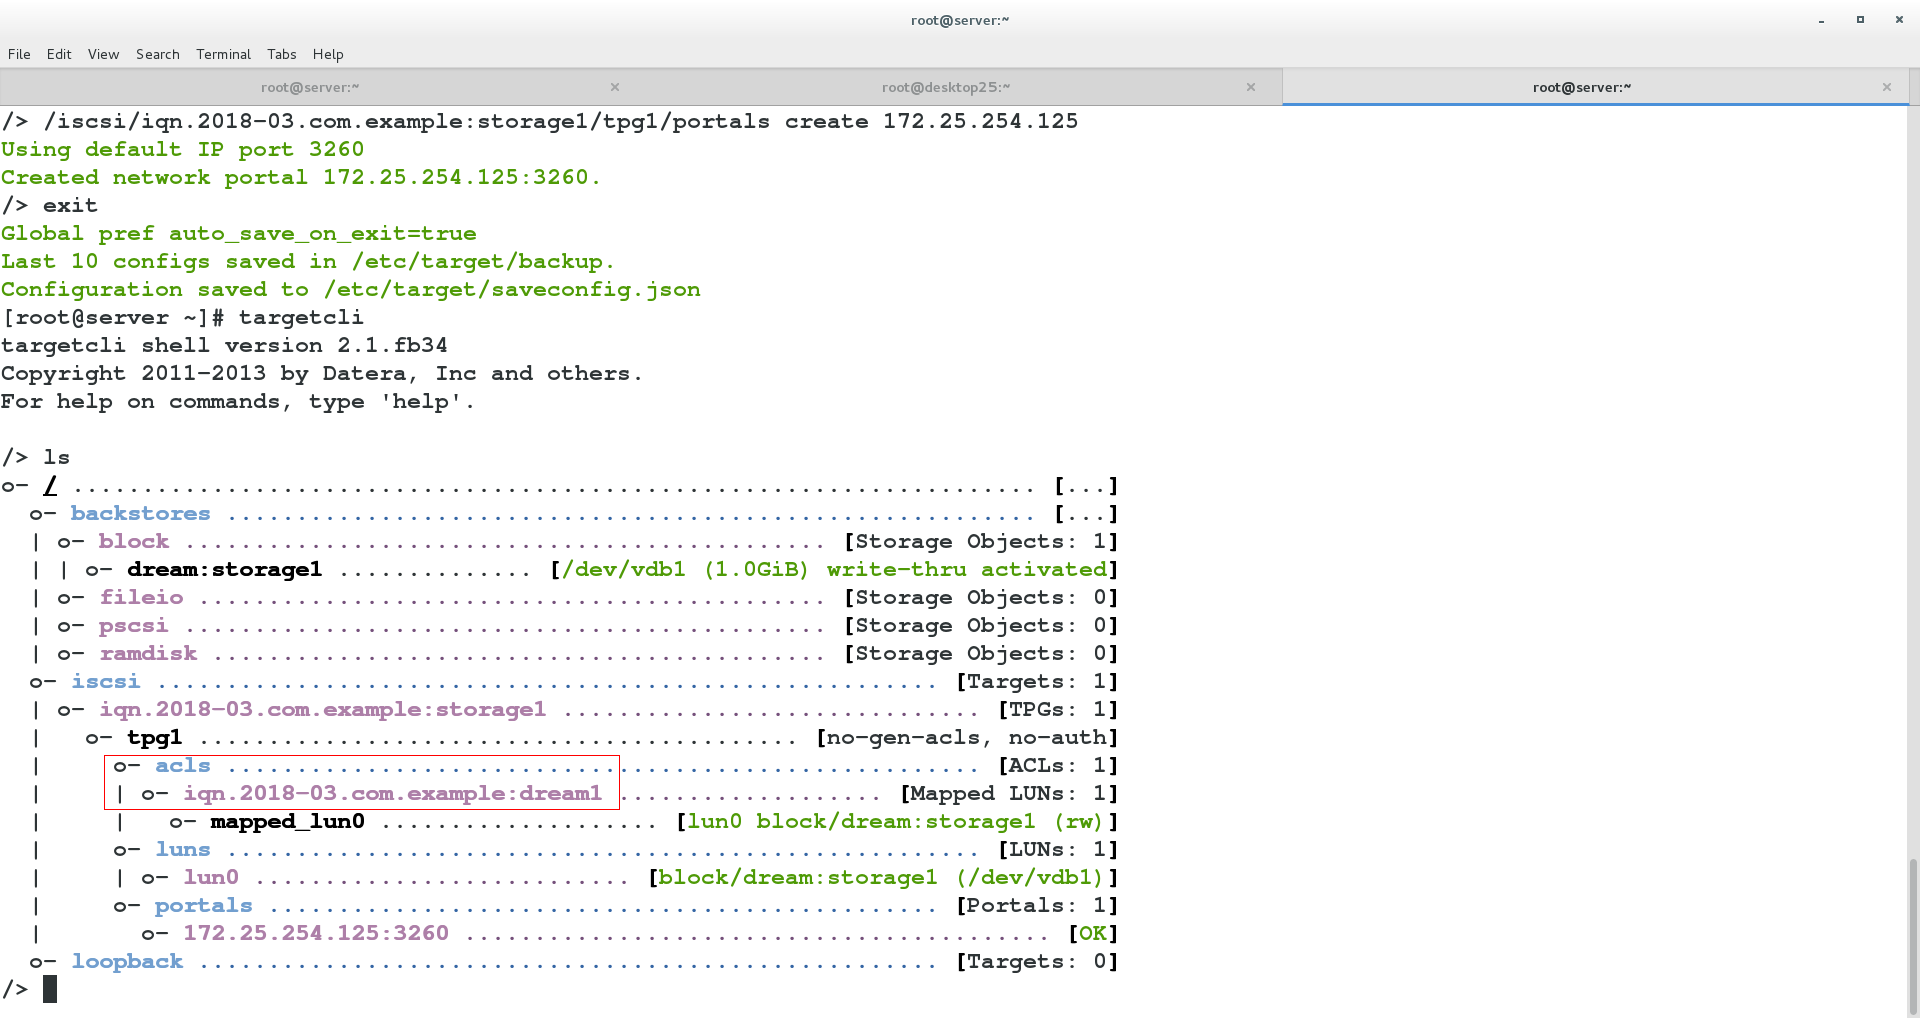
targetcli
/> /backstores/block create dream:storage1 /dev/vdb1 ###Add equipment
Created block storage object dream:storage1 using /dev/vdb1.
/> /iscsi create iqn.2018-03.com.example:storage1 ###iqn: format
Created target iqn.2018-03.com.example:storage1.
Created TPG 1.
/> /iscsi/iqn.2018-03.com.example:storage1/tpg1/acls create iqn.2018-03.com.example:dream1 ###/acls and authentication of tap1
Created Node ACL for iqn.2018-03.com.example:dream1
/> /iscsi/iqn.2018-03.com.example:storage1/tpg1/luns create /backstores/block/dream:storage1 ###luns of /tap1
Created LUN 0.
Created LUN 0->0 mapping in node ACL iqn.2018-03.com.example:dream1
/> /iscsi/iqn.2018-03.com.example:storage1/tpg1/portals create 172.25.254.125 ###/Portals of tap1 (IP is server IP)
Using default IP port 3260
Created network portal 172.25.254.125:3260.
/> exit
Global pref auto_save_on_exit=true
Last 10 configs saved in /etc/target/backup. ###The written one is saved in these 2 configuration files
Configuration saved to /etc/target/saveconfig.json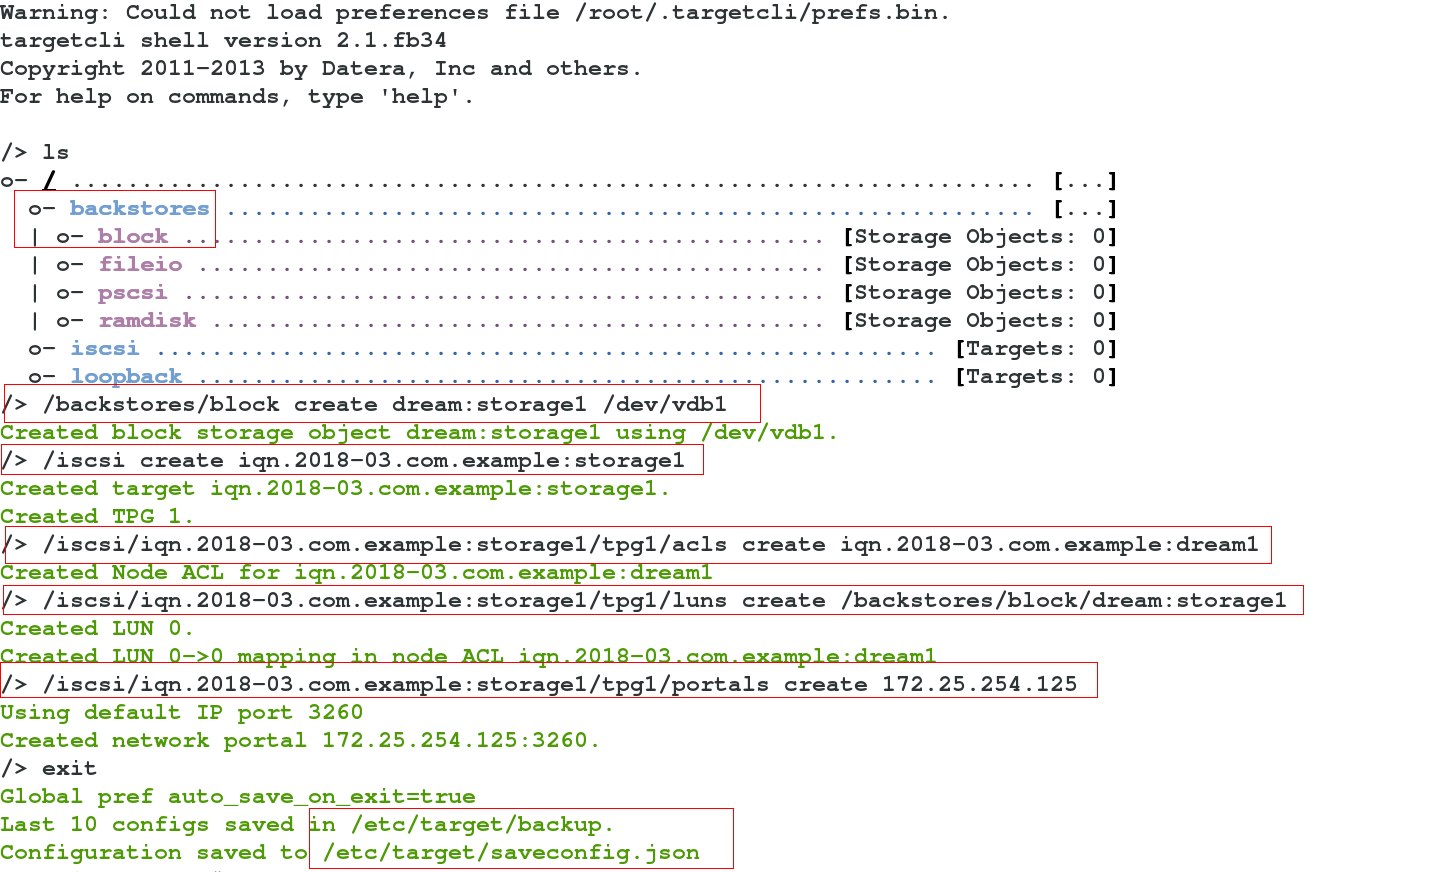
Virtual machine: 172.25.254.225 (client)
yum search iscsi
yum install iscsi-initiator-utils.x86_64 -y
vim /etc/iscsi/initiatorname.iscsi
1 InitiatorName=iqn.2018-03.com.example:dream1
systemctl restart iscsi
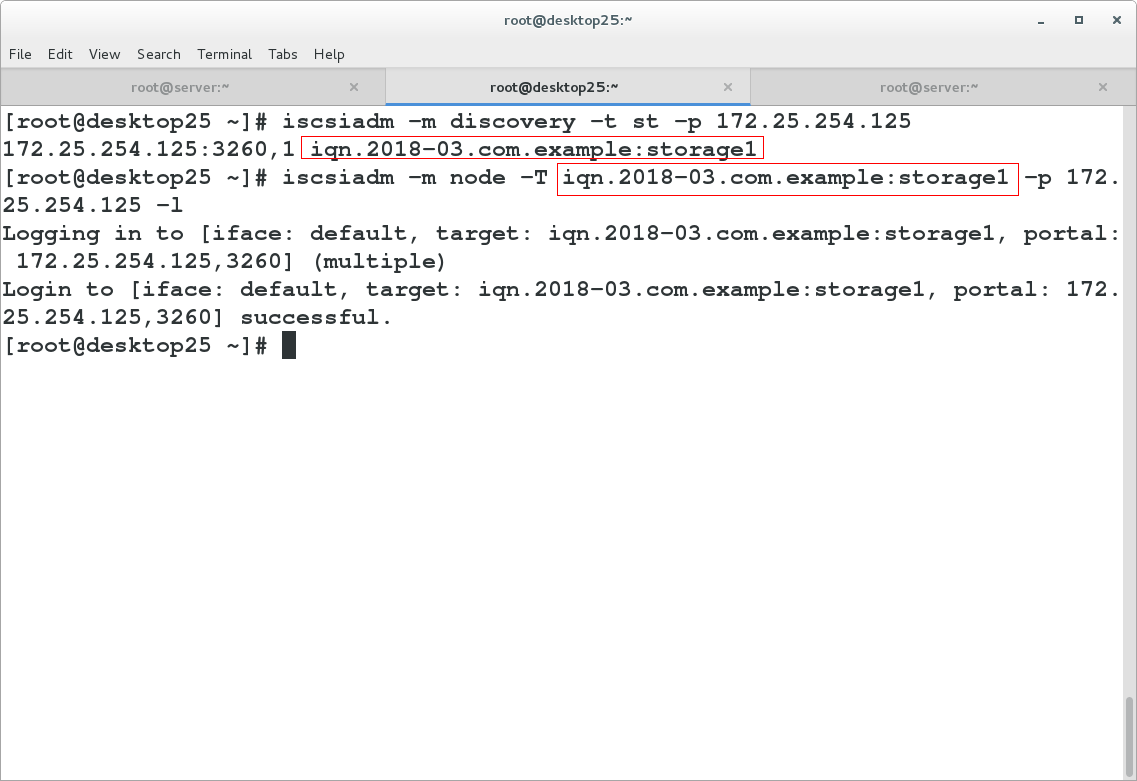
[root@desktop25 ~]# iscsiadm -m discovery -t st -p 172.25.254.125
172.25.254.125:3260,1 iqn.2018-03.com.example:storage1
[root@desktop25 ~]# iscsiadm -m node -T iqn.2018-03.com.example:storage1 -p 172.25.254.125 -l ###l:login login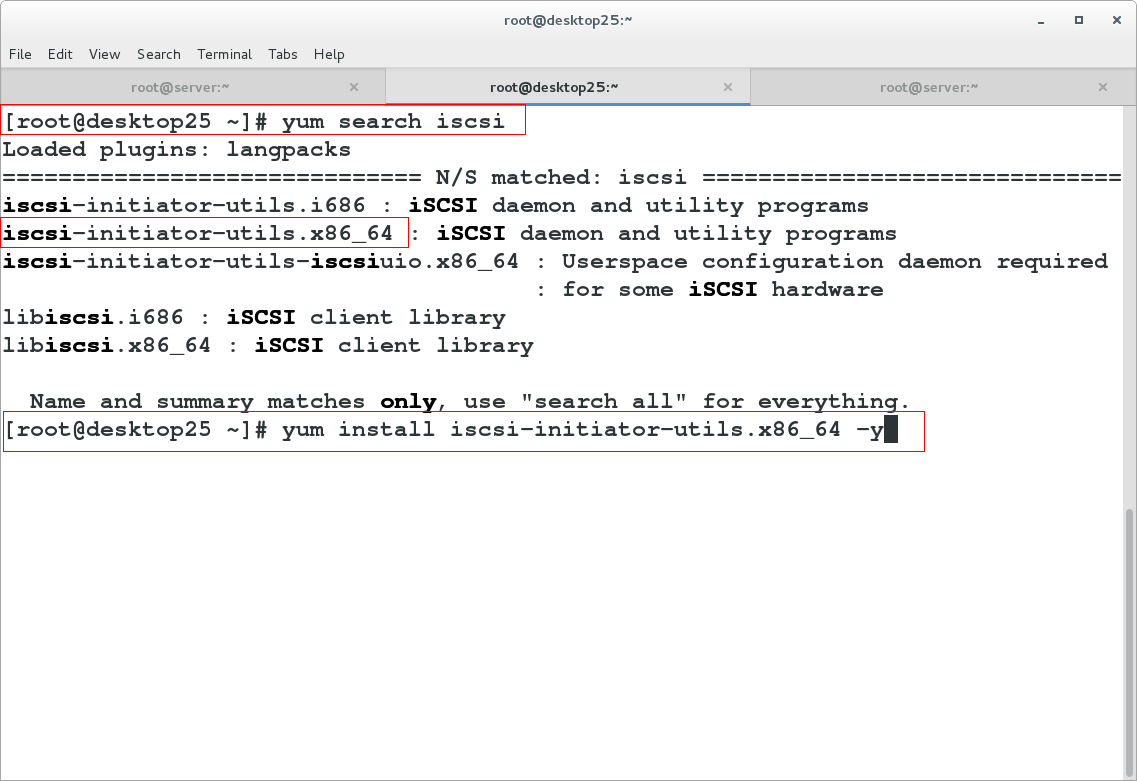
On the server, we can ls view acls authentication and write it to the file / etc/iscsi/initiatorname.iscsi:
test
Virtual machine: 172.25.254.225 (client)
We can be surprised to find that the partition on the server can be used by the client
  fdisk -l
  fdisk /dev/sda
  partprobe
  mkfs.xfs /dev/sda1
  mount /dev/sda1 /mnt
Auto Mount
Virtual machine: 172.25.254.225 (client)
The service is set to start automatically
 [root@desktop25 ~]# blkid                                                              ###Viewing the UUID of a device
 /dev/vda1: UUID="9bf6b9f7-92ad-441b-848e-0257cbb883d1" TYPE="xfs"
 /dev/vdb1: UUID="SIaPf4-OdHu-OzAW-NlQG-vZ3D-X8ZO-1FK3Ih" TYPE="LVM2_member"
 /dev/mapper/vg0-vo: UUID="12294be2-bdad-4817-b162-038e22313d9f" TYPE="ext4"
 /dev/sda1: UUID="d2f0cc3c-dd11-4bc4-a856-6ca3abacc02f" TYPE="xfs"
 [root@desktop25 ~]# vim /etc/fstab                                                     ###_netdev: let the network start first and then mount
 UUID=d2f0cc3c-dd11-4bc4-a856-6ca3abacc02f  /mnt         xfs     defaults,_netdev        0 0
 [root@desktop25 ~]# reboot
delete
 yum install -y tree
 tree /var/lib/iscsi/
 iscsiadm -m node -T iqn.2018-03.com.example:storage1 -p 172.25.254.125 -u            ###Exit - T:targetname,-p:portal(IP and port)
 iscsiadm -m node -T iqn.2018-03.com.example:storage1 -p 172.25.254.125 -o delete     ###delete
 reboot
 systemctl restart iscsi                                                              ###Fdisk-l is correct without device