
SkyEye introduction

SkyEye is an open source software project, whose Chinese name is "Tianmu". SkyEye's goal is to implement a pure software integrated development environment on general Linux and Windows platforms to simulate common embedded computer systems (it is assumed that "simulation" and "simulation" have basically the same meaning); Can run on SkyEye μ CLinux and μ C/OS-II and other embedded operating systems and various system software (such as TCP/IP, graphics subsystem, file subsystem, etc.), and they can be analyzed and tested at the source code level.
More about the open source version: Click me to jump
At present, the open source version stays at 1.3 The later version was developed and maintained by Zhejiang Dijie Software Technology Co., Ltd, Click me to view the latest introduction of SkyEye.
Access this address: https://gitee.com/open-skyeye/build , download the relevant installation packages and toolkits.
build tutorial
Environmental description
This paper introduces how to compile and install the hardware simulation software SkyEye 1.3 in the operating system Ubuntu 16.04 5.
Mirror version: ubuntu-16.04.6-desktop-i386.iso
To ensure a smooth installation, you can choose the same Ubuntu as this article. At the same time, you need to download this warehouse, release / skyeye-1.3 5 contains the installation package and some software packages we need.
Installation dependency
Because skyeye1 Llvm3.5 is referenced in 3.5 0 underlying virtual machine, x11 underlying interface library and other software. If it is a newly installed Ubuntu system, these software may not be available, so you need to install them on the machine before installing SkyEye.
First:
sudo apt-get update
Then execute the following command:
sudo apt-get install git-core make automake autoconf libtool g++ python-dev libxft-dev libx11-dev libxpm-dev libncurses5-dev texi2html xterm texinfo x11proto-xext-dev libxext-dev python-numpy python-faulthandler python-wxtools libjson0-dev putty
The main libraries involved are:
| name | explain |
|---|---|
| git-core | - |
| make | - |
| automake | - |
| autoconf | - |
| libtool | Dynamic library loader |
| g++ | - |
| python-dev | - |
| libxft-dev | - |
| libx11-dev | Interface underlying library dependency package |
| libxpm-dev | - |
| libncurses5-dev | - |
| texi2html | - |
| xterm | Terminal simulator |
| texinfo | file system |
| x11proto-xext-dev | Interface underlying Library |
| libxext-dev | - |
| python-numpy | - |
| python-faulthandler | - |
| python-wxtools | - |
| libjson0-dev | - |
| putty | Terminal tools |
Then, we need to update or install some dependent libraries. These libraries are ubuntu, but to be safe, we need to install them again manually.
sudo apt-get install libgtk2.0-dev pkg-config libatk1.0-dev
sudo apt-get install libpango1.0-dev libfreetype6-dev libglib2.0-dev libx11-dev binutils-dev
sudo apt-get install libncurses5-dev libxpm-dev libltdl-dev
sudo apt-get install binutils-de
Compile SkyEye
Here I create a new folder in the root directory
mkdir work
Enter this folder from release / skyeye-1.3 5 copy the installation package and software package here, and unzip it.
cd work
unzip libiconv-1.12.zip
tar -zxvf llvm-3.0.tar.gz
tar -jxvf Python-2.7.tar.bz2
tar -jxvf skyeye-1.3.5_rc1.tar.bz2
Briefly introduce the functions of these software packages:
| name | explain |
|---|---|
| libiconv-1.14 | Character encoding conversion library |
| llvm-3.0 | Assembly virtual machine |
| Python-2.7 | Programming language |
| kyeye-1.3.5 | Embedded system simulator |
Enter libiconv-1.12 and Python-2.7 folders in sequence, and install libiconv first:
./configure
make
sudo make install
If there is a problem during make install, make clean and make again (do not use sudo make), and then sudo make install.
Install python-2.7 again:
./configure --enable-shared  --enable-unicode=ucs4
sudo make
sudo make install
After confirming that there is no problem in the above steps, compile and install SkyEye, enter the SkyEye source code directory, and enter the following command:
./configure
sudo make lib
If the following problems occur:
/home/tym/work/1.clone/skyeye-1.3.5_rc1/third-party/opcodes/cgen-ops.h:423:

multiple definition of `SUBWORDTFSI'
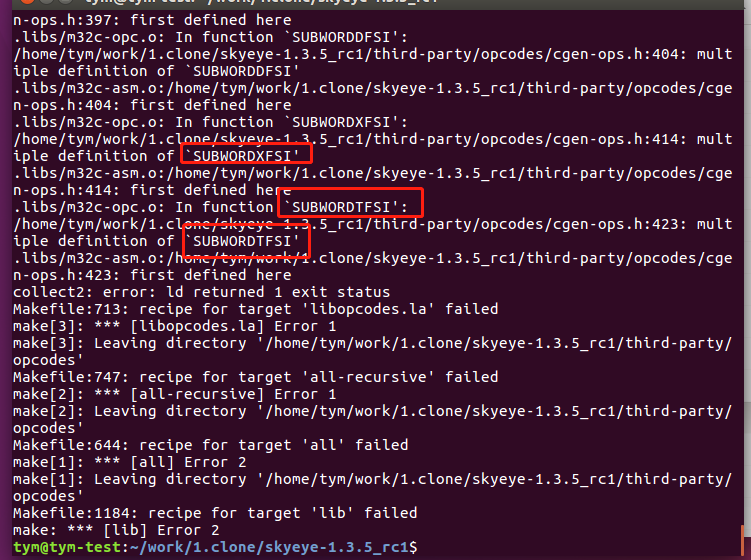
Please follow the instructions below:

Next, enter the following command to complete the compilation and installation:
sudo make
sudo make install_lib
sudo make install
The installation path of skyeye is opt/skyeye. We can add it to the environment variable to quickly operate:
Open the global settings of the current user first:
vim ~/.bashrc
Enter code:
#skyeye 1.3.5
export PATH=/opt/skyeye/bin:$PATH
After saving and exiting, enter the command to update the settings:
source .bashrc
Enter the command to see if skyeye can be started:
skyeye
If an error is reported at this time:
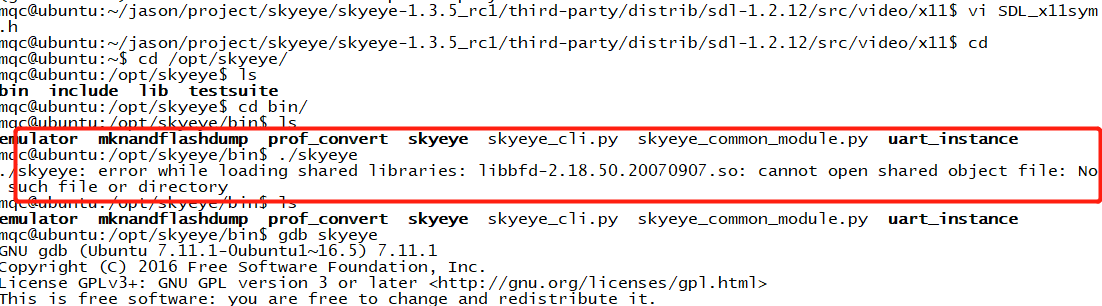
This indicates that this library does not exist. We need to copy a system library here and rename it:
sudo cp //usr/lib/i386-linux-gnu/libbfd-2.26-system.so /usr/lib/libbfd-2.18.50.20070907.so
If there are similar errors in compilation, the operation is the same. Directly find some libraries under the system, copy them and rename them.
Now let's go to the skyeye root directory and use the provided test demo to verify whether skyeye works normally:
cd //opt/skyeye/testsuite/arm_hello
skyeye -e arm_hello
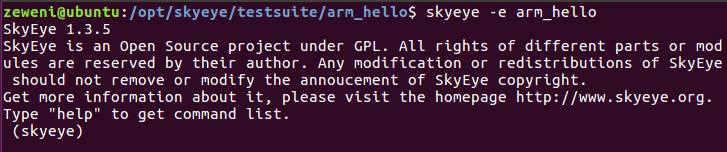
As shown in the figure above, it means that the startup is normal. Now we enter two commands to start the demo:
start
run

So far, our skyeye installation is successful!