1, SPI
1. Introduction
SPI (Serial Peripheral Interface) is a synchronous serial data transmission standard proposed by Motorola Company. It is a high-speed, full duplex and synchronous communication bus, which is widely used in many devices.
2.SPI interface
SPI interface is often called 4-wire serial bus, which works in master / slave mode, and the data transmission process is initialized by the host.
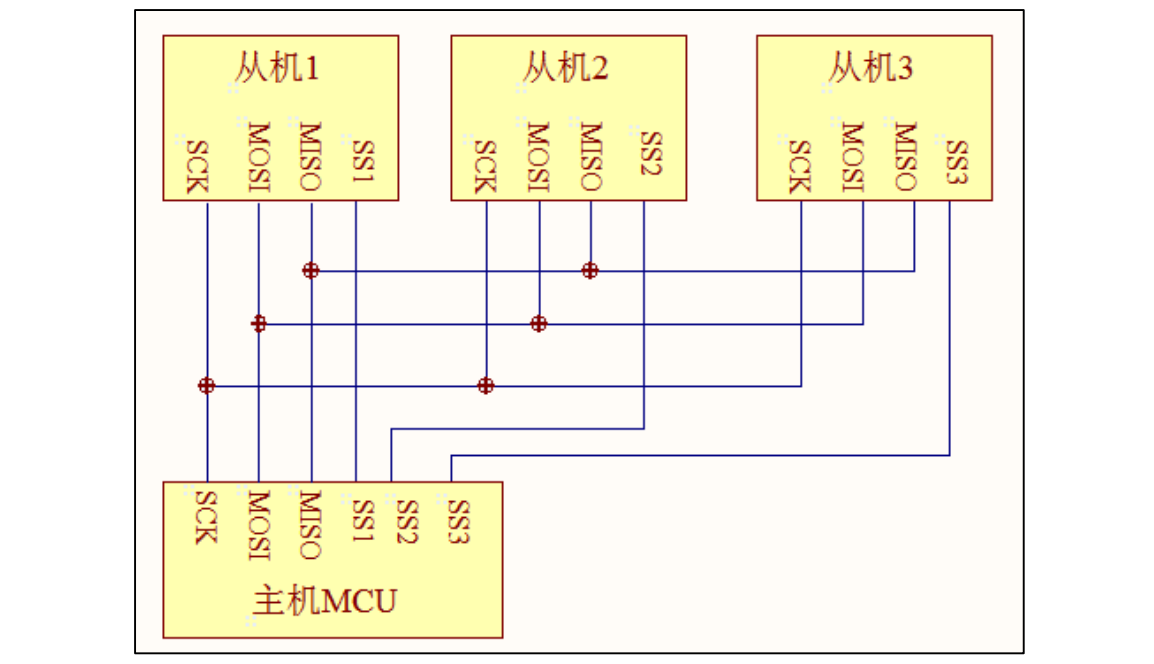
As shown in Figure 1, the four signal lines used are:
1) SCLK: serial clock, used to synchronize data transmission and output by the host;
2) MOSI: master output slave input data line;
3) MISO: host input slave output data line;
4) SS: chip selection line, low level effective, output by the host.
On SPI bus, multiple slaves can appear at a certain time, but there can only be one master. The master determines the slave to communicate through chip selection line. This requires that the MISO port of the slave has three state characteristics, so that the port line shows high impedance when the device is not gated.
2, OLED
demo download link: 0.96 inch SPI_OLED module supporting data package
1.OLED principle
OLED (organic light emitting diode), also known as Organic Electroluminescence Display (OLED). OLED is a kind of current type organic light-emitting device, which emits light through carrier injection and recombination. The luminous intensity is directly proportional to the injected current. Under the action of electric field, holes generated by anode and electrons generated by cathode will move, inject into hole transport layer and electron transport layer respectively, and migrate to light-emitting layer. When they meet in the luminescent layer, they produce energy excitons, which excite luminescent molecules and finally produce visible light
2.0.96 "SPI OLED screen
Pin description
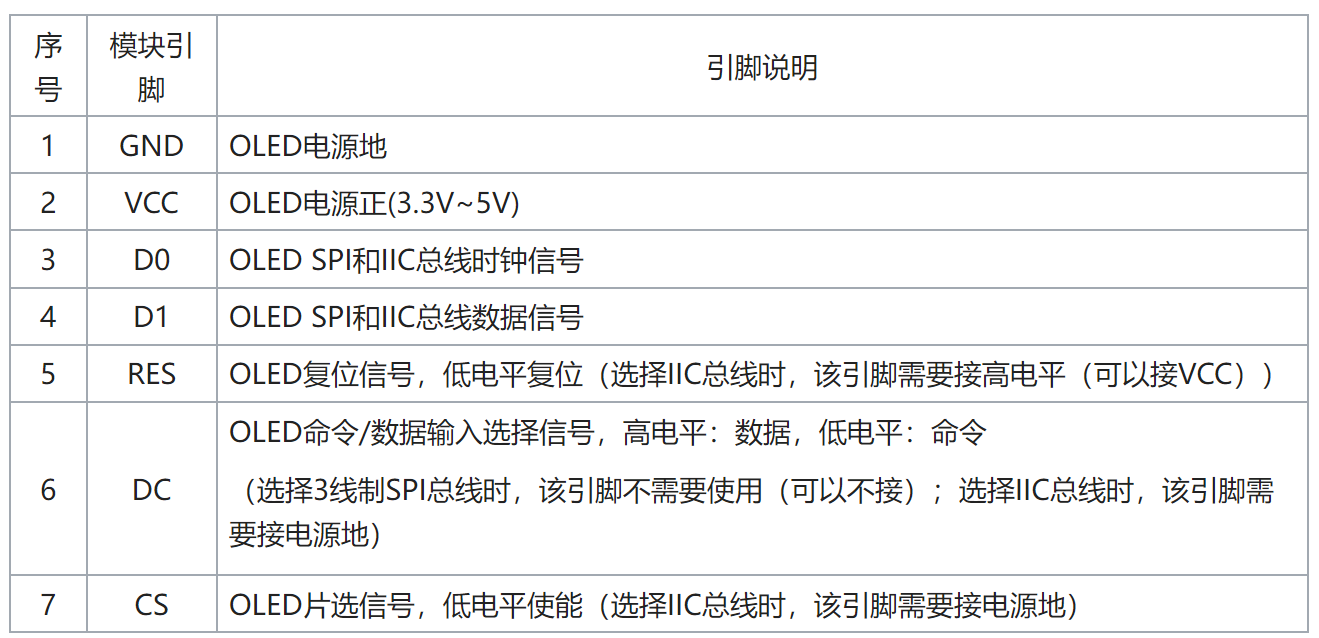
Therefore, according to the above pin description, the pin connection of OLED is shown in the following table
| OLED module | STM32 single chip microcomputer |
|---|---|
| VCC | 5V/3.3V |
| GND | GND |
| D0 | PB13 |
| D1 | PB15 |
| RES | PB12 |
| DC | PB10 |
| CS | PB11 |
3.OLED display text
GPIO configuration
void OLED_Init_GPIO(void)
{
	GPIO_InitTypeDef  GPIO_InitStructure;
 	RCC_APB2PeriphClockCmd(RCC_APB2Periph_GPIOB, ENABLE);	 //Enable port B clock
	GPIO_InitStructure.GPIO_Pin = GPIO_Pin_10|GPIO_Pin_11|GPIO_Pin_12|GPIO_Pin_13|GPIO_Pin_15;	//GPIOB10,11,12,13,15
 	GPIO_InitStructure.GPIO_Mode = GPIO_Mode_Out_PP; 		 //Push pull output
	GPIO_InitStructure.GPIO_Speed = GPIO_Speed_50MHz;//Speed 50MHz
 	GPIO_Init(GPIOB, &GPIO_InitStructure);	  //Initialize GPIOB10, 11, 12, 13, 15
 	GPIO_SetBits(GPIOB,GPIO_Pin_10|GPIO_Pin_11|GPIO_Pin_12|GPIO_Pin_13|GPIO_Pin_15);
}
Initialization of OLED screen
void OLED_Init(void)
{
 	OLED_Init_GPIO(); //Initialize GPIO
 	delay_ms(200);
	OLED_Reset();     //Reset OLED

/**************Initialize SSD1306*****************/
	OLED_WR_Byte(0xAE,OLED_CMD); /*display off*/
	OLED_WR_Byte(0x00,OLED_CMD); /*set lower column address*/
	OLED_WR_Byte(0x10,OLED_CMD); /*set higher column address*/
	OLED_WR_Byte(0x40,OLED_CMD); /*set display start line*/
	OLED_WR_Byte(0xB0,OLED_CMD); /*set page address*/
	OLED_WR_Byte(0x81,OLED_CMD); /*contract control*/
	OLED_WR_Byte(0xFF,OLED_CMD); /*128*/
	OLED_WR_Byte(0xA1,OLED_CMD); /*set segment remap*/
	OLED_WR_Byte(0xA6,OLED_CMD); /*normal / reverse*/
	OLED_WR_Byte(0xA8,OLED_CMD); /*multiplex ratio*/
	OLED_WR_Byte(0x3F,OLED_CMD); /*duty = 1/64*/
	OLED_WR_Byte(0xC8,OLED_CMD); /*Com scan direction*/
	OLED_WR_Byte(0xD3,OLED_CMD); /*set display offset*/
	OLED_WR_Byte(0x00,OLED_CMD);
	OLED_WR_Byte(0xD5,OLED_CMD); /*set osc division*/
	OLED_WR_Byte(0x80,OLED_CMD);
	OLED_WR_Byte(0xD9,OLED_CMD); /*set pre-charge period*/
	OLED_WR_Byte(0XF1,OLED_CMD);
	OLED_WR_Byte(0xDA,OLED_CMD); /*set COM pins*/
	OLED_WR_Byte(0x12,OLED_CMD);
	OLED_WR_Byte(0xDB,OLED_CMD); /*set vcomh*/
	OLED_WR_Byte(0x30,OLED_CMD);
	OLED_WR_Byte(0x8D,OLED_CMD); /*set charge pump disable*/
	OLED_WR_Byte(0x14,OLED_CMD);
	OLED_WR_Byte(0xAF,OLED_CMD); /*display ON*/
}
Generation of font (PCtoLCD2002)
After entering text in the text box, set the format to C51 format in the options, and the output number system is hexadecimal number
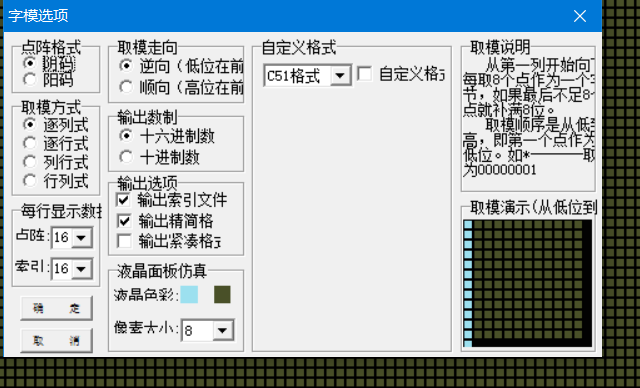

Generate a font and copy it into the code
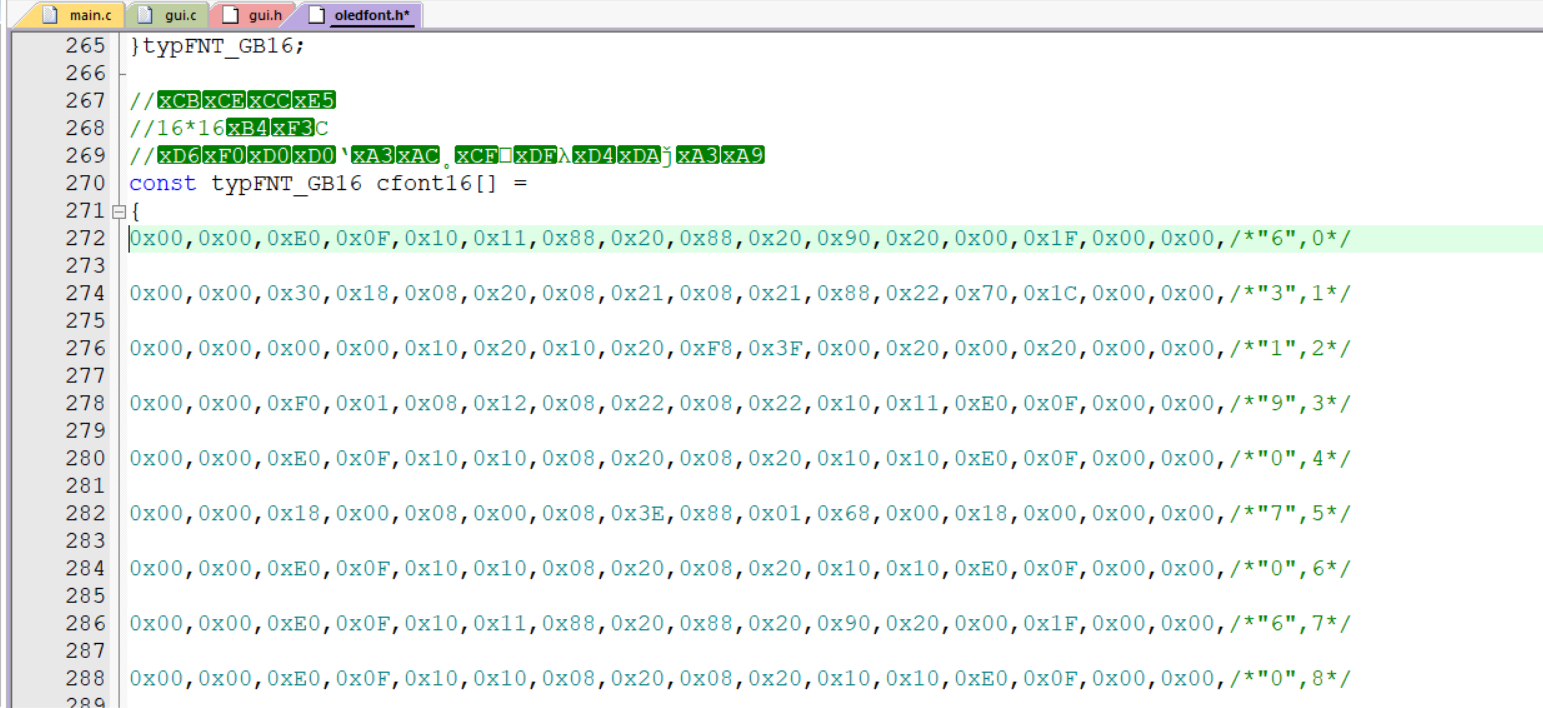
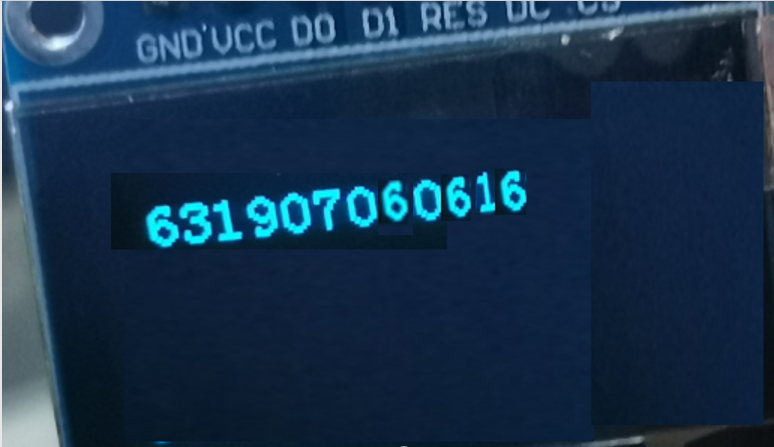
Compile and burn
4. Display the temperature and humidity of AHT20
Winstor code
void read_AHT20(void)
{
uint8_t i;
for(i=0; i<6; i++)
{
readByte[i]=0;
}
//-------------
I2C_Start();
I2C_WriteByte(0x71);
ack_status = Receive_ACK();
readByte[0]= I2C_ReadByte();
Send_ACK();
readByte[1]= I2C_ReadByte();
Send_ACK();
readByte[2]= I2C_ReadByte();
Send_ACK();
readByte[3]= I2C_ReadByte();
Send_ACK();
readByte[4]= I2C_ReadByte();
Send_ACK();
readByte[5]= I2C_ReadByte();
SendNot_Ack();
//Send_ACK();
I2C_Stop();
//--------------
if( (readByte[0] & 0x68) == 0x08 )
{
H1 = readByte[1];
H1 = (H1<<8) | readByte[2];
H1 = (H1<<8) | readByte[3];
H1 = H1>>4;
H1 = (H1*1000)/1024/1024;
T1 = readByte[3];
T1 = T1 & 0x0000000F;
T1 = (T1<<8) | readByte[4];
T1 = (T1<<8) | readByte[5];
T1 = (T1*2000)/1024/1024 - 500;
AHT20_OutData[0] = (H1>>8) & 0x000000FF;
AHT20_OutData[1] = H1 & 0x000000FF;
AHT20_OutData[2] = (T1>>8) & 0x000000FF;
AHT20_OutData[3] = T1 & 0x000000FF;
}
else
{
AHT20_OutData[0] = 0xFF;
AHT20_OutData[1] = 0xFF;
AHT20_OutData[2] = 0xFF;
AHT20_OutData[3] = 0xFF;
printf("lyy");
}
/*Display the collected temperature and humidity through the serial port
printf("\r\n");
printf("Temperature:% d%d.%d",T1/100,(T1/10)%10,T1%10);
printf("Humidity:% d%d.%d",H1/100,(H1/10)%10,H1%10);
printf("\r\n");*/
t=T1/10;
t1=T1%10;
a=(float)(t+t1*0.1);
h=H1/10;
h1=H1%10;
b=(float)(h+h1*0.1);
sprintf(strTemp,"%.1f",a); //Call the Sprintf function to format the temperature data of DHT11 into the string array variable strTemp
sprintf(strHumi,"%.1f",b); //Call the Sprintf function to format the humidity data of DHT11 into the string array variable strHumi
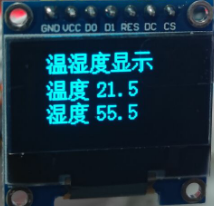
GUI_ShowCHinese(16,00,16,"Temperature and humidity display",1);
GUI_ShowCHinese(16,20,16,"temperature",1);
GUI_ShowString(53,20,strTemp,16,1);
GUI_ShowCHinese(16,38,16,"humidity",1);
GUI_ShowString(53,38,strHumi,16,1);
delay_ms(1500);
delay_ms(1500);
}
main function
#include "delay.h"
#include "usart.h"
#include "bsp_i2c.h"
#include "sys.h"

#include "oled.h"
#include "gui.h"
#include "test.h"

int main(void)
{
	delay_init();	    	       //Delay function initialization
	uart_init(115200);
	IIC_Init();

	NVIC_Configuration(); 	   //Set NVIC interrupt packet 2: 2-bit preemption priority and 2-bit response priority
	OLED_Init();			         //Initialize OLED
	OLED_Clear(0);
	while(1)
	{
		//printf("temperature and humidity display");
		read_AHT20_once();
		OLED_Clear(0);
		delay_ms(1500);
  }
}
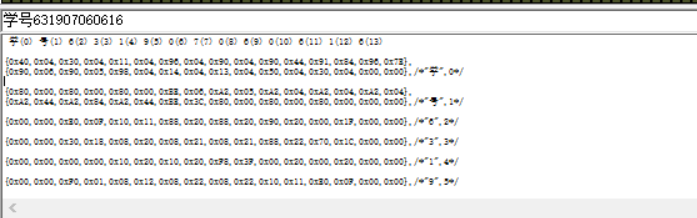
Font
""Wen",0x00,0x00,0x23,0xF8,0x12,0x08,0x12,0x08,0x83,0xF8,0x42,0x08,0x42,0x08,0x13,0xF8,
0x10,0x00,0x27,0xFC,0xE4,0xA4,0x24,0xA4,0x24,0xA4,0x24,0xA4,0x2F,0xFE,0x00,0x00,
""Wet",0x00,0x00,0x27,0xF8,0x14,0x08,0x14,0x08,0x87,0xF8,0x44,0x08,0x44,0x08,0x17,0xF8,
0x11,0x20,0x21,0x20,0xE9,0x24,0x25,0x28,0x23,0x30,0x21,0x20,0x2F,0xFE,0x00,0x00,
""Degree",0x01,0x00,0x00,0x80,0x3F,0xFE,0x22,0x20,0x22,0x20,0x3F,0xFC,0x22,0x20,0x22,0x20,
0x23,0xE0,0x20,0x00,0x2F,0xF0,0x24,0x10,0x42,0x20,0x41,0xC0,0x86,0x30,0x38,0x0E,
result
5. Use OLED screen to slide text
a. Disable scrolling (2Eh)
This instruction is used to stop scrolling. After calling command 2Eh, the data of RAM needs to be rewritten
b. Enable scrolling (2Fh)
This directive is used to start scrolling and can only be invoked after the rolling configuration parameter is invoked by the command 26h/27h/29h/2Ah. Finally, the configuration when invoking the rolling parameter command will override the configuration that calls the outdated settings.
The following actions are disabled when scrolling is enabled:
Access to RAM
Change horizontal scroll configuration parameters
c. Set horizontal left and right scrolling
code:
OLED_WR_Byte(0x2E,OLED_CMD); // Turn off scrolling
OLED_WR_Byte(0x26,OLED_CMD); // Scroll horizontally left or right 26 / 27
OLED_WR_Byte(0x00,OLED_CMD); // virtual byte
OLED_WR_Byte(0x00,OLED_CMD); // Start page 0
OLED_WR_Byte(0x07,OLED_CMD); // Rolling interval
OLED_WR_Byte(0x07,OLED_CMD); // Termination page 7
OLED_WR_Byte(0x00,OLED_CMD); // virtual byte
OLED_WR_Byte(0xFF,OLED_CMD); // virtual byte
OLED_WR_Byte(0x2F,OLED_CMD); // Turn on scrolling
Note: to set horizontal scrolling, you need to turn off scrolling before calling, otherwise the contents in RAM will be wrong. In addition, you need to write two virtual bytes after writing the termination page. On the Internet, it is said that some do not need to write these two virtual bytes. Maybe because the manufacturers are different, you can try if there is a problem here!!!
d. Set vertical and horizontal scrolling
code:
OLED_WR_Byte(0x2e,OLED_CMD); // Turn off scrolling
OLED_WR_Byte(0x29,OLED_CMD); // Horizontal vertical and horizontal scroll left and right 29/2a
OLED_WR_Byte(0x00,OLED_CMD); // virtual byte
OLED_WR_Byte(0x00,OLED_CMD); // Start page 0
OLED_WR_Byte(0x07,OLED_CMD); // Rolling interval
OLED_WR_Byte(0x07,OLED_CMD); // Termination page 1
OLED_WR_Byte(0x01,OLED_CMD); // Vertical scroll offset
OLED_WR_Byte(0x2F,OLED_CMD); // Turn on scrolling
Note: when the vertical scroll offset = 0, there is only a horizontal left-right shift. By setting the start page and end page, the set area can scroll vertically and horizontally, and the other areas can only scroll vertically.
For more detailed commands, please find the SSD1306-OLED driver Chinese manual or reference link: SSD1306(OLED driver chip) instruction details
4.2 code modification
Modify TEST_MainPage function
void TEST_MainPage(void)
{
GUI_ShowCHinese(0,16,16, "dusk and morning", 1); // Display Chinese characters
GUI_ShowCHinese(0,35,16, "unable to recognize", 1); // Display Chinese characters
delay_ms(1500);
delay_ms(1500);
}
Modify main function
int main(void)
{
delay_init(); // Delay function initialization
NVIC_Configuration(); // Set NVIC interrupt packet 2: 2-bit preemption priority and 2-bit response priority
OLED_Init(); // Initialize OLED
OLED_Clear(0); // Clear screen (all black)
OLED_WR_Byte(0x2E,OLED_CMD); // Turn off scrolling
OLED_WR_Byte(0x27,OLED_CMD); // Scroll horizontally left or right 26 / 27
OLED_WR_Byte(0x00,OLED_CMD); // virtual byte
OLED_WR_Byte(0x00,OLED_CMD); // Start page 0
OLED_WR_Byte(0x07,OLED_CMD); // Rolling interval
OLED_WR_Byte(0x07,OLED_CMD); // Termination page 7
OLED_WR_Byte(0x00,OLED_CMD); // virtual byte
OLED_WR_Byte(0xFF,OLED_CMD); // virtual byte
TEST_MainPage();
OLED_WR_Byte(0x2F,OLED_CMD); // Turn on scrolling
while(1)
{}
}
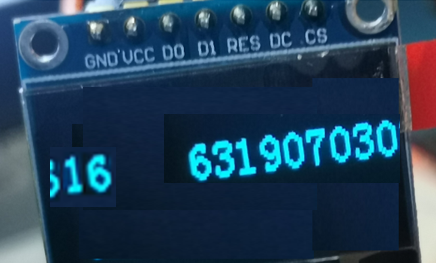
result
3, Summary
Learn the application operation of OLED.