When upgrading the image viewer some time ago, there was no good transition mode when opening the image viewer.
A big man recommended the latest Material Motion animation for Android to me. Although it was not arranged for our App in the end, it provided me with an opportunity to learn Material Motion animation.
Recommended learning materials:
Official tutorials and projects: https://github.com/material-components/material-components-android/blob/master/docs/theming/Motion.md
Android official: https://developer.android.com/training/transitions/start-activity
What is transition animation?
When learning animation, we always hear transition animation. So, what is transition animation?
First, for an animation, two key frames are the start frame and the end frame of the animation, and transition is the transition between the two key frames.
A complete transition animation is shown in the figure:
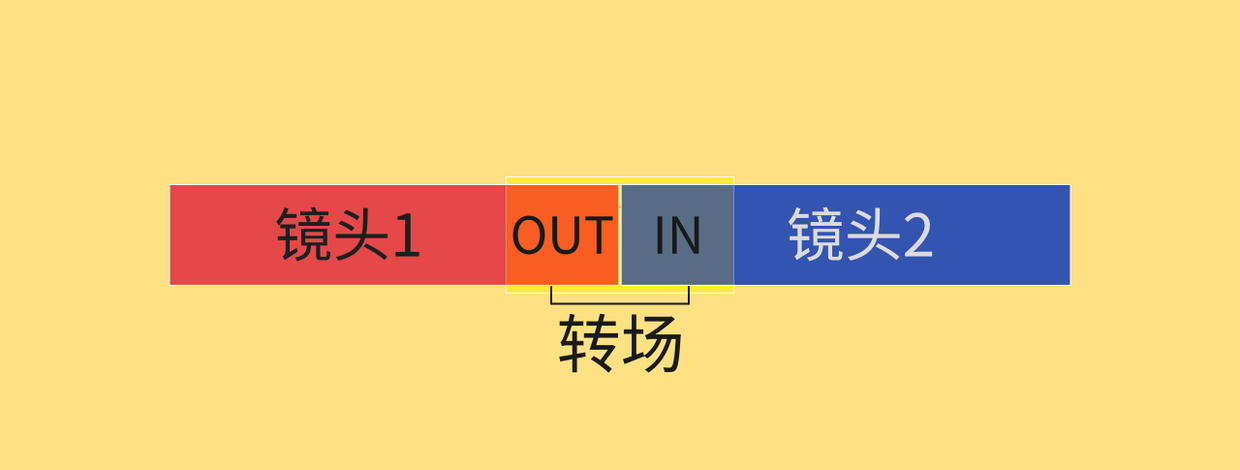
The picture is from the transition method of dynamic design
1, Initial transition
Let's start with a dry product:
adb shell settings put global window_animation_scale 10
adb shell settings put global transition_animation_scale 10
adb shell settings put global animator_duration_scale 10
This command can slow down the animation by 10 times, which is convenient for learning the details of the animation. When the speed is restored, change 10 to 1.
Do you remember how the two activities transited at the beginning? Yes, the overridePendingTransition method is used.
After Android 2.0, you can use overridepending transition (int enterAnim, int exitAnim) to complete the jump animation of Activity. The first parameter exitAnim corresponds to the IN in the transition of the above picture, and the second parameter enterAnim corresponds to the OUT IN the above picture.
If you want to write a pan and transparency jump animation, it usually looks like this:
Step 1: animate entry and exit
Create a new animation resource file in the anim directory under the resource file, and the Activity enters the animation anim_in file:
<?xml version="1.0" encoding="utf-8"?>
<set xmlns:android="http://schemas.android.com/apk/res/android"
    android:duration="500">

    <translate
        android:fromXDelta="100%p"
        android:toXDelta="0"
        />

    <alpha
        android:fromAlpha="0.0"
        android:toAlpha="1.0"
        />
</set>
Activity exit animation anim_out file:
<?xml version="1.0" encoding="utf-8"?>
<set xmlns:android="http://schemas.android.com/apk/res/android"
    android:duration="500">

    <translate
        android:fromXDelta="0"
        android:toXDelta="-100%p"
        />

    <alpha
        android:fromAlpha="1.0"
        android:toAlpha="0.0"
        />
</set>
Step 2: reference animation files
When the interface jumps, call the overridePendingTransition method:
companion object {
    fun start(context: Context){
        val intent = Intent(context, SecondActivity::class.java)
        context.startActivity(intent)
        if(context is Activity){
            context.overridePendingTransition(R.anim.anim_in, R.anim.anim_out)
        }
    }
}
effect:
The problem of writing override pending transition
Like View animation, although it is cool to use, it only supports four animation types: translation, rotation, scaling and transparency. If you encounter slightly complex animation, you can only give up.
2, Android 5.0 Material transition animation
After Android 5.0, we can use the transition animation brought by Material Design.
Without saying anything else, let's look at a few cases:
Official Demo
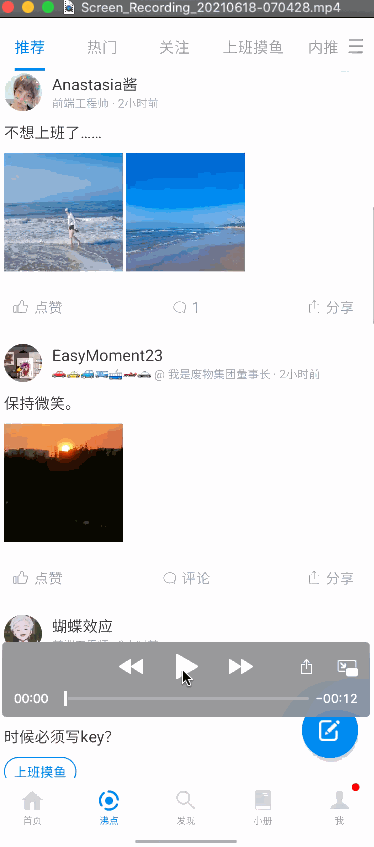
Nuggets APP
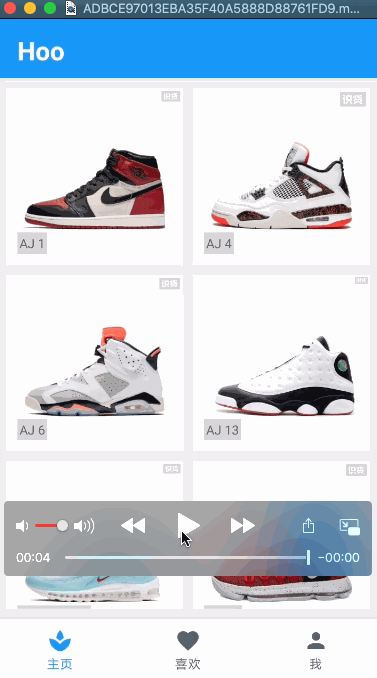
My APP
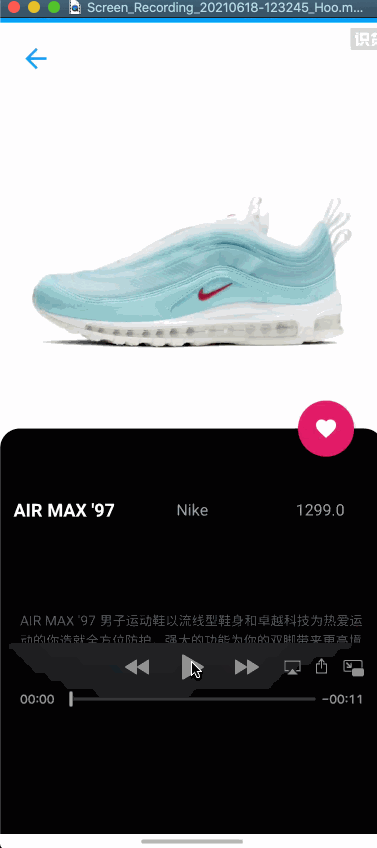
From top to bottom are the official Demo, Nuggets App and my open source project Hoo. The differences from the initial transition are as follows:
- If overridepending transition corresponds to View animation, then Material transition corresponds to attribute animation, so you can customize the interface transition animation.
- In addition to entering and exiting the scene, the Material transition adds a new scene, shared elements, which are used in the animation transition of the above three figures.
- It can be used not only in Activity, but also between Fragment and View.
ImageView is used as the shared element in the three pictures (more complex PhotoView is used in Hoo). The animation of the shared element looks very interesting. It looks like the picture jumps from interface A to interface B.
Why can I judge that the Nuggets also use Material transition? Because the Alpha of StartView will be set to 0 by default at the beginning of the Material shared element animation. Look carefully at the moment when the Nuggets big picture is opened, the following picture has disappeared ~, and there are some small defects in the transition at the beginning.
1. Enter and exit animation
The entry and exit animation does not include the animation of shared elements, and only three animation types are supported:
| animation | explain |
|---|---|
| Explosion | Move the view into or out of the center of the scene |
| Slide (sliding) | Move the view in or out of one of the edges of the scene |
| Fade (fade in and fade out) | Add or remove views from the scene by changing the opacity of the view |
Careful students may find that Material Design does not support two types of animation: Scale and Rotation. Maybe there are too few scenes for these two types of transition animation. If you really want to use them, you can customize them.
Step 1: create a Material Bundle
    startActivity(intent,
                  ActivityOptions.makeSceneTransitionAnimation(this).toBundle())
Step 2: animate
override fun onCreate(savedInstanceState: Bundle?) {
    // Turn on Material animation
    window.requestFeature(Window.FEATURE_ACTIVITY_TRANSITIONS)
    super.onCreate(savedInstanceState)
    //setContentView(R.layout.detail_activity)
    // Animate incoming
    window.enterTransition = Slide()
    // Set exit animation
    window.exitTransition = Slide()
}
In addition to this method, you can also set the entry and exit animation by setting the theme, which is also applicable to shared animation.
2. Shared element animation
The steps to enable shared element animation are slightly different from the previous steps.
Step 1: set Activity A
Set the transitionName for the View first:
ivShoe.transitionName = transitionName
Next, it needs to provide a shared View and TransitionName.
In fact, I want you to tell the system what kind of View needs animation. What if there are multiple views? Therefore, you have to bind a TransitionName to the View to prevent the animation from being mixed up.
code:
val options = ActivityOptions.makeSceneTransitionAnimation(this, binding.ivShoe, transitionName)
ImageGalleryActivity.start(this, it, options.toBundle(), transitionName)
If there are multiple shared elements, you can save the relationship into Pair, and then put Pair in. If you don't understand, you can take a look at Api.
Step 2: animate shared elements for Activity B
The animation of shared elements supported by default is also limited. The supported types are:
| animation | explain |
|---|---|
| changeBounds | Adds animation to changes in the layout boundaries of the target view |
| changeClipBounds | Adds animation to changes in the clipping boundary of the target view |
| changeTransform | Animate changes in the zoom and rotation of the target view |
| changeImageTransform | Add animation effects to changes in the size and zoom of the target picture |
Set sharedElementEnterTransition and sharedElementExitTransition through Window:
override fun onCreate(savedInstanceState: Bundle?) {
    // Turn on Material animation
    window.requestFeature(Window.FEATURE_ACTIVITY_TRANSITIONS)
    val transitionSet = TransitionSet()
    transitionSet.addTransition(ChangeBounds())
    transitionSet.addTransition(ChangeClipBounds())
    transitionSet.addTransition(ChangeImageTransform())
    window.sharedElementEnterTransition = transitionSet
    window.sharedElementExitTransition = transitionSet
    super.onCreate(savedInstanceState)
    // The transitionName here is passed in through Intent
    val transitionName = intent.getStringExtra(CUS_TRANSITION_NAME)
    // Set transitionName for ImageView
    binding.ivShoe.transitionName = transitionName
}
Most scenes can be used after writing in this way. However, if you load online pictures through Glide or other picture libraries, Congratulations, you may encounter such problems:

Why did this happen? Because it takes time to load network pictures, we can wait until the pictures on page B are loaded, and then start the animation. The Material installation factory supports this operation.
The method of calling postponeEnterTransition() in onCreate shows that our animation needs to delay execution. When we need the opportunity, we call the startPostponedEnterTransition() method in Activity to start the animation, so even in the A interface, we can jump to the Fragment in the B interface, and the animation can also be executed.
Here, the interface can jump normally, and the picture will not be put.
The principle of shared element animation is also very simple. If A jumps to B, the states of shared elements of A and B will be recorded respectively, and then jump to B. the attribute animation will be executed according to the previously recorded states. Although they are called shared elements, they are different views.
Not only can Activity support Material transition animation, but also Fragment and View (I always thought it was not possible ~) and interested students can study it by themselves.
3, Android Material Motion animation
What is the new Motion animation?
1. Introduction to Android motion
In fact, it is the newly supported four animation types, namely:
1.1 Container transform
Container transform is also based on shared element animation. The biggest difference from the previous shared element animation is that its Start View can be a ViewGroup or a View. As can be seen in Figure 1, its Start View is a CardView.
1.2 Shared axis
[external chain picture transfer failed. The source station may have anti-theft chain mechanism. It is recommended to save the picture and upload it directly (img-yme0w7km-1624345484780)( https://upload-images.jianshu.io/upload_images/25211949-732ee3c87e85306e.image?imageMogr2/auto -orient/strip)]
The Shared axis looks like a translation animation. The three official examples are horizontal translation, vertical translation and Z-axis translation.
1.3 Fade Through
Fade Through is essentially a transparency + zoom animation. The official suggestion is to use it in the jump of two interfaces with weak correlation.
1.4 Fade
At first glance, Fade animation is consistent with the above Fade Through. In terms of the essence of animation, they are indeed the same transparency + zoom animation, but the official suggests that this animation can be considered if it occurs in the same interface, such as pop-up Dialog, Menu and other pop-up boxes.
Google provides two kinds of libraries for you to use.
One is the Android x package, which is characterized by:
- Compatible with API 14
- Only transition between Fragment and View is supported
- Behavioral consistency
The other is the Platform package, which is characterized by:
- Compatible with API 21
- Support Fragment, View, Activity and Window
- There may be some differences on different API s
The minimum version of current apps should be 21 and support Activity, so it is recommended to choose Platform.
2. Initial experience of material motion
Let's take Container transform as an example to experience the first Android Motion animation between two activities:
Step 1: introduce dependency
implementation 'com.google.android.material:material:1.4.0-alpha01'
Step 2: set Activity A
Activity A here corresponds to MainActivity. Enable transition animation in MainActivity:
class MainActivity : AppCompatActivity() {

    //...
    override fun onCreate(savedInstanceState: Bundle?) {
        window.requestFeature(Window.FEATURE_ACTIVITY_TRANSITIONS)
        setExitSharedElementCallback(MaterialContainerTransformSharedElementCallback())
        window.sharedElementsUseOverlay = false
        super.onCreate(savedInstanceState)
        //...
    }
}
Step 3: set jump events
Like the steps of creating shared elements, set the TransitionName first:
private fun onCreateListener(id: Long, url: String): View.OnClickListener {
    return View.OnClickListener {
        val transitionName = "${id}-${url}"
        it.transitionName = transitionName
        DetailActivity.start(context, id, it as ConstraintLayout, transitionName)
    }
}
Here we steal the laziness, put the setting of TransitionName in the click event, and then create the Bundle:
const val CUS_TRANSITION_NAME: String = "transition_name"
class DetailActivity : AppCompatActivity() {
    companion object {
        fun start(context: Context, id: Long, viewGroup: ConstraintLayout, transitionName: String){
            val intent = Intent(context, DetailActivity::class.java)
            intent.putExtra(BaseConstant.DETAIL_SHOE_ID, id)
            intent.putExtra(CUS_TRANSITION_NAME, transitionName)
            if(context is Activity){
                context.startActivity(intent, ActivityOptions.makeSceneTransitionAnimation(context, viewGroup, transitionName).toBundle())
            }else {
                context.startActivity(intent)
            }
        }
    }
}
Step 4: set Activity B
Activity B in the Demo corresponds to DetailActivity. This step mainly sets the MaterialContainerTransform for the shared animation of entry and exit. The specific code is:
override fun onCreate(savedInstanceState: Bundle?) {
    // 1\.  Animate
    window.requestFeature(Window.FEATURE_ACTIVITY_TRANSITIONS)
    setEnterSharedElementCallback(MaterialContainerTransformSharedElementCallback())

    super.onCreate(savedInstanceState)
    //...

    // 2\.  Set transitionName
    binding.mainContent.transitionName = intent.getStringExtra(CUS_TRANSITION_NAME)
    // 3\.  Set specific animation
    window.sharedElementEnterTransition = MaterialContainerTransform().apply {
        addTarget(binding.mainContent)
        duration = 300L
    }
    window.sharedElementExitTransition = MaterialContainerTransform().apply {
        addTarget(binding.mainContent)
        duration = 300L
    }
}
DataBinding is used in the Demo, but you only need to know about binding Maincontent is a ViewGroup. Here, you can successfully see the effect in the Demo.
Material Motion is actually the same as the Transition animation added in Android 5.0. They also inherit from Transition, but it brings great convenience to our use.
4, Summary
In the process of Android transition:
- The initial View transition brings us the support of four basic abilities: translation, zoom, rotation and transparency;
- Then, Android 5.0 Material transition brings us a surprise of sharing element animation, and has the ability to customize transition animation, upgrading the playing method of Android transition;
- Finally, Android Motion, which came out soon, reduces the difficulty of our transition by encapsulating four kinds of animation.
The source code of this article and more Android advanced UI learning notes can click here obtain!