1, TF Serving
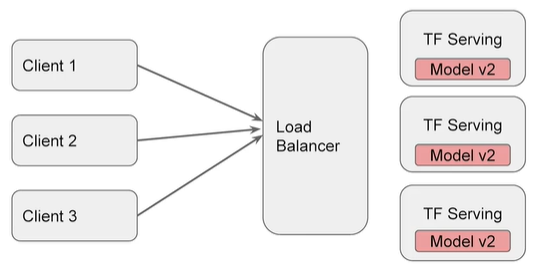
Tensorflow Serving is a part of TFX (Tensorflow Extended). It is an API dedicated to machine learning services in the production environment. Using TF Serving, different versions of models can be accessed through HTTP on the cloud platform.
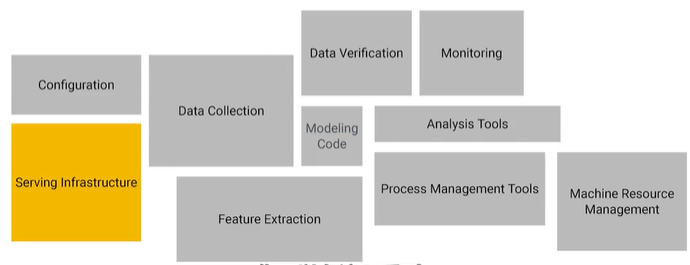
The following figure shows the process that needs to be experienced in the actual project production process. Here we mainly introduce the service architecture.
Before that, we introduced the methods such as TFJS and TensorFlow Lite to deploy models on mobile phones and web pages. However, deploying models on the server side will have a better experience. For example, the model versions supported by different clients may be different and the latest experience cannot be obtained; New hardware can be added according to requirements; The service process can be dynamically allocated.
1. Installation
There are four ways to install TF Serving:
- Docker
- APT
- Source code installation
- pip
2. Construction services
(1) Build model
Let's build the simplest linear model
import os
import json
import tempfile
import requests
import numpy as np

import tensorflow as tf

print("\u2022 Using TensorFlow Version:", tf.__version__)

xs = np.array([-1.0,  0.0, 1.0, 2.0, 3.0, 4.0], dtype=float)
ys = np.array([-3.0, -1.0, 1.0, 3.0, 5.0, 7.0], dtype=float)

model = tf.keras.Sequential([tf.keras.layers.Dense(units=1, input_shape=[1])])

model.compile(optimizer='sgd',
              loss='mean_squared_error')

history = model.fit(xs, ys, epochs=500, verbose=0)

print("Finished training the model")
(2) Save model
In order to load the model into TF Serving, we first need to save the model in SavedModel format, which will generate a protobuf file, which will be placed in the folder containing the version number
MODEL_DIR = tempfile.gettempdir()

version = 1

export_path = os.path.join(MODEL_DIR, str(version))

if os.path.isdir(export_path):
    print('\nAlready saved a model, cleaning up\n')
    !rm -r {export_path}

model.save(export_path, save_format="tf")

print('\nexport_path = {}'.format(export_path))
!ls -l {export_path}
Check the saved model using the command line tool
!saved_model_cli show --dir {export_path} --all
(3) Running TF Model Server
Run TF Model Server with bash script. There are three parameters in total, namely:
- rest_api_port: the port number of the request
- model_name: the URL contained in the request
- model_base_path: model path
In addition, since the variable pointing to the saved file is python, you need to use OS Environ to specify environment variables.
os.environ["MODEL_DIR"] = MODEL_DIR

%%bash --bg
nohup tensorflow_model_server \
  --rest_api_port=8501 \
  --model_name=helloworld \
  --model_base_path="${MODEL_DIR}" >server.log 2>&1
view log
!tail server.log
3. Use of services
(1) Pass data to server
Using JSON implementation, you need to create a dictionary containing the default signature and instance as a JSON file, signature_name comes from! saved_model_cli show --dir {export_path} --all
xs = np.array([[9.0], [10.0]])
data = json.dumps({"signature_name": "serving_default", "instances": xs.tolist()})
print(data)
(2) Get results from server
When sending a request, we need to specify headers, data, and URL s.
headers = {"content-type": "application/json"}
json_response = requests.post('http://localhost:8501/v1/models/helloworld:predict', data=data, headers=headers)

print(json_response.text)

predictions = json.loads(json_response.text)['predictions']
print(predictions)
2, Tensorflow Hub
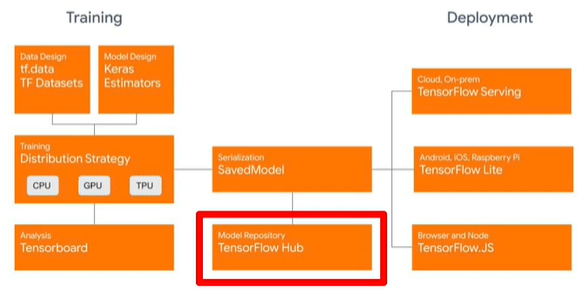
The overall architecture of Tensorflow is shown in the figure below:
Tensorflow Hub mainly contains algorithms in three fields:
- Text: Embedding
- Image classification, target detection, etc
- Videos: Classification
1. Installation
!pip install tensorflow_hub
import tensorflow_hun as hub
2. Simple use
-
Direct loading model
MODULE_HANDLE = 'https://tfhub.dev/google/tf2-preview/mobilenet_v2/classification/4'
module = hub.load(MODULE_HANDLE)
-
Interact with keras
model = tf.keras.Sequential([ hub.KerasLayer(MODULE_HANDLE, input_shape=IMAGE_SIZE + (3,)), tf.keras.layers.Activation('softmax') ]) -
As a feature extractor: note the module here_ Handle has changed
MODULE_HANDLE ="https://tfhub.dev/google/tf2-preview/mobilenet_v2/feature_vector/4"

# Number of classes in the new dataset
NUM_CLASSES = 20

model = tf.keras.Sequential([
        hub.KerasLayer(MODULE_HANDLE,
                       input_shape=IMAGE_SIZE + (3,)),
        tf.keras.layers.Dense(NUM_CLASSES, activation='softmax')
])
3, Tensorboard
Various parameters and indicators of the model can be visualized using Tensorboard_dev can deploy model data to the network. We need to set the callback function to use Tensorboard.
logdir = "logs/image/" + datetime.now().strftime("%Y%m%d-%H%M%S")
# Define the basic TensorBoard callback.
tensorboard_callback = keras.callbacks.TensorBoard(log_dir=logdir. histogram_freq=1)
model.fit(...,callbacks=tensorboard_callback)
!tensorboard --logdir logs/fit
Tensorboard_dev uses the following commands. After running, you need to log in to obtain the verification code, and then you can publish it to the network.
!tensorboard dev upload --logdir ./logs
Viewing drawings in data
img = np.reshape(train_images[0], (-1, 28, 28, 1))

# Sets up a timestamped log directory.
logdir = "logs/train_data/" + datetime.now().strftime("%Y%m%d-%H%M%S")
# Creates a file writer for the log directory.
file_writer = tf.summary.create_file_writer(logdir)

# Using the file writer, log the reshaped image.
with file_writer.as_default():
	tf.summary.image("Training data", img, step=0)
View multiple drawings
with file_writer.as_default():
  # Don't forget to reshape.
  images = np.reshape(train_images[0:25], (-1, 28, 28, 1))
  tf.summary.image("25 training data examples", images, max_outputs=25, step=0)
4, federated learning
In order to consider the privacy of data, we will use federated learning.
1. General
The following figure shows a simple example. First, we select a subset of available (devices are not used) from a large number of users, then send a training model to these devices for retraining, and then return the training results to the server. The server uses these results to train the main model.
After training, the same idea can be used to test on available equipment to verify the results.

There are two ways to protect privacy:
- Aggregation: the data of different devices are aggregated and sent to the server through a certain protocol to avoid data leakage of specific devices.
- Encryption: the data of each specific device will be added with masks (represented by triangles of different colors). During data aggregation, masks of the same type will be offset against each other according to a certain protocol, so that the data of a specific device will not be disclosed during aggregation.

2.API introduction
Tensorflow Federated API includes two types:
- Federated Learning API
- Achieve federal training / testing
- It can be applied to existing models / data
- Federated Core API: allows the use of new federated learning algorithms
Average
@tff.federated_computation(tff.FederatedType(tf.float32, tff.CLIENTS))
def get_average_temperature(sensor_readings):
  return tff.federated_mean(sensor_readings)