Wechat search [Daqi test open] and pay attention to this guy who insists on sharing the dry goods of test development.
This chapter explains the summary to quickly understand the key points of the content. You can also refer to the context points first, realize them first, and then compare them. Such an impression will be more profound.
TPMServer
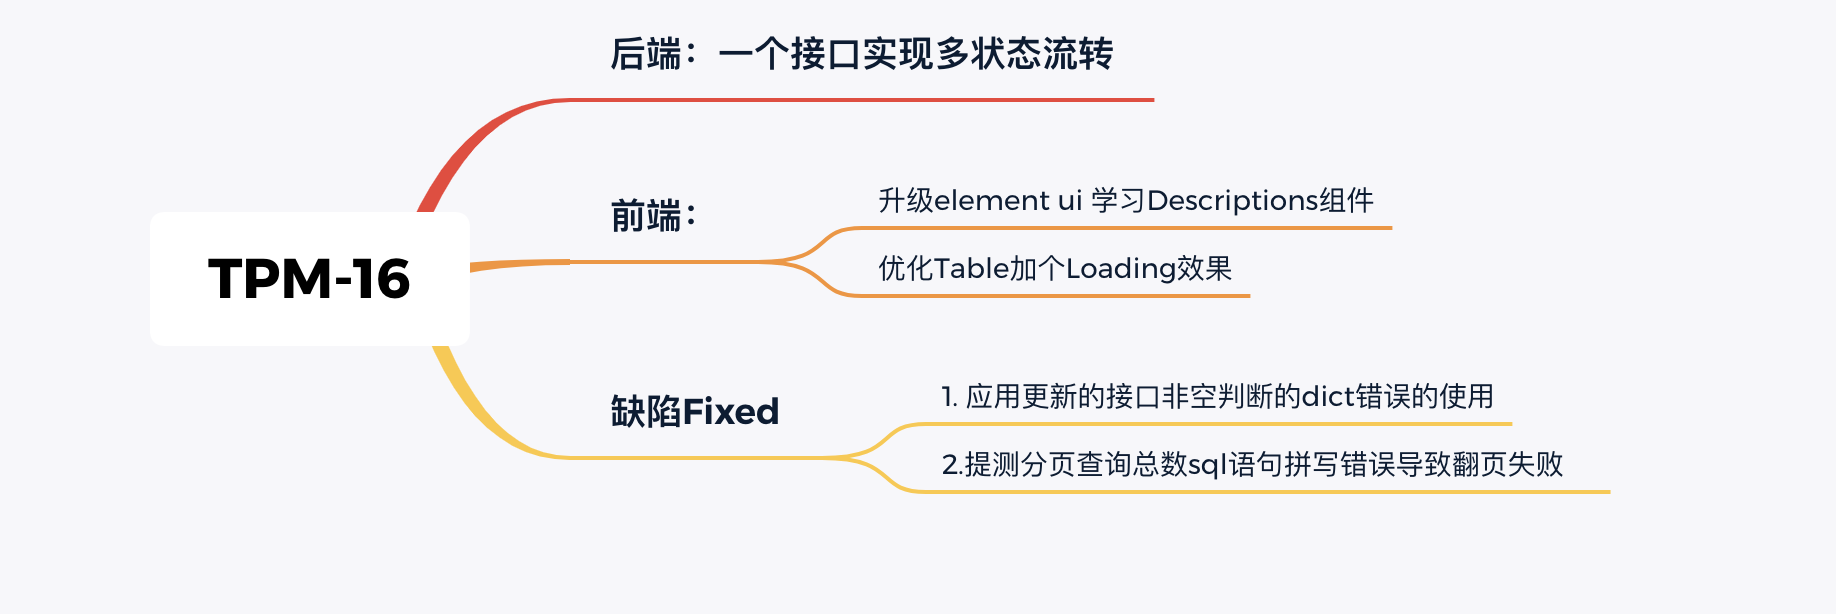
Status flow interface
There are two major functions in the function of power test. One is that after the test is successful, the corresponding test needs to click "start test" within the planned time to mark the status as the next stage, that is, status=2 in the database table (test in progress). The other is that when the test report is submitted, if the status is abandoned, its data can be deleted and not displayed (that is, the soft delete table field isDel=1). From the perspective of these two actions, they are the update operations of the same table. Therefore, one interface implementation can be combined to reduce the redundancy of the interface.
@test_manager.route("/api/test/change", methods=['POST'])
def changeStatus():
    # Initialize return object
    resp_success = format.resp_format_success
    resp_failed = format.resp_format_failed
    # Get request parameter Body
    reqbody = json.loads(request.get_data())
    if 'id' not in reqbody:
        resp_failed['message'] = 'Measurement ID Cannot be empty'
        return resp_failed
    elif 'status' not in reqbody:
        resp_failed['message'] = 'The changed status cannot be empty'
        return resp_failed
    # Relink database
    connection = pool.connection()
    with connection.cursor() as cursor:
        # Judge the operation of status flow. If status==start is to start the test, status==delete soft delete
        if reqbody['status'] == 'start':
            sql = "UPDATE `request` SET `status`=2 WHERE id=%s"
            resp_success['message'] = 'The status flow is successful and enters the test stage.'
        elif reqbody['status'] == 'delete':
            sql = "UPDATE `request` SET `isDel`=1 WHERE id=%s"
            resp_success['message'] = 'The test has been deleted!'
        else:
            resp_failed.message = 'Status flag error'
            return resp_failed
        cursor.execute(sql, reqbody['id'])
        connection.commit()
    return resp_success
The interface implementation is very simple. You can mark which field is updated through an additional field. The reference code is as follows.
Still don't forget to test the back-end interface:
Case1: the request does not give an id or status parameter to verify whether there is a parameter error prompt returned
Case2: status operation status=start verify whether to change the test status to 2
Case3: status operation status=delete verify whether to soft delete the data isDel=1
In fact, there is also a strict case that how to deal with the changed id does not exist. The sample code is not given. Let's see how to optimize it if it's you. Let's also take it as a small exercise.
TPMWeb
Realization of status flow function
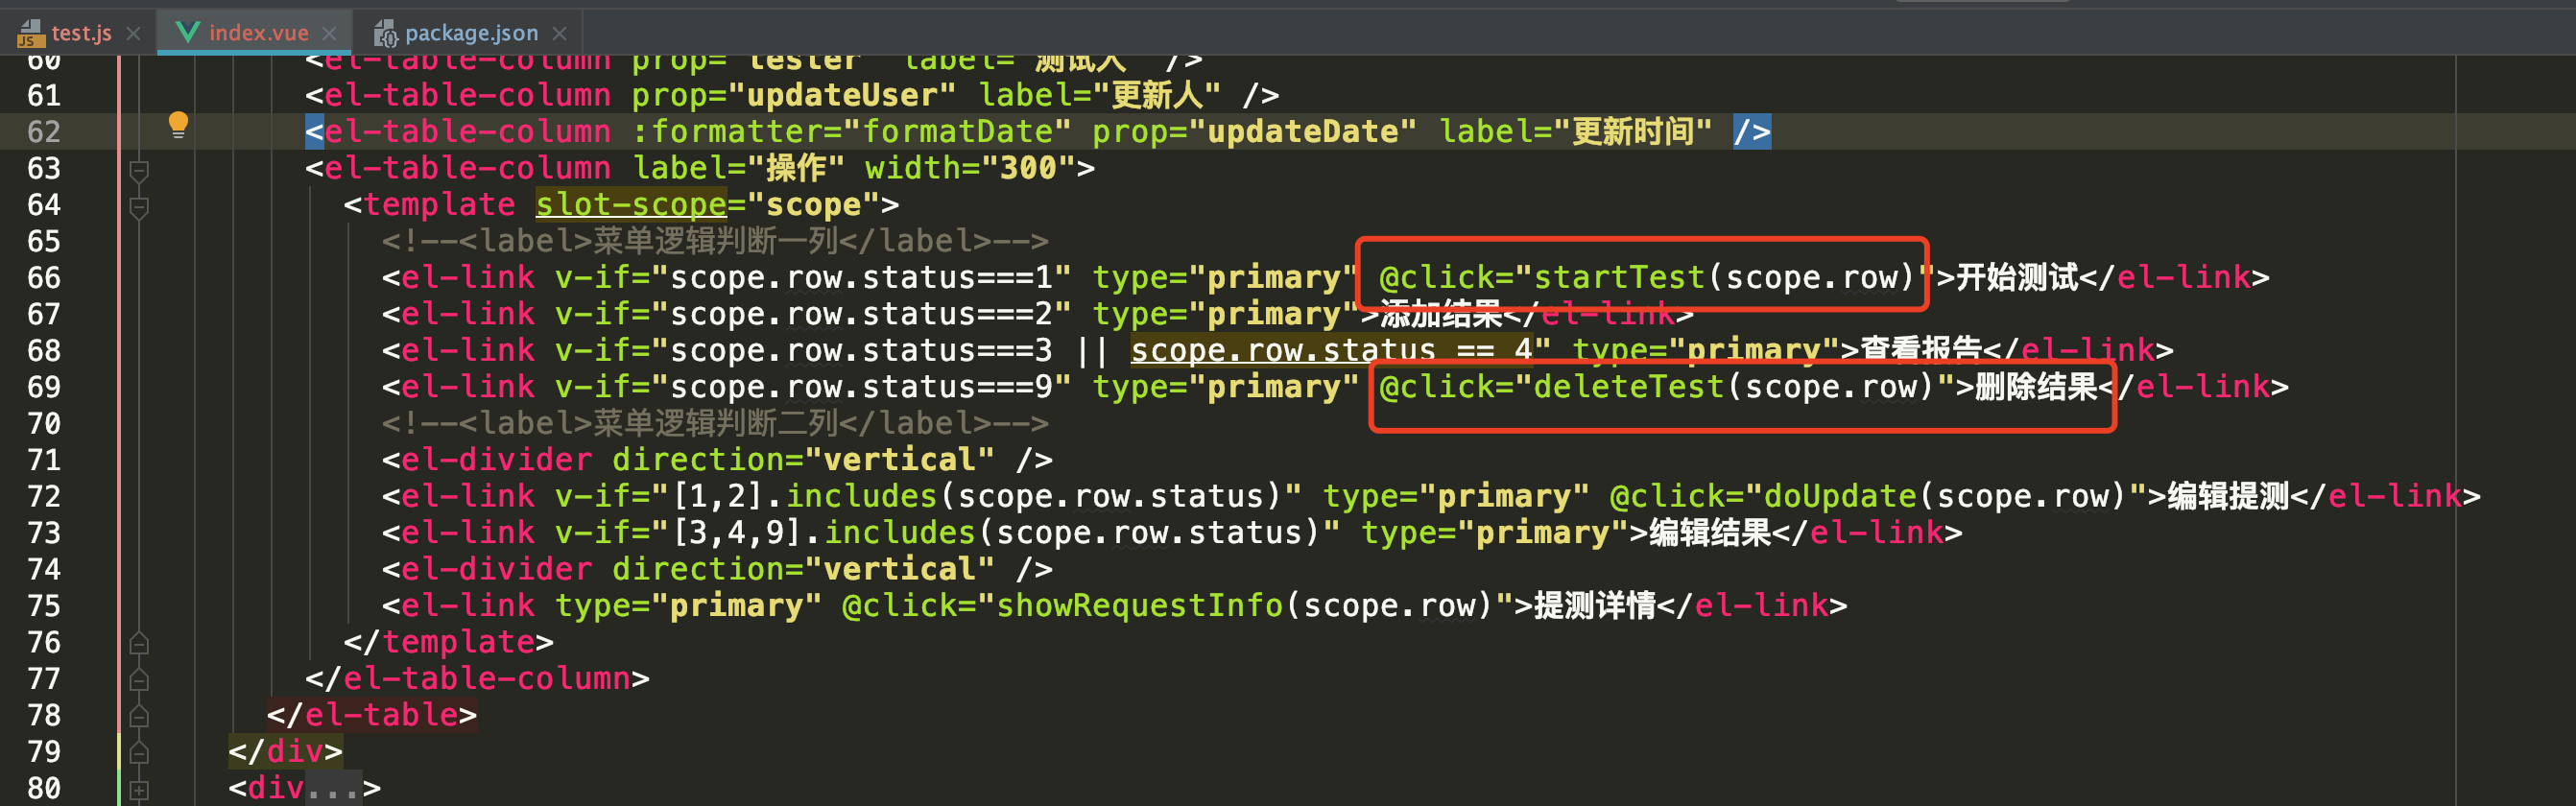
The front end adds @ click methods to "start test" and "delete test" in the previous operation bar respectively, and calls the back-end state change interface. The application of steps remains unchanged
1.test.js defines the interface request
export function changeStatus(body) {
  return request({
    url: '/api/test/change',
    method: 'post',
    data: body
  })
}
2. Add trigger method in < template > of / SRC / views / test / index.vue
3. The method logic processing is carried out in the method of vue on the same page. This time, a $message prompt is added for the return of the request, and the message prompt of the server is given when the correct result is returned. In addition, do not forget to make a query request in the code after the update is successful, and the list refreshes the latest data.
startTest(row) {
  const reqBody = {
    id: row.id,
    status: 'start'
  }
  changeStatus(reqBody).then(resp => {
    this.$message({
      message: resp.message,
      type: 'success'
    })
    this.searchClick()
  })
},
deleteTest(row) {
  const reqBody = {
    id: row.id,
    status: 'delete'
  }
  changeStatus(reqBody).then(resp => {
    this.$message({
      message: resp.message,
      type: 'success'
    })
    this.searchClick()
  })
},
In order to improve the user's perception, the delayed loading is added to the table. Refer to the mark position in the figure, that is, define whether to display the dynamic variable of loading animation, and then open the operation before search and close it when there are results.

Since the local query may be relatively fast, 300 ms is specially set as the delay. If you are still not obvious during the test, you can increase the time to 1000 ms. please note that there are two variables in the figure that declare requestInfoVisible and requestInfo to be used in the next implementation test details.
Display of test details
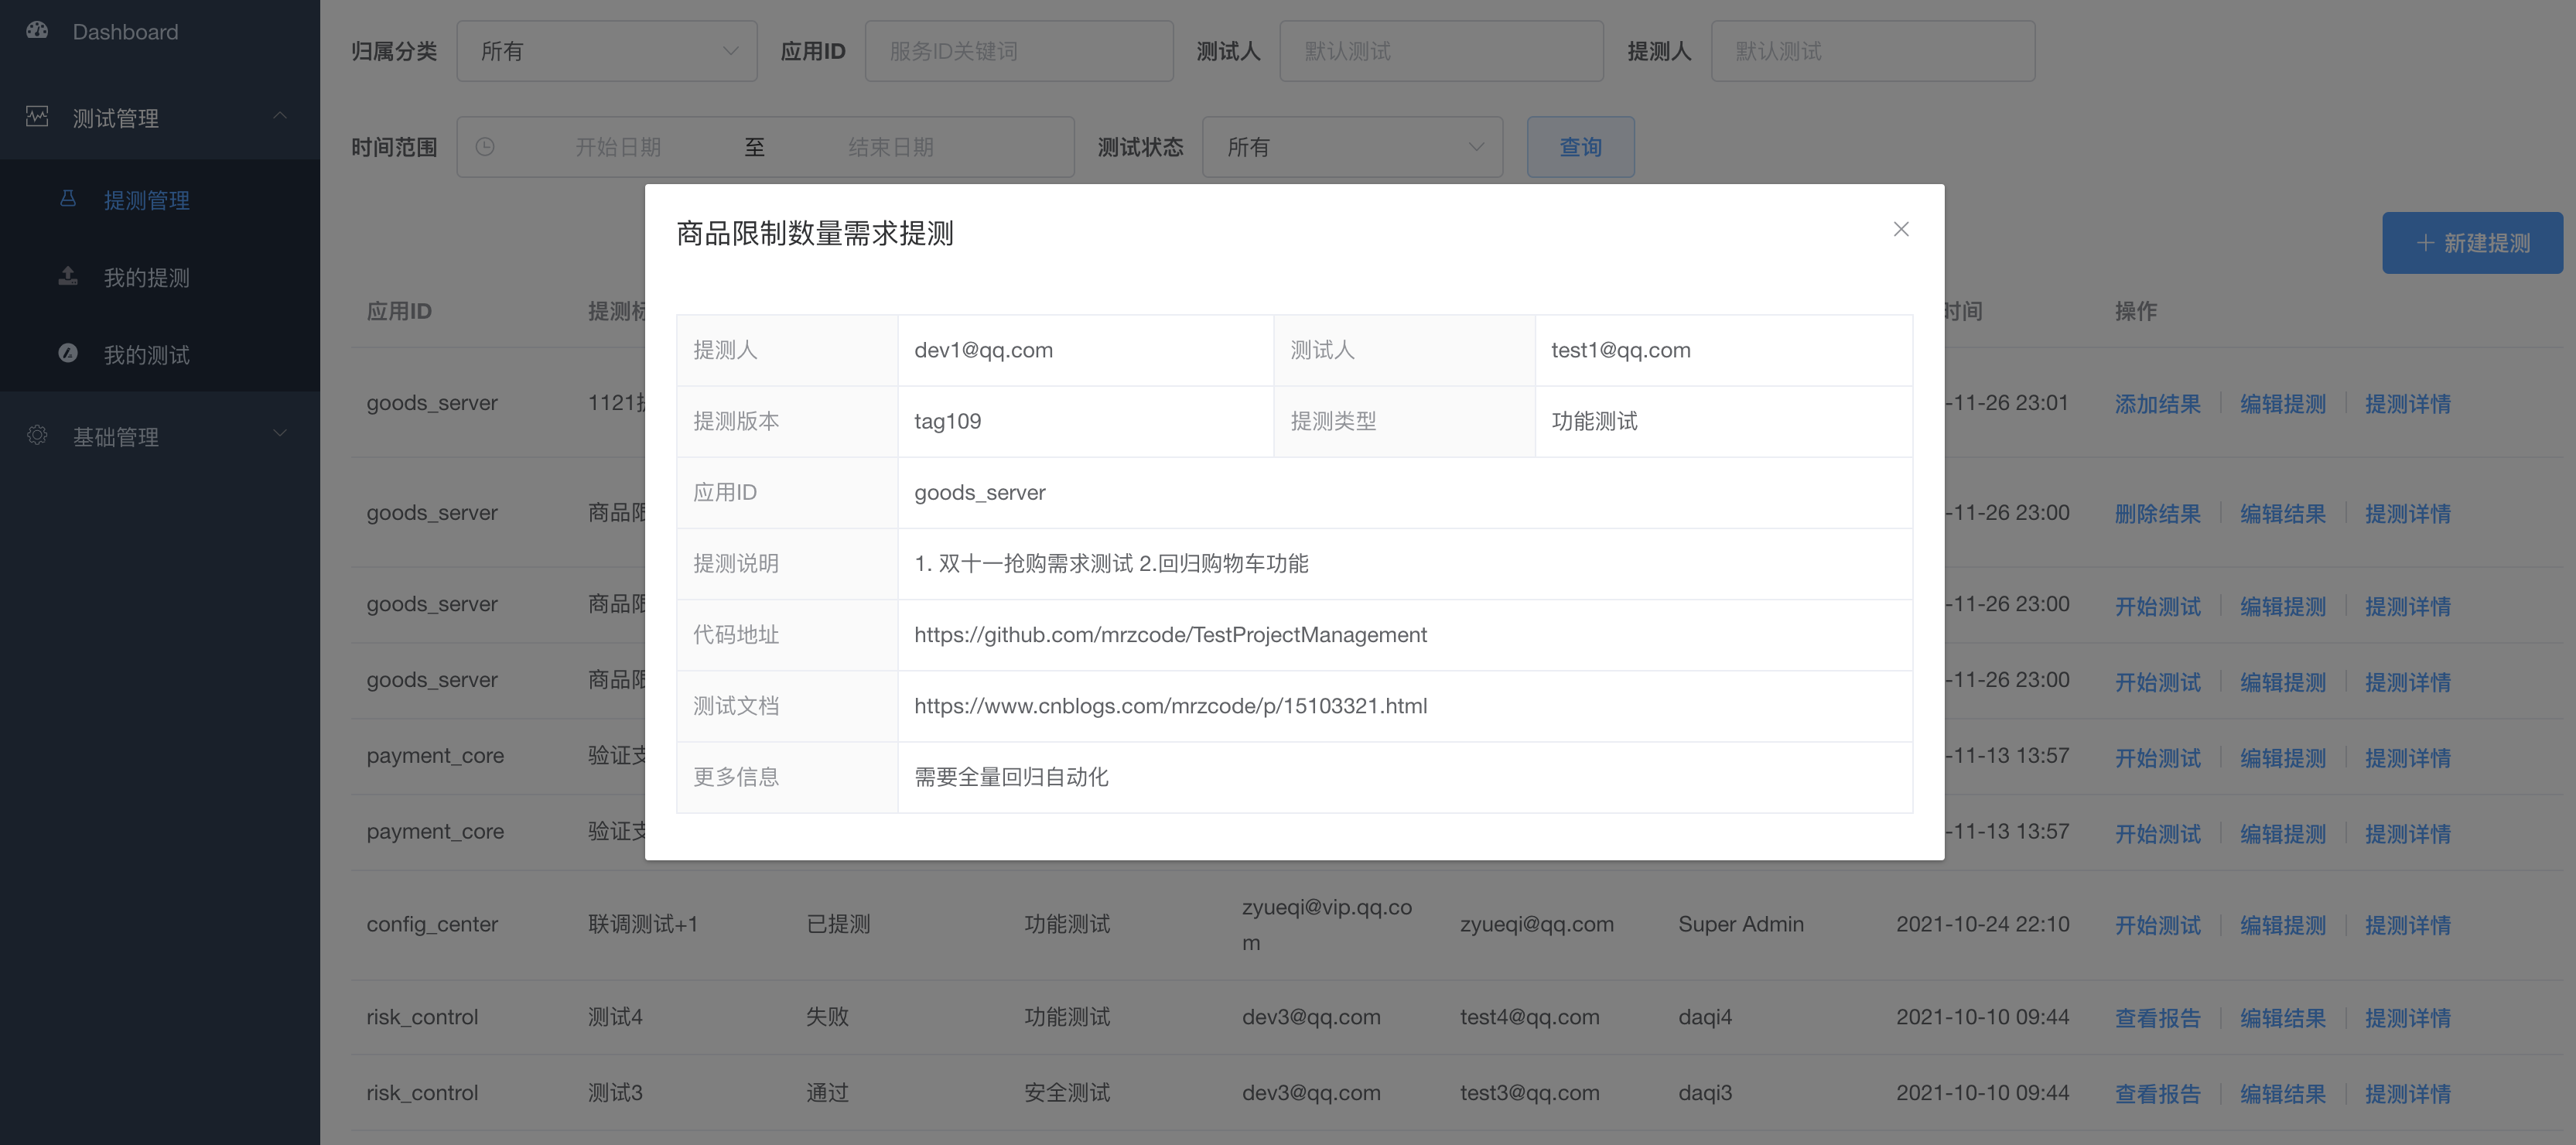
In actual use, there are a lot of test content. You need to have the function of viewing details on the platform. Here, you can display it by pop-up dialog box and embedded "description list". Refer to the official for the use method of components[ https://element.eleme.io/2.15/#/zh-CN/component/descriptions ], there is no need to paste here. Click the operation "test details" pop-up window to realize the Demo style. The relevant fragment codes are as follows:
1. template, core components dialog and descriptions
<el-link type="primary" @click="showRequestInfo(scope.row)">Test details</el-link>
<div>
  <el-dialog :title="requestInfo.title" :visible.sync="requestInfoVisible">
    <el-descriptions title="Measurement information">
    <el-descriptions-item label="user name">kooriookami</el-descriptions-item>
    <el-descriptions-item label="cell-phone number">18100000000</el-descriptions-item>
    <el-descriptions-item label="Place of residence">Suzhou</el-descriptions-item>
    <el-descriptions-item label="remarks">
    <el-tag size="small">school</el-tag>
    </el-descriptions-item>
    <el-descriptions-item label="Contact address">1188 Wuzhong Avenue, Wuzhong District, Suzhou City, Jiangsu Province</el-descriptions-item>
    </el-descriptions>
 </el-dialog>
</div>
2. js part, row data assignment, display the bottomless corner mark press dialog box
showRequestInfo(row) {
  this.requestInfo = row
  this.requestInfoVisible = true
},
Run to see the effect, but find that the normal style is not displayed as expected
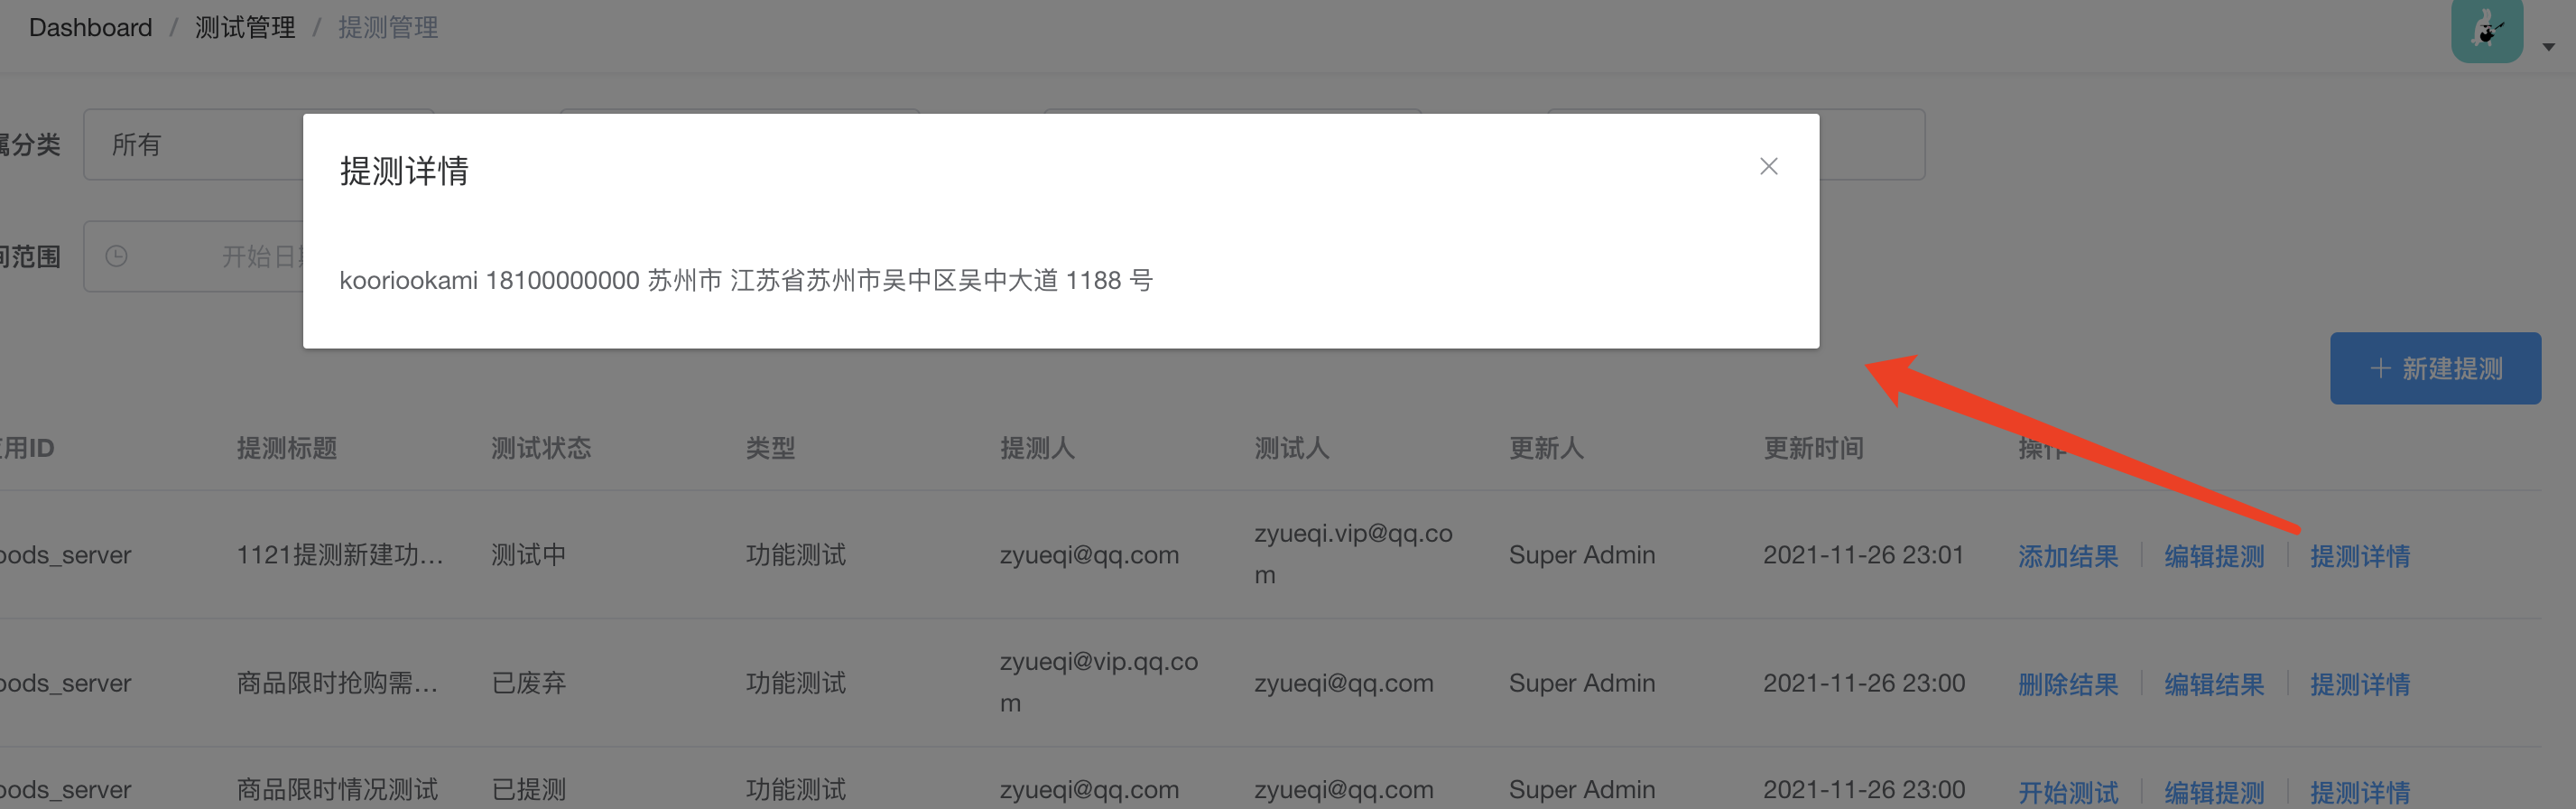
This is because the element UI referenced by the project is version 2.13.0. Without this component, you need to upgrade to "element UI": "2.15.17". Remember to npm install and install the latest dependent package after the version of package.json is changed.
Then modify the < El descriptions item > display content to the content of the project. The final effect is as follows.
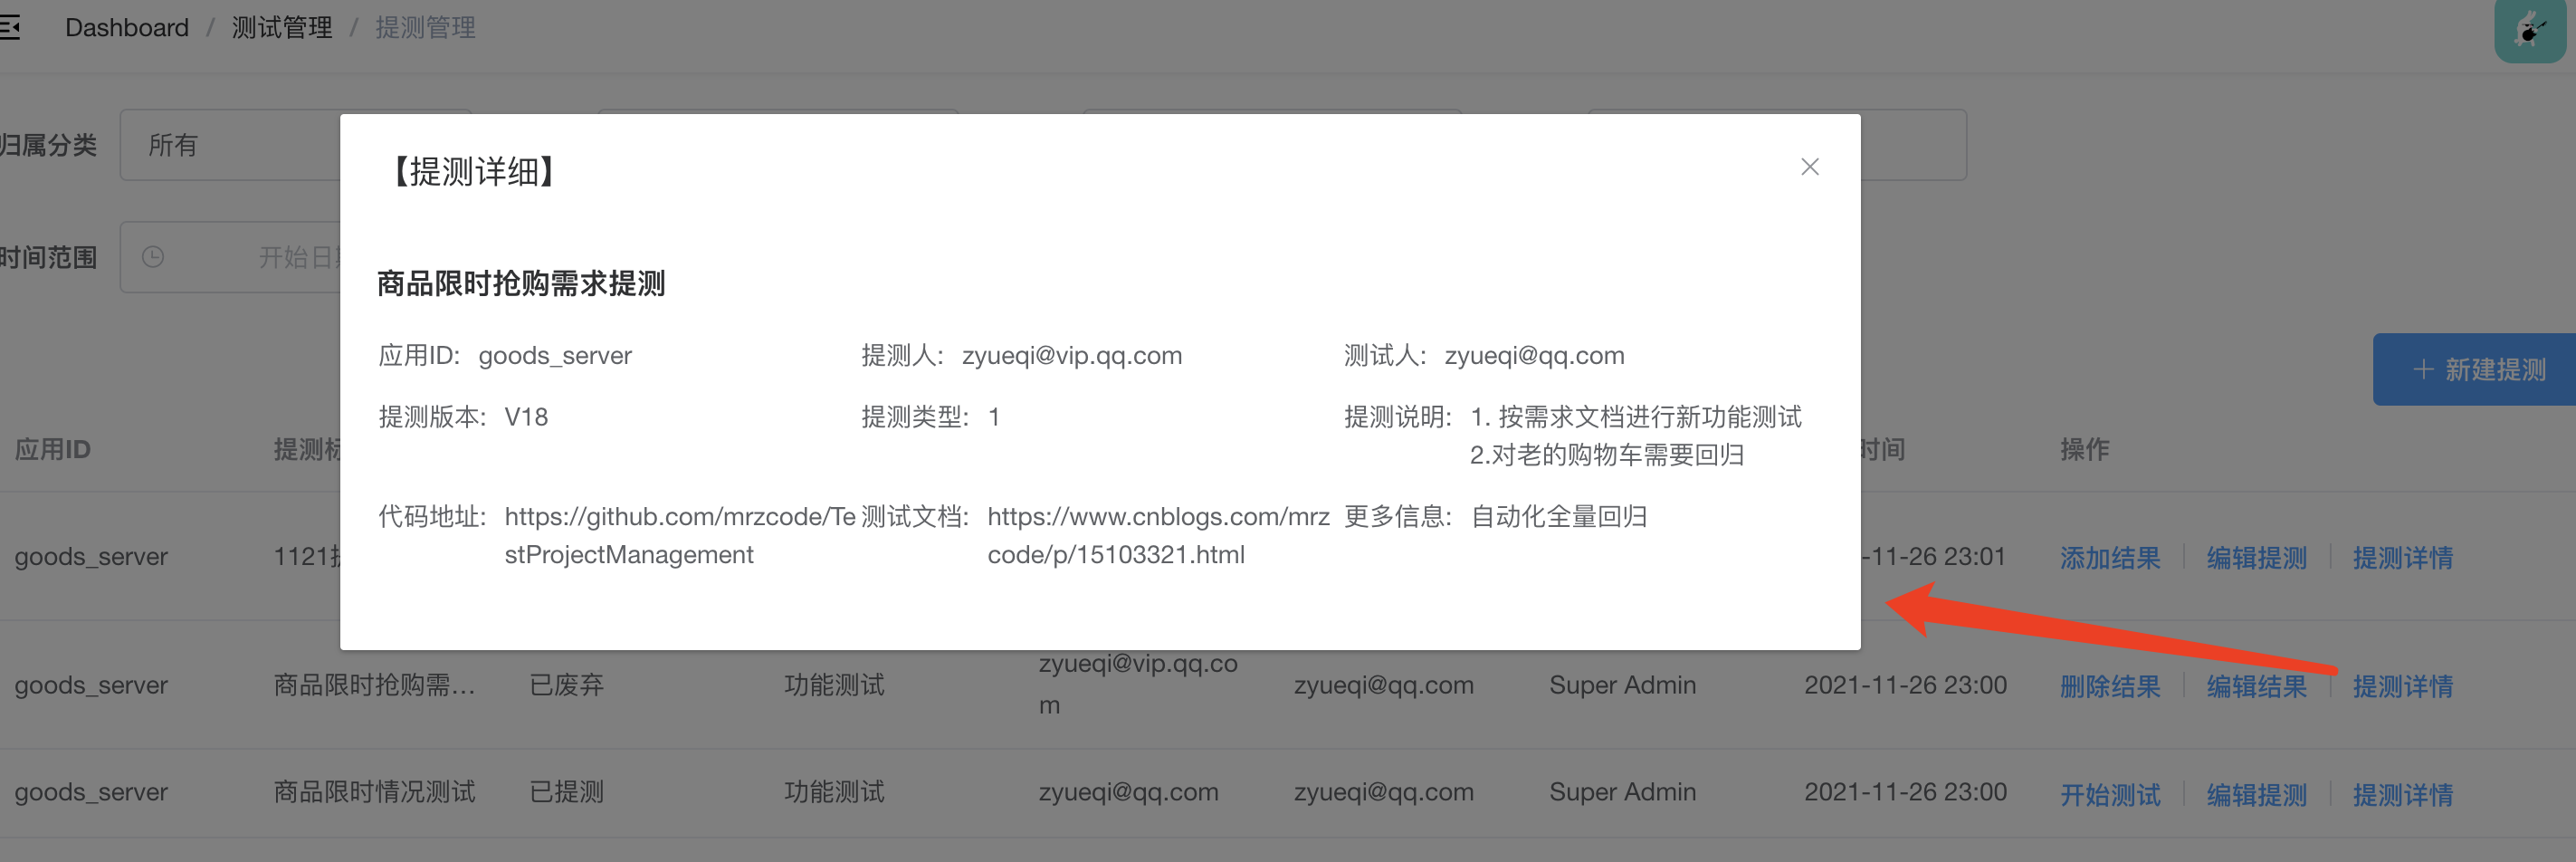
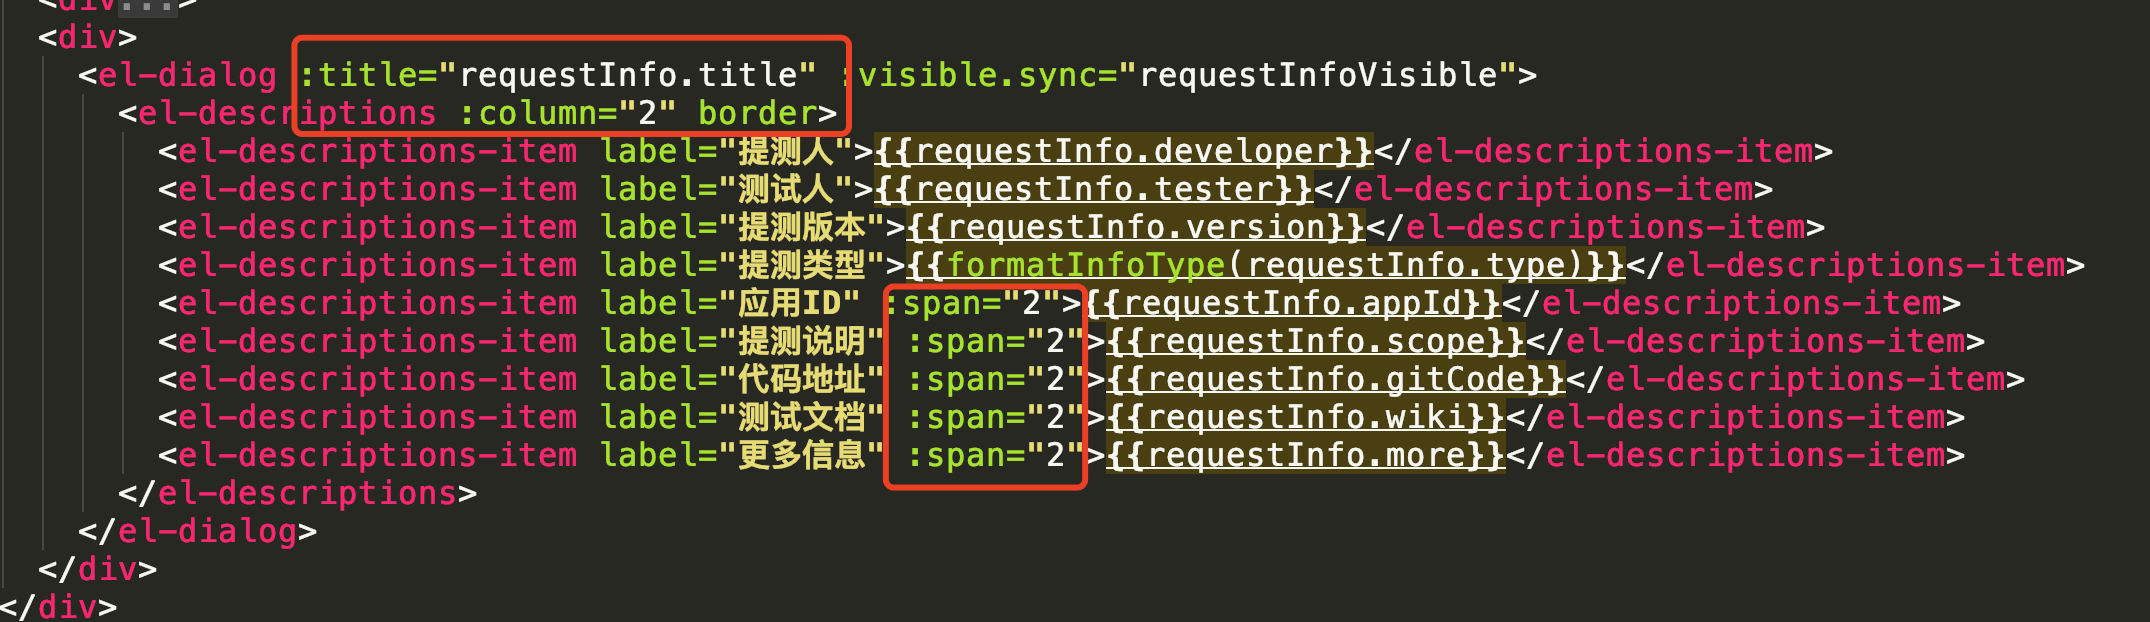
The style is a little strange. Note that some fields will be very long. Carry out the next processing and further optimize them by using the official custom column splitting and merged column attributes. The final effect is shown in the figure.
This part of the optimized complete code reference
So far, the two functions to be realized in this article have been completed.
Defect repair
In updating this content, we actually found two hidden problems. If we had been seriously practicing before, we should have been found long ago. I also Mark here
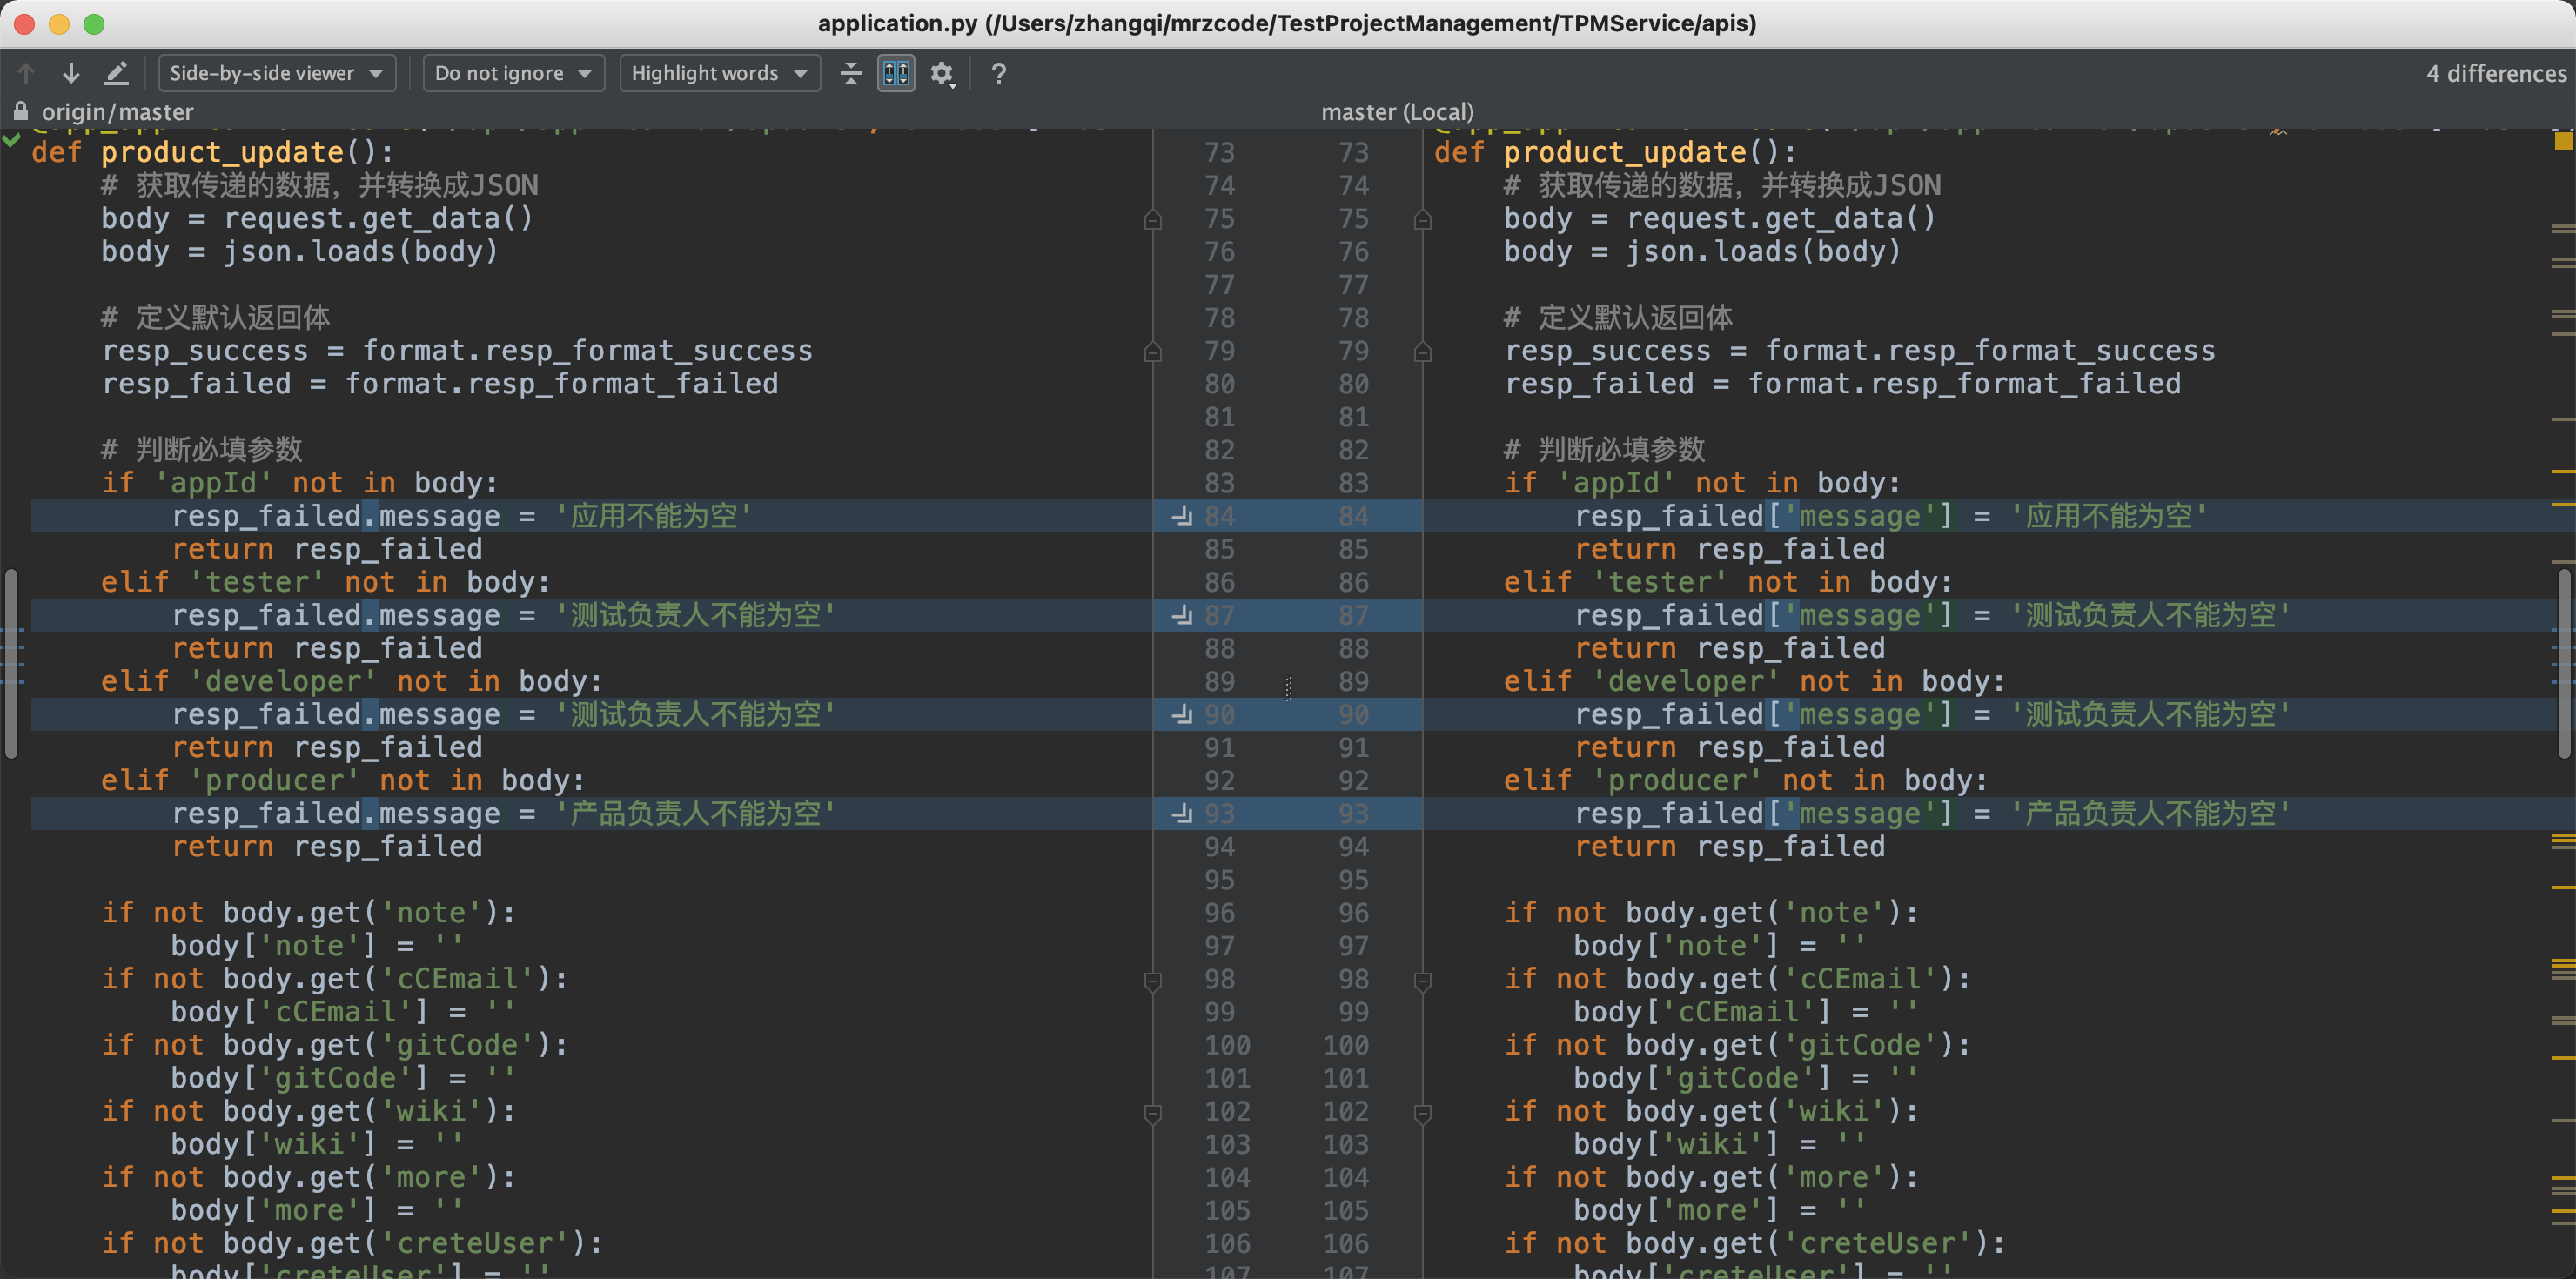
Question 1: error message body (Dictionary / Json) variable assignment reference error. The correct way should be the subscript.
Question 2: the page turning error of list query is because the statistical total should not have a limit condition, and statements need to be processed independently.
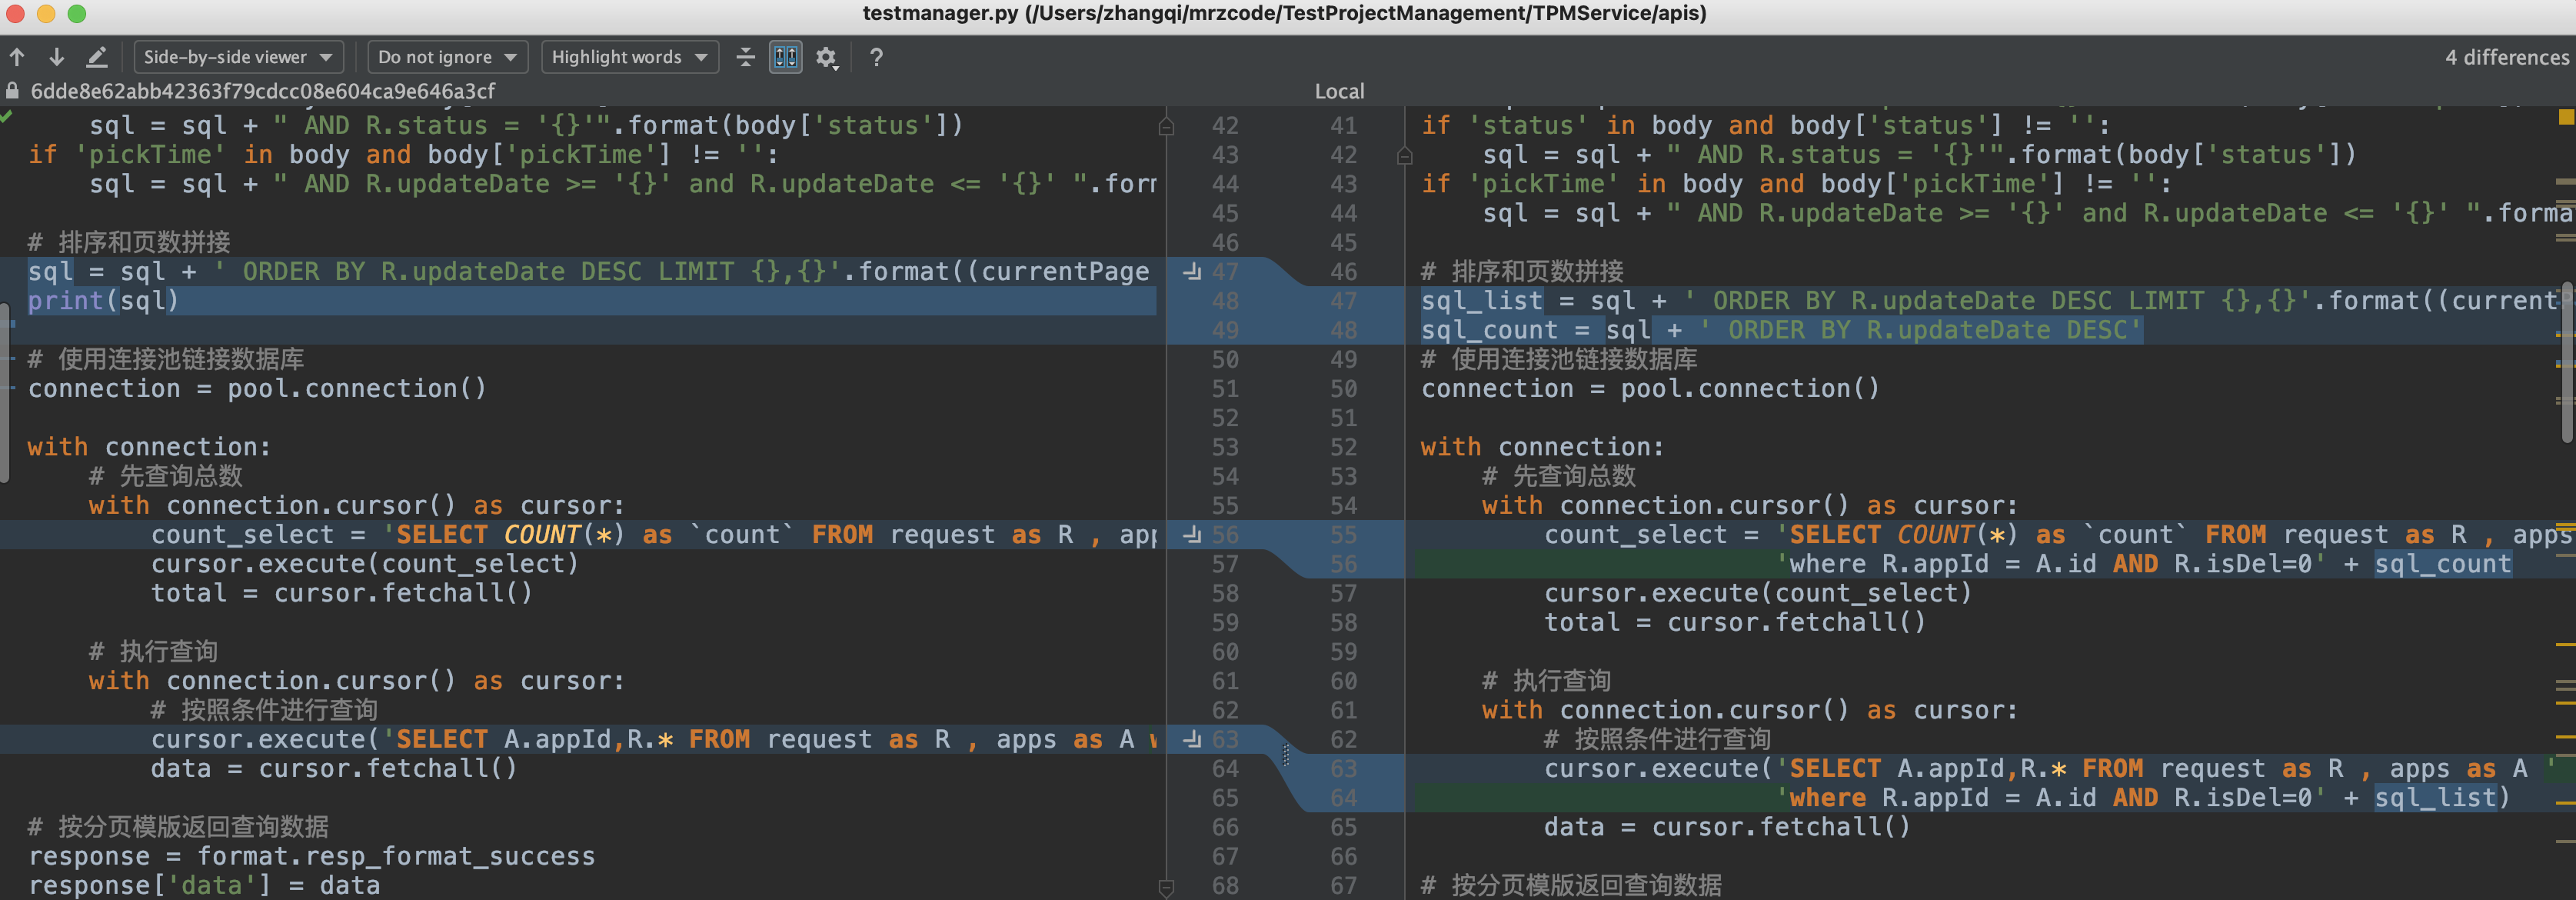
What code is optimized before and after the two defects can be fully explained by git tools.
Finally, official account official, if you have any questions and suggestions in this series, please welcome private letters or add personal WeChat, group and so on. WeChat can get two ways through official account message and menu. Sincerely hope that the original content of blog update can help and dry cargo value in the vast network.
[code update]
-
Address: https://github.com/mrzcode/TestProjectManagement
-
TAG: TPMShare16
Stick to originality, stick to practice and insist on dry cargo. If you find it useful, please click on recommendation, and also welcome my blog Garden and WeChat official account.