1. First effect
python [basketball teaching] code is being imitated
2. Operating environment
Python version: Python 3.0 7 (there should be no problem with Python 3.5 +). It is recommended to run with jupyter
2.1. Dependency Library:
- ①opencv-python(4.5.1.48)
- ②Pillow (7.0.0)
- ③moviepy(1.0.3)
2.2 installation method
pip install -i https://pypi.tuna.tsinghua.edu.cn/simple opencv-python Pillow moviepy
2.3. Import environment
import shutil
import cv2
import os
from PIL import Image # PIL is a Python image processing library
import PIL
import PIL.Image
import PIL.ImageFont
import PIL.ImageOps
import PIL.ImageDraw
import numpy as np
import glob
from PIL import ImageFile
ImageFile.LOAD_TRUNCATED_IMAGES = True
Image.MAX_IMAGE_PIXELS = None
from moviepy.editor import *
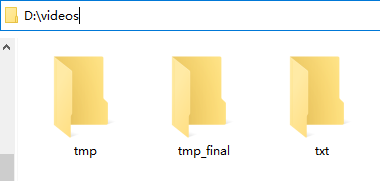
3. Directory structure diagram
- Disk D
- video directory
- tmp Directory - store pictures that are initially decomposed into frames
- Txt Directory - stores txt files converted from the tmp directory
- tmp_final Directory - store the pictures converted from txt directory and normalize them
- first.mp4 - this is the original video to be processed
- middle.mp4 - this is an intermediate video automatically generated after processing
- final.mp4 - splice the original video and the middle video at the left and right positions
- final_with_voice.mp4 - add the original sound to get the final video
- video directory
4. Details of processing steps

5. Code implementation
5.1. Create a temporary directory
Step 1: create a temporary directory in advance to store files.
- D:\videos\tmp \ (the directory where the pictures of the video decomposed according to the frame rate are stored at the beginning)
- D:\videos\txt \ (then convert each frame of picture into the directory where txt is stored)
- D:\videos\tmp_final (convert txt into the directory where the pictures are stored)
def create_path_before_start(path1,path2,path3):
    # Check whether the storage directory for each frame exists. If it does not exist, create it in advance
    if not os.path.exists(path1):
        os.makedirs(path1)

    # Check whether the storage directory of txt corresponding to each frame exists. If it does not exist, create it in advance
    if not os.path.exists(path2):
        os.makedirs(path2)

    # Check whether the storage directory of each frame corresponding to each processed txt exists. If it does not exist, create it in advance
    if not os.path.exists(path3):
        os.makedirs(path3)
For example:
create_path_before_start('D:\\videos\\tmp\\','D:\\videos\\txt\\','D:\\videos\\tmp_final\\')
After successful execution, you can see that the directory has been created in advance.
5.2. Decompose the target video into several pictures
Before executing the code, put the target video into the video directory of disk D:
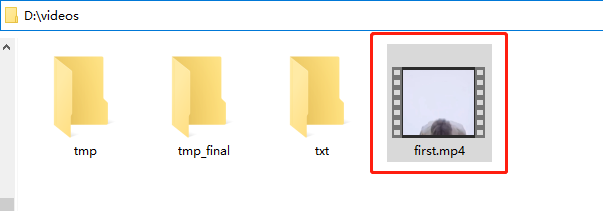
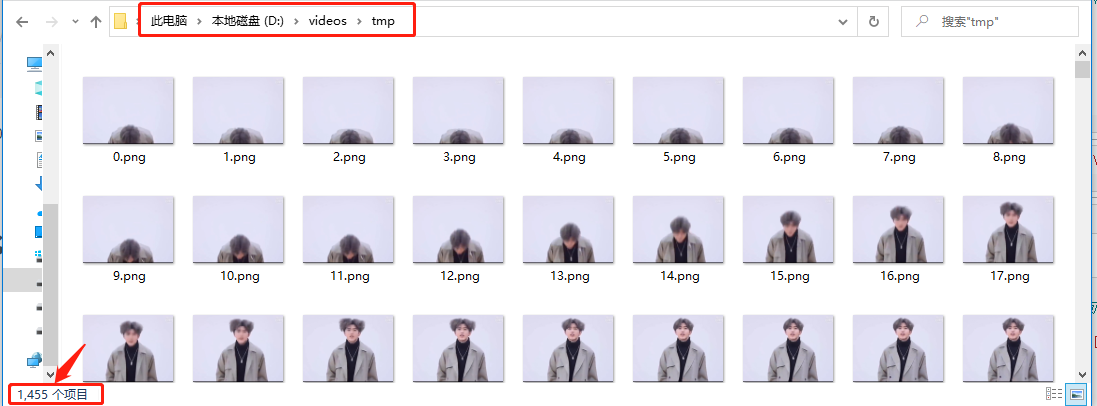
Step 2: set the target video first Mp4 is decomposed into several pictures and coexisted in the tmp directory. I didn't customize the frame rate here, but it was handled according to the default 30.
def deal_with_video_to_frame(path1,path2):
    cap = cv2.VideoCapture(path1)  # Target video location
    # Frame rate of original video
    fps = int(cap.get(5))
    # Total frames of original video
    frame_count = int(cap.get(7))
    c=0
    while(1):
        success, frame = cap.read()
        if success:
            img = cv2.imwrite(path2+str(c) + '.png',frame) # The storage position of each frame of pictures after disassembly. Here I number 0, 1, 2 Name for
            c=c+1
        else:
            break
    cap.release()

    return fps,frame_count
fps,frame_count = deal_with_video_to_frame('D:\\videos\\first.mp4', 'D:\\videos\\tmp\\')
After successful execution, output FPS and frame_ Count to see:
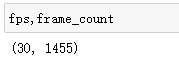
You can see that the video has been decomposed into 1455 pictures according to the frame rate of 30.
5.3. Convert the picture to txt in character set form
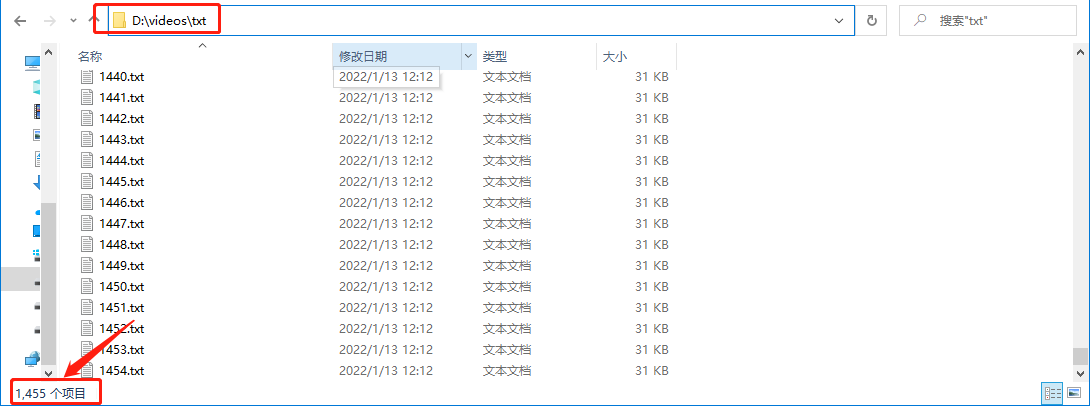
Step 3: synthesize 1455 pictures in the tmp directory into txt. Each picture has a corresponding txt file
def deal_with_frame_to_txt(path1,path2,num):
    # It is the character set used in our character painting. There are 72 characters in total. The type and quantity of characters can be debugged repeatedly according to the effect of character painting
    #ascii_char = list("01")
    ascii_char = list("01B%8&WM#*oahkbdpqwmZO0QLCJUYXzcvunxrjft/\|()1{}[]?-_+~<>i!lI;:oa+>!:+. ")
    WH = Image.open(path1+"0.png")#Returns an Image object
    WIDTH = int(WH.size[0]/10) # The width of character drawing, how many columns does txt occupy
    HEIGHT = int(WH.size[1]/10) # The height of character drawing, how many lines does txt occupy
    WH.close()

    def get_char(r, g, b, alpha=256):  # alpha transparency
        if alpha == 0:
            return ' '
        length = len(ascii_char)
        gray = int(0.2126 * r + 0.7152 * g + 0.0722 * b)  # Calculate grayscale
        unit = (256.0 + 1) / length
        return ascii_char[int(gray / unit)]  # Different grayscale corresponds to different characters
        # Color blocks are distinguished by gray scale

    # Map 256 grayscale to 2 characters, that is, the function of converting RGB value to character:
    def get_char_photo(path3,path4):

        im = Image.open(path3)
        im = im.resize((WIDTH, HEIGHT), Image.NEAREST)
        txt = ""
        for i in range(HEIGHT):
            for j in range(WIDTH):
                txt += get_char(*im.getpixel((j, i))) + ' ' # Get the corresponding characters
            txt += '\n'
        #print(txt)  # Print out character painting
        # Write character drawing to file
        with open(path4, 'w') as f:
            f.write(txt)

    for i in range(num):
        get_char_photo(path1+'{}.png'.format(i), path2+'{}.txt'.format(i))
deal_with_frame_to_txt('D:\\videos\\tmp\\', 'D:\\videos\\txt\\',frame_count)
After successful execution, you can see that 1455 txt files are generated in the txt directory, each corresponding to the pictures in the tmp Directory:
5.4. txt to character coded picture
Step 4: convert 1455 txt files in the txt directory into 1455 pictures.
def deal_with_txt_to_frame(path1,path2,num):
    PIXEL_ON = 0  # PIL color to use for "on"
    PIXEL_OFF = 255  # PIL color to use for "off"

    def text_image(text_path, font_path=None):
        """Convert text file to a grayscale image with black characters on a white background.

        arguments:
        text_path - the content of this file will be converted to an image
        font_path - path to a font file (for example impact.ttf)
        """
        grayscale = 'L'
        # parse the file into lines
        with open(text_path) as text_file:  # can throw FileNotFoundError
            lines = tuple(l.rstrip() for l in text_file.readlines())

        # choose a font (you can see more detail in my library on github)
        large_font = 20  # get better resolution with larger size
        font_path = font_path or 'cour.ttf'  # Courier New. works in windows. linux may need more explicit path
        try:
            font = PIL.ImageFont.truetype(font_path, size=large_font)
        except IOError:
            font = PIL.ImageFont.load_default()
            #print('Could not use chosen font. Using default.')

        # make the background image based on the combination of font and lines
        pt2px = lambda pt: int(round(pt * 96.0 / 72))  # convert points to pixels
        max_width_line = max(lines, key=lambda s: font.getsize(s)[0])
        # max height is adjusted down because it's too large visually for spacing
        test_string = 'ABCDEFGHIJKLMNOPQRSTUVWXYZ'
        max_height = pt2px(font.getsize(test_string)[1])
        max_width = pt2px(font.getsize(max_width_line)[0])
        height = max_height * len(lines)  # perfect or a little oversized
        width = int(round(max_width + 40))  # a little oversized
        image = PIL.Image.new(grayscale, (width, height), color=PIXEL_OFF)
        draw = PIL.ImageDraw.Draw(image)

        # draw each line of text
        vertical_position = 5
        horizontal_position = 5
        line_spacing = int(round(max_height * 0.8))  # reduced spacing seems better
        for line in lines:
            draw.text((horizontal_position, vertical_position),
                      line, fill=PIXEL_ON, font=font)
            vertical_position += line_spacing
        # crop the text
        c_box = PIL.ImageOps.invert(image).getbbox()
        image = image.crop(c_box)
        return image

    for i in range(num):
        image = text_image(path1+'{}.txt'.format(i))
        #image.show()
        image.save(path2+'{}.png'.format(i))
deal_with_txt_to_frame('D:\\videos\\txt\\', 'D:\\videos\\tmp_final\\',frame_count)
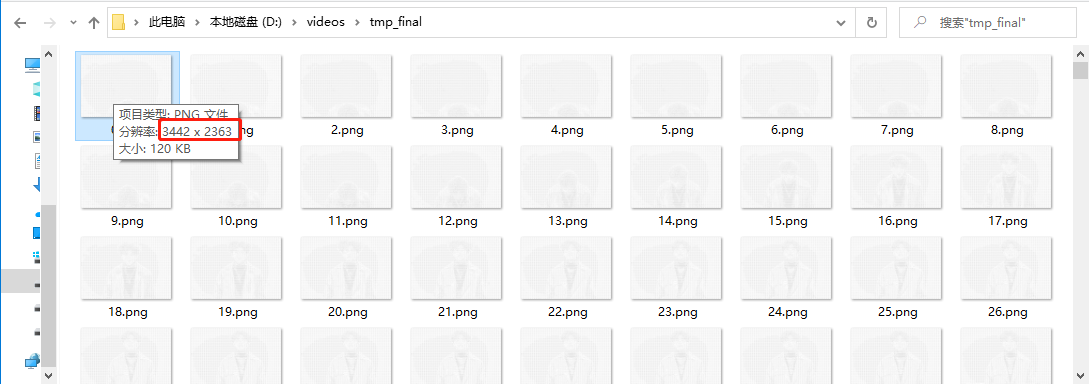
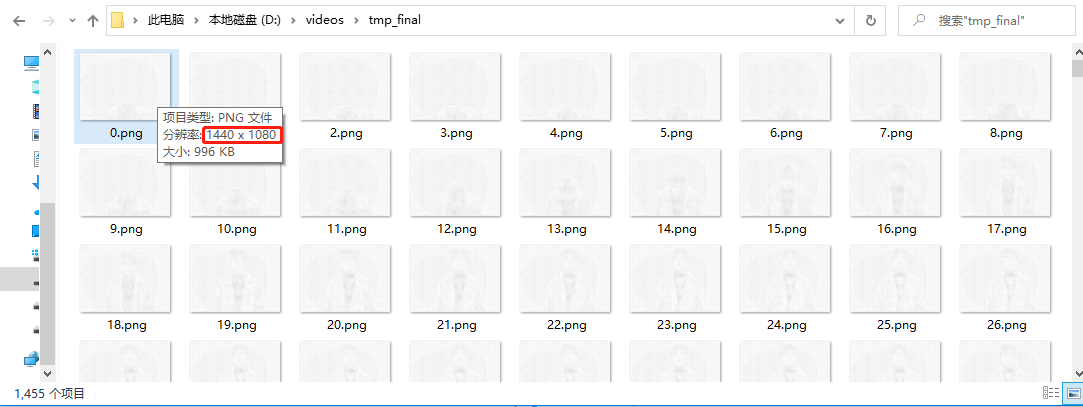
After successful execution, you can see TMP_ 1455 character coded pictures have been generated in the final directory.

5.5. Character coded pictures shall be processed according to standardization
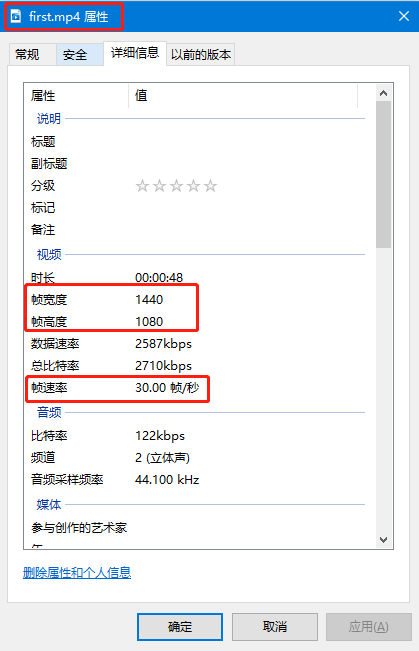
Step 5: normalize the character coded pictures. Because in the moviepy module, the video is exported to mp4 format in the form of pictures, and the resolution of each picture is consistent. Because I added a blank line in the process of converting the picture to txt in 5.3, the resolution of the picture converted back from txt in 5.4 will be greater than that of the original video. And we need to splice it with the original video later, so we compress it to be consistent according to the resolution of the original video.
For example, now tmp_final's picture resolution is 3442 × The code of 2363 and 5.5 is to compress it in equal proportion to the resolution of the original video 1440 × 1080.
def deal_with_the_same_size(path1,path2,num):
    # Get the resolution of the original video
    cap = cv2.VideoCapture(path1)  # Target video location
    WIDTH = int(cap.get(3))
    HEIGHT = int(cap.get(4))
    if WIDTH%2==1:
        WIDTH = WIDTH-1
    if HEIGHT%2==1:
        HEIGHT = HEIGHT -1
    cap.release()

    # Read the picture and adjust the size of the picture to match the original video
    for i in range(num):
        img = cv2.imread(path2+"{}.png".format(i))
        final_img = cv2.resize(img,(WIDTH,HEIGHT))
        cv2.imwrite(path2+"{}.png".format(i), final_img)
    cv2.destroyAllWindows()
deal_with_the_same_size('D:\\videos\\first.mp4', 'D:\\videos\\tmp_final\\',frame_count)
After running successfully, you can see that TMP_ The resolution of all pictures in final has been compressed to 1440 × 1080.
5.6. Synthesize the video and splice it with the original video
Step 6: TMP_ The pictures in final are recombined into video according to the frame rate 30 of the original video, and then spliced with the original video.
def generate_video(path1,file1,file2,file3,frame):
    #Read the length and width of a picture
    WH = Image.open(path1+"0.png")#Returns an Image object
    WIDTH = WH.size[0] # The width of character drawing, how many columns does txt occupy
    HEIGHT = WH.size[1] # The height of character drawing, how many lines does txt occupy
    WH.close()
    size = (WIDTH, HEIGHT)

    # Get how many pictures are there
    list_file_name = glob.glob(os.path.join(path1,"*.png"))
    num = len(list_file_name)

    #After creating the write object, the first parameter is the name of the synthesized video, the second parameter is the available encoder, the third parameter is the frame rate, that is, how many pictures are displayed per second, and the fourth parameter is the picture size information
    videowrite = cv2.VideoWriter(file1,-1,frame,size)
    #img_array=[]
    for filename in [path1+'{}.png'.format(i) for i in range(num)]:
        img = cv2.imread(filename)
        if img is None:
            print(filename + " is error!")
            continue
        videowrite.write(img)

    videowrite.release()

    clip1 = VideoFileClip(file2)
    clip2 = VideoFileClip(file1)
    final_clip = clips_array([[clip1,clip2]])
    final_clip.write_videofile(file3)
generate_video('D:\\videos\\tmp_final\\','D:\\videos\\target.mp4','D:\\videos\\first.mp4','D:\\videos\\final.mp4',fps)
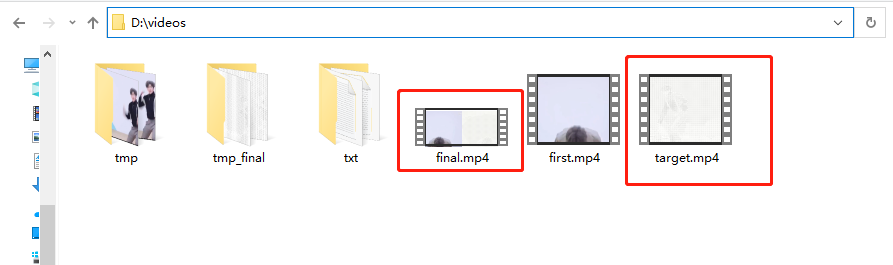
After successful execution, you can see that the character encoded intermediate video target MP4 and spliced video final Mp4 has been generated, but there is no sound yet.
5.7. Import sound into the spliced video
Step 7: import the original sound into the spliced video.
def get_voice_and_load(file1,file2,file3):
    # Get the sound of the original video
    video = VideoFileClip(file1)
    audio = video.audio

    # Import the original sound into the processed video
    video = VideoFileClip(file2)
    final_video = video.set_audio(audio)
    final_video.write_videofile(file3,fps=video.fps,codec='libx264')
    video.close()
get_voice_and_load('D:\\videos\\first.mp4','D:\\videos\\final.mp4','D:\\videos\\final_with_voice.mp4')
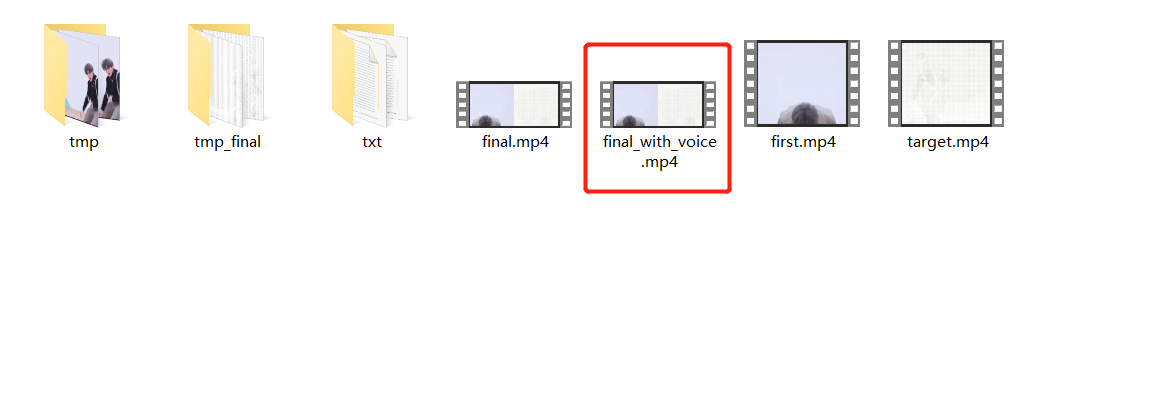
After running successfully, we can get the final video we want_ with_ voice. Mp4.
5.8. Delete temporary directories and intermediate files
The last step: put tmp, txt and tmp_ Finally, these three temporary directories and their generated intermediate files are deleted.
def delete_cache_dir(path1,path2,path3):
    # Check whether the storage directory for each frame exists, and if so, delete it recursively
    if os.path.exists(path1):
        shutil.rmtree(path1)

    # Check whether the storage directory of txt corresponding to each frame exists. If it exists, it will be deleted recursively
    if os.path.exists(path2):
        shutil.rmtree(path2)

    # Check whether the storage directory of each frame corresponding to each processed txt exists, and if so, delete it recursively
    if os.path.exists(path3):
        shutil.rmtree(path3)
delete_cache_dir('D:\\videos\\tmp\\', 'D:\\videos\\txt\\', 'D:\\videos\\tmp_final\\')
After running successfully, you can see that the three directories and their files have been deleted:

6. All codes (for reference)
import shutil
import cv2
import os
from PIL import Image # PIL is a Python image processing library
import PIL
import PIL.Image
import PIL.ImageFont
import PIL.ImageOps
import PIL.ImageDraw
import numpy as np
import glob
from PIL import ImageFile
ImageFile.LOAD_TRUNCATED_IMAGES = True
Image.MAX_IMAGE_PIXELS = None
from moviepy.editor import *
def create_path_before_start(path1,path2,path3):
# Check whether the storage directory for each frame exists. If it does not exist, create it in advance
if not os.path.exists(path1):
os.makedirs(path1)
# Check whether the storage directory of txt corresponding to each frame exists. If it does not exist, create it in advance
if not os.path.exists(path2):
os.makedirs(path2)
# Check whether the storage directory of each frame corresponding to each processed txt exists. If it does not exist, create it in advance
if not os.path.exists(path3):
os.makedirs(path3)
def deal_with_video_to_frame(path1,path2):
cap = cv2.VideoCapture(path1) # Target video location
# Frame rate of original video
fps = int(cap.get(5))
# Total frames of original video
frame_count = int(cap.get(7))
c=0
while(1):
success, frame = cap.read()
if success:
img = cv2.imwrite(path2+str(c) + '.png',frame) # The storage position of each frame of pictures after disassembly. Here I number 0, 1, 2 Name for
c=c+1
else:
break
cap.release()
return fps,frame_count
def deal_with_frame_to_txt(path1,path2,num):
# It is the character set used in our character painting. There are 72 characters in total. The type and quantity of characters can be debugged repeatedly according to the effect of character painting
#ascii_char = list("01")
ascii_char = list("01B%8&WM#*oahkbdpqwmZO0QLCJUYXzcvunxrjft/\|()1{}[]?-_+~<>i!lI;:oa+>!:+. ")
WH = Image.open(path1+"0.png")#Returns an Image object
WIDTH = int(WH.size[0]/10) # The width of character drawing, how many columns does txt occupy
HEIGHT = int(WH.size[1]/10) # The height of character drawing, how many lines does txt occupy
WH.close()
def get_char(r, g, b, alpha=256): # alpha transparency
if alpha == 0:
return ' '
length = len(ascii_char)
gray = int(0.2126 * r + 0.7152 * g + 0.0722 * b) # Calculate grayscale
unit = (256.0 + 1) / length
return ascii_char[int(gray / unit)] # Different grayscale corresponds to different characters
# Color blocks are distinguished by gray scale
# Map 256 grayscale to 2 characters, that is, the function of converting RGB value to character:
def get_char_photo(path3,path4):
im = Image.open(path3)
im = im.resize((WIDTH, HEIGHT), Image.NEAREST)
txt = ""
for i in range(HEIGHT):
for j in range(WIDTH):
txt += get_char(*im.getpixel((j, i))) + ' ' # Get the corresponding characters
txt += '\n'
#print(txt) # Print out character painting
# Write character drawing to file
with open(path4, 'w') as f:
f.write(txt)
for i in range(num):
get_char_photo(path1+'{}.png'.format(i), path2+'{}.txt'.format(i))
def deal_with_txt_to_frame(path1,path2,num):
PIXEL_ON = 0 # PIL color to use for "on"
PIXEL_OFF = 255 # PIL color to use for "off"
def text_image(text_path, font_path=None):
"""Convert text file to a grayscale image with black characters on a white background.
arguments:
text_path - the content of this file will be converted to an image
font_path - path to a font file (for example impact.ttf)
"""
grayscale = 'L'
# parse the file into lines
with open(text_path) as text_file: # can throw FileNotFoundError
lines = tuple(l.rstrip() for l in text_file.readlines())
# choose a font (you can see more detail in my library on github)
large_font = 20 # get better resolution with larger size
font_path = font_path or 'cour.ttf' # Courier New. works in windows. linux may need more explicit path
try:
font = PIL.ImageFont.truetype(font_path, size=large_font)
except IOError:
font = PIL.ImageFont.load_default()
#print('Could not use chosen font. Using default.')
# make the background image based on the combination of font and lines
pt2px = lambda pt: int(round(pt * 96.0 / 72)) # convert points to pixels
max_width_line = max(lines, key=lambda s: font.getsize(s)[0])
# max height is adjusted down because it's too large visually for spacing
test_string = 'ABCDEFGHIJKLMNOPQRSTUVWXYZ'
max_height = pt2px(font.getsize(test_string)[1])
max_width = pt2px(font.getsize(max_width_line)[0])
height = max_height * len(lines) # perfect or a little oversized
width = int(round(max_width + 40)) # a little oversized
image = PIL.Image.new(grayscale, (width, height), color=PIXEL_OFF)
draw = PIL.ImageDraw.Draw(image)
# draw each line of text
vertical_position = 5
horizontal_position = 5
line_spacing = int(round(max_height * 0.8)) # reduced spacing seems better
for line in lines:
draw.text((horizontal_position, vertical_position),
line, fill=PIXEL_ON, font=font)
vertical_position += line_spacing
# crop the text
c_box = PIL.ImageOps.invert(image).getbbox()
image = image.crop(c_box)
return image
for i in range(num):
image = text_image(path1+'{}.txt'.format(i))
#image.show()
image.save(path2+'{}.png'.format(i))
def deal_with_the_same_size(path1,path2,num):
# Get the resolution of the original video
cap = cv2.VideoCapture(path1) # Target video location
WIDTH = int(cap.get(3))
HEIGHT = int(cap.get(4))
if WIDTH%2==1:
WIDTH = WIDTH-1
if HEIGHT%2==1:
HEIGHT = HEIGHT -1
cap.release()
# Read the picture and adjust the size of the picture to match the original video
for i in range(num):
img = cv2.imread(path2+"{}.png".format(i))
final_img = cv2.resize(img,(WIDTH,HEIGHT))
cv2.imwrite(path2+"{}.png".format(i), final_img)
cv2.destroyAllWindows()
def generate_video(path1,file1,file2,file3,frame):
#Read the length and width of a picture
WH = Image.open(path1+"0.png")#Returns an Image object
WIDTH = WH.size[0] # The width of character drawing, how many columns does txt occupy
HEIGHT = WH.size[1] # The height of character drawing, how many lines does txt occupy
WH.close()
size = (WIDTH, HEIGHT)
# Get how many pictures are there
list_file_name = glob.glob(os.path.join(path1,"*.png"))
num = len(list_file_name)
#After creating the write object, the first parameter is the name of the synthesized video, the second parameter is the available encoder, the third parameter is the frame rate, that is, how many pictures are displayed per second, and the fourth parameter is the picture size information
videowrite = cv2.VideoWriter(file1,-1,frame,size)
#img_array=[]
for filename in [path1+'{}.png'.format(i) for i in range(num)]:
img = cv2.imread(filename)
if img is None:
print(filename + " is error!")
continue
videowrite.write(img)
videowrite.release()
clip1 = VideoFileClip(file2)
clip2 = VideoFileClip(file1)
final_clip = clips_array([[clip1,clip2]])
final_clip.write_videofile(file3)
def get_voice_and_load(file1,file2,file3):
# Get the sound of the original video
video1 = VideoFileClip(file1)
audio = video1.audio
# Import the original sound into the processed video
video2 = VideoFileClip(file2)
final_video = video2.set_audio(audio)
final_video.write_videofile(file3,fps=video2.fps,codec='libx264')
video1.close()
video2.close()
def delete_cache_dir(path1,path2,path3):
# Check whether the storage directory for each frame exists, and if so, delete it recursively
if os.path.exists(path1):
shutil.rmtree(path1)
# Check whether the storage directory of txt corresponding to each frame exists. If it exists, it will be deleted recursively
if os.path.exists(path2):
shutil.rmtree(path2)
# Check whether the storage directory of each frame corresponding to each processed txt exists, and if so, delete it recursively
if os.path.exists(path3):
shutil.rmtree(path3)
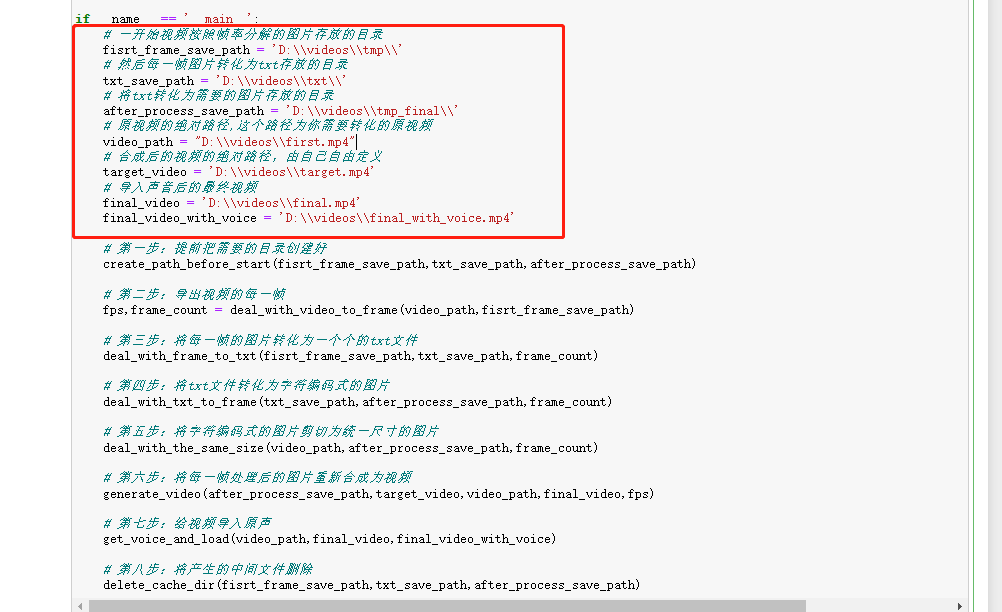
if __name__ == '__main__':
# At the beginning, the video is decomposed according to the frame rate, and the pictures are stored in the directory
fisrt_frame_save_path = 'D:\\videos\\tmp\\'
# Then each frame of picture is converted into the directory where txt is stored
txt_save_path = 'D:\\videos\\txt\\'
# Convert txt to the directory where the pictures are stored
after_process_save_path = 'D:\\videos\\tmp_final\\'
# The absolute path of the original video. This path is the original video you need to convert
video_path = "D:\\videos\\first.mp4"
# The absolute path of the synthesized video is freely defined by yourself
target_video = 'D:\\videos\\target.mp4'
# Final video after importing sound
final_video = 'D:\\videos\\final.mp4'
final_video_with_voice = 'D:\\videos\\final_with_voice.mp4'
# Step 1: create the required directory in advance
create_path_before_start(fisrt_frame_save_path,txt_save_path,after_process_save_path)
# Step 2: export each frame of the video
fps,frame_count = deal_with_video_to_frame(video_path,fisrt_frame_save_path)
# Step 3: convert the pictures of each frame into txt files
deal_with_frame_to_txt(fisrt_frame_save_path,txt_save_path,frame_count)
# Step 4: convert the txt file into a character coded picture
deal_with_txt_to_frame(txt_save_path,after_process_save_path,frame_count)
# Step 5: cut the character coded picture into a uniform size picture
deal_with_the_same_size(video_path,after_process_save_path,frame_count)
# Step 6: recombine the processed picture of each frame into video
generate_video(after_process_save_path,target_video,video_path,final_video,fps)
# Step 7: import the original sound into the video
get_voice_and_load(video_path,final_video,final_video_with_voice)
# Step 8: delete the generated intermediate file
delete_cache_dir(fisrt_frame_save_path,txt_save_path,after_process_save_path)
Before running the whole code, you need to place your own target video in the D:\videos \ directory, such as first. Net in this article mp4. Or customize the absolute paths of directories and files in the main function. Other functions have been written and can be called directly. It is recommended to take a video test for a few seconds to understand the process. It usually takes half an hour to run a video for more than one minute. Of course, just for my computer.
PS OK, that's all for today's sharing.
It's not easy to share. Brothers who run successfully remember to come back and point a praise, and deduct a punch in the comment area before leaving.