Refer to previous articles for specific installation configuration https://blog.csdn.net/weixin_44001965/article/details/102723855
Article directory
1, Common commands for nginx operations
Prerequisites for using nginx operation command: you must enter the directory of nginx
/usr/local/nginx/sbin
# View nginx version number
./nginx -v
# Close nginx
./nginx -s stop
# Open nginx
./nginx
# Reload nginx
./nginx -s reload
nginx profile
Location of nginx configuration file

nginx configuration file consists of three parts
-
Part I, global block
- From the beginning of the configuration file to the events block, some configuration instructions that affect the overall operation of nginx server will be set.
- For example, the larger the word "processes 1"; value is, the more concurrent processes can be supported.
-
Part two, events block
- The instructions of events block design mainly affect the network connection between nginx server and users,
- For example, the maximum number of connections supported by worker \ u connections 1024.
-
The third part, http block
- The most frequent part of nginx server configuration
- http block also includes http global block and server block.
2, nginx configure reverse agent (1)
The essential purpose of reverse proxy: when the window browser accesses 192.168.186.128 and the port is 80, nginx will forward to the address of http://127.0.0.1:8080.
Start Tomcat in the linux virtual machine first (enter the bin directory of tomcat, execute. / startup.sh file to start Tomcat)
Access to

In the configuration file of nginx, change the server name to the ip address of linux.

After this sub configuration, when the window browser accesses 192.168.186.128 and the port is 80, nginx will forward to the address of http://127.0.0.1:8080.
After configuration, nginx needs to be reloaded to take effect
cd /usr/local/nginx/sbin Get into sbin Catalog
# Execute command reload
./nginx -s reload
Then we implement nginx reverse proxy.

3, nginx configure reverse agent (2)
Effect to achieve: use nginx reverse proxy, jump to different service ports according to different access paths.
Preparation: prepare two tomcat servers, one port 8080 and one port 8081.
First, kill the tomcat process
[root@bogon src]# ps -ef | grep tomcat
root       8298      1  0 22:36 pts/0    00:00:04 /usr/local/java/jdk1.8.0_231/bin/java -Djava.util.logging.config.file=/opt/apache-tomcat-7.0.96/conf/logging.properties -Djava.util.logging.manager=org.apache.juli.ClassLoaderLogManager -Djdk.tls.ephemeralDHKeySize=2048 -Dignore.endorsed.dirs= -classpath /opt/apache-tomcat-7.0.96/bin/bootstrap.jar:/opt/apache-tomcat-7.0.96/bin/tomcat-juli.jar -Dcatalina.base=/opt/apache-tomcat-7.0.96 -Dcatalina.home=/opt/apache-tomcat-7.0.96 -Djava.io.tmpdir=/opt/apache-tomcat-7.0.96/temp org.apache.catalina.startup.Bootstrap start
root       8949   2973  0 23:17 pts/0    00:00:00 grep --color=auto tomcat
[root@bogon src]# kill 8298
[root@bogon src]# ps -ef | grep tomcat
root       8957   2973  0 23:18 pts/0    00:00:00 grep --color=auto tomcat
Then create two new folders tomcat8080 and tomcat8081 in the / usr/src directory, and use xftp to pass in Tomcat compression package to the two folders respectively.
If the upload error is to give permission with the command chmod 777 folder name.
Separate decompression
tar -xvf apache-tomcat-7.0.96.tar.gz
Start tomcat on port 8080

Start the Tomcat of port 8081, unzip it, enter the conf directory of tomcat, and edit the server.xml configuration file
[root@bogon tomcat8081]# ls
apache-tomcat-7.0.96  apache-tomcat-7.0.96.tar.gz
[root@bogon tomcat8081]# cd apache-tomcat-7.0.96/
[root@bogon apache-tomcat-7.0.96]# ls
bin  BUILDING.txt  conf  CONTRIBUTING.md  lib  LICENSE  logs  NOTICE  README.md  RELEASE-NOTES  RUNNING.txt  temp  webapps  work
[root@bogon apache-tomcat-7.0.96]# cd conf
[root@bogon conf]# ls
catalina.policy  catalina.properties  context.xml  logging.properties  server.xml  tomcat-users.xml  web.xml
[root@bogon conf]# vim server.xml
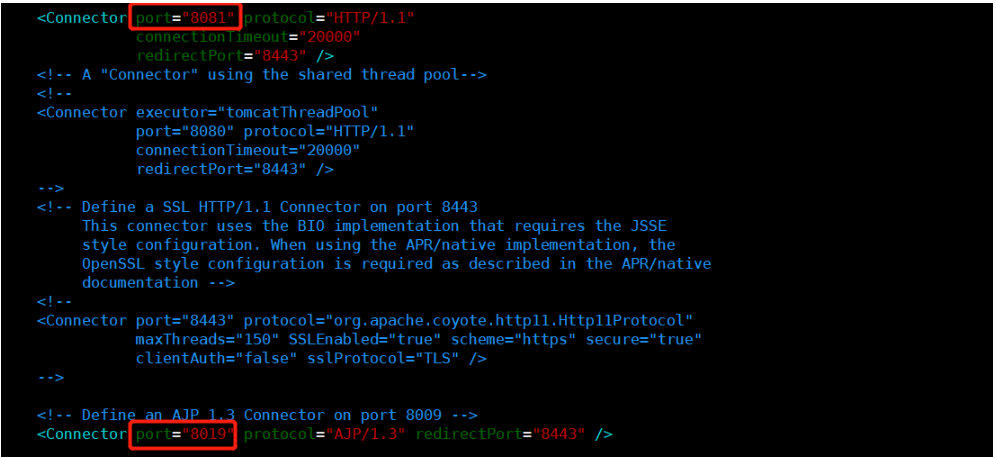
First, change this to port 8015

Then change to port 8081 and port 8019 respectively

Then start the tomcat of port 8081
[root@bogon bin]# ls
bootstrap.jar  catalina-tasks.xml            configtest.bat  digest.bat        setclasspath.sh  startup.bat      tomcat-native.tar.gz  version.bat
catalina.bat   commons-daemon.jar            configtest.sh   digest.sh         shutdown.bat     startup.sh       tool-wrapper.bat      version.sh
catalina.sh    commons-daemon-native.tar.gz  daemon.sh       setclasspath.bat  shutdown.sh      tomcat-juli.jar  tool-wrapper.sh
[root@bogon bin]# ./startup.sh
Using CATALINA_BASE:   /usr/src/tomcat8081/apache-tomcat-7.0.96
Using CATALINA_HOME:   /usr/src/tomcat8081/apache-tomcat-7.0.96
Using CATALINA_TMPDIR: /usr/src/tomcat8081/apache-tomcat-7.0.96/temp
Using JRE_HOME:        /usr/local/java/jdk1.8.0_231
Using CLASSPATH:       /usr/src/tomcat8081/apache-tomcat-7.0.96/bin/bootstrap.jar:/usr/src/tomcat8081/apache-tomcat-7.0.96/bin/tomcat-juli.jar
Tomcat started.
Create folders and test pages to prepare for the test.
Create a new folder in the webapps folder of two tomcat;
Create a new folder edu in webapps of tomcat on port 8080, and a new html file < H1 > on port 8080 < / H1 > in edu;
Create a new folder vod in webapps of tomcat on port 8081, and create a new html file in vod < H1 > 8081!! < / H1 >;
And then visit the

Find the nginx configuration file to configure the reverse agent
[root@bogon vod]# cd /usr/local/nginx/conf
[root@bogon conf]# ls
fastcgi.conf          fastcgi_params          koi-utf  mime.types          nginx.conf          scgi_params          uwsgi_params          win-utf
fastcgi.conf.default  fastcgi_params.default  koi-win  mime.types.default  nginx.conf.default  scgi_params.default  uwsgi_params.default
[root@bogon conf]# vim nginx.conf
Add the following configuration
Note: listen to the address 192.168.186.128:9001, if the following path is edu, forward to the address http://127.0.0.1:8080; if the following address vod, forward to the address http://127.0.0.1:8081.

Then reload nginx and go to the directory / usr/local/nginx/sbin
# Turn off nginx first
./nginx -s stop
# Turn nginx on again
./nginx
Testing: accessing in windows Explorer

nginx reverse proxy is done.
4, nginx configuration load balancing
Implementation effect: input http://192.168.186.128/edu/a.html into browser address bar, load balancing effect, average to port 8080 and port 8081.
preparation:
- Two tomcat servers, one 8080 port and one 8081 port, which have been prepared.
- Create edu folder in webapps directory of two tomcat, and create a.html file in edu folder
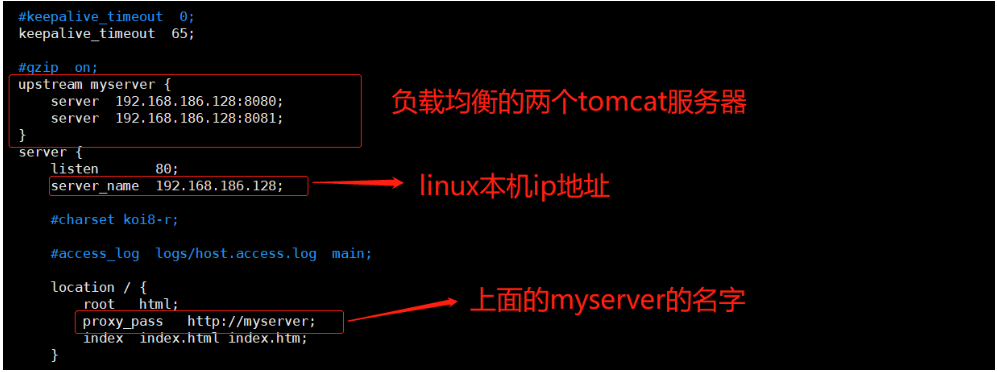
- Load balancing configuration in nginx configuration file
Load balancing configuration
Add the following configuration in the following location.

Add the following rules to server {}

Test: access in window browser

Refresh the following browser, access tomcat on port 8081, and keep refreshing and switching.

This shows that nginx distributes multiple requests equally to different servers, and achieves load balancing.
Server allocation strategy for nginx load balancing
First: polling
Each request is allocated to different back-end servers in chronological order. If the back-end servers are down, they can be automatically eliminated.
Second: weight weight
Weight represents the weight, which is 1 by default. The higher the weight, the more clients are assigned.
upstream myserver {
server 192.168.186.128:8080 weight=5;
server 192.168.186.128:8080 weight=10;
}
The third is IP hash
Each request is allocated according to the hash result of the access ip, so that each visitor's fixed access is to the back-end server, which can solve the problem of session sharing (single sign on will encounter this problem).
upstream myserver {
ip_hash;
server 192.168.186.128:8080;
server 192.168.186.128:8080 ;
}
Fourth: fair (third party)
Requests are allocated according to the response time of the back-end server, and those with short response time are allocated preferentially.
upstream myserver {
server 192.168.186.128:8080;
server 192.168.186.128:8080 ;
fair;
}

