
The secondary market can be divided into many "sects", including technology, fundamentals and news. This issue is based on the quantitative content of the news. The most common idea is to analyze public opinion and judge market sentiment, so as to make investment decisions.

Public opinion analysis involves a sub field of artificial intelligence - natural language processing (NLP). In 2018, Google put forward the natural language pre training model BERT in BERT: pre training of deep bidirectional transformers for language understanding, which greatly improves the ability of machine processing language and reduces the threshold of NLP. When I first came into contact with BERT, I consulted a large number of materials and found that most of them talked about the principle of BERT, and basically translated the main points of the paper (of course, I can't avoid vulgarity. In the principle part, I will try to translate it into "human language"). However, there is little talk about how to apply it. Even if there is, it is too complex. Until I saw the article Making BERT Easier with Preprocessing Models From TensorFlow Hub. This issue is mainly to move the code and make some improvements, so that zero based partners can build their own models. I have always pursued the view that learning while doing is like learning to ride a bike. You don't need to learn to ride a bike after understanding the principle of bicycle** All kinds of algorithms are too abstract. It's better to learn how to call the model after roughly understanding the principle of the algorithm, and then study the algorithm based on the application** Therefore, this paper will not have any formula, try to explain the principle of BERT in popular language, and give a simple NLP implementation process.
1, The principle of BERT
1. Pre training and fine tuning
The full name of BERT is Bidirectional Encoder Representations from Transformers. It is a pre trained natural language model, which can be divided into two steps to complete NLP tasks:
(1) Pre training: unsupervised learning of a large number of corpora;
(2) Fine tuning: conduct supervised learning on a small number of labeled corpus to improve the performance ability of the model for specific tasks.
Of course, the pre training models include GPT of Open AI, ELMo of AI2, etc.
As we all know, the key of machine learning lies in data. One advantage of natural language processing is that it can find a large number of corpora, such as Wikipedia, various books, various websites, etc. through unsupervised learning of these corpora, the machine can have a good effect on judging the emotion and context of the text. The pre training is completed by a third-party organization (such as Google) with its own server, and then the trained model is published.
However, for individuals or small institutions, it is difficult to achieve and requires great investment in talents and hardware. Therefore, * * pre training greatly reduces the threshold of NLP** In addition, we need to preprocess the input data according to the requirements of the trained model (which will be discussed later). The model has been trained for us. We just need to fine tune it.
2. How to pre train
Pre training requires two tasks at the same time, Masked LM and NSP (yes, I fainted when I looked at two words for the first time).
2.1 Masked LM(Masked Language Model)
The focus is Masked ("occlusion"), that is, randomly occluding some characters in the corpus, and then training the model to predict the occluded characters. In fact, it is cloze filling. The implementation process is still divided into two steps.
(1) Select 15% words randomly from each sentence. For example, the ith word is selected and counted as word_i;
(2) Do the following three things for the selected i-th word:
-
80% probability will be_ I replace with [MASK];
-
A 10% probability will be_ I randomly replace with any word;
-
10% probability for word_i no replacement;
(3) The corpus after "Masked" is trained, and the cross entropy is used as the loss function. To "bitcoin fell below 500 million, where is the future." For example: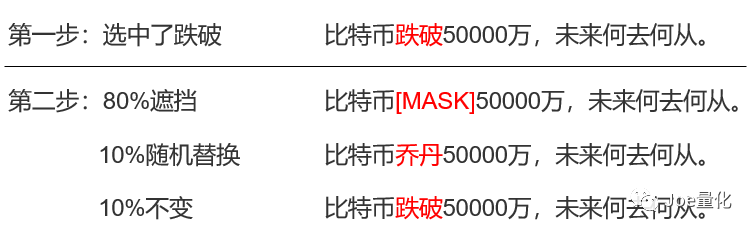
Combined with the above example, we can well understand B in BERT (b stands for Bidirectional, i.e. two-way). The model is broken through context prediction, and two-way refers to context. One way is to predict the following through the above.
2.2 NSP(Next Sentence Prediction)
The function of NSP is to understand the relationship between sentences and judge whether sentence A is the next sentence of sentence B.
(1) 50% probability that B is really the next statement of A and returns "IsNext";
(2) The probability of 50% is that B is a randomly selected statement and returns "NotNext". For example, we have a two sentence paragraph:
The second case is obviously that the foreword does not match the Afterword, and NotNext is returned. In addition, NSP will add [CLS] character at the beginning of each paragraph to store information related to classification, and add [SEP] character between sentences to make clauses.
3. How to fine tune
Using the pre trained model, we can supervise the learning of specific tasks. The [CLS] character stores the classification information and can be used as the input of the classification layer to obtain the classification results. Next, the text with labels (such as financial news, microblog, etc.) is used for training to fine tune BERT, so as to improve the accuracy for specific tasks.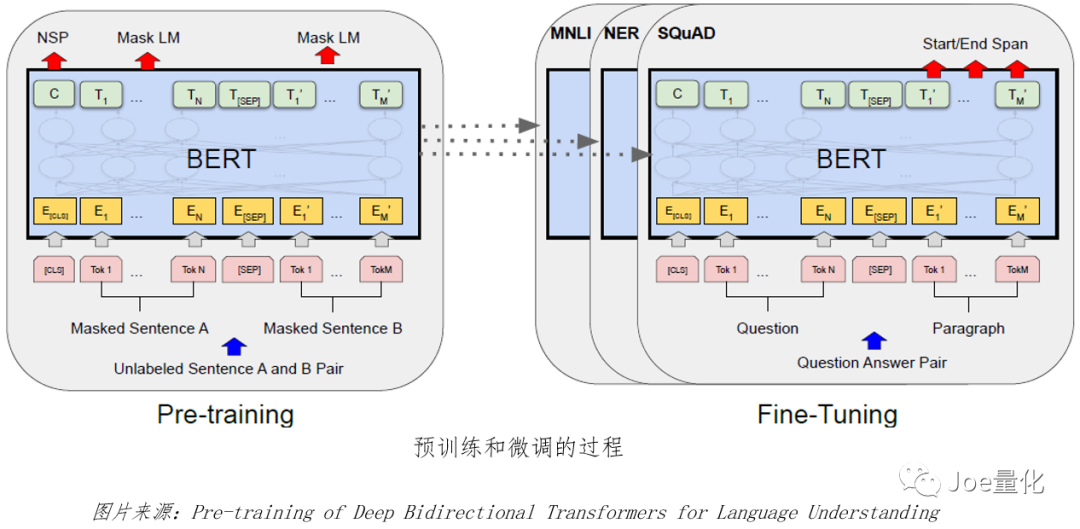
I think it's enough for the beginner to understand this level. Let's see how to implement BERT.
2, Implementing BERT in TensorFlow Hub
Because TensorFlow Hub really makes the implementation of BERT very simple, we only need to do two more steps:
(1) Import the BERT model (that is, the model pre trained by others);
(2) Import preprocessing model


1. Preprocessing model
**The preprocessing model does two things, one is embedding, and the other is to ensure that the output data type is tensor** Because machines are better at dealing with numbers, embeddings can be understood as converting text into a matrix composed of a pile of numbers suitable for model training (embeddings is an important concept in NLP. Due to the length problem, it is strongly recommended that you read this article: https://jalammar.github.io/illustrated-word2vec/ ). Tensor is the data type of TensorFlow. In fact, it is a generalized multidimensional matrix, similar to array in numpy.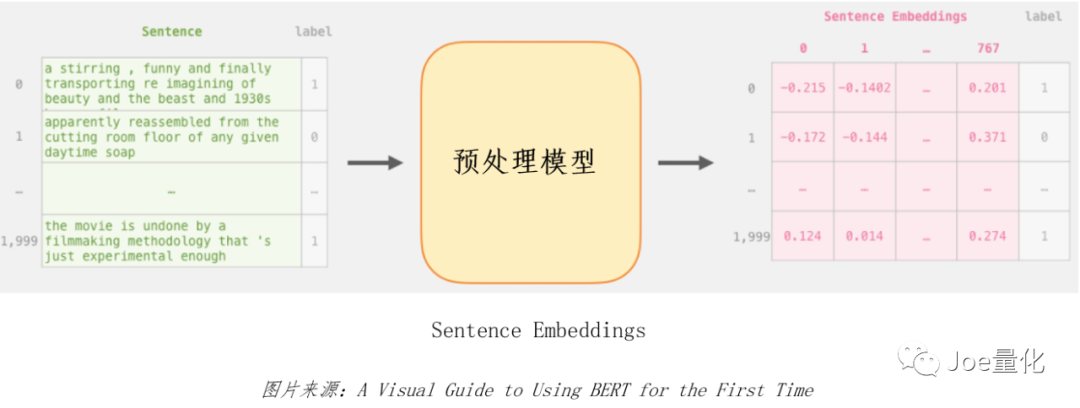 2. There are many pre trained BERT models. The main difference is the complexity of the model. The more complex the model, the higher the accuracy and the longer the training time. We can use this website( https://tfhub.dev/google/collections/BERT/1 )Find the original BERT model, and the extraction methods of preprocessing model and BERT model will be provided on the page of each model. In addition, the original version also provides a Chinese pre training model. For beginners, it is recommended to choose Small BERT. Although the accuracy is slightly poor, the training is faster and suitable for hand training.
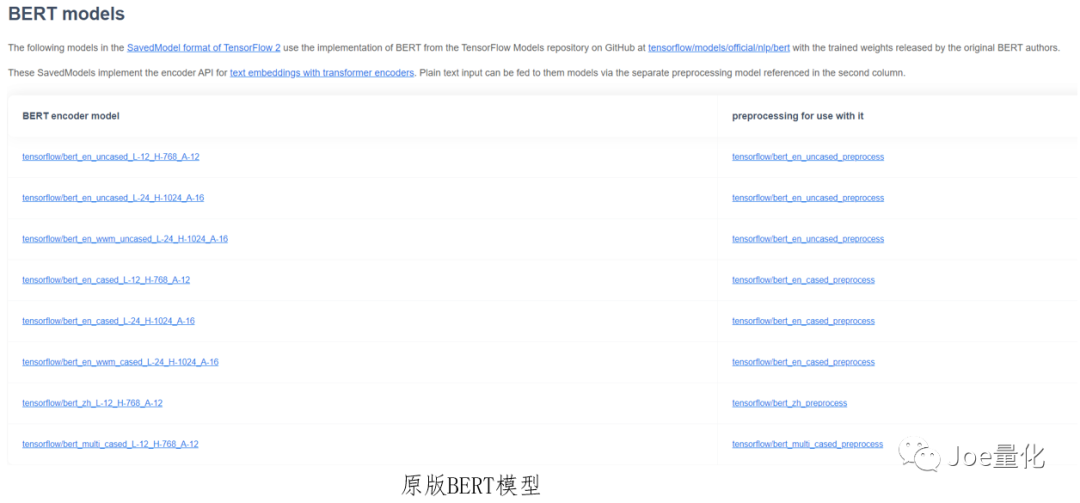
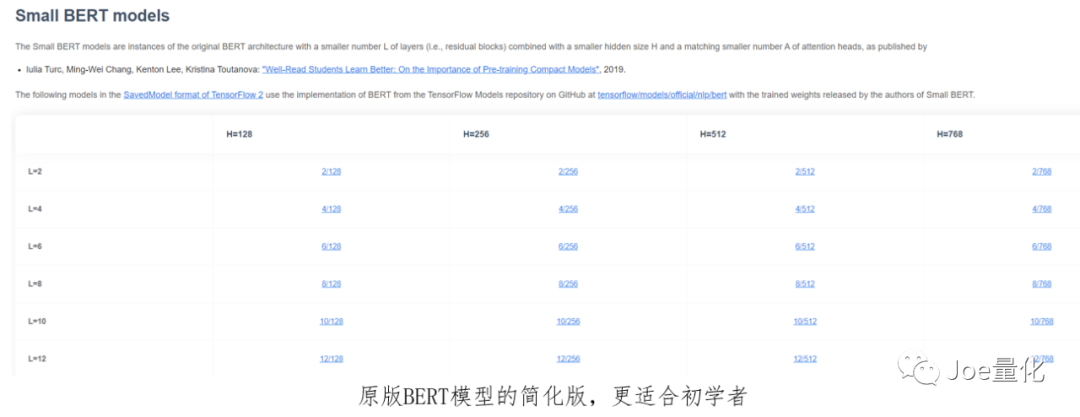
With Bert_ en_ uncased_ L-12_ H-768_ Take A-12 as an example:
text_input = tf.keras.layers.Input(shape=(), dtype=tf.string)

# ==Extract preprocessing model
preprocessor = hub.KerasLayer(
"https://tfhub.dev/tensorflow/bert_en_uncased_preprocess/3 "# model address
)
encoder_inputs = preprocessor(text_input)

# ==Extract BERT encoder
encoder = hub.KerasLayer(
"https://tfhub.dev/tensorflow/bert_en_uncased_L-12_H-768_A-12/4 ", # model address
trainable=True  # Control whether this layer can be trained
)
outputs = encoder(encoder_inputs)

# ==Output
pooled_output = outputs["pooled_output"]      # [batch_size, 768]
sequence_output = outputs["sequence_output"]  # [batch_size, seq_length, 768]
Sequence above_ Output can be considered as the result of Mask LM task, pooled_output can be regarded as the result of NSP task.
3, Twitter emotion analysis
From here( http://help.sentiment140.com/for-students )Find 1.6 million tagged Twitter text data. To facilitate the demonstration:
(1) The original data is classified into three categories and changed into two categories, that is, 0 represents negative emotion and 1 represents positive emotion;
(2) 16000 pieces were randomly sampled to improve the training speed.
1. Data processing
First, you need to load the data, split the training set, verification set and test set, and convert them into datasets. See the end of the text for the complete code.
# ==The parameters remain unchanged according to the original text
batch_size = 32  # One batch represents the sample size used in one iteration
AUTOTUNE = tf.data.AUTOTUNE  # Set the parameter buffer for pre reading partial data_ Size. TF. Is generally used by default data. AUTOTUNE

# ==Convert the split DataSet into DataSet
train_ds = df_to_dataset(train, AUTOTUNE, batch_size=batch_size)
val_ds = df_to_dataset(val, AUTOTUNE, batch_size=batch_size)
test_ds = df_to_dataset(test_data, AUTOTUNE, batch_size=batch_size)
2. Definition and evaluation index of optimizer
# ==Define loss function (cross entropy) and evaluation index (accuracy)
loss = tf.keras.losses.BinaryCrossentropy(from_logits=True)
metrics = tf.metrics.BinaryAccuracy()

# ==Optimizer
epochs = 5  # One epoch means that all samples in the training set have completed one training
steps_per_epoch = tf.data.experimental.cardinality(train_ds).numpy()  # Number of training set samples / number of samples in each batch. In this case, 11200 / 32 = 350
num_train_steps = steps_per_epoch * epochs
num_warmup_steps = int(0.1*num_train_steps)
init_lr = 3e-5
optimizer = optimization.create_optimizer(
      init_lr=init_lr,
      num_train_steps=num_train_steps,
      num_warmup_steps=num_warmup_steps,
      optimizer_type='adamw'
)
3. Model training
Model training takes 2.5 hours. The larger the amount of data, the more complex and time-consuming the model is.
def build_classifier_model():

    text_input = tf.keras.layers.Input(shape=(), dtype=tf.string, name='text')
    preprocessing_layer = hub.KerasLayer(tfhub_handle_preprocess, name='preprocessing')
    encoder_inputs = preprocessing_layer(text_input)

    encoder = hub.KerasLayer(tfhub_handle_encoder, trainable=True, name='BERT_encoder')
    outputs = encoder(encoder_inputs)

    outputs = outputs['pooled_output']

    outputs = tf.keras.layers.Dropout(0.1)(outputs)
    outputs = tf.keras.layers.Dense(1, activation=None, name='classifier')(outputs)

    return tf.keras.Model(text_input, outputs)


classifier_model = build_classifier_model()
classifier_model.compile(
      optimizer=optimizer,
      loss=loss,metrics=metrics
      )
history = classifier_model.fit(
      x=train_ds,
      validation_data=val_ds,
      epochs=epochs
      )

4. Model test
 loss, accuracy = classifier_model.evaluate(test_ds)

 print(f'Loss: {loss}')
 print(f'Accuracy: {accuracy}')
5. Model saving and loading
# ==Preserve
dataset_name = 'Twitter'
saved_model_path = './{}_bert'.format(dataset_name.replace('/', '_'))
classifier_model.save(saved_model_path, include_optimizer=False)

# ==Load
reloaded_model = tf.saved_model.load(saved_model_path)
That's all for this issue. There will be advanced usage of BERT and related quantitative strategies in the future.
The complete code can privately trust me.
reference:
BERT: Pre-training of Deep Bidirectional Transformers for Language Understanding
Making BERT Easier with Preprocessing Models From TensorFlow Hub
A Visual Notebook to Using BERT for the First Time
A Large-scale Chinese Corpus for Pre-training Language Model
END