1. Video link
2. Tutorial link
3. Form
3.1 form
Form elements allow users to enter content in the form, such as text fields, drop-down lists, radio buttons, checkboxes, and so on.
The form tag is used to create an HTML form for user input.
Forms can contain input elements, such as text fields, check boxes, radio boxes, submit buttons, and so on. You can also include elements such as textarea. Forms are used to transfer data to the server. The form element is a block level element, and a line break occurs before and after it.
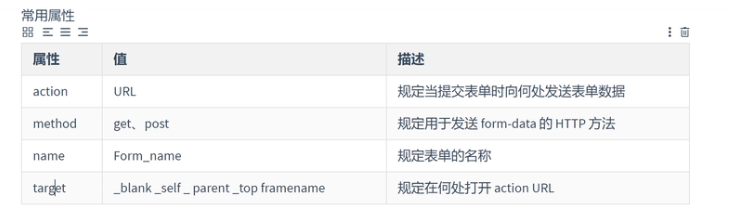
Method: form submission method: get Post , get , post , upload , etc
get: by default, it is an active acquisition method. The data is placed on the url. The capacity of the data is limited, the security is poor, and there is a cache
post: the data is placed in the requesting entity. Theoretically, there is no limit on the amount of data. It is relatively safe and there is no cache
3.2 input
The input tag is used to collect user information.
Depending on the value of the type attribute, the input field has many forms. Input fields can be text fields, check boxes, radio buttons, buttons, and so on.
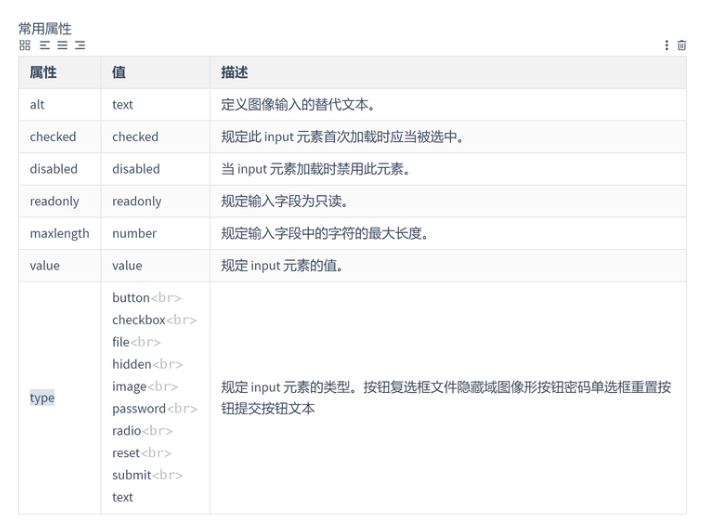
Each form must have a name and id, and the radio box label radio. For example, if you choose between men and women, you need to set the names of the two radios to be the same to ensure that they cannot be selected at the same time. Check box label and check box name also need to be set the same.
Example code:
<!DOCTYPE html>
<html>
	<head>
		<meta charset="utf-8" />
		<title>Forms and form elements</title>
	</head>
	<body>
		<form action="#" method="get" id="myform" name="myform">
			No.:<input type="hidden" name="userid" value="1" /> <br />
			full name:<input type="text" value="zhangsan" name="username" /> <br />
			password:<input type="password" name="userpwd"/> <br>
			Gender: Male<input type="radio" name="userSex" value="man"/>
				female<input type="radio" name="userSex" value="woman" />	<br>
			Hobbies: singing<input type="checkbox"  name="userHobby" value="sing" /> <br />
				dance<input type="checkbox" name="userHobby"  value="dance"/> <br />
				Rap<input type="checkbox" name="userHobby"  value="rap"/> <br />
			birthday:<input type="date" name="userData"  /> <br />
			head portrait:<input type="file" name="userHead" /> <br />
			<input type="button" value="Normal button" />
			<input type="reset" value="Reset button" />
			<input type="submit" value="Submit button" />
			<input type="image" src="img/baidu.png" />
		</form>
	</body>
</html>
Instance effect: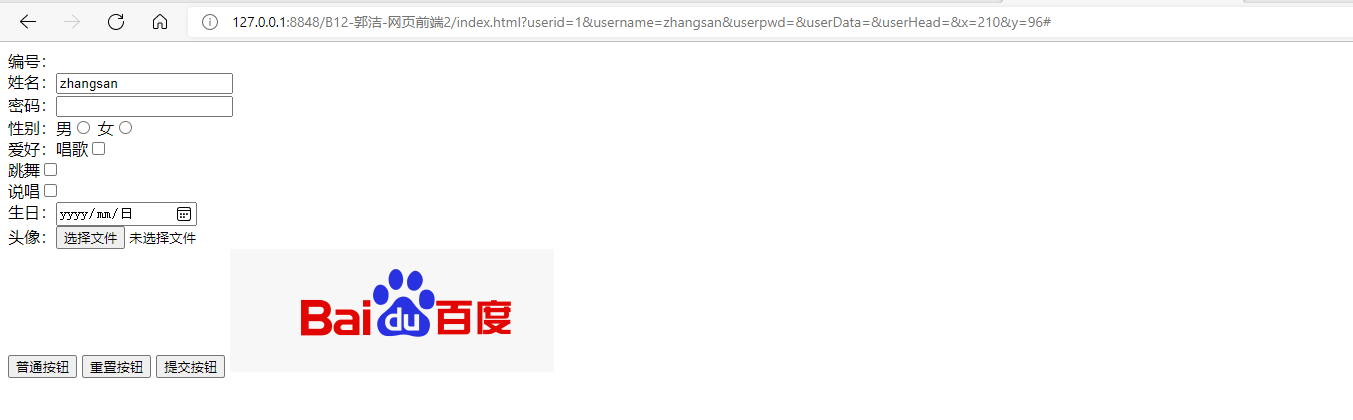
3.3 textarea
This label defines a multiline text input control. The text area can accommodate an unlimited number of text, and the size of the textarea can be specified through the cols and rows attributes. Cols specifies the visible width within the text area. Rows specifies the number of visible lines in the text area.
Introduction:<textarea name="remark" rows="5" cols="50">11111</textarea> <br />

3.4 label
The label label defines a label (tag) for the input element. The label element does not present any special effects.
The for attribute of the label label should be the same as the id attribute of the relevant element. At this time, clicking the label will automatically focus on the element

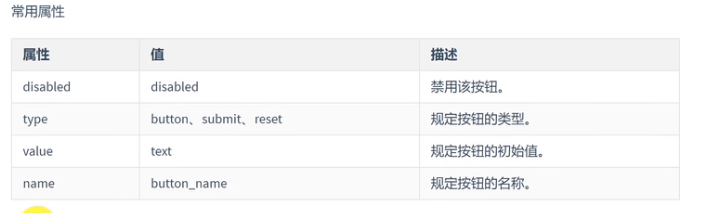
3.5 button
Example code
            <button type="button">Normal button</button>
			<button type="submit">Submit button</button>
			<button type="reset">Reset button</button>
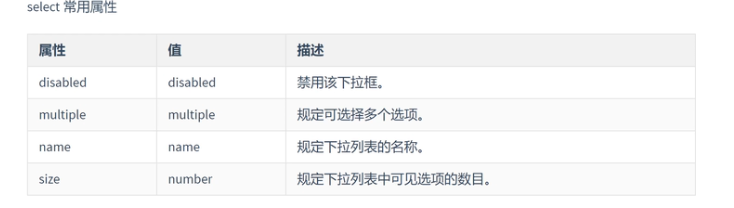
3.6 select
select is used to define the drop-down list
Example code:
city:
				<select name="city">
					<option>Please select a city</option>
					<option value="beijing">Beijing</option>
					<option value="shanghai">Shanghai</option>
					<option value="hangzhou">Hangzhou</option>
				</select>
Note: when the value attribute value is set in option, the submitted data is the value corresponding to value; If value is not set, the submitted data is a text value
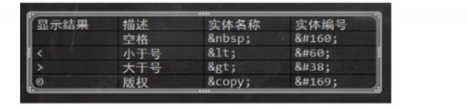
4. Common character entity
In HTML, some characters are reserved.
The less than sign (<) and the greater than sign (>) cannot be used in HTML because browsers mistakenly think they are tags.
If we want to display reserved characters correctly, we must use character entities in the HTML source code. Entity name is case sensitive!