The Spring framework summarizes the common ways in which Spring creates bean s
1, Common ways Spring creates bean s
- xml configuration file
- @Bean annotation
- @Component
- BeanDefinition
- FactoryBean
- Supplier
2, Use of various creation methods
1.xml configuration file
First create a User entity class
public class User {

    private String name;

    public void setName(String name) {
        this.name = name;
    }

    public String getName() {
        return name;
    }
}
Add spring.com under the classpath XML file
<?xml version="1.0" encoding="UTF-8"?>
<beans xmlns="http://www.springframework.org/schema/beans"
       xmlns:xsi="http://www.w3.org/2001/XMLSchema-instance"
       xsi:schemaLocation="http://www.springframework.org/schema/beans http://www.springframework.org/schema/beans/spring-beans.xsd">

    <!--id by bean name, class by bean type-->
    <bean id="user" class="com.spring.beans.User">
    </bean>
</beans>
Write the main function to start the spring container, and use the ClassPathXmlApplicationContext class to load spring XML file, spring will parse the specified file and add the beans defined in the tag to the spring container one by one. At this time, the bean definition is completed.
Then take the object from the spring container for verification through the getBean() method of the spring context object.
public class Test {
    public static void main(String[] args) {
        //Start the spring container and load the spring configuration file
        ClassPathXmlApplicationContext applicationContext = new ClassPathXmlApplicationContext("spring.xml");
        //Take the user object from the spring container and verify whether the bean was created successfully
        User user = applicationContext.getBean("user", User.class);
        System.out.println(user);
    }
}
The console print is shown in the following figure. It can be seen that there are bean objects of User type in the spring container.

2.@Bean annotation
This method is widely used at present. For example, the following is a configuration class:
public class ConfigTest {
    @Bean
    public User getUser() {
        User user = new User();
        user.setName("99 classmate");
        return user;
    }
}
Now that the configuration class has been written, just tell the spring container to load it. Here is the startup code:
public class Test {
    public static void main(String[] args) {
        //Start the Spring container and load the ConfigText configuration class. Here, the AnnotationConfigApplicationContext class is used to start Spring
        AnnotationConfigApplicationContext applicationContext = new AnnotationConfigApplicationContext(ConfigTest.class);
        //Remove the user object from the spring container
        User user = applicationContext.getBean("user", User.class);
        System.out.println(user);
        System.out.println(user.getName());
    }
}
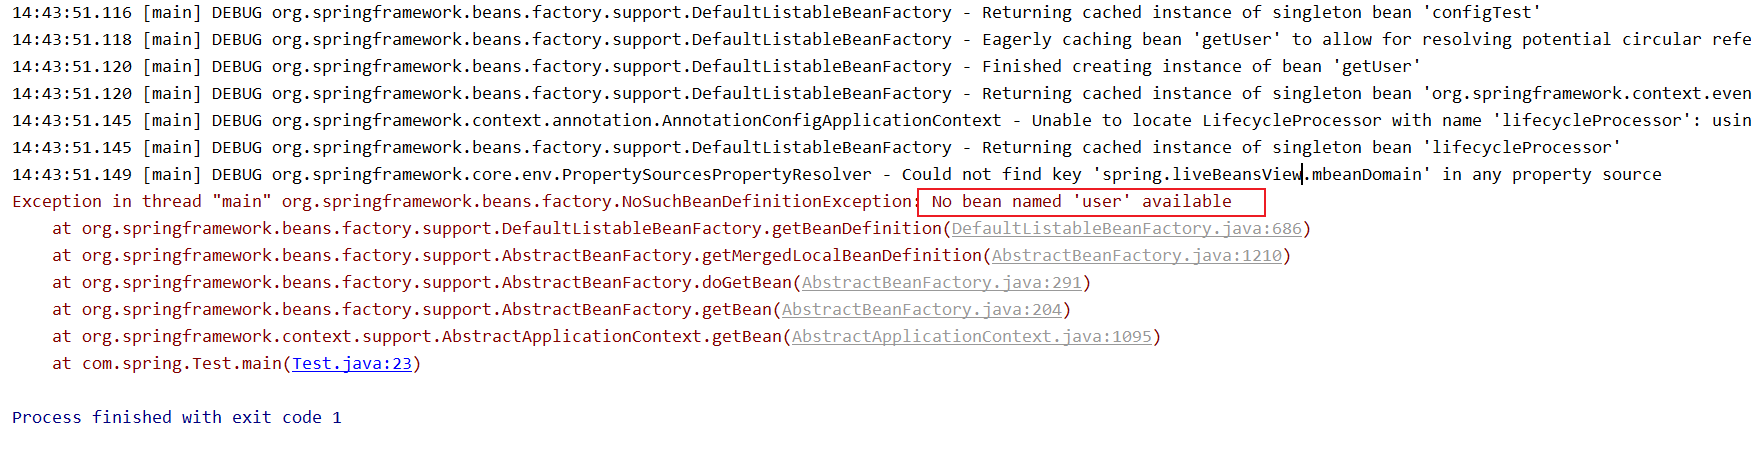
Start the main function above and find that the system throws an exception directly. Don't panic. Let's take a look at the exception content: No bean named 'user' available, which means, At present, there is No bean named "user" in the spring container. The reason is very simple. When using @ bean annotation, the method name using the annotation will be put into the spring container as the bean name. We can see that the method name used here is "getUser", so the bean name of user type existing in the spring container should be "getUser".
Now let's modify the code in the startup class. Let's change the name of the bean from the spring container to "getUser" for testing.
public class Test {
    public static void main(String[] args) {
        //Start the Spring container and load the ConfigText configuration class. Here, the AnnotationConfigApplicationContext class is used to start Spring
        AnnotationConfigApplicationContext applicationContext = new AnnotationConfigApplicationContext(ConfigTest.class);
        //Remove the user object from the spring container
        User user = applicationContext.getBean("getUser", User.class);
        System.out.println(user);
        System.out.println(user.getName());
    }
}
The operation results are as follows. You can see that the operation is successful.

See here, you should have mastered the use of @ bean annotation, that is, specify the bean Configuration class when starting the spring container with the AnnotationConfigApplicationContext class. But what if there are multiple Configuration classes that need to be loaded? Here we can use it with @ Configuration annotation. We add a @ Configuration annotation on the top of the Configuration class:
@Configuration
public class ConfigTest {
    @Bean
    public User getUser() {
        User user = new User();
        user.setName("99 classmate");
        return user;
    }
}
Then modify the startup class code. When using AnnotationConfigApplicationContext to start spring, we do not directly specify the @ bean Configuration class, but a spring startup Configuration class test Class, when spring starts, it will scan the class declared with @ Configuration annotation and take it as a bean Configuration class, load the methods annotated by @ bean in the class, and then put the corresponding beans into the spring container.
@SpringBootApplication
public class Test {
    public static void main(String[] args) {
        //Instead of specifying the bena configuration class, we directly specify a spring spring container startup configuration class
        AnnotationConfigApplicationContext applicationContext = new AnnotationConfigApplicationContext(Test.class);
        //Remove the user object from the spring container
        User user = applicationContext.getBean("getUser", User.class);
        System.out.println(user);
        System.out.println(user.getName());
    }
}
After the modification, the running result is as follows. A User type bean is successfully injected into the spring container.

3.@Component annotation
The annotation as like as two peas, which is the most commonly used annotation, has three variants: @Controller, @Service, @Repository. These annotations are exactly the same as @Component, but only for stratification in the background development of Web, even if @Service is used in the control layer, it is just not consistent with the common agreement.
@The use of Component annotation is very simple. You can add it to the class that needs to be registered as a bean. Spring will put the bean into the spring container with the initial lowercase of the class name; For example, the following class will be put into the spring container with user as the object name.
//@Controller for control layer
//@Service is used in the service layer
//@Repository is used for persistence layer
@Component
public class User {

    private String name;

    public void setName(String name) {
        this.name = name;
    }

    public String getName() {
        return name;
    }
}
After adding, just tell spring to load the class with @ Component annotation when spring starts. Here, the parameter scanBasePackages is used to specify the package to be scanned,
//@The parameter in the SpringBootApplication annotation means to tell spring to scan com spring. The classes under the beans package,
// If there is a variant with @ component or @ Component annotation on the class, inject the object of the class into the Springspring container.
@SpringBootApplication(scanBasePackages="com.spring.beans")
public class Test {
    public static void main(String[] args) {
        //Instead of specifying the bena configuration class, we directly specify a spring spring container startup configuration class
        AnnotationConfigApplicationContext applicationContext = new AnnotationConfigApplicationContext(Test.class);
        //Remove the user object from the spring container
        User user = applicationContext.getBean("user", User.class);
        System.out.println(user);
    }
}
4.BeanDefinition
Here is a big difference from the above. If the above methods are declarative, then the next step is to create bean s programmatically.
Next, let's look at the usage. There are two steps to create a bean using BeanDefinition:
Step 1: use BeanDefinition to define a bean;
Step 2: put the defined bean into the spring container.
public class Test {
    public static void main(String[] args) {
        //Start the spring container
        AnnotationConfigApplicationContext applicationContext = new AnnotationConfigApplicationContext(Test.class);

        //Step 1: create an AbstractBeanDefinition object and define a bean of User type
        AbstractBeanDefinition beanDefinition = BeanDefinitionBuilder.genericBeanDefinition().getBeanDefinition();
        beanDefinition.setBeanClass(User.class);

        //Step 2: put the defined bean of user type into the spring container and specify the name of the bean as user
        applicationContext.registerBeanDefinition("user",beanDefinition);

        //Extract the user object from the spring container for validation
        User user = applicationContext.getBean("user", User.class);
        System.out.println(user);
    }
}
The printout is as follows. You can see that the bean has also been successfully created.

5.FactoryBean
FactoryBean is an interface with two methods to be implemented. Here I define a FactoryBeanTest to implement FactoryBean; These two methods are very simple. The first getObject() is to get an object. When implementing this method, only one object needs to be returned, and the spring container will put the object into the spring container; The return value of the second method should be based on the first method. What is returned is the Class object of the object type returned by the first method. What I return here is the Class object of User Class.
@Component
public class FactoryBeanTest implements FactoryBean {

    @Override
    public Object getObject() throws Exception {
        User user = new User();
        return user;
    }

    @Override
    public Class<?> getObjectType() {
        return User.class;
    }
}
After defining the implementation class of FactoryBean, I need to put the implementation class into the spring container. Here I use the third method mentioned above, using @ Component annotation.
Now start the spring container to verify
@SpringBootApplication
public class Test {
    public static void main(String[] args) {
        //Start the spring container
        AnnotationConfigApplicationContext applicationContext = new AnnotationConfigApplicationContext(Test.class);

        //Extract the user object from the spring container for validation
        User user = applicationContext.getBean("user", User.class);
        System.out.println(user);
    }
}
At this time, it is found that the console throws an exception, saying that there is no object named user

In fact, there is no object named user here. Although the object name defined in the getObject() method is user, the spring container does not recognize it. The spring container will take the lowercase initial of the class name of factorybeantest as the object name, that is, factorybeantest. Now replace it with factorybeantest and try it;
@SpringBootApplication
public class Test {
    public static void main(String[] args) {
        //Start the spring container
        AnnotationConfigApplicationContext applicationContext = new AnnotationConfigApplicationContext(Test.class);
        //Extract the user object from the spring container for validation
        User user = applicationContext.getBean("factoryBeanTest", User.class);
        System.out.println(user);
    }
}
You can see that you can get the bean object of User type here.

In addition to the object of User type, in fact, a bean of factorybeantest type is put into the spring container. This is not difficult to understand, because the @ Component annotation is added. However, when the @ Component annotation is injected into the bean object, the object name will be the lowercase initial of the class name, but the name of factorybeantest here is occupied by the User class. To obtain the factorybeantest object, You need to use & factorybeantest to obtain,
@SpringBootApplication
public class Test {
    public static void main(String[] args) {
        //Start the spring container
        AnnotationConfigApplicationContext applicationContext = new AnnotationConfigApplicationContext(Test.class);
        //Extract the user object from the spring container for validation
        User user = applicationContext.getBean("factoryBeanTest", User.class);
        FactoryBeanTest factoryBeanTest = applicationContext.getBean("&factoryBeanTest", FactoryBeanTest.class);
        System.out.println(user);
        System.out.println(factoryBeanTest);
    }
}
6.Supplier
ApplicationContext. Is used here Registerbean (user. Class) can register a bean into the spring container, but if you need to customize the properties of the bean, you need to use the second parameter: functional parameter, in which you need to implement a method get(), which is very similar to the getObject() method in the FactoryBean interface above. Both beans are registered into the spring container with the return value. Here, the bean object in the container is the user object I returned in the get() method.
public class Test {
    public static void main(String[] args) {
        //Start the spring container
        AnnotationConfigApplicationContext applicationContext = new AnnotationConfigApplicationContext(Test.class);

        //The first parameter specifies the type of registered bean, and the second parameter is a function, which is a new feature of Java 8, lambda expression.
        applicationContext.registerBean(User.class, new Supplier<User>() {
            //The return value is registered in the spring container.
            @Override
            public User get() {
                User user = new User();
                user.setName("99 classmate");
                return user;
            }
        });

        //Extract the user object from the spring container for validation
        User user = applicationContext.getBean("user", User.class);
        System.out.println(user);
        System.out.println(user.getName());
    }
As can be seen from the following output, the name attribute in user is "99" that I set in the get() method.

3, Summary
In fact, no matter which way, the principle is not much different. It is to put an object into the spring container, either create an object and put it into the container, or specify a class and tell spring to put the object of this class into the spring container.