Library File Import
Bugly supports automatic integration and manual integration. If you use Gradle to compile Apk, we strongly recommend that you use automatic access to configure library files.
Automatic integration (recommendation)
Bugly support JCenter Warehouse and Maven Central Warehouse . In order to achieve more flexible configuration, Bugly SDK (version 2.1.5 and above) and NDK (SO library) are now separated into two separate warehouses:
- SDK: com.tencent.bugly:crashreport
- NDK: com.tencent.bugly:nativecrashreport
Among them, integrated Bugly In NDK, Bugly SDK needs to be integrated at the same time.
Integrated SDK
Add dependencies and attribute configurations to the Modele build.gradle file:
dependencies {
    compile 'com.tencent.bugly:crashreport:latest.release' //Where latest.release refers to the latest Bugly SDK version number, it can also specify a specific version number, such as 2.2.0.
}
Integrating SDK and NDK at the same time
Add dependencies and attribute configurations to the Modele build.gradle file:
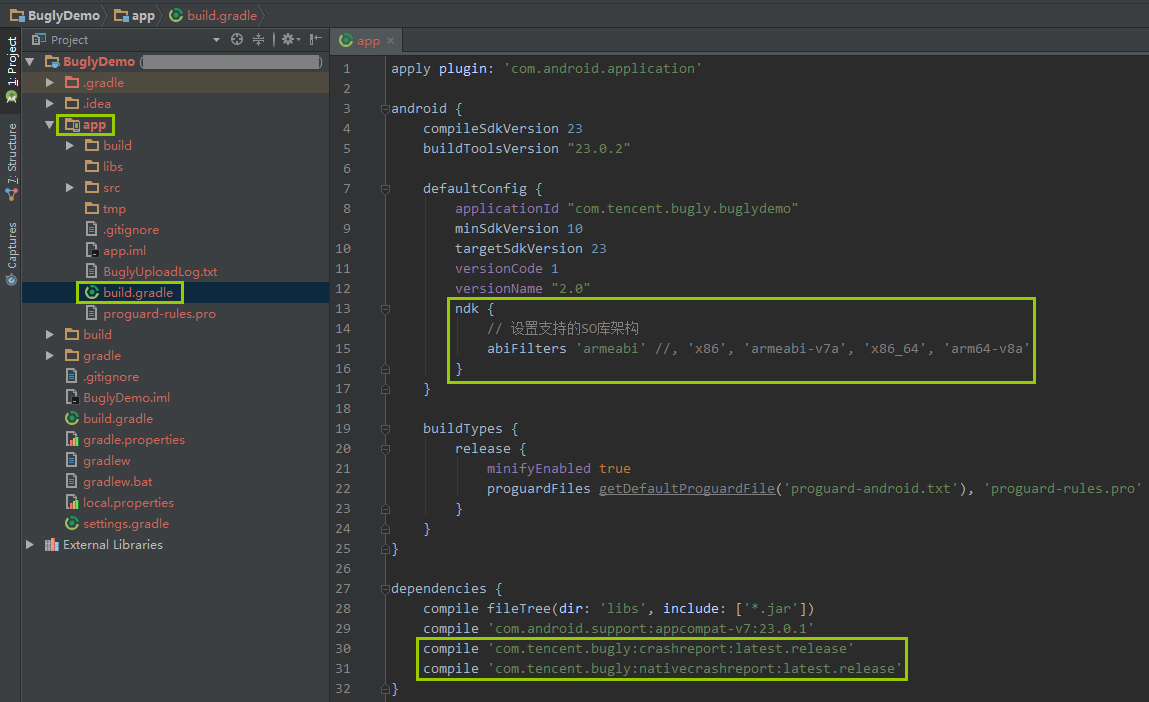
android {
    defaultConfig {
        ndk {
            // Setting up Supported SO Library Architecture
            abiFilters 'armeabi' //, 'x86', 'armeabi-v7a', 'x86_64', 'arm64-v8a'
        }
    }
}

dependencies {
    compile 'com.tencent.bugly:crashreport:latest.release' //Where latest.release refers to the latest Bugly SDK version number, it can also specify a specific version number, such as 2.1.9.
    compile 'com.tencent.bugly:nativecrashreport:latest.release' //Where latest.release refers to the latest Bugly NDK version number, it can also specify a specific version number, such as 3.0.
}
The configuration of integrating Bugly SDK and NDK is shown in the following figure. When the Bugly SDK and NDK are updated later, only the version number in the configuration script needs to be changed.
Note: Bugly is automatically included in automatic integration SO library, it is recommended to use the "abiFilter" configuration of NDK in the build.gradle file of Modele to set up the supported SO library architecture.
If Android Studio has the following prompt after adding "abiFilter":
NDK integration is deprecated in the current plugin. Consider trying the new experimental plugin.
In the gradle.properties file of the project root directory, add:
android.useDeprecatedNdk=true
Manual integration
If you do not use the above automatic import method, you can also manually integrate Bugly SDK.
Download Bugly library files
- Download Bugly's Android SDK package;
- If your project has Native code (C/C++) or integrates other third-party SO libraries, it is recommended to download Bugly's NDK Dynamic Library.
Bugly NDK contains multiple architectures of SO libraries:
- armeabi
- armeabi-v7a
- arm64-v8a
- x86
- x86_64
When integrating Bugly SO libraries, note that only the supported architecture SO libraries are retained.
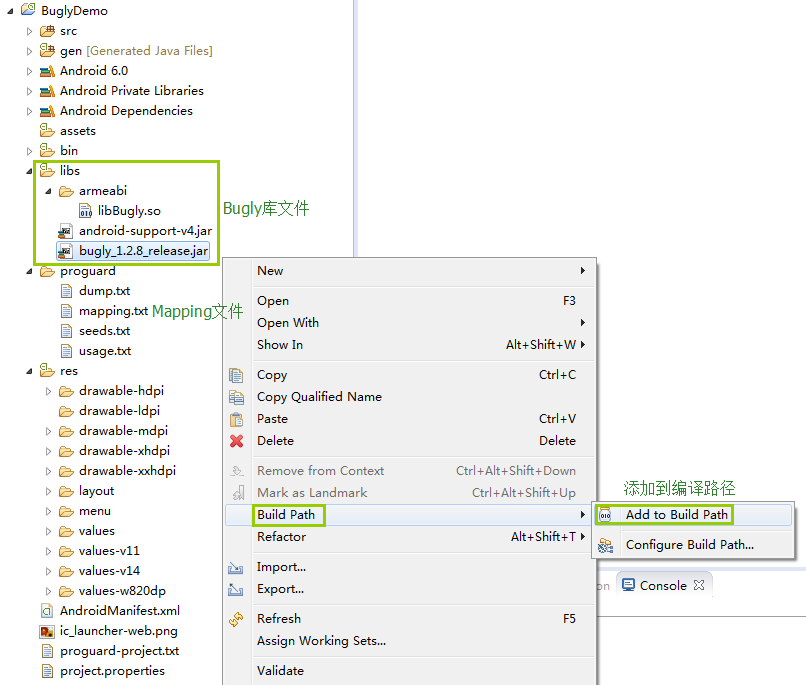
Eclipse Project
- Copy the Bugly library files to the libs directory of the project.
- Refresh first project;
- Add Engineering Dependency: Right-click Bugly's JAR file to add to the compilation path.
Android Studio Project
- Copy the Bugly library files to the libs directory of the project.
- If Bugly NDK is integrated, the SO Library Directory configuration is added to the Module's buid.gradle file:
android {
    sourceSets {
        main.jniLibs.srcDirs = ['libs']
    }
}
- Click Sync to synchronize the configuration.

In order to make the APP Crash stack more readable, it is recommended that you configure the symbol table file to locate the problem more accurately:
- Project of pure Java code: only need to configure the Mapping file generated after obfuscation;
- Engineering with Native code: It is recommended to configure Symbol table files extracted from Debug SO by Symbol Table Tool.
Bugly supports manual and automatic configurations. For specific configurations, please refer to:< Bugly Android Symbol Table Configuration>
Parameter Configuration
- Add permissions in AndroidManifest.xml:
<uses-permission android:name="android.permission.READ_PHONE_STATE" />
<uses-permission android:name="android.permission.INTERNET" />
<uses-permission android:name="android.permission.ACCESS_NETWORK_STATE" />
<uses-permission android:name="android.permission.ACCESS_WIFI_STATE" />
<uses-permission android:name="android.permission.READ_LOGS" />
- Avoid confusing Bugly by adding the following configuration to the Proguard confusion file:
-dontwarn com.tencent.bugly.**
-keep public class com.tencent.bugly.**{*;}
The simplest initialization
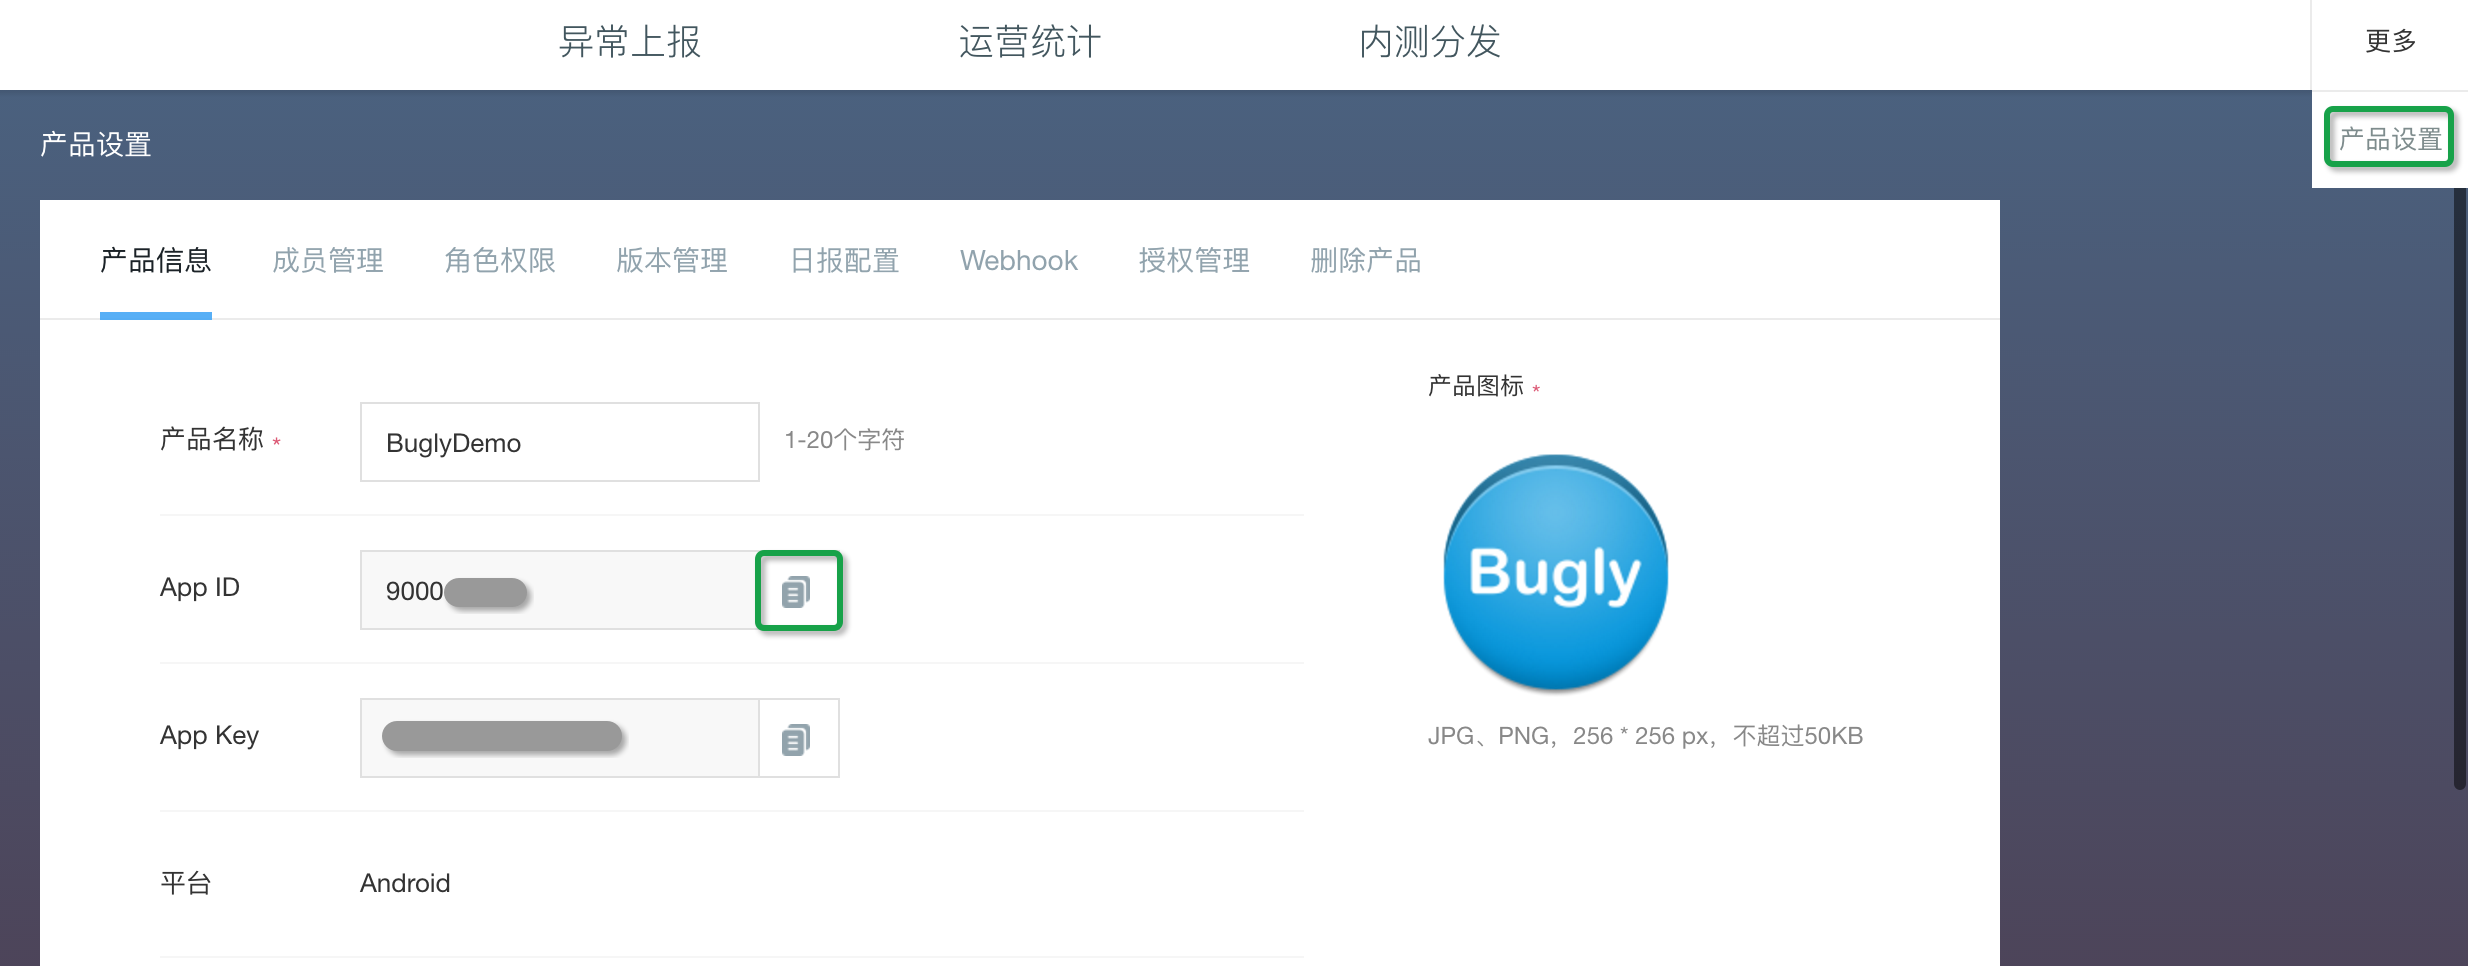
Get the APP ID and copy the following code into the project Application class onCreate(), Bugly will automatically detect the environment and complete the configuration:
CrashReport.initCrashReport(getApplicationContext(), "Applicants at the time of registration APPID", false);
To ensure the accuracy of operational data, it is recommended not to initialize Bugly in asynchronous threads.
The third parameter is SDK debugging mode switch. The behavioral characteristics of the debugging mode are as follows:
- Output detailed Bugly SDK logs;
- Every Crash will be reported immediately.
- The custom log will be output in Logcat.
It is recommended that the recommendation be set to true during the test phase and false at publication.
In addition, Bugly 2.0 and above also supports the configuration of APP information through "Android Manifest. xml". If the APP information is configured in the code at the same time, the information of the code configuration is the final criterion.
Add the "meta-data" configuration item to the "Application" of "Android Manifest.xml":
<application
    <!-- To configureAPP ID -->
    <meta-data
            android:name="BUGLY_APPID"
            android:value="<APP_ID>" />
    <!-- To configure APP version number -->
    <meta-data
            android:name="BUGLY_APP_VERSION"
            android:value="<APP_Version>" />
    <!-- To configure APP Channel number -->
    <meta-data
            android:name="BUGLY_APP_CHANNEL"
            android:value="<APP_Channel>" />
    <!-- To configure Bugly Debugging mode( true perhaps false)-->
    <meta-data
            android:name="BUGLY_ENABLE_DEBUG"
            android:value="<isDebug>" />
</application>
Unlike "Android: version Name," BUGLY_APP_VERSION configures the version number of APP for the Bugly platform.
The initialization method after configuring "Android Manifest. xml" is as follows:
CrashReport.initCrashReport(getApplicationContext());
Bugly reads "VersionName" as version number by default from "Android Manifest. xml" file. Use reference for custom settings“ advanced setting".
MultiDex Notes
If MultiDex is used, it is recommended that Bugly's class be placed in the main Dex by Gradle's "multiDex KeepFile" configuration, and that non-main DEX be loaded actively in the "attachBaseContext" method of Application class:
public class MyApplication extends SomeOtherApplication {
  @Override
  protected void attachBaseContext(Context base) {
     super.attachBaseContext(context);
     Multidex.install(this);
  }
}
Increase reporting process control
If App uses multiple processes and each process initializes Bugly (for example, Bugly is initialized in the Application class onCreate(), Bugly under each process will report data, resulting in unnecessary waste of resources.
Therefore, in order to save traffic, memory and other resources, it is recommended to control the reporting process during initialization, only report data under the main process: determine whether it is the main process (by the process name is a package name), and add a policy configuration to the reporting process when initializing Bugly.
Context context = getApplicationContext();
// Get the current package name
String packageName = context.getPackageName();
// Get the current process name
String processName = getProcessName(android.os.Process.myPid());
// Set whether to report process or not
UserStrategy strategy = new UserStrategy(context);
strategy.setUploadProcess(processName == null || processName.equals(packageName));
// Initialize Bugly
CrashReport.initCrashReport(context, "Applicants at the time of registration APPID", isDebug, strategy);
// If you configure APP information by "Android Manifest. xml", the initialization method is as follows
// CrashReport.initCrashReport(context, strategy);
The method of getting process name "getProcessName" has many implementations. The recommended methods are as follows:
/**
 * Get the process name corresponding to the process number
 *
 * @param pid Process number
 * @return Process name
 */
private static String getProcessName(int pid) {
    BufferedReader reader = null;
    try {
        reader = new BufferedReader(new FileReader("/proc/" + pid + "/cmdline"));
        String processName = reader.readLine();
        if (!TextUtils.isEmpty(processName)) {
            processName = processName.trim();
        }
        return processName;
    } catch (Throwable throwable) {
        throwable.printStackTrace();
    } finally {
        try {
            if (reader != null) {
                reader.close();
            }
        } catch (IOException exception) {
            exception.printStackTrace();
        }
    }
    return null;
}
test
Now you can create a Crash (which is suggested to be triggered by a "button" to experience Bugly's capabilities. After initializing Bugly, call Bugly to test the Java Crash interface.
CrashReport.testJavaCrash();
A Crash occurs when this code is executed, and the output from TAG=CrashReportInfo of Logcat is:

Now you can see the Crash issue triggered just now on the crash page (the delay is usually less than 10 seconds).