Bowen outline:
(1) Concepts related to GlusterFS.
(2) The deployment of various volume types of GlusterFS and the use of client mounting.
(3) GlusterFS maintenance command.
(1) Concepts related to GlusterFS:
GlusterFS is an open source distributed file system, and is also the core of Scale-Out storage solution Gluster. It has powerful horizontal scalability in data storage. GlusterFS is mainly composed of storage server, client and NFS/Samba storage gateway (optional components). The biggest design feature of GlusterFS architecture is that there is no metadata server component, that is to say, there is no master/slave server, and every node can be the master server.
1) The Gluster reference documents are as follows (my configuration below is based on the local yum configuration. If you need to build the latest version, you can configure it directly according to the following document links):
Gluster official website ,Installation of Gluster Official Documents Based on centos7/Redhat
2) GlusterFS related terms:
- Brick: A dedicated partition in a trusted host pool that is provided by the host for physical storage.
- Volume: A logical volume is a collection of Brick s. Volumes are logical devices for data storage.
- FUSE: A kernel module that allows users to create their own file systems without modifying the kernel code.
- Glusterd: Runs on every node in the storage cluster.
- VFS: The interface provided by kernel space to access disks by user space.
3) Volume type of GlusterFS:
- Distributed volume: equivalent to cross-area volume in Windows, it only enlarges disk space and does not have fault tolerance.
- Strip Volume: It is equivalent to the zone volume in Windows. It belongs to RAID 0 level. A file can be read and written on multiple disks. The larger the file, the higher the efficiency of reading and writing, but it has no fault-tolerant ability.
- Copy Volume: The mirror volume in Windows, which belongs to RAID 1 level, has fault tolerance, high read performance, but poor write performance, because the same file is written to multiple Brick s synchronously.
- Distributed Strip Volume: The number of brick servers is a multiple of the number of strips (the number of bricks distributed by data blocks), which has the characteristics of both distributed and strip volumes.
- Distributed replication volume: The number of brick servers is a multiple of the number of mirrors (the number of data replicas), which has the characteristics of both distributed and replicated volumes.
- Strip Copy Volume: Similar to RAID 10, it also has the characteristics of strip and copy volume.
- Distributed Strip Copy Volume: A composite volume of three basic volumes, usually used in map reduce applications.
Some of the above volume types may not be comprehensible, but it doesn't matter. In the production environment, most companies will use RAID 5, or RAID 10, considering disk utilization. For the configuration of RAID 5 volume, you can refer to: Summary of GlusterFS Dispersed Volume.
4) The characteristics of some volume types of GlusterFS (excluding RAID5) are described below.
1. Distributed volumes (similar to cross-section volumes in Windows):
Distributed volumes are GlusterFS's default volumes. When creating volumes, the default option is to create distributed volumes. In this mode, the file is not partitioned, and the file is stored directly on a server node.
Distributed volumes have the following characteristics:
- Files are distributed on different servers and do not have redundancy.
- It's easier and cheaper to expand volume sizes.
- Single point failure can cause data loss.
- Depends on the underlying data protection.
2. Strip Volume (similar to the Strip Volume in Windows, also known as RAID 0):
Strip mode is equivalent to RAID 0, in which files are divided into N blocks (N strip nodes) according to offset and stored in each Brick Server node polling. Each data block is stored in the local file system as a common file, and the total number of blocks and the serial number of each block are recorded by extending attributes. The number of bands specified in the configuration must be equal to the number of storage servers contained in Brick in the volume. When storing large files, the performance is particularly outstanding, but there is no redundancy.
The strip coil has the following characteristics:
- The data is divided into smaller pieces and distributed to different stripes in the block server cluster.
- Distribution reduces load and smaller files speed up access.
- No data redundancy.
3. Copy volume (similar to mirror volume in Windows, also known as RAID 1)
Copy mode, that is, the same file saves one or more copies, each node saves the same content and directory structure. In replication mode, the disk utilization is low because the replica is to be saved. If the storage space on multiple nodes is inconsistent, the lowest node capacity will be taken as the total capacity of the volume according to the barrel effect. Copy volume has redundancy, even if a node is damaged, it does not affect the normal use of data.
Copied volumes have the following characteristics:
- All servers in the volume keep a complete copy.
- The number of copies of volumes can be determined by the time the customer creates them.
- At least two or more servers.
- Redundancy.
4. Distributed replication volume (also known as RAID 10):
Distributed replication volume takes into account the functions of distributed volume and replication volume. It is mainly used in situations where redundancy is required.
(2) Deployment of various volume types of GlusterFS and use of client mounting:
My environment here is as follows:
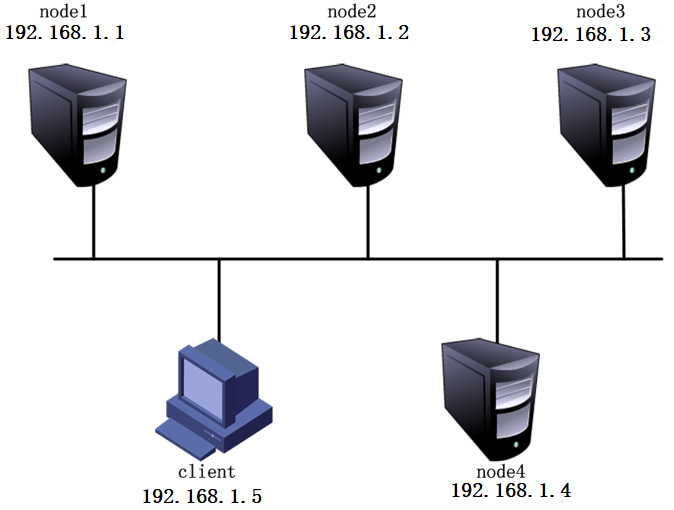
Server related information:
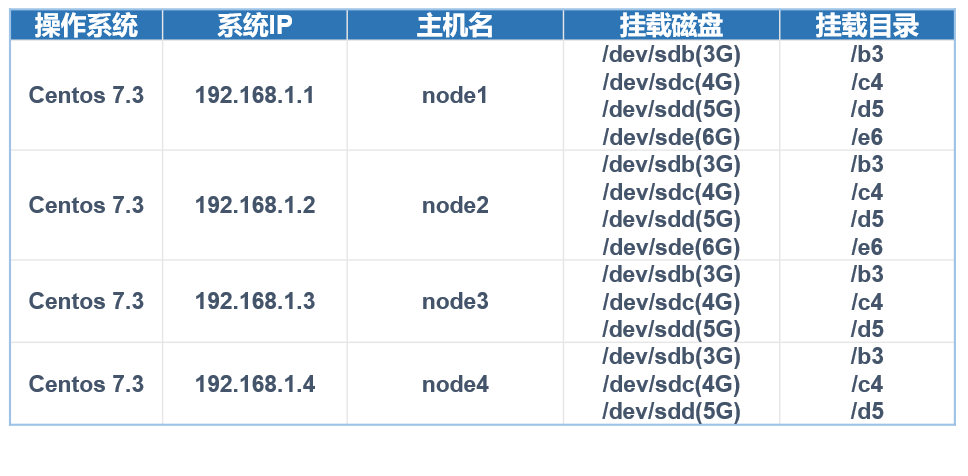
Disk related information:
Pre-deployment preparation:
1. Perform the following operations on all nodes: add disk according to the above table, partition by fdisk command, format mkfs, create the corresponding mount directory, and mount the formatted disk into the corresponding directory. Finally, modify the / etc/fstab configuration file to make it permanent mount. The specific configuration can refer to my previous blog. Wen: centos 7.3 Create, mount and uninstall (including automatic mount) file systems This is the case. (My main purpose here is to make a note, so the size of the disk is not based on the actual environment, according to their actual environment for disk partitioning)
2. Configure your own firewall and selinux. I shut it down for convenience.
3. Download what I provided Local yum warehouse And upload to each node server.
II. Start deploying:
1. Noe1 is configured as follows:
[root@node1 ~]# vim /etc/hosts         #Write the last four lines to add the parsing of four nodes
127.0.0.1   localhost localhost.localdomain localhost4 localhost4.localdomain4
::1         localhost localhost.localdomain localhost6 localhost6.localdomain6
192.168.1.1 node1
192.168.1.2 node2
192.168.1.3 node3
192.168.1.4 node4
[root@node1 ~]# mount /dev/cdrom /media     #Mount the yum warehouse I provided
mount: /dev/sr0 Write protection will be mounted as read-only
[root@node1 ~]# rm -rf /etc/yum.repos.d/*       #Delete or remove the original yum configuration file
[root@node1 ~]# yum clean all       #Clear yum cache
[root@node1 ~]# vim /etc/yum.repos.d/a.repo       #Edit the yum configuration file and write the following
[fd]
baseurl=file:///media
gpgcheck=0
#Write the above three lines, save and exit.
[root@node1 ~]# yum -y install glusterfs glusterfs-server glusterfs-fuse glusterfs-rdma
#Install GlusterFS software
[root@node1 ~]# systemctl start glusterd         #Start the service
[root@node1 ~]# systemctl enable glusterd     #Set to Boot Self-Start
2. Noe2 is configured as follows:
[root@node2 ~]# scp root@192.168.1.1:/etc/hosts /etc/    #Copy the hosts configuration file for node1
The authenticity of host 192.168.1.1 (192.168.1.1)cat be established.
ECDSA key fingerprint is SHA256:BS+lKMN05pYF3F1XeIYU69VnHjzKBiBiMZ1SDKgsxxs.
ECDSA key fingerprint is MD5:ba:0b:a7:47:55:01:6f:41:41:5f:ee:b8:88:bf:7a:60.
Are you sure you want to continue connecting (yes/no)? yes    #Enter "yes"
Warning: Permanently added '192.168.1.1' (ECDSA) to the list of known hosts.
root@192.168.1.1s password:               #Enter the password of the other party's username
hosts                                             100%  230   286.9KB/s   00:00
[root@node1 ~]# rm -rf /etc/yum.repos.d/*       #Delete or remove the original yum configuration file
[root@node1 ~]# yum clean all       #Clear yum cache
[root@node2 ~]# scp root@192.168.1.1:/etc/yum.repos.d/a.repo /etc/yum.repos.d/
#Copy the yum file of node1
root@192.168.1.1s password:
a.repo                          100%   38    31.1KB/s   00:00
[root@node2 ~]# mount /dev/cdrom /media          #Mount the yum warehouse I provided
mount: /dev/sr0 Write protection will be mounted as read-only
[root@node1 ~]# yum -y install glusterfs glusterfs-server glusterfs-fuse glusterfs-rdma
#Install GlusterFS software
[root@node1 ~]# systemctl start glusterd         #Start the service
[root@node1 ~]# systemctl enable glusterd     #Set to Boot Self-Start
So far, the configuration of node2 has been completed, node3, node4 can repeat the configuration of node2, I will not write, please configure yourself.
3. Add nodes (all the following configurations can be executed on any node, and I will execute on node1 here):
[root@node1 ~]# gluster peer probe node1      #Add node1, so the prompt does not need to be added
peer probe: success. Probe on localhost not needed
[root@node1 ~]# gluster peer probe node2             #Add node2
peer probe: success.
[root@node1 ~]# gluster peer probe node3            #Add node3
peer probe: success.
[root@node1 ~]# gluster peer probe node4            #Add node4
[root@node1 ~]# gluster peer status      #Viewing Cluster Status
Number of Peers: 3

Hostname: node2
Uuid: d733aa7c-5078-43b2-9e74-6673f3aaa16e
State: Peer in Cluster (Connected) #If a node displays Disconnected, check the hosts configuration file

Hostname: node3
Uuid: dc64b6c6-ce2d-41d3-b78b-56f46038ab52
State: Peer in Cluster (Connected)

Hostname: node4
Uuid: 926b51e9-4599-4fe8-ad2b-11f53a2ffb5a
State: Peer in Cluster (Connected)
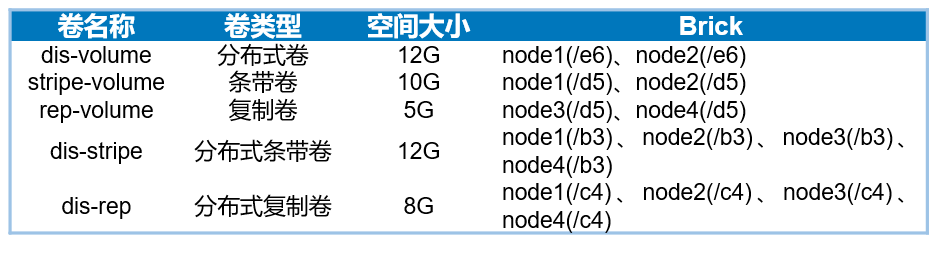
4. Create various types of volumes
(1) Create distributed volumes:
[root@node1 ~]# gluster volume create dis-volume node1:/e6 node2:/e6 force
#Create distributed volumes, where "dis-volume" is the name of the volume, and no type is specified. Distributed volumes are created by default.
volume create: dis-volume: success: please start the volume to access data
[root@node1 ~]# gluster volume info dis-volume   #View information about this volume

Volume Name: dis-volume
Type: Distribute
Volume ID: 2552ea18-b8f4-4a28-b411-a5b1bd168009
Status: Created
Snapshot Count: 0
Number of Bricks: 2
Transport-type: tcp
Bricks:
Brick1: node1:/e6
Brick2: node2:/e6
Options Reconfigured:
transport.address-family: inet
nfs.disable: on
[root@node1 ~]# gluster volume start dis-volume          #Enable the volume
volume start: dis-volume: success
(2) Create strip volume:
[root@node1 ~]# gluster volume create stripe-volume stripe 2 node1:/d5 node2:/d5 force
#Create strip volumes, specifying the number of strip volumes to be 2. "stripe-volume" is the volume name
#The specified type is stripe, with a value of 2, followed by two brick servers, so the strip volume is created
volume create: stripe-volume: success: please start the volume to access data
[root@node1 ~]# gluster volume info stripe-volume       #View information about this volume

Volume Name: stripe-volume
Type: Stripe      #Volume type is strip
Volume ID: c38107e9-9d92-4f37-a345-92568c2c9e9a
Status: Created
Snapshot Count: 0
Number of Bricks: 1 x 2 = 2
Transport-type: tcp
Bricks:
Brick1: node1:/d5
Brick2: node2:/d5
Options Reconfigured:
transport.address-family: inet
nfs.disable: on
[root@node1 ~]# gluster volume start stripe-volume            #Enable the volume
volume start: stripe-volume: success
(3) Create replica volumes:
[root@node1 ~]# gluster volume create rep-volume replica 2 node3:/d5 node4:/d5 force
#The specified type is "replica" and the value is "2", followed by two brick server s, so the replica volume is created.
volume create: rep-volume: success: please start the volume to access data
[root@node1 ~]# gluster volume info rep-volume               #View information about this volume

Volume Name: rep-volume
Type: Replicate          #Volume type is replication
Volume ID: 03553b49-c5fa-4a5f-8d66-8c229e617696
Status: Created
Snapshot Count: 0
Number of Bricks: 1 x 2 = 2
Transport-type: tcp
Bricks:
Brick1: node3:/d5
Brick2: node4:/d5
Options Reconfigured:
transport.address-family: inet
nfs.disable: on
[root@node1 ~]# gluster volume start rep-volume           #Enable the volume
volume start: rep-volume: success
(4) Create distributed strip volumes:
[root@node1 ~]# gluster volume create dis-stripe stripe 2 node1:/b3 node2:/b3 node3:/b3 node4:/b3 force
#The specified type is stripe, with a value of 2, followed by four brick server s, so a distributed stripe volume is created.
volume create: dis-stripe: success: please start the volume to access data
[root@node1 ~]# gluster volume info dis-stripe               #View information about this volume

Volume Name: dis-stripe
Type: Distributed-Stripe           #Volume type is distributed + strip
Volume ID: 059ee6e3-317a-4e47-bf92-47d88e3acf3c
Status: Created
Snapshot Count: 0
Number of Bricks: 2 x 2 = 4
Transport-type: tcp
Bricks:
Brick1: node1:/b3
Brick2: node2:/b3
Brick3: node3:/b3
Brick4: node4:/b3
Options Reconfigured:
transport.address-family: inet
nfs.disable: on
[root@node1 ~]# gluster volume start dis-stripe          #Enable the volume
volume start: dis-stripe: success
8. Create distributed replication volumes:
[root@node1 ~]# gluster volume create dis-rep replica 2 node1:/c4 node2:/c4 node3:/c4 node4:/c4 force
#The specified type is replica, with a value of 2, followed by four brick servers, which is twice as large as 2, so a distributed replica volume is created.
volume create: dis-rep: success: please start the volume to access data
[root@node1 ~]# gluster volume info dis-rep                  #View information about this volume

Volume Name: dis-rep
Type: Distributed-Replicate               #Volume type is distributed + replication
Volume ID: 9e702694-92c7-4a3a-88d2-dcf9ddad741c
Status: Created
Snapshot Count: 0
Number of Bricks: 2 x 2 = 4
Transport-type: tcp
Bricks:
Brick1: node1:/c4
Brick2: node2:/c4
Brick3: node3:/c4
Brick4: node4:/c4
Options Reconfigured:
transport.address-family: inet
nfs.disable: on
[root@node1 ~]# gluster volume start dis-rep         #Enable the volume
volume start: dis-rep: success
OK, now that the volume involved has been created, it can be mounted and used on the client side:
5. Deploy Gluster Client:
(1) Deployment and installation:
[root@node1 ~]# rm -rf /etc/yum.repos.d/*       #Delete or remove the original yum configuration file
[root@node1 ~]# yum clean all       #Clear yum cache
[root@node2 ~]# scp root@192.168.1.1:/etc/yum.repos.d/a.repo /etc/yum.repos.d/
#Copy the yum file of node1
root@192.168.1.1s password:
a.repo                          100%   38    31.1KB/s   00:00
[root@node2 ~]# mount /dev/cdrom /media          #Mount the yum warehouse I provided
mount: /dev/sr0 Write protection will be mounted as read-only
[root@client ~]#  yum -y install glusterfs glusterfs-fuse   #Install GlusterFS software required by client
[root@client ~]# mkdir -p /test/{dis,stripe,rep,dis_and_stripe,dis_and_rep}        #Create mount directories
[root@client ~]# ls /test       #Check whether the mount directory is created
dis  dis_and_rep  dis_and_stripe  rep  stripe
[root@client ~]# scp root@192.168.1.1:/etc/hosts /etc/
#client also needs to parse the node server, so copy the hosts file of host 1.1
root@192.168.1.1 s password:           #Enter the user password for the opposite server
hosts                                             100%  230     0.2KB/s   00:00
(2) Mount Gluster file system:
[root@client ~]# mount -t glusterfs node1:dis-volume /test/dis
[root@client ~]# mount -t glusterfs node2:stripe-volume /test/stripe
[root@client ~]# mount -t glusterfs node3:rep-volume /test/rep
[root@client ~]# mount -t glusterfs node4:dis-stripe /test/dis_and_stripe
[root@client ~]# mount -t glusterfs node1:dis-rep /test/dis_and_rep
#If the mount is unsuccessful, check hosts file parsing. When mounting, you can specify any host in the logical storage volume.
#Because all GlusterFS configuration information is shared among nodes, this also avoids node1 failures and makes it impossible to use others.
#Volume problems.
(3) Modify the fstab configuration file in order to realize automatic boot-up mounting:
[root@client ~]# vim /etc/fstab       #Write the following lines at the end of the file
node2:stripe-volume     /test/stripe    glusterfs       defaults,_netdev 0 0
node3:rep-volume        /test/rep       glusterfs       defaults,_netdev 0 0
node4:dis-stripe        /test/dis_and_stripe    glusterfs       defaults,_netdev 0 0
node1:dis-rep           /test/dis_and_rep       glusterfs       defaults,_netdev 0 0
node1:dis-volume        /test/dis       glusterfs       defaults,_netdev 0 0
When setting up automatic mount, the relevant directories must be manually mounted to achieve automatic mount. Although it is possible to specify which node when mounting manually, it is recommended that when writing to / etc/fstab, which node specified at the current mount should be written.
(3) GlusterFS Maintenance Order:
[root@node1 ~]# gluster volume list      #View Volume List
dis-rep
dis-stripe
dis-volume
rep-volume
stripe-volume
[root@node1 ~]# gluster volume info           #View information on all volumes
Volume Name: dis-rep
Type: Distributed-Replicate
Volume ID: 9e702694-92c7-4a3a-88d2-dcf9ddad741c
Status: Started
Snapshot Count: 0
Number of Bricks: 2 x 2 = 4
Transport-type: tcp
Bricks:
Brick1: node1:/c4
Brick2: node2:/c4
Brick3: node3:/c4
Brick4: node4:/c4
Options Reconfigured:
transport.address-family: inet
nfs.disable: on
 .......................      #Omit part of content
[root@node1 ~]# gluster volume status           #View the status of volumes
Status of volume: dis-rep
Gluster process                             TCP Port  RDMA Port  Online  Pid
------------------------------------------------------------------------------
Brick node1:/c4                             49155     0          Y       11838
Brick node2:/c4                             49155     0          Y       12397
Brick node3:/c4                             49154     0          Y       12707
Brick node4:/c4                             49154     0          Y       12978
Self-heal Daemon on localhost               N/A       N/A        Y       11858
Self-heal Daemon on node4                   N/A       N/A        Y       12998
Self-heal Daemon on node2                   N/A       N/A        Y       12417
Self-heal Daemon on node3                   N/A       N/A        Y       12728
       ............................

 [root@node1 ~]# gluster volume stop dis-stripe             #Stop a volume
Stopping volume will make its data inaccessible. Do you want to continue? (y/n) y
volume stop: dis-stripe: success
[root@node1 ~]# gluster volume delete dis-stripe           #Delete a volume
Deleting volume will erase all information abe. Do you want to continue? (y/n) y
volume delete: dis-stripe: success
[root@node1 ~]# gluster volume set dis-rep auth.allow 192.168.1.*,10.1.1.*
#Setting up client access volume dis-rep for specific network segments only
volume set: success