1, Spring initialization
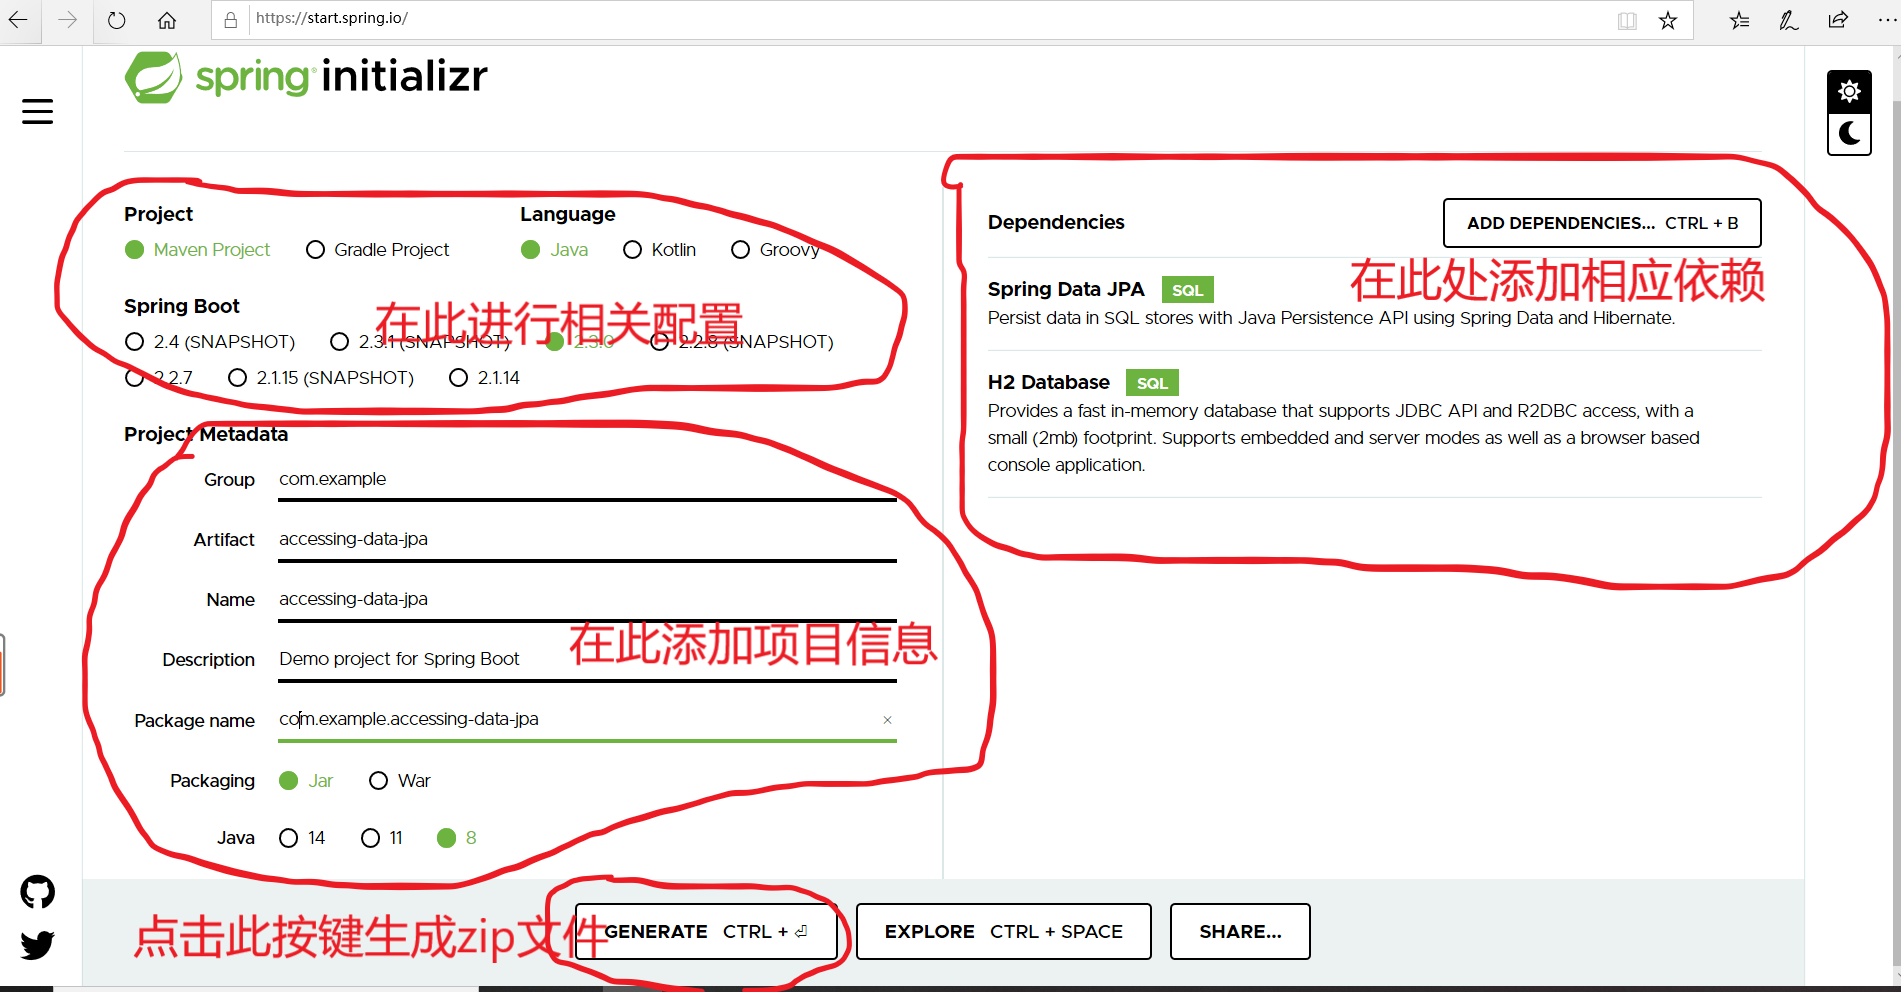
1. Open https://start.spring.io/ , fill in the relevant information of the project on this page, add the corresponding dependencies, and then click "GENERATE" to GENERATE a zip file, decompress it in a suitable location on your computer, and then open the project using IDEA.
 2, Preparation of relevant documents
The effect to be achieved: store customer information (including ID, firstname, lastname) in H2 database, and get all customer information in the database, and get customer information according to customer ID and lastname. The specific implementation is as follows:
1. Define a simple Entity: create a customer class in the src/main/java/com/example/accessingdatajpa directory Customer.java The code is as follows:
package com.example.accessingdatajpa;

import javax.persistence.Entity;
import javax.persistence.GeneratedValue;
import javax.persistence.GenerationType;
import javax.persistence.Id;

//This annotation indicates that Customer is a JPA entity, that is, it will map Customer to a table named Customer
@Entity
public class Customer {

  //This annotation is intended to let JPA know that the ID attribute is the ID of the entity
  @Id
  //This annotation indicates that the ID is auto plus 1
  @GeneratedValue(strategy=GenerationType.AUTO)
  private Long id;
  private String firstName;
  private String lastName;

  //JPA requires a default constructor
  protected Customer() {}

  //This constructor is what we use to create a Customer instance
  public Customer(String firstName, String lastName) {
    this.firstName = firstName;
    this.lastName = lastName;
  }

  @Override
  //Override this method so that it can output Customer properties in a specific format
  public String toString() {
    return String.format(
        "Customer[id=%d, firstName='%s', lastName='%s']",
        id, firstName, lastName);
  }

  public Long getId() {
    return id;
  }

  public String getFirstName() {
    return firstName;
  }

  public String getLastName() {
    return lastName;
  }
}
2. Create a simple query: create a CustomerRepository interface under the directory "src/main/java/com/example/accessingdatajpa /"
package com.example.accessingdatajpa;

import java.util.List;

import org.springframework.data.repository.CrudRepository;

public interface CustomerRepository extends CrudRepository<Customer, Long> {

  List<Customer> findByLastName(String lastName);

  Customer findById(long id);
}
Explanation: Spring Data JPA can use JPA to store data in a relational database. The most significant feature is to automatically create implementation classes for the repository interface at runtime (you do not need to write their own implementation classes for the interface). CustomerRepository inherits from CrudRepository, so the interface contains save, delete and find methods. And you can customize other query methods, just declare the method in the interface, such as findByLastName() method in the code.
3. Create an application class: in the initialization phase, Spring Boot creates an AccessingDataJpaApplication class. The specific code is as follows:
package com.example.accessingdatajpa;

import org.springframework.boot.SpringApplication;
import org.springframework.boot.autoconfigure.SpringBootApplication;

//This annotation indicates that this class is a SpringBoot application
@SpringBootApplication
public class AccessingDataJpaApplication {

  public static void main(String[] args) {
    //Use this method to start the SpringBoot application
    SpringApplication.run(AccessingDataJpaApplication.class, args);
  }

  @Bean
  public CommandLineRunner demo(CustomerRepository repository) {
    return (args) -> {
      // save a few customers
      repository.save(new Customer("Jack", "Bauer"));
      repository.save(new Customer("Chloe", "O'Brian"));
      repository.save(new Customer("Kim", "Bauer"));
      repository.save(new Customer("David", "Palmer"));
      repository.save(new Customer("Michelle", "Dessler"));

      // fetch all customers
      log.info("Customers found with findAll():");
      log.info("-------------------------------");
      for (Customer customer : repository.findAll()) {
        log.info(customer.toString());
      }
      log.info("");

      // fetch an individual customer by ID
      Customer customer = repository.findById(1L);
      log.info("Customer found with findById(1L):");
      log.info("--------------------------------");
      log.info(customer.toString());
      log.info("");

      // fetch customers by last name
      log.info("Customer found with findByLastName('Bauer'):");
      log.info("--------------------------------------------");
      repository.findByLastName("Bauer").forEach(bauer -> {
        log.info(bauer.toString());
      });
      // for (Customer bauer : repository.findByLastName("Bauer")) {
      //  log.info(bauer.toString());
      // }
      log.info("");
    };
  }

}
Explanation: demo method, first it will get the customer repository from the Spring application context, then store the customer information in the database, and then you can get the customer information you want according to some methods. Demo returns a CommandLineRunner bean that automatically runs its code when the application starts.