1. Installing anaconda3
1.1 download anaconda3
Directly in Official website Slow down, recommended Tsinghua mirror (you can also change the source of Pip to domestic, and pip install will be much faster)
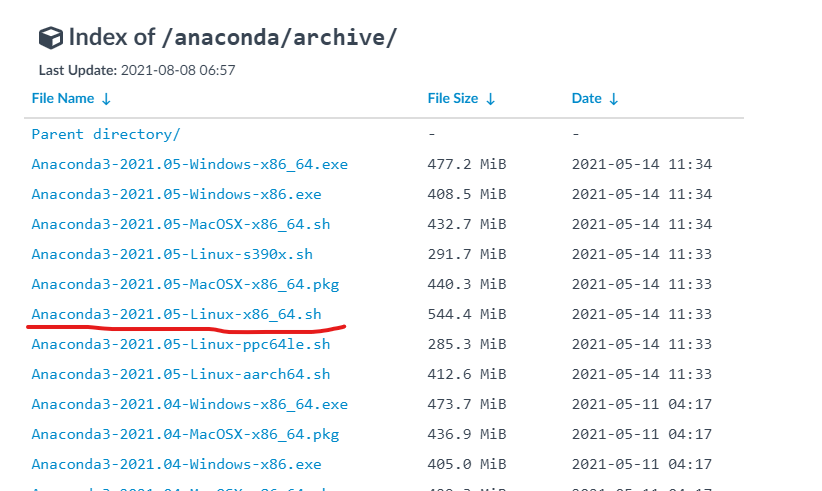
In the latest date, select an Anaconda3 installation package corresponding to your system version, x86_64 means compatible with 32-bit and 64 bit systems.
1.2 installation of anaconda3
Find the download directory and install
bash Anaconda3-2021.05-Linux-x86_64.sh
 or
sh Anaconda3-2021.05-Linux-x86_64.sh
Differences between sh and bash: here
in fact, it is the difference between Bash and POSIX mode. sh follows the POSIX specification: "when a line of code goes wrong, do not continue to explain". Even if bash goes wrong, it will continue to execute downward.
in short, sh is a special mode of bash. sh is bash that opens the POSIX standard, and / bin/sh is equivalent to / bin/bash --posix.
Then yes and Enter all the way
There may be an error indicating that bunzip2 cannot be found. Install it using yum with the name bzip2:
yum install -y bzip2
install -y is to prevent unimportant problems
If you see the following prompt, the installation is successful:
Thank you for installing Anaconda3!

===========================================================================

Anaconda and JetBrains are working together to bring you Anaconda-powered
environments tightly integrated in the PyCharm IDE.

PyCharm for Anaconda is available at:
https://www.anaconda.com/pycharm
1.3 environment configuration
source after installation!!!
Environment configuration of conda
vim ~/.bashrc
Add on the last line
export PATH=$PATH:/home/username/anaconda3/bin
username is the user name, that is, the colon is followed by the path where anaconda is installed (bin folder). You should refresh it at the end
souce ~/.bashrc
2. Create virtual environment
'''
If the network is bad, you can change it conda Domestic source
conda config --add channels https://mirrors.tuna.tsinghua.edu.cn/anaconda/pkgs/free/
conda config --set show_channel_urls yes
 The first line adds Tsinghua's conda The second line displays the download source when setting the installation package
'''
conda create --name pytorch python=3.7 # establish
conda activate pytorch # activation
conda deactivate # Exit virtual environment

#Other commands
conda info --envs or conda env list # View the established virtual environment
conda remove -n pytorch --all # Delete virtual environment
conda create --name pytorchcopy --clone pytorch # Clone virtual environment
conda list # View package list
conda install -n env_name package_name # Install package to specified environment
3. Install torch torch vision cudatoolkit
conda install python== torchvision== cudatoolkit=
Correspondence between torch and torch vision versions:
| torch | torchvision | python | cuda |
|---|---|---|---|
| 1.5.1 | 0.6.1 | >=3.6 | 9.2,10.1,10.2 |
| 1.5.0 | 0.6.0 | >=3.6 | 9.2, 10.1,10.2 |
| 1.4.0 | 0.5.0 | ==2.7, >=3.5, <=3.8 | 9.2, 10.0 |
| 1.3.1 | 0.4.2 | ==2.7, >=3.5, <=3.7 | 9.2, 10.0 |
| 1.3.0 | 0.4.1 | ==2.7, >=3.5, <=3.7 | 9.2, 10.0 |
| 1.2.0 | 0.4.0 | ==2.7, >=3.5, <=3.7 | 9.2, 10.0 |
| 1.1.0 | 0.3.0 | ==2.7, >=3.5, <=3.7 | 9.0, 10.0 |
| <1.0.1 | 0.2.2 | ==2.7, >=3.5, <=3.7 | 9.0, 10.0 |
pytorch official website: Link
pytorch version correspondence viewing website: Link
Download pytorch and torchvision by yourself. Download address: Link
4. Install pycharm
(pycharm is installed for better debugging code)
Through access Pycharm Download from the official website. You can choose to download professional version or community version. If you are new to Python programming, it is recommended to download the Community Edition. However, if you plan to develop professional programming, some excellent features of professional edition can not be ignored.
The name of the downloaded file may be 'pycharm-professional-2021.7 1.tar. gz’. Decompression required
tar -xvzf pycharm-professional-2021.7.1.tar.gz -C ~
Other decompression commands
The above command will install pycharm in the home directory
function:
Go to the home directory and find the bin directory under pycharm
sh pycharm.sh
summary
Decompression command
1,.tar use tar –xvf decompression
2,.gz use gzip -d perhaps gunzip decompression
3,.tar.gz and.tgz use tar –xzf decompression
4,.bz2 use bzip2 -d Or use bunzip2 decompression
5,.tar.bz2 use tar –xjf decompression
6,.Z use uncompress decompression
7,.tar.Z use tar –xZf decompression
8,.rar use unrar e decompression
9,.zip use unzip decompression
Differences between sh and bash:
1
in fact, it is the difference between Bash and POSIX mode. sh follows the POSIX specification: "when a line of code goes wrong, do not continue to explain". Even if bash goes wrong, it will continue to execute downward.
in short, sh is a special mode of bash. sh is bash that opens the POSIX standard, and / bin/sh is equivalent to / bin/bash --posix.