@[toc] since August, many RabbitMQ tutorials have been serialized intermittently. Recently, I took time to sort them out. There may be a video tutorial in the future. Please look forward to it.
1. Common message oriented middleware large PK
When it comes to message oriented middleware, it is estimated that everyone can talk about ActiveMQ, RabbitMQ, RocketMQ, Kafka and other protocols, as well as JMS, AMQP and other protocols. However, what are the characteristics of these message oriented middleware and which one should we choose in development? Today, brother song came to comb with his friends.
1.1 several protocols
Let's talk about several common protocols in message oriented middleware.
1.1.1 JMS
1.1.1.1 introduction to JMS
Let's talk about JMS first.
The full name of JMS is Java Message Service, which is similar to JDBC and different from JDBC. JMS is the message service interface of Java EE. JMS mainly has two versions:
- 1.1
- 2.0.
Compared with the two, the latter mainly simplifies the code of sending and receiving messages.
Considering that message oriented middleware is a very common tool, Java EE has developed a special specification JMS for this purpose.
However, like JDBC, JMS, as a specification, is only a set of interfaces and does not contain specific implementations. If we want to use JMS, we generally need corresponding implementations, just like using JDBC requires corresponding drivers.
1.1.1.2 JMS model
JMS message service supports two message models:
- Point to point or queue model
- Publish / subscribe model
In the peer-to-peer or queue model, a producer publishes messages to a specific queue, and a consumer reads messages from the queue. Here, the producer knows the consumer's queue and sends the message directly to the corresponding queue. This is a point-to-point message model, which is summarized as follows:
- Only one consumer will get the message.
- The producer does not need to be in the running state when the consumer consumes the message, and the consumer does not need to be in the running state when the message is sent, that is, the producer and consumer of the message are completely decoupled.
- Each successfully processed message is signed by the message consumer.
The publisher / subscriber model supports publishing messages to a specific message topic, and consumers can define topics they are interested in. This is a point-to-point message model, which can be summarized as follows:
- Multiple consumers can consume messages.
- There is a time dependency between publishers and subscribers. Publishers need to create a subscription so that customers can subscribe; Subscribers must remain online to receive messages; Of course, if the subscriber creates a persistent subscription, when the subscriber is not connected, the messages published by the message producer will be republished when the subscriber reconnects.
1.1.1.3 JMS implementation
Open source message middleware supporting JMS includes:
- Kafka
- Apache ActiveMQ
- HornetQ of JBoss community
- Joram
- MantaRay of Coridan
- OpenJMS
Some commercial message middleware supporting JMS include:
- WebLogic Server JMS
- EMS
- GigaSpaces
- iBus
- IONA JMS
- IQManager (acquired by Sun Microsystems in August 2005)
- JMS+
- Nirvana
- SonicMQ
- WebSphere MQ
Many of them were excavated by SongGe archaeology. In fact, Kafka and ActiveMQ may have more contact with our daily development.
1.1.2 AMQP
1.1.2.1 introduction to AMQP
Another protocol related to message oriented middleware is AMQP.
The demand for Message Queue has a long history. Goldman Sachs and other companies first adopted Teknekron's products in financial transactions in the 1980s. At that time, the Message Queue software was called the information bus (TIB). TiB was adopted by telecommunications and communications companies, and Reuters acquired Teknekron. After that, IBM developed MQSeries and Microsoft developed Microsoft Message Queue (MSMQ). The problem with these commercial MQ suppliers is vendor lock-in and high prices. In 2001, Java Message Service tried to solve the problems of locking and interactivity, but it was more troublesome for applications.
So in 2004, JPMorgan Chase and iMatrix began to develop the Advanced Message Queuing Protocol (AMQP) open standard. In 2006, AMQP specification was issued. In 2007, Rabbit MQ 1.0 developed by Rabbit technology based on AMQP standard was released.
At present, the latest version of RabbitMQ is 3.5.7, which is based on AMQP 0-9-1.
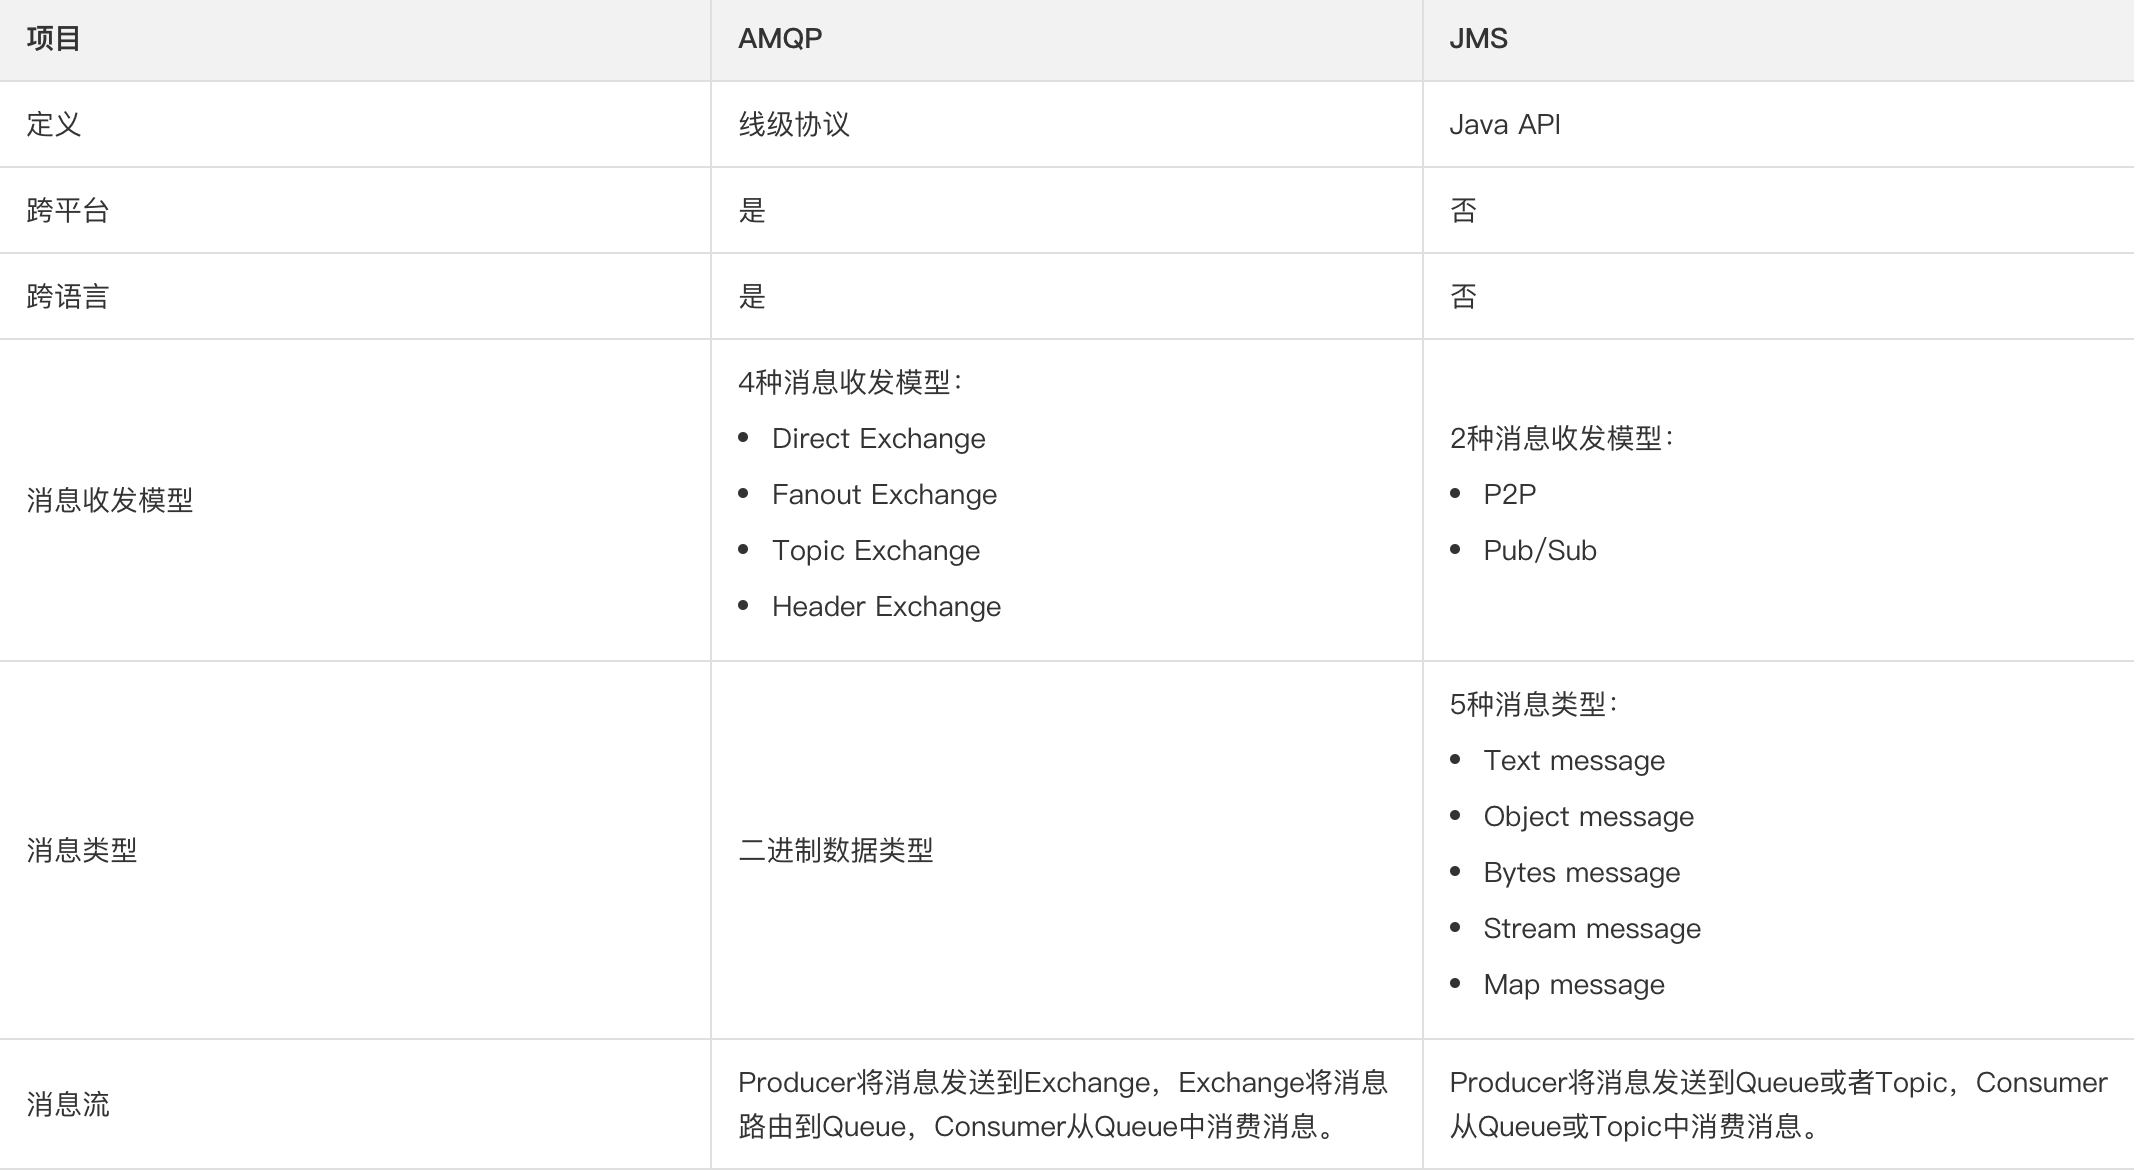
In AMQP protocol, messaging involves the following concepts:
- Broker: an application that receives and distributes messages. RabbitMQ we use everyday is a Message Broker.
- Virtual host: designed for multi tenancy and security factors, the basic components of AMQP are divided into a virtual group, similar to the concept of namespace in the network. When multiple different users use the same service provided by RabbitMQ, they can be divided into multiple vhosts. Each user creates exchange / queue in his own vhost. SongGe wrote a special article before. Portal: How to understand VirtualHost in RabbitMQ.
- Connection: for the TCP connection between publisher / consumer and Broker, the disconnection operation will only be performed on the client side, and the Broker will not disconnect unless there is a network failure or a problem with the Broker service.
- Channel: if a Connection is established every time RabbitMQ is accessed, the overhead of establishing a TCP Connection when the message volume is large will be huge and the efficiency will be low. A channel is a logical Connection established within a Connection. If the application supports multithreading, a separate channel is usually created for each Thread to communicate. The AMQP method contains a Channel id to help the client and Message Broker identify the channel, so the channels are completely separated. As a lightweight Connection, channel greatly reduces the overhead of establishing TCP Connection by the operating system. For channel, SongGe How to use the RabbitMQ administration page It has also been introduced in detail in the article.
- Exchange: the message arrives at the first stop of the Broker, matches the routing key in the query table according to the distribution rules, and distributes the message to the queue. Common types are: direct (point-to-point), topic (publish and subscribe) and fanout (broadcast).
- queue: the Message is finally sent here for the Consumer to take away. A Message can be copied to multiple queues at the same time.
- Binding: the virtual connection between Exchange and Queue. The binding can contain routing key. The binding information is saved in the query table in Exchange as the basis for Message distribution.
1.1.2.2 AMQP implementation
Let's take a look at some specific message middleware products that implement the AMQP protocol.
- Apache Qpid
- Apache ActiveMQ
- RabbitMQ
There may be some friends who wonder why there is ActiveMQ? In fact, ActiveMQ supports not only JMS but also AMQP, which will be described in detail later.
In addition, there is the well-known RocketMQ produced by Ali, which has customized a set of protocols, and the community also provides JMS, but it is not mature. Brother song will explain it in detail later.
1.1.3 MQTT
Small partners engaged in the development of the Internet of things should often contact this protocol. MQTT (Message Queuing Telemetry Transport) is an instant messaging protocol developed by IBM. At present, it seems to be one of the more important protocols in the development of the Internet of things. This protocol supports all platforms and can connect almost all networked items to the outside, It is used as a communication protocol between sensors and actuators (such as networking houses through Twitter). Its advantages are simple format, small bandwidth occupation, support for mobile communication, support for PUSH, and suitable for embedded systems.
1.1.4 XMPP
XMPP (Extensible Messaging and Presence Protocol) is an XML based protocol, which is mostly used for instant messaging (IM) and online field detection, and is suitable for quasi instant operation between servers. The core is based on XML streaming, a protocol that may eventually allow Internet users to send instant messages to anyone else on the Internet, even if their operating system is different from the browser. It has the advantages of universal openness, strong compatibility, scalability and high security. The disadvantage is that XML coding format occupies a large bandwidth.
1.1.5 JMS Vs AMQP
As far as we Java engineers are concerned, JMS and AMQP protocols should be the most frequently contacted protocols. Since JMS and AMQP are both protocols, what is the difference between them? Take a look at the following figure:
This picture is very clear, so I won't be wordy.
1.2. Important products
1.2.1 ActiveMQ
ActiveMQ is a subproject under Apache, which fully supports JMS 1 1 and J2EE 1 4 standard JMS Provider implementation, a small amount of code can efficiently implement advanced application scenarios, and support pluggable transport protocols, such as in VM, TCP, SSL, NiO, UDP, multicast, jgroups and JXTA transports.
ActiveMQ supports many commonly used language clients, such as C + +, Java Net, Python, Php, Ruby, etc.
ActiveMQ is now available in two versions:
- ActiveMQ Classic
- ActiveMQ Artemis
The ActiveMQ Classic here is the original ActiveMQ, and ActiveMQ Artemis is developed on the basis of the HornetQ server code donated by red hat. The two codes are completely different, and the latter supports jms2 0. Using asynchronous IO based on Netty greatly improves the performance. What's more amazing is that the latter supports not only JMS protocol, but also AMQP protocol, STOMP and MQTT. It can be said that the latter has quite rich playing methods.
Therefore, it is recommended to directly select ActiveMQ Artemis when using.
1.2.2 RabbitMQ
RabbitMQ is the most important product under the AMQP system. It is developed and implemented based on Erlang language. It is estimated that many people have been tortured by the installation of RabbitMQ. SongGe suggests installing RabbitMQ and directly using docker to save time and effort (the background of the company replies that docker has a tutorial).
RabbitMQ supports AMQP, XMPP, SMTP, STOMP and other protocols. It has powerful functions and is suitable for enterprise development.
Take a look at the structure diagram of RabbitMQ:
About RabbitMQ, brother song recently sent more than ten tutorials, so I won't be wordy here.
1.2.3 RocketMQ
RocketMQ is a distributed messaging middleware open source by Alibaba. Its original name is Metaq, and its name has been changed to RocketMQ since version 3.0. It is a set of MQ implemented by Alibaba in Java language with reference to Kafka's design idea. RocketMQ integrates multiple MQ products (Notify and Metaq) in Alibaba, only maintains the core functions, removes all other runtime dependencies, and ensures the most simplified core functions. On this basis, RocketMQ cooperates with other open source products mentioned above to realize the MQ architecture in different scenarios. At present, it is mainly used in the order trading system.
RocketMQ has the following features:
- Ensure strict message order.
- Provides filtering for messages.
- Provides rich message pull modes.
- Efficient subscriber horizontal scalability.
- Real time message subscription mechanism.
- 100 million message accumulation capacity
For Java engineers, this is also a frequently used MQ.
1.2.4 Kafka
Kafka is an open source stream processing platform under Apache, written by Scala and Java. Kafka is a high-throughput distributed publish subscribe message system, which can process the flow data of all consumer actions (web browsing, search and other user actions) in the website. Kafka aims to unify online and offline message processing through Hadoop's parallel loading mechanism, and also to provide real-time messages through clusters.
Kafka has the following features:
- Fast persistence: through disk sequential read-write and zero copy mechanism, message persistence can be carried out under the system overhead of O(1).
- High throughput: the throughput rate of 10W/s can be achieved on an ordinary server.
- High accumulation: under topic, consumers can be offline for a long time, and the message accumulation is large.
- Fully distributed system: Broker, Producer and Consumer all support distributed, and more complex load balancing can be realized automatically through Zookeeper.
- Support Hadoop data parallel loading.
We may often contact Kafka in big data development and Java development, but we may contact less.
1.2.5 ZeroMQ
ZeroMQ is known as the fastest message queue system. It is specially developed for scenarios with high throughput / low delay. It is often used in applications in the financial community, focusing on real-time data communication scenarios. ZeroMQ is not a separate service, but an embedded library. It encapsulates functions such as network communication, message queuing and thread scheduling, and provides a concise API to the upper layer. Applications realize high-performance network communication by loading library files and calling API functions.
ZeroMQ features:
- Lockless queue model: for the data exchange channel pipe between cross thread interactions (client and session), the lockless queue algorithm CAS is adopted. Asynchronous events are registered at both ends of the pipe. When reading or writing messages to the pipe, the read-write events will be automatically triggered.
- Batch processing algorithm: for batch messages, adaptive optimization is carried out, and messages can be received and sent in batch.
- Thread binding under multi-core does not require CPU switching: different from the traditional multi-threaded concurrency mode, semaphore or critical area, ZeroMQ makes full use of the advantages of multi-core, and each core binding runs a worker thread to avoid CPU switching overhead between multi threads.
1.2.6 others
In addition, for example, Redis can also be used as a message queue. Brother song has also published an article to introduce using Redis as a general message queue and a delayed message queue. There is no need to be verbose here.
1.3. compare
Finally, let's compare various message oriented middleware through a diagram.
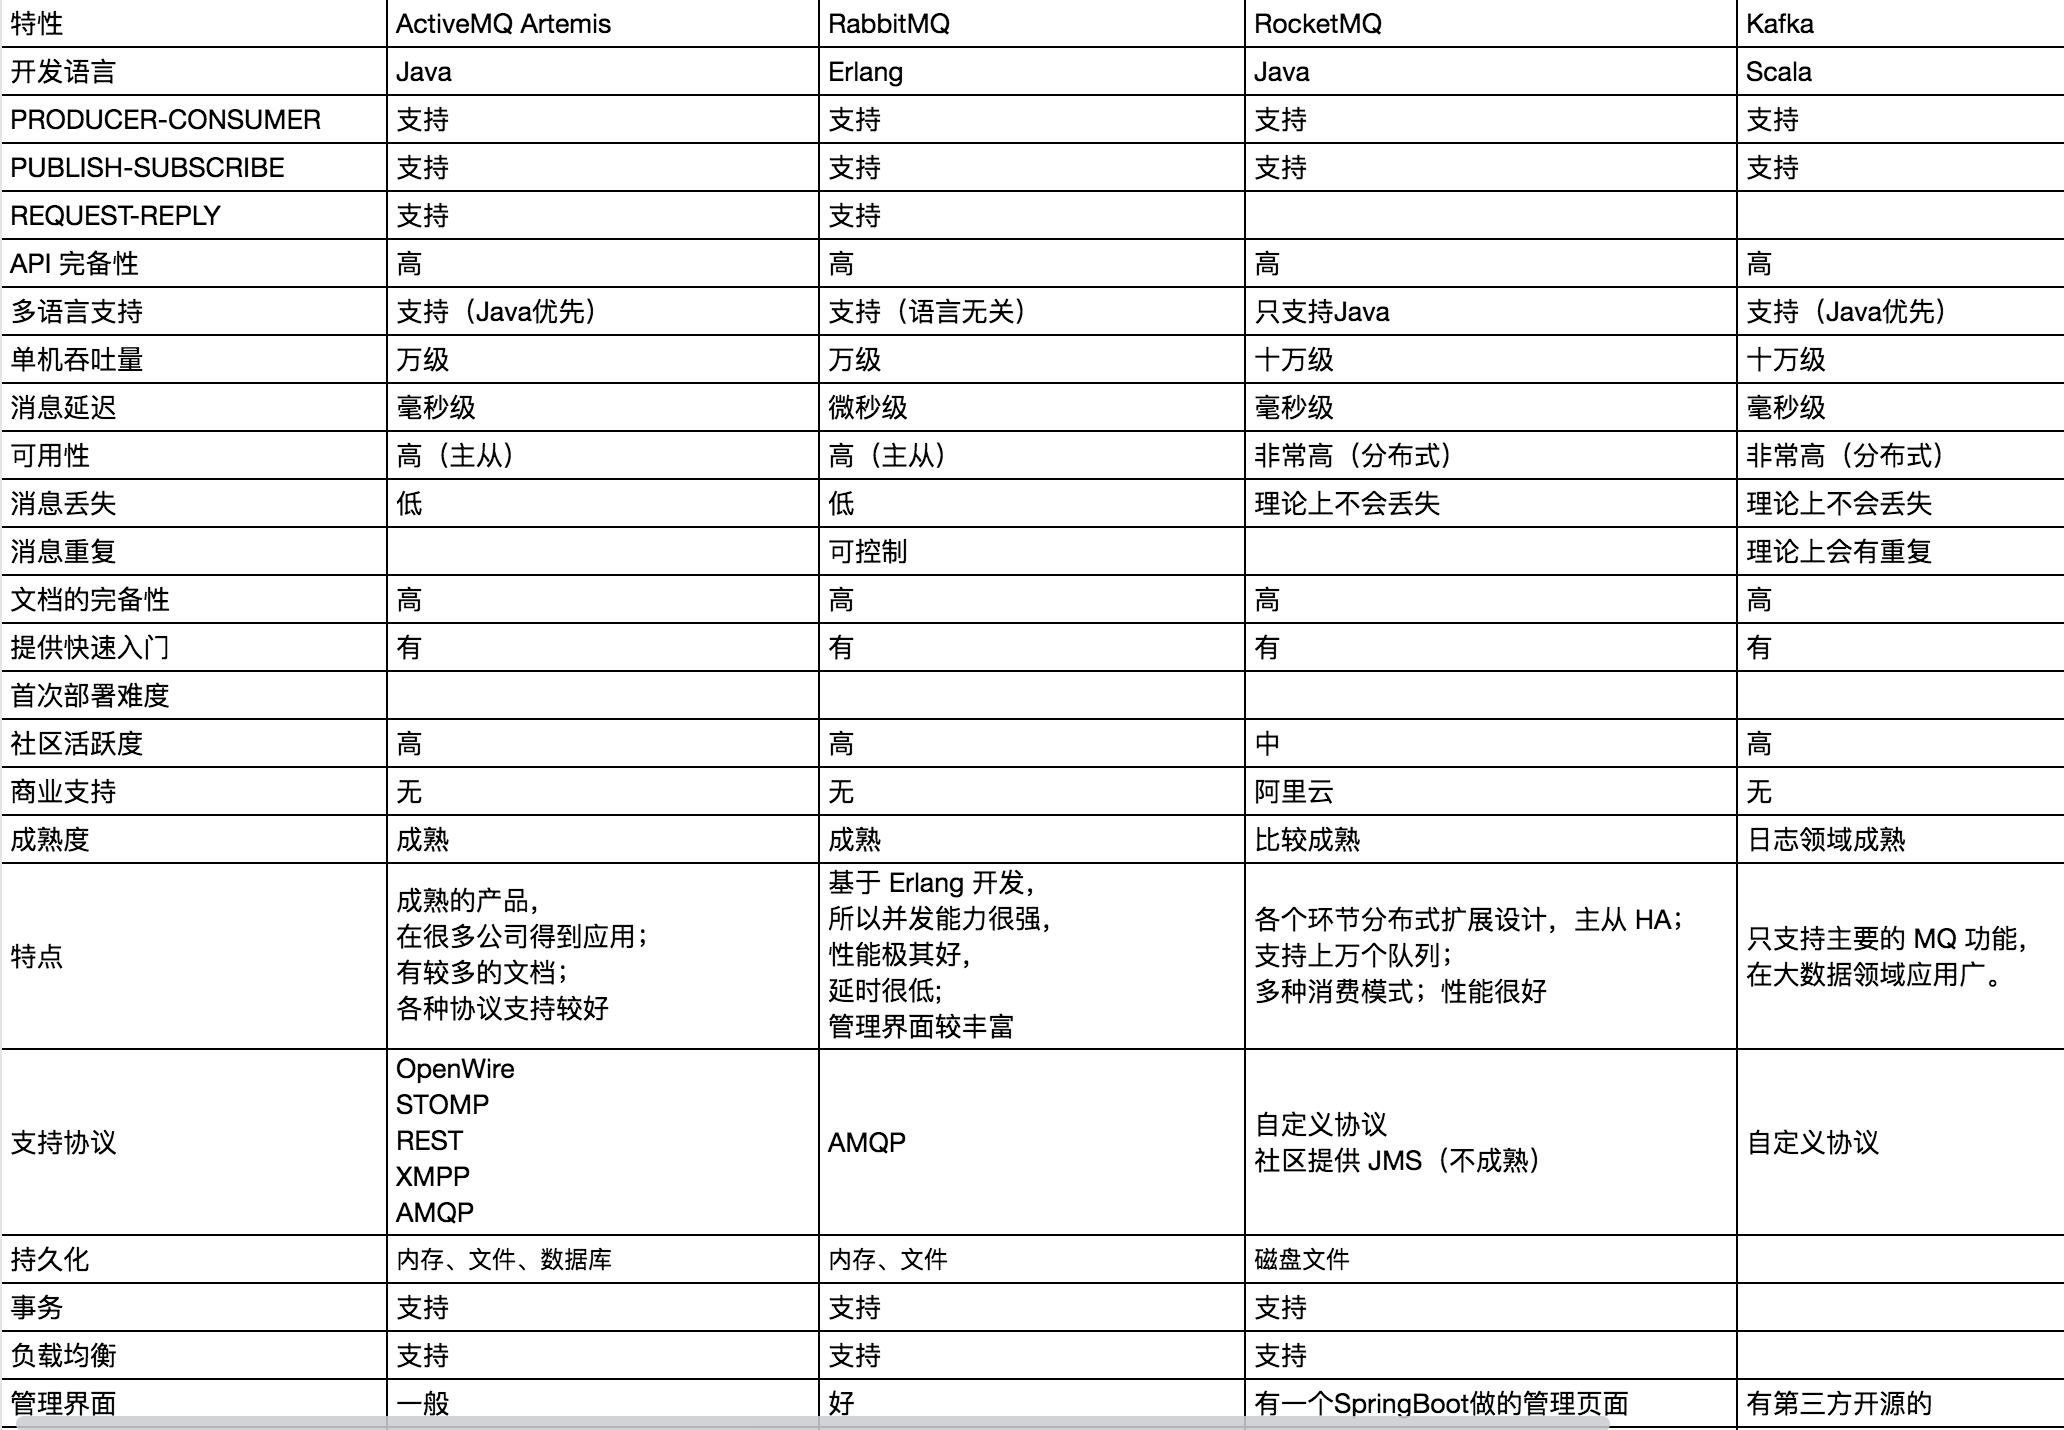
The buddies can reply to mqpkmq in the background of official account, and get the Excel form link.
2. RabbitMQ management page
RabbitMQ's web management page is believed to have been used by many small partners. It is estimated that they all know what it means. However, in the spirit of excellence, brother song still wants to go through all the details of this management page with you.
2.1 overview
First, the Web management page is roughly like the following figure:
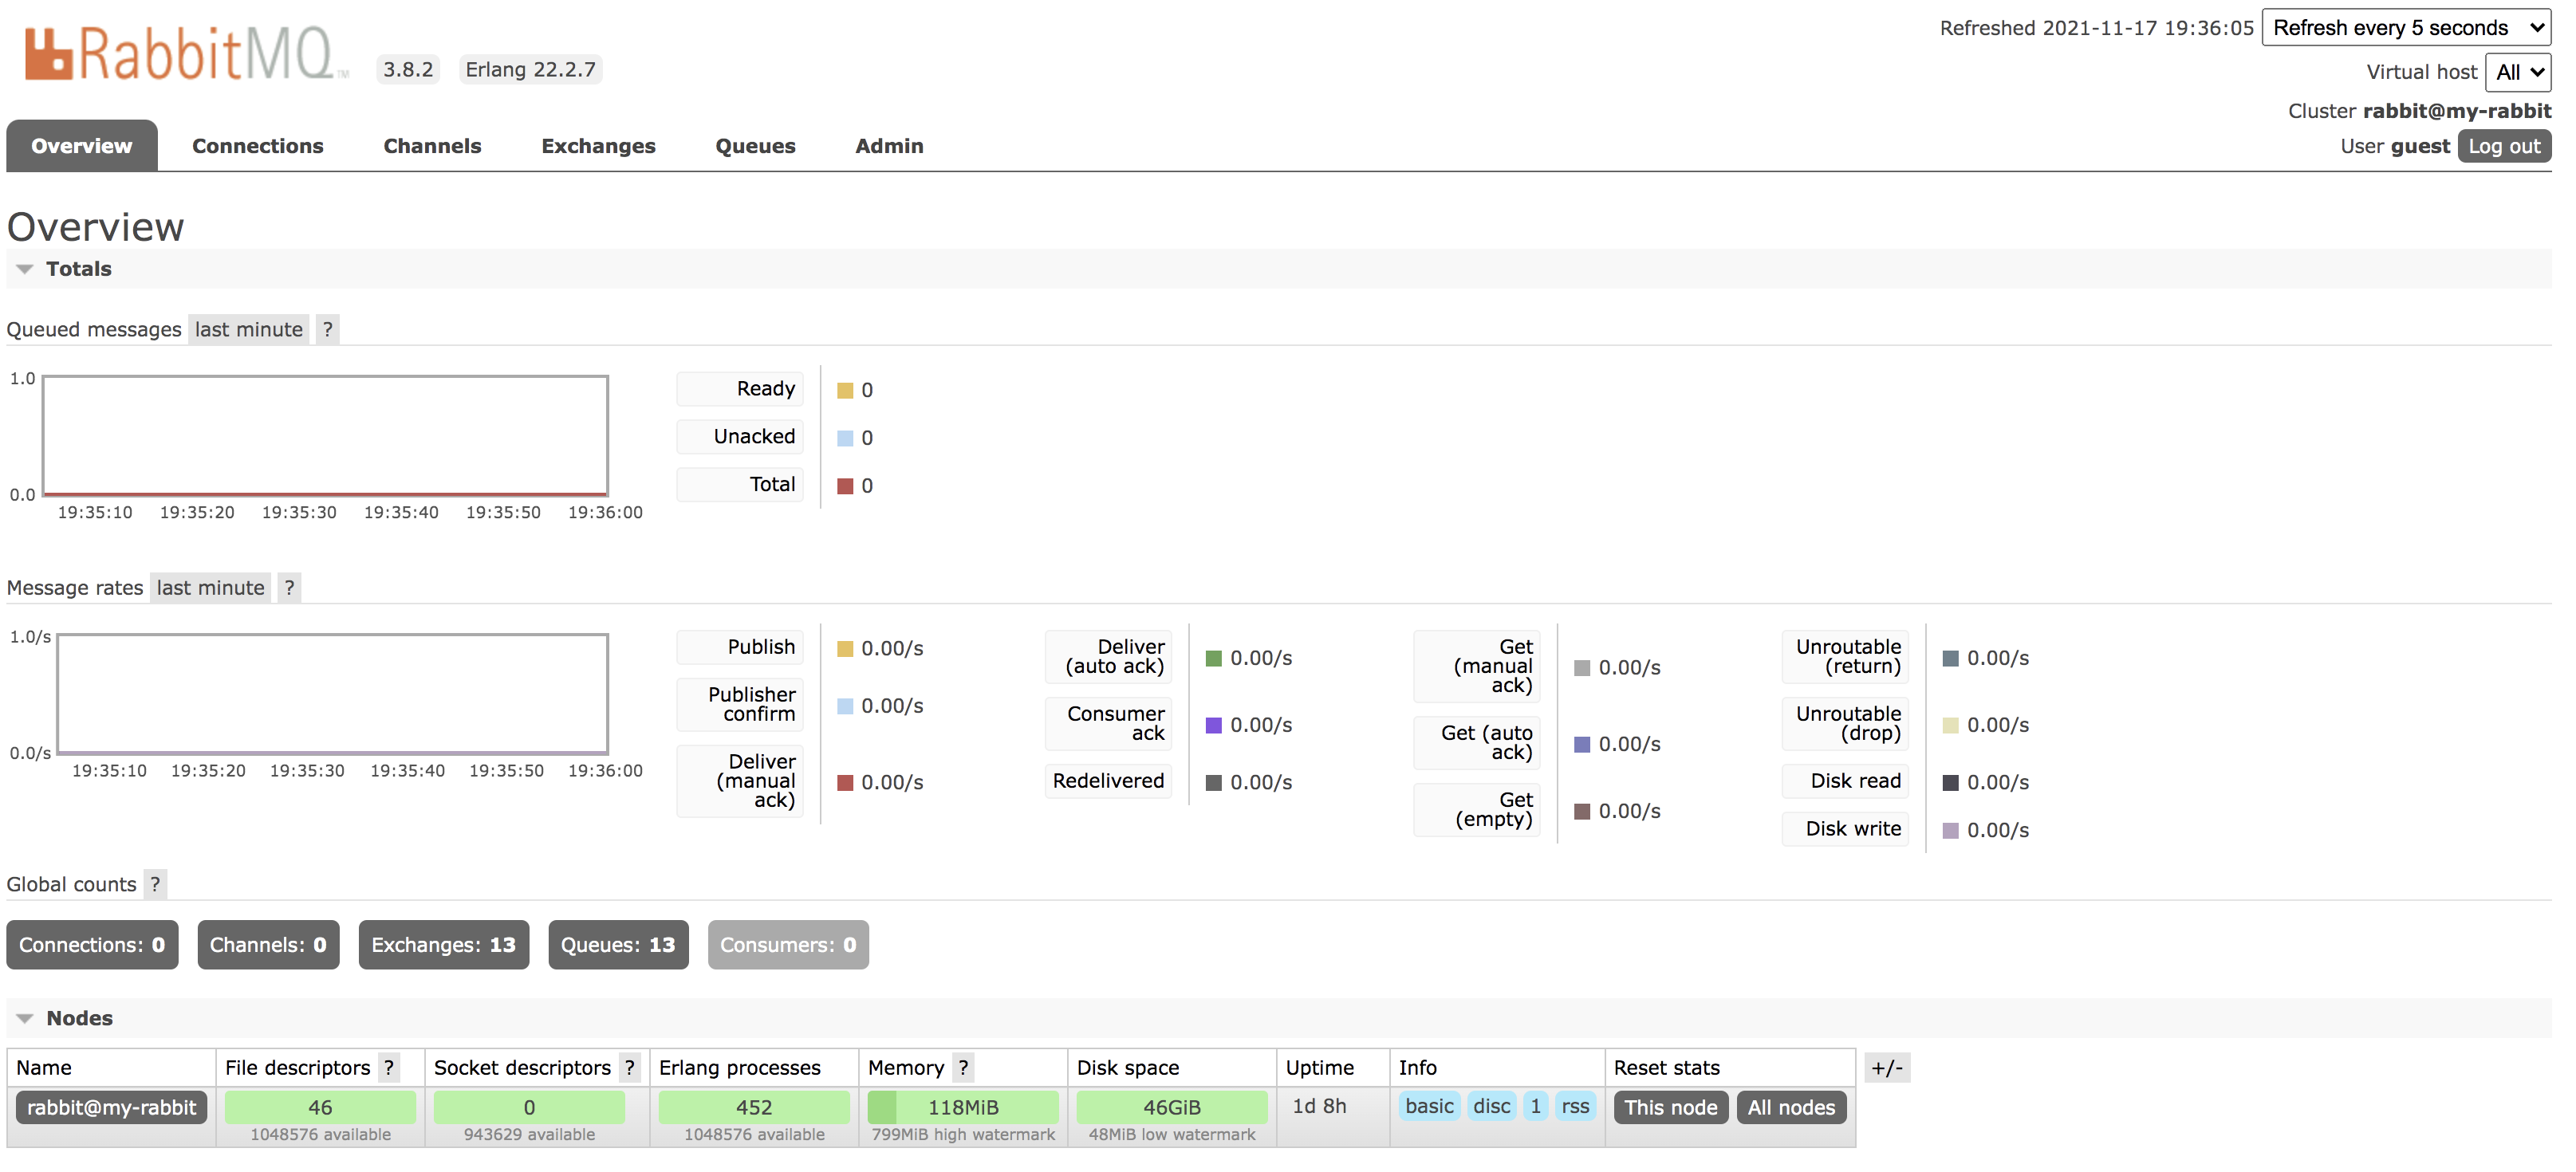
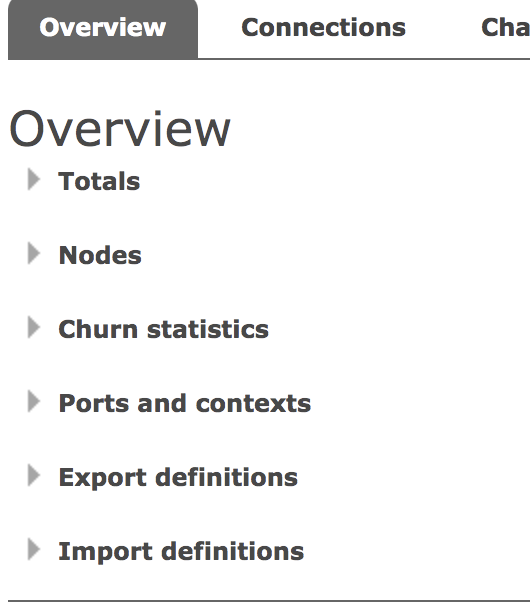
First, there are six tabs:
- Overview: Here you can overview the overall situation of RabbitMQ. If it is a cluster, you can also view the situation of each node in the cluster. Including the port mapping information of RabbitMQ, you can view it in this tab.
- Connections: in this tab, the producers and consumers connected to RabbitMQ are listed.
- Channels: here is the "channel" information. Brother song will introduce the relationship between "channel" and "connection" in detail later.
- Exchange: all switch information is displayed here.
- Queue: all queue information is displayed here.
- Admin: all user information is displayed here.
The upper right corner is the page refresh time. By default, it is refreshed every 5 seconds. It shows all virtual hosts.
This is an overview of the entire management page. Next, let's introduce it one by one.
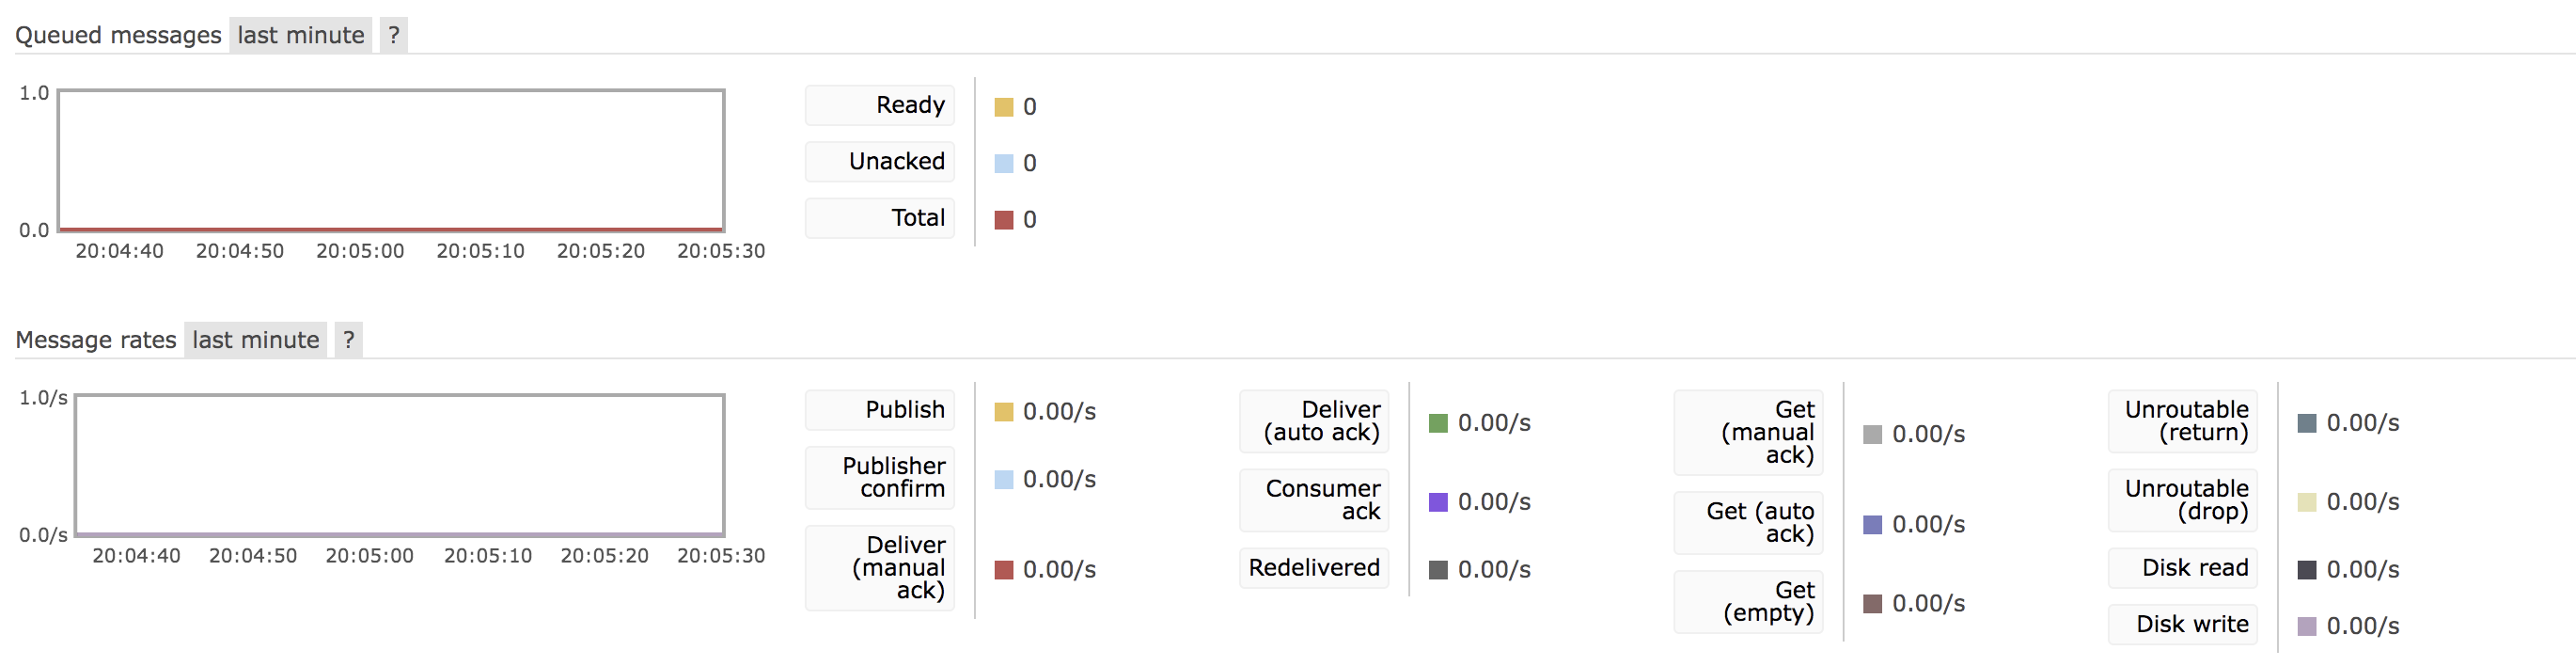
2.2 Overview
The Overview is divided into the following functional modules:
namely:
Totals:
In total, there are the number of messages to be consumed, the number of messages to be confirmed, the total number of messages and various message processing rates (sending rate, confirmation rate, writing rate to hard disk, etc.).
Nodes:
Nodes are actually some machines that support the operation of RabbitMQ, which is equivalent to the nodes of the cluster.

Click each node to view the node details.
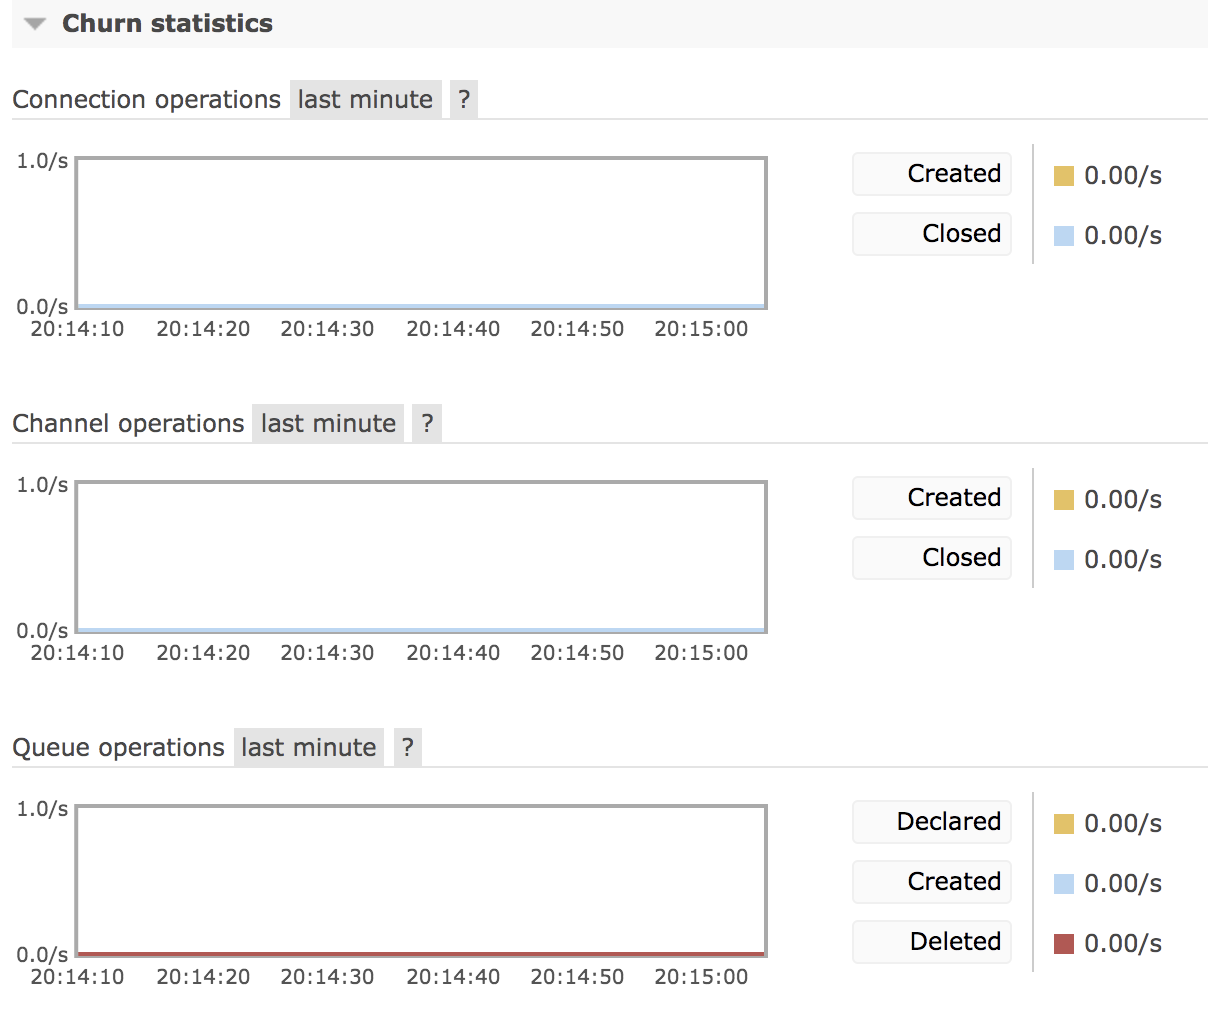
Churn statistics:
This is not easy to translate. It shows the creation / closing rate of Connection, Channel and Queue.
Ports and contexts:
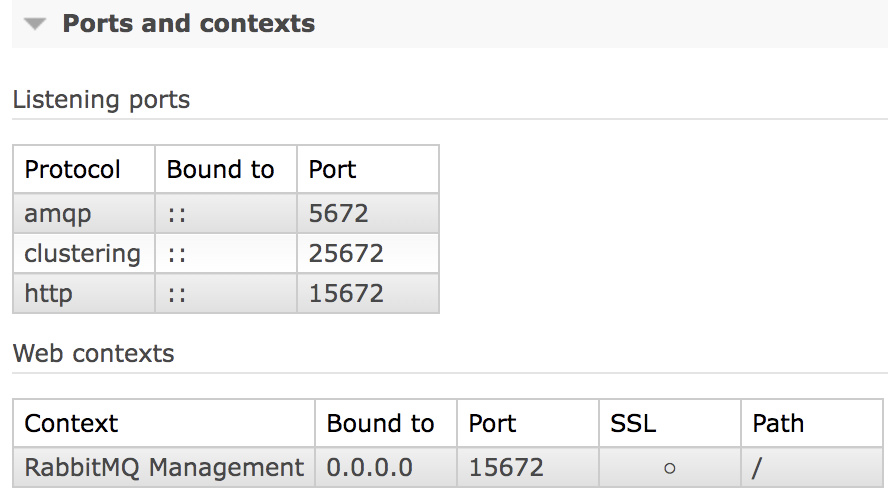
This shows the port mapping information and Web context information.
- 5672 is the RabbitMQ communication port.
- 15672 is the Web management page port.
- 25672 is the cluster communication port.
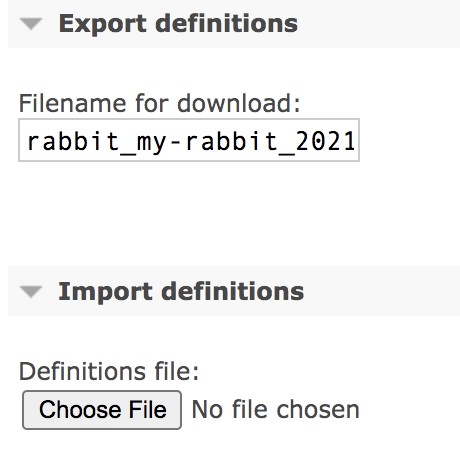
Export definitions && Import definitions:
The last two can import and export some configuration information of the current instance:
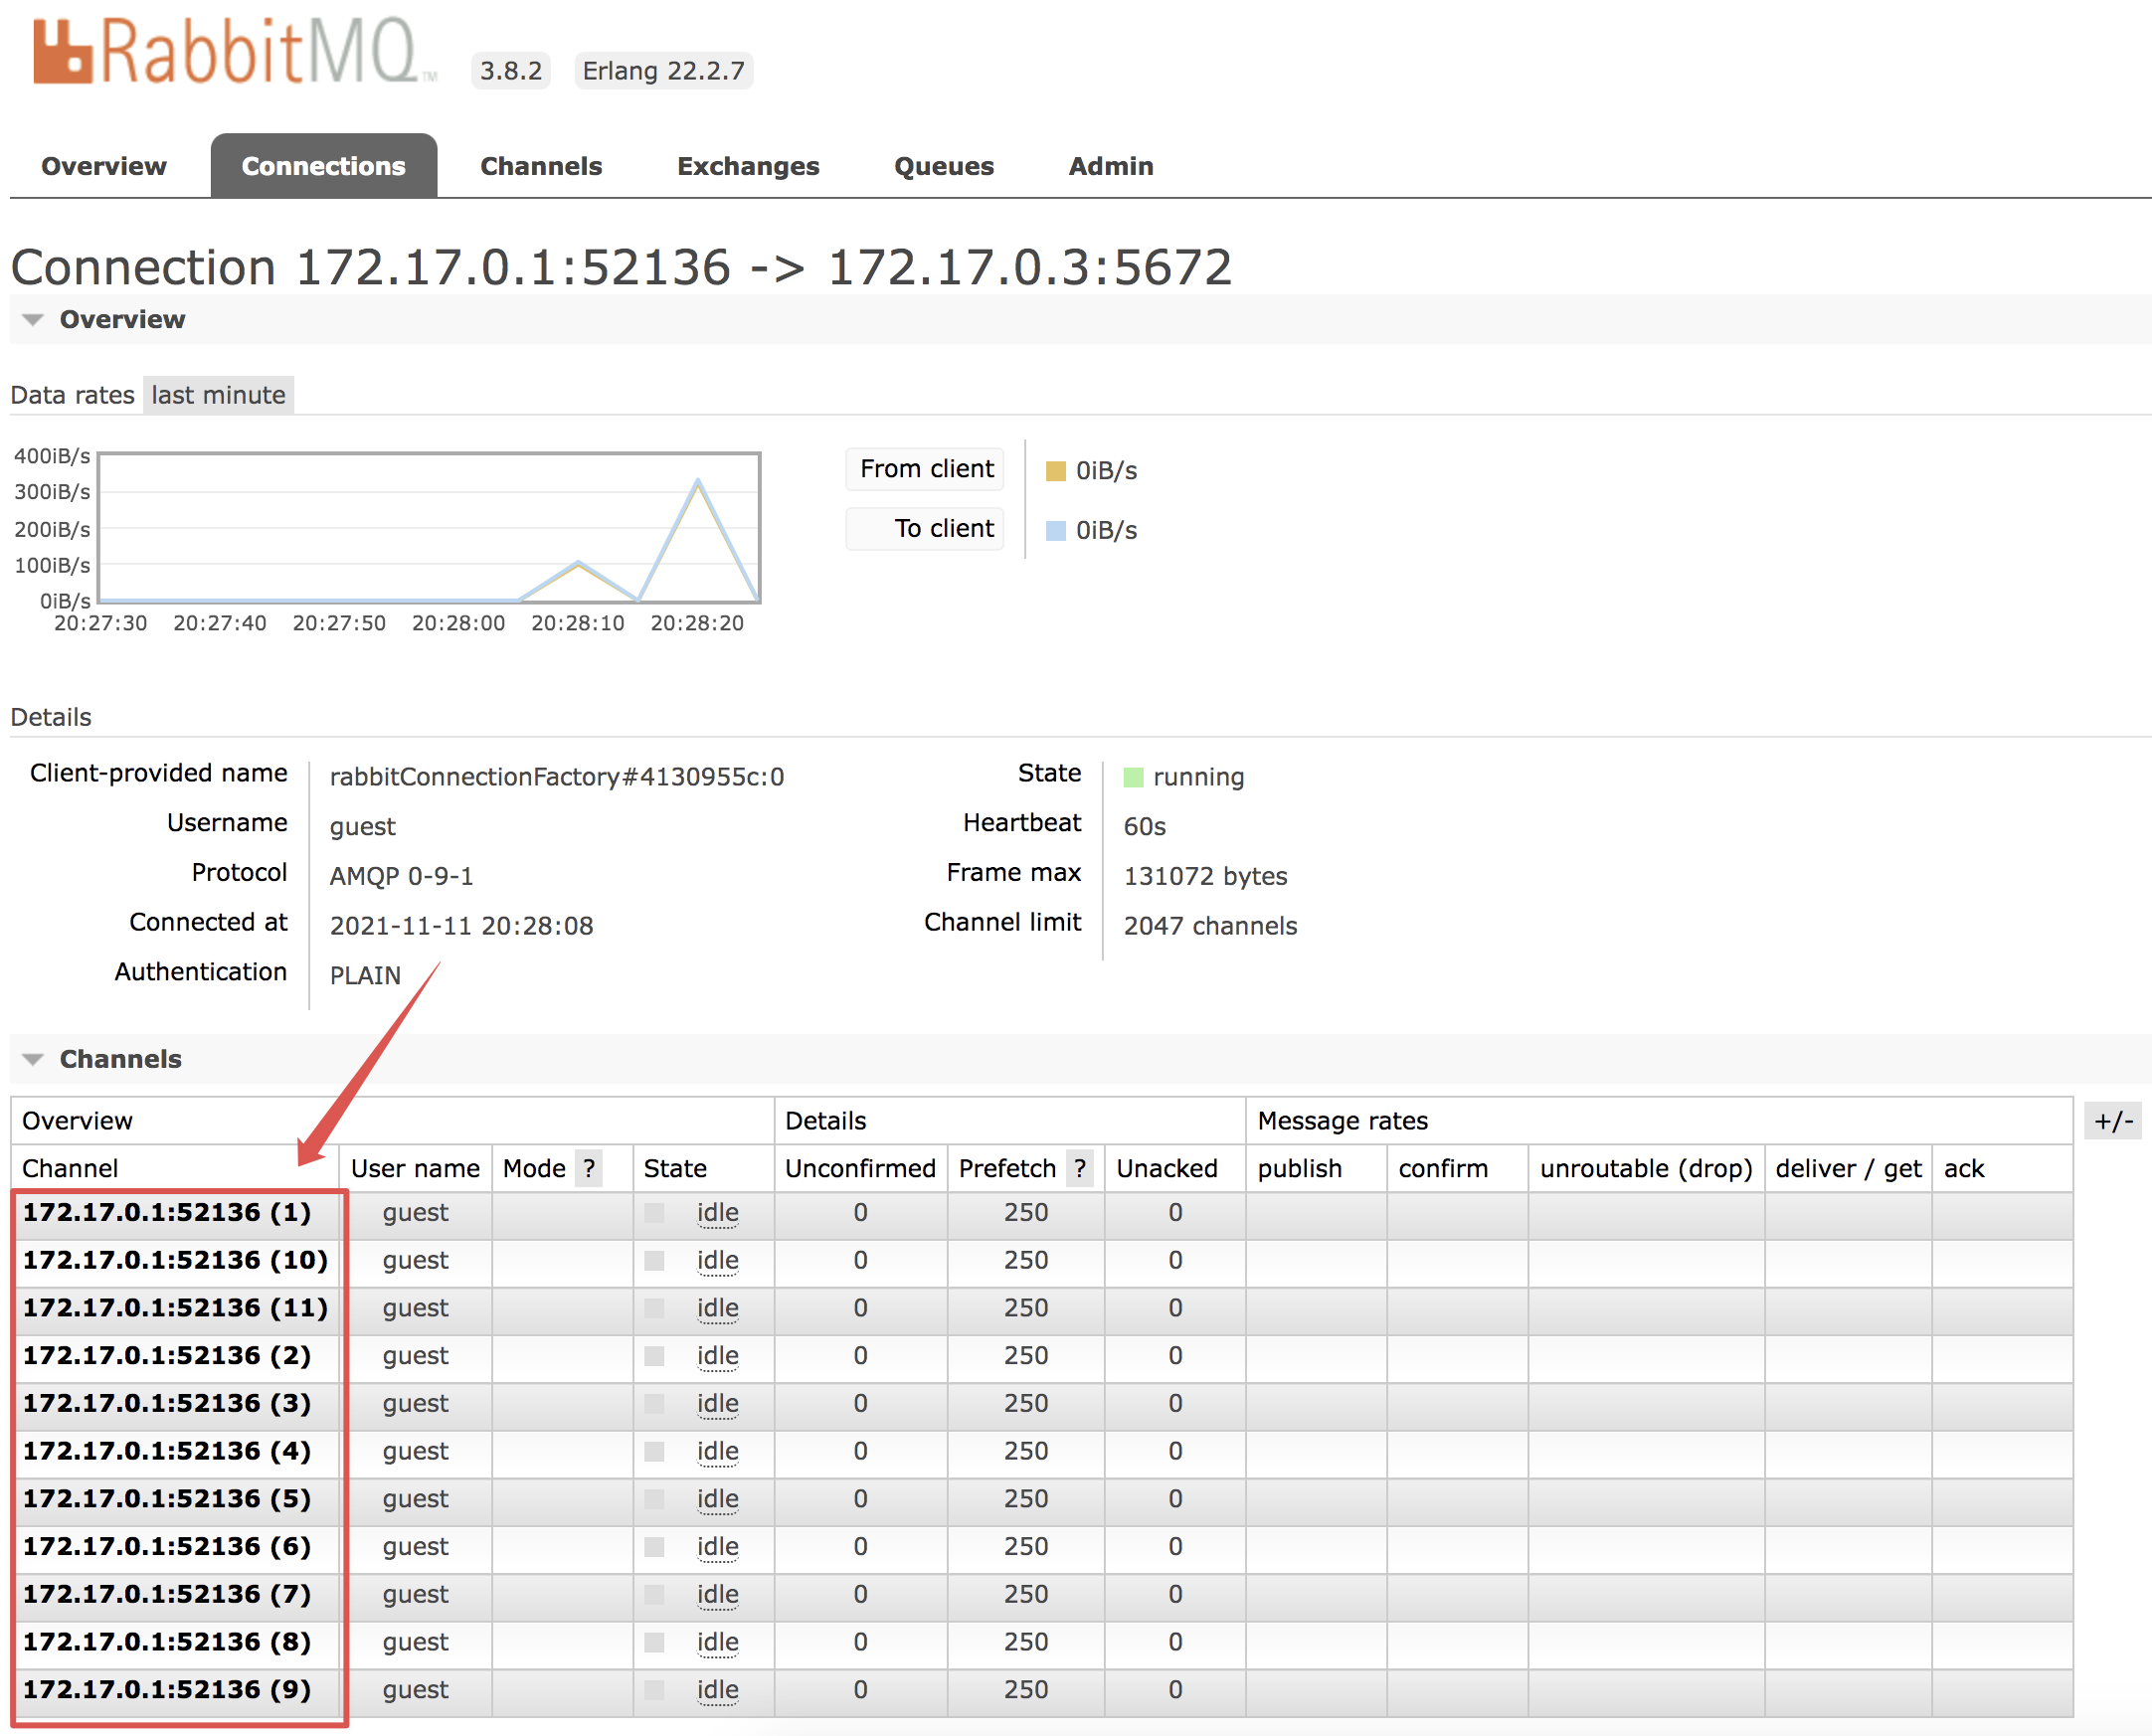
2.3 Connections
The information of RabbitMQ currently connected is mainly displayed here. As long as it is connected, it will be displayed here, whether it is a message producer or a message consumer.
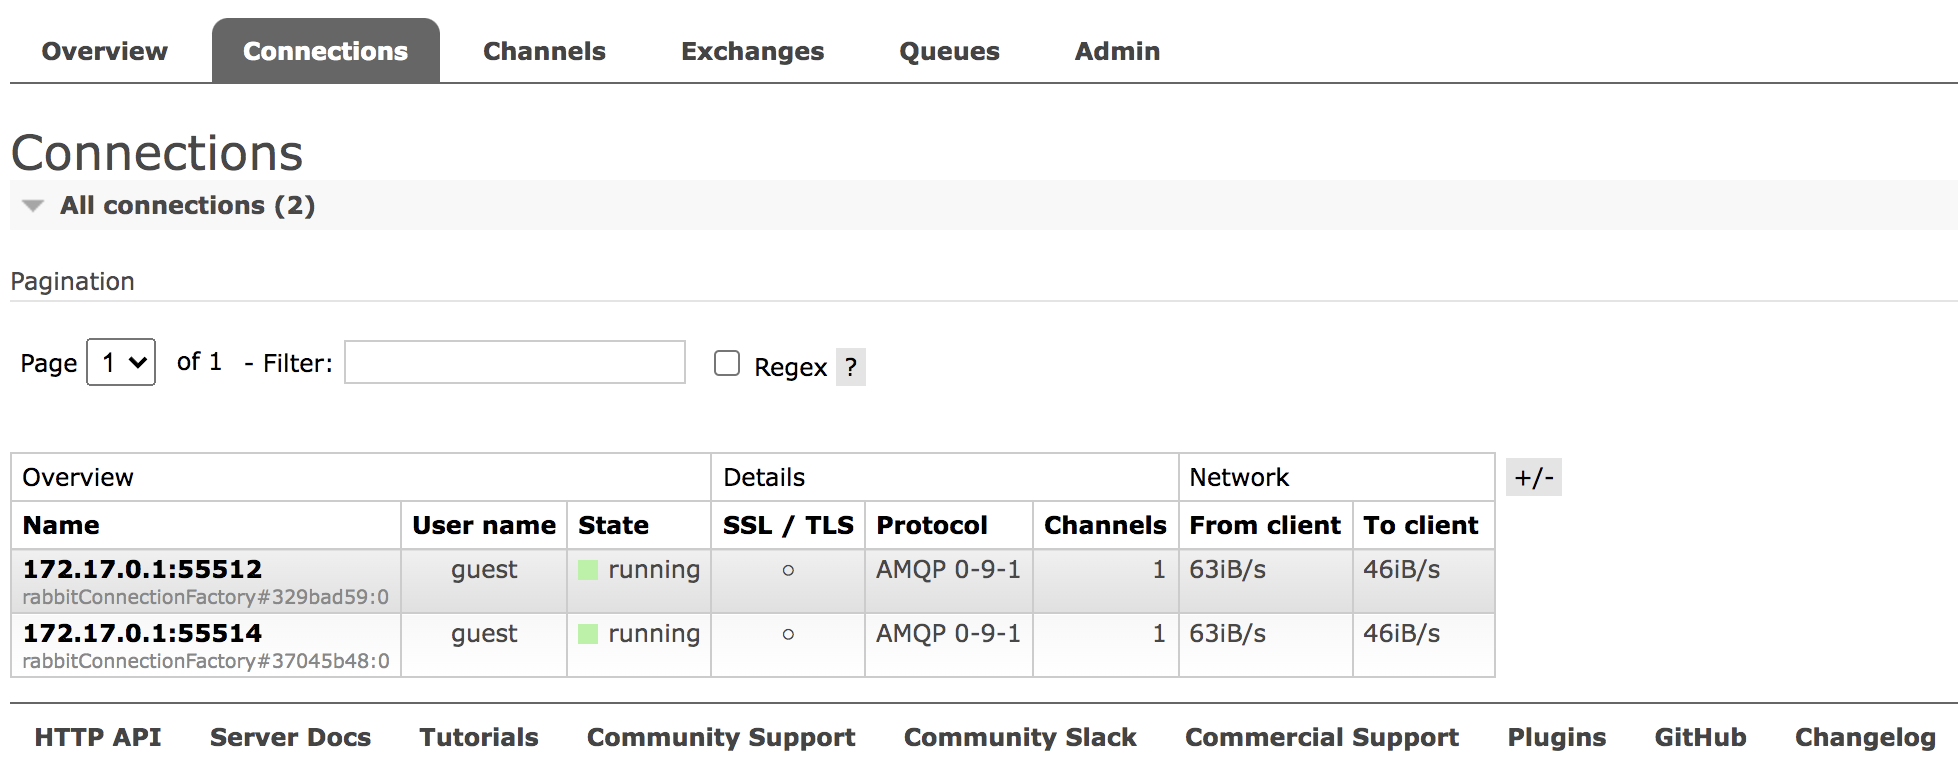
Note that AMQP 0-9-1 in the protocol refers to the version number of AMQP protocol.
Other attributes have the following meanings:
- User name: the user name used for the current connection.
- State: the state of the current connection. Running means running; Idle means idle.
- SSL/TLS: indicates whether ssl is used for connection.
- Channels: the total number of channels created by the current connection.
- From client: packets sent per second.
- To client: packets received per second.
Click the connection name to view the details of each connection.
In details, you can view the number of channels and other details of each connection, or force a connection to be closed.
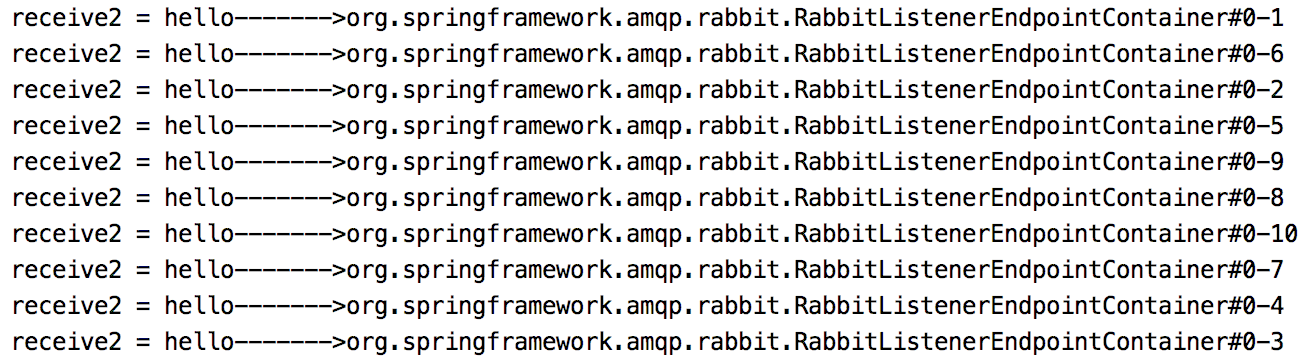
2.4 Channels
This place shows the information of the channel:
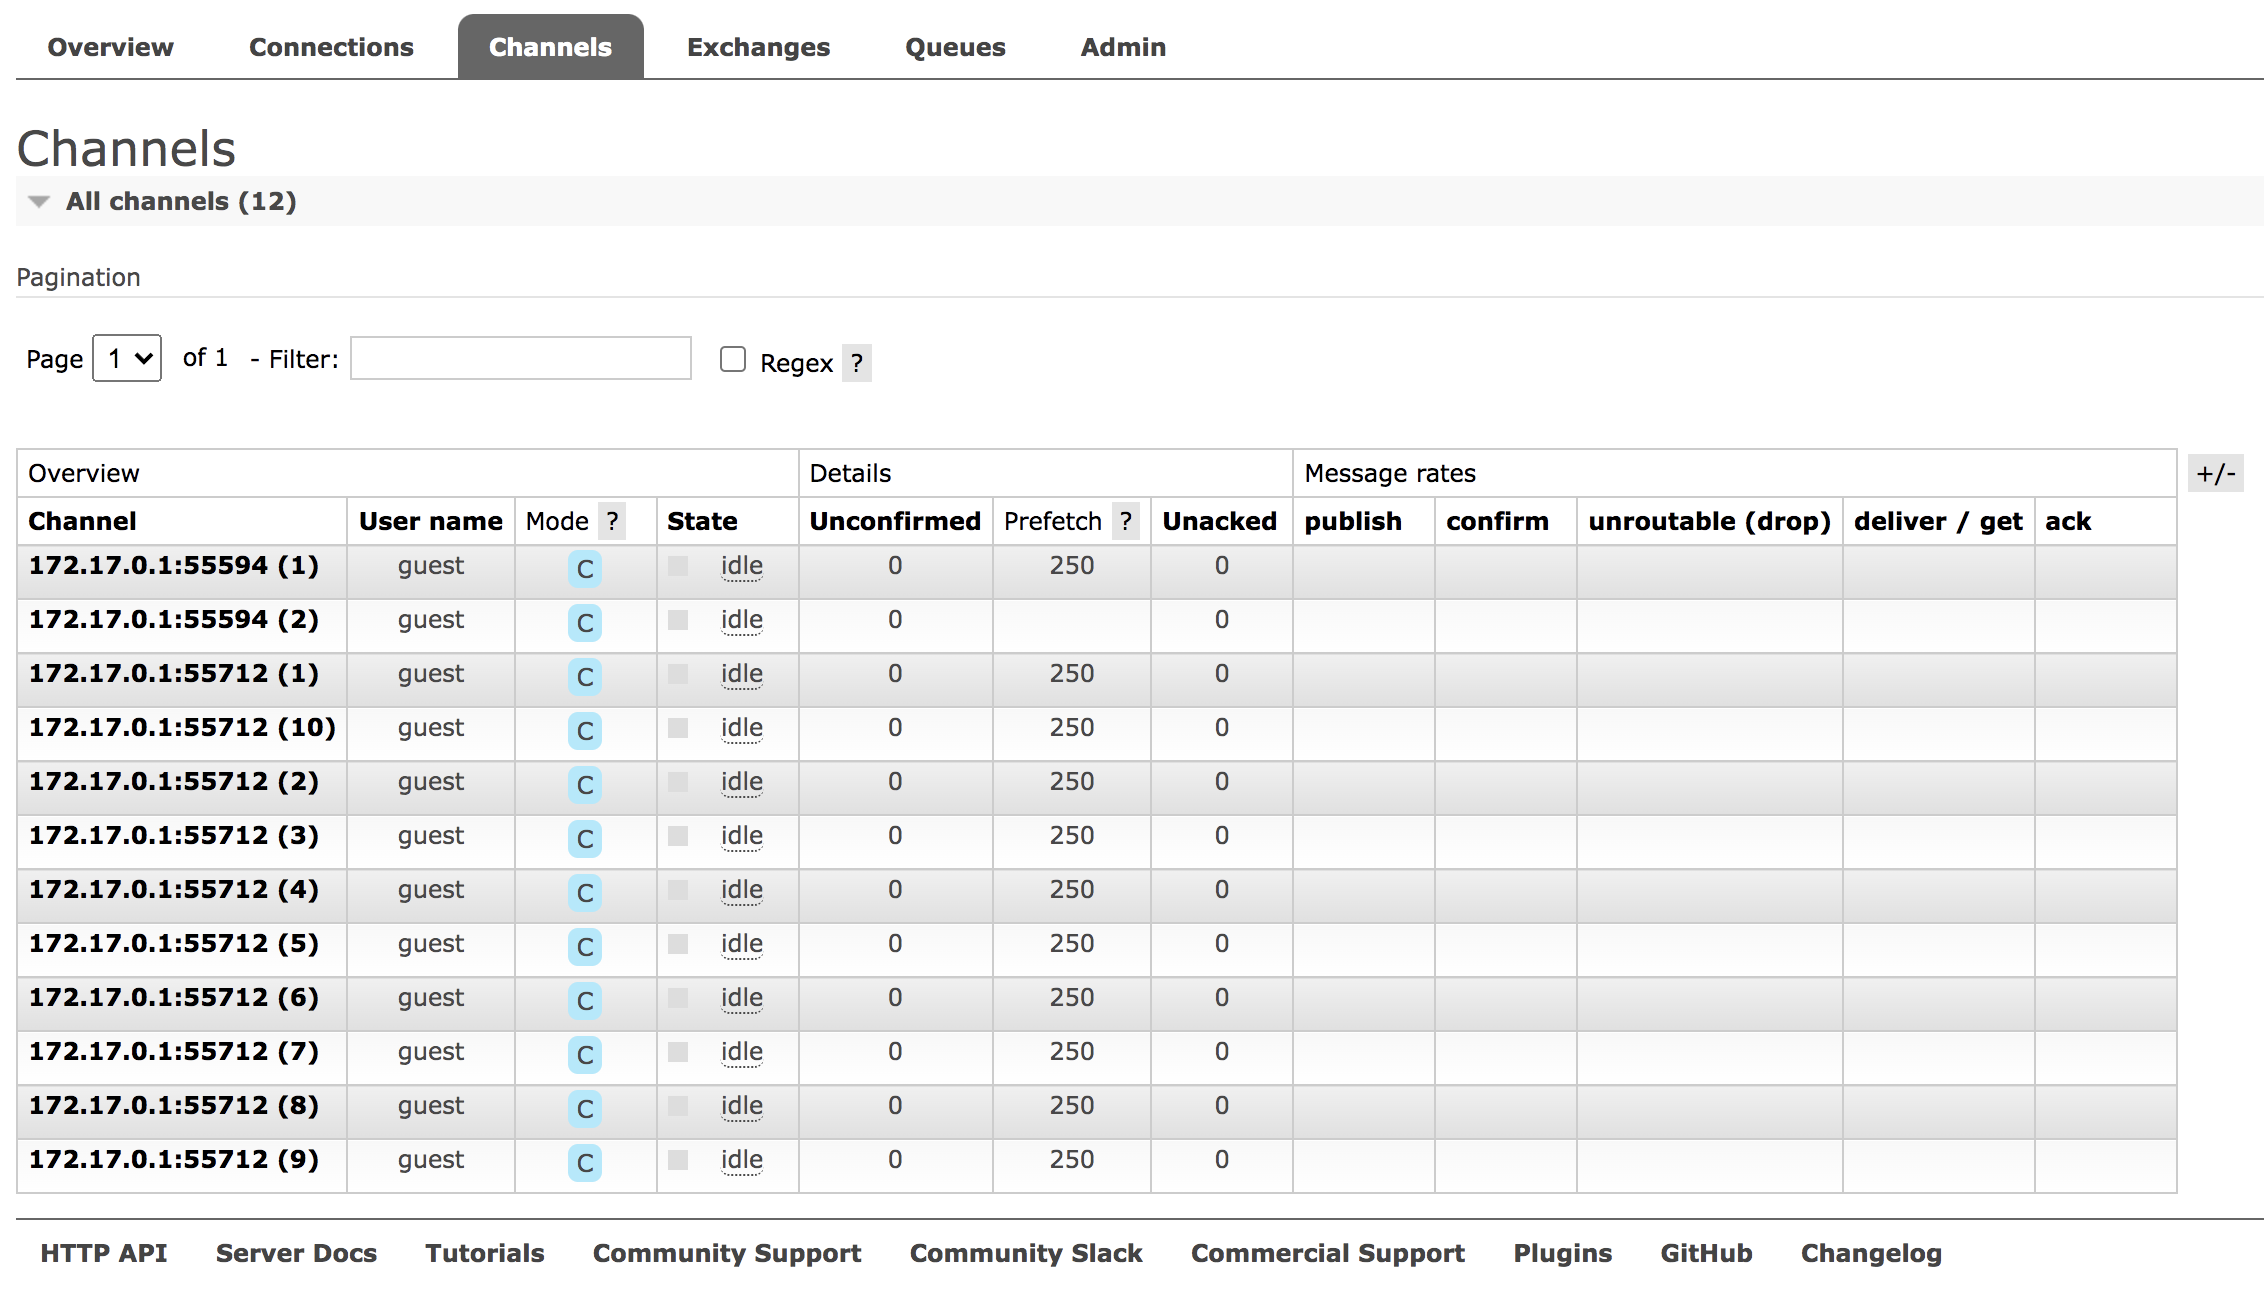
So what is a channel?
A connection (IP) can have multiple channels, as shown in the figure above. There are two connections in total, but there are 12 channels in total.
A connection can have multiple channels, which are implemented through multiple threads. Generally, we create queues, switches, etc. in the channels.
Producers' access is usually closed immediately; Consumers are always listening, and the channel will almost always exist.
The meanings of the above parameters are as follows:
- Channel: channel name.
- User name: the user name used for the channel login.
- Model: channel confirmation mode, C means confirm; T represents a transaction.
- State: the current state of the channel. Running means running; Idle means idle.
- Unconfirmed: the total number of messages to be confirmed.
- Prefetch: prefetch indicates the maximum number of unacknowledged messages that each consumer can bear. In short, it is used to specify how many messages a consumer can get from RabbitMQ at a time and store them in the consumer. Once the consumer's buffer is full, RabbitMQ will stop delivering new messages to the consumer until it sends a message that has been acked. Generally speaking, consumers are responsible for continuously processing messages and constantly ack. Then RabbitMQ will continuously deliver messages as long as the number of unAcked is less than the number of prefetch * consumer s.
- Unacker: the total number of messages to be acked.
- publish: the rate at which message producers send messages.
- confirm: the rate at which message producers acknowledge messages.
- unroutable (drop): indicates a message that has not been received and has been deleted.
- deliver/get: the rate at which message consumers get messages.
- ACK: the rate at which message consumers ack messages.
2.5 Exchange
This place displays switch information:
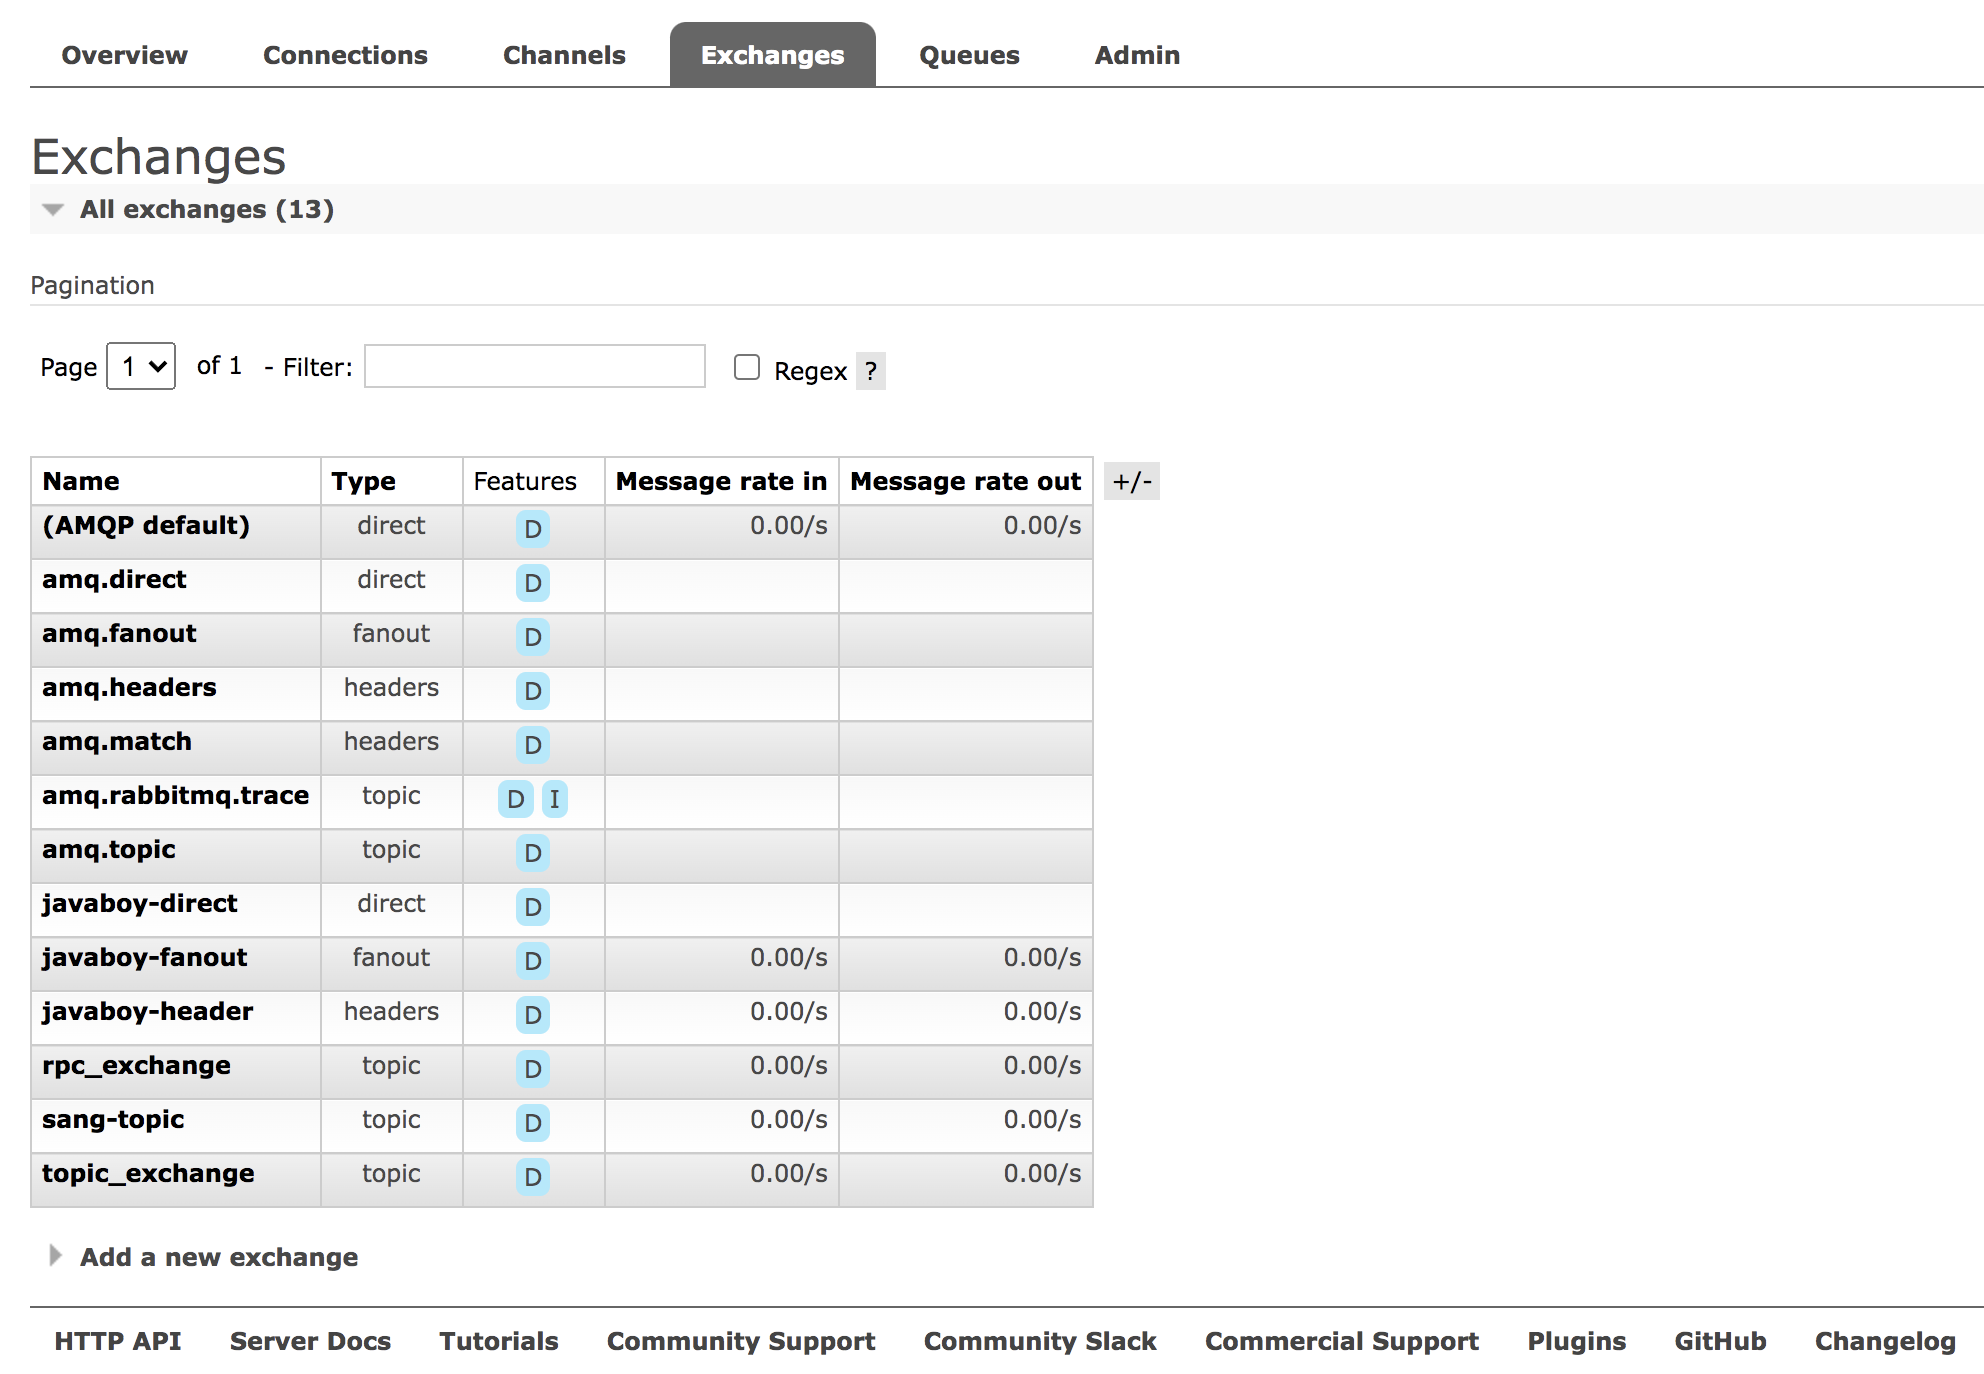
Various information about the switch will be shown here.
Type indicates the type of switch.
Features have two values D and I.
D means the switch is persistent and the attributes of the switch are saved inside the server. When RabbitMQ is restarted after the MQ server is accidentally or shut down, there is no need to manually or execute code to establish the switch again. The exchange opportunity is established automatically, which is equivalent to always existing.
I means that this switch cannot be used by message producers to push messages, but only for binding between switches.
Message rate in indicates the rate at which messages enter. Message rate out indicates the rate at which messages go out.
Click Add a new exchange below to create a new exchange.
2.6 Queue
This tab is used to display message queues:
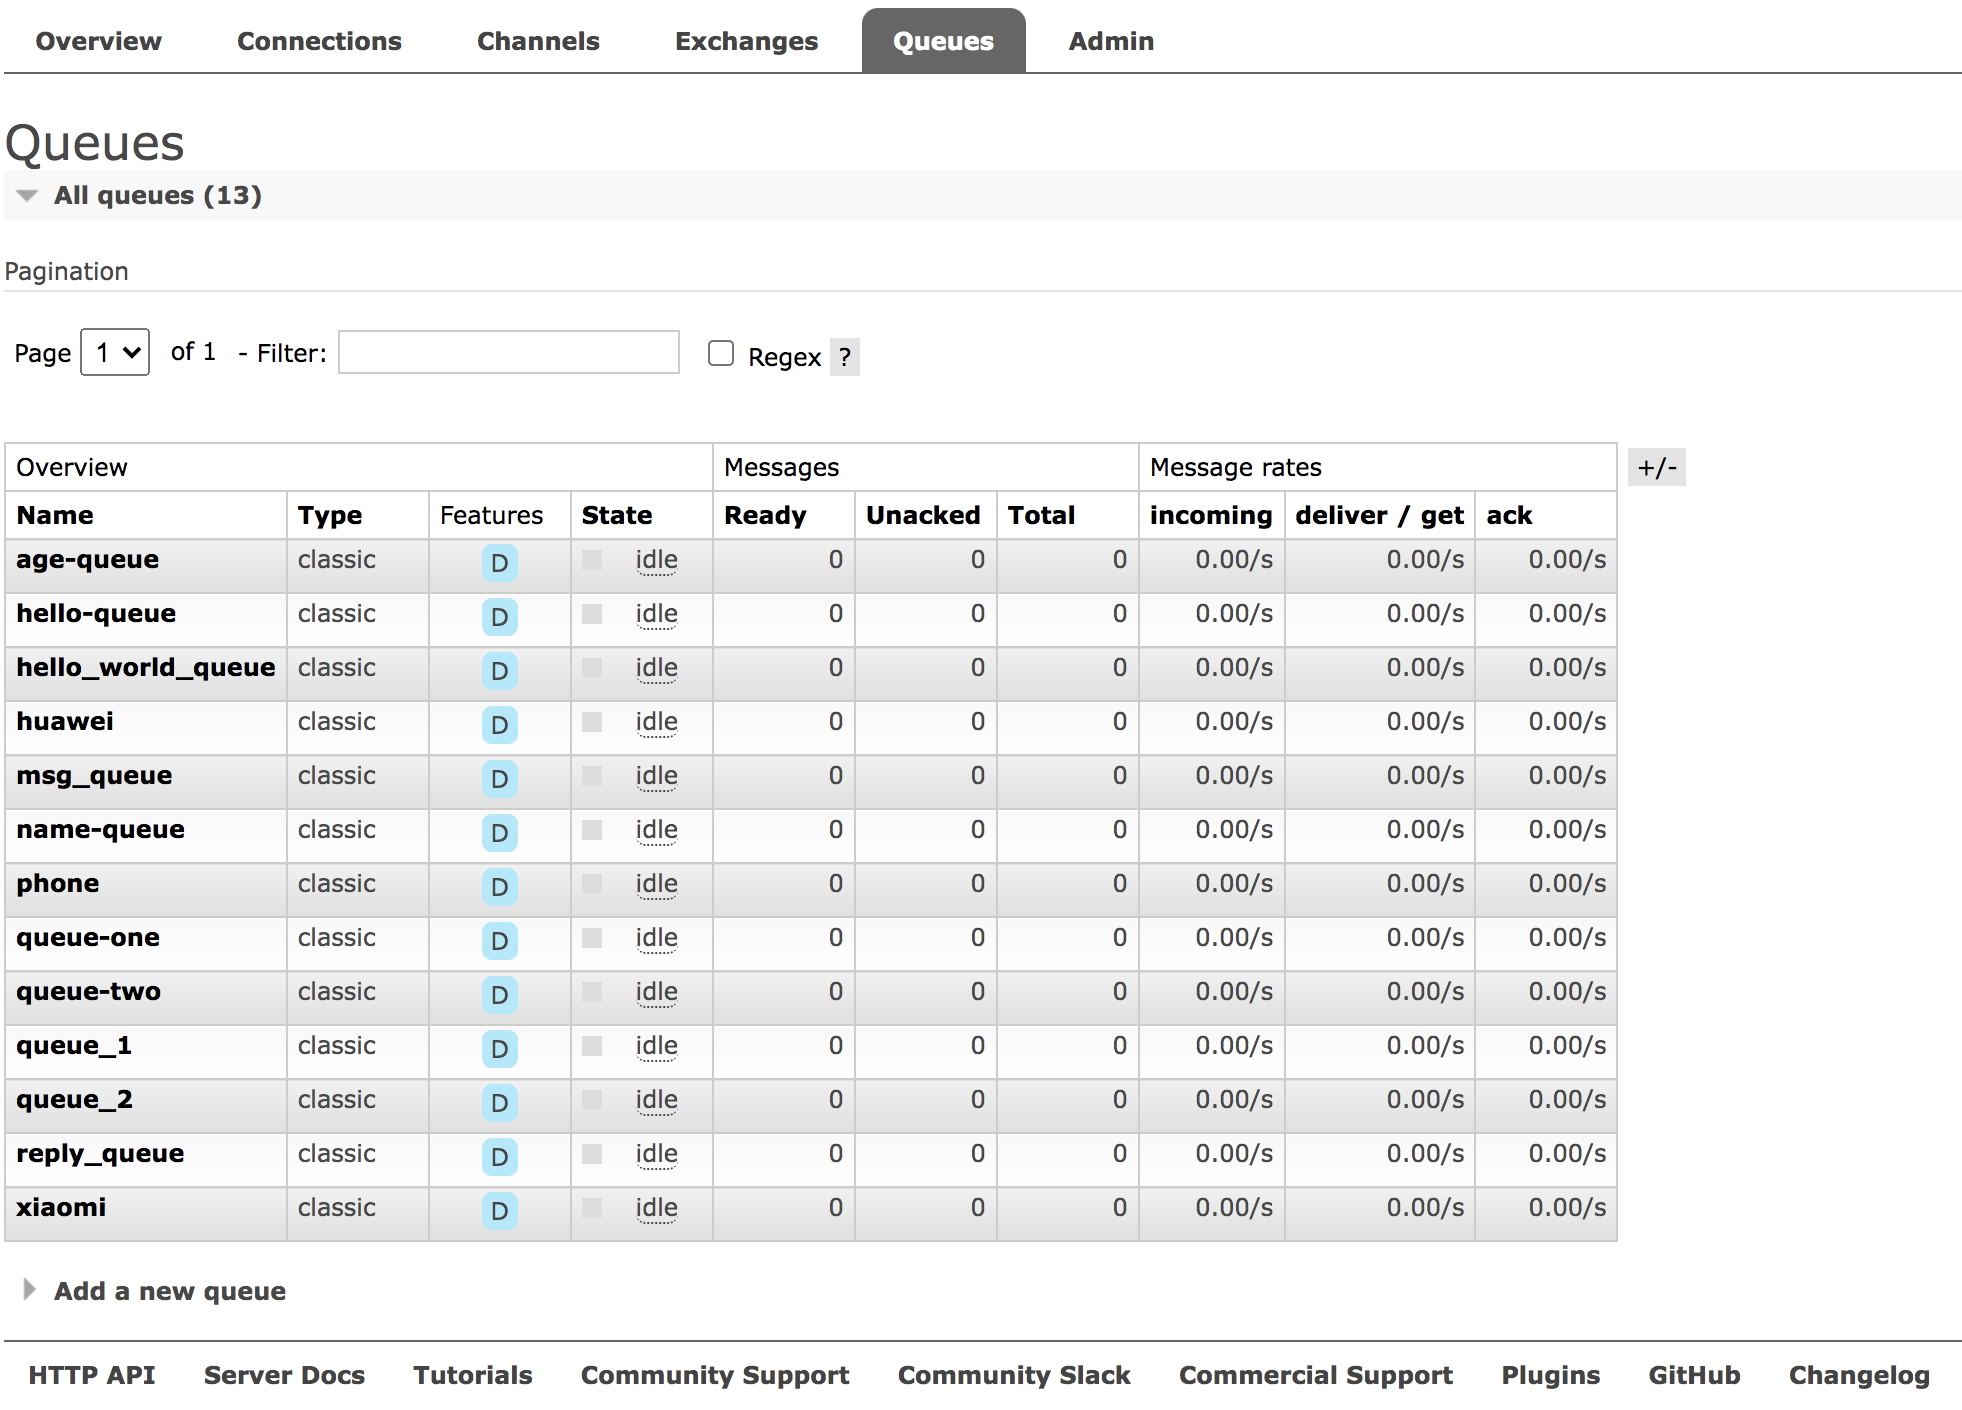
Each item has the following meanings:
- Name: indicates the name of the message queue.
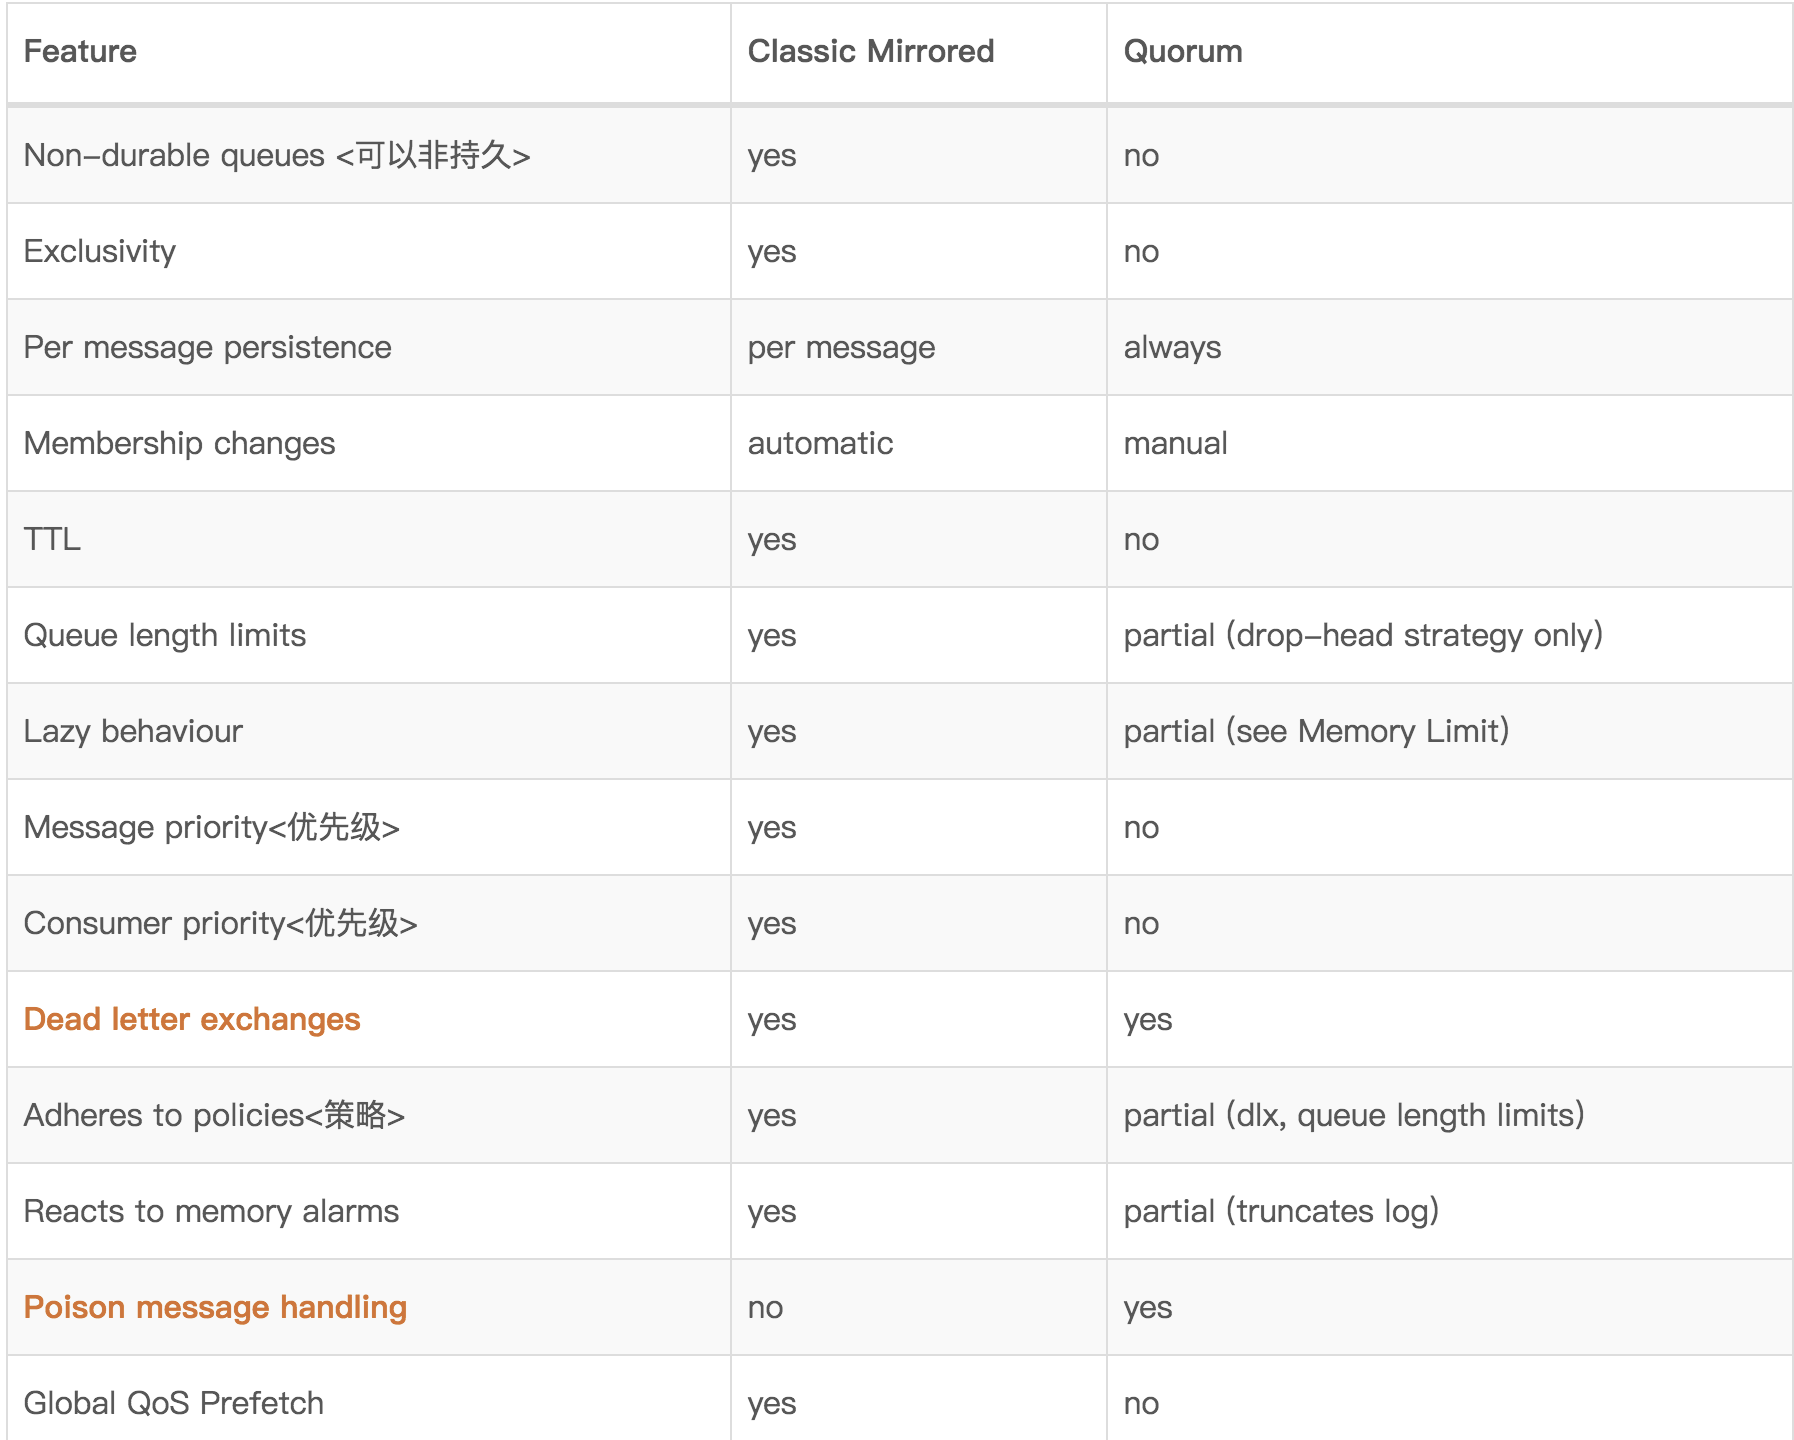
- Type: indicates the type of message queue. In addition to the classic in the figure above, another message type is Quorum. The two differences are as follows:
- Features: indicates the characteristics of message queue, and D indicates message queue persistence.
- State: indicates the status of the current queue, and running indicates running; Idle means idle.
- Ready: indicates the total number of messages to be consumed.
- Unacked: indicates the total number of messages to be answered.
- Total: indicates the total number of messages ready + unacknowledged.
- incoming: indicates the rate at which messages enter.
- deliver/get: indicates the rate of getting messages.
- ack: indicates the rate of message replies.
Click Add a new queue below to add a new message queue.
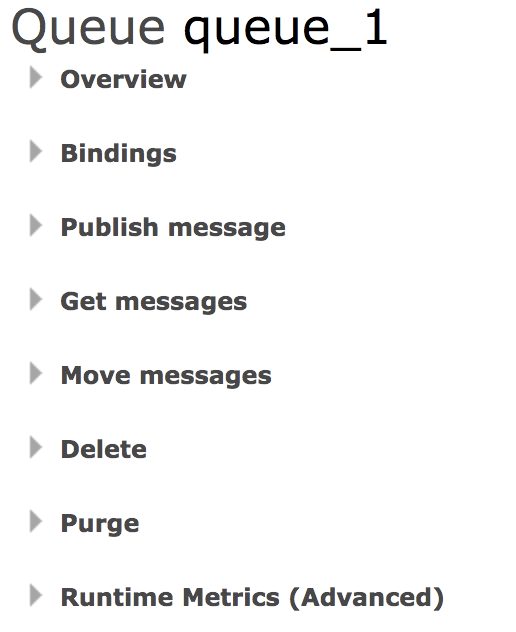
Click the name of each message queue to enter the message queue. After entering the message queue, you can complete further operations on the message queue, such as:
- Bind the message queue to a switch.
- Send a message.
- Get a message.
- Move a message (requires plug-in support).
- Delete message queue.
- Clear the messages in the message queue.
- ...
As shown below:
2.7 Admin
Here are some user management operations, as shown in the following figure:

The meanings of each attribute are as follows:
- Name: indicates the user name.
- Tags: indicates the role tag. Only one tag can be selected.
- Can access virtual hosts: indicates the virtual hosts that are allowed to enter.
- Has password: indicates whether the user has set a password.
Two common operations are managing users and virtual hosts.
Click Add a user below to add a new user. When adding a user, you need to set Tags for the user, which is actually the user role, as follows:
-
none: cannot access the management plugin
-
management: users can do anything through AMQP, list the virtual hosts they can log in to through AMQP, view the queues, exchanges and bindings in their virtual hosts, view and close their channels and connections, and view the "whole office" statistics about their virtual hosts, including the activities of other users in these virtual hosts
-
policymaker: management can do anything to view, create and delete the policies and parameters of its own virtual hosts
-
monitoring: management can do anything to list all virtual hosts, including virtual hosts that they cannot log in. View connections and channels of other users. View node level data such as clustering and memory usage. View real global statistics about all virtual hosts
-
administrator: anything policymaker and monitoring can do create and delete virtual hosts view create and delete users view create and delete permissions close connections for other users
-
Impersonator, unable to log in to the administrative console.
In addition, you can also operate the virtual host virtual host here. The following sections will introduce the virtual host to you.
3. RabbitMQ has seven messaging methods
In this section, let's share with our friends the seven message passing forms of RabbitMQ. Let's have a look.
In most cases, we may use RabbitMQ in Spring Boot or Spring Cloud environment. Therefore, I mainly share the usage of RabbitMQ from these two aspects.
3.1 introduction to rabbitmq architecture
A picture is worth a thousand words, as follows:
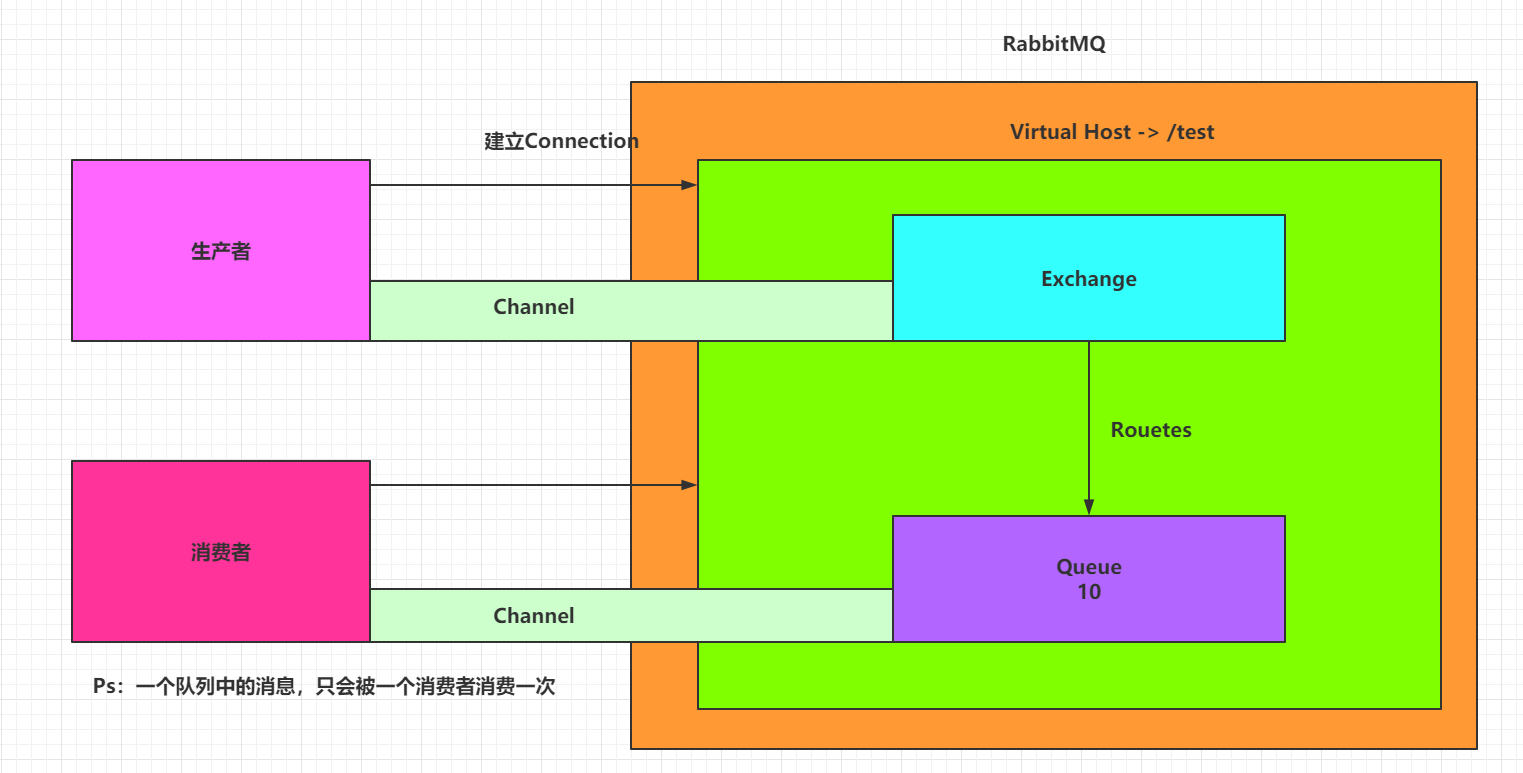
The following concepts are involved in this figure:
- Producer (Publisher): publish messages to the switch (Exchange) in RabbitMQ.
- Exchange: establish a connection with the producer and receive messages from the producer.
- Consumer: listen for messages in the Queue in RabbitMQ.
- Queue: Exchange distributes messages to the specified queue, which interacts with consumers.
- Routes: Rules for the switch to forward messages to the queue.
3.2 preparation
As we all know, RabbitMQ is a product in the AMQP camp. Spring Boot provides AMQP with automatic configuration dependency Spring Boot starter AMQP. Therefore, first create the Spring Boot project and add the dependency, as follows:
After the project is created successfully, in application Configure the basic connection information of RabbitMQ in properties, as follows:
spring.rabbitmq.host=localhost
spring.rabbitmq.username=guest
spring.rabbitmq.password=guest
spring.rabbitmq.port=5672
Next, configure RabbitMQ. In RabbitMQ, all messages submitted by message producers will be handed over to Exchange for redistribution, and Exchange will distribute messages to different queues according to different policies.
RabbitMQ official website introduces the following forms of message distribution:
Here are seven kinds, of which the seventh is message confirmation. Message confirmation has sent relevant articles before. Portal:
- Four strategies ensure the reliability of RabbitMQ message sending! Which one do you use?
- How RabbitMQ high availability ensures successful message consumption
So here I mainly introduce the first six messaging methods.
3.3 messaging
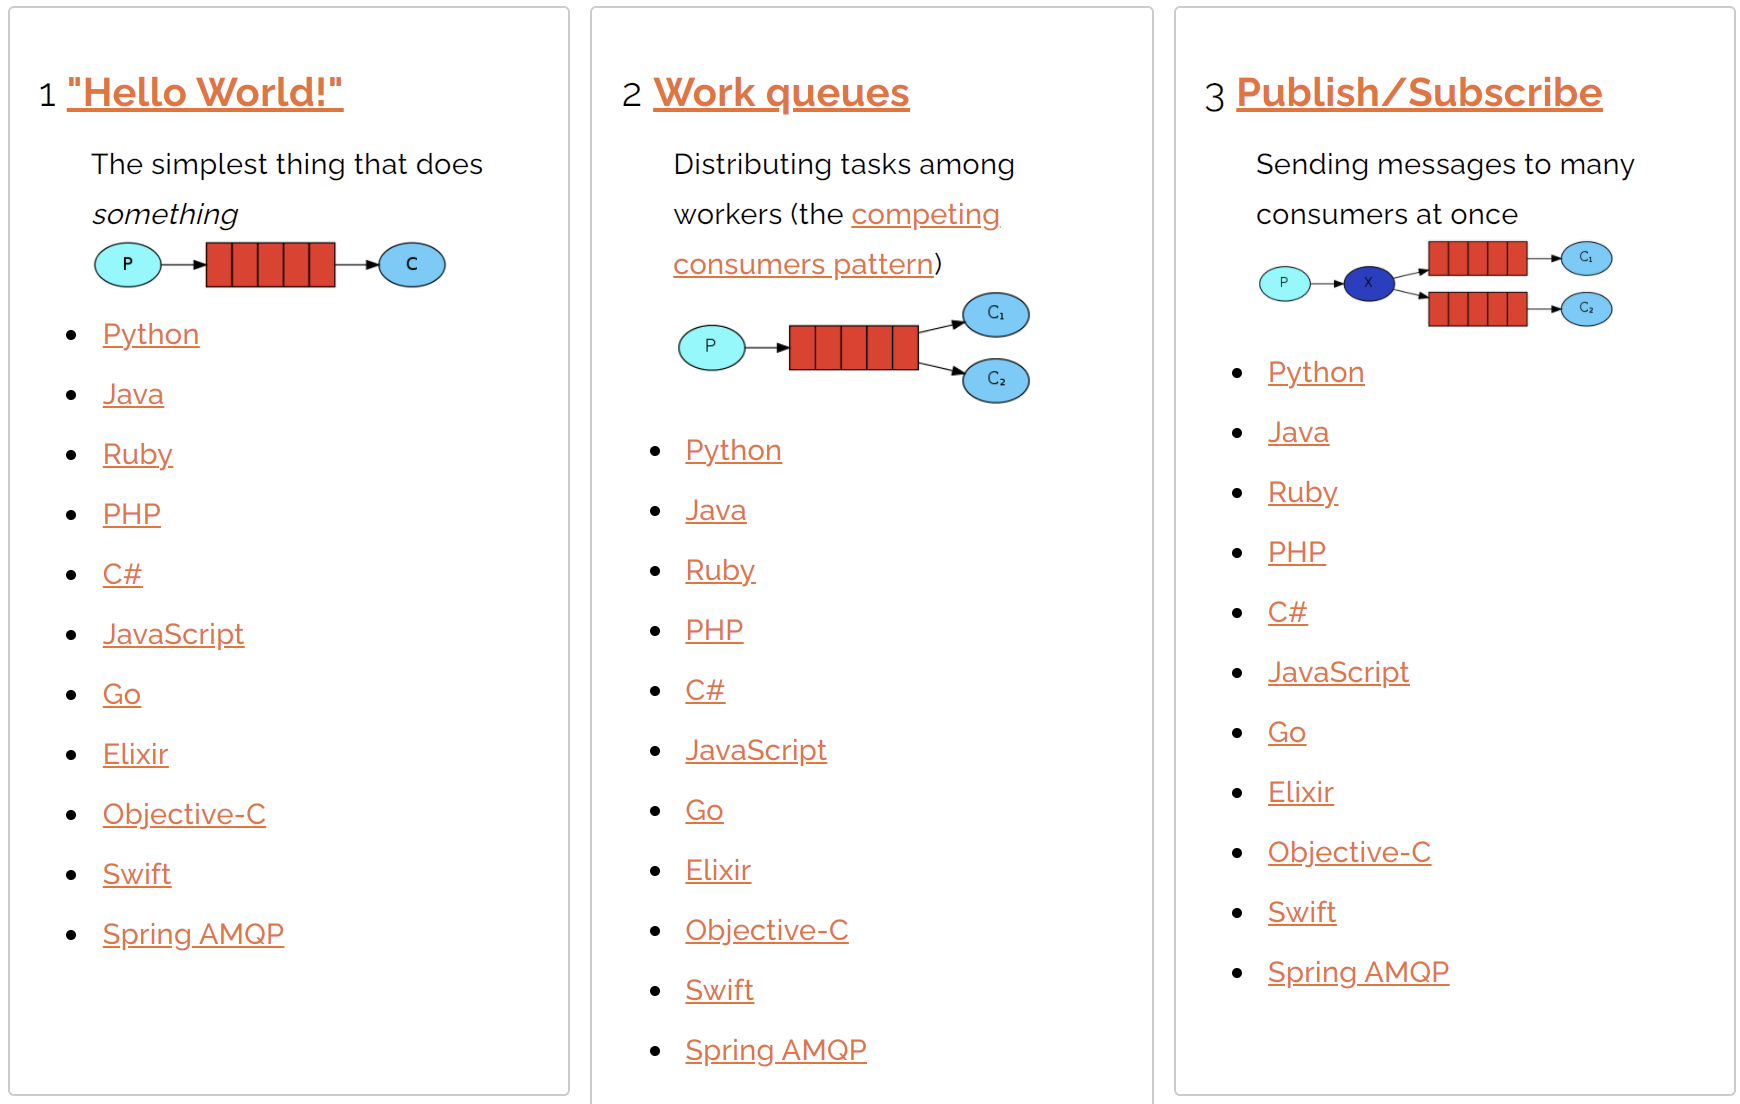
3.3.1 Hello World
Eh? Why doesn't this have a switch? This is actually the default switch. We need to provide a producer, a queue and a consumer. The message propagation diagram is as follows:

Let's look at the code implementation:
Let's first look at the definition of queue:
@Configuration
public class HelloWorldConfig {

    public static final String HELLO_WORLD_QUEUE_NAME = "hello_world_queue";

    @Bean
    Queue queue1() {
        return new Queue(HELLO_WORLD_QUEUE_NAME);
    }
}
Let's look at the definition of message consumer:
@Component
public class HelloWorldConsumer {
    @RabbitListener(queues = HelloWorldConfig.HELLO_WORLD_QUEUE_NAME)
    public void receive(String msg) {
        System.out.println("msg = " + msg);
    }
}
Message sending:
@SpringBootTest
class RabbitmqdemoApplicationTests {

    @Autowired
    RabbitTemplate rabbitTemplate;


    @Test
    void contextLoads() {
        rabbitTemplate.convertAndSend(HelloWorldConfig.HELLO_WORLD_QUEUE_NAME, "hello");
    }

}
In fact, the default direct exchange is used at this time. The routing policy of DirectExchange is to bind the message Queue to a DirectExchange. When a message arrives at DirectExchange, it will be forwarded to the Queue with the same routing key as the message. For example, the message Queue is named "Hello Queue", Then the message with routingkey "Hello Queue" will be received by the message Queue.
3.3.2 Work queues
This is the case:
One producer, one default switch (DirectExchange), one queue and two consumers, as shown in the following figure:
A queue corresponds to multiple consumers. By default, the queue distributes messages evenly, and messages will be distributed to different consumers. Consumers can configure their concurrency capabilities to improve message consumption, or configure manual ack to decide whether to consume a message.
Let's first look at the configuration of concurrency capability, as follows:
@Component
public class HelloWorldConsumer {
    @RabbitListener(queues = HelloWorldConfig.HELLO_WORLD_QUEUE_NAME)
    public void receive(String msg) {
        System.out.println("receive = " + msg);
    }
    @RabbitListener(queues = HelloWorldConfig.HELLO_WORLD_QUEUE_NAME,concurrency = "10")
    public void receive2(String msg) {
        System.out.println("receive2 = " + msg+"------->"+Thread.currentThread().getName());
    }
}
You can see that for the second consumer, I have configured the concurrency to be 10. At this time, for the second consumer, there will be 10 sub threads to consume messages at the same time.
Start the project. You can also see a total of 11 consumers in the RabbitMQ background.
At this point, if the producer sends 10 messages, they will be consumed at once.
The message sending method is as follows:
@SpringBootTest
class RabbitmqdemoApplicationTests {

    @Autowired
    RabbitTemplate rabbitTemplate;


    @Test
    void contextLoads() {
        for (int i = 0; i < 10; i++) {
            rabbitTemplate.convertAndSend(HelloWorldConfig.HELLO_WORLD_QUEUE_NAME, "hello");
        }
    }

}
The message consumption log is as follows:
As you can see, the news was consumed by the first consumer. However, partners should note that this is not always the case (you can see the difference by trying a few more times). Messages may also be consumed by the first consumer (only because the second consumer has ten threads running together, the second consumer consumes a larger proportion of messages).
Of course, message consumers can also enable manual ACK, so they can decide whether to consume messages sent by RabbitMQ. The way to configure manual ack is as follows:
spring.rabbitmq.listener.simple.acknowledge-mode=manual
The consumption code is as follows:
@Component
public class HelloWorldConsumer {
    @RabbitListener(queues = HelloWorldConfig.HELLO_WORLD_QUEUE_NAME)
    public void receive(Message message,Channel channel) throws IOException {
        System.out.println("receive="+message.getPayload());
        channel.basicAck(((Long) message.getHeaders().get(AmqpHeaders.DELIVERY_TAG)),true);
    }

    @RabbitListener(queues = HelloWorldConfig.HELLO_WORLD_QUEUE_NAME, concurrency = "10")
    public void receive2(Message message, Channel channel) throws IOException {
        System.out.println("receive2 = " + message.getPayload() + "------->" + Thread.currentThread().getName());
        channel.basicReject(((Long) message.getHeaders().get(AmqpHeaders.DELIVERY_TAG)), true);
    }
}
At this point, the second consumer rejects all messages, and the first consumer consumes all messages.
This is the case with Work queues.
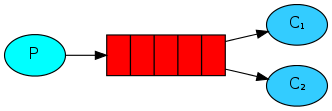
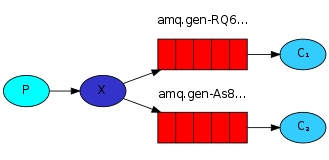
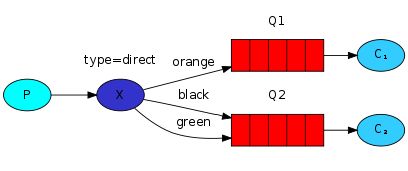
3.3.3 Publish/Subscribe
Let's look at the publish subscribe mode. This is the case:
A producer has multiple consumers. Each consumer has its own queue. Instead of directly sending messages to the queue, the producer sends them to the switch. Each queue is bound to the switch. The messages sent by the producer pass through the switch and reach the queue to achieve the purpose of obtaining a message by multiple consumers. It should be noted that if a message is sent to an Exchange without queue binding, the message will be lost because Exchange does not have the ability to store messages in RabbitMQ, and only the queue has the ability to store messages, as shown in the following figure:
In this case, we have four switches to choose from:
- Direct
- Fanout
- Topic
- Header
Let me give you a simple example.
3.3.3.1 Direct
The routing policy of DirectExchange is to bind the message Queue to a DirectExchange. When a message arrives at DirectExchange, it will be forwarded to the Queue with the same routing key as the message. For example, if the message Queue name is "Hello Queue", the message with the routing key of "Hello Queue" will be received by the message Queue. DirectExchange is configured as follows:
@Configuration
public class RabbitDirectConfig {
    public final static String DIRECTNAME = "javaboy-direct";
    @Bean
    Queue queue() {
        return new Queue("hello-queue");
    }
    @Bean
DirectExchange directExchange() {
        return new DirectExchange(DIRECTNAME, true, false);
    }
    @Bean
    Binding binding() {
        return BindingBuilder.bind(queue())
                .to(directExchange()).with("direct");
    }
}
- First, provide a message Queue, and then create a DirectExchange object. The three parameters are name, whether it is still valid after restart, and whether to delete it if it is not used for a long time.
- Create a Binding object to bind Exchange and Queue together.
- The configuration of DirectExchange and Binding beans can be omitted, that is, if DirectExchange is used, only one instance of Queue can be configured.
Let's look at consumers:
@Component
public class DirectReceiver {
@RabbitListener(queues = "hello-queue")
public void handler1(String msg) {
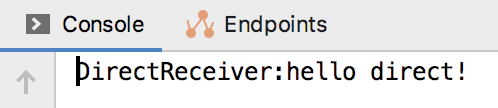
System.out.println("DirectReceiver:" + msg);
}
}
Specify a method as a message consumption method through the @ RabbitListener annotation, and the method parameter is the received message. Then inject a RabbitTemplate object into the unit test class to send messages, as follows:
@RunWith(SpringRunner.class)
@SpringBootTest
public class RabbitmqApplicationTests {
    @Autowired
    RabbitTemplate rabbitTemplate;
    @Test
    public void directTest() {
        rabbitTemplate.convertAndSend("hello-queue", "hello direct!");
    }
}
The final implementation results are as follows:
3.3.3.2 Fanout
The data exchange policy of FanoutExchange is to forward all messages arriving at FanoutExchange to all queues bound to it. In this policy, routingkey will not play any role. The configuration of FanoutExchange is as follows:
@Configuration
public class RabbitFanoutConfig {
    public final static String FANOUTNAME = "sang-fanout";
    @Bean
    FanoutExchange fanoutExchange() {
        return new FanoutExchange(FANOUTNAME, true, false);
    }
    @Bean
    Queue queueOne() {
        return new Queue("queue-one");
    }
    @Bean
    Queue queueTwo() {
        return new Queue("queue-two");
    }
    @Bean
    Binding bindingOne() {
        return BindingBuilder.bind(queueOne()).to(fanoutExchange());
    }
    @Bean
    Binding bindingTwo() {
        return BindingBuilder.bind(queueTwo()).to(fanoutExchange());
    }
}
Here, first create FanoutExchange, and the meaning of the parameter is consistent with that of the DirectExchange parameter. Then create two queues, and then bind both queues to FanoutExchange. Next, create two consumers, as follows:
@Component
public class FanoutReceiver {
    @RabbitListener(queues = "queue-one")
    public void handler1(String message) {
        System.out.println("FanoutReceiver:handler1:" + message);
    }
    @RabbitListener(queues = "queue-two")
    public void handler2(String message) {
        System.out.println("FanoutReceiver:handler2:" + message);
    }
}
Two consumers consume messages in two message queues respectively, and then send messages in the unit test, as follows:
@RunWith(SpringRunner.class)
@SpringBootTest
public class RabbitmqApplicationTests {
    @Autowired
    RabbitTemplate rabbitTemplate;
    @Test
    public void fanoutTest() {
        rabbitTemplate
        .convertAndSend(RabbitFanoutConfig.FANOUTNAME,
                null, "hello fanout!");
    }
}
Note that the routingkey is not required to send messages here. You can specify exchange. The routingkey can directly pass a null.
The final execution log is as follows:

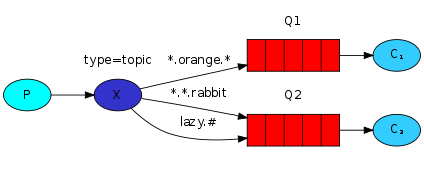
3.3.3.3 Topic
TopicExchange is a complex but flexible routing strategy. In TopicExchange, the Queue is bound to TopicExchange through the routingkey. When the message arrives at TopicExchange, TopicExchange routes the message to one or more queues according to the routingkey of the message. TopicExchange is configured as follows:
@Configuration
public class RabbitTopicConfig {
    public final static String TOPICNAME = "sang-topic";
    @Bean
    TopicExchange topicExchange() {
        return new TopicExchange(TOPICNAME, true, false);
    }
    @Bean
    Queue xiaomi() {
        return new Queue("xiaomi");
    }
    @Bean
    Queue huawei() {
        return new Queue("huawei");
    }
    @Bean
    Queue phone() {
        return new Queue("phone");
    }
    @Bean
    Binding xiaomiBinding() {
        return BindingBuilder.bind(xiaomi()).to(topicExchange())
                .with("xiaomi.#");
    }
    @Bean
    Binding huaweiBinding() {
        return BindingBuilder.bind(huawei()).to(topicExchange())
                .with("huawei.#");
    }
    @Bean
    Binding phoneBinding() {
        return BindingBuilder.bind(phone()).to(topicExchange())
                .with("#.phone.#");
    }
}
- First, create TopicExchange, and the parameters are the same as before. Then create three queues. The first Queue is used to store messages related to "xiaomi", the second Queue is used to store messages related to "huawei", and the third Queue is used to store messages related to "phone".
- Bind the three queues to TopicExchange respectively. "xiaomi. #" in the first Binding indicates that the routingkey of the message starts with "xiaomi" and will be routed to the Queue named "xiaomi". The "huawei. #" in the second Binding indicates that the routingkey of the message starts with "huawei", Will be routed to the Queue named "huawei". The "#. Phone. #" in the third Binding means that all messages containing "phone" in the routingkey of the message will be routed to the Queue named "phone".
Next, create three consumers for three queues, as follows:
@Component
public class TopicReceiver {
    @RabbitListener(queues = "phone")
    public void handler1(String message) {
        System.out.println("PhoneReceiver:" + message);
    }
    @RabbitListener(queues = "xiaomi")
    public void handler2(String message) {
        System.out.println("XiaoMiReceiver:"+message);
    }
    @RabbitListener(queues = "huawei")
    public void handler3(String message) {
        System.out.println("HuaWeiReceiver:"+message);
    }
}
Then send the message in the unit test, as follows:
@RunWith(SpringRunner.class)
@SpringBootTest
public class RabbitmqApplicationTests {
    @Autowired
    RabbitTemplate rabbitTemplate;
    @Test
    public void topicTest() {
        rabbitTemplate.convertAndSend(RabbitTopicConfig.TOPICNAME,
"xiaomi.news","Xiaomi news..");
        rabbitTemplate.convertAndSend(RabbitTopicConfig.TOPICNAME,
"huawei.news","Huawei news..");
        rabbitTemplate.convertAndSend(RabbitTopicConfig.TOPICNAME,
"xiaomi.phone","Mi phones..");
        rabbitTemplate.convertAndSend(RabbitTopicConfig.TOPICNAME,
"huawei.phone","Huawei mobile phone..");
        rabbitTemplate.convertAndSend(RabbitTopicConfig.TOPICNAME,
"phone.news","Mobile News..");
    }
}
According to the configuration in RabbitTopicConfig, the first message will be routed to the Queue named "xiaomi", the second message will be routed to the Queue named "huawei", and the third message will be routed to the Queue named "xiaomi" and "phone", The fourth message will be routed to the Queue named "huawei" and "phone", and the last message will be routed to the Queue named "phone".
3.3.3.4 Header
HeadersExchange is a less used routing policy. HeadersExchange routes messages to different queues according to the message Header. This policy is also independent of routingkey. The configuration is as follows:
@Configuration
public class RabbitHeaderConfig {
public final static String HEADERNAME = "javaboy-header";
@Bean
HeadersExchange headersExchange() {
return new HeadersExchange(HEADERNAME, true, false);
}
@Bean
Queue queueName() {
return new Queue("name-queue");
}
@Bean
Queue queueAge() {
return new Queue("age-queue");
}
@Bean
Binding bindingName() {
Map<string, object> map = new HashMap<>();
map.put("name", "sang");
return BindingBuilder.bind(queueName())
.to(headersExchange()).whereAny(map).match();
}
@Bean
Binding bindingAge() {
return BindingBuilder.bind(queueAge())
.to(headersExchange()).where("age").exists();
}
}
Most of the configurations here are the same as those described above. The difference is mainly reflected in the Binding configuration. In the first bindingName method, where any means that as long as one Header in the Header of the message matches the key/value in the map, the message will be routed to the Queue named "name Queue". The whereAll method can also be used here, Indicates that all headers of the message must match. whereAny and whereAll actually correspond to an attribute called x-match. The configuration in bindingAge means that as long as the Header of the message contains age, regardless of the value of age, the message will be routed to the Queue named "age Queue".
Next, create two message consumers:
@Component
public class HeaderReceiver {
    @RabbitListener(queues = "name-queue")
    public void handler1(byte[] msg) {
        System.out.println("HeaderReceiver:name:"
                + new String(msg, 0, msg.length));
    }
    @RabbitListener(queues = "age-queue")
    public void handler2(byte[] msg) {
        System.out.println("HeaderReceiver:age:"
                + new String(msg, 0, msg.length));
    }
}
Note that the parameters here are received in byte array. Then create a message sending method in the unit test. Here, the message sending is also independent of the routingkey, as follows:
@RunWith(SpringRunner.class)
@SpringBootTest
public class RabbitmqApplicationTests {
    @Autowired
    RabbitTemplate rabbitTemplate;
    @Test
    public void headerTest() {
        Message nameMsg = MessageBuilder
                .withBody("hello header! name-queue".getBytes())
                .setHeader("name", "sang").build();
        Message ageMsg = MessageBuilder
                .withBody("hello header! age-queue".getBytes())
                .setHeader("age", "99").build();
        rabbitTemplate.send(RabbitHeaderConfig.HEADERNAME, null, ageMsg);
        rabbitTemplate.send(RabbitHeaderConfig.HEADERNAME, null, nameMsg);
    }
}
Here, two messages are created. The two messages have different headers. Messages with different headers will be sent to different queues.
The final implementation effect is as follows:

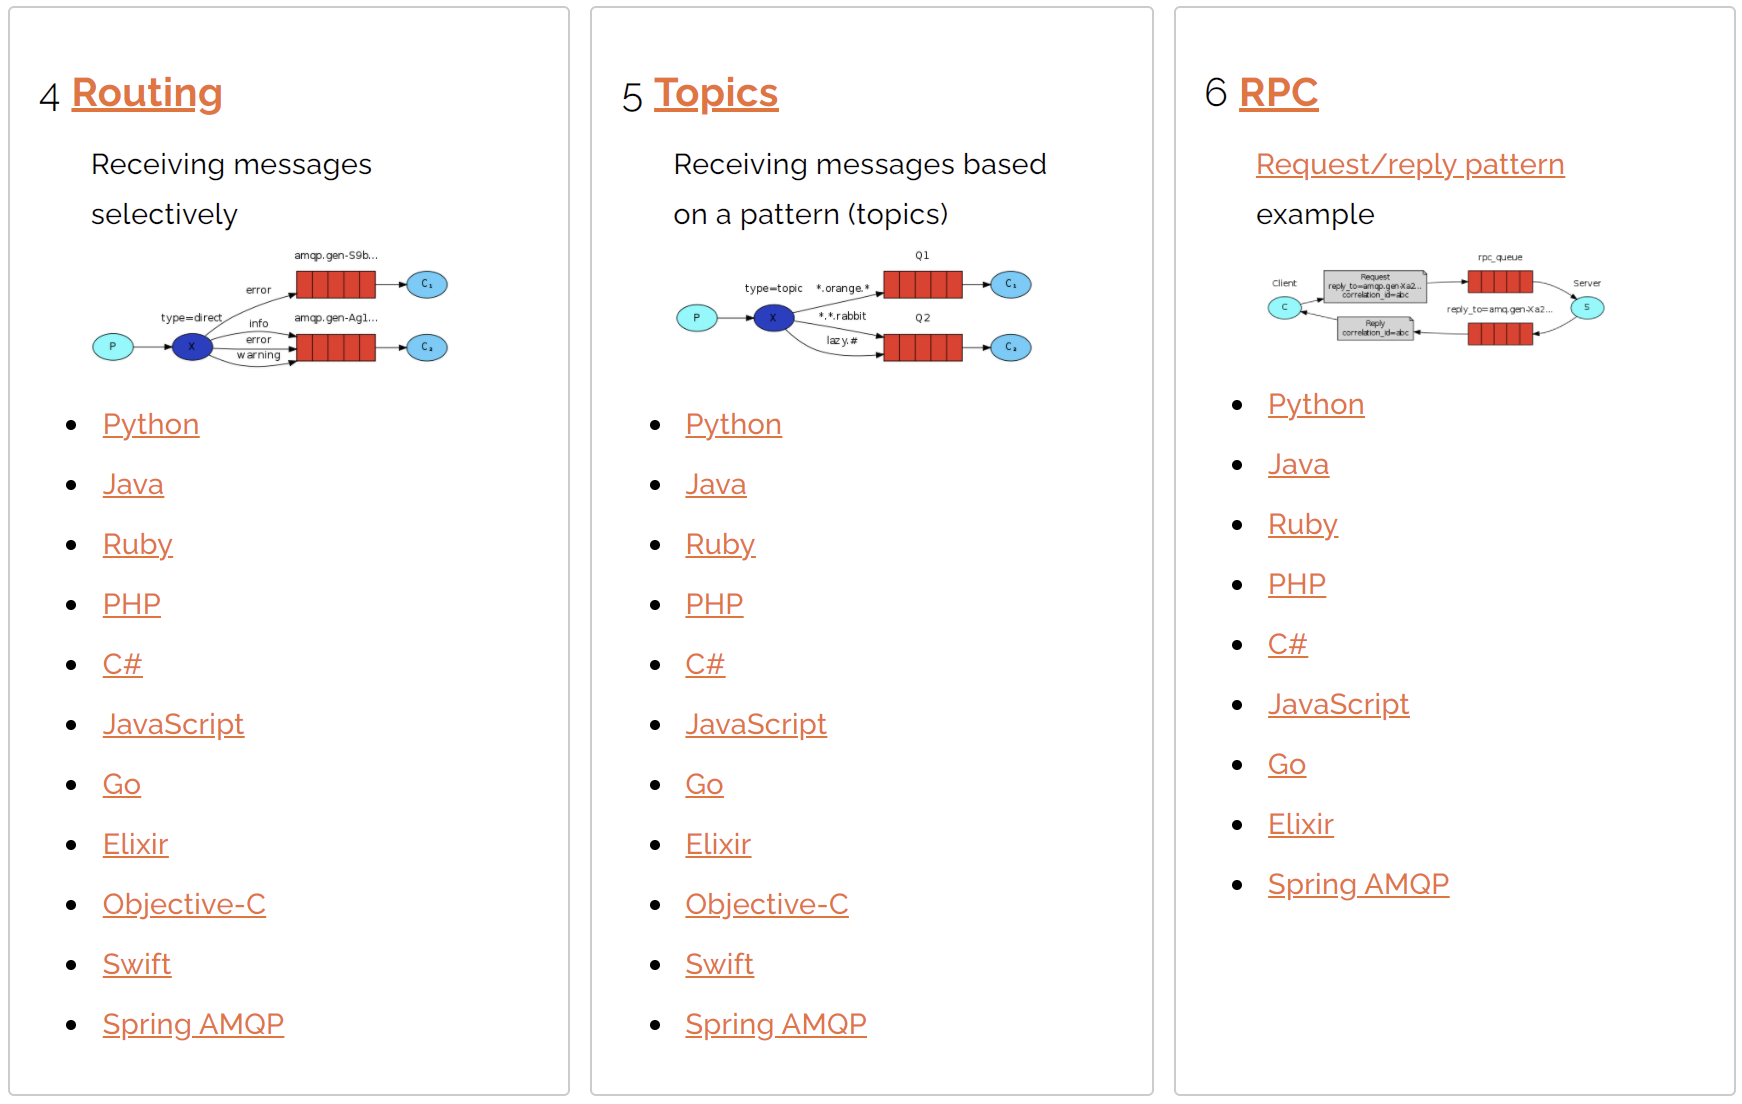
3.3.4 Routing
This is the case:
One producer, one switch, two queues and two consumers. After creating the Exchange, the producer binds the corresponding queue according to the RoutingKey, and specifies the specific RoutingKey of the message when sending the message.
As shown below:
This is to route messages according to the routing key. I won't give an example here. You can refer to the summary of 3.3.1.
3.3.5 Topics
This is the case:
One producer, one switch, two queues and two consumers. The producer creates the Exchange of the Topic and binds it to the queue. This binding can use * and # keywords to specify the RoutingKey content. Pay attention to the format XXX when writing xxx. XXX to write.
As shown below:
I won't give an example. The example has been given in the previous section 3.3.3, so I won't repeat it.
3.3.6 RPC
As for RPC, brother song just wrote an article and introduced it to you two days ago. I won't talk about it here. Portal:
3.3.7 Publisher Confirms
This kind of sending confirms that brother song has written relevant articles before. Portal:
- Four strategies ensure the reliability of RabbitMQ message sending! Which one do you use?
- How RabbitMQ high availability ensures successful message consumption
4. RabbitMQ implements RPC
When it comes to RPC (Remote Procedure Call Protocol), the estimates in the minds of the partners are RESTful API, Dubbo, WebService, Java RMI, CORBA, etc.
In fact, RabbitMQ also provides us with RPC function, which is very simple to use.
SongGe uses a simple case to share with you how spring boot + rabbit MQ implements a simple RPC call.
be careful
Some partners may have some misunderstandings about RabbitMQ's implementation of RPC calls, thinking that this is not simple? Two message queues_ 1 and queue_2. First, the client sends a message to the queue_ On 1, the server listens to the queue_1. Process the message after receiving it; After processing, the server sends a message to the queue_2 on the queue, and then the client listens to the queue_2 messages on the queue, so you can know the processing results of the server.
This way is either impossible or a little troublesome! RabbitMQ provides ready-made solutions that can be used directly and are very convenient. Next, let's study together.
4.1 architecture
Let's take a look at a simple architecture diagram:
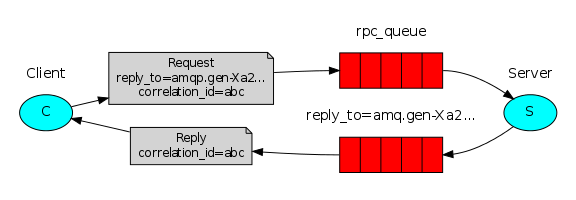
This picture makes the problem clear:
- First, the Client sends a message. Compared with ordinary messages, this message has two more key contents: one is correlation_id, which represents the unique id of the message. Another content is reply_to, which indicates the name of the message reply queue.
- The Server obtains messages from the message sending queue and processes the corresponding business logic. After processing, the Server sends the processing results to reply_to the specified callback queue.
- When the Client reads the message from the callback queue, it can know what the execution of the message looks like.
This situation is actually very suitable for handling asynchronous calls.
4.2 practice
Next, let's take a concrete example to see how to play this.
4.2.1 client development
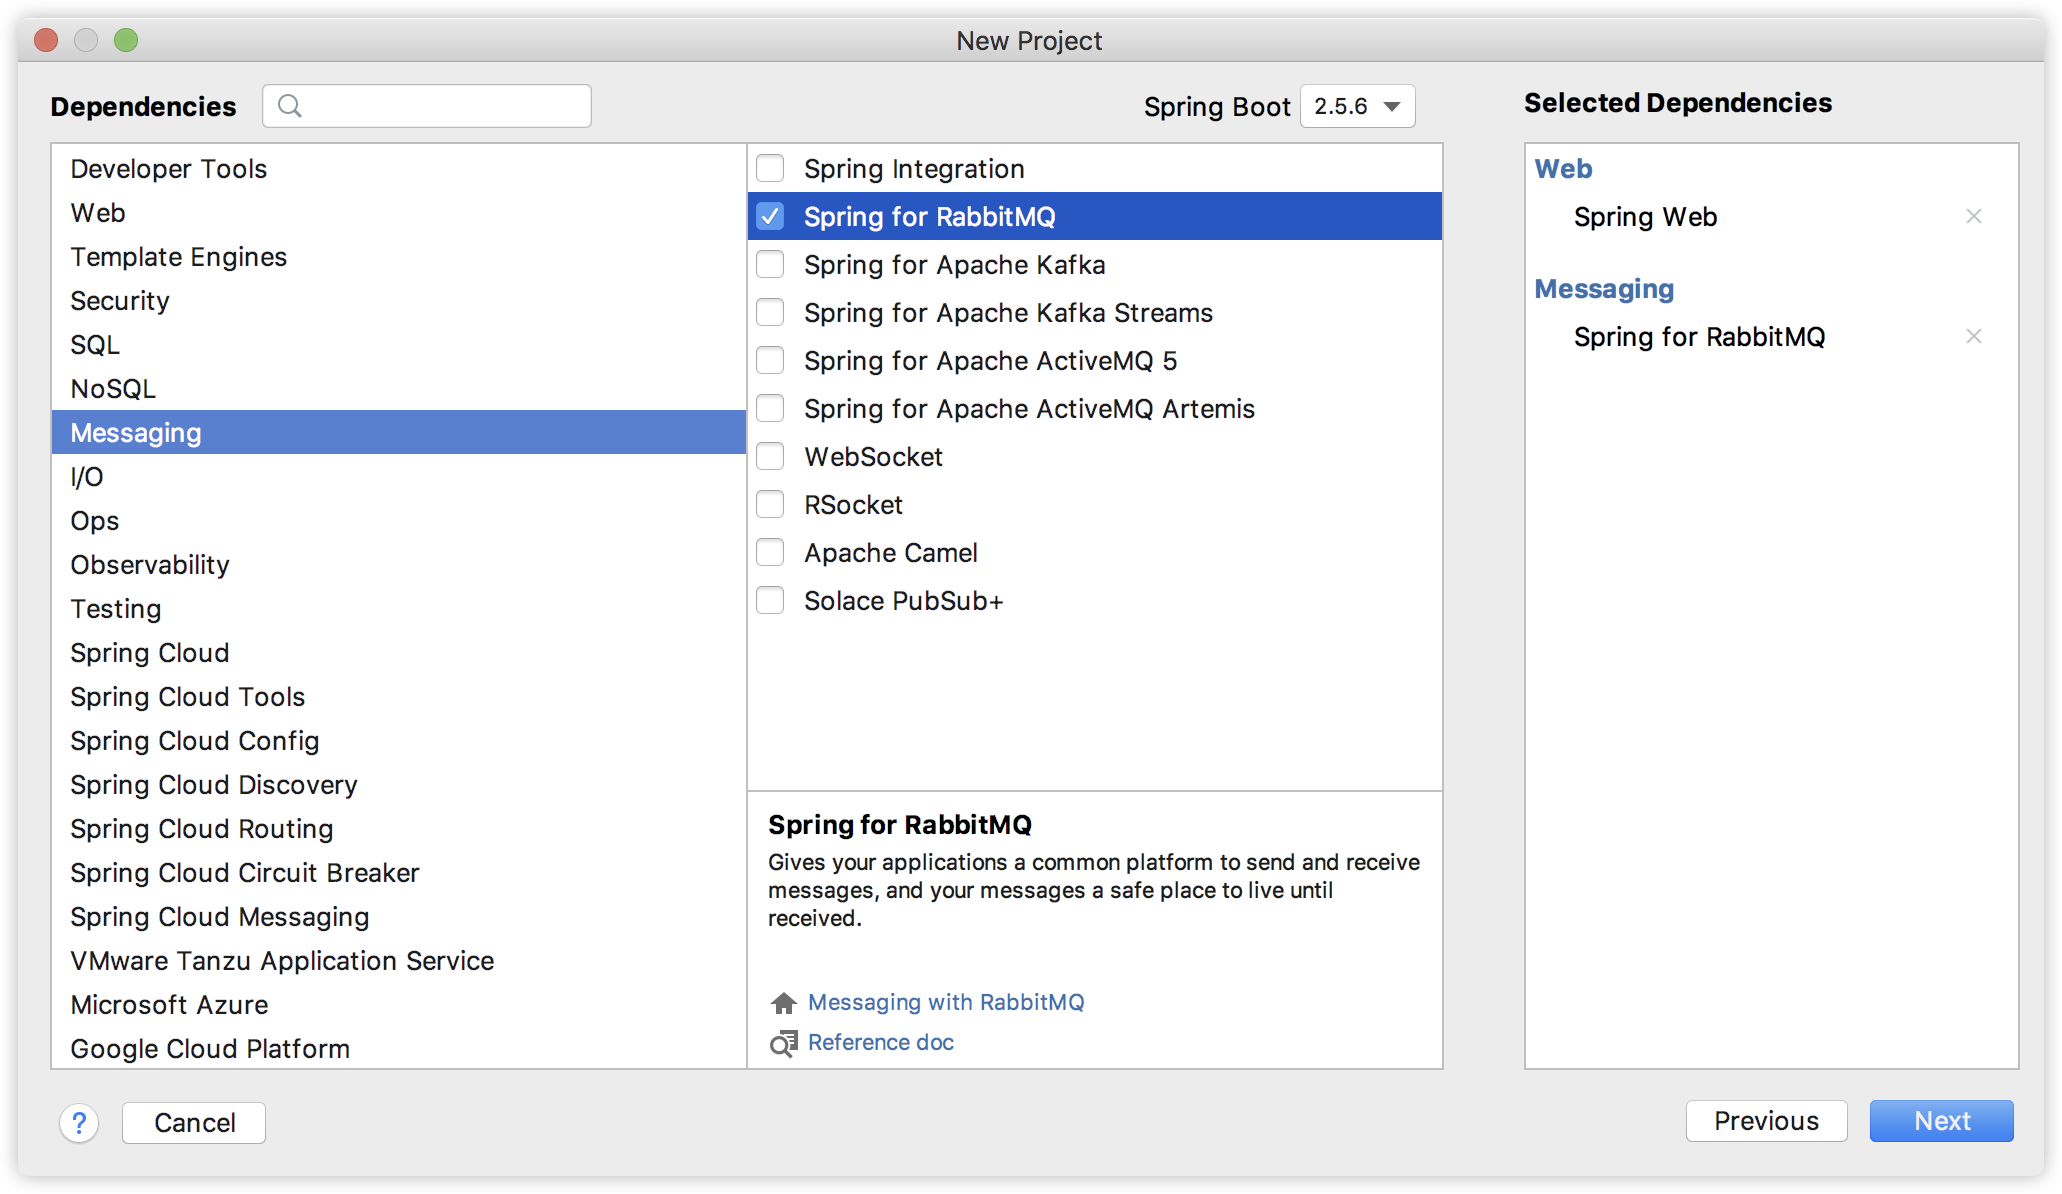
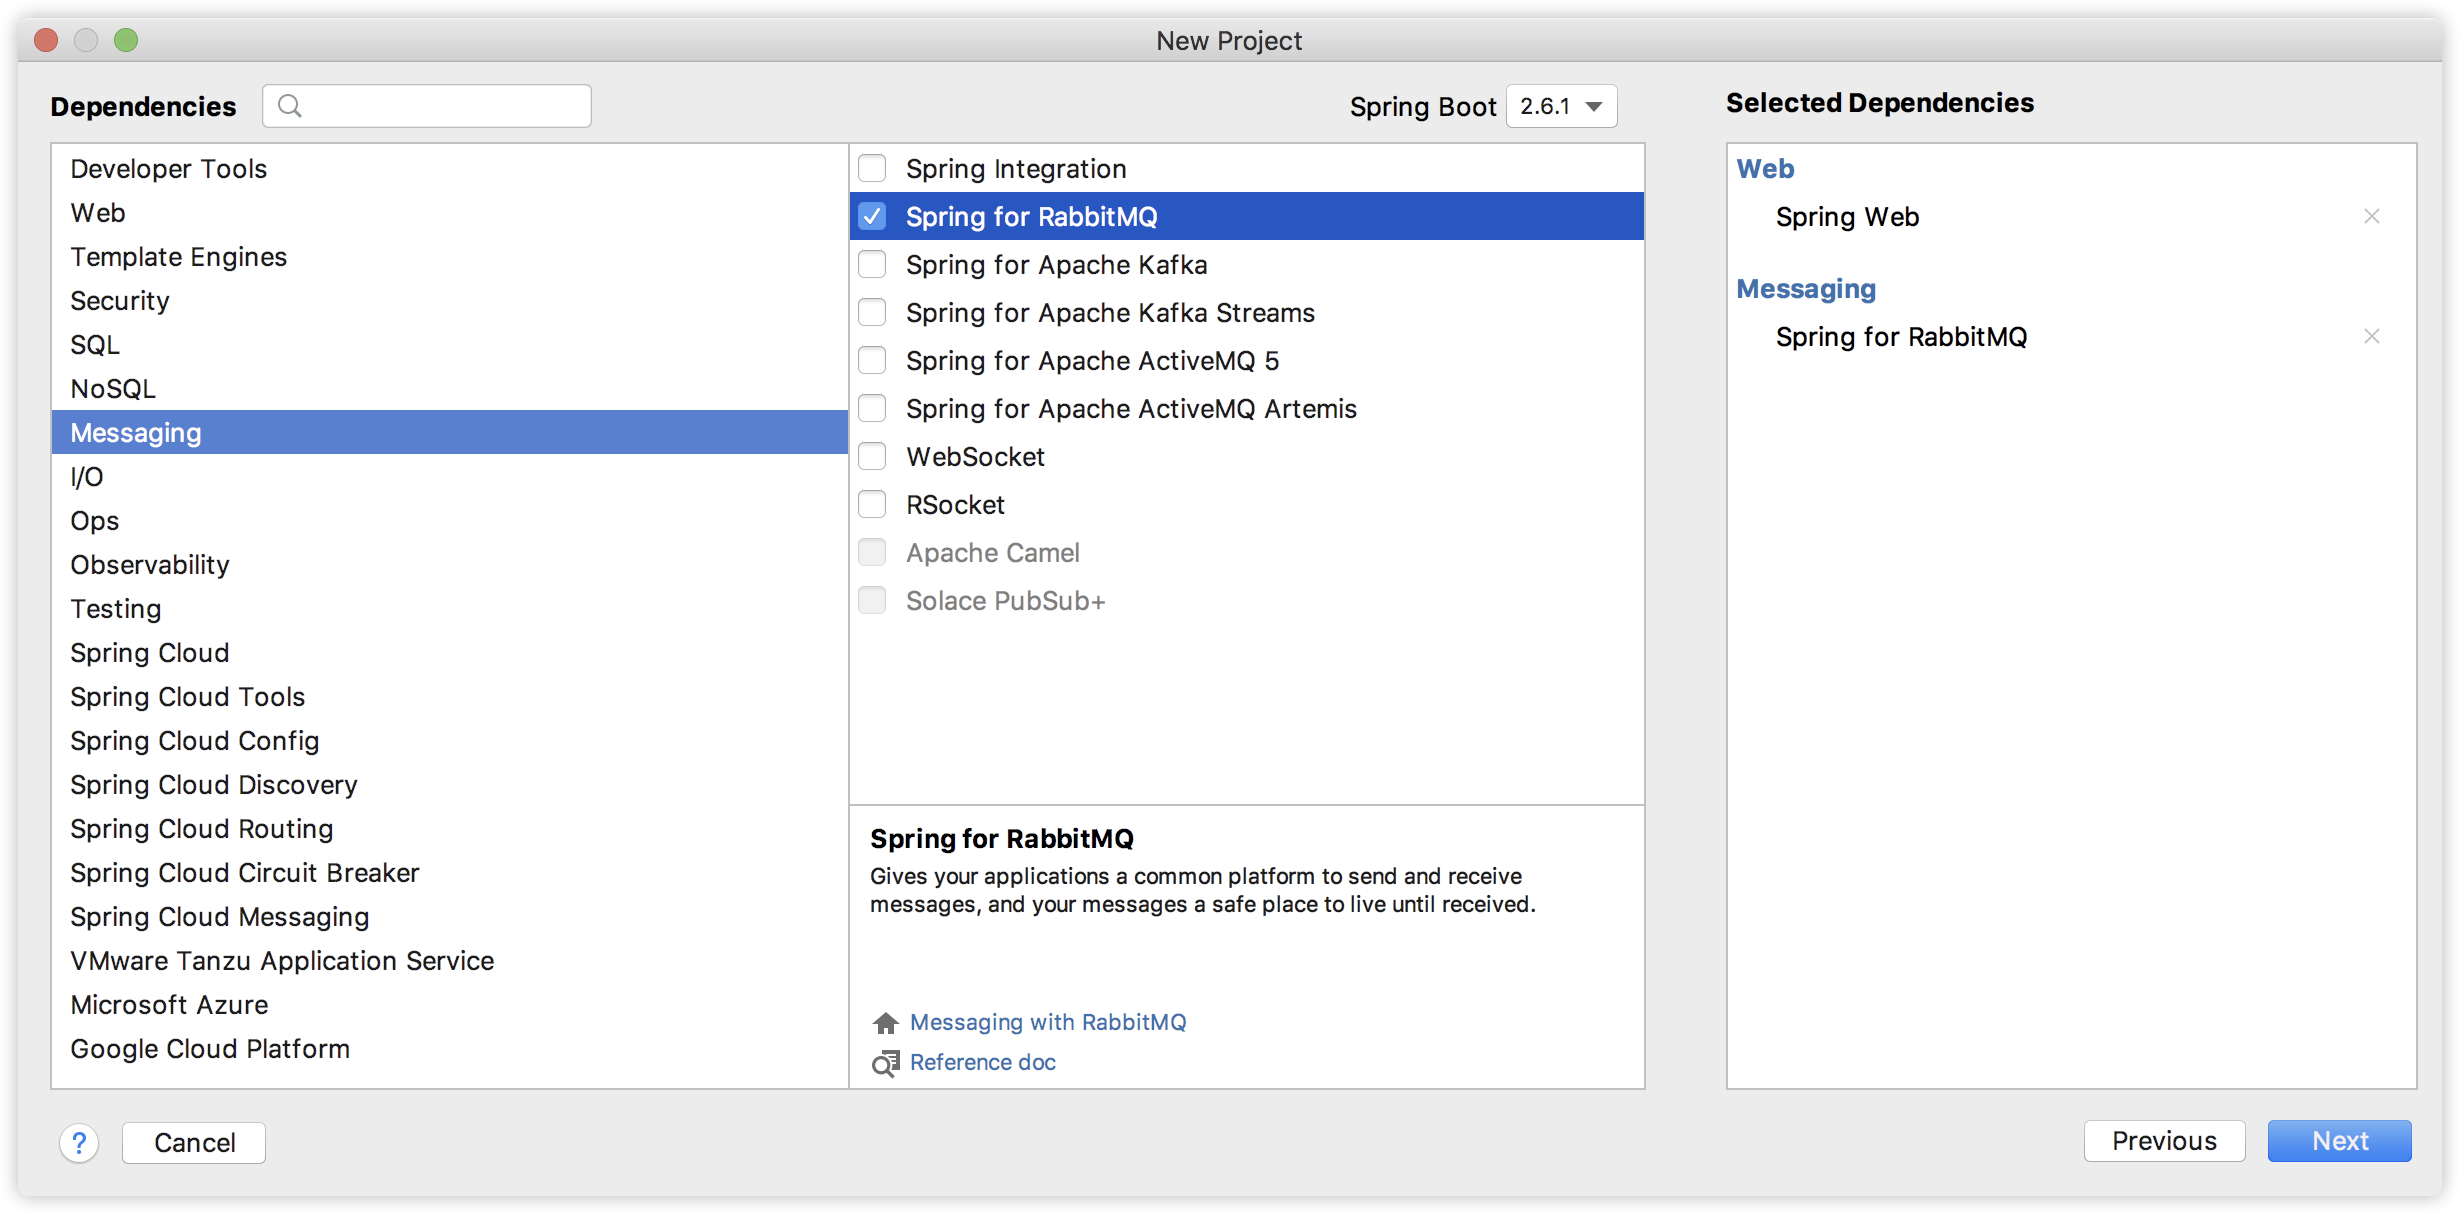
First, let's create a Spring Boot project named producer as a message producer. When creating, we add web and rabbitmq dependencies, as shown in the following figure:

After the project is successfully created, first in application The basic information of configuring RabbitMQ in properties is as follows:
spring.rabbitmq.host=localhost
spring.rabbitmq.port=5672
spring.rabbitmq.username=guest
spring.rabbitmq.password=guest
spring.rabbitmq.publisher-confirm-type=correlated
spring.rabbitmq.publisher-returns=true
The first four lines of this configuration are easy to understand, so I won't repeat them. The second two lines are: first, configure the message confirmation method. We confirm it through correlated. Only when this configuration is enabled will correlation be carried in future messages_ ID, only through correlation_id so that we can associate the sent message with the return value. The last line is configured to enable sending failure return.
Next, let's provide a configuration class, as follows:
/**
 * @author A little rain in Jiangnan
 * @The official account of WeChat is a little rain in the south of the Yangtze River.
 * @Website http://www.itboyhub.com
 * @International station http://www.javaboy.org
 * @Wechat a_java_boy
 * @GitHub https://github.com/lenve
 * @Gitee https://gitee.com/lenve
 */
@Configuration
public class RabbitConfig {

    public static final String RPC_QUEUE1 = "queue_1";
    public static final String RPC_QUEUE2 = "queue_2";
    public static final String RPC_EXCHANGE = "rpc_exchange";

    /**
     * Set message sending RPC queue
     */
    @Bean
    Queue msgQueue() {
        return new Queue(RPC_QUEUE1);
    }

    /**
     * Set return queue
     */
    @Bean
    Queue replyQueue() {
        return new Queue(RPC_QUEUE2);
    }

    /**
     * Set up switch
     */
    @Bean
    TopicExchange exchange() {
        return new TopicExchange(RPC_EXCHANGE);
    }

    /**
     * Request queue and switch binding
     */
    @Bean
    Binding msgBinding() {
        return BindingBuilder.bind(msgQueue()).to(exchange()).with(RPC_QUEUE1);
    }

    /**
     * Return queue and switch binding
     */
    @Bean
    Binding replyBinding() {
        return BindingBuilder.bind(replyQueue()).to(exchange()).with(RPC_QUEUE2);
    }


    /**
     * Sending and receiving messages using the RabbitTemplate
     * And set the callback queue address
     */
    @Bean
    RabbitTemplate rabbitTemplate(ConnectionFactory connectionFactory) {
        RabbitTemplate template = new RabbitTemplate(connectionFactory);
        template.setReplyAddress(RPC_QUEUE2);
        template.setReplyTimeout(6000);
        return template;
    }


    /**
     * Set listener for return queue
     */
    @Bean
    SimpleMessageListenerContainer replyContainer(ConnectionFactory connectionFactory) {
        SimpleMessageListenerContainer container = new SimpleMessageListenerContainer();
        container.setConnectionFactory(connectionFactory);
        container.setQueueNames(RPC_QUEUE2);
        container.setMessageListener(rabbitTemplate(connectionFactory));
        return container;
    }
}
In this configuration class, we configure the message sending queue msgQueue and the message returning queue replyQueue respectively, and then bind the two queues to the message switch. This is the normal operation of RabbitMQ. There's nothing to say.
In Spring Boot, our tool for message sending is RabbitTemplate. By default, the system automatically provides this tool, but here we need to customize this tool again, mainly to add the return queue for message sending. Finally, we need to set a listener for the return queue.
OK, then we can start sending specific messages:
/**
 * @author A little rain in Jiangnan
 * @The official account of WeChat is a little rain in the south of the Yangtze River.
 * @Website http://www.itboyhub.com
 * @International station http://www.javaboy.org
 * @Wechat a_java_boy
 * @GitHub https://github.com/lenve
 * @Gitee https://gitee.com/lenve
 */
@RestController
public class RpcClientController {

    private static final Logger logger = LoggerFactory.getLogger(RpcClientController.class);

    @Autowired
    private RabbitTemplate rabbitTemplate;

    @GetMapping("/send")
    public String send(String message) {
        // Create message object
        Message newMessage = MessageBuilder.withBody(message.getBytes()).build();

        logger.info("client send: {}", newMessage);

        //Client send message
        Message result = rabbitTemplate.sendAndReceive(RabbitConfig.RPC_EXCHANGE, RabbitConfig.RPC_QUEUE1, newMessage);

        String response = "";
        if (result != null) {
            // Gets the correlationId of the sent message
            String correlationId = newMessage.getMessageProperties().getCorrelationId();
            logger.info("correlationId:{}", correlationId);

            // Get response header information
            HashMap<string, object> headers = (HashMap<string, object>) result.getMessageProperties().getHeaders();

            // Get the message id returned by the server
            String msgId = (String) headers.get("spring_returned_message_correlation");

            if (msgId.equals(correlationId)) {
                response = new String(result.getBody());
                logger.info("client receive: {}", response);
            }
        }
        return response;
    }
}
In fact, this code is also some conventional code. I'll pick a few key nodes and say:
- Message sending calls the sendAndReceive method, which has its own return value, which is the message returned by the server.
- In the message returned by the server, the header contains spring_ returned_ message_ The correlation field, which is the correlation when the message is sent_ ID, the correlation when the message is sent_ ID and return the spring in the message header_ returned_ message_ With the value of the correlation field, we can bind the returned message content with the sent message, and confirm that the returned content is for the sent message.
This is the development of the whole client. In fact, the core is the call of sendAndReceive method. Although the call is simple, the preparation work still needs to be done enough. For example, if we are not in application If correlated is configured in properties, there will be no correlation in the sent message_ ID, so the returned message content cannot be associated with the sent message content.
4.2.2 server development
Let's take a look at the development of the server.
First, create a Spring Boot project named consumer. The dependencies added by the project are consistent with those created by client development. I won't repeat it.
Then configure application Properties configuration file. The configuration of this file is also consistent with the configuration in the client. I won't repeat it.
Next, a RabbitMQ configuration class is provided. This configuration class is relatively simple. Simply configure the message queue and bind it to the message switch, as follows:
/**
 * @author A little rain in Jiangnan
 * @The official account of WeChat is a little rain in the south of the Yangtze River.
 * @Website http://www.itboyhub.com
 * @International station http://www.javaboy.org
 * @Wechat a_java_boy
 * @GitHub https://github.com/lenve
 * @Gitee https://gitee.com/lenve
 */
@Configuration
public class RabbitConfig {

    public static final String RPC_QUEUE1 = "queue_1";
    public static final String RPC_QUEUE2 = "queue_2";
    public static final String RPC_EXCHANGE = "rpc_exchange";

    /**
     * Configure message sending queue
     */
    @Bean
    Queue msgQueue() {
        return new Queue(RPC_QUEUE1);
    }

    /**
     * Set return queue
     */
    @Bean
    Queue replyQueue() {
        return new Queue(RPC_QUEUE2);
    }

    /**
     * Set up switch
     */
    @Bean
    TopicExchange exchange() {
        return new TopicExchange(RPC_EXCHANGE);
    }

    /**
     * Request queue and switch binding
     */
    @Bean
    Binding msgBinding() {
        return BindingBuilder.bind(msgQueue()).to(exchange()).with(RPC_QUEUE1);
    }

    /**
     * Return queue and switch binding
     */
    @Bean
    Binding replyBinding() {
        return BindingBuilder.bind(replyQueue()).to(exchange()).with(RPC_QUEUE2);
    }
}
Finally, let's look at the consumption of news:
@Component
public class RpcServerController {
    private static final Logger logger = LoggerFactory.getLogger(RpcServerController.class);
    @Autowired
    private RabbitTemplate rabbitTemplate;

    @RabbitListener(queues = RabbitConfig.RPC_QUEUE1)
    public void process(Message msg) {
        logger.info("server receive : {}",msg.toString());
        Message response = MessageBuilder.withBody(("i'm receive:"+new String(msg.getBody())).getBytes()).build();
        CorrelationData correlationData = new CorrelationData(msg.getMessageProperties().getCorrelationId());
        rabbitTemplate.sendAndReceive(RabbitConfig.RPC_EXCHANGE, RabbitConfig.RPC_QUEUE2, response, correlationData);
    }
}
The logic here is relatively simple:
- The server first receives the message and prints it out.
- The server extracts the correlation in the original message_ id.
- The server calls the sendAndReceive method to send the message to RPC_QUEUE2 queue with correlation_id parameter.
After the server sends the message, the client will receive the result returned by the server.
OK, it's done.
4.2.3 testing
Next, let's do a simple test.
Start RabbitMQ first.
Next, start producer and consumer respectively, then test the interface of producer in postman, as follows:
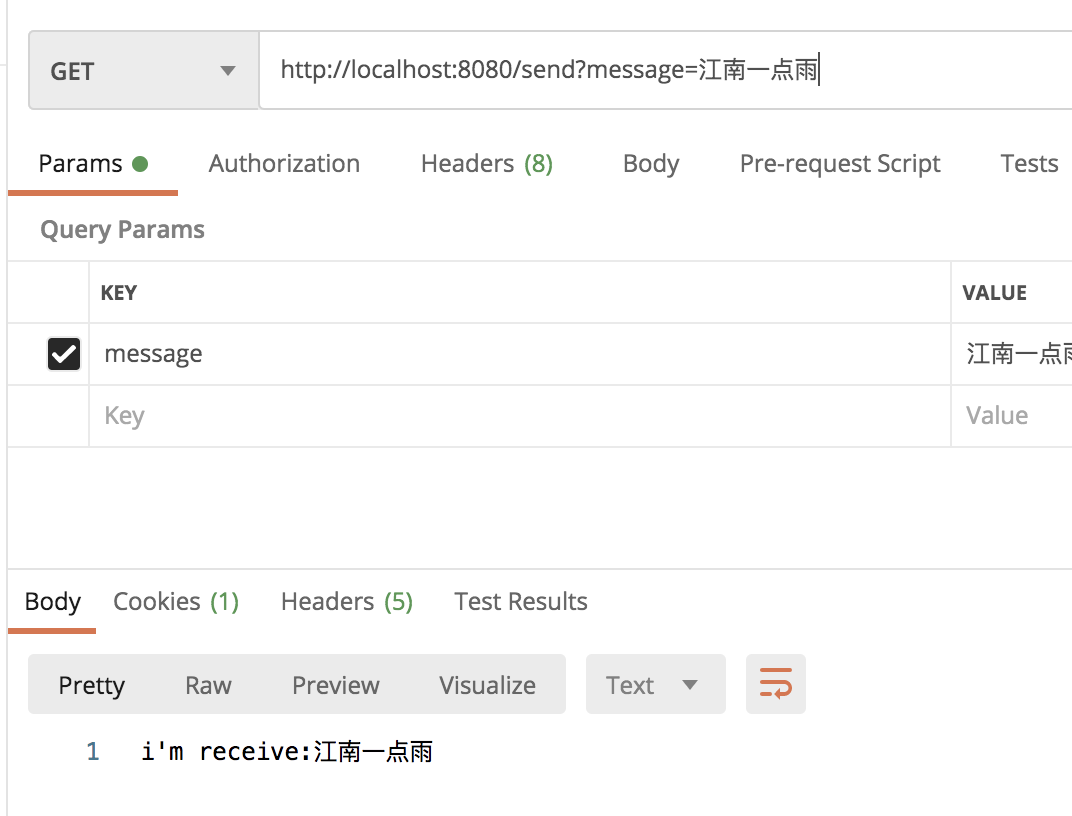
You can see that the return information from the server has been received.
Let's take a look at the running log of producer:

You can see that after the message is sent, the information returned by the consumer is also received.

As you can see, the consumer also received a message from the client.
5. RabbitMQ message validity
Will messages in RabbitMQ expire if they are not consumed for a long time? Friends who have used RabbitMQ may have such questions. Brother song, let's talk about this problem.
5.1 default
First, let's look at the default.
By default, messages will not expire. That is, if we do not set any parameters related to message expiration when sending messages on weekdays, messages will not expire. Even if messages are not consumed, they will always be stored in the queue.
In this case, I don't need to demonstrate the specific code. SongGe's previous articles related to RabbitMQ are basically like this.
5.2 TTL
TTL (time to live), the time that the message survives, that is, the validity period of the message. If we want the message to have a lifetime, we can set TTL to achieve this requirement. If the message's survival time exceeds the TTL and has not been received, the message will become a dead letter. Brother song will tell you about the dead letter and the dead letter queue later.
There are two different ways to set TTL:
- When declaring a queue, we can set the validity period of the message in the queue property, so that all messages entering the queue will have the same validity period.
- When sending a message, set the validity period of the message, so that different messages have different validity periods.
What if both are set?
Whichever is shorter.
When we set the message validity period, the message will be deleted from the queue when it expires (enter the dead letter queue, as described later, and will not be marked). However, there are some differences in the corresponding deletion timing between the two methods:
- For the first method, when the expiration time is set for the message queue, the expired message will be deleted, because after the message enters RabbitMQ, there is a message queue, and the head of the queue is the earliest message to expire. Therefore, RabbitMQ only needs a regular task to scan whether there are expired messages from the head, and if so, it will be deleted directly.
- In the second method, messages will not be deleted immediately after they expire, but only when they are delivered to consumers. In the second method, the expiration time of each message is different. To know which message expires, you must traverse all messages in the queue. When there are many messages, it will cost performance, Therefore, for the second method, the message is deleted when it is to be delivered to the consumer.
After introducing TTL, let's take a look at the specific usage.
Next, all the codes are explained by taking AMPQ encapsulated in Spring Boot as an example.
5.2.1 single message expiration
Let's first look at the expiration time of a single message.
First, create a Spring Boot project and introduce Web and RabbitMQ dependencies, as follows:

Then in application Configure the connection information of RabbitMQ in properties as follows:
spring.rabbitmq.host=127.0.0.1
spring.rabbitmq.port=5672
spring.rabbitmq.username=guest
spring.rabbitmq.password=guest
spring.rabbitmq.virtual-host=/
Next, configure the message queue slightly:
@Configuration
public class QueueConfig {

    public static final String JAVABOY_QUEUE_DEMO = "javaboy_queue_demo";
    public static final String JAVABOY_EXCHANGE_DEMO = "javaboy_exchange_demo";
    public static final String HELLO_ROUTING_KEY = "hello_routing_key";

    @Bean
    Queue queue() {
        return new Queue(JAVABOY_QUEUE_DEMO, true, false, false);
    }

    @Bean
    DirectExchange directExchange() {
        return new DirectExchange(JAVABOY_EXCHANGE_DEMO, true, false);
    }

    @Bean
    Binding binding() {
        return BindingBuilder.bind(queue())
                .to(directExchange())
                .with(HELLO_ROUTING_KEY);
    }
}
This configuration class mainly does three things: configuring message queues, configuring switches, and binding them together.
- First, configure a message Queue and new a Queue: the first parameter is the name of the message Queue; The second parameter indicates whether the message is persistent; The third parameter indicates whether the message Queue is exclusive. Generally, we set it to false, that is, it is not exclusive; The fourth parameter indicates that if the Queue does not have any subscribed consumers, the Queue will be deleted automatically. It is generally applicable to temporary queues.
- Configure a DirectExchange switch.
- Bind switches and queues together.
This configuration should be very simple. There is nothing to explain. There is an exclusivity. Brother Song said a little more here:
>For exclusivity, if it is set to true, the message queue can only be accessed by the Connection that created it, and other connections cannot access the message queue. If you try to re declare or access the exclusive queue in different connections, the system will report an error that the resources are locked. On the other hand, for an exclusive queue, when the Connection is broken, the message queue will also be deleted automatically (whether the queue is declared as a persistent queue or not).
Next, a message sending interface is provided, as follows:
@RestController
public class HelloController {
    @Autowired
    RabbitTemplate rabbitTemplate;

    @GetMapping("/hello")
    public void hello() {
        Message message = MessageBuilder.withBody("hello javaboy".getBytes())
                .setExpiration("10000")
                .build();
        rabbitTemplate.convertAndSend(QueueConfig.JAVABOY_QUEUE_DEMO, message);
    }
}
When creating a Message object, we can set the expiration time of the Message. Here, we set the expiration time of the Message to 10 seconds.
That's it!
Next, we start the project and test the message sending. After the message is sent successfully, because there is no consumer, the message will not be consumed. Open the RabbitMQ management page and click the Queues tab. After 10s, we will find that the message has disappeared:
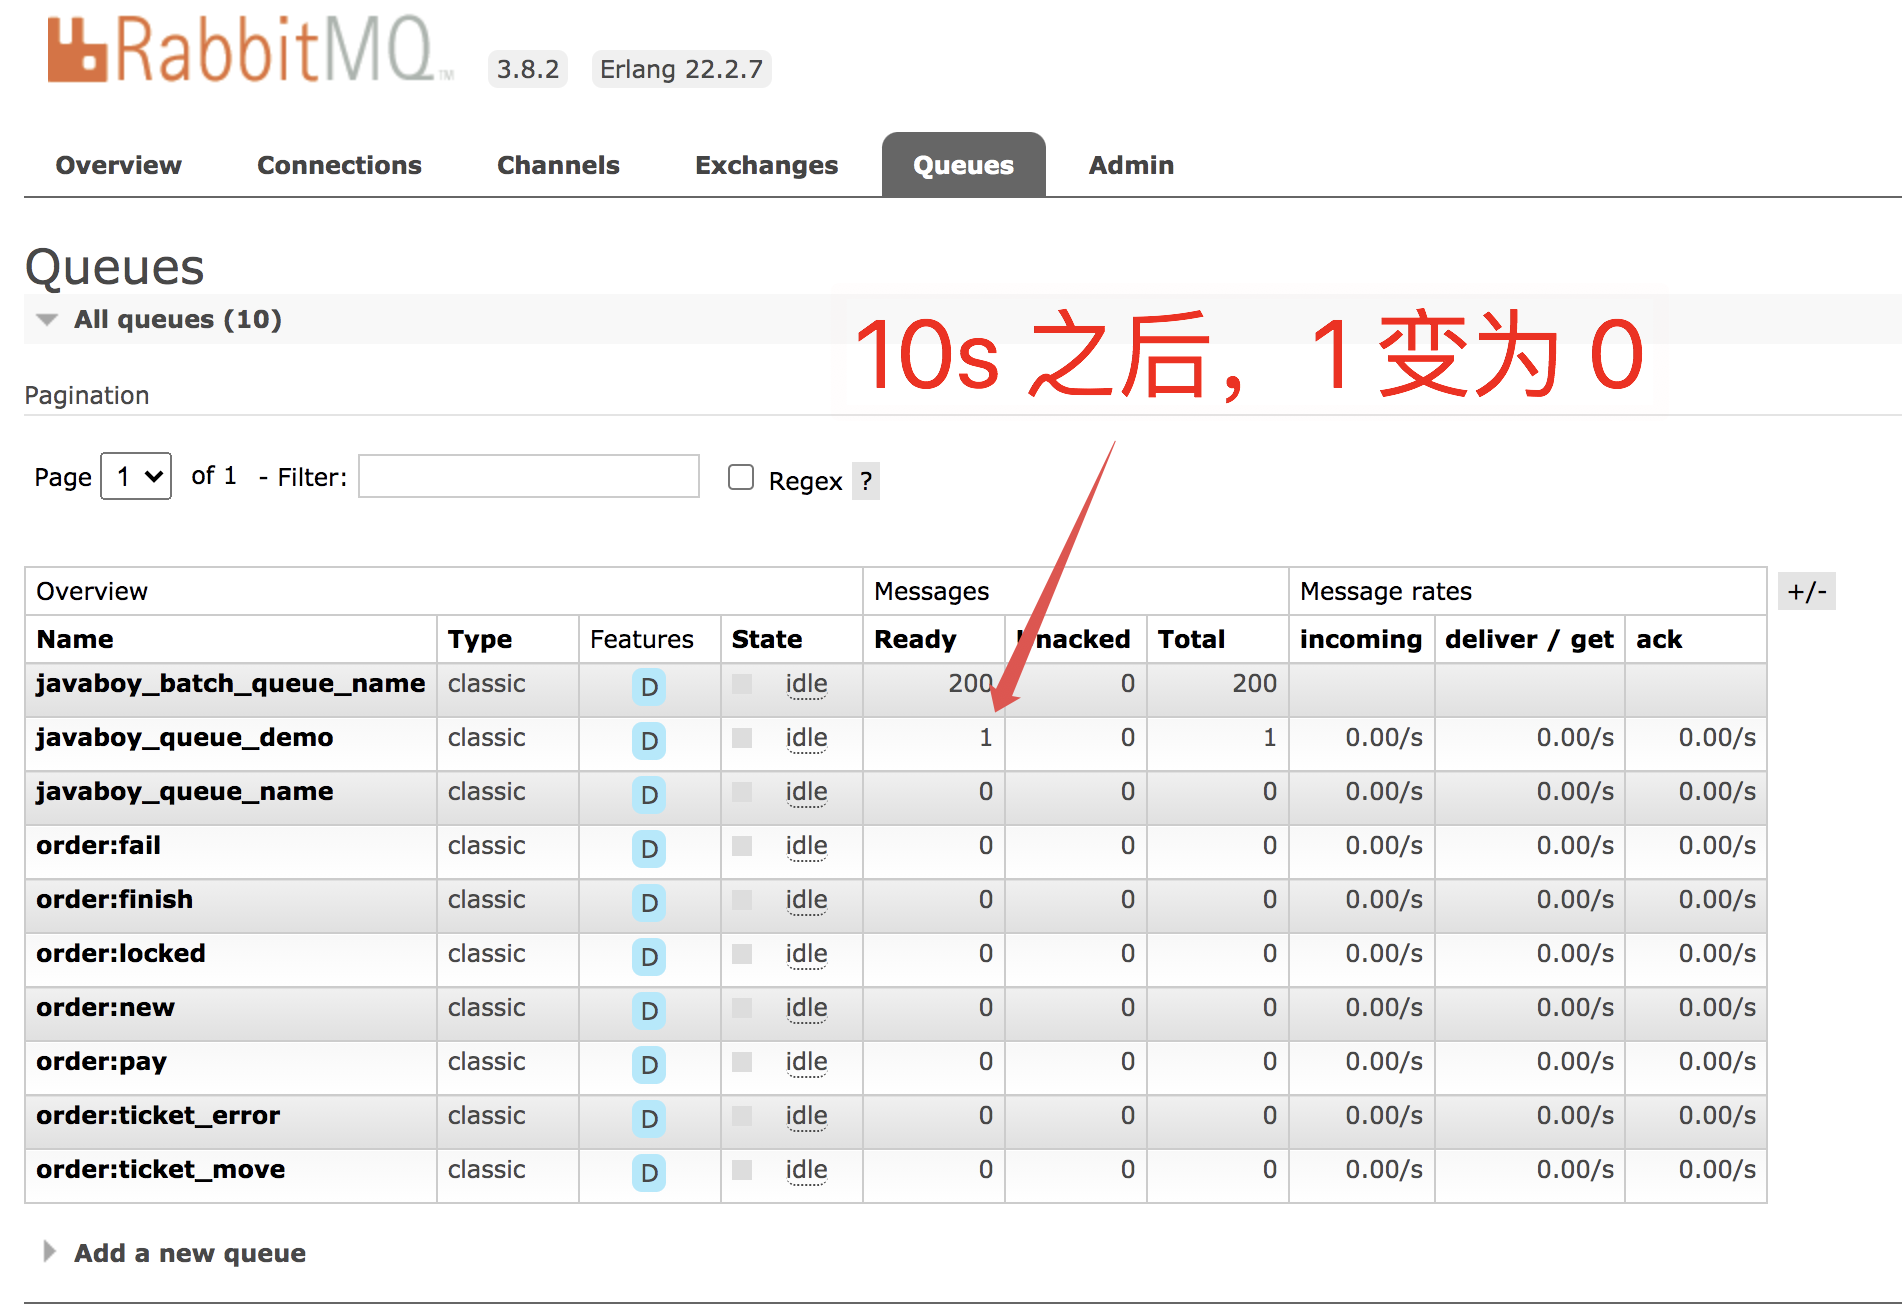
It's simple!
Setting the expiration time for a single message is to set the message validity period when the message is sent.
5.2.2 queue message expiration
Set the message expiration time for the queue as follows:
@Bean
Queue queue() {
Map<string, object> args = new HashMap<>();
args.put("x-message-ttl", 10000);
return new Queue(JAVABOY_QUEUE_DEMO, true, false, false, args);
}
After setting, we modify the sending logic of the message as follows:
@RestController
public class HelloController {
    @Autowired
    RabbitTemplate rabbitTemplate;

    @GetMapping("/hello")
    public void hello() {
        Message message = MessageBuilder.withBody("hello javaboy".getBytes())
                .build();
        rabbitTemplate.convertAndSend(QueueConfig.JAVABOY_QUEUE_DEMO, message);
    }
}
You can see that the message can be sent normally without setting the message expiration time.
OK, start the project and send a message to test. View the RabbitMQ management page as follows:
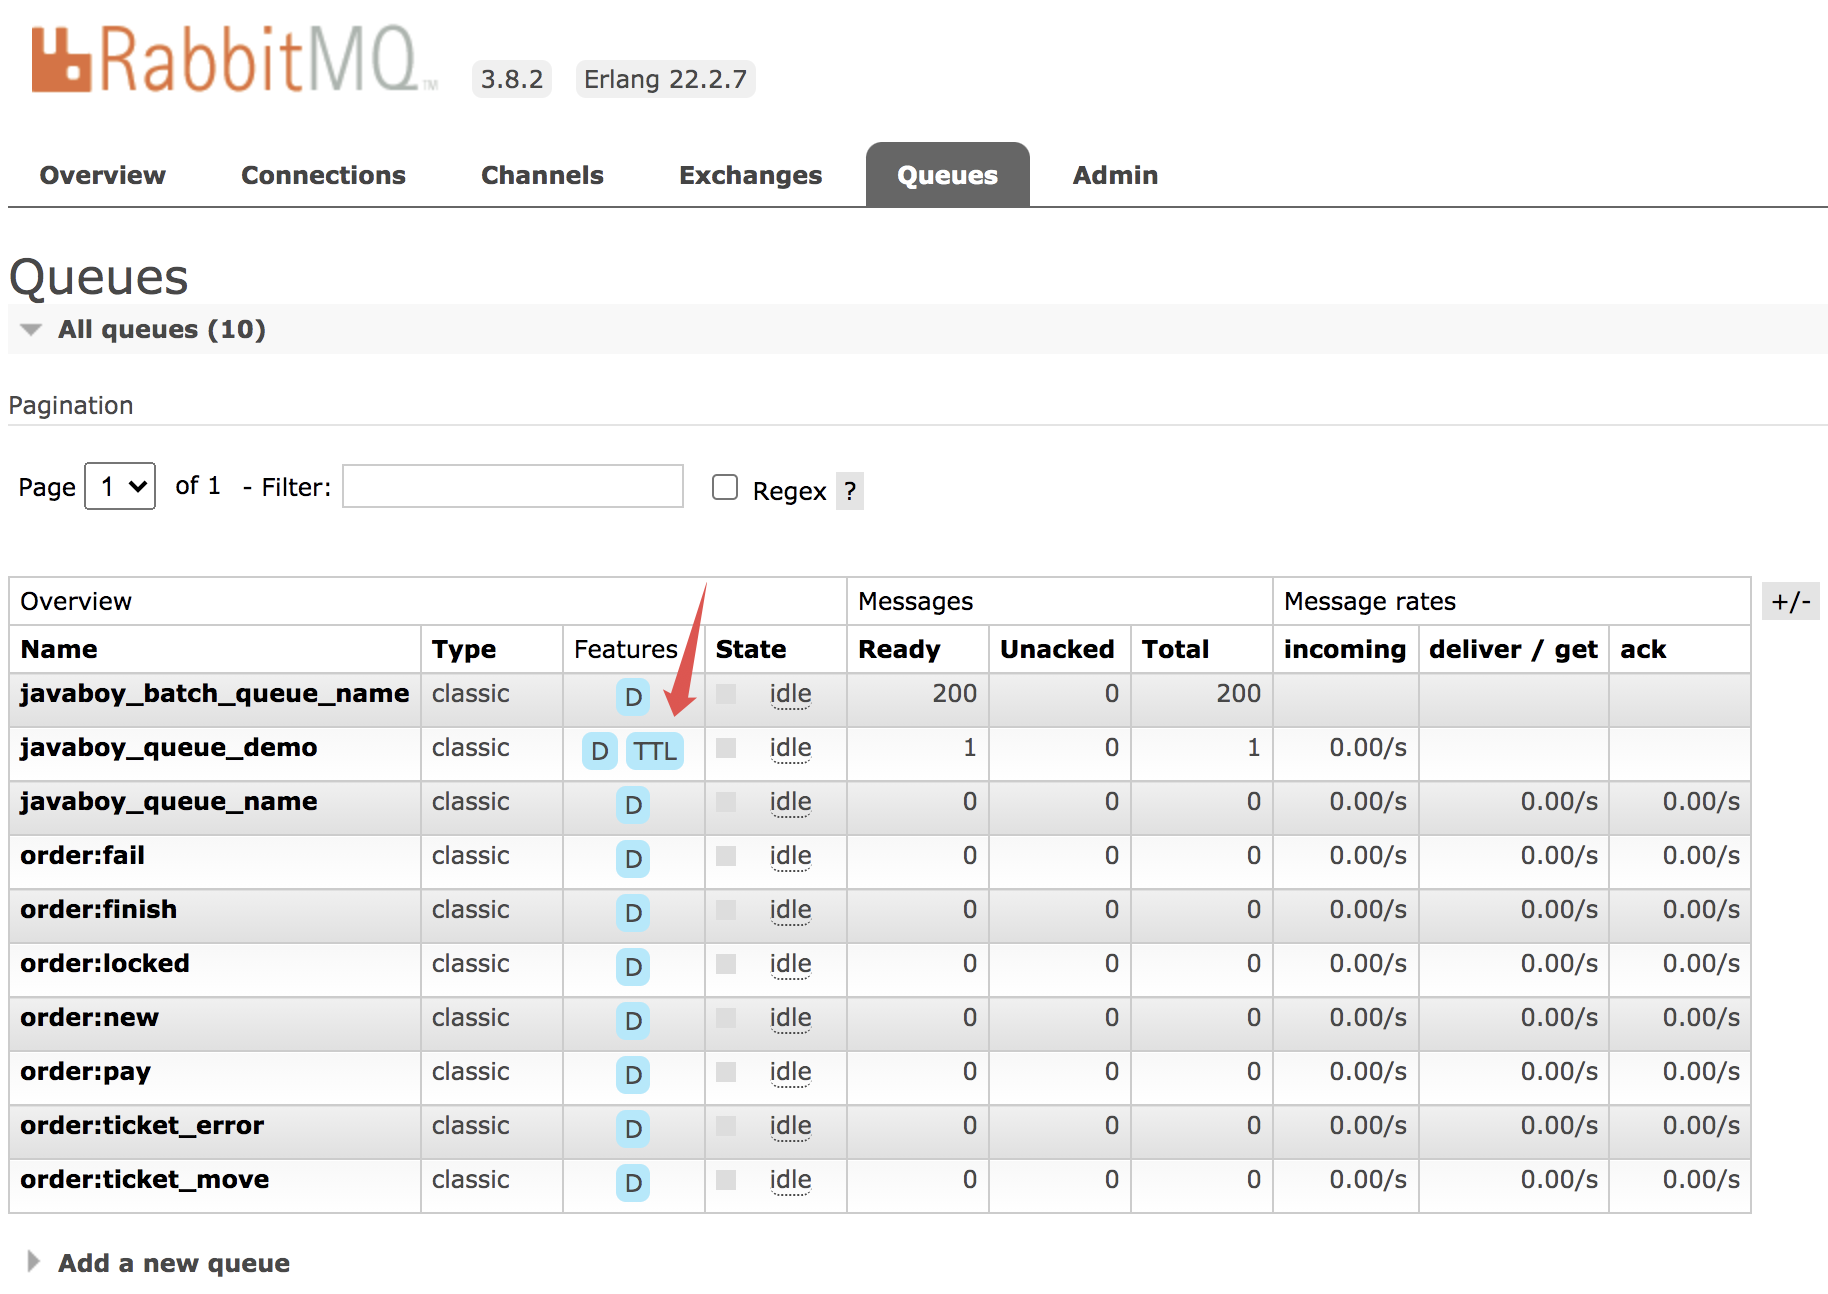
You can see that the Features attributes of the message queue are D and TTL. D means that the message in the message queue is persistent, and TTL means that the message will expire.
After 10s, refresh the page and find that the number of messages has been restored to 0.
This is to set the message expiration time for the message queue. Once set, all messages entering the queue will have an expiration time.
5.2.3 special circumstances
Another special case is to set the message expiration time TTL to 0, which means that if the message cannot be consumed immediately, it will be discarded immediately. This feature can partially replace rabbitmq3 The immediate parameter previously supported by 0 is partially replaced because the immediate parameter will have basic when delivery fails The return method returns the message body (this function can be implemented by using the dead letter queue).
I won't demonstrate the specific code. This should be easier.
5.3 dead letter queue
A little friend can't help asking, where are the deleted messages? Is it really deleted? No, no! This involves the dead letter queue. Next, let's take a look at the dead letter queue.
5.3.1 dead letter switch
Dead letter exchange, or DLX.
Dead letter switch is used to receive Dead Message. What is Dead Message? There are several situations when a general message becomes a dead letter message:
- The message is rejected (Basic.Reject/Basic.Nack) and the request parameter is set to false
- Message expiration
- The queue has reached its maximum length
When a message becomes a dead letter message in a queue, it will be sent to DLX. The message queue bound to DLX is called a dead letter queue.
DLX is essentially a common switch. We can specify DLX for any queue. When there is a dead letter in the queue, RabbitMQ will automatically publish the dead letter to DLX and then route it to another queue bound to DLX (i.e. dead letter queue).
5.3.2 dead letter queue
This is easy to understand. The queue bound to the dead letter switch is the dead letter queue.
5.3.3 practice
Let's take a simple example.
First, let's create a dead letter switch, then create a dead letter queue, and then bind the dead letter switch and the dead letter queue together:
public static final String DLX_EXCHANGE_NAME = "dlx_exchange_name";
public static final String DLX_QUEUE_NAME = "dlx_queue_name";
public static final String DLX_ROUTING_KEY = "dlx_routing_key";

/**
 * Configure dead letter switch
 *
 * @return
 */
@Bean
DirectExchange dlxDirectExchange() {
    return new DirectExchange(DLX_EXCHANGE_NAME, true, false);
}
/**
 * Configure dead letter queue
 * @return
 */
@Bean
Queue dlxQueue() {
    return new Queue(DLX_QUEUE_NAME);
}
/**
 * Bind dead letter queue and dead letter switch
 * @return
 */
@Bean
Binding dlxBinding() {
    return BindingBuilder.bind(dlxQueue())
            .to(dlxDirectExchange())
            .with(DLX_ROUTING_KEY);
}
This is actually no different from ordinary switches and ordinary message queues.
Next, configure the dead letter switch for the message queue as follows:
@Bean
Queue queue() {
Map<string, object> args = new HashMap<>();
//Set message expiration time
args.put("x-message-ttl", 0);
//Set up dead letter switch
args.put("x-dead-letter-exchange", DLX_EXCHANGE_NAME);
//Set dead letter routing_key
args.put("x-dead-letter-routing-key", DLX_ROUTING_KEY);
return new Queue(JAVABOY_QUEUE_DEMO, true, false, false, args);
}
There are two parameters:
- x-dead-letter-exchange: configure dead letter switch.
- x-dead-letter-routing-key: configure dead letter routing_key.
This is configured.
Messages sent to this message queue in the future will be sent to DLX if they have problems such as nack, reject or expiration, and then enter the message queue bound to DLX.
The consumption of dead letter message queue is the same as that of ordinary message queue:
@RabbitListener(queues = QueueConfig.DLX_QUEUE_NAME)
public void dlxHandle(String msg) {
    System.out.println("dlx msg = " + msg);
}
It's easy, isn't it
6. RabbitMQ implements delay queue
There are various kinds of scheduled tasks. Common scheduled tasks, such as log backup, may be backed up at 3 a.m. every day. This fixed time scheduled task can be easily realized by using cron expression. There are also some special scheduled tasks. Watch the time bomb in the movie and it will explode three minutes later, This kind of scheduled task is not easy to describe with cron. Because the start time is uncertain, we sometimes encounter similar requirements in development, such as:
- In e-commerce projects, we generally need to pay within 20 minutes or 30 minutes after placing an order, otherwise the order will enter the exception handling logic and be cancelled. Then entering the exception handling logic can be regarded as a delay queue.
- I bought an intelligent casserole, which can be used to cook porridge. Before going to work, I put all the materials in the pot, and then set a few minutes to start cooking porridge, so that I can drink delicious porridge after work. Then the porridge cooking instruction can also be regarded as a delayed task, put it in a delayed queue, and execute it when the time comes.
- The company's conference reservation system will notify all users who book the conference half an hour before the conference after the conference reservation is successful.
- If the safety work order is not processed for more than 24 hours, the enterprise wechat group will be automatically pulled to remind the relevant responsible person.
- After placing an order for takeout, the user will remind the takeout brother that the timeout is about to expire when there are 10 minutes before the timeout.
- ...
In many scenarios, we need to delay queues.
This article takes RabbitMQ as an example to talk about the playing method of delay queue.
On the whole, there are two ways to implement scheduled tasks on RabbitMQ:
- The message expiration and private message queue mechanism of RabbitMQ is used to realize the scheduled task.
- RabbitMQ using rabbitmq_delayed_message_exchange plug-in to implement scheduled tasks. This scheme is relatively simple.
Let's look at the two usages separately.
6.1 plug in
6.1.1 installing plug-ins
First, we need to download rabbitmq_delayed_message_exchange plug-in, an open source project on GitHub, can be downloaded directly:
Choose the version that suits you. I choose the latest version 3.9.0 here.
After downloading, execute the following command on the command line to copy the downloaded file to the Docker container:
docker cp ./rabbitmq_delayed_message_exchange-3.9.0.ez some-rabbit:/plugins
Here, the first parameter is the file address on the host, and the second parameter is the location copied to the container.
Next, execute the following command to enter the RabbitMQ container:
docker exec -it some-rabbit /bin/bash
After entering the container, execute the following command to enable the plug-in:
rabbitmq-plugins enable rabbitmq_delayed_message_exchange
After enabling successfully, you can also view all installed plug-ins through the following command to see if there are any plug-ins we just installed, as follows:
rabbitmq-plugins list
The complete execution process of the command is as follows:
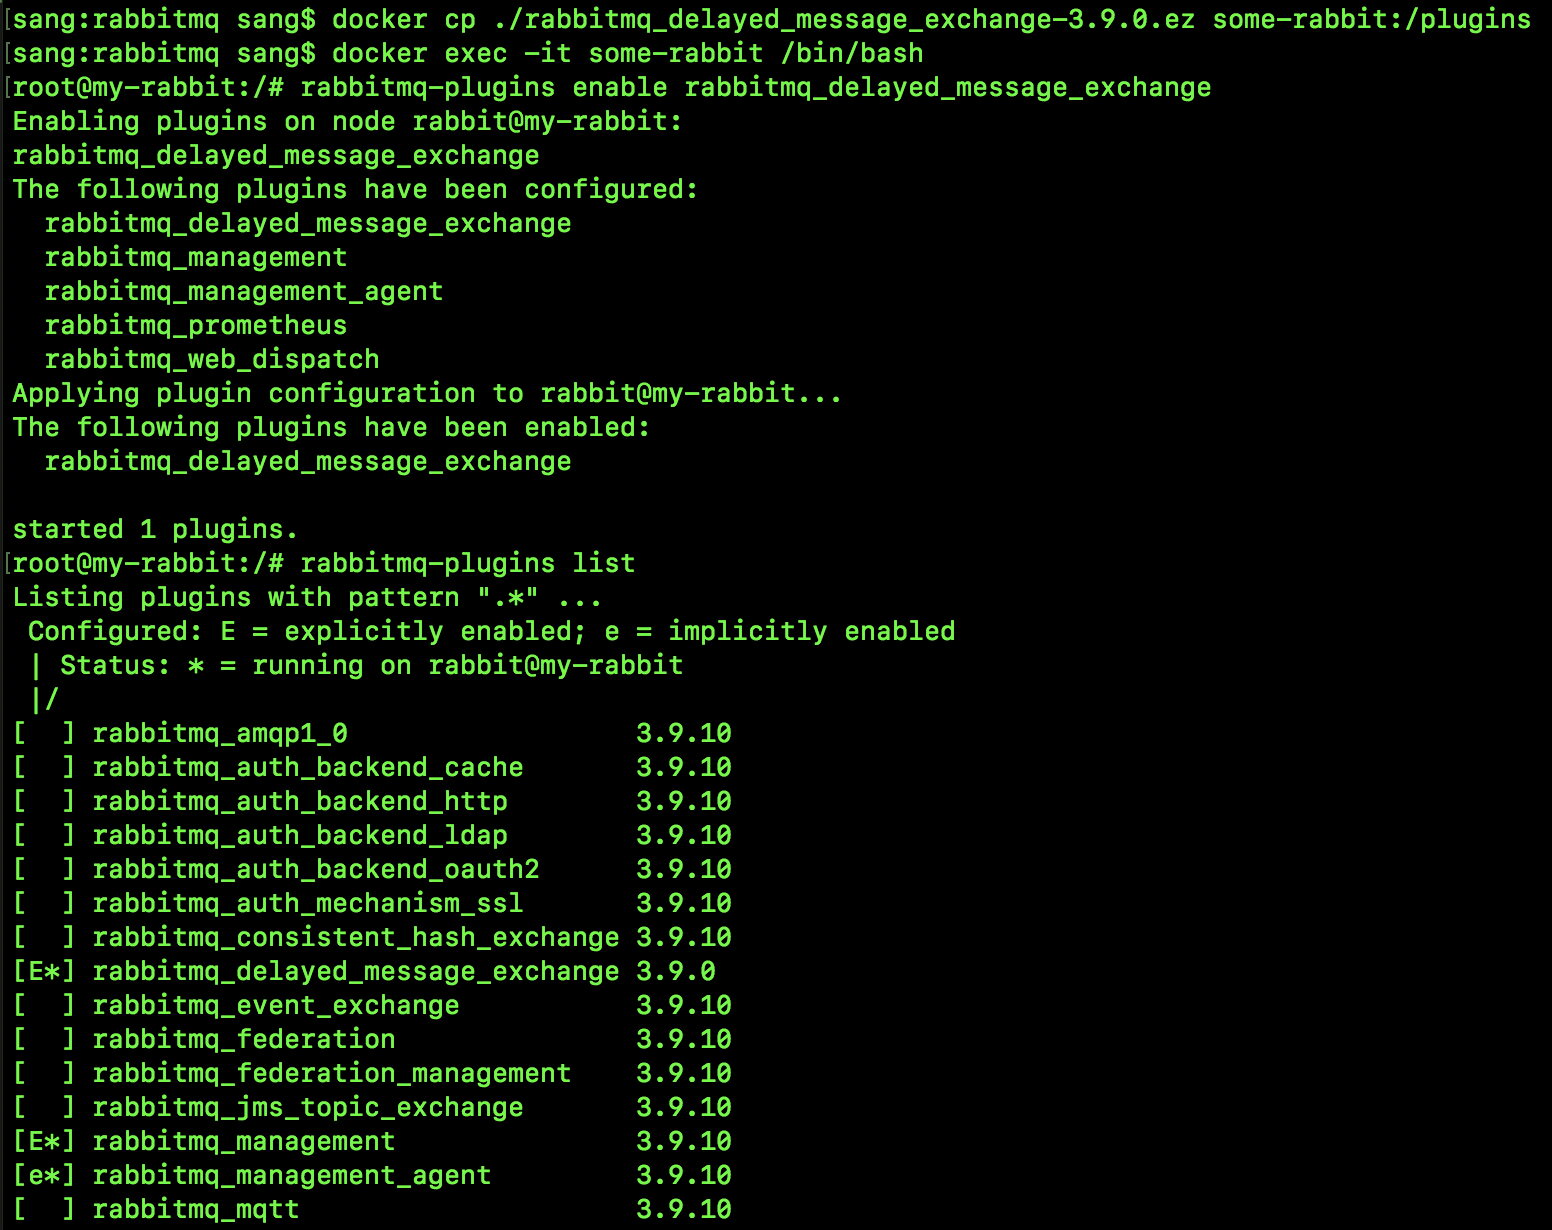
OK, after the configuration is completed, we execute the exit command to exit the RabbitMQ container. Then start coding.
6.1.2 messaging
Next, start messaging.
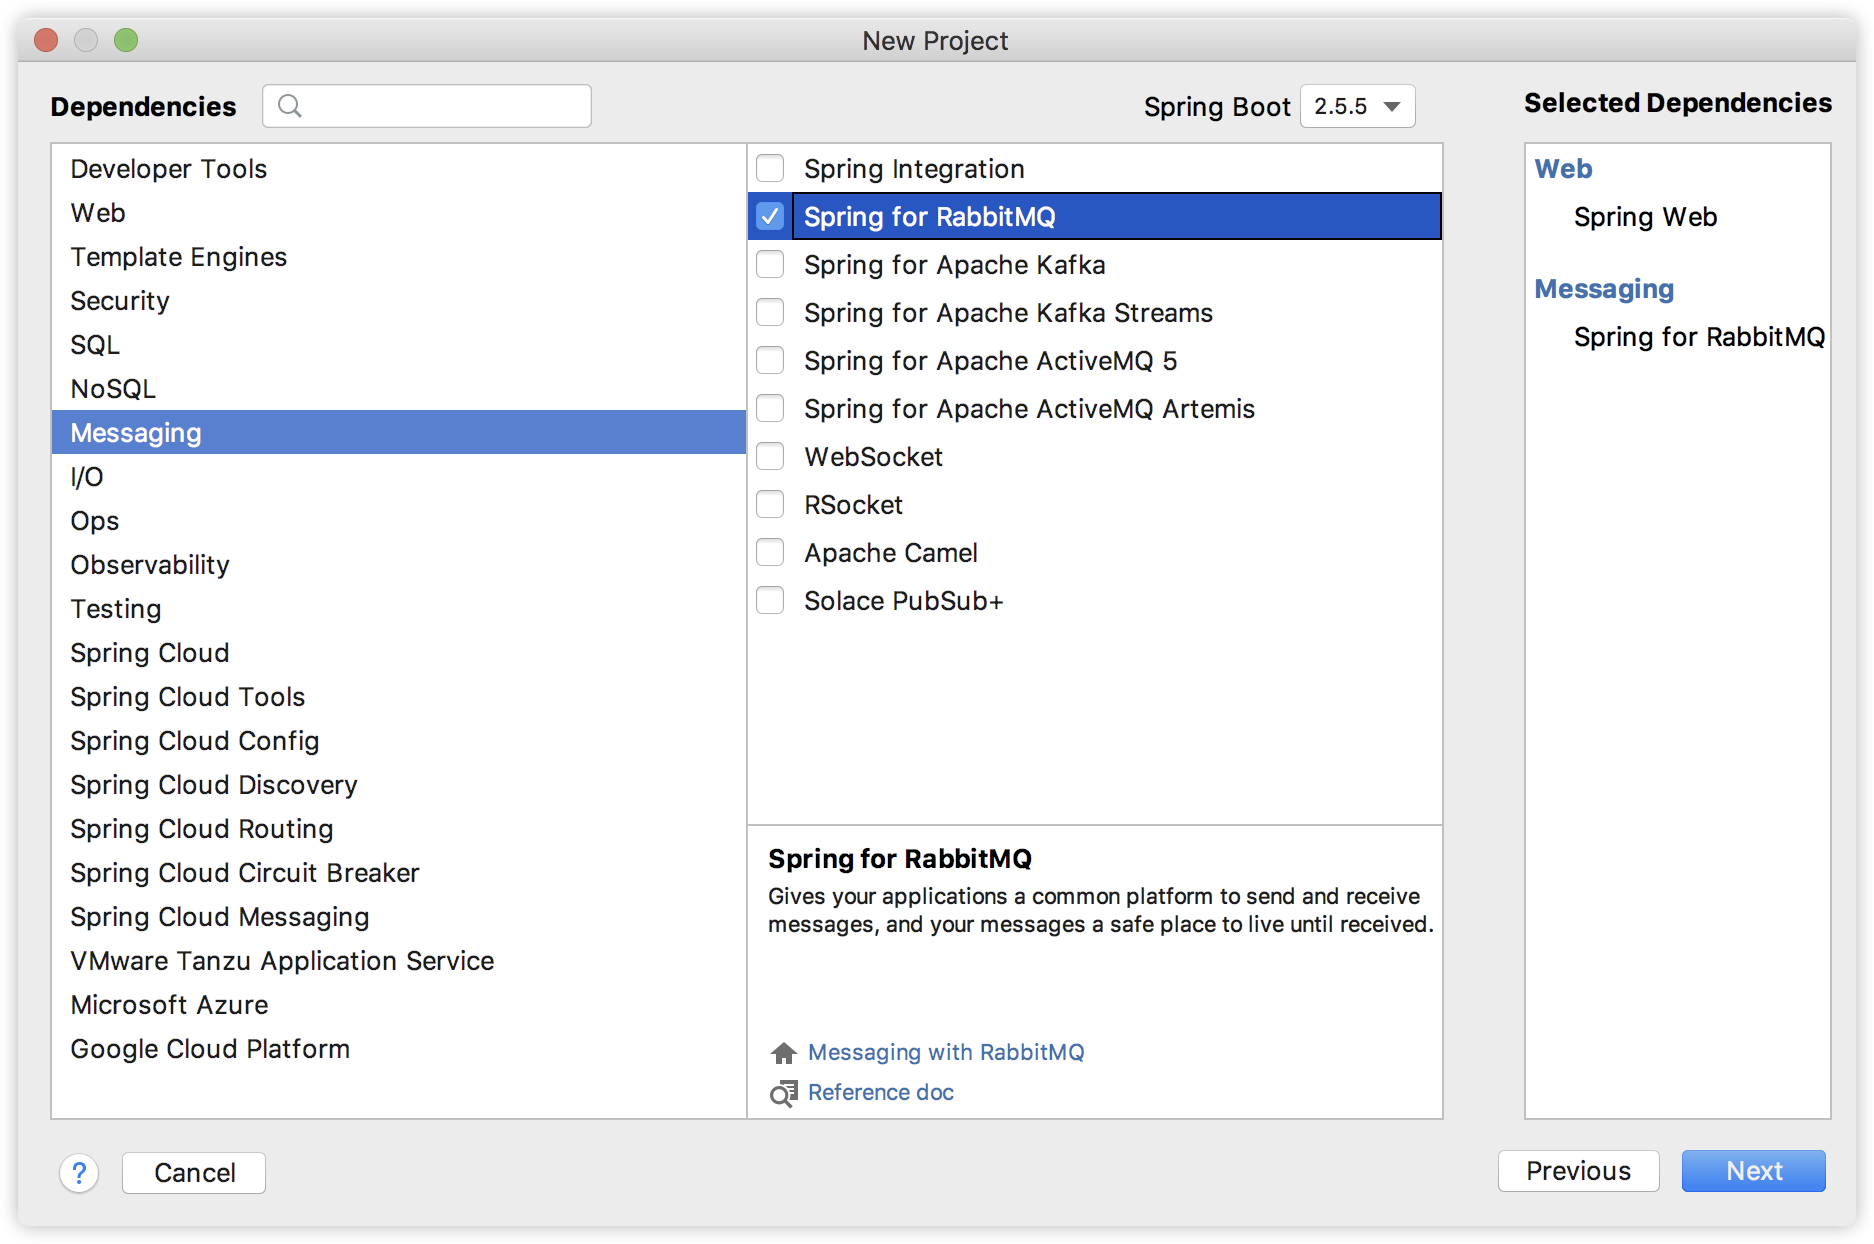
First, we create a Spring Boot project and introduce Web and RabbitMQ dependencies, as follows:
After the project is created successfully, in application The basic information of configuring RabbitMQ in properties is as follows:
spring.rabbitmq.host=localhost
spring.rabbitmq.password=guest
spring.rabbitmq.username=guest
spring.rabbitmq.virtual-host=/
Next, a RabbitMQ configuration class is provided:
@Configuration
public class RabbitConfig {
public static final String QUEUE_NAME = "javaboy_delay_queue";
public static final String EXCHANGE_NAME = "javaboy_delay_exchange";
public static final String EXCHANGE_TYPE = "x-delayed-message";
@Bean
Queue queue() {
return new Queue(QUEUE_NAME, true, false, false);
}
@Bean
CustomExchange customExchange() {
Map<string, object> args = new HashMap<>();
args.put("x-delayed-type", "direct");
return new CustomExchange(EXCHANGE_NAME, EXCHANGE_TYPE, true, false,args);
}
@Bean
Binding binding() {
return BindingBuilder.bind(queue())
.to(customExchange()).with(QUEUE_NAME).noargs();
}
}
The main reason here is that the definitions of switches are different, and small partners need to pay attention to them.
The switch we use here is CustomExchange, which is a switch provided in Spring. There are five parameters when creating CustomExchange, with the following meanings:
- Switch name.
- Switch type, this place is fixed.
- Whether the switch is persistent.
- If no queue is bound to the switch, whether to delete the switch.
- Other parameters.
The last args parameter specifies the message distribution type of the switch. This type is known as direct, fanout, topic and header. Which type is used and which method the switch will distribute messages in the future.
Next, we create a message consumer:
@Component
public class MsgReceiver {
    private static final Logger logger = LoggerFactory.getLogger(MsgReceiver.class);
    @RabbitListener(queues = RabbitConfig.QUEUE_NAME)
    public void handleMsg(String msg) {
        logger.info("handleMsg,{}",msg);
    }
}
Just print the message content.
Next, write a unit test method to send messages:
@SpringBootTest
class MqDelayedMsgDemoApplicationTests {

    @Autowired
    RabbitTemplate rabbitTemplate;
    @Test
    void contextLoads() throws UnsupportedEncodingException {
        Message msg = MessageBuilder.withBody(("hello A little rain in Jiangnan"+new Date()).getBytes("UTF-8")).setHeader("x-delay", 3000).build();
        rabbitTemplate.convertAndSend(RabbitConfig.EXCHANGE_NAME, RabbitConfig.QUEUE_NAME, msg);
    }

}
Set the delay time of the message in the message header.
OK, next, start the Spring Boot project, and then run the unit test method to send messages. The final console print log is as follows:

From the log, we can see that the message delay has been realized.
6.2 DLX implementation delay queue
6.2.1 implementation idea of delay queue
The idea of delay queue implementation is also very simple, that is Last article What we call DLX (dead letter switch) + TTL (message timeout).
We can treat the dead letter queue as a delay queue.
Specifically:
If a message needs to be delayed for 30 minutes, we will set the validity of the message to 30 minutes, and configure the dead letter switch and dead letter routing for the message_ Key, and no consumer is set for the message queue. Then 30 minutes later, the message enters the dead letter queue because it is not consumed by the consumer. At this time, we have a consumer in the dead letter queue. As soon as the message enters the dead letter queue, it is immediately consumed.
This is the implementation idea of delay queue. Is it very simple?
6.2.2 cases
Next, SongGe will demonstrate the specific implementation of delay queue through a simple case.
First, prepare a launched RabbitMQ.
Then we create a Spring Boot project and introduce the RabbitMQ dependency:
Then in application Configure the basic connection information of RabbitMQ in properties:
spring.rabbitmq.host=localhost
spring.rabbitmq.username=guest
spring.rabbitmq.password=guest
spring.rabbitmq.port=5672
Next, let's configure two message queues: a normal queue and a dead letter queue:
@Configuration
public class QueueConfig {
public static final String JAVABOY_QUEUE_NAME = "javaboy_queue_name";
public static final String JAVABOY_EXCHANGE_NAME = "javaboy_exchange_name";
public static final String JAVABOY_ROUTING_KEY = "javaboy_routing_key";
public static final String DLX_QUEUE_NAME = "dlx_queue_name";
public static final String DLX_EXCHANGE_NAME = "dlx_exchange_name";
public static final String DLX_ROUTING_KEY = "dlx_routing_key";
/**
* Dead letter queue
* @return
*/
@Bean
Queue dlxQueue() {
return new Queue(DLX_QUEUE_NAME, true, false, false);
}
/**
* Dead letter switch
* @return
*/
@Bean
DirectExchange dlxExchange() {
return new DirectExchange(DLX_EXCHANGE_NAME, true, false);
}
/**
* Bind dead letter queue and dead letter switch
* @return
*/
@Bean
Binding dlxBinding() {
return BindingBuilder.bind(dlxQueue()).to(dlxExchange())
.with(DLX_ROUTING_KEY);
}
/**
* General message queue
* @return
*/
@Bean
Queue javaboyQueue() {
Map<string, object> args = new HashMap<>();
//Set message expiration time
args.put("x-message-ttl", 1000*10);
//Set up dead letter switch
args.put("x-dead-letter-exchange", DLX_EXCHANGE_NAME);
//Set dead letter routing_key
args.put("x-dead-letter-routing-key", DLX_ROUTING_KEY);
return new Queue(JAVABOY_QUEUE_NAME, true, false, false, args);
}
/**
* General switch
* @return
*/
@Bean
DirectExchange javaboyExchange() {
return new DirectExchange(JAVABOY_EXCHANGE_NAME, true, false);
}
/**
* Bind the normal queue and the corresponding switch
* @return
*/
@Bean
Binding javaboyBinding() {
return BindingBuilder.bind(javaboyQueue())
.to(javaboyExchange())
.with(JAVABOY_ROUTING_KEY);
}
}
Although this configuration code is slightly longer, the principle is actually simple.
- The configuration can be divided into two groups. The first group is configured with dead letter queue and the second group is configured with ordinary queue. Each group consists of message queue, message switch and Binding.
- When configuring the message queue, specify a dead letter queue for the message queue. Unfamiliar partners can turn to the previous article, portal: Will messages in RabbitMQ expire?.
- When configuring the expiration time of messages in the queue, the default time unit is milliseconds.
Next, we configure a consumer for the dead letter queue, as follows:
@Component
public class DlxConsumer {
    private static final Logger logger = LoggerFactory.getLogger(DlxConsumer.class);

    @RabbitListener(queues = QueueConfig.DLX_QUEUE_NAME)
    public void handle(String msg) {
        logger.info(msg);
    }
}
Print the message as soon as you receive it.
That's it.
Start the project.
Finally, we send a message in the unit test:
@SpringBootTest
class DelayQueueApplicationTests {

    @Autowired
    RabbitTemplate rabbitTemplate;

    @Test
    void contextLoads() {
        System.out.println(new Date());
        rabbitTemplate.convertAndSend(QueueConfig.JAVABOY_EXCHANGE_NAME, QueueConfig.JAVABOY_ROUTING_KEY, "hello javaboy!");
    }

}
There's nothing to say about this. It's an ordinary message. After 10 seconds, this message will be printed out among consumers in the dead letter queue.
Well, these are the two ideas of using RabbitMQ as a delay queue ~ interested partners can try it
7. RabbitMQ sending reliability
Microservices can be designed as message driven microservices, and responsive systems can also be based on message middleware. From this perspective, message middleware is really very important in Internet application development.
Take RabbitMQ as an example. Brother song will talk to you about the reliability of sending intermediate messages.
Note that the following content mainly discusses with you how to ensure that message producers send messages successfully, and does not involve message consumption.
7.1 RabbitMQ message sending mechanism
As we all know, the message sending in RabbitMQ introduces the concept of Exchange (switch). The message is sent to the switch first, and then the switch routes the message to different queues according to the established routing rules, and then different consumers consume it.

The general process is like this, so to ensure the reliability of message sending, we mainly confirm from two aspects:
- The message successfully reached Exchange
- The message successfully arrived at the Queue
If we can confirm these two steps, we can think that the message has been sent successfully.
If there is a problem in either of these two steps, the message will not be delivered successfully. At this time, we may have to retry to resend the message. After multiple retries, if the message still cannot arrive, manual intervention may be required.
Through the above analysis, we can confirm that we only need to do three things to ensure the successful sending of messages:
- The confirmation message arrives at Exchange.
- The confirmation message arrives at the Queue.
- Start the scheduled task and deliver the messages that fail to be sent regularly.
7.2 RabbitMQ's efforts
There are three steps mentioned above. The third step needs to be implemented by ourselves. RabbitMQ has ready-made solutions for the first two steps.
How do I ensure that messages successfully arrive at RabbitMQ? RabbitMQ gives two schemes:
- Turn on transaction mechanism
- Sender acknowledgement mechanism
These are two different schemes. You can't start them at the same time. You can only select one of them. If both are started at the same time, the following error will be reported:

Let's look at it separately. All the following cases are launched in Spring Boot. You can download the relevant source code at the end of the article.
7.2.1 enable transaction mechanism
The way to enable the RabbitMQ transaction mechanism in Spring Boot is as follows:
First, you need to provide a transaction manager, as follows:
@Bean
RabbitTransactionManager transactionManager(ConnectionFactory connectionFactory) {
    return new RabbitTransactionManager(connectionFactory);
}
Next, do two things on the message producer: add transaction annotations and set the communication channel to transaction mode:
@Service
public class MsgService {
    @Autowired
    RabbitTemplate rabbitTemplate;

    @Transactional
    public void send() {
        rabbitTemplate.setChannelTransacted(true);
        rabbitTemplate.convertAndSend(RabbitConfig.JAVABOY_EXCHANGE_NAME,RabbitConfig.JAVABOY_QUEUE_NAME,"hello rabbitmq!".getBytes());
        int i = 1 / 0;
    }
}
Here are two points to note:
- Add the @ Transactional annotation to the method sending the message to mark the transaction.
- Call the setChannelTransacted method and set it to true to turn on the transaction mode.
That's OK.
In the above case, we end with a 1 / 0, which will inevitably throw an exception at runtime. We can try to run this method and find that the message was not sent successfully.
When we turn on the transaction mode, the RabbitMQ producer will send messages in four additional steps:
- The client sends a request to set the channel to transaction mode.
- The server gives a reply and agrees to set the channel to transaction mode.
- The client sends a message.
- The client commits the transaction.
- The server gives a response to confirm the transaction submission.
The above steps, except for the third step, which is already there, are many other steps for no reason. Therefore, we can see that the transaction mode is actually a little inefficient, which is not the best solution. We can think about what projects will use message oriented middleware? Generally speaking, these projects are highly concurrent projects, and concurrency performance is particularly important at this time.
Therefore, RabbitMQ also provides a sender confirmation mechanism to ensure successful message sending. In this way, the performance is much higher than that of the transaction mode. Let's take a look at it together.
7.2.2 sender confirmation mechanism
7.2.2.1 single message processing
First, we remove the code just about the transaction, and then in application Configure and enable the message sender confirmation mechanism in properties, as follows:
spring.rabbitmq.publisher-confirm-type=correlated
spring.rabbitmq.publisher-returns=true
The first line is the confirmation callback of the configuration message arrival switch, and the second line is the callback of the configuration message arrival queue.
The first row of attribute configuration has three values:
- none: indicates that the publish confirmation mode is disabled. This is the default mode.
- correlated: indicates the callback method that will be triggered after successfully publishing the message to the exchange.
- simple: similar to correlated, and supports calls to waitForConfirms() and waitForConfirmsOrDie() methods.
Next, we want to enable two monitors. The specific configuration is as follows:
@Configuration
public class RabbitConfig implements RabbitTemplate.ConfirmCallback, RabbitTemplate.ReturnsCallback {
    public static final String JAVABOY_EXCHANGE_NAME = "javaboy_exchange_name";
    public static final String JAVABOY_QUEUE_NAME = "javaboy_queue_name";
    private static final Logger logger = LoggerFactory.getLogger(RabbitConfig.class);
    @Autowired
    RabbitTemplate rabbitTemplate;
    @Bean
    Queue queue() {
        return new Queue(JAVABOY_QUEUE_NAME);
    }
    @Bean
    DirectExchange directExchange() {
        return new DirectExchange(JAVABOY_EXCHANGE_NAME);
    }
    @Bean
    Binding binding() {
        return BindingBuilder.bind(queue())
                .to(directExchange())
                .with(JAVABOY_QUEUE_NAME);
    }

    @PostConstruct
    public void initRabbitTemplate() {
        rabbitTemplate.setConfirmCallback(this);
        rabbitTemplate.setReturnsCallback(this);
    }

    @Override
    public void confirm(CorrelationData correlationData, boolean ack, String cause) {
        if (ack) {
            logger.info("{}:The message successfully reached the switch",correlationData.getId());
        }else{
            logger.error("{}:Message sending failed", correlationData.getId());
        }
    }

    @Override
    public void returnedMessage(ReturnedMessage returned) {
        logger.error("{}:The message was not successfully routed to the queue",returned.getMessage().getMessageProperties().getMessageId());
    }
}
About this configuration class, I say the following:
- Define the configuration class and implement the rabbittemplate Confirmcallback and rabbittemplate Returncallback is two interfaces. The callback of the former is used to determine the arrival of the message to the exchanger, and the latter will be called when the message routing to the queue fails.
- Define the initRabbitTemplate method and add the @ PostConstruct annotation. In this method, configure the two callbacks for the rabbitTemplate respectively.
That's it.
Next, we test the message sending.
First, we try to send the message to a nonexistent switch, as follows:
rabbitTemplate.convertAndSend("RabbitConfig.JAVABOY_EXCHANGE_NAME",RabbitConfig.JAVABOY_QUEUE_NAME,"hello rabbitmq!".getBytes(),new CorrelationData(UUID.randomUUID().toString()));
Note that the first parameter is a string, not a variable, and the switch does not exist. At this time, the console will report the following error:

Next, we give a real switch, but a nonexistent queue, as follows:
rabbitTemplate.convertAndSend(RabbitConfig.JAVABOY_EXCHANGE_NAME,"RabbitConfig.JAVABOY_QUEUE_NAME","hello rabbitmq!".getBytes(),new CorrelationData(UUID.randomUUID().toString()));
Note that the second parameter is a string, not a variable.

You can see that although the message successfully reached the switch, it was not successfully routed to the queue (because the queue does not exist).
This is the sending of a message. Let's take a look at the batch sending of messages.
7.2.2.2 message batch processing
In case of message batch processing, the callback listening for successful sending is the same, which will not be repeated here.
This is the publisher confirm mode.
Compared with transactions, the message throughput in this mode will be greatly improved.
7.3 failure retry
There are two kinds of failed retries. One is the failed retry caused by not finding MQ at all, and the other is that MQ is found but the message sending fails.
Let's look at the two methods separately.
7.3.1 built in retry mechanism
The transaction mechanism and sender confirmation mechanism mentioned above are both ways for the sender to confirm that the message has been sent successfully. If the sender cannot connect to MQ at the beginning, there is also a corresponding retry mechanism in Spring Boot, but this retry mechanism has nothing to do with MQ itself. This is accomplished by using the retry mechanism in Spring. The specific configuration is as follows:
spring.rabbitmq.template.retry.enabled=true
spring.rabbitmq.template.retry.initial-interval=1000ms
spring.rabbitmq.template.retry.max-attempts=10
spring.rabbitmq.template.retry.max-interval=10000ms
spring.rabbitmq.template.retry.multiplier=2
The meanings of top-down configuration are as follows:
- Enable retry mechanism.
- Retry start interval.
- Maximum number of retries.
- Maximum retry interval.
- Interval multiplier. (if the interval multiplier configured here is 2, the first interval is 1 second, the second retry interval is 2 seconds, the third time is 4 seconds, and so on.)
After the configuration is completed, start the Spring Boot project again, and then turn off MQ. At this time, if you try to send a message, it will fail, resulting in automatic retry.

7.3.2 service retry
Service retry is mainly used when the message does not reach the switch.
If the message does not arrive at the exchange successfully, according to the explanation in the second section, the message sending failure callback will be triggered. In this callback, we can make an article!
The overall idea is as follows:
- First, create a table to record the messages sent to the middleware, as follows:

Each time a message is sent, a record is added to the database. The fields here are easy to understand. I'll say three additional things:
- Status: indicates the status of the message. There are three values. 0, 1 and 2 respectively indicate that the message is being sent, that the message is successfully sent and that the message is failed.
- tryTime: indicates the first retry time of the message (after the message is sent, the successful sending is not displayed at the time point of tryTime, and the retry can be started).
- count: indicates the number of message retries.
Other fields are easy to understand, so I won't be verbose one by one.
- When sending a message, we save a message sending record in the table, and set the status status to 0 and tryTime to 1 minute later.
- In the confirm callback method, if you receive a callback that successfully sends a message, set the status of the message to 1 (set msgId for the message when the message is sent, and uniquely lock the message through msgId when the message is sent successfully).
- In addition, start a scheduled task. The scheduled task retrieves messages from the database every 10s, specifically to retrieve those messages whose status is 0 and the tryTime time has passed. After picking up these messages, first judge whether the number of retries has exceeded 3. If more than 3 times, modify the status of the message to 2, indicating that the message failed to be sent, And don't try again. For records with no more than 3 retries, resend the message and set the value of its count to + 1.
The general idea is the above. Brother song doesn't give the code here. This is the idea to deal with the e-mail sending in brother song's vhr. For the complete code, you can refer to the vhr project( https://github.com/lenve/vhr).
Of course, this idea has two disadvantages:
- Going to the database may slow down the Qos of MQ, but sometimes we don't need MQ to have a high Qos, so this application depends on the specific situation.
- According to the above ideas, the same message may be sent repeatedly, but this is not a problem. We can solve the idempotency problem when consuming messages.
Of course, you should also pay attention to whether the message should be sent 100% successfully depends on the specific situation.
Well, these are some common problems and corresponding solutions for message producers. In the next section, SongGe will discuss with you how to ensure the success of message consumption and solve the idempotent problem.
8. RabbitMQ consumption reliability
In the previous section, SongGe talked with you about how MQ high availability ensures the successful sending of messages. Various configurations are launched together to finally ensure the successful sending of messages. Even in some extreme cases, the same message may be sent repeatedly. Anyway, the message has been sent. If you haven't read the previous article, I suggest you take a look first, Here's another article:
Today, let's talk about message consumption and see how to ensure successful message consumption and idempotency.
8.1 two consumption ideas
RabbitMQ's message consumption, on the whole, has two different ideas:
- push: MQ actively pushes messages to consumers. This method requires consumers to set a buffer to cache messages. For consumers, there are always a pile of messages to be processed in memory, so this method is relatively efficient, which is also the consumption method adopted by most applications at present.
- Pull: consumers actively pull messages from MQ. This method is not very efficient, but sometimes it can be used if the server needs to pull messages in batches.
Let me give an example of both ways.
Let's start with push:
This is a common way to mark consumers through @ RabbitListener annotation, as follows:
@Component
public class ConsumerDemo {
    @RabbitListener(queues = RabbitConfig.JAVABOY_QUEUE_NAME)
    public void handle(String msg) {
        System.out.println("msg = " + msg);
    }
}
This method is triggered when there is a message in the listening queue.
pull again:
@Test
public void test01() throws UnsupportedEncodingException {
    Object o = rabbitTemplate.receiveAndConvert(RabbitConfig.JAVABOY_QUEUE_NAME);
    System.out.println("o = " + new String(((byte[]) o),"UTF-8"));
}
Call the receiveAndConvert method. The method parameter is the queue name. After the method is executed, a message will be pulled from MQ. If the return value of the method is null, it means that there are no messages on the queue. The receiveAndConvert method has an overloaded method in which you can pass in a waiting timeout, such as 3 seconds. At this time, if there are no messages in the queue, the receiveAndConvert method will block for 3 seconds. If there are new messages in the queue within 3 seconds, it will return. If there are still no new messages in the queue after 3 seconds, it will return null. If the waiting timeout is not set, it will be 0 by default.
These are two different consumption patterns.
If you need to continuously obtain messages from the message queue, you can use the push mode; If you simply consume a message, you can use the pull mode. Never put the pull mode into an endless loop to subscribe to messages in a disguised form, which will seriously affect the performance of RabbitMQ.
8.2 two ideas to ensure successful consumption
stay Last article In, we try our best to ensure that messages can be sent successfully. For the success of message consumption, the official provides relevant mechanisms. Let's take a look.
In order to ensure that messages can reach message consumers reliably, RabbitMQ provides a message consumption confirmation mechanism. When a consumer consumes a message, the confirmation method of message consumption can be expressed by specifying the autoAck parameter.
- When autoAck is false, RabbitMQ will not remove the message immediately even if the consumer has received the message. Instead, it will mark the message for deletion after the consumer explicitly replies to the confirmation signal, and then delete it.
- When autoAck is true, the message consumer will automatically set the sent message as confirmation, and then remove the message (from memory or disk), even if the message does not reach the consumer.
Let's look at a picture:

As shown in the above figure, on the web management page of RabbitMQ:
- Ready indicates the number of messages to be consumed.
- Un ack ed indicates the number of messages sent to consumers but not received from consumers.
This is how we can observe the consumption and confirmation of messages from the UI level.
When we set autoAck to false, for RabbitMQ, consumption is divided into two parts:
- Messages to be consumed
- Messages that have been delivered to consumers but have not been confirmed by consumers
In other words, when autoAck is set to false, the consumer becomes very calm. It will have enough time to process the message. After the message is processed normally, it will manually ack. At this time, RabbitMQ will think that the message consumption is successful. If RabbitMQ has not received any feedback from the client and the client has disconnected, RabbitMQ will put the message back in the queue and wait for the next consumption.
To sum up, ensuring that messages are successfully consumed is nothing more than manual Ack or automatic Ack. Of course, whichever of the two may eventually lead to repeated consumption of messages, so generally speaking, we also need to solve the idempotency problem when processing messages.
8.3 message rejection
When the client receives a message, it can choose to consume it or reject it. Let's look at the way to refuse:
@Component
public class ConsumerDemo {
    @RabbitListener(queues = RabbitConfig.JAVABOY_QUEUE_NAME)
    public void handle(Channel channel, Message message) {
        //Get message number
        long deliveryTag = message.getMessageProperties().getDeliveryTag();
        try {
            //Reject message
            channel.basicReject(deliveryTag, true);
        } catch (IOException e) {
            e.printStackTrace();
        }
    }
}
After receiving the message, the consumer can choose to reject the message. The rejection steps are divided into two steps:
- Gets the message number deliveryTag.
- Call the basicReject method to reject the message.
When calling the basicReject method, the second parameter is request, that is, whether to rejoin the queue. If the second parameter is true, the rejected message will re-enter the message queue and wait for the next consumption; If the second parameter is false, the rejected message will be discarded and no new consumers will consume it.
Note that the basicReject method can reject only one message at a time.
8.4 message confirmation
Message confirmation is divided into automatic confirmation and manual confirmation. Let's look at them separately.
8.4.1 automatic confirmation
Let's take a look at automatic confirmation. In Spring Boot, message consumption is automatically confirmed by default.
Let's look at the following message consumption method:
@Component
public class ConsumerDemo {
    @RabbitListener(queues = RabbitConfig.JAVABOY_QUEUE_NAME)
    public void handle2(String msg) {
        System.out.println("msg = " + msg);
        int i = 1 / 0;
    }
}
Inject the current class into the Spring container through the @ Componet annotation, and then mark a message consumption method through the @ RabbitListener annotation. By default, the message consumption method has its own transaction, that is, if the method throws an exception during execution, the consumed message will return to the queue and wait for the next consumption, If the method executes normally without throwing an exception, the message is consumed.
8.4.2 manual confirmation
Manual confirmation I divide it into two types: push mode manual confirmation and pull mode manual confirmation.
8.4.2.1 manual confirmation of push mode
To enable manual confirmation, we need to turn off automatic confirmation first. The closing method is as follows:
spring.rabbitmq.listener.simple.acknowledge-mode=manual
This configuration means that the confirmation mode of the message is changed to manual confirmation.
Next, let's look at the code in the consumer:
@RabbitListener(queues = RabbitConfig.JAVABOY_QUEUE_NAME)
public void handle3(Message message,Channel channel) {
    long deliveryTag = message.getMessageProperties().getDeliveryTag();
    try {
        //The code for message consumption is written here
        String s = new String(message.getBody());
        System.out.println("s = " + s);
        //After consumption, ack manually
        channel.basicAck(deliveryTag, false);
    } catch (Exception e) {
        //Manual nack
        try {
            channel.basicNack(deliveryTag, false, true);
        } catch (IOException ex) {
            ex.printStackTrace();
        }
    }
}
Put what consumers want to do into a try Catch code block.
If the normal consumption of the message is successful, execute basicAck to complete the confirmation.
If the message consumption fails, execute the basicNack method to tell RabbitMQ that the message consumption fails.
Two methods are involved:
- basicAck: This is to manually confirm that the message has been successfully consumed. This method has two parameters: the first parameter represents the id of the message; If the second parameter multiple is false, it means that only the current message is successfully consumed. If true, it means that all messages not confirmed by the current consumer before the current message are successfully consumed.
- basicNack: This is to tell RabbitMQ that the current message has not been successfully consumed. This method has three parameters: the first parameter represents the id of the message; If the second parameter multiple is false, it means that only the consumption of the current message is rejected. If true, it means that all messages not confirmed by the current consumer before the current message are rejected; The third parameter, request, has the same meaning as the above, and determines whether the rejected message is re queued.
When the last parameter in basicNack is set to false, it also involves a dead letter queue. Brother song will write an article to talk to you in detail later.
8.4.2.2 manual confirmation of pull mode
Manual ack in pull mode is more troublesome. The corresponding method is not found in the RabbitTemplate encapsulated in Spring, so we have to use the native method, as follows:
public void receive2() {
    Channel channel = rabbitTemplate.getConnectionFactory().createConnection().createChannel(false);
    long deliveryTag = 0L;
    try {
        GetResponse getResponse = channel.basicGet(RabbitConfig.JAVABOY_QUEUE_NAME, false);
        deliveryTag = getResponse.getEnvelope().getDeliveryTag();
        System.out.println("o = " + new String((getResponse.getBody()), "UTF-8"));
        channel.basicAck(deliveryTag, false);
    } catch (IOException e) {
        try {
            channel.basicNack(deliveryTag, false, true);
        } catch (IOException ex) {
            ex.printStackTrace();
        }
    }
}
The basicAck and basicNack methods involved here are the same as the previous ones, so I won't repeat them.
8.5 idempotency problem
Finally, let's talk about the idempotency of messages.
Imagine the following scenario:
>After consuming a message, the consumer sends an ack confirmation to RabbitMQ. At this time, RabbitMQ does not receive the ack due to network disconnection or other reasons. Then RabbitMQ will not delete the message. After the connection is re established, the consumer will still receive the message again, resulting in repeated consumption of the message. Meanwhile, for similar reasons, the same message may be sent twice when it is sent (see Four strategies ensure the reliability of RabbitMQ message sending! Which one do you use? ). For various reasons, we must deal with the idempotency problem when consuming news.
It's not difficult to deal with idempotency problems. They are basically dealt with from the business. Let me talk about the ideas.
Redis is adopted. Before consumers consume messages, the message id is now put into redis. The storage method is as follows:
- id-0 (executing business)
- id-1 (successful execution of business)
If ack fails, when RabbitMQ sends the message to other consumers, execute setnx first. If the key already exists (indicating that someone has consumed the message before), get its value. If it is 0, the current consumer will do nothing. If it is 1, ACK directly.
Extreme case: the first consumer has a deadlock when executing the business. On the basis of setnx, set a lifetime for the key. Producer, specify messageId when sending a message.
Of course, this is just a simple idea for your reference.
SongGe also handled the problem of message idempotency in the vhr project. Interested partners can view the vhr source code( https://github.com/lenve/vhr ), the code is in mailserver.
9. Understand VirtualHost
After we install a RabbitMQ for the first time, we may manage the RabbitMQ through a Web page. By default, the default user we use for the first time is guest.
After successful login, you can view all users in the admin tab:

You can see that each user has a Can access virtual hosts attribute. What does this attribute mean?
Today, brother song came to brush with you a little.
9.1 multi tenant
RabbitMQ has a concept called multi tenancy. How do you understand it?
We install a RabbitMQ server. Each RabbitMQ server can create many virtual message servers. These virtual message servers are what we call virtual host, which is generally referred to as vhost.
In essence, each vhost is an independent small RabbitMQ server. This vhost will have its own message queue, message switch and corresponding binding relationship, and has its own independent permissions. Queues and switches in different vhosts cannot be bound to each other. This skill ensures safe operation and avoids naming conflict.
We don't need to look at vhost in particular. Just like ordinary physical RabbitMQ, different vhost can provide logical separation to ensure that different application message queues can run safely and independently.
For me, what should we think of the relationship between vhost and RabbitMQ? RabbitMQ is equivalent to an Excel file, while vhost is a sheet in the Excel file. All our operations are performed on a sheet.
>In essence, vhost is a concept in AMQP protocol.
9.2 creating vhost from the command line
Let's first look at how to create vhost from the command line.
Since RabbitMQ in SongGe is installed with docker, we first enter the docker container:
docker exec -it some-rabbit /bin/bash
Then execute the following command to create a vhost named / myvh:
rabbitmqctl add_vhost myvh
The final implementation results are as follows:

Then you can view the existing vhost through the following command:
rabbitmqctl list_vhosts
Of course, this command can also add two options, name and tracing. Name indicates the name of vhost, and tracing indicates whether the tracing function is used (tracing can help track the inflow and outflow of messages in RabbitMQ), as shown in the following figure:
You can delete a vhost with the following command:
rabbitmqctl delete_vhost myvh

When a vhost is deleted, all the message queues, switches and binding relationships related to the vhost will be deleted.
Set vhost for a user:
rabbitmqctl set_permissions -p myvh guest ".*" ".*" ".*"

The preceding parameters are easy to say. The last three ". *" have the following meanings:
- Users have configurable permissions on all resources (create / delete message queues, create / delete switches, etc.).
- Users have write permission (send messages) on all resources.
- Users have read permissions on all resources (message consumption, queue emptying, etc.).
Prohibit a user from accessing a vhost:
rabbitmqctl clear_permissions -p myvh guest

9.3 create vhost on the management page
Of course, we can also manage vhost on the web side:
In the admin tab, click Virtual Hosts on the right, as follows:
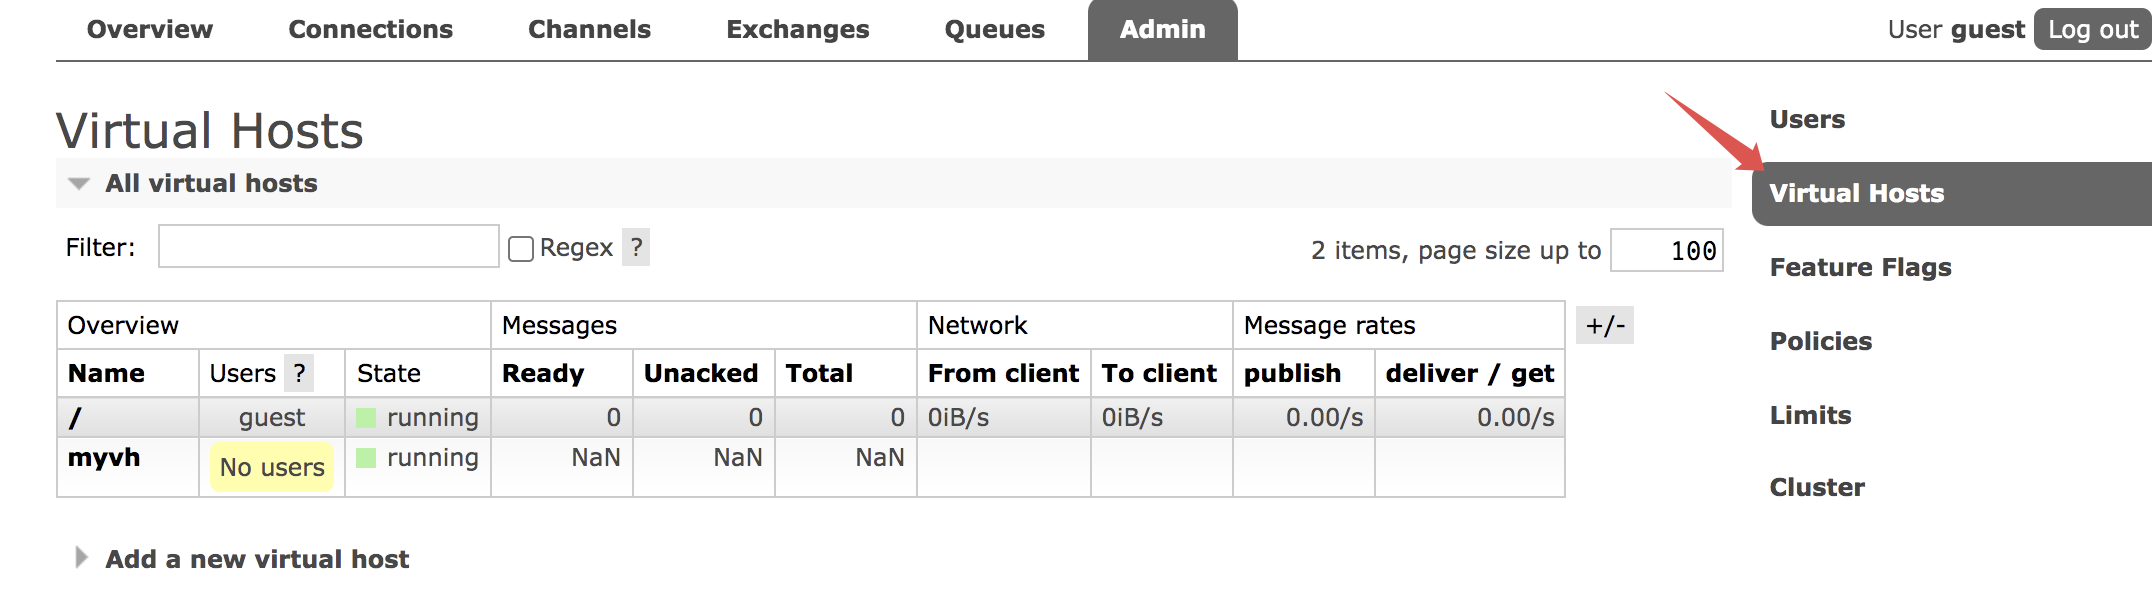
Then click Add a new virtual host below to add a new vhost:
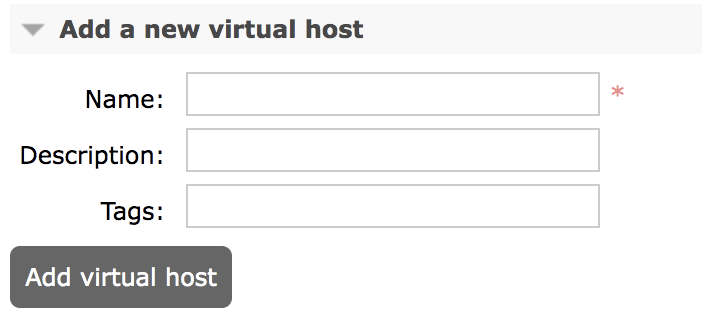
After entering a vhost, you can modify its permissions and delete a vhost, as shown in the following figure:
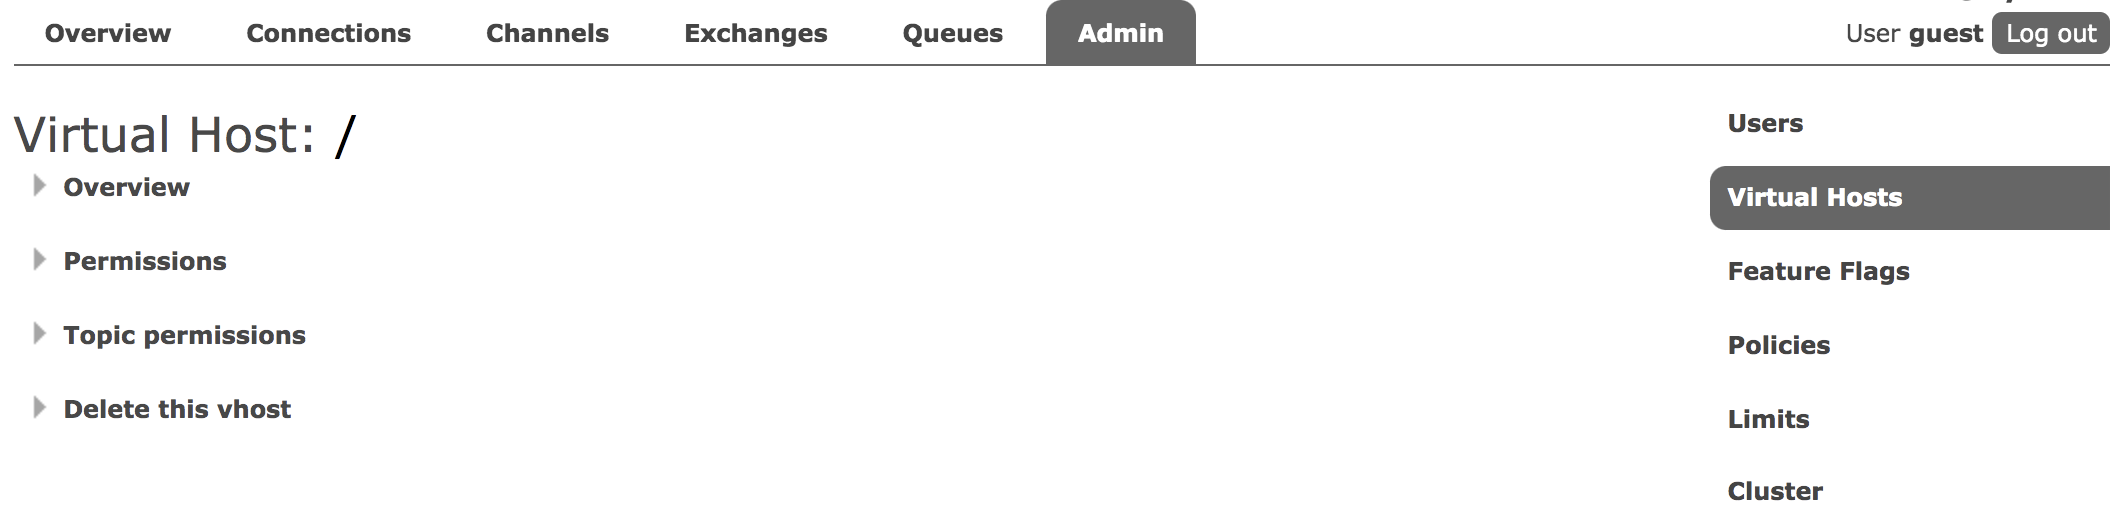
9.4 user management
Because vhost usually appears with the user, I will also mention the user's related operations here.
Add a user whose user name is javaboy and password is 123 as follows:
rabbitmqctl add_user javaboy 123

The user password can be modified by the following command (change the password of javaboy to 123456):
rabbitmqctl change_password javaboy 123456

The user password can be verified by the following command:
rabbitmqctl authenticate_user javaboy 123456
The success and failure of verification are as follows:
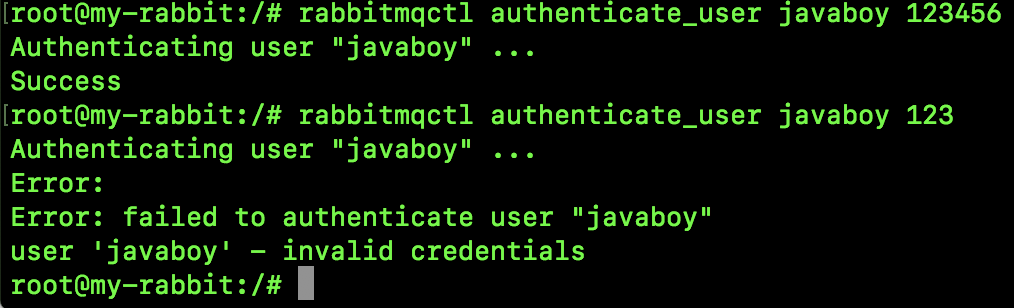
You can view all current users through the following command:
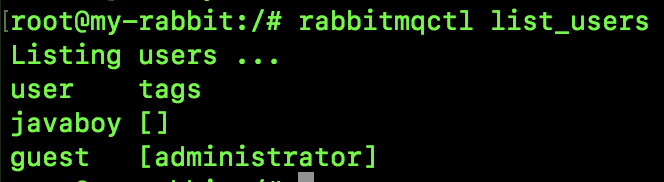
The first column is the user name and the second column is the user role.
I talked about user roles in the last article, so I won't repeat them here. Portal: How to use the RabbitMQ administration page.
The commands to set roles for users are as follows (set administrator role for javaboy):
rabbitmqctl set_user_tags javaboy administrator

Finally, the command to delete a user is as follows:
rabbitmqctl delete_user javaboy

10. REST API
We can manage RabbitMQ through the web page. In the previous article of SongGe, we also introduced it to our partners:
But what if we install rabbitmq_management plug-in, that is, if the Web management client in RabbitMQ is installed, we can manage RabbitMQ through the REST API.
A little friend may ask, what's the use of this?
If our project uses graphical tools such as Granglia or Graphite, and we want to capture the consumption / accumulation of messages on the current RabbitMQ, we can use the REST API to query these information and transmit the query results to the new graphical tools. At the same time, because the REST API is HTTP requests, the supported clients are also diverse, As long as you can send HTTP requests, you can use it. Is it particularly convenient?
10.1 REST API
Some friends may not know what REST API is. Here's a brief introduction:
REST (representative state transfer) is a Web software architecture style. It is a style, not a standard. Network services matching or compatible with this architecture style are called REST services.
REST services are concise and hierarchical. It is usually based on existing widely popular protocols and standards such as HTTP, URI, XML and HTML. In REST, resources are specified by URIs. The addition, deletion, modification and query of resources can be realized through GET, POST, PUT, DELETE and other methods provided by HTTP protocol.
Using REST can make more efficient use of cache to improve response speed. At the same time, the communication session state in REST is maintained by the client, which allows different servers to process different requests in a series of requests, so as to improve the scalability of the server.
In the front end and back end separation project, a well-designed Web software architecture must meet the REST style.
10.2 open the Web management page
Let's talk about how to open the Web management page. On the whole, we have two ways to open the Web management page:
- When installing RabbitMQ, directly select the rabbitmq:3-management image. The installation command is as follows:
docker run -d --rm --hostname my-rabbit --name some-rabbit -p 15672:15672 -p 5672:5672 rabbitmq:3-management
In this way, the installed RabbitMQ can directly use the Web management page.
- During installation, select the normal normal image rabbitmq:3. The installation command is as follows:
docker run -d --hostname my-rabbit --name some-rabbit2 -p 5673:5672 -p 25672:15672 rabbitmq:3
After the installation, we need to enter the container and manually open the Web management plug-in. The command is as follows:
docker exec -it some-rabbit2 /bin/bash
rabbitmq-plugins enable rabbitmq_management
The first command is to enter the container. The second command opens the Web management plug-in. The execution results are as follows:
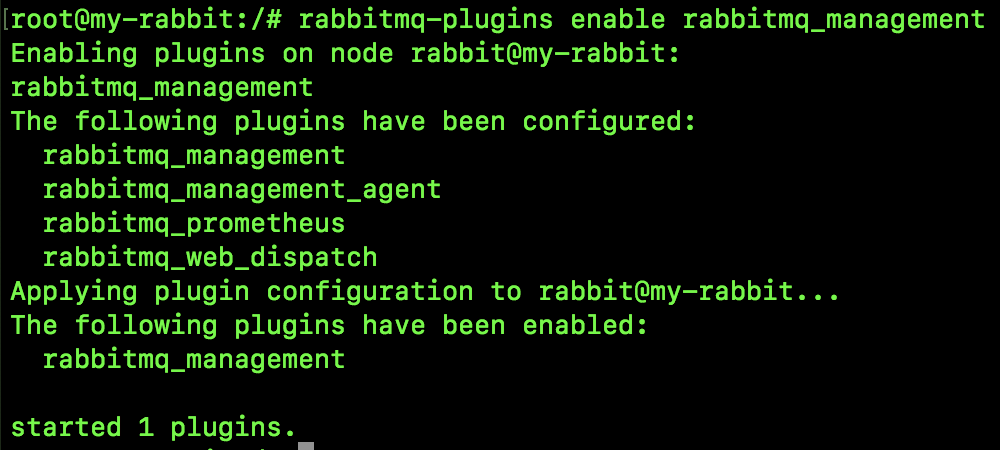
Open the Web management page in either of the above two ways, and then we can use the REST API.
10.3 practice
Next, let's experience several common REST API operations.
We can send requests through CURL tool or POSTMAN. We can choose what we like. Brother song, here are two ways to demonstrate to you.
10.3.1 viewing queue statistics
For example, if we want to view the data statistics of the Hello queue under the virtual host myvh, we can view it in the following ways:
curl -i -u javaboy:123 http://localhost:15672/api/queues/myvh/hello-queue
-i indicates that the response header information is displayed.
The final implementation results are as follows:
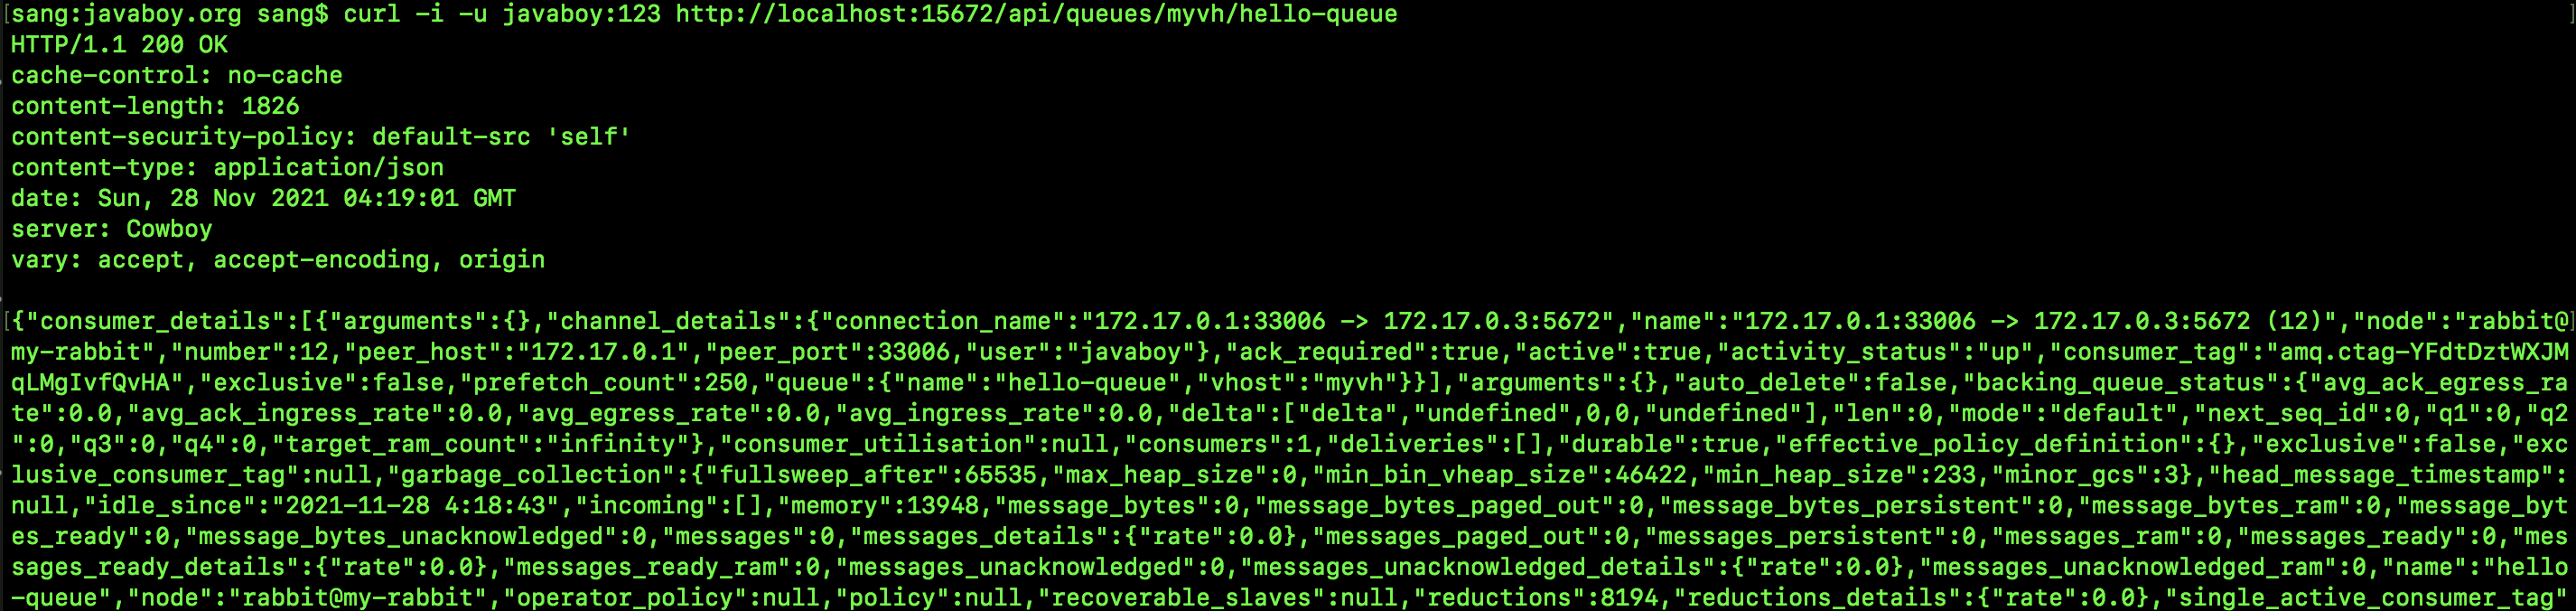
It can be seen that the returned information has both response headers and JSON, but the returned JSON is not formatted, which looks a little uncomfortable. If the returned data only has JSON and does not contain response headers, we can use python to format the data, as follows:
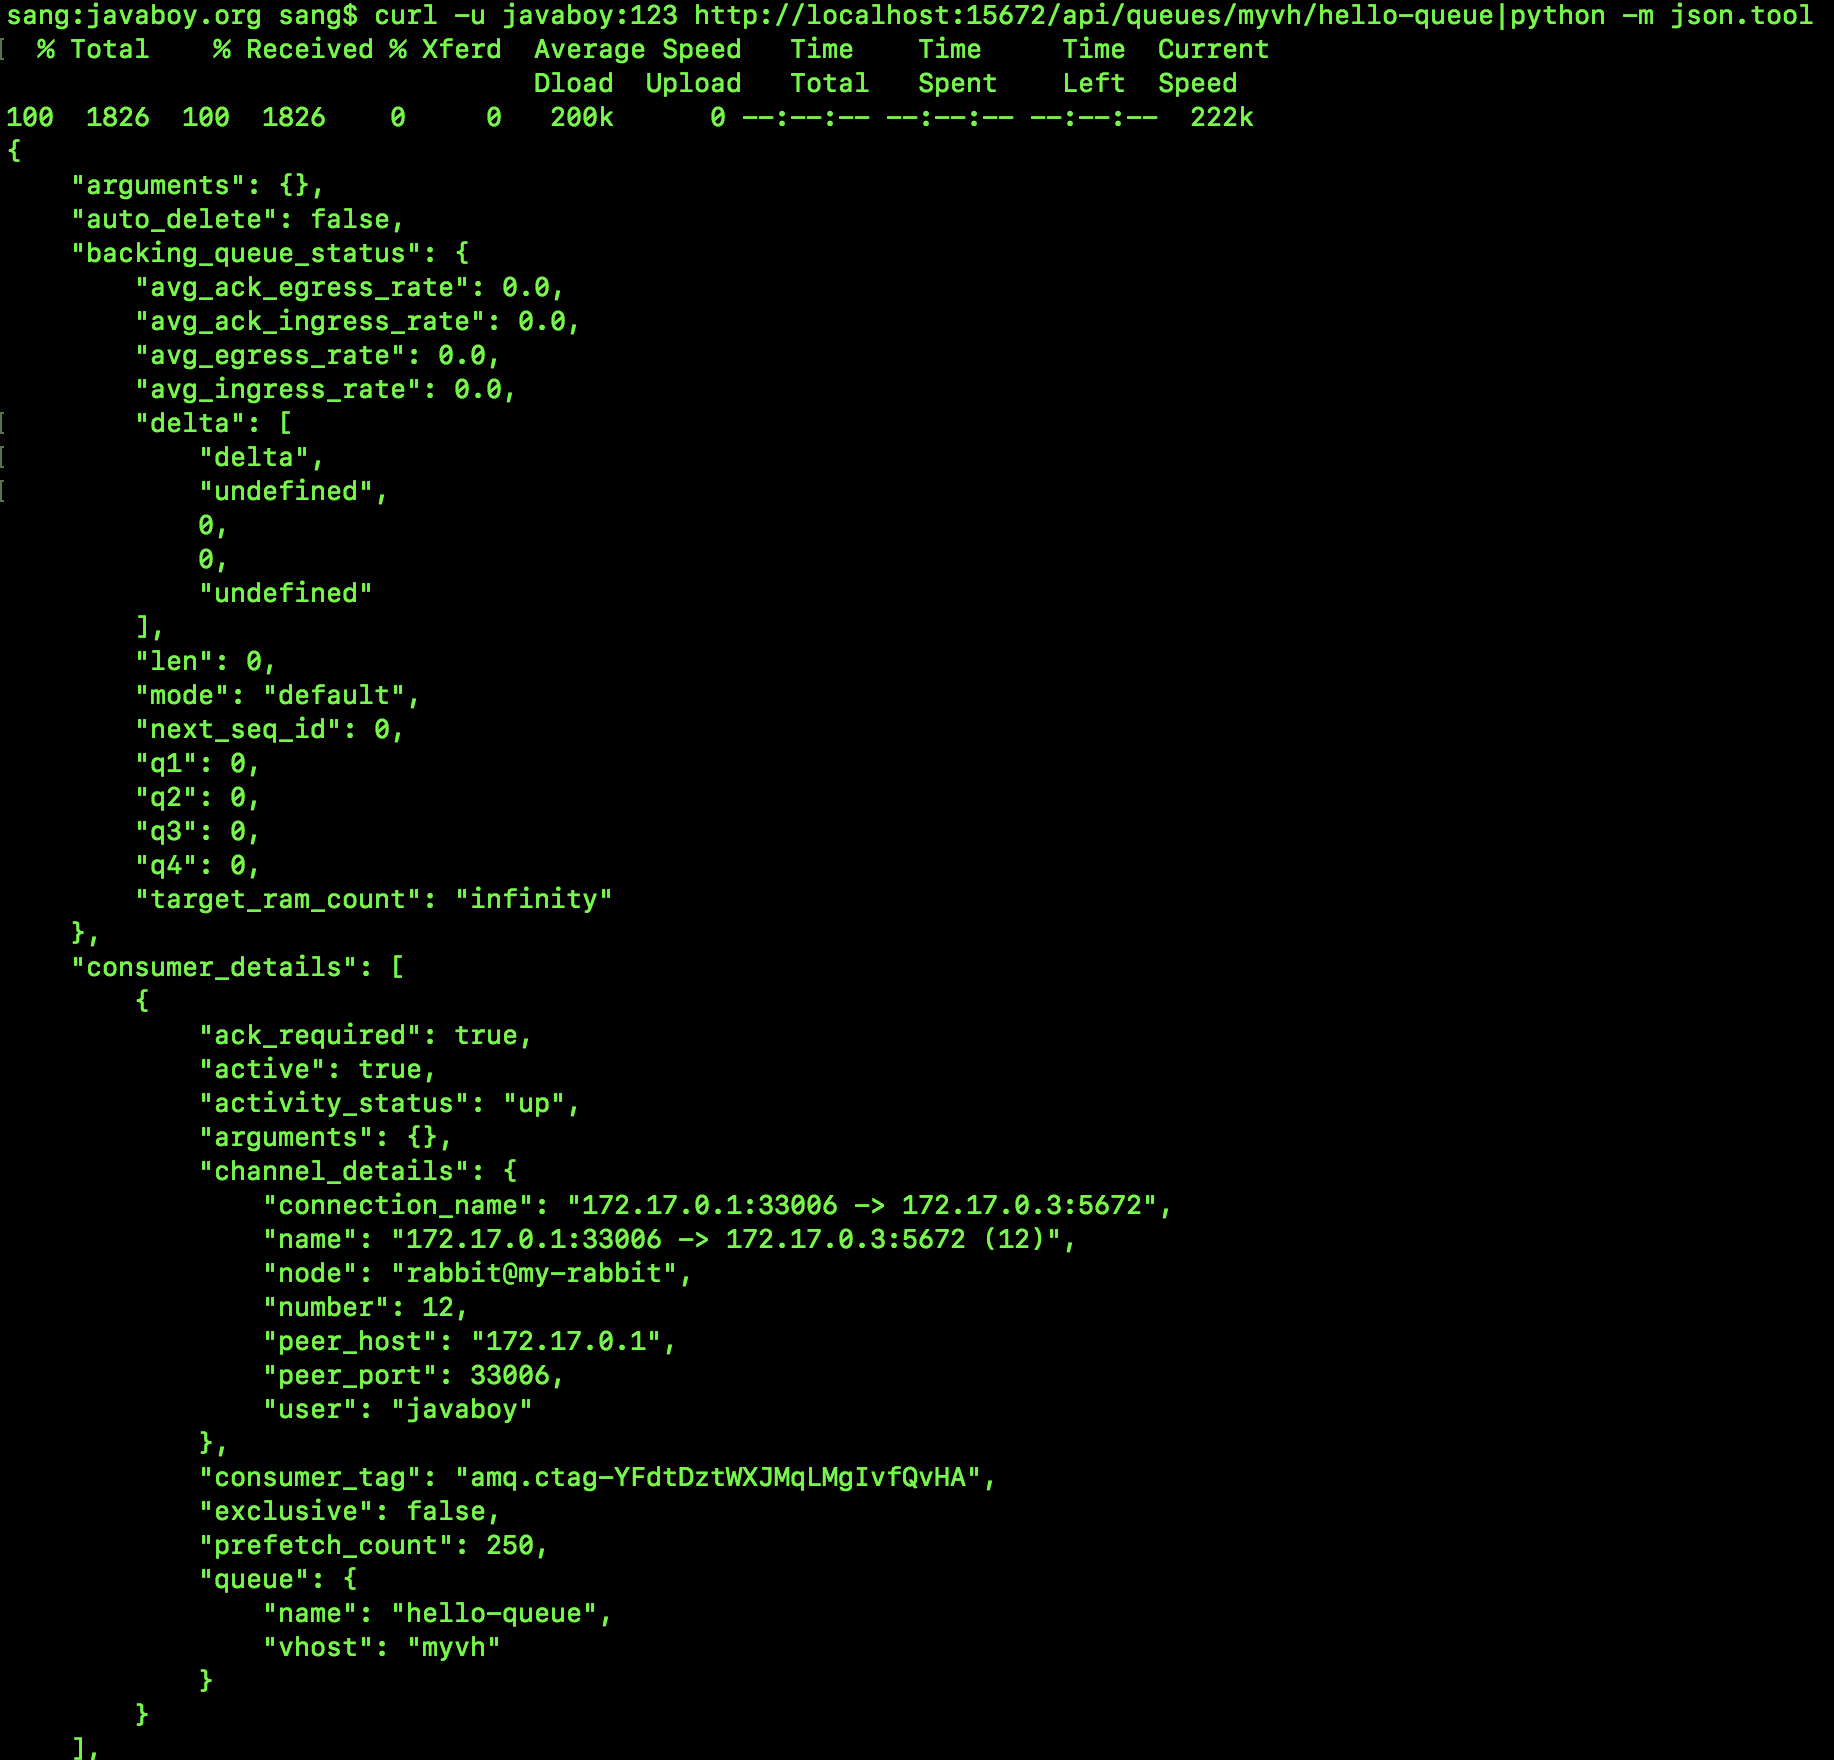
As you can see, the returned data is formatted.
Of course, we can also use POSTMAN to send this request as follows:
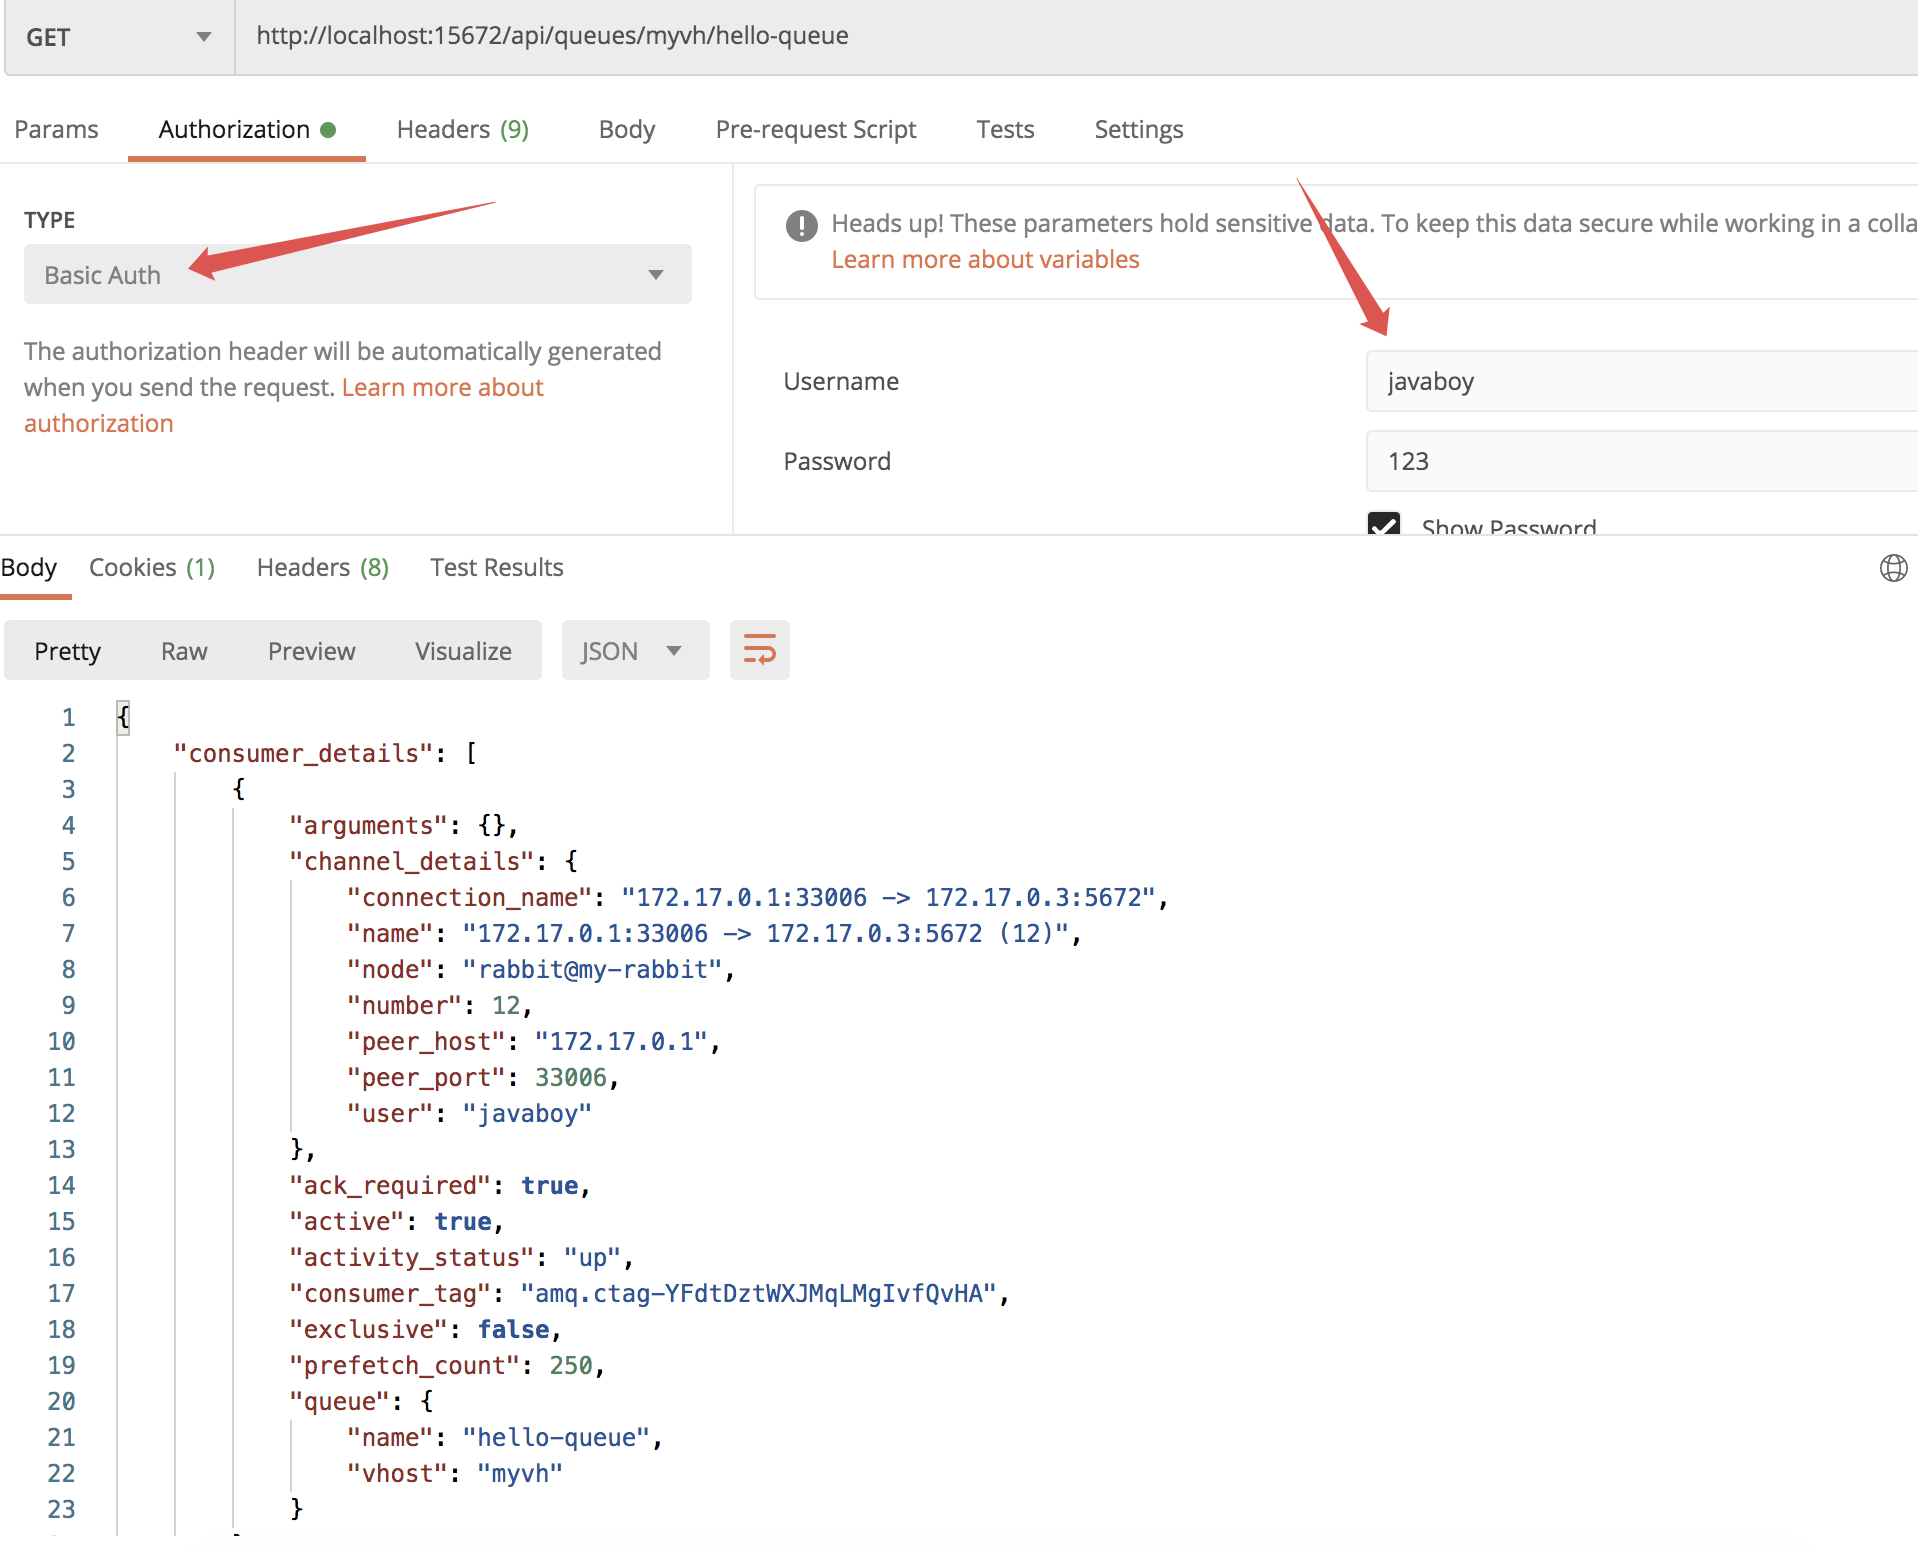
Note that the authentication method is Basic Auth, and set the correct user name and password.
POSTMAN requests are still much more convenient.
10.3.2 creating queues
Create a queue named javaboy queue under the / myvh virtual host, and use the CURL request method as follows:
curl -i -u javaboy:123 -XPUT -H "Content-Type:application/json" -d '{"auto_delete":false,"durable":true}' http://localhost:15672/api/queues/myvh/javaboy-queue
Note that the request method is PUT request, and the request parameters are JSON. There are two things in JSON, one is auto_delete means whether the queue will be automatically deleted if there is no consumer subscription to the queue (if it is some temporary queues, this attribute can be set to true); Another durable parameter is whether the queue is persistent (the persistent queue still exists after RabbitMQ is restarted). If you have created a queue in Java code, these two parameters are easy to understand, because these two parameters are often used when we create a queue in Java code.
Of course, we can also use POSTMAN to send requests:
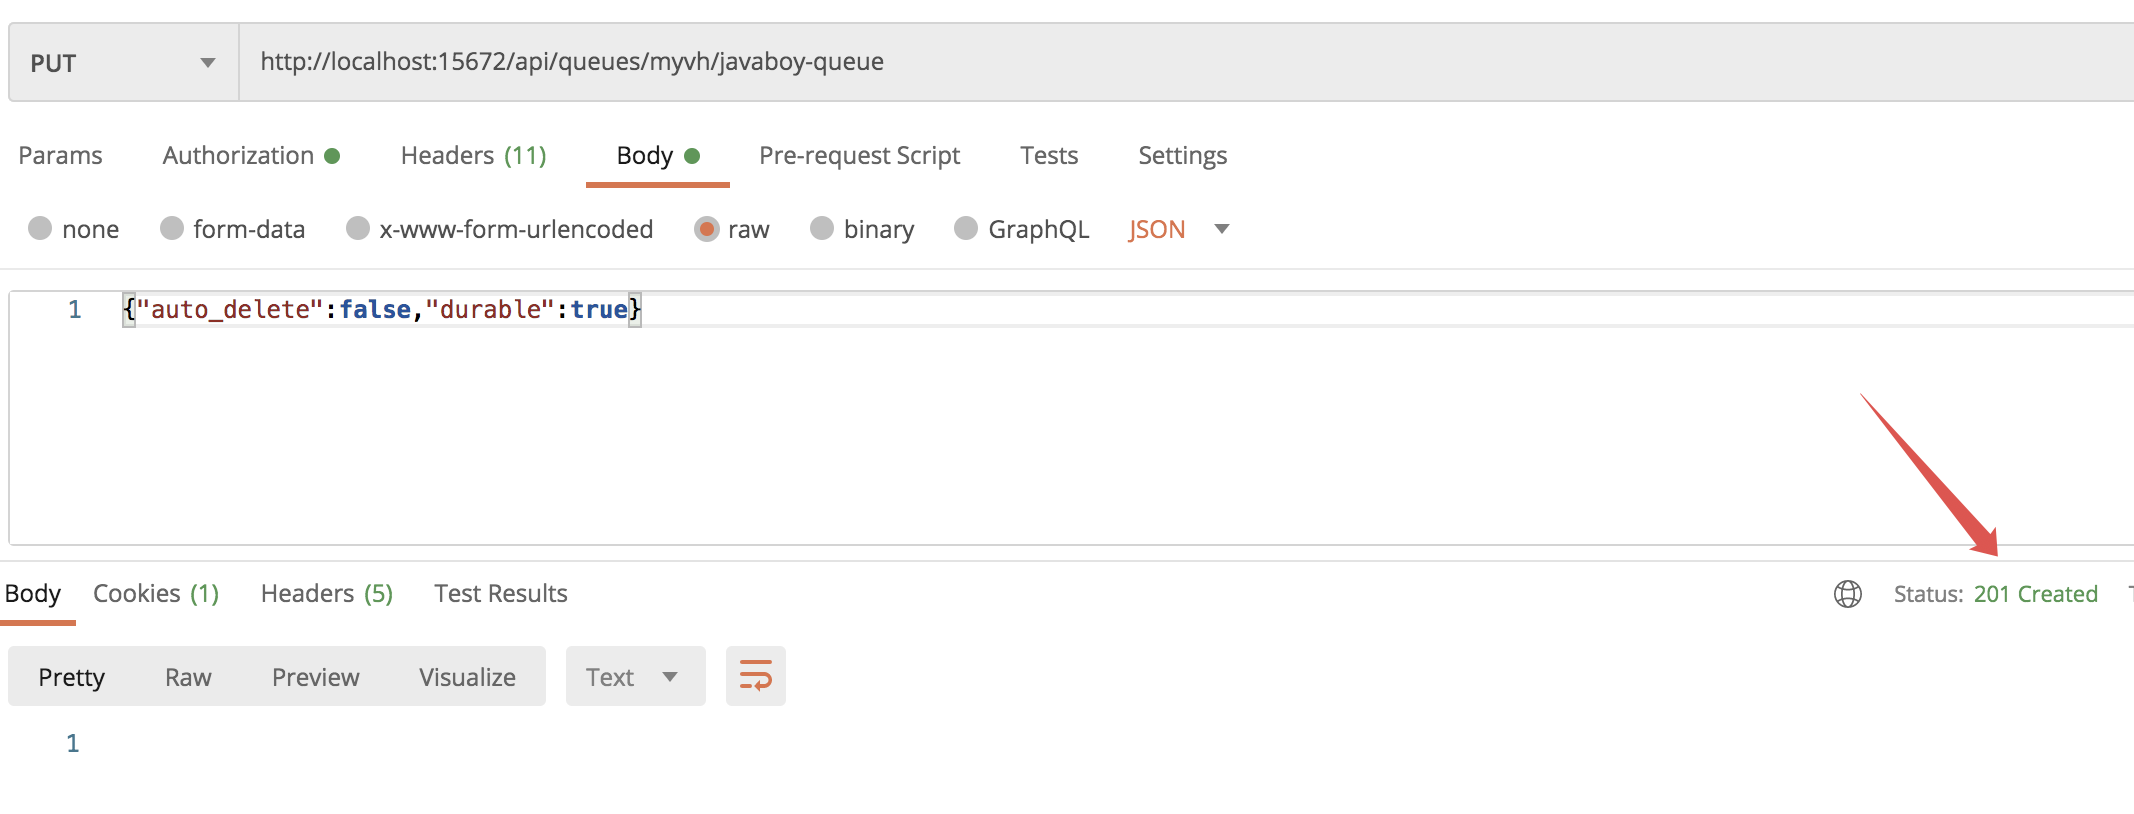
201 Created is returned, indicating that the queue was created successfully.
Note, however, that the user name / password is set in the Authorization tab:
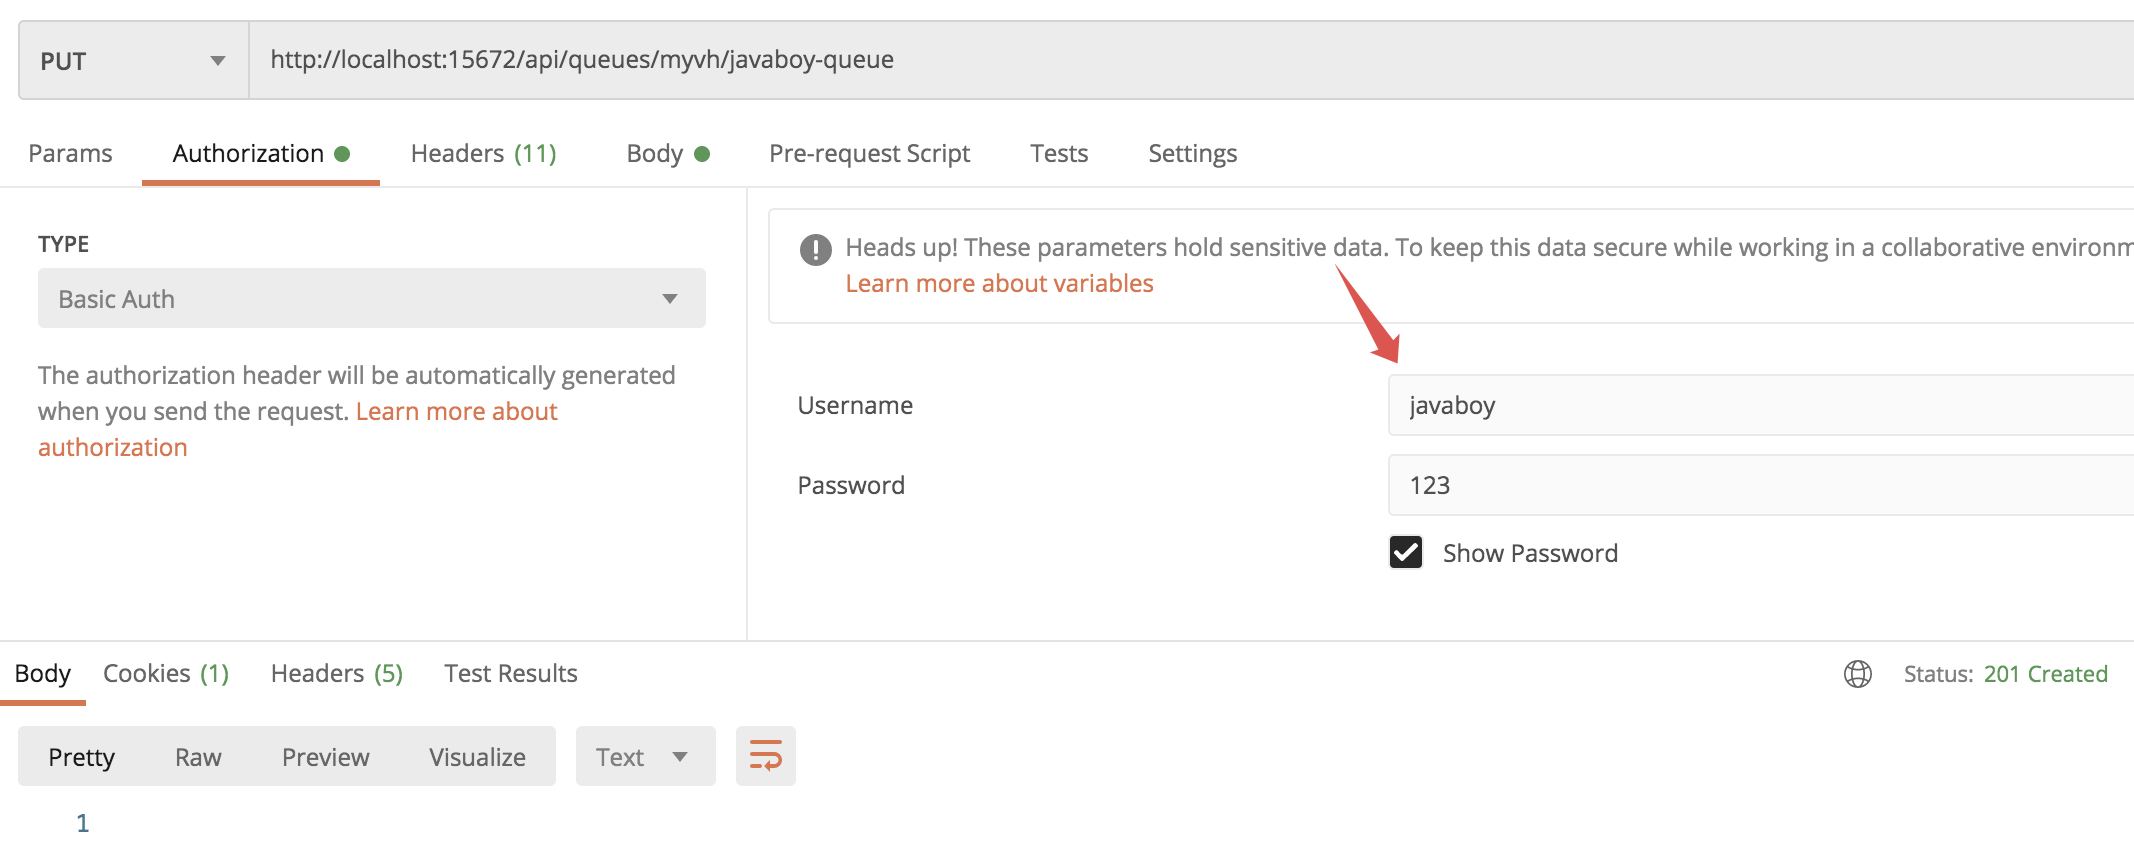
10.3.3 view current connection information
We can view the current connection information through the following request:
The request is as follows:
curl -i -u javaboy:123 http://localhost:15672/api/connections
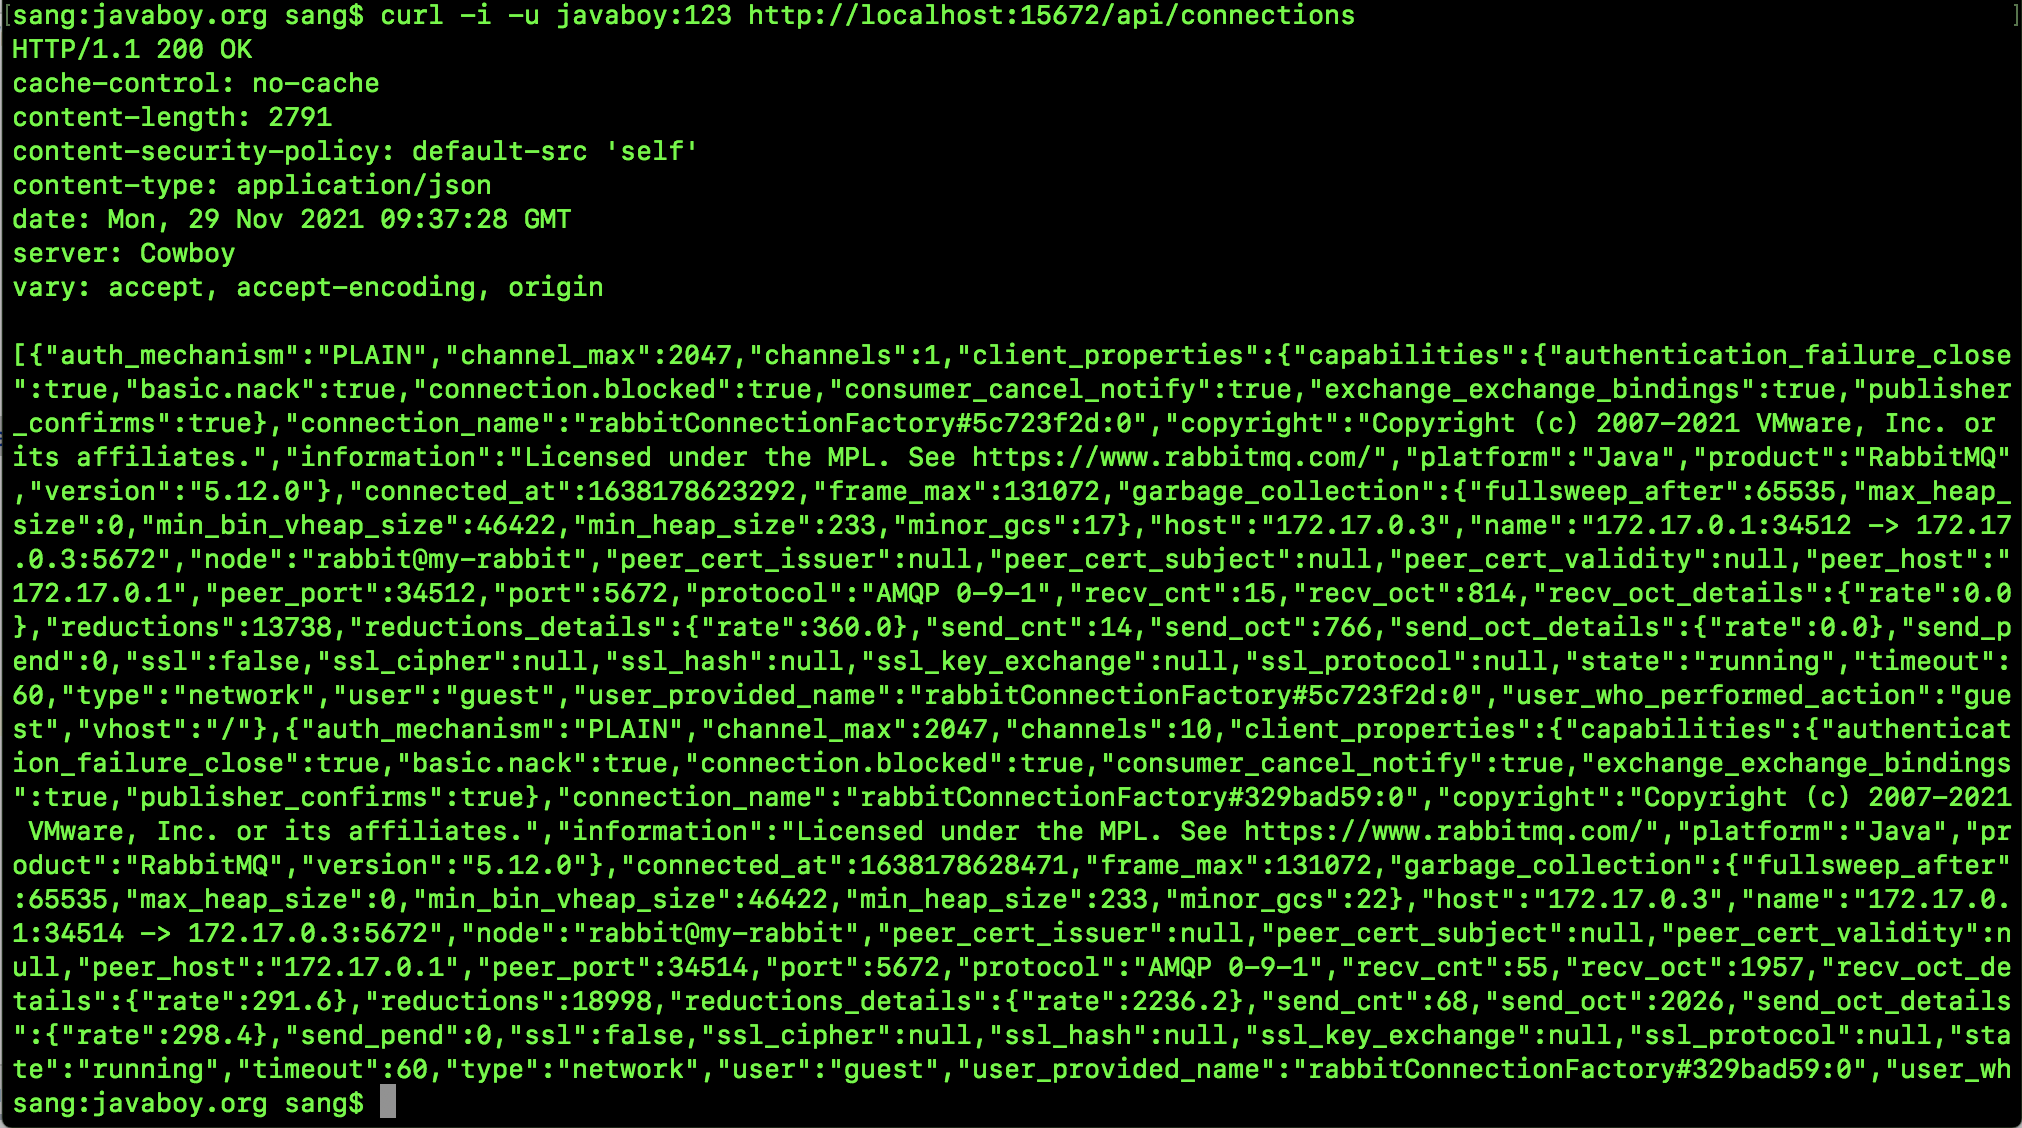
POSTMAN can be viewed as follows:
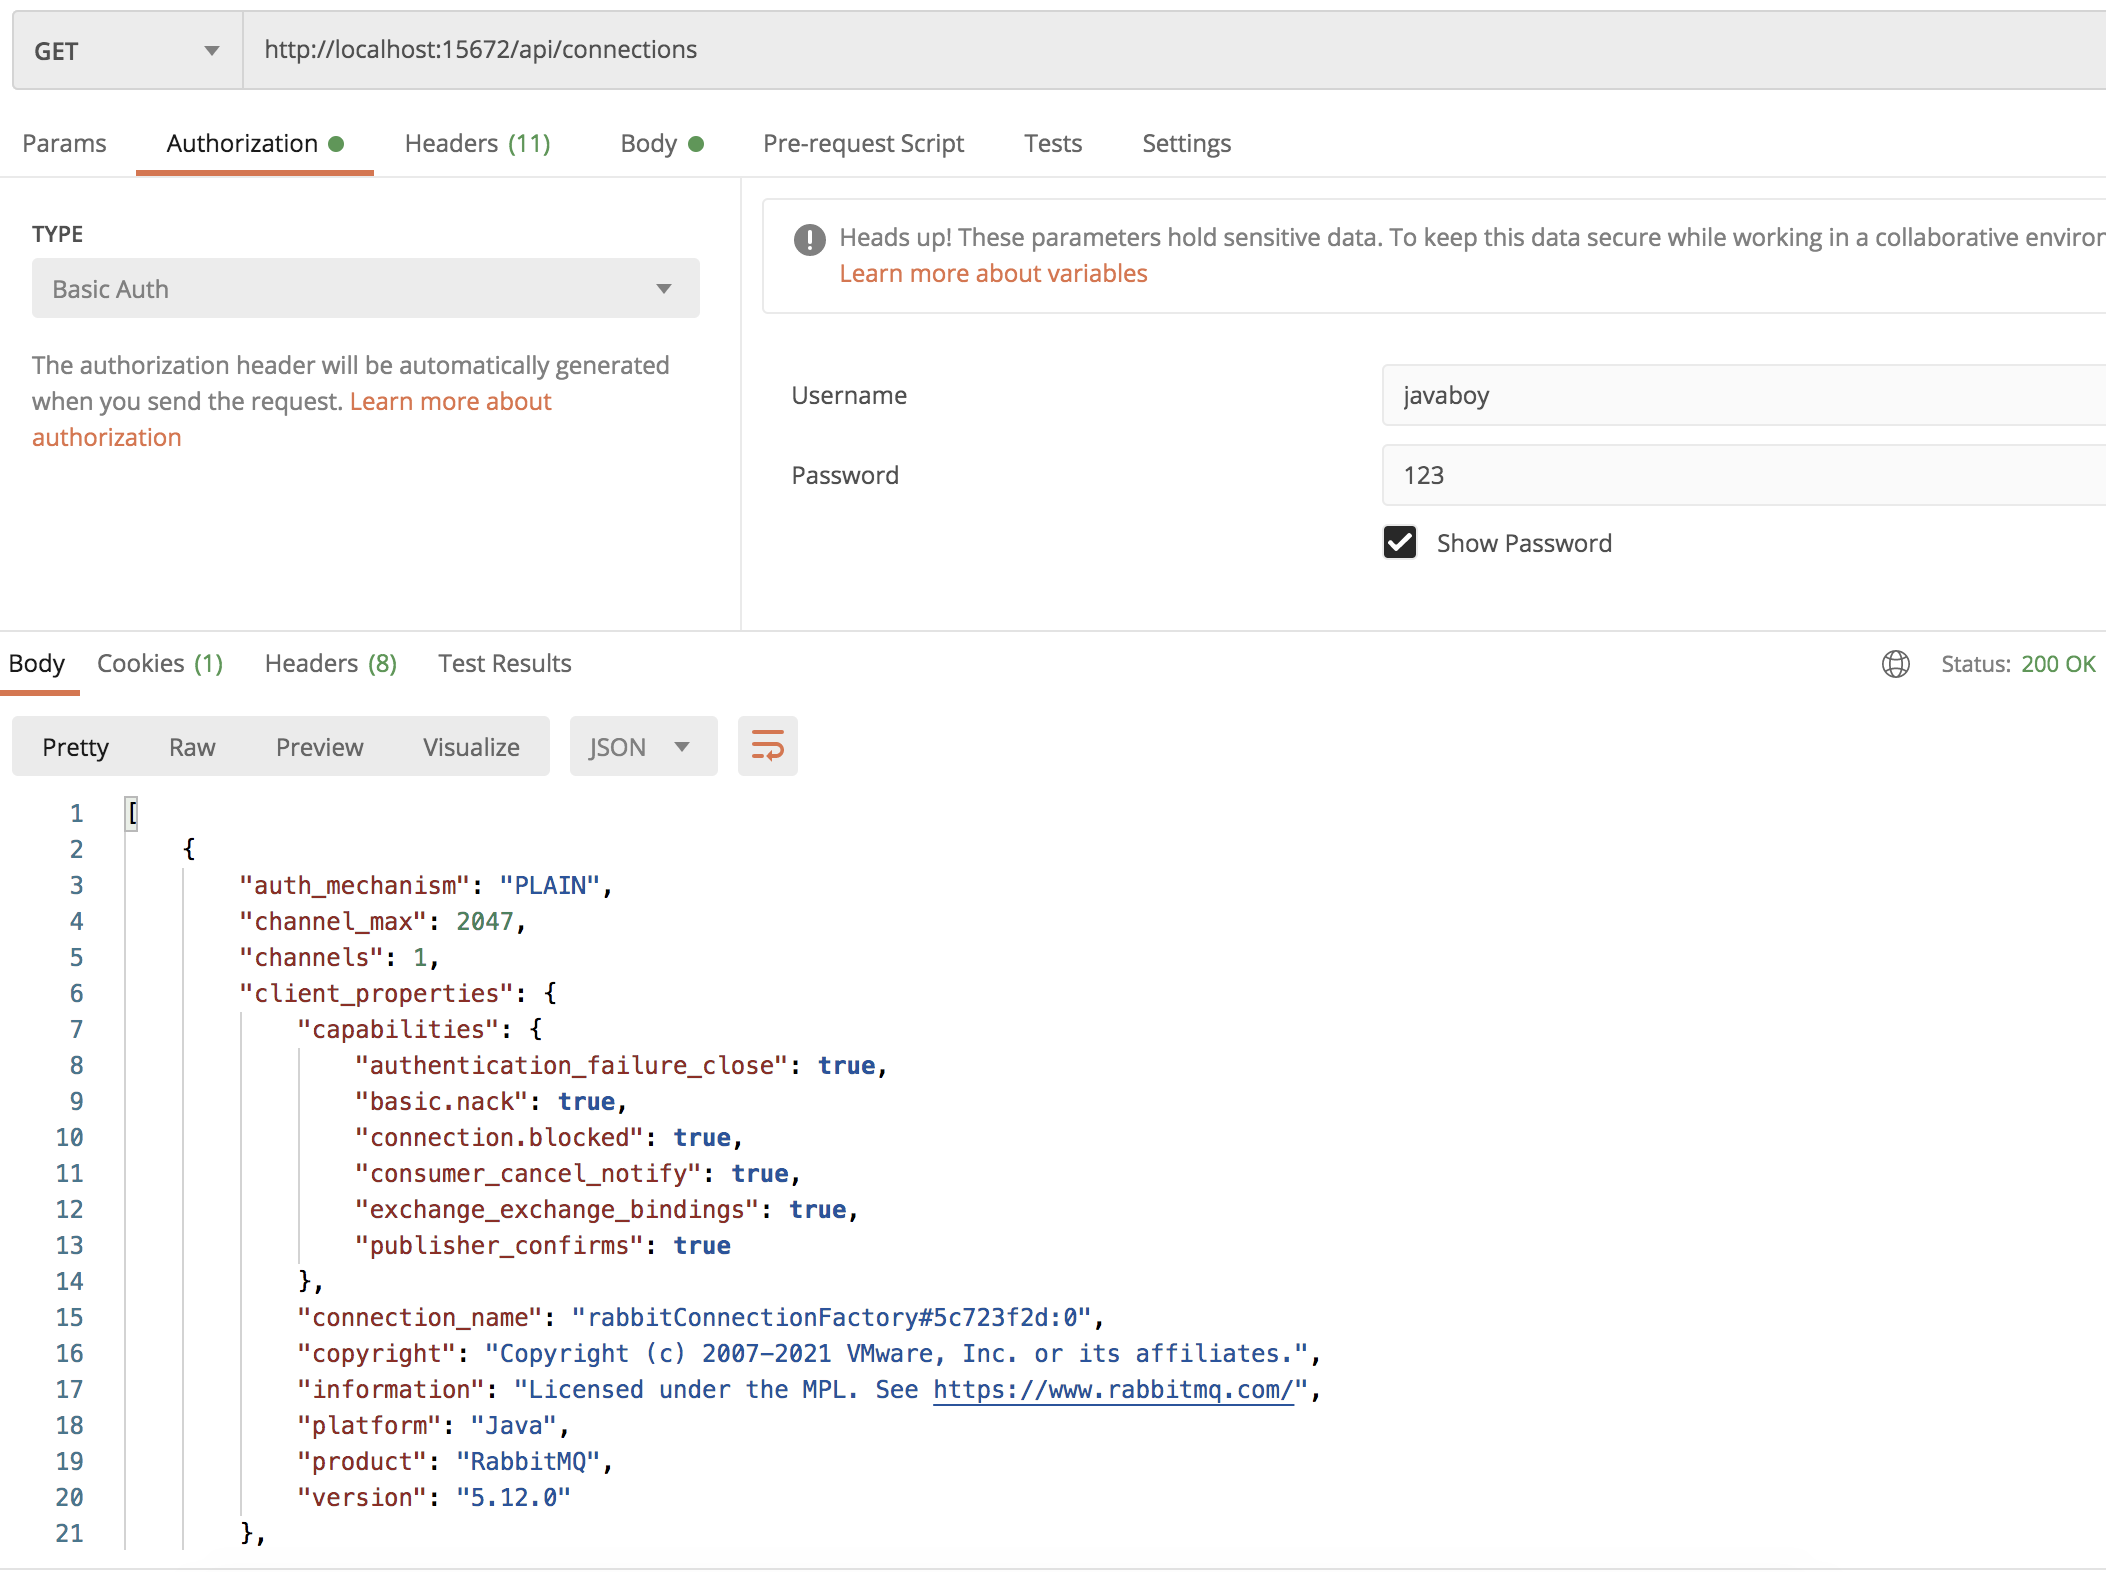
10.3.4 viewing current user information
curl -i -u javaboy:123 http://localhost:15672/api/users

The POSTMAN view information is as follows:
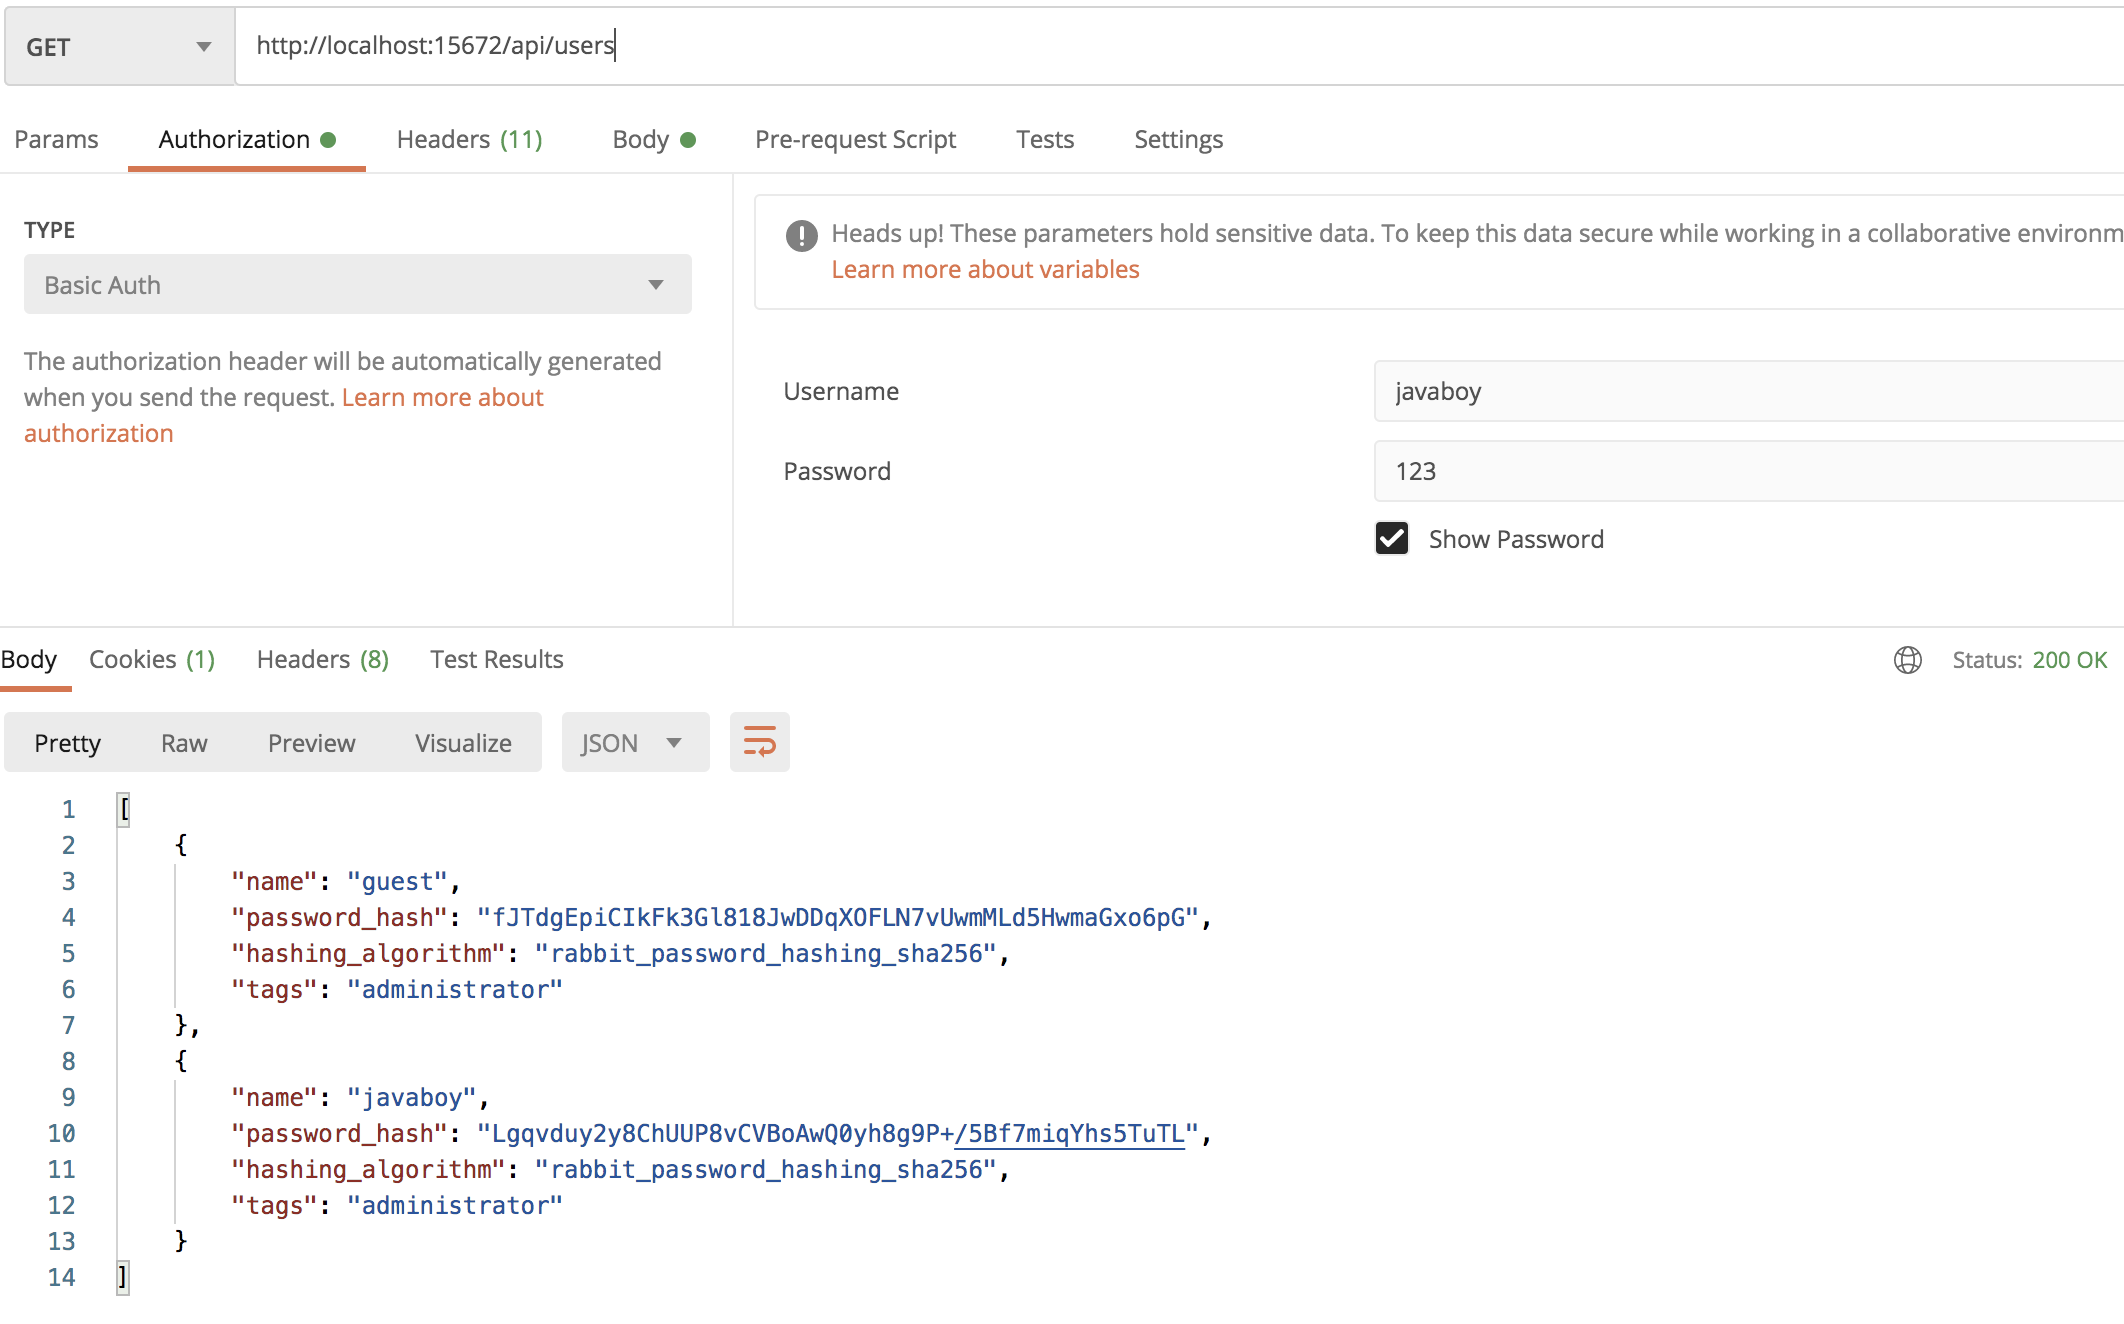
10.3.5 create a user
Create a user named zhangsan, password 123 and role administrator.
CURL:
curl -i -u javaboy:123 -H "{Content-Type:application/json}" -d '{"password":"123","tags":"administrator"}' -XPUT http://localhost:15672/api/users/zhangsan
POSTMAN:
10.3.6 setting vhost for new users
Set the user named zhangsan to the vhost named myvh:
curl -i -u javaboy:123 -H "{Content-Type:application/json}" -d '{"configure":".*","write":".*","read":".*"}' -XPUT http://localhost:15672/api/permissions/myvh/zhangsan
Parameters are specific permission information:

The POSTMAN request method is as follows:
Well, brother song, I'll give you a few examples of the usage of other APIs. You can open the management page of RabbitMQ and click the HTTP API button below. There is a complete document:
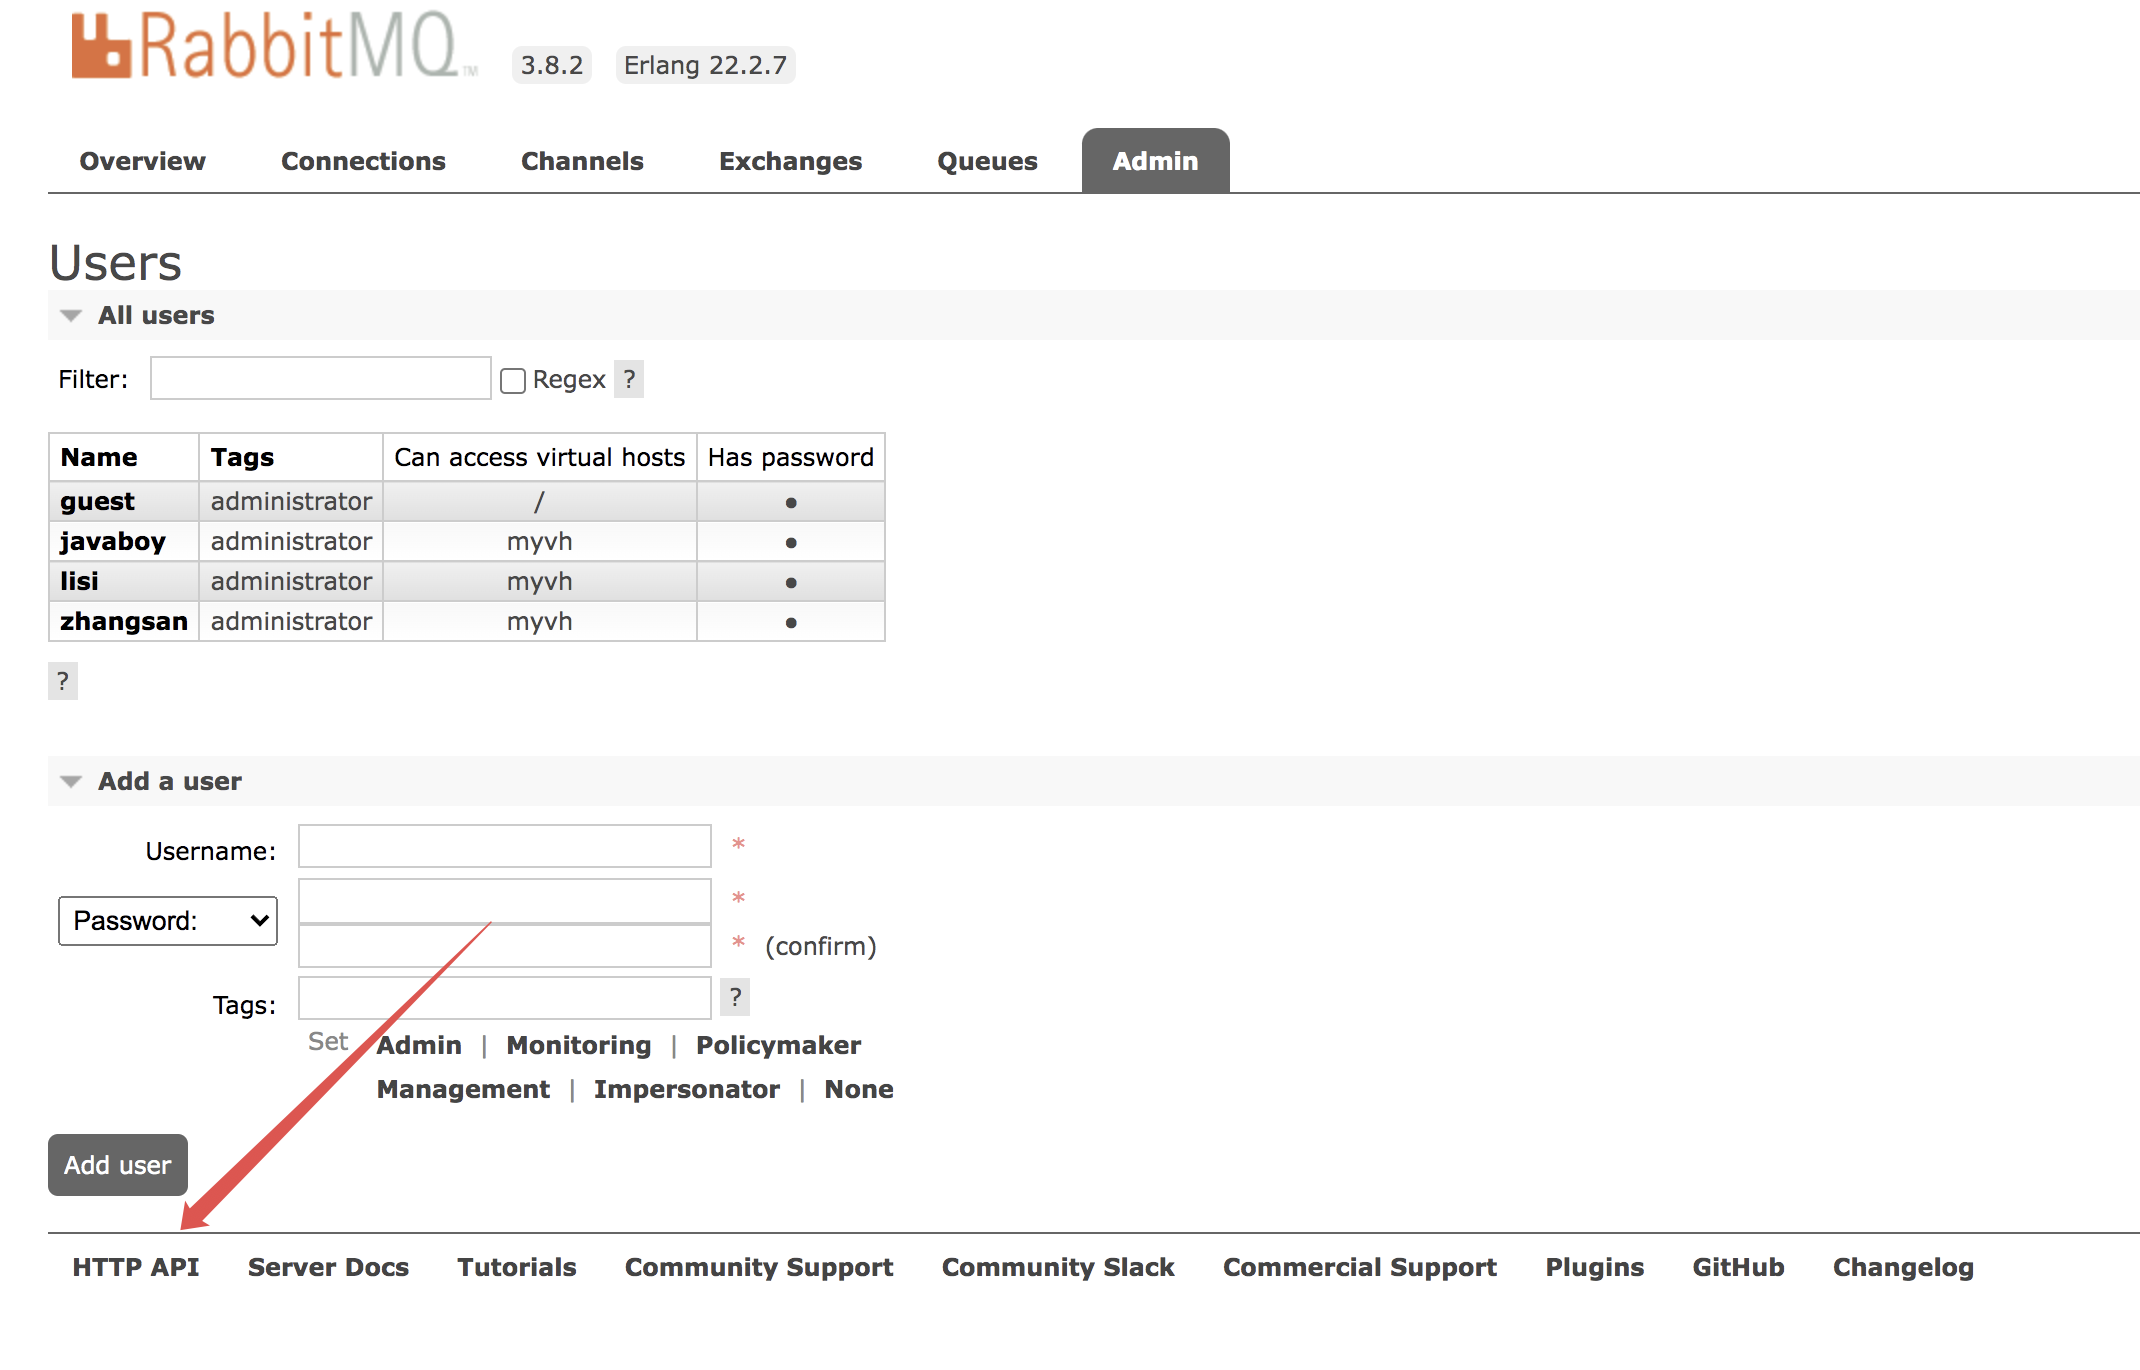
11. Common operation commands
We introduced some rest APIs earlier. It is very convenient to call these rest APIs where it is convenient to send HTTP requests. However, in some places where it is inconvenient to send HTTP requests, these rest APIs are not very convenient. Today, SongGe will introduce another way of playing RabbitMQ - rabbitmqadmin.
11.1 rabbitmqadmin
We usually open the Web management page of RabbitMQ when we do our own exercises. However, in the production environment, there is often no Web management page, so we can only manage MQ through CLI commands.
In fact, although the Web management page is friendly, it is often not as fast as the CLI. Moreover, through the operation of the CLI command line, we can make more customization, such as finding out the key information and providing it to the centralized monitoring system to trigger the alarm.
It is a bit troublesome to directly operate the CLI command line. RabbitMQ provides the CLI management tool rabbitmqadmin, which is actually a script written in Python based on the HTTP API of RabbitMQ. Because it is troublesome for the REST API to write requests manually, these scripts just simplify the operation and make it easier for us.
You need to install rabbitmqadmin first.
If we use rabbitmq:3-management image when creating RabbitMQ container, rabbitmqadmin is installed by default.
Otherwise, we may need to install rabbitmqadmin ourselves. The installation method is very simple,
First, confirm that Python is installed on your device, which is the most basic, because rabbitmqadmin is a python script.
Then open the Web management page of RabbitMQ, and enter the following address (the interface of my management page is mapped to 25672):
http://localhost:25672/cli/index.html

You can see the download link of rabbitmqadmin in the open page. Download rabbitmqadmin and give it executable permission:
chmod +x rabbitmqadmin
After downloading rabbitmqadmin, we can directly open it with Notepad, which is actually a pile of Python scripts.
This process is still very troublesome to operate, so I suggest you directly use rabbitmq:3-management image to achieve the goal in one step.
11.2 functions of rabbitmqadmin
- List exchanges, queues, bindings, vhosts, users, permissions, connections and channels.
- Create and delete exchanges, queues, bindings, vhosts, users and permissions.
- Publish and get messages, as well as message details.
- Close the connection and empty the queue.
- Import and export configuration.
Next, SongGe will introduce these functions to his partners one by one.
11.3 list various information
View all switches:
rabbitmqadmin list exchanges
View all queues:
rabbitmqadmin list queues
View all bindings:
rabbitmqadmin list bindings
View all virtual hosts:
rabbitmqadmin list vhosts
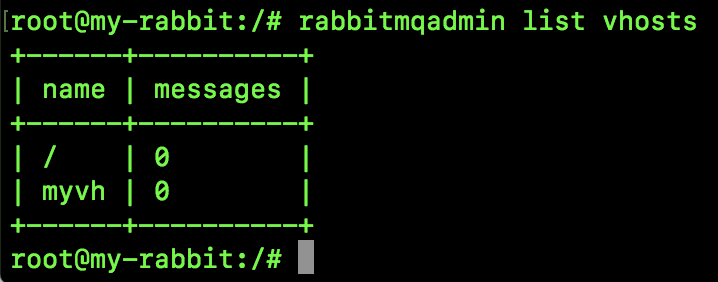
View all user information:
rabbitmqadmin list users

View all permission information:
rabbitmqadmin list permissions
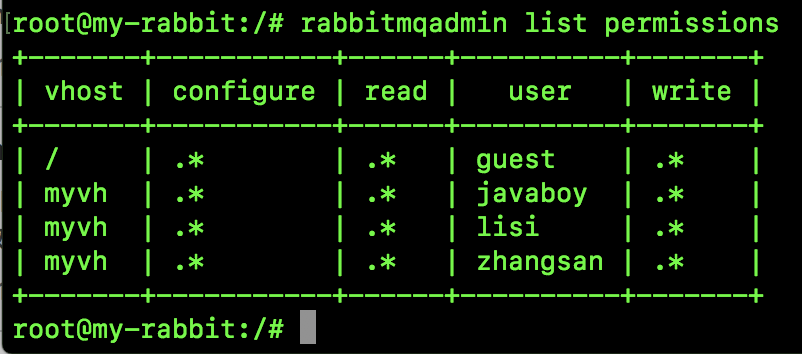
View all connection information:
rabbitmqadmin list connections
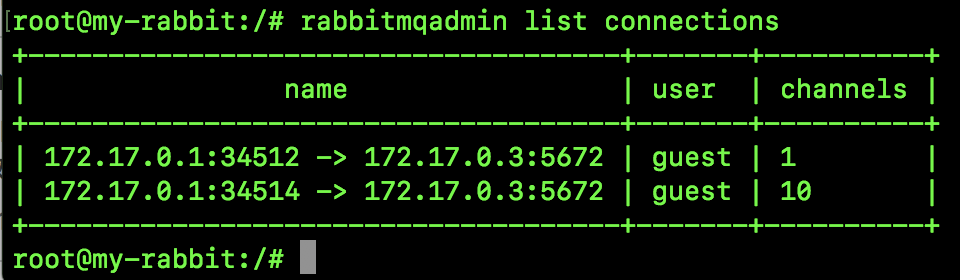
View all channel information:
rabbitmqadmin list channels
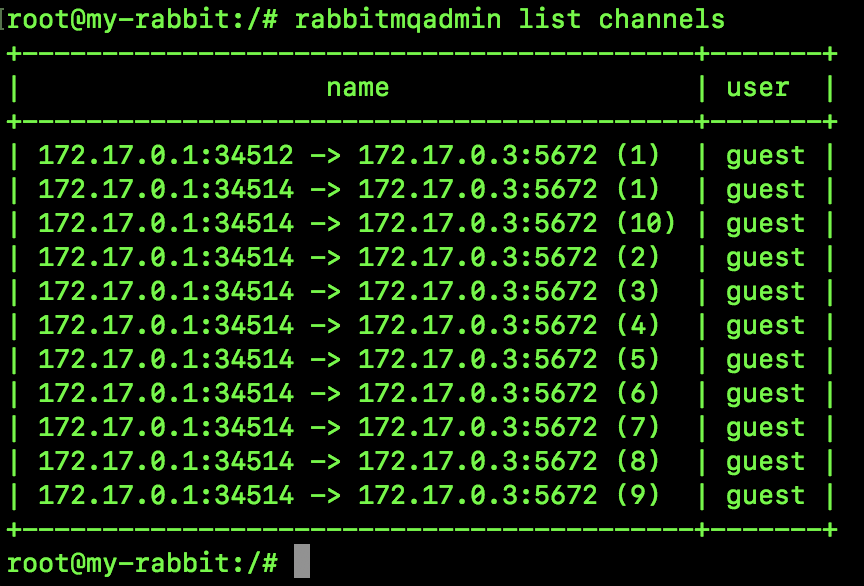
11.4 a complete example
Next, let's use rabbitmqadmin to write a complete example of messaging.
First create a switch called javaboy exchange:
rabbitmqadmin declare exchange name=javaboy-exchange durable=true auto_delete=false type=direct

All parameters here are easy to understand, so I won't say more.
Next, create a queue named javaboy queue:
rabbitmqadmin declare queue name=javaboy-queue durable=true auto_delete=false

Next, create a Binding to bind the switch to the message queue:
rabbitmqadmin declare binding source=javaboy-exchange destination=javaboy-queue routing_key=javaboy-routing

Three concepts are involved:
- Source: the source actually refers to the switch.
- Destination: the destination actually refers to the message queue.
- routing_key: This is the key of the route.
Next release a message:
rabbitmqadmin publish routing_key=javaboy-queue payload="hello javaboy"

The parameters here are very simple. There's nothing to say.
View the messages in the queue (only view, do not consume, and the messages are still after reading):
rabbitmqadmin get queue=javaboy-queue

Clear messages in a queue:
rabbitmqadmin purge queue name=javaboy-queue

11.5 list of commands
The table font is a little bit small. We can get back the rabbitmqadmin document in the background of the official account of the south of the Yangtze River and get the Excel document link.
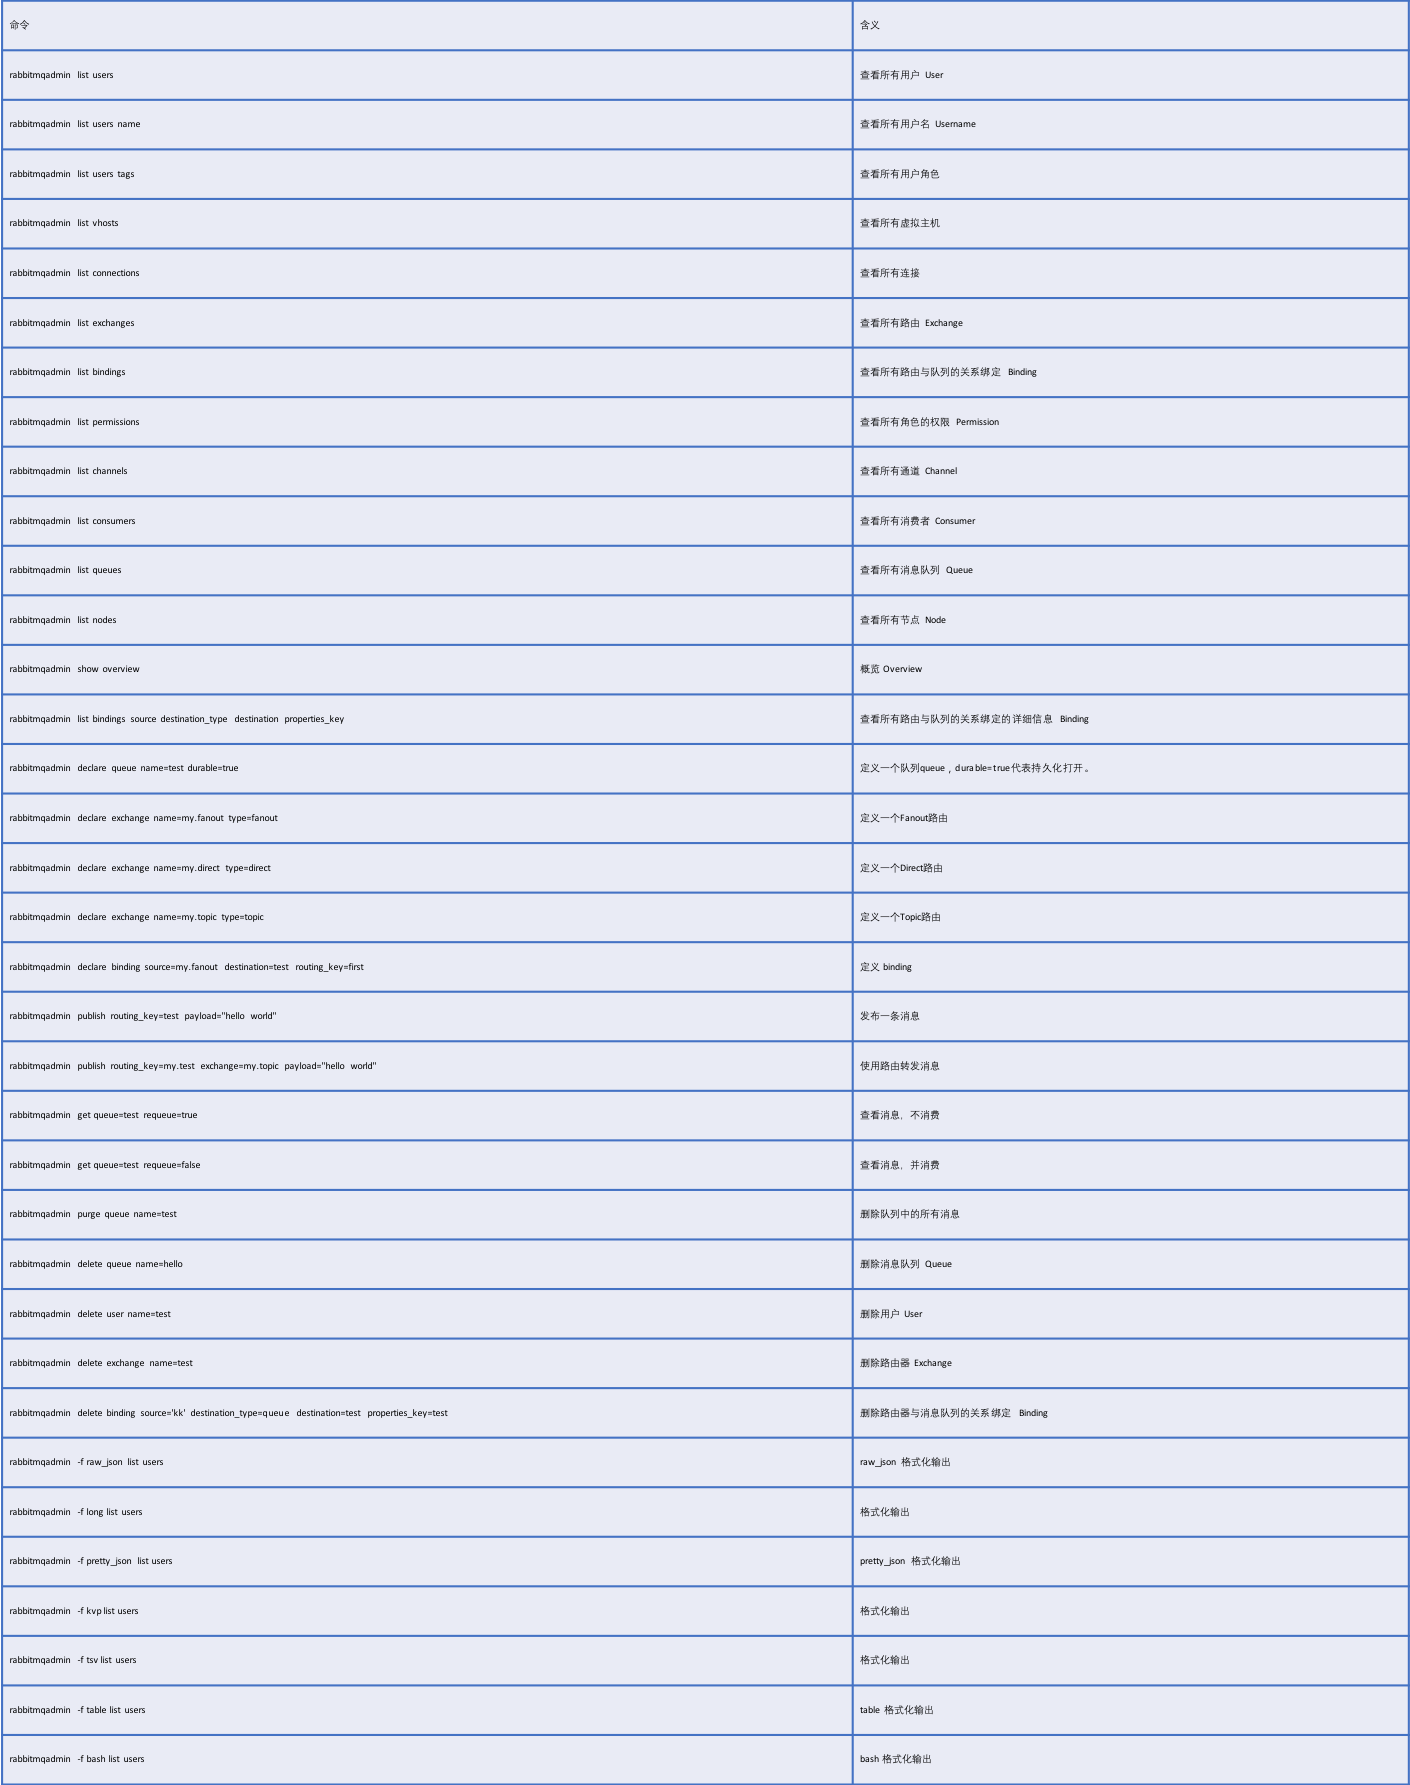
12. RabbitMQ permission system
Whether we create a user object through a web page or a command-line tool, the newly created user object cannot be used directly. We need to first place the user under a vhost, and then give it permission. With permission, the user can use it normally.
Today, let's learn about the permission system in RabbitMQ and see what this permission system looks like.
12.1 RabbitMQ permission system introduction
RabbitMQ has implemented a set of ACL style permission system since version 1.6. Some friends may not know what ACL style permission system is. You can see these two articles published by SongGe:
- How to refine permission granularity in Spring Security?
- A case demonstrates the fine-grained permission control in Spring Security!
In this ACL style permission management system, many fine-grained permission controls are allowed, and different users can set read, write, configuration and other permissions respectively.
Three different permissions are involved:
- Read: all operations related to message consumption, including clearing messages in the whole queue.
- Write: post a message.
- Configuration: creation and deletion of message queues, switches, etc.
This is a brief introduction to the RabbitMQ permission system.
12.2 correspondence between operation and permission
Next, the following figure shows the corresponding relationship between operation and permission:
Official account back to rabbitmq_permission can get the Excel table of this figure.
What commands to execute and what permissions are required are clearly described in this figure.
12.3 authority operation command
The format of permission operation command in RabbitMQ is as follows:
rabbitmqctl set_permissions [-p vhosts] {user} {conf} {write} {read}
Here are several parameters:
- [- p vhost]: the name of the vhost that grants access to the user. If it is not written, the default is /.
- User: user name.
- conf: on which resources the user has configurable permissions (regular expressions are supported).
- Write: on which resources the user has write permission (regular expressions are supported).
- Read: on which resources the user has read permission (regular expressions are supported).
As for what configurable permissions can do, what write permissions can do, and what read permissions can do, you can refer to the second section, which will not be repeated here.
Let's give a simple example.
Suppose we have a user named zhangsan. We want the user to have all permissions under the myvh virtual host. Our operation commands are as follows:
rabbitmqctl set_permissions -p myvh zhangsan ".*" ".*" ".*"
The results are as follows:

Next, execute the following command to verify whether the authorization is successful:
rabbitmqctl -p myvh list_permissions
It can be seen that Zhang San's authority has been assigned in place.
In the above authorization commands, we all use ". *". Brother song will add this wildcard:
- ". *": This indicates that all switches and queues are matched.
- "Javaboy -. *": This represents switches and queues with matching names starting with javaboy -.
- "": This indicates that there is no match between any queue and the switch (you can use this if you want to revoke the user's permission).
We can use the following commands to remove the permissions of a user on a vhost, such as removing all permissions of zhangsan on myvh, as follows:
rabbitmqctl clear_permissions -p myvh zhangsan
After execution, we can use rabbitmqctl - P myvh list_ Use the permissions command to check whether the execution result is effective. The final execution effect is as follows:
If a user has corresponding permissions on multiple vhosts, follow the rabbitmqctl - P myvh list above_ The permissions command can only view the permissions on one vhost. At this time, we can view the permissions of lisi on all vhosts through the following command:
rabbitmqctl list_user_permissions lisi
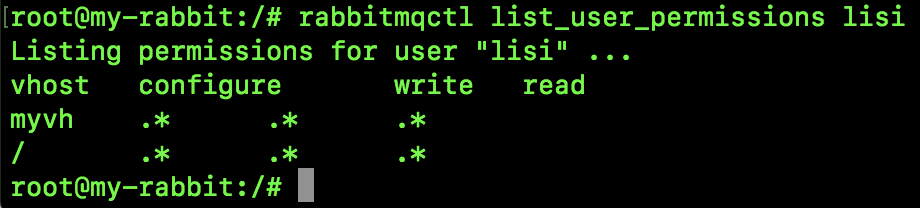
12.4 Web management page operation
Of course, if you don't want to knock the command, you can also operate the permission through the Web management end.
On the Admin tab, click the user name to set permissions for the user, as follows:
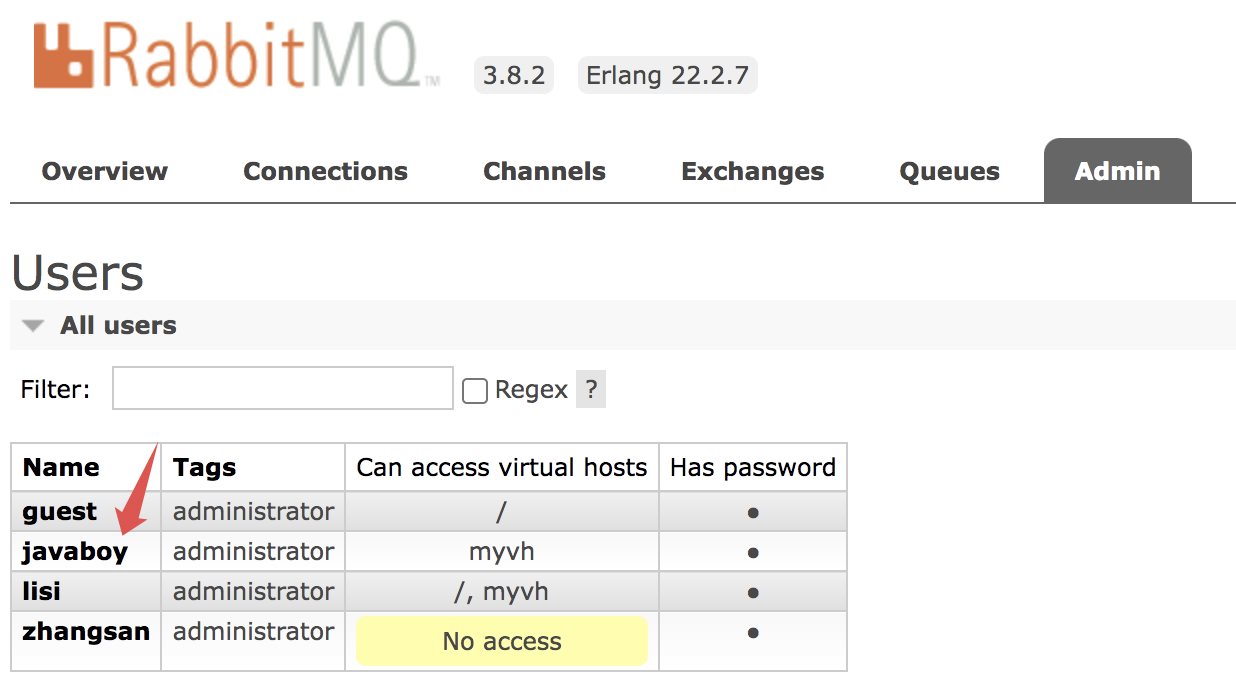
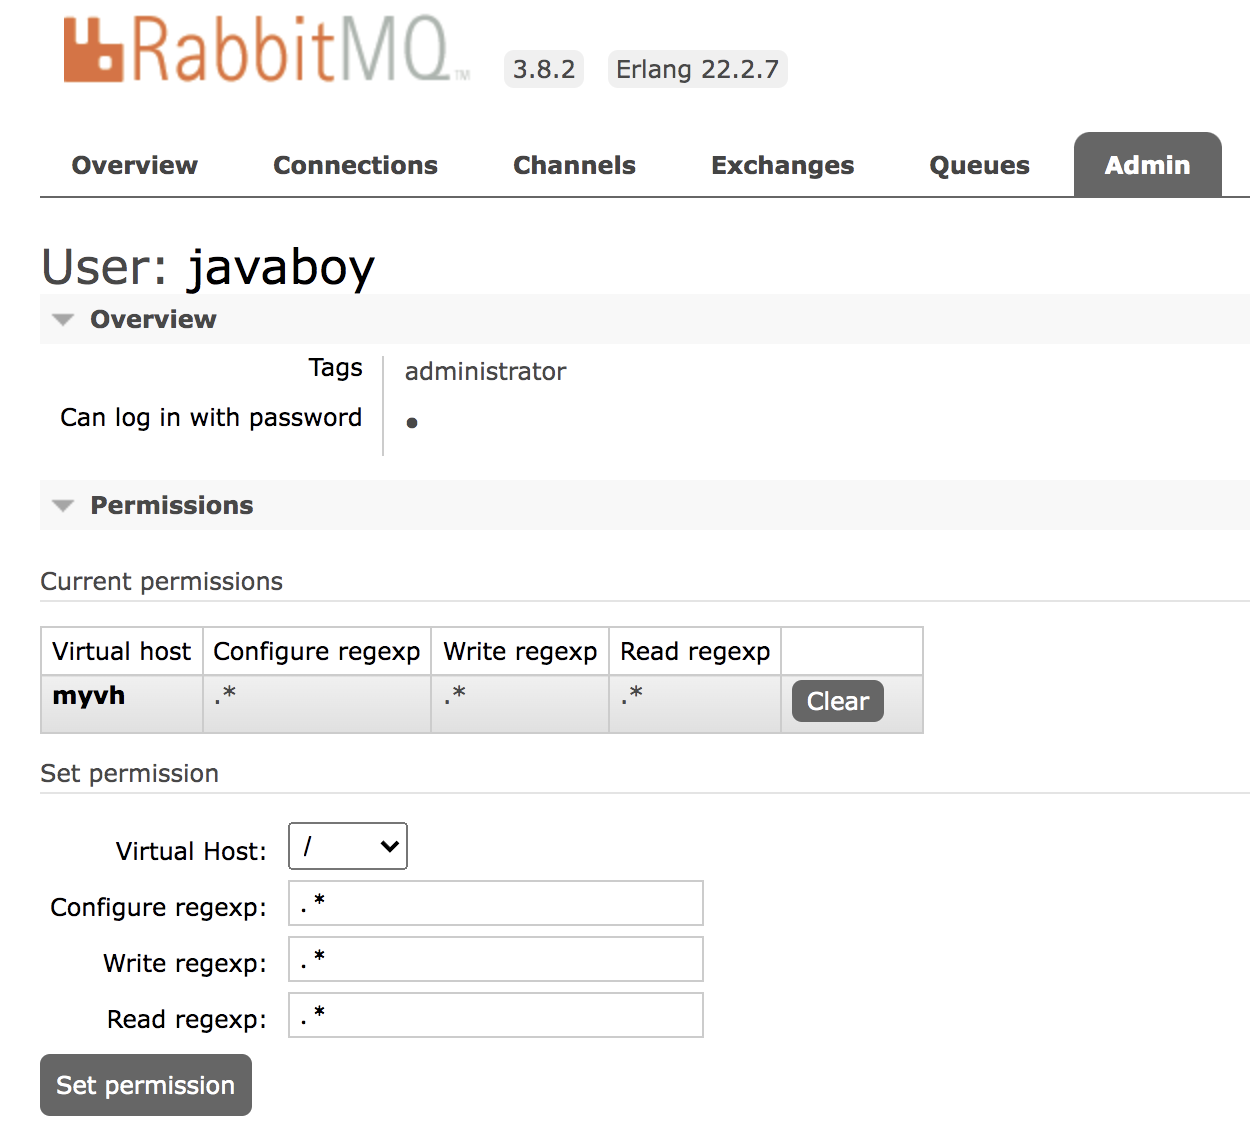
Permissions can be set or cleared.
Of course, there is also a Topic Permissions on the web page, which is rabbit mq3 A new function started in 7 can set permissions for a topic exchange, mainly for the STOMP or MQTT protocol. We rarely use this configuration in our daily Java development. If the user does not set it, the corresponding topic exchange always has permission.
13. RabbitMQ cluster construction
A single RabbitMQ certainly cannot achieve high availability. If you want high availability, you have to go to the cluster.
Today, brother song will talk to you about the construction of RabbitMQ cluster.
13.1 two modes
When it comes to clusters, my friends, the first question may be: if I have a RabbitMQ cluster, do I save a copy of each instance in my message cluster?
This actually involves two modes of RabbitMQ cluster:
- Ordinary cluster
- Mirror cluster
13.1.1 general cluster
The common cluster mode is to deploy RabbitMQ to multiple servers. Each server starts a RabbitMQ instance, and multiple instances communicate with each other.
At this time, the metadata of the Queue created by us (mainly some configuration information of the Queue) will be synchronized in all RabbitMQ instances, but the messages in the Queue will only exist in one RabbitMQ instance and will not be synchronized to other queues.
When we consume a message, if we connect to another instance, that instance will locate the location of the Queue through metadata, then access the instance where the Queue is located, pull the data and send it to the consumer.
This cluster can improve the message throughput of RabbitMQ, but it cannot guarantee high availability, because once a RabbitMQ instance hangs, the message cannot be accessed. If the message queue is persisted, it can continue to be accessed after the RabbitMQ instance is restored; If the message queue is not persisted, the message is lost.
The general flow chart is shown in the figure below:
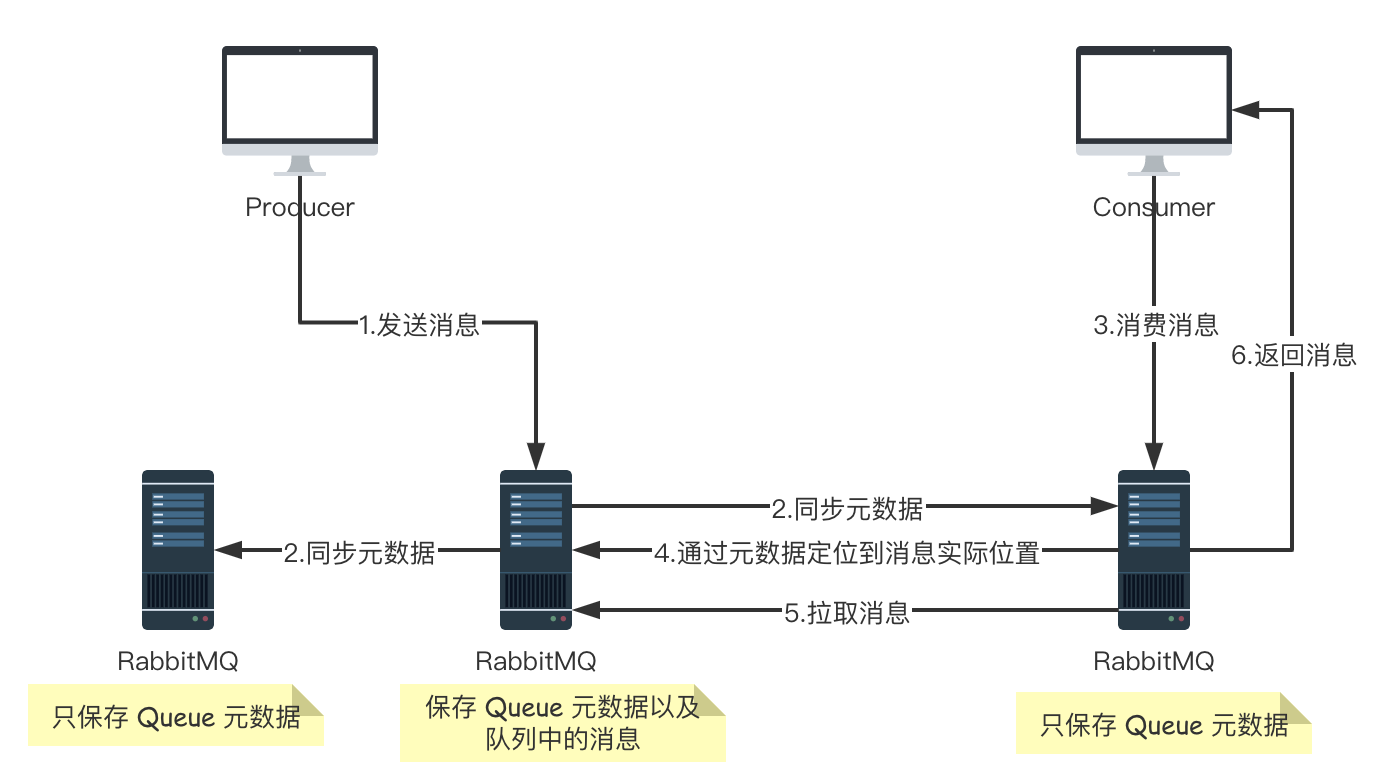
13.1.2 mirror cluster
The biggest difference between it and an ordinary cluster is that the Queue data and the original data are no longer stored separately on one machine, but on multiple machines at the same time. That is, each RabbitMQ instance has a copy of image data (copy data). Each time a message is written, the data will be automatically synchronized to multiple instances. In this way, once one of the machines fails, the other machines have a copy of data that can continue to provide services, which realizes high availability.
The general flow chart is shown in the figure below:
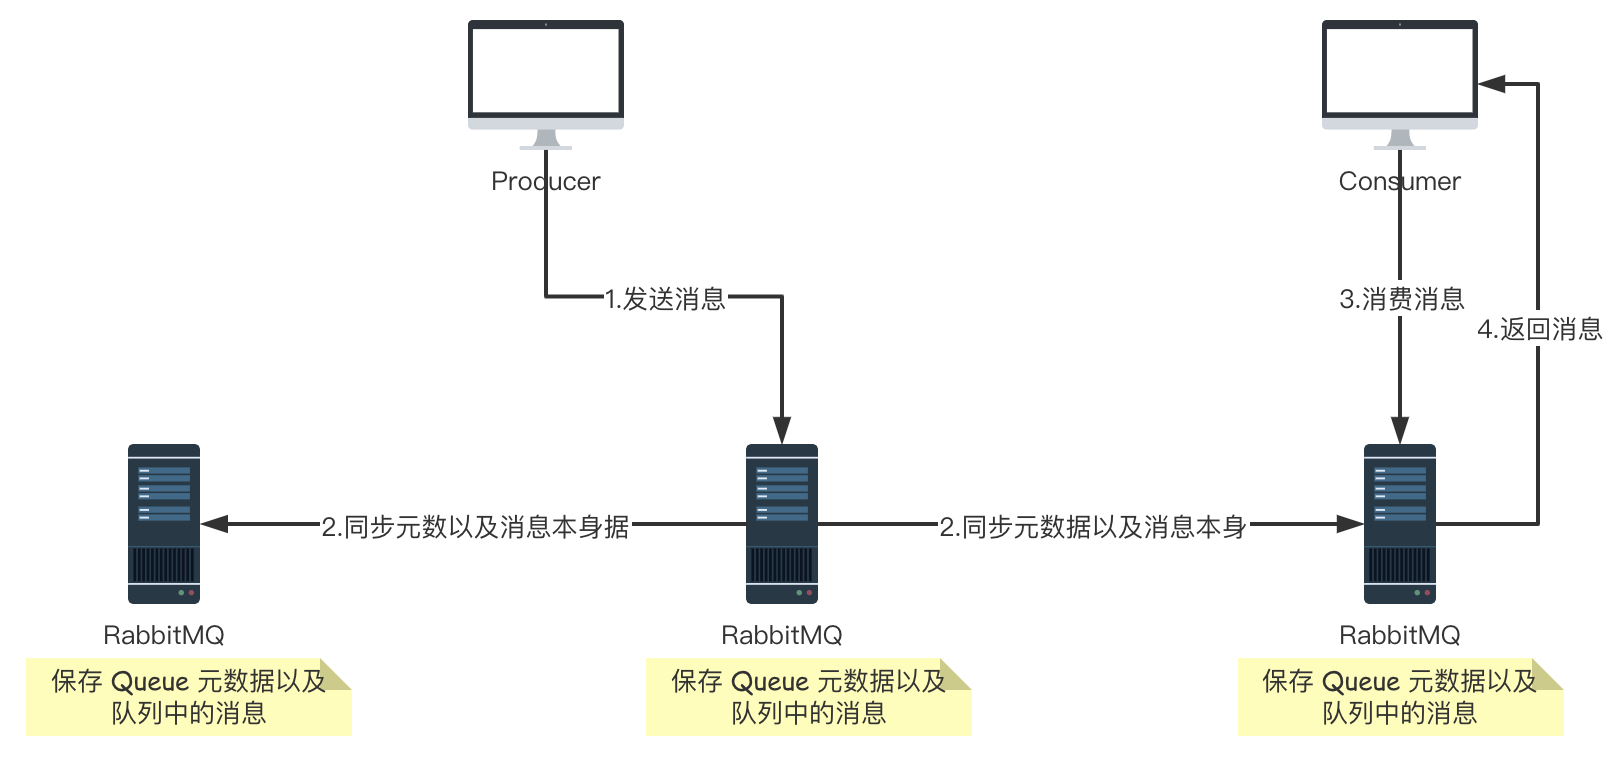
13.1.3 node type
There are two types of nodes in RabbitMQ:
- RAM node: the memory node stores all metadata definitions of queues, switches, bindings, users, permissions and vhost in memory. The advantage is that it can make operations such as switches and queue declarations faster.
- Disk node: stores metadata on the disk. The single node system only allows nodes of disk type to prevent the loss of system configuration information when RabbitMQ is restarted
RabbitMQ requires at least one disk node in the cluster, and all other nodes can be memory nodes. When a node joins or leaves the cluster, it must notify at least one disk node of the change. If the only disk node in the cluster crashes, the cluster can still run, but other operations (addition, deletion, modification and query) cannot be performed until the node recovers. In order to ensure the reliability of cluster information, or when it is uncertain whether to use disk nodes or memory nodes, it is recommended to use disk nodes directly.
13.2 building common clusters
13.2.1 preliminary knowledge
After understanding the general structure, let's build the cluster. Start with ordinary clusters, and we will use docker to build them.
Before construction, there are two preliminary knowledge to be understood:
- When building a cluster, the Erlang Cookie value in the node should be consistent. By default, the file is / var / lib / RabbitMQ / erlang. Cookie. When we create a RabbitMQ container with docker, we can set the corresponding cookie value for it.
- RabbitMQ connects services through host names. It must be ensured that all host names can be pinged. You can manually add the host name and IP correspondence by editing / etc/hosts. If the host name ping fails, the RabbitMQ service will fail to start (if we are building a RabbitMQ cluster on different servers, we need to pay attention to this. In the following 2.2 summary, we will access containers through the Docker container connection link, which is slightly different).
13.2.2 start construction
Create three RabbitMQ containers by executing the following command:
docker run -d --hostname rabbit01 --name mq01 -p 5671:5672 -p 15671:15672 -e RABBITMQ_ERLANG_COOKIE="javaboy_rabbitmq_cookie" rabbitmq:3-management
docker run -d --hostname rabbit02 --name mq02 --link mq01:mylink01 -p 5672:5672 -p 15672:15672 -e RABBITMQ_ERLANG_COOKIE="javaboy_rabbitmq_cookie" rabbitmq:3-management
docker run -d --hostname rabbit03 --name mq03 --link mq01:mylink02 --link mq02:mylink03 -p 5673:5672 -p 15673:15672 -e RABBITMQ_ERLANG_COOKIE="javaboy_rabbitmq_cookie" rabbitmq:3-management
The operation results are as follows:

The three node is now ready to start. Note that in mq02 and mq03, --link parameters are used to implement container connection. If you do not understand this parameter, you can reply to docker in the background of the official account of the south of the Yangtze River. The introduction to docker is written by brother song. I won't be wordy here. In addition, it should be noted that both mq01 and mq02 can be connected in the mq03 container.
Next, go to the mq02 container. First, check the hosts file. You can see that the container connection we configured has taken effect:
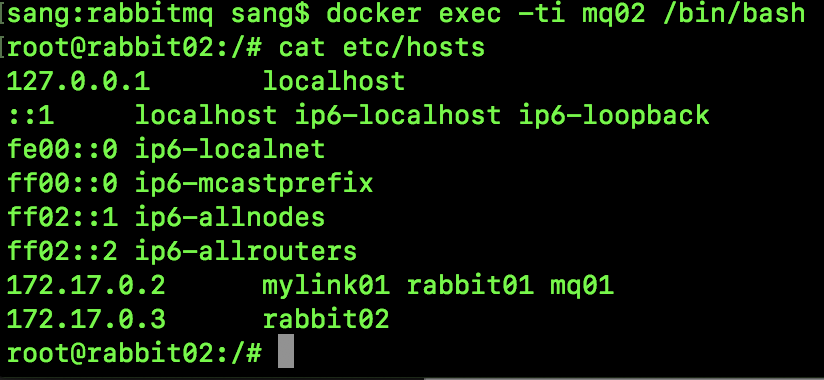
In the future, in the mq02 container, you can access the mq01 container through mylink01 or rabbit01.
Next, let's start the cluster configuration.
Execute the following commands to add the mq02 container to the cluster:
rabbitmqctl stop_app
rabbitmqctl join_cluster rabbit@rabbit01
rabbitmqctl start_app
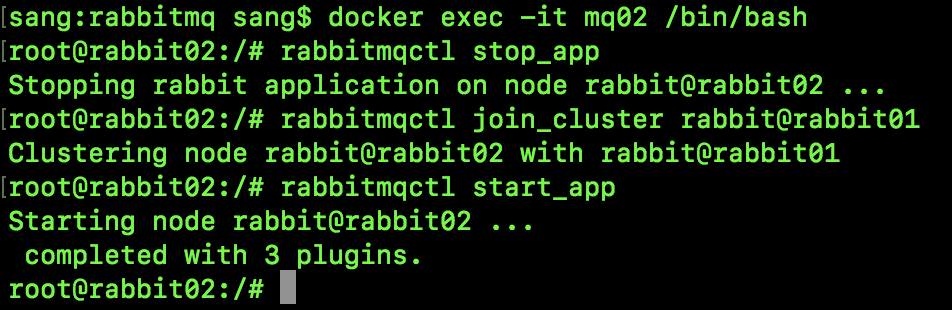
Next, enter the following command to view the status of the cluster:
rabbitmqctl cluster_status
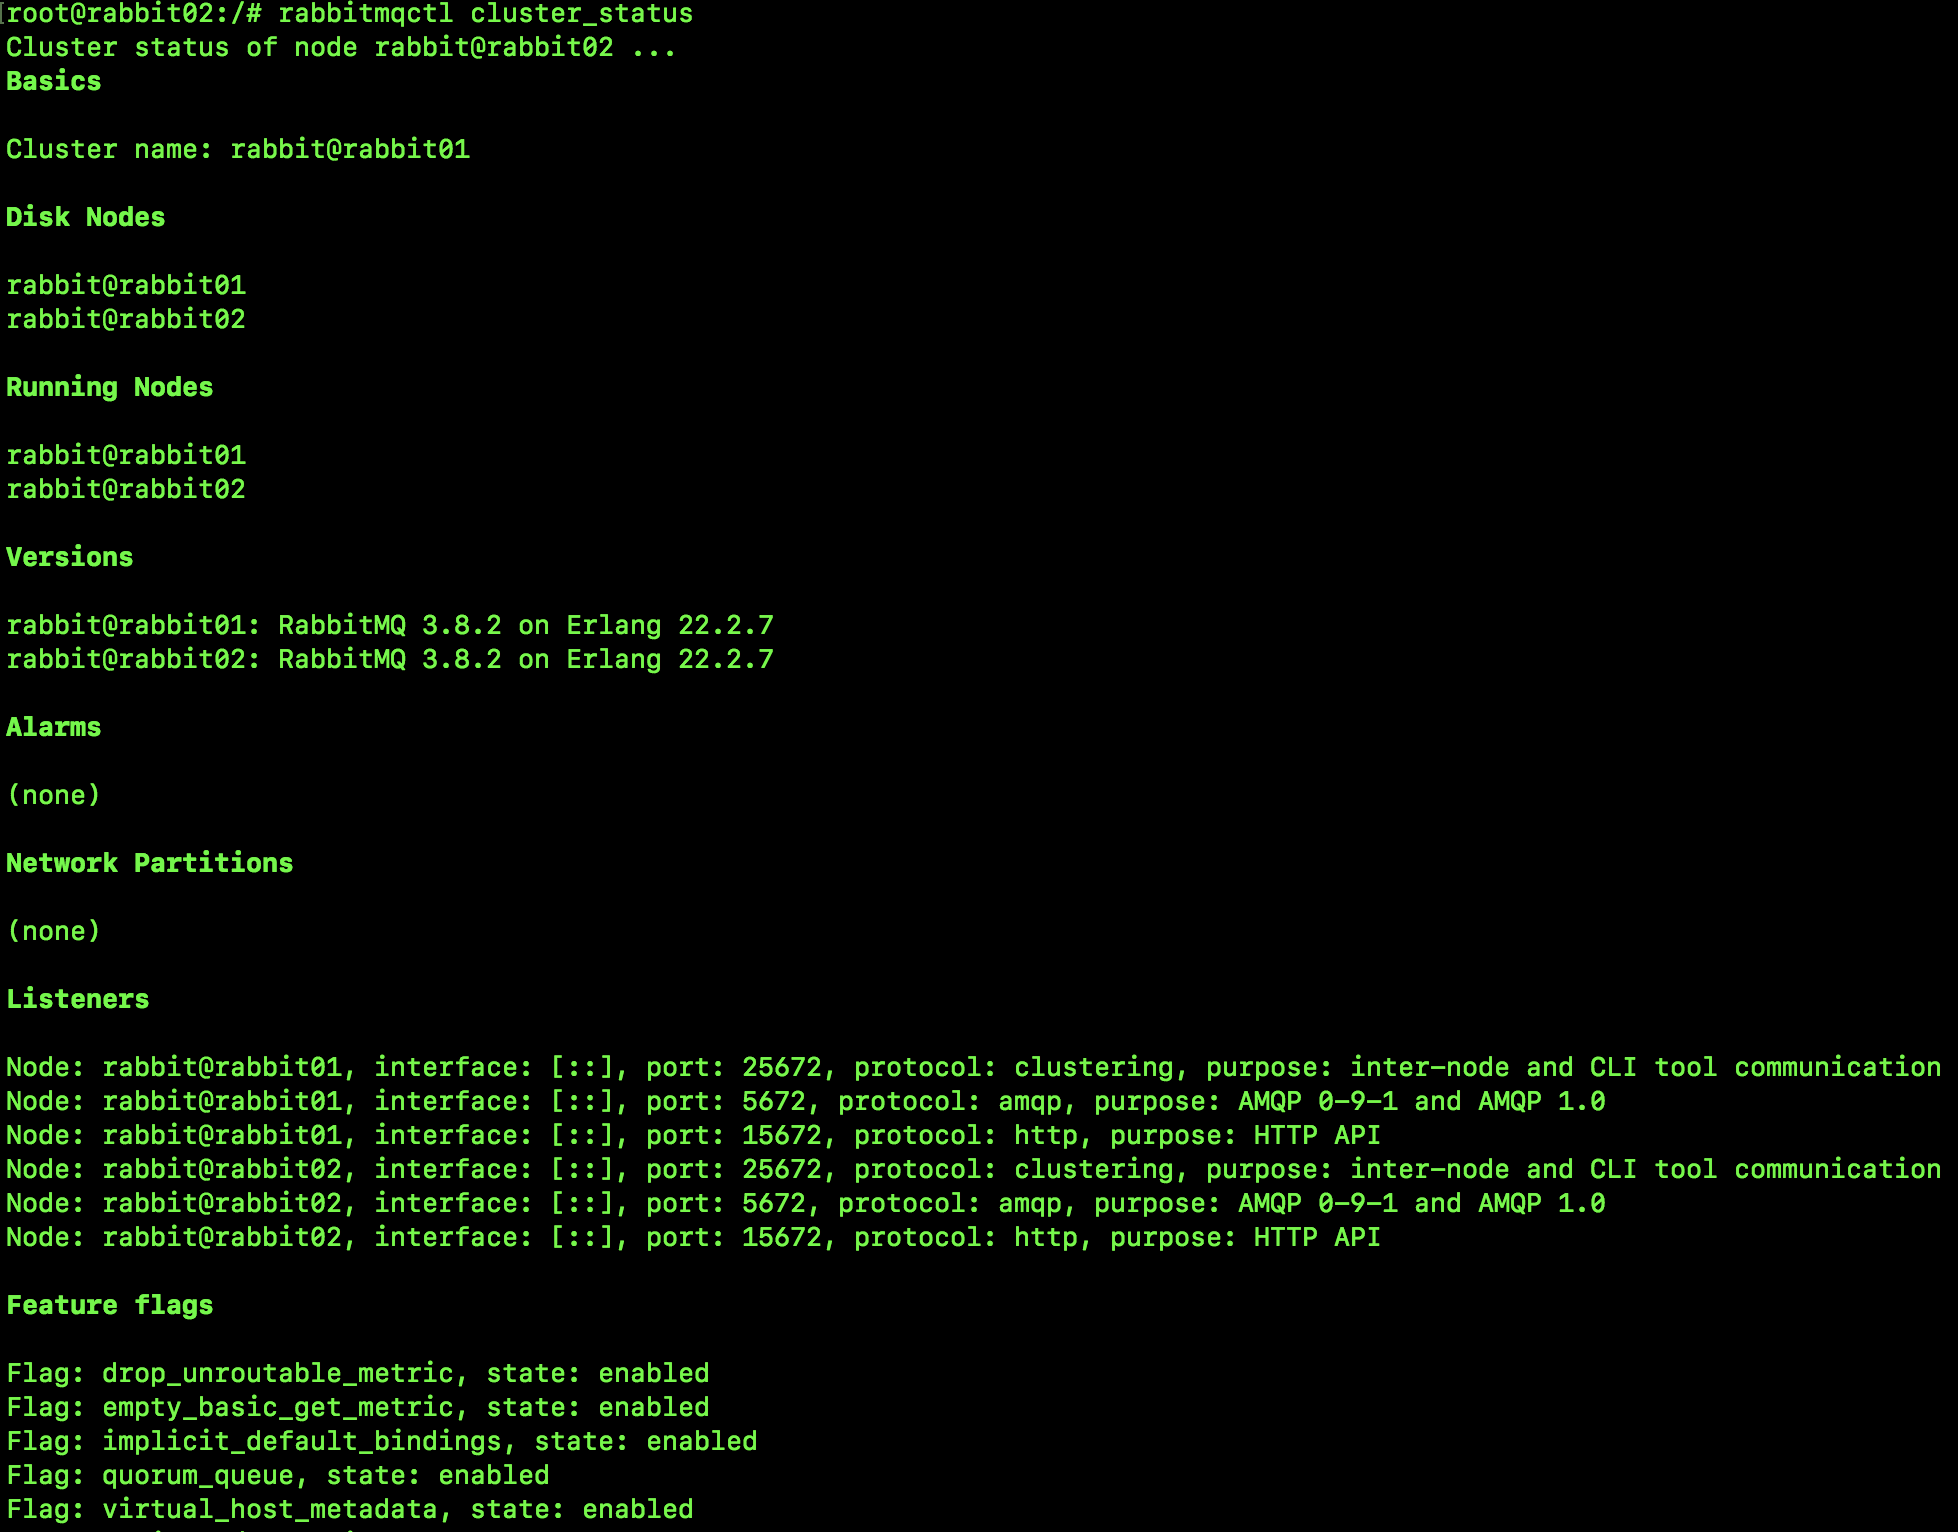
You can see that there are already two nodes in the cluster.
Next, add mq03 to the cluster in the same way:
rabbitmqctl stop_app
rabbitmqctl join_cluster rabbit@rabbit01
rabbitmqctl start_app
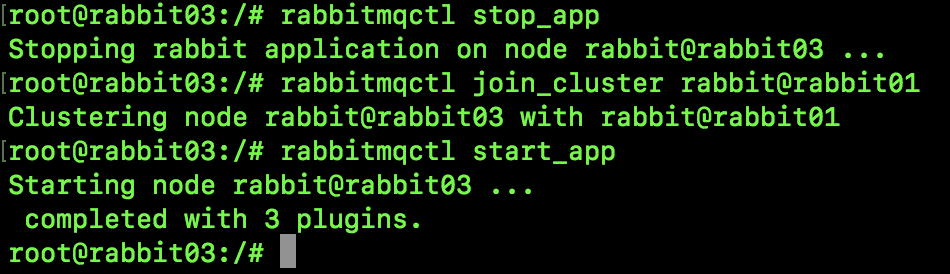
Next, we can view the cluster information:
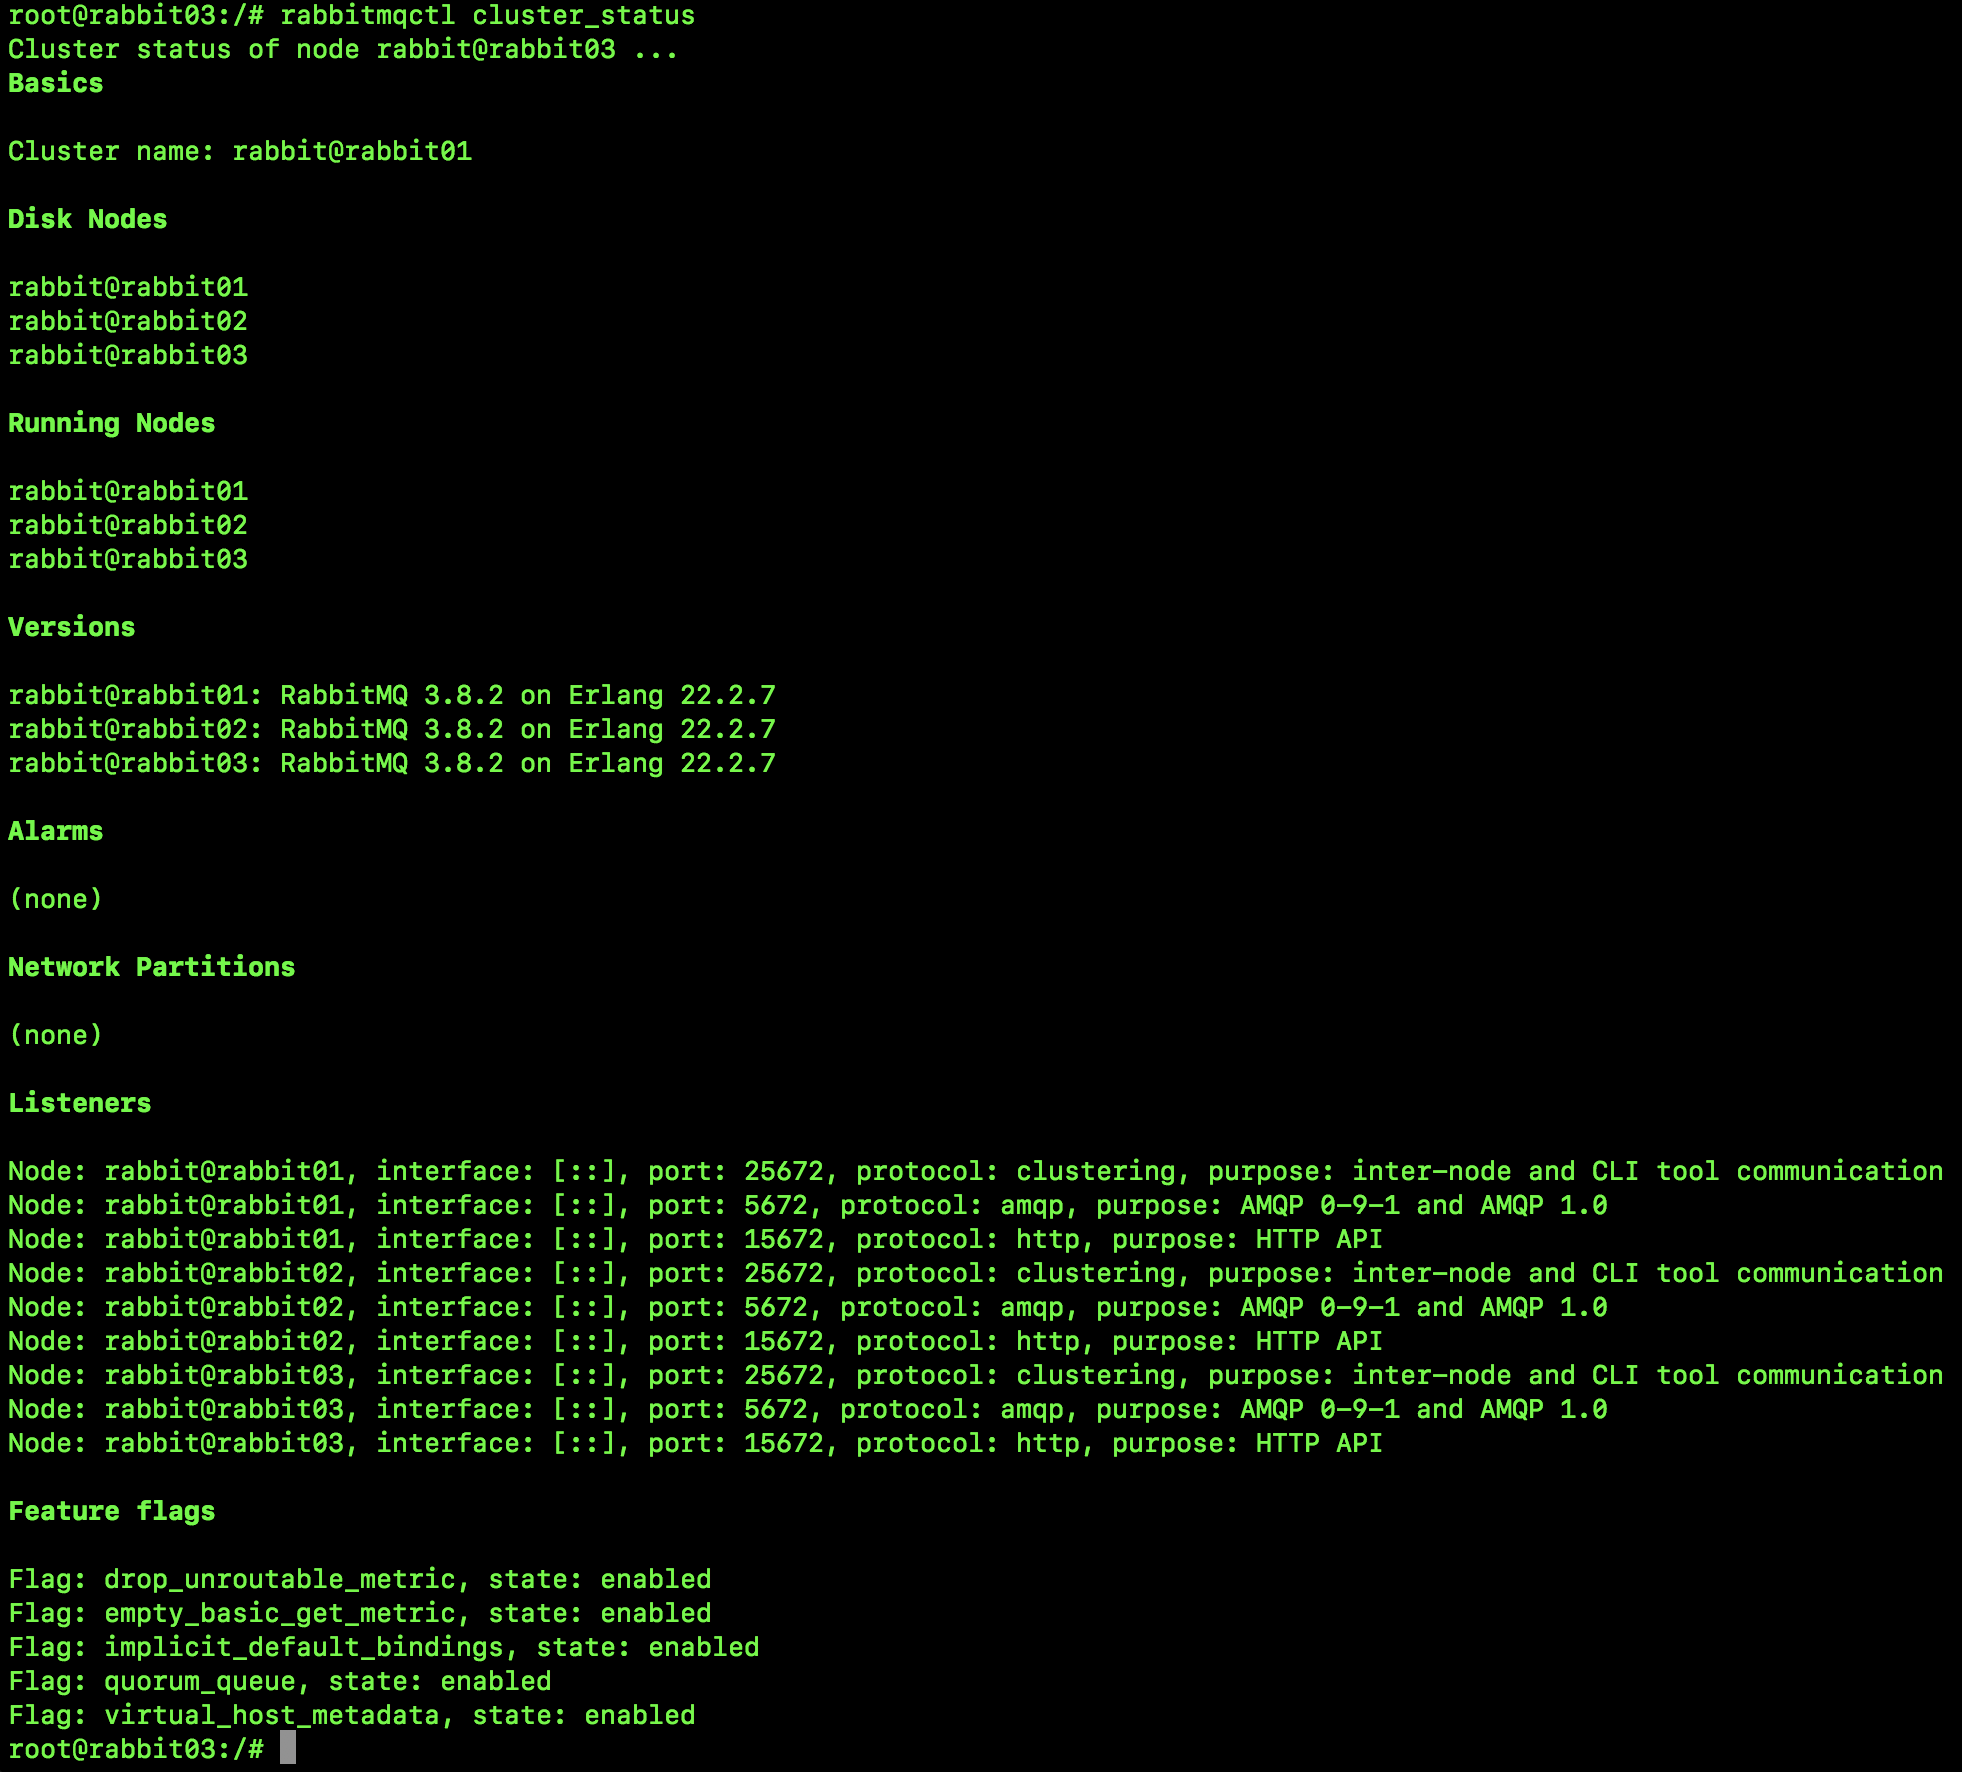
You can see that there are already three nodes in the cluster.
In fact, at this time, we can also view the cluster information through the Web page. On the Web side home page of the three RabbitMQ instances, we can see the following contents:
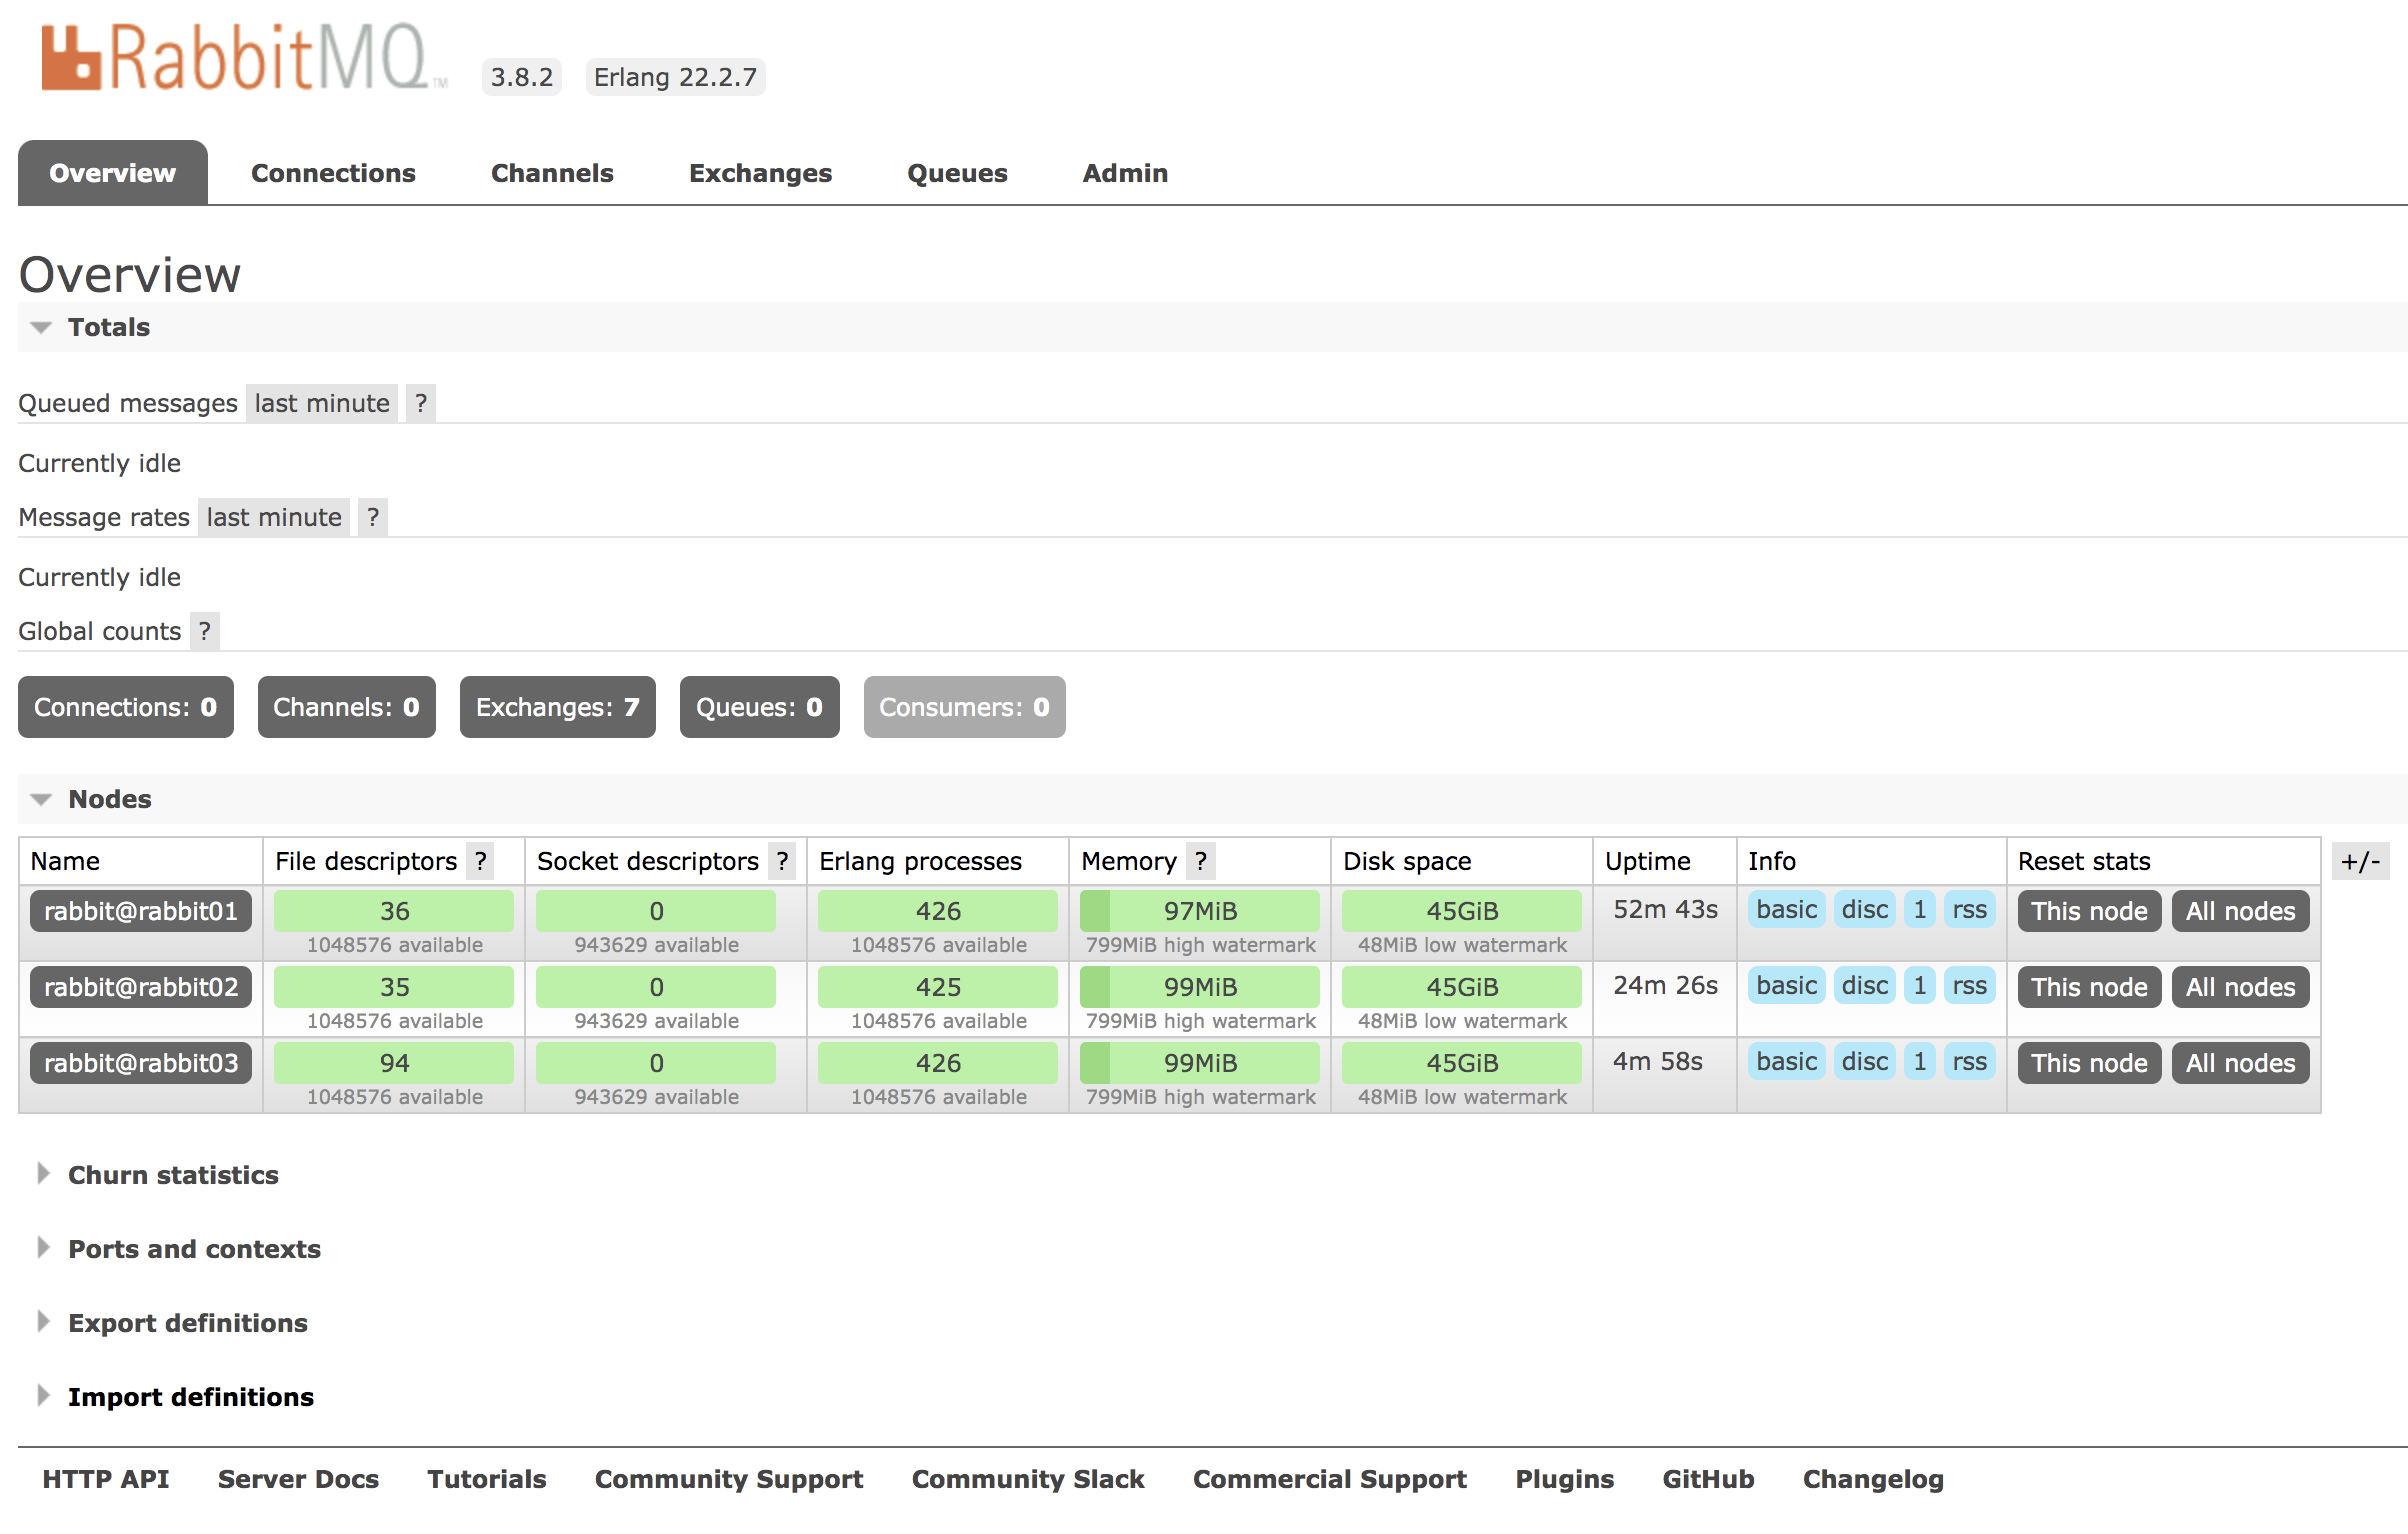
13.2.3 code test
Next, let's simply test the cluster.
Let's create one called MQ_ cluster_ The parent project of the demo, and then create two child projects in it.
The first sub project, named provider, is a message producer. Web and RabbitMQ dependencies are introduced during creation, as follows:
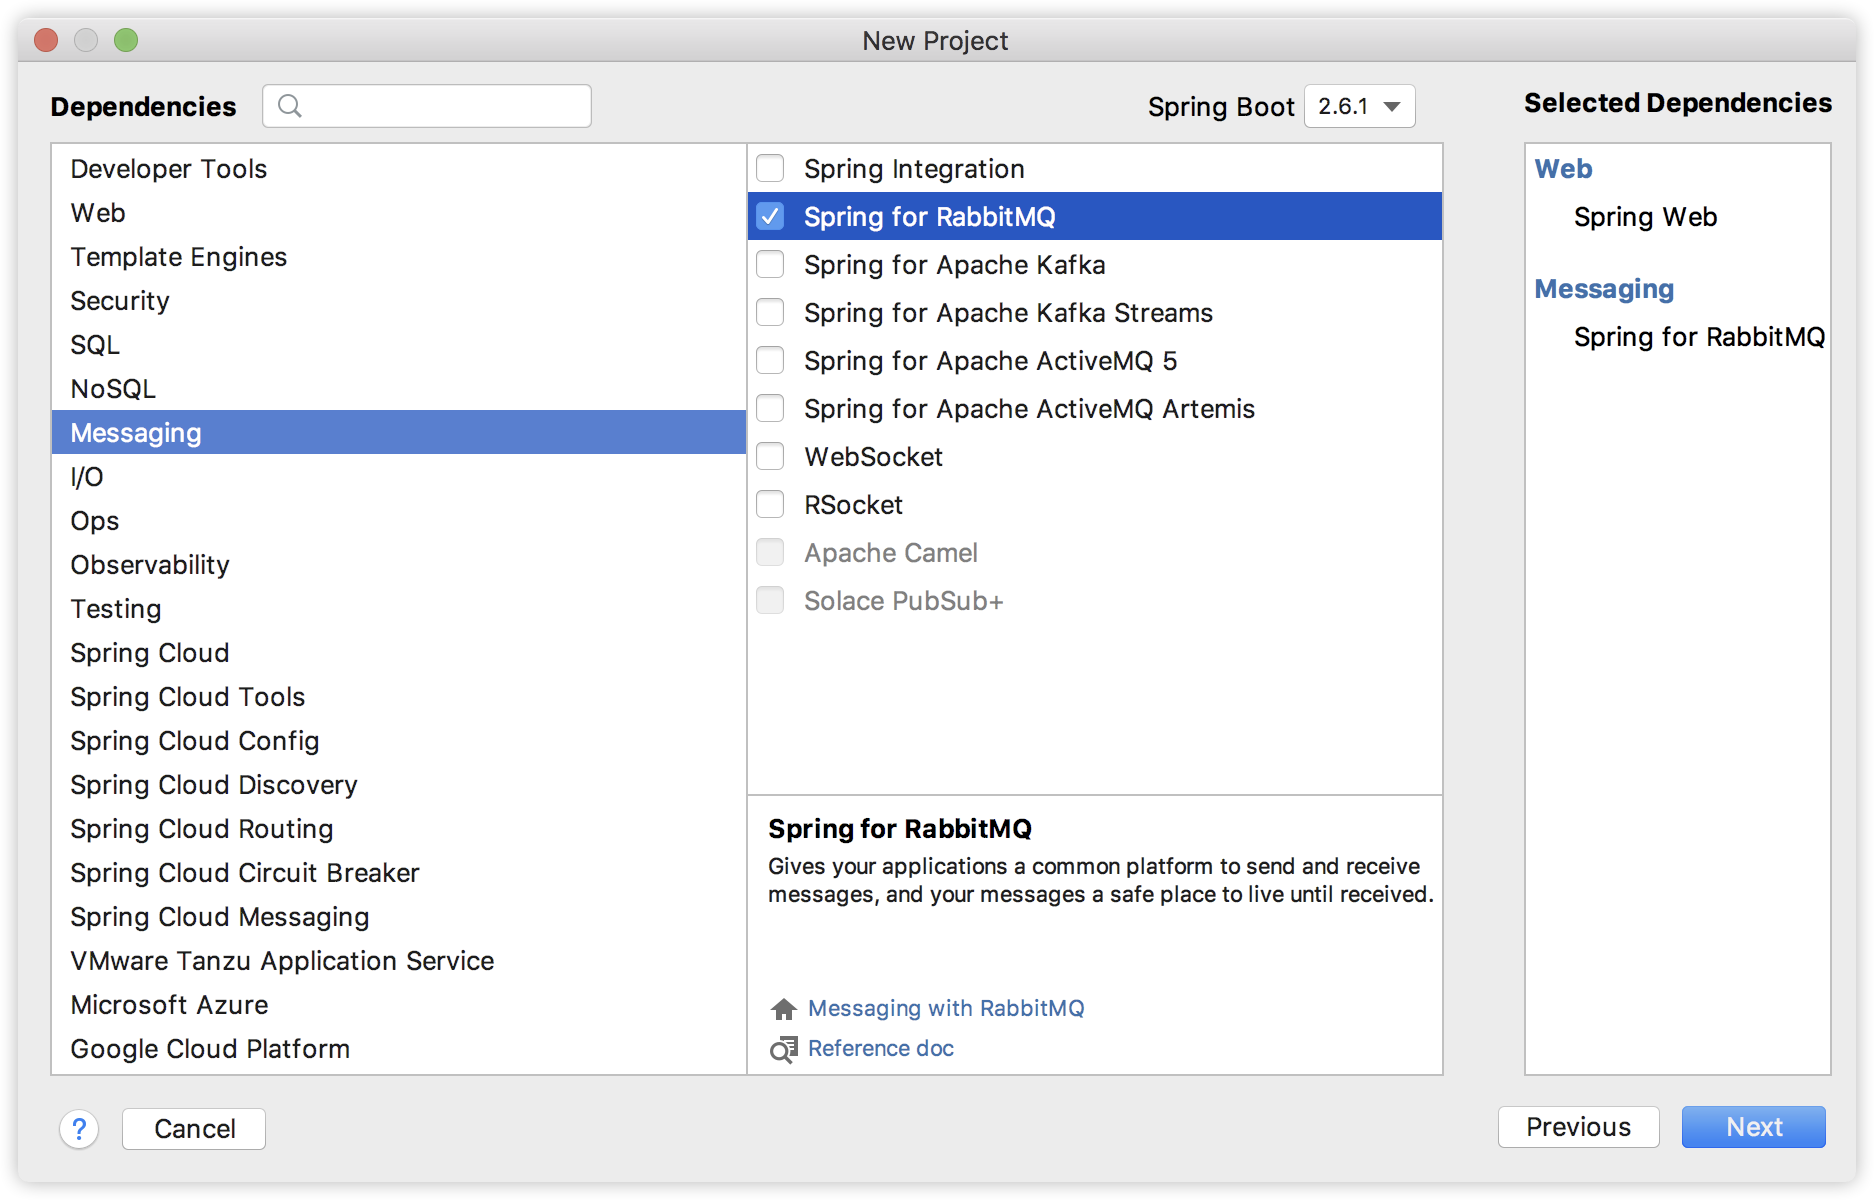
Then configure applicaiton Properties, as follows (note the cluster configuration):
spring.rabbitmq.addresses=localhost:5671,localhost:5672,localhost:5673
spring.rabbitmq.username=guest
spring.rabbitmq.password=guest
Next, a simple queue is provided as follows:
@Configuration
public class RabbitConfig {
    public static final String MY_QUEUE_NAME = "my_queue_name";
    public static final String MY_EXCHANGE_NAME = "my_exchange_name";
    public static final String MY_ROUTING_KEY = "my_queue_name";

    @Bean
    Queue queue() {
        return new Queue(MY_QUEUE_NAME, true, false, false);
    }

    @Bean
    DirectExchange directExchange() {
        return new DirectExchange(MY_EXCHANGE_NAME, true, false);
    }

    @Bean
    Binding binding() {
        return BindingBuilder.bind(queue())
                .to(directExchange())
                .with(MY_ROUTING_KEY);
    }
}
There's nothing to say about this. It's all basic content. Next, we'll test the message sending in the unit test:
@SpringBootTest
class ProviderApplicationTests {

    @Autowired
    RabbitTemplate rabbitTemplate;

    @Test
    void contextLoads() {
        rabbitTemplate.convertAndSend(null, RabbitConfig.MY_QUEUE_NAME, "hello A little rain in Jiangnan");
    }

}
After this message is successfully sent, we will see that a message will be displayed on all three RabbitMQ instances on the Web management side of RabbitMQ, but in fact, the message itself only exists in one RabbitMQ instance.
As like as two peas, we will create another message consumer, which is identical to the message consumer and the configuration and the message producer. I will not repeat the message consumer.
@Component
public class MsgReceiver {

    @RabbitListener(queues = RabbitConfig.MY_QUEUE_NAME)
    public void handleMsg(String msg) {
        System.out.println("msg = " + msg);
    }
}
After the message consumer is started successfully, only one message is received in this method, which further verifies that the RabbitMQ cluster we built is no problem.
13.2.4 reverse test
Next, SongGe gives two counterexamples to prove that the message is not synchronized to other RabbitMQ instances.
Ensure that the three RabbitMQ instances are in the startup state, close the Consumer, and then send a message through the provider. After the message is sent successfully, close the mq01 instance, and then start the Consumer instance. At this time, the Consumer instance will not consume the message, but will report an error that the mq01 instance cannot be connected. This example can show that the message is on mq01, It is not synchronized to the other two MQ. On the contrary, if we close the mq02 instance instead of closing the mq01 instance after the provider successfully sends the message, you will find that the consumption of the message is not affected.
13.3 setting up a mirror cluster
The so-called mirror cluster mode does not need to be built additionally. We only need to configure the queue as a mirror queue.
This configuration can be configured through the web page or the command line. Let's look at it separately.
13.3.1 configuring the image queue for web pages
Let's first look at how to configure the image queue on the web page.
Click the Admin tab, then click Policies on the right, and then click Add/update a policy, as shown below:
Next, add a policy, as shown in the following figure:
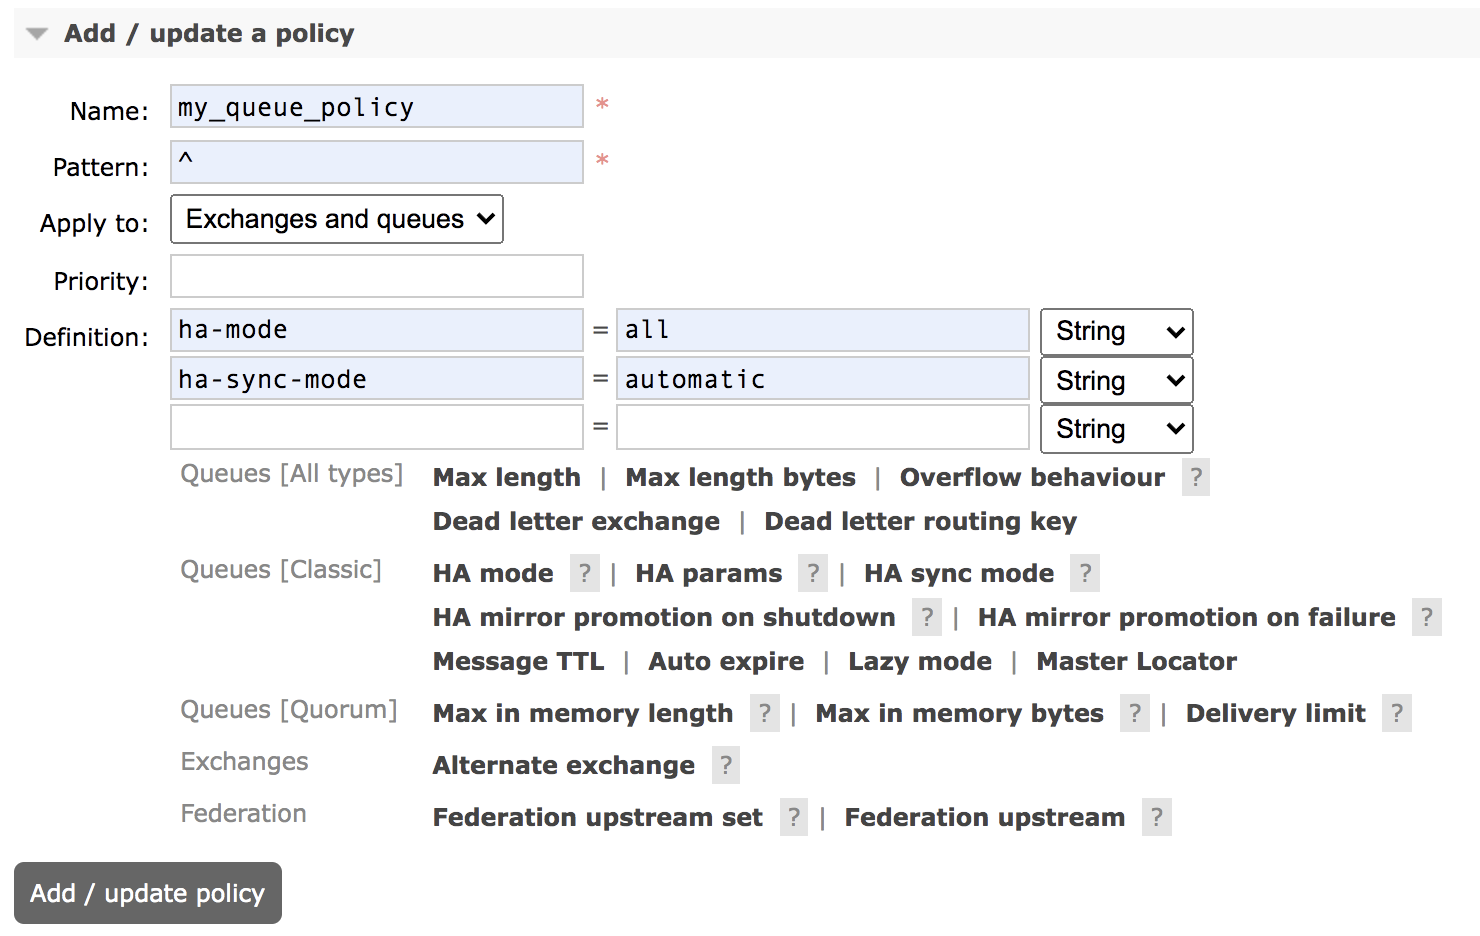
The meaning of each parameter is as follows:
- Name: the name of the policy.
- Pattern: the matching pattern (regular expression) of the queue.
- Definition: image definition. It mainly has three parameters: Ha mode, ha params and ha sync mode.
- Ha mode: indicates the mode of the image queue. Valid values are all, exactly, and nodes. Where all means to mirror on all nodes in the cluster (this is the default); Exactly means to mirror on a specified number of nodes, and the number of nodes is specified by HA params; Nodes means to mirror on the specified node, and the node name is specified through ha params.
- Ha params: parameters required for HA mode mode.
- Ha sync mode: the synchronization method of messages in the queue. The valid values are automatic and manual.
- Priority is an optional parameter, indicating the priority of the policy.
After configuration, click the add/update policy button below to add the policy, as follows:

After adding, we can conduct a simple test.
First, confirm that all three RabbitMQ are started, and then use the above provider to send a message to the message queue.
Close the mq01 instance after sending.
Next, start the consumer. At this time, it is found that the consumer can complete the consumption of messages (note that it is different from the previous reverse test), which indicates that the image queue has been built successfully.
13.3.2 configuring the image queue from the command line
The configuration format of the command line is as follows:
rabbitmqctl set_policy [-p vhost] [--priority priority] [--apply-to apply-to] {name} {pattern} {definition}
Take a simple configuration example:
rabbitmqctl set_policy -p / --apply-to queues my_queue_mirror "^" '{"ha-mode":"all","ha-sync-mode":"automatic"}'
