today, I'm bringing you how to configure your environment in ECs. Let me explain my configuration first. I use Alibaba cloud server ECS + Ubuntu 20.04 64 bit. Different servers and different system versions may lead to slightly different operations. If you are a user of Huawei cloud, Tencent cloud or Baidu cloud, please explore more. The general idea is the same. No more nonsense. Let's start to realize it now

——Here we assume that you have purchased alicloud ECS Cloud server oh
1. Check your security team
First of all, what we need to do is open your security group and check whether your port 22 is turned on. Only when the port is turned on can it be connected remotely by Xshell.

from the above picture, we can clearly see that Alibaba cloud has enabled port 22 for us. Alibaba cloud is still very reassuring. If it is not enabled, please select add rules manually and add port 22 to the security group.
some small partners will ask, if I want to add, what protocol will I use? My answer is: most of TCP, HTTP and HTTPS can be used to achieve the purpose. Please rest assured and boldly choose these three protocols and other protocols. Just ignore them directly. At least most of them don't need them.

Summary: in fact, this one is almost negligible. Generally speaking, cloud service providers will help you open port 22 by default, at least for large manufacturers. However, if you buy unknown cloud servers from other small manufacturers, it is not necessarily. Therefore, for the sake of insurance, we suggest you take a look
2. Use XShell to connect to your ECs
2.1 view your public IP
after we open port 22 in the security group, we can start to use XShell to connect to our server. Before we connect, we must first find the public IP of your server. Only after we get the public IP can we use XShell to connect to the server.
open the server console interface. On the interface, we can directly see the public IP and private IP. Note that the public IP and private IP are generally not 192.168 xxx. XXX format is all public IP. You must pay attention to it. It must be public IP. If you have a mine at home, I won't say anything if you use private IP!
2.2 connecting to the server using XShell
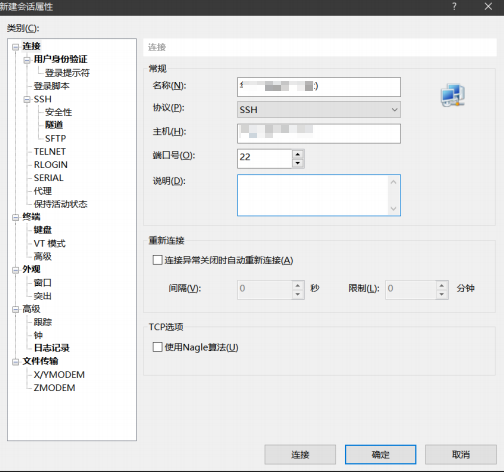
after we get the public IP, open XShell → file → new to create a new connection. After the interface appears, customize the name, and then fill the public IP into the host. The default port number is 22. We don't need to change it here. Then click the link.

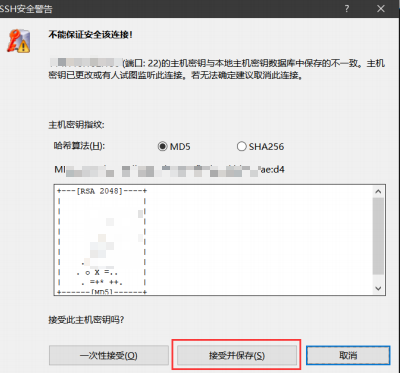
after clicking the link, the following SSH security warning will appear. After clicking accept and save, the link will succeed


At this time, we can see that we have connected to the ECS. At this time, we can continue to the next step!

3. Configure your ECS
finally, today's key point is to configure ECs. Here I declare that I use Ubuntu 20.04 system. The following operations only represent my personal operating environment. Different people's environments are different. Please refer to your real operating environment for specific operations!
3.1 modify the system name of the server
why should we first modify the server system name? You can see that after we connect to the server, its system name is:
<span style="color:rgba(0, 0, 0, 0.75)"><span style="background-color:#ffffff"><span style="color:#000000"><code class="language-powershell">root@msdsfsdfsa1:~<span style="color:#999999">#</span>
</code></span></span></span>
is the system name very long? It's hard to see. At the beginning of Alibaba cloud's creation of the server, you can customize the system name, but you changed it carelessly at that time. Now you think it's ugly. After creation, you drag a long string of letters. Don't mention how hard it is
It's obsessive-compulsive disorder!!! Let's change the system name first
enter the following command under the root user to modify the server system name:
<span style="color:rgba(0, 0, 0, 0.75)"><span style="background-color:#ffffff"><span style="color:#000000"><code class="language-powershell">vim <span style="color:#99cc99">/</span>etc<span style="color:#99cc99">/</span>hostname
</code></span></span></span>
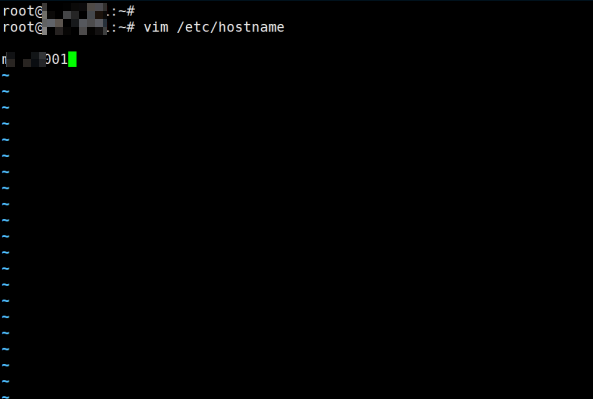
enter the following interface after entering the command, delete the original string, and enter the name you want at will. It is recommended to enter English characters as far as possible
Do not use Chinese names.
(in fact, Alibaba cloud is also very considerate. We can change the host name directly on the homepage of our Alibaba cloud server! Let's explore it ourselves!!!)

PS: take care of the students who can't use vim here. Please skip the following automatically:
after entering the interface, you will find that you can't do anything except move the cursor up, down, left and right. At this time, you need to press i to enter the editing mode. When you press it, you will find that you can enter. At this time, move the cursor to delete the existing characters,
Then enter your own characters. Note: the keypad cannot be used for input. To input numbers, please use the number keys on the large keyboard.
after editing your system name, you can be ready to exit. But at this time, you will find that I can't get out

at this time, please press ESC, and then enter: wq to exit. Remember to enter a colon. These two operations are indispensable.
after modifying the system name, we can find that the characters on the interface are still unchanged. At this time, we need to restart the system, enter the following command to restart the system, or restart the system from the console:
<span style="color:rgba(0, 0, 0, 0.75)"><span style="background-color:#ffffff"><span style="color:#000000"><code class="language-powershell">reboot
</code></span></span></span>
3.2 create a new user
for us, the root user's permission is too high and the impact is too great. We generally don't use the root user to operate things, which can effectively protect us from stepping on the pit of misoperation. So let's create a new user:
3.2.1 create a new user
after restarting, use XShell to reconnect to our ECs, and then enter the following command under root to create a new user,
note that the - m parameter must not be less, which is a necessary parameter!
<span style="color:rgba(0, 0, 0, 0.75)"><span style="background-color:#ffffff"><span style="color:#000000"><code class="language-powershell">useradd <span style="color:#99cc99">-</span>m <span style="color:#999999">[</span>Your username<span style="color:#999999">]</span>
</code></span></span></span>
3.2.2 add password for new user
if you are careful enough, you will find that I am not asked to enter the password in the process of creating a new user. How should we log in at this time? therefore
we need to add a password for our new user. Enter the following command to add a password for the new user
<span style="color:rgba(0, 0, 0, 0.75)"><span style="background-color:#ffffff"><span style="color:#000000"><code class="language-powershell">passwd <span style="color:#999999">[</span>Your username<span style="color:#999999">]</span>
</code></span></span></span>
After entering the above command, you will be asked to enter the password twice in a row. After entering, we will finish creating a new user.
3.3 log in to the server using the newly created user
like the process of 2.2, create a new connection, and then log in your public network IP, port number, newly created user and password, which will not be repeated here. After logging in successfully, you will find that unlike the learning environment we usually use, this user does not have an account path, as shown in the figure:

3.4 creating user paths for new users
since the newly created user has no user path, we will change the configuration and configure the user path for it. Under root, enter the following
Command of
<span style="color:rgba(0, 0, 0, 0.75)"><span style="background-color:#ffffff"><span style="color:#000000"><code class="language-powershell">vim <span style="color:#99cc99">/</span>etc<span style="color:#99cc99">/</span>passwd
</code></span></span></span>
after inputting, we enter a file. At this time, we can see a pile of configuration information. In the bottom line of the configuration, you will see the configuration of the new user, which is written as follows:
<span style="color:rgba(0, 0, 0, 0.75)"><span style="background-color:#ffffff"><span style="color:#000000"><code class="language-powershell">connor:x:1000:1000::<span style="color:#99cc99">/</span>home<span style="color:#99cc99">/</span>connor:<span style="color:#99cc99">/</span>bin<span style="color:#99cc99">/</span>sh
</code></span></span></span>
Don't move the previous configuration. We can modify the last: / bin/sh of this configuration to: / bin/bash, then save and exit.
When the modification is completed, we will reconnect the new user. At this time, we will see that there is already a user directory
3.5 add sudo permissions for new users
when we use sudo apt get to install something, you will find that we do not have super user permission. At this time, we need to add super permission for the new user.
under the root user, execute the following command:
<span style="color:rgba(0, 0, 0, 0.75)"><span style="background-color:#ffffff"><span style="color:#000000"><code class="language-powershell">chmod 777 <span style="color:#99cc99">/</span>etc<span style="color:#99cc99">/</span>sudoers
</code></span></span></span>
<span style="color:rgba(0, 0, 0, 0.75)"><span style="background-color:#ffffff"><span style="color:#000000"><code class="language-powershell">vim <span style="color:#99cc99">/</span>etc<span style="color:#99cc99">/</span>sudoers
</code></span></span></span>
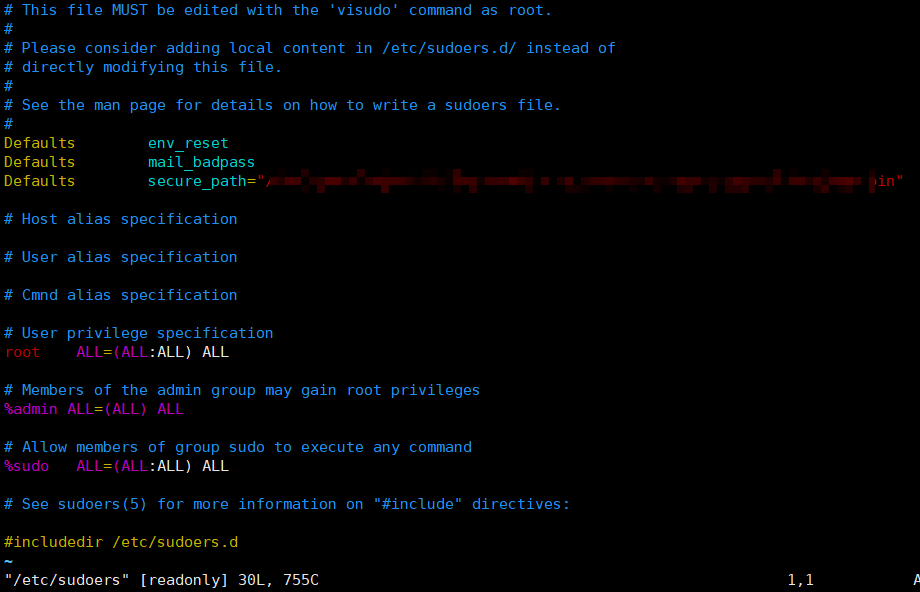
At this time, we will enter the following interface:
 We add a new content after root ALL=(ALL:ALL) ALL:
<span style="color:rgba(0, 0, 0, 0.75)"><span style="background-color:#ffffff"><span style="color:#000000"><code class="language-powershell"><span style="color:#999999">[</span>Your username<span style="color:#999999">]</span> ALL=<span style="color:#999999">(</span>ALL:ALL<span style="color:#999999">)</span> ALL
</code></span></span></span>
After adding, save and exit. Then execute the following command
<span style="color:rgba(0, 0, 0, 0.75)"><span style="background-color:#ffffff"><span style="color:#000000"><code class="language-powershell">chmod 440 <span style="color:#99cc99">/</span>etc<span style="color:#99cc99">/</span>sudoers
</code></span></span></span>
Here, we will add super permissions for the newly created users, and then we can continue to the next step!

3.6 update apt
after adding super permissions for the new user, we need to update apt. under the new user, execute the following command to update apt:
<span style="color:rgba(0, 0, 0, 0.75)"><span style="background-color:#ffffff"><span style="color:#000000"><code class="language-powershell">sudo apt update
</code></span></span></span>
- 1
after the update is completed, we can use Xftp to transfer files to the ECS. The connection method of Xftp is similar to that of XShell. I won't do more here
Repeat.
In the end!
Now your alicloud ECS server is ready for you to perform various operations!!!
Warm tips - take a snapshot of your baby Alibaba cloud server! To prevent the back from being damaged by you, you have to start over again!
❤️ You can scan the code to pay attention to my official account - any question can be asked in public address (official account is answered at regular intervals). And update the dry goods from time to time. Welcome to pay attention! ❤️

Judging from the current pattern of the domestic cloud computing market, the top three domestic cloud computing are Alibaba cloud, Tencent cloud and Huawei cloud. Alibaba cloud and Tencent cloud, as enterprises backed by the Internet platform, prefer B-end users; As traditional communication giants, Huawei and are more inclined to the G-end.
I have been engaged in cloud computing related work for many years. I have been in contact with mainstream cloud platforms in China, including their sales and technical teams. I also have a little understanding of various products, and have guided hundreds of enterprises to migrate to the cloud. I also have a certain say in the choice of cloud platforms!
There are many online evaluations, and there are a variety of evaluation data. Whoever is good has it. The analysis and summary of these two blog posts are very detailed and shared with you. The document address is:
If it is a high concurrency and high IO business scenario, it is necessary to determine the server specification to optimize the performance of business applications. Refer to the official document:
Alibaba cloud server specifications: ECS instance family - ECS specification
Tencent cloud server specification: CVM instance family - ECS specification