Notebook model: Thinkpad T14
Graphics card: NVIDIA GeForce MX330
Video memory type: 2GB GDDR5
Operating system: Ubuntu 16 04
1, Cause
If the ubuntu system computer has two graphics cards: independent display and core display, there will be no signal in HDMI. Because the computer uses core display by default, and the output of HDMI is given by independent display, there will be no signal in HDMI.
2, Solution
Install your own display driver.
Graphics card driver installation
1. Check your own graphics card driver model
Method 1. The least brain intensive method: restart and enter windows, and the device manager directly looks at the graphics card model, or download Master Lu's hardware to detect the graphics card model.
Method 2: a hexadecimal number will appear in lspci | grep -i vga
The one with nvidia is the unique display (mine is 2191). Paste this hexadecimal number into the PCI devices (the website is slow and patient) you can query the model of the graphics card.
2. Download nvidia driver
Download driver URL , select a version to download after query.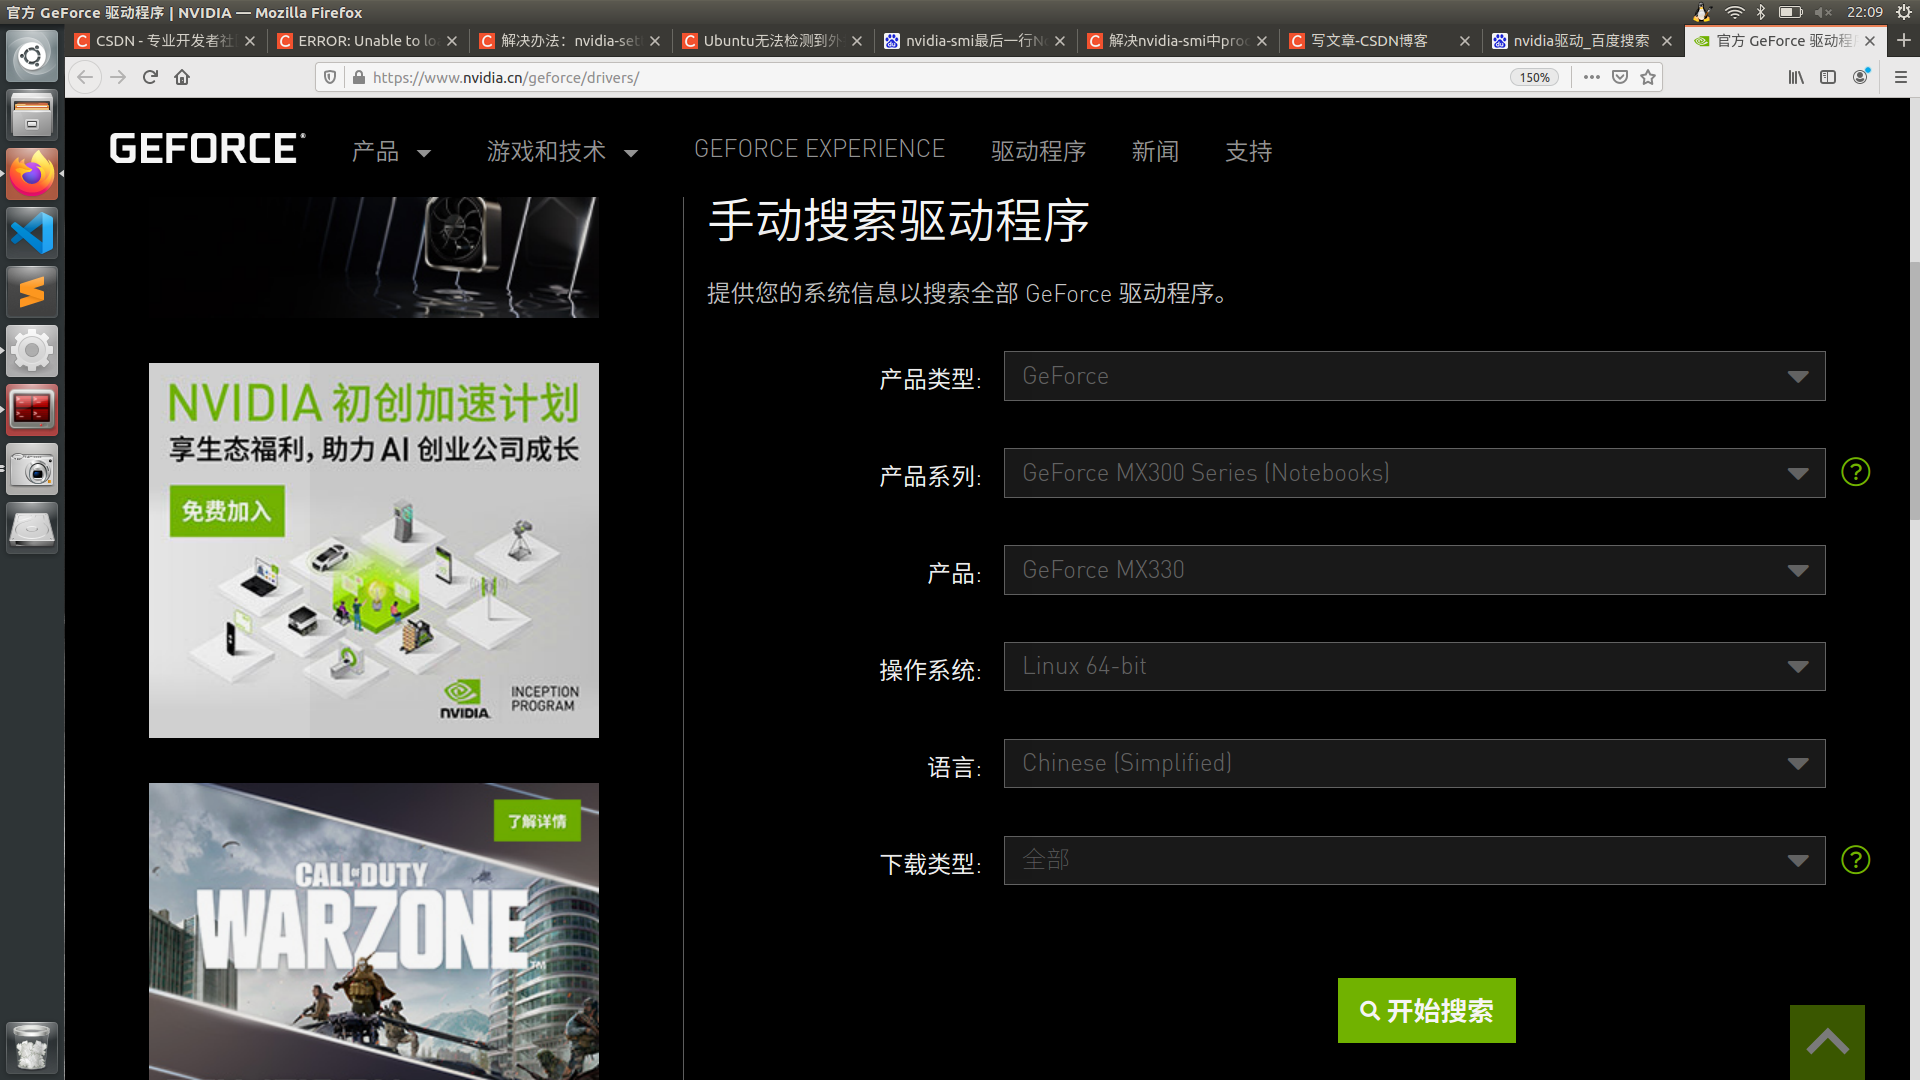
3. Preparation
Disable nouveau
sudo gedit /etc/modprobe.d/blacklist.conf
Add to open file
blacklist nouveau
options nouveau modeset=0
Update system
sudo update-initramfs -u
restart
sudo reboot
Verify whether nouveau is disabled. If the system does not have any output, it is disabled successfully.
lsmod | grep nouveau
4. Start installation
-
Will download The run file is placed in the home folder for later use (be sure to do so).
-
In ubuntu, ctrl+alt+f1 enters the command line interface, and ctrl+alt+f7 exits the command line interface. (in case you don't know how to get out after going in)
-
Enter the command line interface ctrl+alt+f1. The next steps are best to take pictures with your mobile phone first
-
sudo service lightdm stop / / close the graphical interface
-
Sudo apt get remove NVIDIA - * / / uninstall the original driver
-
sudo chmod 777 NVIDIA-Linux-x86_64-430.64.run / / convert the driver to an executable file
NVIDIA-Linux-x86_64-430.64.run is my driver file, which should be changed to my own -
sudo ./ NVIDIA-Linux-x86_ 64-430.64. Run - no Nouveau check - no OpenGL files / / all are entered
-
The installation speed is very fast. Just press enter all the way. If you have any questions, see the quotation below
The distribution-provided pre-install script failed! Are you sure you want to continue?
Select yes to continue.
Would you like to register the kernel module souces with DKMS? This will allow DKMS to automatically build a new module, if you install a different kernel later?
Select No to continue.
The problem is not remembered. The option is: install without signing. The problem is probably: Nvidia's 32-bit compatibility
libraries?
Select No to continue.
Would you like to run the nvidia-xconfigutility to automatically update your x configuration so that the NVIDIA x driver will be used when you restart x? Any pre-existing x confile will be backed up.
Select Yes to continue
If these options are selected incorrectly, the installation may fail. It doesn't matter. As long as there is no error in the front, just try a few more times.
9.sudo service lightdm start / / starts the graphical interface
During the installation process, it shows that my gcc version is too low. I upgraded the gcc version. Please refer to the installation tutorial Installing GCC 9.2.0 for Linux
5. Completion of work
Mount Nvidia driver:
modprobe nvidia//Do it
Check whether the driver is installed successfully:
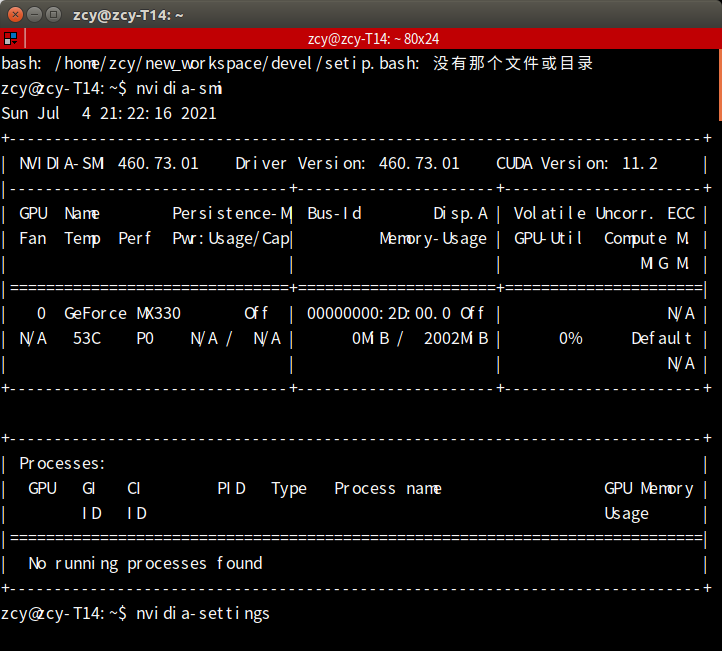
nvidia-smi
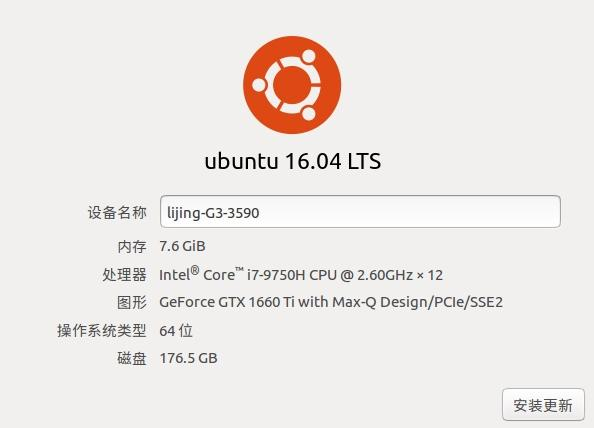
Enter your own system settings - details, and the graphics will display your own graphics card information
4. There may be one or more. Select the recommended one
5. Mine is nvidia-430. If it's different, change it yourself
sudo apt-get install nvidia-430 nvidia-settings nvidia-prime
6. restart
sudo reboot
end
Open the terminal and enter
nvidia-settings
above NVIDIA driver installation tutorial Reprinted from: https://www.freesion.com/article/35781091556/
Question:
1. No running processes found
After installation, follow step 5 above
nvidia-smi
The discovery displays the following: No running processes found
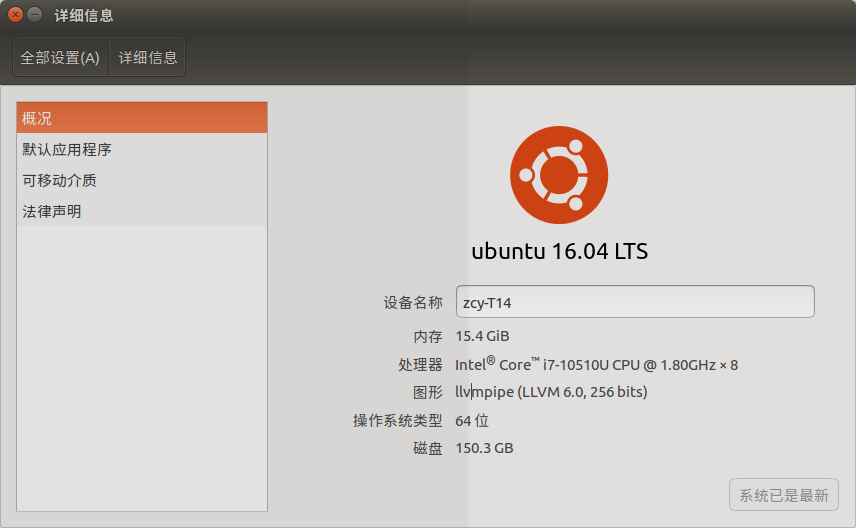
In addition, in the system setting amount details, the graphic line displays: llvmpipe (LLVM 6.0, 256 bits)
2. Question 2: no content will be displayed after inputting Ubuntu drivers devices
ubuntu-drivers devices
3. ERROR: Unable to load info from any available system
use
nvidia-settings
Post display
ERROR: Unable to load info from any available system
Solving process
Problem 1 (failed to solve - reinstall the system)
Don't follow subordinates' methods!!!
Don't follow subordinates' methods!!!
Don't follow subordinates' methods!!!
1. Switch to NVIDIA driver
sudo prime-select nvidia
display
sudo: prime-select: Command not found
Enter the following code to resolve
sudo apt-get install nvidia-prime
Enter the following code to view the current graphics card
prime-select query
return
unknown
Re enter sudo prime select nvisudo prime select nvidiadia, and there is a problem after switching to NVIDIA:
Info: the current GL alternatives in use are: ['mesa', None]
Info: the current EGL alternatives in use are: ['mesa-egl', None]
Error: the installed packages do not support PRIME
Error: nvidia mode can't be enabled
Input (this should be a plug-in that can display the taskbar icon)
sudo add-apt-repository ppa:nilarimogard/webupd8
sudo apt-get update
sudo apt-get install prime-indicator
After restart, the screen appears in the upper right corner After clicking the icon, selecting Open NVIDIA Settings has no response, and selecting Quick switch graphics has no response.
Based on the above error Error: the installed packages do not support PRIME, I think the versions do not match, so I queried the system version, graphics card version and gcc version.
Query system version
cat /proc/version
Return results
Linux version 5.3.5-050305-generic (kernel@sita) (gcc version 9.2.1 20190909 (Ubuntu 9.2.1-8ubuntu1)) #201910071830 SMP Mon Oct 7 18:33:03 UTC 2019
Query graphics card version
cat /proc/driver/nvidia/version
Return results
NVRM version: NVIDIA UNIX x86_64 Kernel Module  460.73.01  Thu Apr  1 21:40:36 UTC 2021
GCC version:  gcc version 5.4.0 20160609 (Ubuntu 5.4.0-6ubuntu1~16.04.12)
Query gcc version
gcc -v
Return results
Using built-in specs.
COLLECT_GCC=gcc
COLLECT_LTO_WRAPPER=/usr/lib/gcc/x86_64-linux-gnu/5/lto-wrapper
Target: x86_64-linux-gnu
Configured with: ../src/configure -v --with-pkgversion='Ubuntu 5.4.0-6ubuntu1~16.04.12' --with-bugurl=file:///usr/share/doc/gcc-5/README.Bugs --enable-languages=c,ada,c++,java,go,d,fortran,objc,obj-c++ --prefix=/usr --program-suffix=-5 --enable-shared --enable-linker-build-id --libexecdir=/usr/lib --without-included-gettext --enable-threads=posix --libdir=/usr/lib --enable-nls --with-sysroot=/ --enable-clocale=gnu --enable-libstdcxx-debug --enable-libstdcxx-time=yes --with-default-libstdcxx-abi=new --enable-gnu-unique-object --disable-vtable-verify --enable-libmpx --enable-plugin --with-system-zlib --disable-browser-plugin --enable-java-awt=gtk --enable-gtk-cairo --with-java-home=/usr/lib/jvm/java-1.5.0-gcj-5-amd64/jre --enable-java-home --with-jvm-root-dir=/usr/lib/jvm/java-1.5.0-gcj-5-amd64 --with-jvm-jar-dir=/usr/lib/jvm-exports/java-1.5.0-gcj-5-amd64 --with-arch-directory=amd64 --with-ecj-jar=/usr/share/java/eclipse-ecj.jar --enable-objc-gc --enable-multiarch --disable-werror --with-arch-32=i686 --with-abi=m64 --with-multilib-list=m32,m64,mx32 --enable-multilib --with-tune=generic --enable-checking=release --build=x86_64-linux-gnu --host=x86_64-linux-gnu --target=x86_64-linux-gnu
Thread model: posix
gcc version 5.4.0 20160609 (Ubuntu 5.4.0-6ubuntu1~16.04.12)
You can see that the returned result of the above graphics card still uses gcc version 5.4, so if you want to upgrade it, please refer to the tutorial below Check gcc version and version switching in ubuntu system
After installation, restart the system. The system enters the circular login mode and searches for tutorials on the Internet. There is no solution. Finally, it is decided to reinstall ubuntu

After reassembly, follow This tutorial Continue.
If the mentality breaks down, let it go for a few days and do it later!