What is docker?
docker is an open source container engine developed in go language. The source code is hosted on Github
docker adopts C/S architecture
In short: docker is a technical means to quickly solve the stable business environment, and can quickly build the environment on which the project operation depends. And the built running environment can be reused
Popular explanation: for example, if we have developed a project and now need to deploy it online, the environment used in the development, such as project dependency package, mysql database, redis database, etc., should be deployed. If the online servers need to install mysql and redis one by one according to the traditional method, the speed will be very slow. If you use docker, You can use docker to build encapsulated environments, such as mysql environment and redis environment. With these environments, we can transfer these environments to the online server and run all the required mysql and redis with only a few commands. This is the role of docker during deployment. Moreover, the built environment can be reused. For example, for some time, if we want to run this project on another server, we only need to package the environment in docker, load it, and execute a few commands
Composition of Docker
Docker image: it is a read-only file, which is similar to the iso CD image we need to install the operating system. We can complete the deployment of various applications by running this image. The image here is a program that can be run by docker
In short: image is actually our encapsulated environment. For example, I need an environment for mysql database. We can encapsulate the mysql database environment into the docker image
Docker container: the container is similar to an operating system that we run, and the operating system starts some services. The container here refers to a docker image from our luck
In short: a container is a container that runs the environment encapsulated in the image. Multiple containers can be run through a single image
Docker Repository: the repository is similar to a mirror station where we search the operating system CD on the Internet. The warehouse here refers to the place where docker images are stored
As shown below:

The digital capsule stores houses, cars and the like, which is equivalent to the image, which encapsulates the running environment of mysql,redis and other databases
After starting the capsule, it becomes a house, which is equivalent to turning the image into a container, and the box containing the capsule is equivalent to the warehouse containing the image
advantage:
Multiple: there are many usage scenarios, such as mysql,redis and many other things that can be deployed
Fast: the environment is quickly deployed and updated. The environment is encapsulated and can be used only by running some commands
Save: save money, labor and people
Disadvantages:
Operating system dependent
Dependent network
In terms of hardware, docker can not be used to virtual the door-to-door in the software system
Installation of Docker
setup script
① Use alicloud installation source
curl -fsSL https://mirrors.aliyun.com/docker-ce/linux/ubuntu/gpg | sudo apt-key add -

add-apt-repository "deb [arch=amd64] https://mirrors.aliyun.com/docker-ce/linux/ubuntu $(lsb_release -cs) stable"

Note that you need to run as root
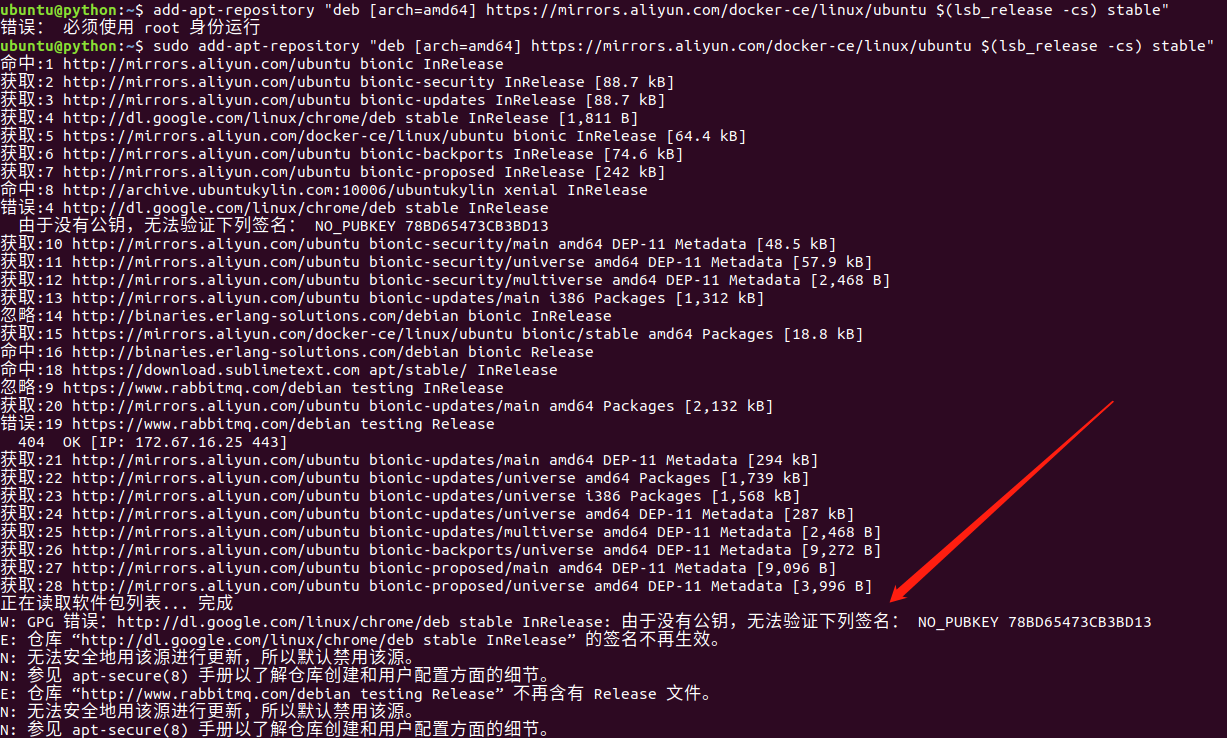
Error:
W: GPG Error: http://packages.ros.org/ros/ubuntu xenial InRelease: the following signature cannot be verified because there is no public key: NO_PUBKEY F42ED6FBAB17C654
W: Warehouse“ http://packages.ros.org/ros/ubuntu xenial InRelease "does not have a digital signature.
N: Data from this source cannot be authenticated, so using it poses a potential risk.
N: See apt-secure(8) Manual to understand the details of warehouse creation and user configuration.
solve:
sudo apt-key adv --keyserver keyserver.ubuntu.com --recv-keys 78BD65473CB3BD13
Note: the following codes can be modified according to different computers
② Install dependent software
apt-get install apt-transport-https ca-certificates curl software-properties-common -y
③ Install docker software
# Install docker
apt-get install docker-ce -y
# View supported docker versions
apt-cache madison docker-ce
# Note: you can specify a version to install docker
apt-get install docker-ce=<VERSION> -y
④ View docker service status
systemctl status docker
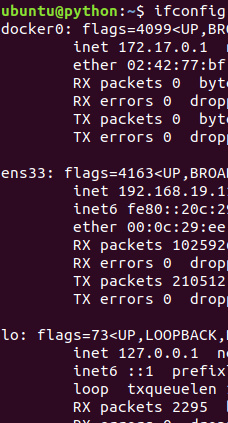
⑤ Network card difference
Before installation: only ens33 and lo network cards
After installation: after docker is started, docker0 network card is added, and the network card address is 172.17.0.1
⑥ docker service command
systemctl [parameter] docker
 Parameter details:
  start   Open service
  stop    close
  restart restart
  status  state
Docker accelerator
Accelerator introduction:
After docker is installed, we need to pull some images we need. By default, it is pulled from the image source of foreign websites. When connecting foreign websites at home, it is very slow. It will be unable to download or timeout due to network reasons. The docker accelerator uses the domestic official image source to download images, which is the purpose of the accelerator. In this way, the speed of downloading images will be faster than that from abroad by default
Click the image accelerator on the left side of the page to see the accelerator address
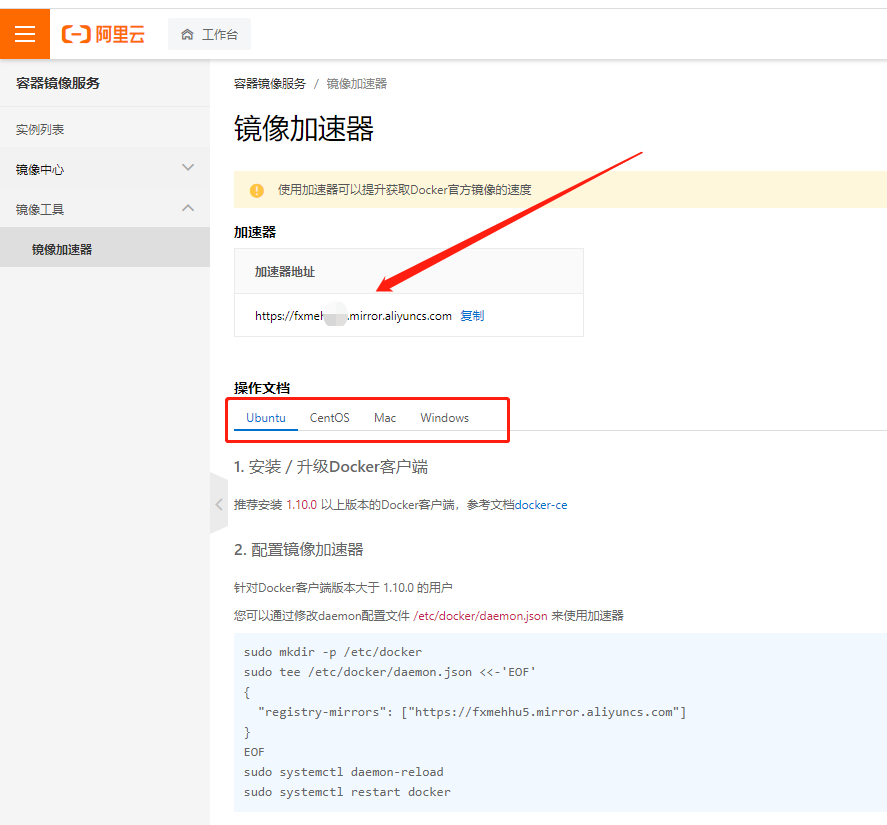
Choose according to the operating system you use. I use ubuntu
Accelerator configuration:
① Execute the following commands at the terminal
mkdir -p /etc/docker    # Create a new directory
touch /etc/docker/daemon.json   # Create a new json file in the directory
echo '{"registry-mirrors": ["This is the accelerator address"]}' > /etc/docker/daemon.json  # Write this information into the json file
Note: if for the created daemon JSON does not have write permission. If you need to switch to root
1. Switch from normal user to root user
Reset the password of root user, as shown in the following figure
: ~ $sudo passwd root, press enter and follow the prompts.
Log in as root
: ~$ su
Enter the UNIX password just now.
PS: after resetting the password, you can log in to the root user directly in the future!
Of course, if you forget the password of the root user, you can reset it again.
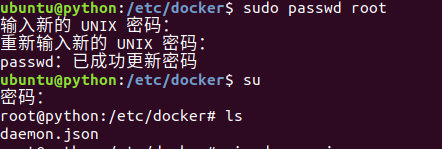
Image Management
2.1 basic commands
① Search image
Command format:
  docker search [image_name]
Command Demo:
  docker search ubuntu
② Get image
Command format:
  docker pull [image_name]
Command Demo:
  docker pull ubuntu
  docker pull nginx
Note: the obtained image is in the / var/lib/docker directory.
③ View local mirror
Command format:
  docker images
 Command Demo:
  docker images
The ID of the image uniquely identifies the image. If the IDs are the same, it means that it is the same image. TAG information to distinguish different release versions. If no specific TAG is specified, the latest TAG information is used by default.
④ View mirror history
View mirror history command format:
docker history [image_name]
If you want to know which commands are started by default or which system layers are encapsulated in an image, you can use the docker history command to obtain this information.
2.2 rename and delete
① Mirror rename
Command format:
  docker tag [old_image]:[old_version] [new_image]:[new_version]
Command Demo:
  docker tag nginx:latest smart-nginx:v1.0
The name of the image is different from that of the image after renaming, because the name of the image is different from that of the image after renaming
② Delete mirror
Command format:
  docker rmi [image_id]
  or
  docker rmi [image_name:image_version]
Note: if an image_ If the ID has multiple names, you should delete the image in the format of name:tag
2.3 export and import
① Export mirror
Export the downloaded image to the local for future use.
Command format:
  docker save -o [Package file] [image]
Command Demo:
  docker save -o nginx.tar nginx
Operation demonstration:

You can see that there is an nginx in the current directory tar
Note: docker save will save all the history and metadata information of the image
② Import mirror
Command format:
  docker load < [image.tar_name]
  docker load -i [image.tar_name]
Note: docker load cannot specify the name of the image
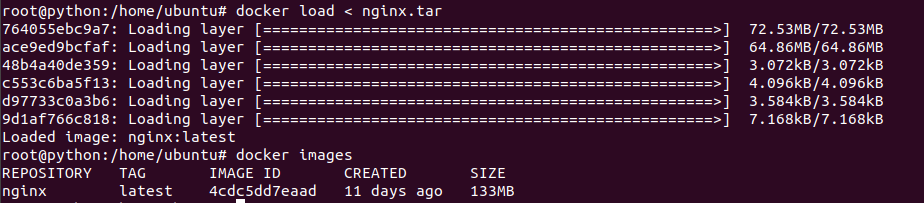
Command Demo:
# For better demonstration effect, delete the image of nginx first.
docker rmi nginx
# Import image file
docker load < nginx.tar
Delete first

View after deletion

Import mirror
Functions of importing and exporting images: for example, you have encapsulated an image yourself. Now you want to use the image for others. Now you need to export the image to a local file and copy the file to others. If others want to use the image in the file, they need to import the image
1. Vessel introduction
Running the image becomes a container
2.1 basic commands
① View container
Command format:
  docker ps   # See which containers are running locally
 Command Demo:
  # docker ps
  CONTAINER ID    IMAGE    COMMAND    CREATED    STATUS     PORTS    NAMES
be careful:
The docker container can be managed by name or container id
Displays all containers that are already running, - ps does not display all containers that are already running
② Create container
Command format:
  docker run <Parameter, optional> [docker_image] [Commands executed]
Command Demo:
  # Let the Docker container run as a daemon in the background. This can be achieved by adding the - d parameter
  docker run -d nginx
Creating a container means running the image
Case:

Check the containers that are not currently running through docker ps. docker run -d nginx runs the image into a container. Note that the version of the image here is latest, so it can be omitted. If not, add it
③ Stop, start container
# Start container
 Command format:
  docker start [container_id]

# Close the container
 Command format:
  docker stop [container_id]
④ Delete container
There are two ways to delete a container:
Normal delete: delete closed
Force delete: delete running
# Delete closed containers:
Command format:
  docker rm [container_id]

# Force deletion of run container
 Command format:
  docker rm -f [container_id]

# Expand: batch delete container
 Command format:
  docker rm -f $(docker ps -a -q)
2.2 entry and exit
Entering the container, we learn two methods:
Enter the container while creating the container
Enter the container manually
① Create and enter container
Command format:
  docker run --name [container_name] -it [docker_image] /bin/bash
Detailed explanation of startup command parameters:
– Name: define a name for the container. If it is not specified, it will be randomly generated
-i: Interact with containers
-t: Let docker assign a pseudo terminal and bind it to the standard input of the container
/bin/bash: execute a command
Case:

Create the container and enter. Here ls you can see the files in the nginx container
② Exit container
Method 1: exit
 Method 2: ctrl + d
③ Manually enter the container
Command format:
  docker exec -it container id /bin/bash
2.3 creating images based on containers
The container is equivalent to running a system in which we can install the environment we need, but after installing the environment, we want to reuse it, so we need to package the container into an image
Command format:
  docker commit -m 'Description information' -a "Author information" [container_id] [new_image:tag]
case
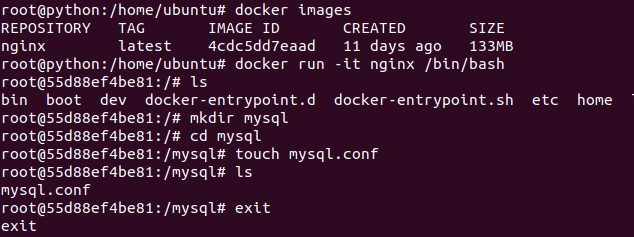
For example, I want to install a mysql database environment in this container (in order to save time, use mysql directory instead), and exit the current container after installation
① Enter a container, create a file, and exit
docker exec –it d74fff341687 /bin/bash
mkdir /smart
exit
② Create a mirror
docker commit -m 'mkdir /smart' -a "smart" d74fff341687 smart-nginx:v2.0
③ View mirror
docker images
④ Start a container
docker run -itd smart-nginx:v2.0 /bin/bash
⑤ Enter the container to view
docker exec –it ae63ab299a84 /bin/bash
ls
2.4 log and information
① View container run log
Command format:
  docker logs [container_id]
② View container details
Command format:
  docker inspect [container_id]
docker data management
- data management
During the operation of the container, some data may be generated, such as logs generated by the software in the container, data saved in the database, etc. These data will be lost when the container is stopped, restarted or deleted. However, in the actual production process, it is often necessary to persist these data. How do you operate?
The answer is: data volumes and data volume containers.
2. Data volume
Data volume is to map a directory or file of the host to the container as a directory or file for data storage, so we can store data in the host. To put it bluntly, it is to save the container data to the host.
The host computer is the container on which you run, and which computer is the host computer. In this way, the data will not be lost if the hormone container is accidentally deleted
2.1 basic use
When creating a container, you can map through the - v parameter:
-v: The parameter is used to mount a directory or file (absolute path) of the host as the data volume of the container into the docker container, so that a directory can be shared between the host and the container. If the local path does not exist, docker will be created automatically.
Command format:
docker run -v <Host Directory>:<Container directory> ...
docker run -v <Host file>:<Container file> ...
2.2 data volume practice
For data volume management, we can say it from two aspects:
① Directory mapping
② Normal file mapping
Directory mapping of data volume practice:
Command format:
docker run -itd --name <Container name> -v <Host Directory>:<Container directory> <Image name> <command(Optional)>
Example:
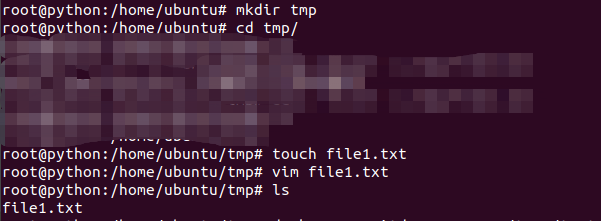
Here is to create a folder in the host computer

Create a container and map the directory. It can be seen by the arrow. The folder created in the host can be seen in the container, and vice versa. Those interested can try
File mapping of data volume:
Command format:
docker run -itd --name <Container name> -v <Host file>:<Container file> <Image name> <command(Optional)>
Note: Although the file in the container can be renamed, the type must be consistent with the host file
Command Demo:
① Create test file
echo "file1" > /tmp/file1.txt
② Start a container to mount the data volume
docker run -itd --name test2 -v /tmp/file1.txt:/nihao/nihao.sh nginx
③ Test effect
~# docker exec -it test1 /bin/bash
root@84c37743d339:/# cat /nihao/nihao.sh
file1
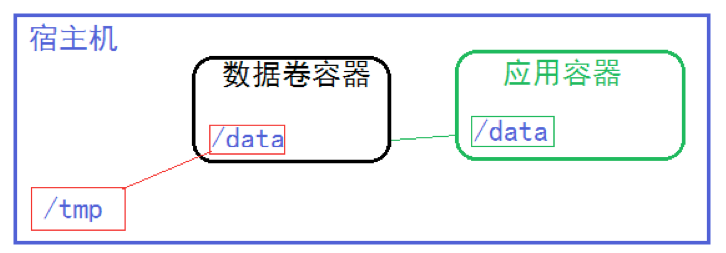
3. Data volume container
Data volume container is to create a container to map directly with the directory or file of the host, and then other containers can mount the data volume container, so as to realize the data sharing between containers.
3.1 operation process
If data volume containers are used to share data among multiple containers and permanently save these data, a standardized process is required:
① Create data volume container
② Other containers mount data volume containers
3.2 data volume container commands
# Create data volume container
docker create -v <Host Directory|file>:<Container directory|file> --name <Container name> <Image name> <command(Optional)>
# Mount data volume container
docker run --volumes-from <Data volume container id/name> -itd --name <Container name> <Image name> <command(Optional)>
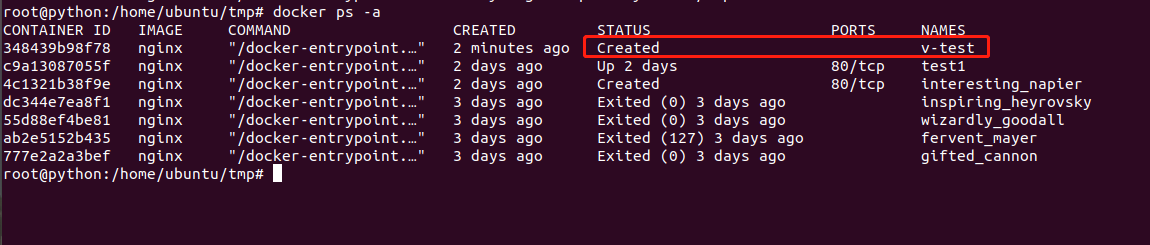
Note: the data volume container does not start.
3.3 data volume container practice
① Create a data volume container
docker create -v /tmp:/data --name v-test nginx
Example:
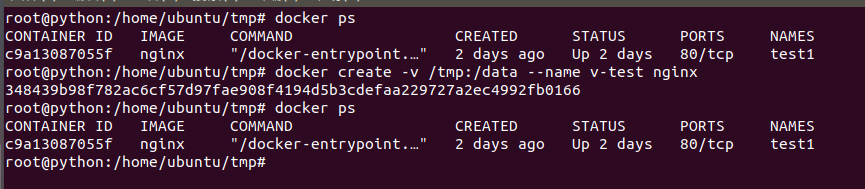
Create a data volume container, but you cannot see the v-test created at this time because the data volume container is not started
② Create two containers and mount the data volume container at the same time
# Create VC test1 container
docker run --volumes-from v-test -itd --name vc-test1 nginx /bin/bash
# Create vc-test2 container
docker run --volumes-from v-test -itd --name vc-test2 nginx /bin/bash
Example:

③ Confirm volume container share
# Enter vc-test1 and operate the data volume container
~# docker exec -it vc-test1 /bin/bash
root@c408f4f14786:/# ls /data/
root@c408f4f14786:/# echo 'v-test1' > /data/v-test1.txt
root@c408f4f14786:/# exit

# Enter vc-test2 and confirm the data volume
~# docker exec -it vc-test2 /bin/bash
root@7448eee82ab0:/# ls /data/
v-test1.txt
root@7448eee82ab0:/# echo 'v-test2' > /data/v-test2.txt
root@7448eee82ab0:/# exit

# Go back to VC test1 for verification
~# docker exec -it vc-test1 /bin/bash
root@c408f4f14786:/# ls /data/
v-test1.txt  v-test2.txt
root@c408f4f14786:/# cat /data/v-test2.txt
v-test2

# Go back to the host to view the / data / directory
~# ls /data/
~#
Example:
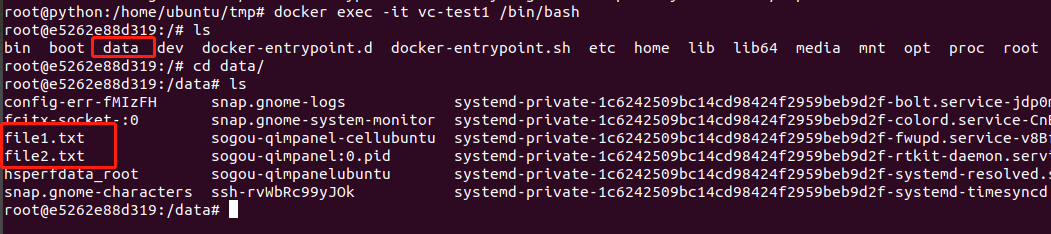
Here's file1 Txt and File2 Txt is the file in the temp folder in the host computer
docker network management
By default, the network between the container and the host is isolated (that is, the container can't use the network), but everything we learned earlier depends on the network to work.
In order to make the container use the network, we can adopt two ways: port mapping and network mode.
2. Port mapping
2.1 port mapping Basics
① Introduction to port mapping
The port in the container can be mapped to a port of the host through port mapping. In this way, we can access the contents of the container through the ip:port of the host. For example, when running an nginx container, an nginx service will run in the container. If you do not do port mapping, you cannot access the nginx service because the network is isolated
② Port mapping type:
Random mapping
Specify mapping
Note: production scenarios generally do not use random mapping, but the advantage of random mapping is that it is allocated by docker and ports will not conflict. No matter which mapping will affect performance, because mapping is involved.
③ Port mapping command
-P: Random port mapping
-p <Host computer ip>:<Host computer port>:<container port>: Specify port mapping
2.2 Random Mapping Practice
① Command format
docker run -d -P [Image name]
② Start an nginx image
docker run -d -P nginx
Example effect

Note: Map port 49153 of the host to port 80 of the container, that is, the port monitored by the nginx service running in the nginx container. Now you can access nginx services by accessing port 49153 of the host

Note: the format entered by the browser is: ip of docker container host: Port mapped by the container. This is returned by the nginx service running in the nginx container
Note: 32768 of the host is mapped to port 80 of the container
-P automatically binds all container ports that provide external services. The mapped ports will be automatically selected randomly from the unused port pool. However, if multiple containers are started continuously, the port of the next container defaults to the port number occupied by the current container + 1
2.3 specifying mapping practices
① Command format
docker run -d -p <Host computer ip>:<Host port>:<Container port> --name <Container name> <Image name>
be careful:
If the host ip is not specified, 0.0.0.0 is used by default.
The container port must be clear and must be written out.
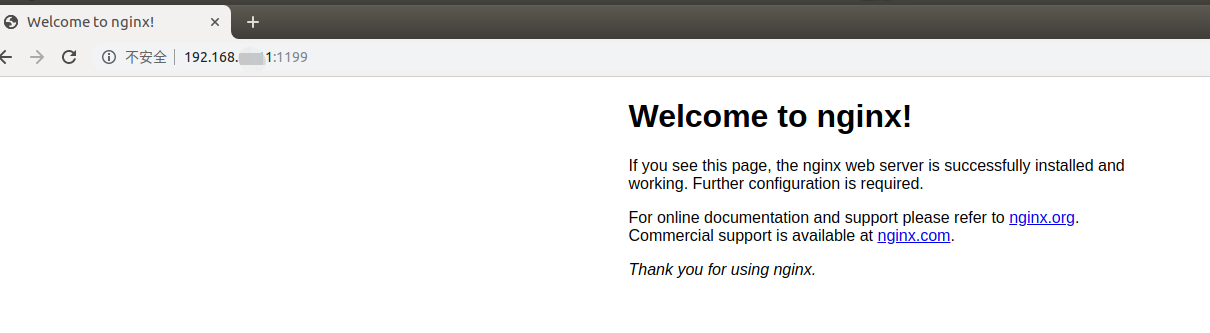
② Now when we create the container, we map port 1199 of the host to port 80 in the container.
docker run -d -p 192.168.xx.11:1199:80 --name nginx-1 nginx
Example effect

2.4 multi port mapping practice
① Command format
docker run -d -p <Host port 1>:<Container port 1> -p <Host port 2>:<Container port 2> --name <Container name> <Image name>
② Multi port mapping practice
docker run -d -p 520:443 -p 6666:80 --name nginx-2 nginx
3. Network mode
In addition to port mapping, you can also set the network mode of the container when setting the network of the container. There are many network modes of the container. Here we only introduce the most commonly used host network mode.
3.1 host network mode
The container uses the ip address and port of the host to communicate, and the container and the host share the network.
Command format:
docker run --network=host -itd --name <Container name> <Image name>
3.2 practice of host network mode
① Create a container and set the host network mode
docker run --network=host -itd --name nginx-3 nginx

There is a problem here. The container uses port 80. It will directly use port 80 of the host. However, if port 80 of the host is occupied, it will not be used. Although you see it running, the things in it are useless to run. Port 80 here is occupied by Nginx of the host
You can view ports

So all you have to do is turn off the program that occupies port 80 of the host, delete the container just created, set the host network mode container, and then restart