
/ preface /
Or the old routine, let's see the effect!

Before writing this effect, you need to be familiar with the recycling mechanism of Rv, because to realize this effect, you need to customize LayoutManager()
As we all know, RecyclerView is a slidable View, so its recycling / reuse entry must be in the onTouchEvent() event
The response during sliding is MotionEvent.ACTION_MOVE event, so just come here and have a look!!
/ Caching mechanism /
onTouchEvent() entry
#RecyclerView.java

 @Override
public boolean onTouchEvent(MotionEvent e) {

    final int action = e.getActionMasked();
     switch (action) {
            ........................................
               ........Show only code ideas,Please check the details yourself........
               ........................................

            case MotionEvent.ACTION_MOVE: {
            if (mScrollState == SCROLL_STATE_DRAGGING) {
                    mLastTouchX = x - mScrollOffset[0];
                    mLastTouchY = y - mScrollOffset[1];

                    //  Key code 1
                    if (scrollByInternal(
                            canScrollHorizontally ? dx : 0,
                            canScrollVertically ? dy : 0,
                            vtev)) {
                        getParent().requestDisallowInterceptTouchEvent(true);
                    }
                    if (mGapWorker != null && (dx != 0 || dy != 0)) {
                        mGapWorker.postFromTraversal(this, dx, dy);
                    }
                }
            }
            break;
    }
}
Then find the scrollByInternal(int x, int y, MotionEvent ev) method
#RecyclerView.java

boolean scrollByInternal(int x, int y, MotionEvent ev) {
     if (mAdapter != null) {
            ........................................
               ........Show only code ideas,Please check the details yourself........
               ........................................
            if (x != 0) {
                //  Key code 2   Go to   LinearLayoutManager   Execute the fill method
                consumedX = mLayout.scrollHorizontallyBy(x, mRecycler, mState);
                unconsumedX = x - consumedX;
            }
            if (y != 0) {
                //  Key code 2   Go to LinearLayoutManager   Execute the fill method
                consumedY = mLayout.scrollVerticallyBy(y, mRecycler, mState);
                unconsumedY = y - consumedY;
            }
        }
        ....
}
Now go to mlayout. Scrollhorizontalyby (x, mrecycler, mState);
Then go to LinearLayoutManager() Find scrollhorizontalyby () method
#LinearLayoutManager.java

    @Override
    public int scrollVerticallyBy(int dy, RecyclerView.Recycler recycler,
                                  RecyclerView.State state) {
        if (mOrientation == HORIZONTAL) {
            return 0;
        }
        //  Key code 3
        return scrollBy(dy, recycler, state);
    }
scrollBy()->
#LinearLayoutManager.java

 int scrollBy(int dy, RecyclerView.Recycler recycler, RecyclerView.State state) {
       ........................................
     ........Show only code ideas,Please check the details yourself........
     ........................................
     final int consumed = mLayoutState.mScrollingOffset
                //  Key code 4
                + fill(recycler, mLayoutState, state, false);
}
Then find the fill() method
#LinearLayoutManager.java

int fill(RecyclerView.Recycler recycler, LayoutState layoutState,
             RecyclerView.State state, boolean stopOnFocusable) {

        if (layoutState.mScrollingOffset != LayoutState.SCROLLING_OFFSET_NaN) {

            //  Key code 19   Cache ViewHolder
            recycleByLayoutState(recycler, layoutState);
        }

        //  Loop call
        while ((layoutState.mInfinite || remainingSpace > 0) && layoutState.hasMore(state)) {

           //  Key code 5   [for level 4 multiplexing]
            layoutChunk(recycler, state, layoutState, layoutChunkResult);

                  ........................................
                    ........Show only code ideas,Please check the details yourself........
                  ........................................
        }

    }
Just remember the following two points:
- recycleByLayoutState(recycler, layoutState); Cache ViewHolder
- layoutChunk(recycler, state, layoutState, layoutChunkResult); Four level multiplexing
Some people may ask, why is level 4 here? Didn't you say level three?
In fact, level 3 and level 4 don't matter. The knowledge points won't change, but the more levels, the deeper and more detailed the understanding
Code directly into the cache:
#LinearLayoutManager.java

 private void recycleByLayoutState(RecyclerView.Recycler recycler, LayoutState layoutState) {
        if (layoutState.mLayoutDirection == LayoutState.LAYOUT_START) {
            //  Key code 21   Cache bottom
            recycleViewsFromEnd(recycler, layoutState.mScrollingOffset);
        } else {
            //  Key code 20   Cache header
            recycleViewsFromStart(recycler, layoutState.mScrollingOffset);
        }
    }
If you slide down here, the header will be cached, and the execution will be to
recycleViewsFromStart()
If you slide up, the tail will be cached, and you will execute to recycleViewsFromEnd()
Click either recycleViewsFromStart() or recycleViewsFromEnd(). The code inside is almost the same
#LinearLayoutManager.java

 private void recycleViewsFromStart(RecyclerView.Recycler recycler, int dt) {

        if (mShouldReverseLayout) {
            for (int i = childCount - 1; i >= 0; i--) {
            ...
                    //  Key code 22
                    recycleChildren(recycler, childCount - 1, i);
                    return;
            }
        } else {
            for (int i = 0; i < childCount; i++) {
            ...
                    //  Key code 23
                    recycleChildren(recycler, 0, i);
                    return;
            }
        }
    }
No matter which if() Will go to the recycleChildren() method
#LinearLayoutManager.java

private void recycleChildren(RecyclerView.Recycler recycler, int startIndex, int endIndex) {
        if (startIndex == endIndex) {
            return;
        }
        if (endIndex > startIndex) {
            for (int i = endIndex - 1; i >= startIndex; i--) {
                //  Remove View    Key code 23   [execute to RecyclerView.removeAndRecycleViewAt()]
                removeAndRecycleViewAt(i, recycler);
            }
        } else {
            for (int i = startIndex; i > endIndex; i--) {
                removeAndRecycleViewAt(i, recycler);
            }
        }
    }
Next, the removeAndRecycleViewAt() method of RecyclerView will be executed
#RecyclerView.java

        //  Key code 24
        public void removeAndRecycleViewAt(int index, Recycler recycler) {
            final View view = getChildAt(index);
            removeViewAt(index);
            //  Key code 25
            recycler.recycleView(view);
        }
Continue
#RecyclerView.java

 public void recycleView(View view) {
            .......
            ViewHolder holder = getChildViewHolderInt(view);
            //  cache
            recycleViewHolderInternal(holder);
        }
Then continue to execute recycleViewHolderInternal()
#RecyclerView.java

void recycleViewHolderInternal(ViewHolder holder) {
            ........................................
            ........Show only code ideas,Please check the details yourself........
            ........................................
             boolean cached = false;

            if (forceRecycle || holder.isRecyclable()) {
                //  mViewCacheMax  =  Maximum cache size
                // mViewCacheMax = 2
                //  If the viewHolder is invalid, not removed, not marked
                if (mViewCacheMax > 0
                        && !holder.hasAnyOfTheFlags(ViewHolder.FLAG_INVALID
                        | ViewHolder.FLAG_REMOVED
                        | ViewHolder.FLAG_UPDATE
                        | ViewHolder.FLAG_ADAPTER_POSITION_UNKNOWN)) {
                    int cachedViewSize = mCachedViews.size();

                    //  Key code 24
                    // mViewCacheMax = 2
                    if (cachedViewSize >= mViewCacheMax && cachedViewSize > 0) {
                        //  If the viewholder is full of 2, the 0th position will be removed
                        //  Ensure mCachedViews   Up to 2 viewholders can be cached
                        recycleCachedViewAt(0);
                        cachedViewSize--;
                    }
                    ....
                    //  Save ViewHolder data   [no more than 2 mCachedViews data]
                    mCachedViews.add(targetCacheIndex, holder);
                    cached = true;
                }
                 if (!cached) {
                    //  When the ViewHolder does not change (there is only one ViewHolder)   It will be stored directly in the cache pool
                    addViewHolderToRecycledViewPool(holder, true);
                    recycled = true;
                }
                ........................................
                   ........Show only code ideas,Please check the details yourself........
                ........................................
        }
adopt Key code 24 It can be seen that mCachedViews can save up to 2 viewholders
If the third ViewHolder comes, the 0 will be deleted first, and then mCachedViews.add(targetCacheIndex, holder);
Then take a look Details of recycleCachedViewAt(0)!
#RecyclerView.java

    void recycleCachedViewAt(int cachedViewIndex) {
            ...
            ViewHolder viewHolder = mCachedViews.get(cachedViewIndex);

            //  Key code 25
            //  Add to ViewPool cache
            addViewHolderToRecycledViewPool(viewHolder, true);

            //  Remove the 0-th ViewHolder
            mCachedViews.remove(cachedViewIndex);
        }
Continue to addViewHolderToRecycledViewPool() method
Get the ViewHolder in mCachedViews.get(0), add it to the cache pool, and delete it
#RecyclerView.java

void addViewHolderToRecycledViewPool(ViewHolder holder, boolean dispatchRecycled) {
            .....
            //  Add to cache pool   Save ViewHolder   Key code 28
            getRecycledViewPool().putRecycledView(holder);
        }
Click in to see the putRecycledView() method
#RecyclerView.java

//  SparseArray   Similar to   HashMap<int,ScrapData>
//  characteristic:   If the key is the same, the last one will be retained,
//       It will be sorted according to the int value of the key (from small to large)
SparseArray<ScrapData> mScrap = new SparseArray<>();

 public void putRecycledView(ViewHolder scrap) {
       //  Gets the ViewHolder layout type
      final int viewType = scrap.getItemViewType();

      //  Get ViewHolder according to layout type
       final ArrayList scrapHeap = getScrapDataForType(viewType).mScrapHeap;

       //  Determine the size of the cache pool
       //  mScrap.get(viewType).mMaxScrap   Default to   five
       //  Same ViewType   Save only 5 viewholders
        if (mScrap.get(viewType).mMaxScrap <= scrapHeap.size()) {
           return;
        }

       //  Empty ViewHolder record
        scrap.resetInternal();

        //add
        scrapHeap.add(scrap);
}
 //  Empty ViewHolder record
 void resetInternal() {
            mFlags = 0;
            mPosition = NO_POSITION;
            mOldPosition = NO_POSITION;
            mItemId = NO_ID;
            mPreLayoutPosition = NO_POSITION;
            mIsRecyclableCount = 0;
            mShadowedHolder = null;
            mShadowingHolder = null;
            clearPayload();
            mWasImportantForAccessibilityBeforeHidden = View.IMPORTANT_FOR_ACCESSIBILITY_AUTO;
            mPendingAccessibilityState = PENDING_ACCESSIBILITY_STATE_NOT_SET;
            clearNestedRecyclerViewIfNotNested(this);
        }

//  According to different ViewTypes   Get ViewHolder
 private ScrapData getScrapDataForType(int viewType) {
            ScrapData scrapData = mScrap.get(viewType);
            if (scrapData == null) {
                scrapData = new ScrapData();
                mScrap.put(viewType, scrapData);
            }
            return scrapData;
        }
It can be seen that at most 5 viewholders of the same type are saved in the cache pool, and the ViewHolder is an empty ViewHolder,
And all the data stored in the cache pool are removed by mCachedViews!!
[](https://upload-images.jianshu...)
- Summary
mCachedViews saves 2 viewholders that are about to leave the screen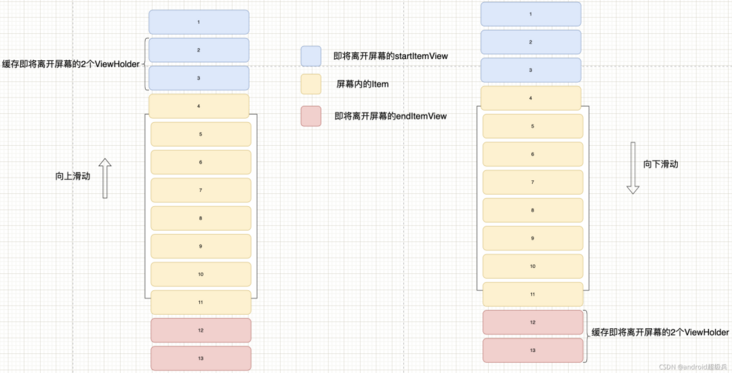
In the mRecyclerPool cache pool: the same ItemViewType can save up to 5 empty data viewholders by default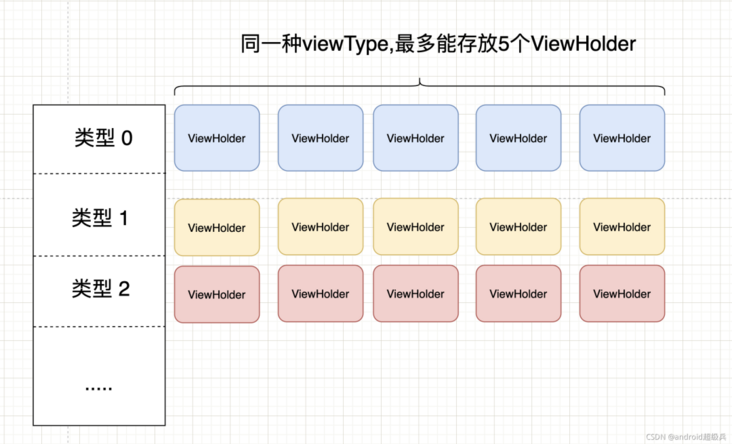
Take it into practice to see the effect:
Here, take a single layout (ItemViewType = 0) as an example
My layoutManger is GridLayoutManager(content,7), so every time I draw the screen, I will directly draw away seven viewholders
It can be seen that at the moment of marking out, the first five will not execute onCreateViewHolder(), and the last two will execute onCreateViewHolder()
⚠️: onCreateViewHolder() It is used to create ViewHolder. It will be said later when reusing!
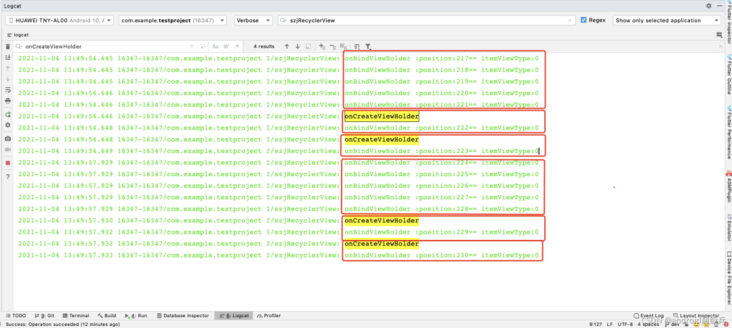
Here, I just analyzed the scrolling event of RecyclerView from onTouchEvent() – > move event
Finally, the ViewHolder will be saved to mcachedviews, and mcachedviews can only save 2 viewholders
If the third ViewHolder comes, it will be saved to the mrecyclerpool
The mrecyclerpool can store up to 5 empty viewholders
This is just an entry for caching. There is another entry for caching, which is in the onLayout() of RecyclerView
Attachedsrap and mchangedsrap cache viewholders visible on the screen
onLayout() entry
#RecyclerView.java
    @Override
    protected void onLayout(boolean changed, int l, int t, int r, int b) {
        //  entrance
        dispatchLayout();
    }
Then execute dispatchLayout()
#RecyclerView.java

void dispatchLayout() {
       .....
       dispatchLayoutStep2();
       ......
}
Then execute dispatchLayoutStep2()
#RecyclerView.java

private void dispatchLayoutStep2() {
          ......

        //  Cache here first
        mLayout.onLayoutChildren(mRecycler, mState);
        .....
}
Then go to the LinearLayoutManager.onLayoutChildren() method
#LinearLayoutManager.java

 @Override
public void onLayoutChildren(RecyclerView.Recycler recycler, RecyclerView.State state) {
        ....
        //Will execute to:   RecyclerView.detachAndScrapAttachedViews()
         detachAndScrapAttachedViews(recycler);
        ......
}
Here we will go to recyclerview. Detachandscrapatachedviews (), which is a key line of code. It can be said that it is the starting point of the ViewHolder in the cache screen, and it is also necessary to complete the "exploration" effect later!!
#RecyclerView.java

public void detachAndScrapAttachedViews(Recycler recycler) {
            final int childCount = getChildCount();
            for (int i = childCount - 1; i >= 0; i--) {
                final View v = getChildAt(i);
                //  Recycling mechanism key code 1
                scrapOrRecycleView(recycler, i, v);
            }
}
Continue with scrapOrRecycleView()
#RecyclerView.java

private void scrapOrRecycleView(Recycler recycler, int index, View view) {
            final ViewHolder viewHolder = getChildViewHolderInt(view);
           ...
            if (viewHolder.isInvalid() && !viewHolder.isRemoved()
                    && !mRecyclerView.mAdapter.hasStableIds()) {
                removeViewAt(index);
                //  Cache mechanism key code 2   Mainly used to deal with   cacheView  , Cache of RecyclerViewPool
                recycler.recycleViewHolderInternal(viewHolder);
            } else {
                detachViewAt(index);
                //  Cache mechanism key code 3
                recycler.scrapView(view);
            }
}
Here are two key points
- The key code 2 of the cache mechanism is mainly used to handle the cache of cacheview and recycleviewpool. Recycleviewholder internal (viewholder); // This key point has been analyzed above!! forget the ctrl+F search and have a look
- recycler.scrapView(view); // Cache ViewHolder in screen
Let's take a look at the details of recycler.scrapView(view)
void scrapView(View view) {
            final ViewHolder holder = getChildViewHolderInt(view);
            //  If the mark is not removed or invalid, it will be cleared   Will cache
            if (holder.hasAnyOfTheFlags(ViewHolder.FLAG_REMOVED | ViewHolder.FLAG_INVALID)
                    || !holder.isUpdated() || canReuseUpdatedViewHolder(holder)) {
                holder.setScrapContainer(this, false);
                //  L1 cache location point 1
                mAttachedScrap.add(holder);
            } else {
                if (mChangedScrap == null) {
                    mChangedScrap = new ArrayList<ViewHolder>();
                }
                holder.setScrapContainer(this, true);
                //  L1 cache location point 2
                mChangedScrap.add(holder);
            }
}
At this point, the level 4 cache is over
To sum up:
Refer to for an in-depth understanding of the caching mechanism of Android RecyclerView:
https://segmentfault.com/a/11...
/ Reuse mechanism /
Go back to the fill() method. ctrl + F search, as mentioned above
#LinearLayoutManager.java

int fill(RecyclerView.Recycler recycler, LayoutState layoutState,
             RecyclerView.State state, boolean stopOnFocusable) {

        final int start = layoutState.mAvailable;
        if (layoutState.mScrollingOffset != LayoutState.SCROLLING_OFFSET_NaN) {
            .....
            //  Key code 19   [for level 4 cache]
            recycleByLayoutState(recycler, layoutState);
        }
         ....

        //  Loop call
        while ((layoutState.mInfinite || remainingSpace > 0) && layoutState.hasMore(state)) {

           //  Key code 5   [for level 4 multiplexing]
            layoutChunk(recycler, state, layoutState, layoutChunkResult);

                  ........................................
                    ........Show only code ideas,Please check the details yourself........
                  ........................................
        }
}
The cache is the entered recycleByLayoutState(recycler, layoutState); method
Reuse is the incoming layoutChunk() method
Execute to layoutState.next(recycler); method
#LinearLayoutManager.java

void layoutChunk(RecyclerView.Recycler recycler, RecyclerView.State state,
                     LayoutState layoutState, LayoutChunkResult result) {
        //  Get current view
        //  Key code 6
        View view = layoutState.next(recycler);

        //  Survey View
        measureChildWithMargins(view, 0, 0);
        .....
}
Then execute to recycler.getViewForPosition(mCurrentPosition);
#LinearLayoutManager.java

View next(RecyclerView.Recycler recycler) {
           .....
            //  Key code 7   [reuse mechanism entry]
            final View view = recycler.getViewForPosition(mCurrentPosition);
            return view;
}
Then continue to getviewforposition() – > getViewForPosition()
#RecyclerView.java

 public View getViewForPosition(int position) {
            //  Key code 8
            return getViewForPosition(position, false);
}

View getViewForPosition(int position, boolean dryRun) {
     //  Key code 10   All reuse is here

      return tryGetViewHolderForPositionByDeadline(position, dryRun, FOREVER_NS).itemView;
}
Finally, it will execute to tryGetViewHolderForPositionByDeadline(), and all the reuse code is here!
#RecyclerView.java

  ViewHolder tryGetViewHolderForPositionByDeadline(int position,
                                                         boolean dryRun, long deadlineNs) {
             ViewHolder holder = null;

            //  One level reuse   [mChangedScrap]
            if (mState.isPreLayout()) {
                //  Key code 11
                holder = getChangedScrapViewForPosition(position);
                fromScrapOrHiddenOrCache = holder != null;
            }

            //  Primary multiplexing   [mAttachedScrap]
            if (holder == null) {
                //  Passing position
                //  Key code 12
                holder = getScrapOrHiddenOrCachedHolderForPosition(position, dryRun);

            }

            //  Secondary multiplexing   [mCachedViews]
             if (holder == null) {
                    //  Get layout type
                    final int type = mAdapter.getItemViewType(offsetPosition);

                    // 2) Find from scrap/cache via stable ids, if exists
                    //  2)   Find from scrap / cache by stable ID (if present)
                    if (mAdapter.hasStableIds()) {
                    //  Key code 13   Reuse according to Id
                    holder = getScrapOrCachedViewForId(mAdapter.getItemId(offsetPosition),
                            type, dryRun);
                    }
             }

             //  Three-level multiplexing   [user defined reuse]
                if (holder == null && mViewCacheExtension != null) {
                    //  Key code 14
                    //  Custom reuse
                    final View view = mViewCacheExtension
                            .getViewForPositionAndType(this, position, type);
                    if (view != null) {
                        holder = getChildViewHolder(view);
                     }
                }

            //  Four level multiplexing   [mrecyclerpool]
              if (holder == null) {
                    //  Key code 15   Get viewHolder from cache pool
                    holder = getRecycledViewPool().getRecycledView(type);

                }

            //  Finally, if you come here, holder  ==  0 indicates that there is no cache, then the ViewHolder is created
            if (holder == null) {
                    //  If the fourth level cache is   null,   Then it is created by the adapter   ViewHolder
                    holder = mAdapter.createViewHolder(RecyclerView.this, type);
            }

            //  When we get here, ViewHolder  !=  null
            //  Binding layout
            if (mState.isPreLayout() && holder.isBound()) {
               .....
            } else if (!holder.isBound() || holder.needsUpdate() || holder.isInvalid()) {
                 ......
                //  Key code 17
                //  Tune it here   onBindViewHolder()   Binding data
                bound = tryBindViewHolderByDeadline(holder, offsetPosition, position, deadlineNs);
                ......
            }
            ......
}
Take a look at the specific binding details of tryBindViewHolderByDeadline(), binding ViewHolder:
private boolean tryBindViewHolderByDeadline(ViewHolder holder, int offsetPosition,
                                                    int position, long deadlineNs) {
           ....
           //  Final binding location
            mAdapter.bindViewHolder(holder, offsetPosition);
           ...
}
The reuse mechanism is much simpler than the cache mechanism, because there is only one reuse entry. Look at the flow chart at a glance!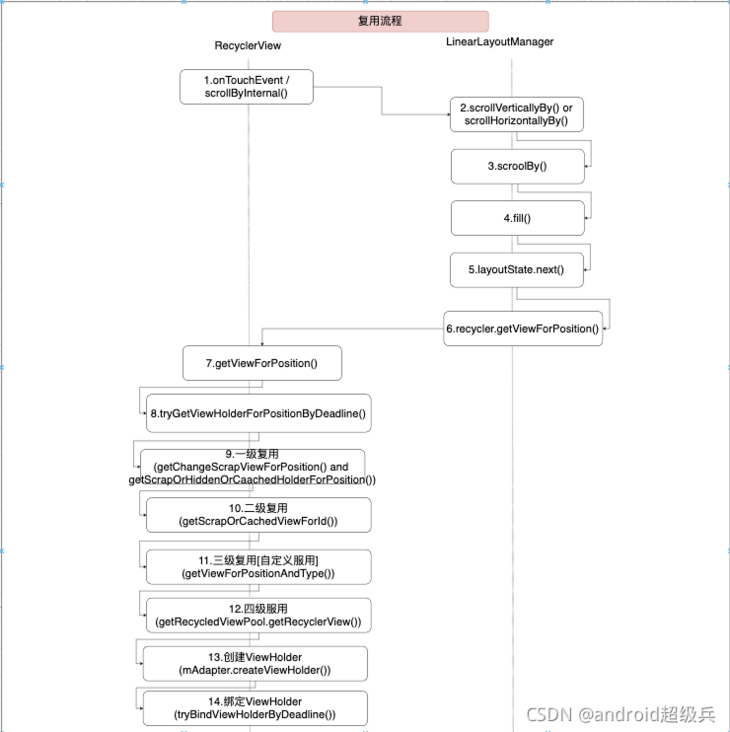
/ Exploration effect and actual combat /
⚠️: In order to consider the overall situation, java is used in actual combat, and the java/kotlin source code is attached at the bottom
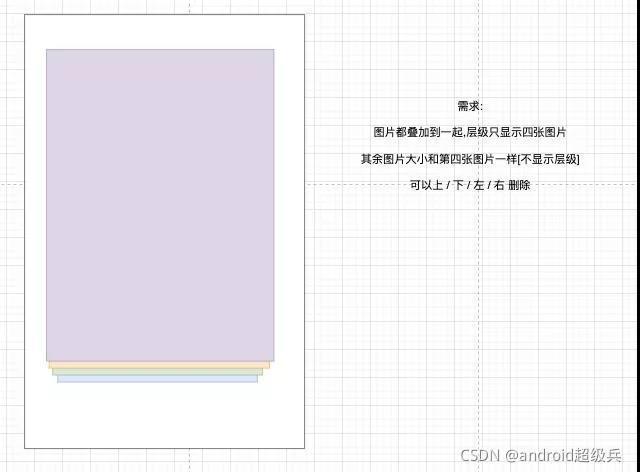
If you want to practice, you must first achieve the most common effect. This code has no nutrition. You can see the effect directly!
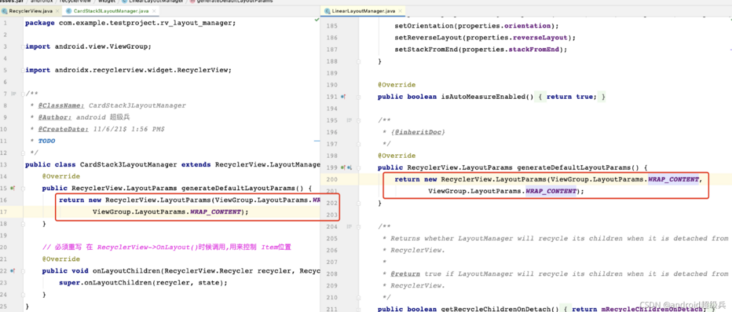
Customize LayoutManager
public class CardStack3LayoutManager extends RecyclerView.LayoutManager {
    @Override
    public RecyclerView.LayoutParams generateDefaultLayoutParams() {
         return new RecyclerView.LayoutParams(ViewGroup.LayoutParams.WRAP_CONTENT,
                ViewGroup.LayoutParams.WRAP_CONTENT);
    }

     //  Must override   stay   Called when recyclerview - > onlayout(), used to place   Item location
     @Override
    public void onLayoutChildren(RecyclerView.Recycler recycler, RecyclerView.State state) {
        super.onLayoutChildren(recycler, state);
    }
}
The generateDefaultLayoutParams() method needs to be rewritten. We are imitating LinearLayoutManager(), so we can directly refer to LinearLayoutManager()
Note: here onLayoutChildren() Manual rewriting is required!
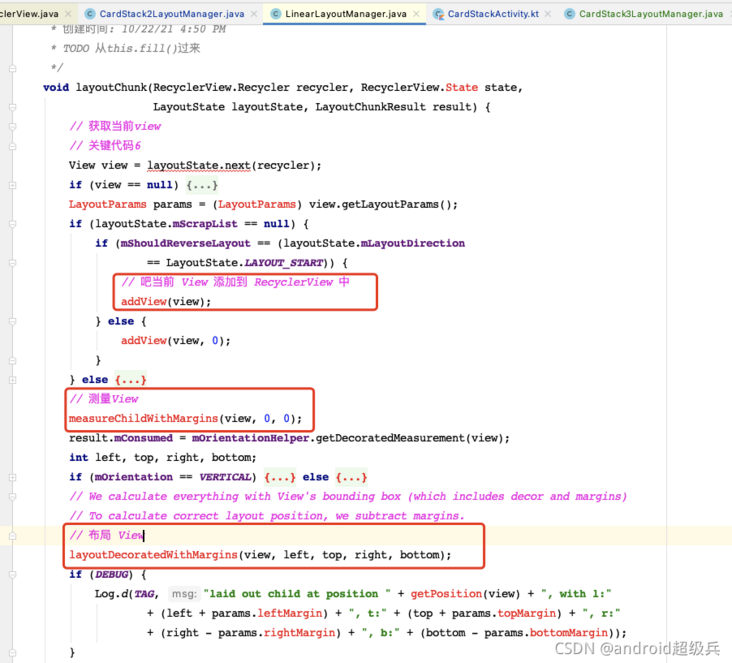
The main functions are written in onLayoutChildren()
#CardStack2LayoutManager.java

 //  Number displayed at the beginning
 public static final int MAX_SHOW_COUNT = 4;

    @Override
    public void onLayoutChildren(RecyclerView.Recycler recycler, RecyclerView.State state) {
        super.onLayoutChildren(recycler, state);

         //  Call the caching mechanism of RecyclerView   cache   ViewHolder
        detachAndScrapAttachedViews(recycler);

        //  Bottom picture subscript
        int bottomPosition = 0;
        //  Get all pictures
        int itemCount = getItemCount();

        if (itemCount > MAX_SHOW_COUNT) {
            //  Which page did you get from
            bottomPosition = itemCount - MAX_SHOW_COUNT;
        }

         for (int i = bottomPosition; i < itemCount; i++) {
            //  Gets the width and height of the current view
            View view = recycler.getViewForPosition(i);

            addView(view);

            //  measure
            measureChildWithMargins(view, 0, 0);

//             getWidth()   RecyclerView   wide
//             getDecoratedMeasuredWidth()   Width of View
            int widthSpace = getWidth() - getDecoratedMeasuredWidth(view);
            int heightSpace = getHeight() - getDecoratedMeasuredHeight(view);

            // LinearLayoutManager#layoutChunk#layoutDecoratedWithMargins
            //  Draw layout
            layoutDecoratedWithMargins(view, widthSpace / 2,
                    heightSpace / 2,
                    widthSpace / 2 + getDecoratedMeasuredWidth(view),
                    heightSpace / 2 + getDecoratedMeasuredHeight(view));
            }
}
This code is to get all itemviews, and then layout them all to the center of the screen
Let's take a look at the current effect:
As mentioned above, detachandscrapatachedviews () is the entrance to the cache and will directly call the recyclerview. Detachandscrapatachedviews () method
The code for measuring layout and placement refers to LinearLayoutManager(). The idea is to add the current View to the RecyclerView, then in the measurement View, and finally in the placement (layout) View
Finally, when the View is placed, there is a zoom level:
#CardStack2LayoutManager.java

 //  Number displayed at the beginning
    public static final int MAX_SHOW_COUNT = 4;

    //  item   Translate Y-axis distance
    public static final int TRANSLATION_Y = 20;

    //  Scaled size
    public static final float SCALE = 0.05f;

@Override
    public void onLayoutChildren(RecyclerView.Recycler recycler, RecyclerView.State state) {
        super.onLayoutChildren(recycler, state);

        //  cache   ViewHolder
        detachAndScrapAttachedViews(recycler);

        //  Bottom picture subscript
        int bottomPosition = 0;
        //  Get all pictures
        int itemCount = getItemCount();

        //If all pictures  >  Picture displayed
        if (itemCount > MAX_SHOW_COUNT) {
            //  Which page did you get from
            bottomPosition = itemCount - MAX_SHOW_COUNT;
        }

        for (int i = bottomPosition; i < itemCount; i++) {
            //  Gets the width and height of the current view
            View view = recycler.getViewForPosition(i);

            addView(view);

            //  measure
            measureChildWithMargins(view, 0, 0);

//             getWidth()   RecyclerView   wide
//             getDecoratedMeasuredWidth()   Width of View
            int widthSpace = getWidth() - getDecoratedMeasuredWidth(view);
            int heightSpace = getHeight() - getDecoratedMeasuredHeight(view);

            // LinearLayoutManager#layoutChunk#layoutDecoratedWithMargins
            //  Draw layout
            layoutDecoratedWithMargins(view, widthSpace / 2,
                    heightSpace / 2,
                    widthSpace / 2 + getDecoratedMeasuredWidth(view),
                    heightSpace / 2 + getDecoratedMeasuredHeight(view));

            /*
             * Author: android   Super soldier
             * TODO itemCount - 1  = Last element
                    Last element  -  i  =  Reciprocal element
             */
            int level = itemCount - 1 - i;

            if (level > 0) {
                int value = toDip(view.getContext(), TRANSLATION_Y);

                //  Zoom if it's not the last one
                if (level < MAX_SHOW_COUNT - 1) {

                    //  translation
                    view.setTranslationY(value * level);
                    //  zoom
                    view.setScaleX(1 - SCALE * level);
                    view.setScaleY(1 - SCALE * level);
                } else {
                    //  Bottom View   Same as the previous View layout (level  -  1)
                    view.setTranslationY(value * (level - 1));
                    view.setScaleX(1 - SCALE * (level - 1));
                    view.setScaleY(1 - SCALE * (level - 1));
                }
            }
        }
    }

    private int toDip(Context context, float value) {
        return (int) TypedValue.applyDimension(TypedValue.COMPLEX_UNIT_DIP, value, context.getResources().getDisplayMetrics());
    }
The current effect is:
So far, the stacking and placement of ItemView has been completed. Next, you only need to add sliding!
You need to use ItemTouchHelper.SimpleCallback to drag and slide RecyclerView
public class SlideCardStackCallBack2<T> extends ItemTouchHelper.SimpleCallback {
    private final CardStackAdapter<T> mAdapter;

    public SlideCardStackCallBack2(CardStackAdapter<T> mAdapter) {
        super(0, 15);
        this.mAdapter = mAdapter;
    }

    //  Drag and drop, never mind
    @Override
    public boolean onMove(@NonNull RecyclerView recyclerView, @NonNull RecyclerView.ViewHolder viewHolder, @NonNull RecyclerView.ViewHolder target) {
        return false;
    }

   //  Processing after sliding
    @Override
    public void onSwiped(@NonNull RecyclerView.ViewHolder viewHolder, int direction) {

    }
}
Two parameters need to be passed here:
- Parameter 1: dragDirs drag
- Parameter 2: swipeDirs sliding
Here, we don't need to drag, just give it to 0, mainly about sliding swipeDirs
#ItemTouchHelper.java

/**
     * Up direction, used for swipe & drag control.
     */
    public static final int UP = 1;    //1

    /**
     * Down direction, used for swipe & drag control.
     */
    public static final int DOWN = 1 << 1; //2

    /**
     * Left direction, used for swipe & drag control.
     */
    public static final int LEFT = 1 << 2; //4

    /**
     * Right direction, used for swipe & drag control.
     */
    public static final int RIGHT = 1 << 3; //8
Sliding is mainly based on these bit operation groups
- If you need to slide up and down, it is UP+DOWN = 1+2 = 3
- If it slides up, down and left, it means UP + DOWN + LEFT = 1 + 2 + 4 = 7
- Then, if it slides up, down, left and right, it means UP + DOWN + LEFT + RIGHT = 15
So if you fill in 15 directly here, it means you can slide up, down, left and right
Onshipped() processing:
#SlideCardStackCallBack2.java

@Override
    public void onSwiped(@NonNull RecyclerView.ViewHolder viewHolder, int direction) {
        //  Current sliding View subscript
        int layoutPosition = viewHolder.getLayoutPosition();
        //  Deletes the currently sliding element
        CardStackBean<T> bean = mAdapter.getData().remove(layoutPosition);

        //  Add to collection position 0   Effect of circular sliding
        mAdapter.addData(0, bean);
        mAdapter.notifyDataSetChanged();
}
This code is easy to understand. First delete the current sliding View, and then add it to the last one, resulting in the effect of circular sliding! Let's see the effect:
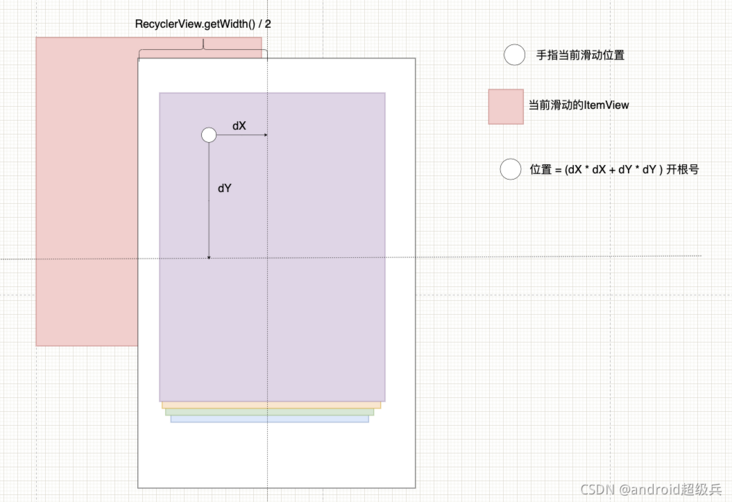
Now it seems that it is still a little stiff. Add some sliding coefficient scaling: the complete code is directly posted here: look at the picture and speak:
#SlideCardStackCallBack2.java

@Override
    public void onChildDraw(@NonNull Canvas c, @NonNull RecyclerView recyclerView, @NonNull RecyclerView.ViewHolder viewHolder, float dX, float dY, int actionState, boolean isCurrentlyActive) {
        super.onChildDraw(c, recyclerView, viewHolder, dX, dY, actionState, isCurrentlyActive);
        int maxDistance = recyclerView.getWidth() / 2;

            //  dx  =  Current slide x position
            //  dy  =  Current slide y position
        //sqrt   Open root
        double sqrt = Math.sqrt((dX * dX + dY * dY));

        //  Amplification factor
        double scaleRatio = sqrt / maxDistance;

        //  The maximum coefficient is 1
        if (scaleRatio > 1.0) {
            scaleRatio = 1.0;
        }

        int childCount = recyclerView.getChildCount();
        //  Cycle all data
        for (int i = 0; i < childCount; i++) {
            View view = recyclerView.getChildAt(i);

            int valueDip = toDip(view.getContext(), 20f);

            /*
             * Author: android   Super soldier
             * TODO
             *   childCount - 1 =  itemView Total number
             *    childCount - 1 - i = itemView Total number  -  i  =  Start with the last one
             *
             * hypothesis   childCount  -  one  =  seven
             *     i accumulation
             *     So level  =  childCount  -  one  -  0  =  seven
             *     So level  =  childCount  -  one  -  one  =  six
             *     So level  =  childCount  -  one  -  two  =  five
             *     So level  =  childCount  -  one  -  three  =  four
             *     So level  =  childCount  -  one  -  four  =  three
             *      . . . .
             */
            int level = childCount - 1 - i;
            if (level > 0) {
                //  Maximum number of display overlays: CardStack2LayoutManager.MAX_SHOW_COUNT  =  four
                if (level < CardStack2LayoutManager.MAX_SHOW_COUNT - 1) {
                    //  Scale:   CardStack2LayoutManager.SCALE  =  zero point zero five
                    float scale = CardStack2LayoutManager.SCALE;

                    //  valueDip  *  level   =  Original translation distance
                    //  scaleRatio  *  valueDip  =  Translation coefficient
                    //  valueDip  *  level  -  scaleRatio  *  valueDip  =  Y-axis translation distance during finger sliding
                    //  Because it's the Y axis, translating up is  -  number
                    view.setTranslationY((float) (valueDip * level - scaleRatio * valueDip));

                    //  one  -  scale  *  level  =  Original zoom size
                    //  scaleRatio  *  scale  =  Scaling factor
                    //  Because it needs to be enlarged, so here is  +  number
                    view.setScaleX((float) ((1 - scale * level) + scaleRatio * scale));
                    view.setScaleY((float) ((1 - scale * level) + scaleRatio * scale));
                }
            }
        }
    }

    private int toDip(Context context, float value) {
        return (int) TypedValue.applyDimension(TypedValue.COMPLEX_UNIT_DIP, value, context.getResources().getDisplayMetrics());
    }
Sliding coefficient diagram:
⚠️: Remember to bind RecyclerView
//  Create drag
        val slideCardStackCallBack = SlideCardStackCallBack2(cardStackAdapter)
        val itemTouchHelper = ItemTouchHelper(slideCardStackCallBack)

        //  Bind drag
        itemTouchHelper.attachToRecyclerView(rootRecyclerView)
The notes here are clear. Let's see the final effect~

There are two more interesting parameters
//  Set rebound distance
    @Override
    public float getSwipeThreshold(@NonNull RecyclerView.ViewHolder viewHolder) {
        return 0.3f;
    }

    //  Set rebound time
    @Override
    public long getAnimationDuration(@NonNull RecyclerView recyclerView, int animationType, float animateDx, float animateDy) {
        return 3000;
    }
It's very simple. Look at the effect directly

Project address: https://gitee.com/lanyangyang...
end of document
Your favorite collection is my greatest encouragement!
Welcome to follow me, share Android dry goods and exchange Android technology.
If you have any opinions on the article or any technical problems, please leave a message in the comment area for discussion!