background
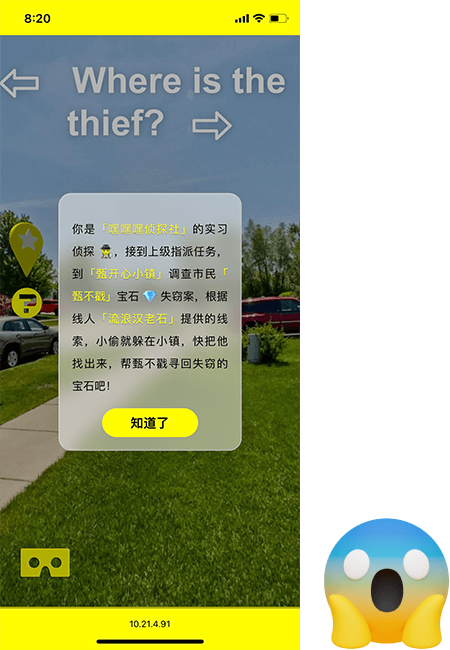
You're an intern detective at the detective agency 🕵️, After receiving the task assigned by the superior, go to Zhen Kaixin town 🏠 Investigate whether citizens are screened or not 👨 gemstone 💎 Theft case, according to the informant, tramp Lao Shi 👨🎤 According to the clues provided, the thief is hiding in the town. Find him quickly and help Zhen bupoke to find the stolen gem!
This article uses three JS sphereometry creates a 3D panorama preview function, and adds interactive points such as 2D SpriteMaterial, Canvas and 3D GLTF to the panorama to realize a detective game with scene switching and click interaction.
Realization effect
Slide the screen left and right to find the interaction point in the 3D panoramic scene and click to find out the real hiding position of the suspect.
The mobile terminal has been adapted and can be accessed on the mobile phone.
💡 Online preview: https://dragonir.github.io/3d...
code implementation
Initialize scene
Create scene, add camera, light source and rendering.
// Perspective camera
camera = new THREE.PerspectiveCamera(75, window.innerWidth / window.innerHeight, 1, 1100);
camera.target = new THREE.Vector3(0, 0, 0);
scene = new THREE.Scene();
// Add ambient light
light = new THREE.HemisphereLight(0xffffff);
light.position.set(0, 40, 0);
scene.add(light);
// Add directional light
light = new THREE.DirectionalLight(0xffffff);
light.position.set(0, 40, -10);
scene.add(light);
// Render
renderer = new THREE.WebGLRenderer();
renderer.setPixelRatio(window.devicePixelRatio);
renderer.setSize(window.innerWidth, window.innerHeight);
container.appendChild(renderer.domElement);
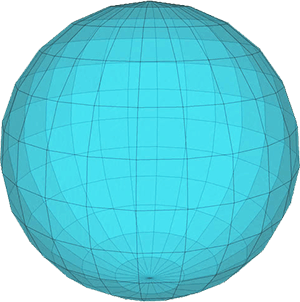
Use sphere to realize panoramic function
// Create a panoramic scene
geometry = new THREE.SphereGeometry(500, 60, 60);
// Flip by z axis
geometry.scale(1, 1, -1);
// Add outdoor low quality map
outside_low = new THREE.MeshBasicMaterial({
  map: new THREE.TextureLoader().load('./assets/images/outside_low.jpg')
});
// Add interior low quality map
inside_low = new THREE.MeshBasicMaterial({
  map: new THREE.TextureLoader().load('./assets/images/inside_low.jpg')
});
mesh = new THREE.Mesh(geometry, outside_low);
// Asynchronous loading of HD texture map
new THREE.TextureLoader().load('./assets/images/outside.jpg', texture => {
  outside = new THREE.MeshBasicMaterial({
    map: texture
  });
  mesh.material = outside;
});
// Add to scene
scene.add(mesh);
📌 The panoramic map is shown in the figure above. The picture is from Bing.
💡 Sphere geometry
Constructor:
THREE.SphereGeometry(radius, segmentsWidth, segmentsHeight, phiStart, phiLength, thetaStart, thetaLength)
- Radius: radius;
- segmentsWidth: number of segments in longitude;
- Segments height: number of segments in latitude;
- Phstart: radian at the beginning of longitude;
- phiLength: radian of longitude crossing;
- thetaStart: radian at the beginning of latitude;
- Thetalongth: the radian the latitude crosses.
💡 Base mesh material MeshBasicMaterial
The sphere material uses MeshBasicMaterial, which is a simple material that is not affected by the lighting in the scene. Meshes using this material will be rendered as simple planar polygons, and the wireframe of geometry can also be displayed.
Constructor:
MeshBasicMaterial(parameters: Object)
parameters: (optional) an object that defines the appearance of a material, with one or more attributes.
Properties:
- . Alpha map [texture]: an alpha map is a grayscale texture that controls the opacity of the entire surface. (Black: completely transparent; white: completely opaque). The default value is null.
- . aoMap[Texture]: the red channel of the texture is used as an ambient occlusion map. The default value is null.
- . aoMapIntensity[Float]: the intensity of the ambient occlusion effect. The default value is 1. Zero is an unobstructed effect.
- . color[Color]: the color of the material. The default value is white 0xffffff.
- . combine[Integer]: how to combine the results of the surface color with the environment map (if any). The options are THREE.Multiply (default), THREE.MixOperation, THREE.AddOperation. If multiple are selected, use. reflectivity to mix between the two colors.
- . envMap[Texture]: environment map. The default value is null.
- . lightMap[Texture]: lightmap. The default value is null.
- . lightMapIntensity[Float]: bake the intensity of light. The default value is 1.
- . map[Texture]: texture map. The default is null.
- . morphTargets[Boolean]: whether the material uses morphTargets. The default value is false.
- . reflectivity[Float]: the influence degree of the environment map on the surface. The default value is 1. The valid range is between 0 (no reflection) and 1 (full reflection).
- . refractionRatio[Float]: the refractive index should not exceed 1. The default value is 0.98.
- . specularMap[Texture]: the specular map used by the material. The default value is null.
- . wireframe[Boolean]: renders geometry as wireframe. The default value is false (that is, it renders as a planar polygon).
- . wireframeLinecap[String]: defines the appearance of both ends of the line. The optional values are but, round and square. The default is round.
- . wireframeLinejoin[String]: defines the style of line connection nodes. The optional values are round, bevel and miter. The default value is round.
- . wireframeLinewidth[Float]: controls the wireframe width. The default value is 1.
💡 TextureLoader
TextureLoader loads from the given URL and passes the fully loaded texture to onLoad. This method also returns a new texture object, which can be directly used for material creation, loads a class of material, and internally uses ImageLoader to load files.
Constructor:
TextureLoader(manager: LoadingManager)
- manager: the loadingManager used by the loader. The default value is three DefaultLoadingManager.
method:
.load(url: String, onLoad: Function, onProgress: Function, onError: Function) : Texture
- URL: the URL or path of the file. It can also be a Data URI.
- onLoad: called when the load is complete. The callback parameter is the texture to be loaded.
- onProgress: will be called during loading. The parameter is the XMLHttpRequest instance, which contains the total and loaded parameters.
- onError: called when loading an error.
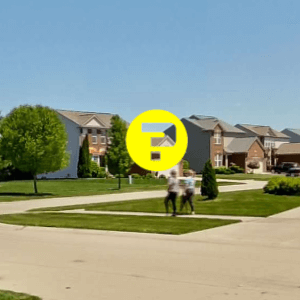
Add interaction point
Create a new interaction point array, including the name, scale and spatial coordinates of each interaction point.
var interactPoints = [
  { name: 'point_0_outside_house', scale: 2, x: 0, y: 1.5, z: 24 },
  { name: 'point_1_outside_car', scale: 3, x: 40, y: 1, z: -20 },
  { name: 'point_2_outside_people', scale: 3, x: -20, y: 1, z: -30 },
  { name: 'point_3_inside_eating_room', scale: 2, x: -30, y: 1, z: 20 },
  { name: 'point_4_inside_bed_room', scale: 3, x: 48, y: 0, z: -20 }
];
Add 2D static picture interaction point
let pointMaterial = new THREE.SpriteMaterial({
  map: new THREE.TextureLoader().load('./assets/images/point.png')
});
interactPoints.map(item => {
  let point = new THREE.Sprite(pointMaterial);
  point.name = item.name;
  point.scale.set(item.scale * 1.2, item.scale * 1.2, item.scale * 1.2);
  point.position.set(item.x, item.y, item.z);
  scene.add(point);
});
💡 SpriteMaterial
Constructor:
SpriteMaterial(parameters : Object)
- parameters: optional, an object that defines the appearance of a Material, with one or more attributes. Any attribute of a Material can be passed in from here (including any attribute inherited from Material and ShaderMaterial).
- SpriteMaterials will not be used by material Clippingplanes crop.
Properties:
. Alpha map [texture]: an alpha map is a grayscale texture that controls the opacity of the entire surface. The default value is null.
. color[Color]: the color of the material. The default value is white 0xffffff map will be multiplied by color.
. map[Texture]: color map. The default is null.
. rotation[Radians]: the rotation of sprite, in radians. The default value is 0.
. Sizeathenation [Boolean]: whether the size of the sprite will be attenuated by the camera depth. (perspective cameras only.) the default is true.
Using the same method, load a two-dimensional picture of the suspect and add it to the scene.
function loadMurderer() {
  let material = new THREE.SpriteMaterial({
    map: new THREE.TextureLoader().load('./assets/models/murderer.png')
  });
  murderer = new THREE.Sprite(material);
  murderer.name = 'murderer';
  murderer.scale.set(12, 12, 12);
  murderer.position.set(43, -3, -20);
  scene.add(murderer);
}
Add 3D dynamic model anchors
The three-dimensional dynamic anchor point is realized by loading the gltf model of landmark anchor point shape. Gltfloader needs to be introduced separately to load gltf JS, the landmark model is built using Blender.
var loader = new THREE.GLTFLoader();
loader.load('./assets/models/anchor.gltf', object => {
  object.scene.traverse(child => {
    if (child.isMesh) {
      // Modify material styles
      child.material.metalness = .4;
      child.name.includes('yellow') && (child.material.color = new THREE.Color(0xfffc00))
    }
  });
  object.scene.rotation.y = Math.PI / 2;
  interactPoints.map(item => {
    let anchor = object.scene.clone();
    anchor.position.set(item.x, item.y + 3, item.z);
    anchor.name = item.name;
    anchor.scale.set(item.scale * 3, item.scale * 3, item.scale * 3);
    scene.add(anchor);
  })
});
The autobiographical animation effect needs to be realized by modifying the rotation of the model in the requestAnimationFrame.
function animate() {
requestAnimationFrame(animate);
anchorMeshes.map(item => {
item.rotation.y += 0.02;
});
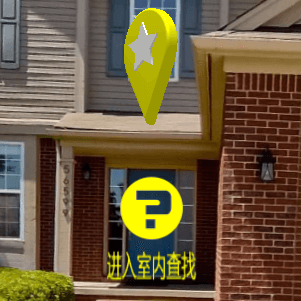
}Add 2D text prompt
You can use Canvas to create text prompts and add them to your scene.
function makeTextSprite(message, parameters) {
  if (parameters === undefined) parameters = {};
  var fontface = parameters.hasOwnProperty("fontface") ? parameters["fontface"] : "Arial";
  var fontsize = parameters.hasOwnProperty("fontsize") ? parameters["fontsize"] : 32;
  var borderThickness = parameters.hasOwnProperty("borderThickness") ? parameters["borderThickness"] : 4;
  var borderColor = parameters.hasOwnProperty("borderColor") ? parameters["borderColor"] : { r: 0, g: 0, b: 0, a: 1.0 };
  var canvas = document.createElement('canvas');
  var context = canvas.getContext('2d');
  context.font = fontsize + "px " + fontface;
  var metrics = context.measureText(message);
  var textWidth = metrics.width;
  context.strokeStyle = "rgba(" + borderColor.r + "," + borderColor.g + "," + borderColor.b + "," + borderColor.a + ")";
  context.lineWidth = borderThickness;
  context.fillStyle = "#fffc00";
  context.fillText(message, borderThickness, fontsize + borderThickness);
  context.font = 48 + "px " + fontface;
  var texture = new THREE.Texture(canvas);
  texture.needsUpdate = true;
  var spriteMaterial = new THREE.SpriteMaterial({ map: texture });
  var sprite = new THREE.Sprite(spriteMaterial);
  return sprite;
}
usage method:
outsideTextTip = makeTextSprite('Enter the room to find');
outsideTextTip.scale.set(2.2, 2.2, 2)
outsideTextTip.position.set(-0.35, -1, 10);
scene.add(outsideTextTip);- 💡 Canvas canvases can be used as three JS texture map CanvasTexture. Canvas canvas can draw various geometric shapes through 2D API. You can draw a contour through canvas and then use it as three JS texture mapping of mesh model, Sprite model and other model objects.
- 💡 The measureText() method returns an object that contains the specified font width in pixels. Use this method if you need to know the width of the text before it is output to the canvas. Measuretext syntax: context measureText(text). width.
Add 3D text prompt
Due to limited time, 3D text is not used in this example, but using 3D text in the page will achieve better visual effect. To understand the specific implementation details, you can read another article of mine, and the subsequent mouse capture and other contents are also explained in detail in this article.
🔗 Portal: Use three JS to achieve cool acid style 3D pages
Mouse capture
Use Raycaster to get the selected mesh object and add click interaction.
function onDocumentMouseDown(event) {
  raycaster.setFromCamera(mouse, camera);
  var intersects = raycaster.intersectObjects(interactMeshes);
  if (intersects.length > 0) {
    let name = intersects[0].object.name;
    if (name === 'point_0_outside_house') {
      camera_time = 1;
    } else if (name === 'point_4_inside_bed_room') {
      Toast('The thief is here', 2000);
      loadMurderer();
    } else {
      Toast(`The thief is not here ${name.includes('car') ? 'In the car' : name.includes('people') ? 'crowd' : name.includes('eating') ? 'restaurant' : 'here'}`, 2000);
    }
  }
  onPointerDownPointerX = event.clientX;
  onPointerDownPointerY = event.clientY;
  onPointerDownLon = lon;
  onPointerDownLat = lat;
}
Scene switching
function update() {
  lat = Math.max(-85, Math.min(85, lat));
  phi = THREE.Math.degToRad(90 - lat);
  theta = THREE.Math.degToRad(lon);
  camera.target.x = 500 * Math.sin(phi) * Math.cos(theta);
  camera.target.y = 500 * Math.cos(phi);
  camera.target.z = 500 * Math.sin(phi) * Math.sin(theta);
  camera.lookAt(camera.target);
  if (camera_time > 0 && camera_time < 50) {
    camera.target.x = 0;
    camera.target.y = 1;
    camera.target.z = 24;
    camera.lookAt(camera.target);
    camera.fov -= 1;
    camera.updateProjectionMatrix();
    camera_time++;
    outsideTextTip.visible = false;
  } else if (camera_time === 50) {
    lat = -2;
    lon = 182;
    camera_time = 0;
    camera.fov = 75;
    camera.updateProjectionMatrix();
    mesh.material = inside_low;
    // Load a new panorama scene
    new THREE.TextureLoader().load('./assets/images/inside.jpg', function (texture) {
      inside = new THREE.MeshBasicMaterial({
        map: texture
      });
      mesh.material = inside;
    });
    loadMarker('inside');
  }
  renderer.render(scene, camera);
}- 💡 After the properties of the perspective camera are created, we can modify them according to personal needs, but after the properties of the camera are modified, we need to call the updateProjectionMatrix() method to update them.
- 💡 THREE.Math.degToRad: converts degrees to radians.
Here, the 3D panoramic function is fully realized.
🔗 Full code: https://github.com/dragonir/3...
summary
The main knowledge points involved in this case include:
- Sphere geometry
- Base mesh material MeshBasicMaterial
- SpriteMaterial
- Material loading TextureLoader
- Text texture Canvas
- Mouse capture Raycaster
reference material
- [1]. Use three in React JS to realize Web VR panoramic viewing
- [2]. Use three JS to achieve cool acid style 3D pages