introduction
The value selection box is similar to the drop-down box. It is used to allow users to select the content they need through this component, and let the interface program obtain this content at the same time. However, there is a difference between the two. The drop-down box only displays several optional values for users to choose. The selection of the value selection box is logical, and the content allowed to be selected is also logical.
In short, the drop-down box can provide the selection of any relevant content, while the value selection box allows the selection of contents with sequential or reverse logic, such as logical items such as value and size.
In TinUI, we will implement similar functions.
layout
Function structure
def add_spinbox(self,pos:tuple,width=150,data=('1','2','3'),now='',fg='black',bg='',activefg='black',activebg='#E5F1FB',font=('Microsoft YaHei ',12),command=None):#Draw selection box
    '''
    pos::position
    width::input/Selected value display box width
    data::Selected value data, format:(ele1,ele2,ele3...)
    now::The current display range. If it is empty or the selected value data is no longer selected, the first content of the selected value data will be displayed
    fg::Input box text color
    bg::Input box background color
    activefg::Button response text color
    activebg::Button response background color
    font::Display the font and affect the up adjustment at the same time/Down button font
    command::The callback function when selecting a value must accept a parameter: the selected value
    '''
Selected value display
In order to facilitate and complete the input and selection function of the value selection box, we directly use the Entry control as the main body of the value selection box. At present, we have not determined how to judge the input box, directly input the selected value, and then use the adjustment button to select the value. Therefore, we will draw the input box first.
We mainly solve two problems:
- The Entry control does not allow the background color to be transparent, so we need to obtain the TinUI background color instead
- Judge whether the parameter "now" is standard and carry out relevant operations
if bg=='':#Get TinUI background color
    bg=self['background']
wentry=Entry(self,font=font,fg=fg,bd=2,bg=bg,relief='groove')
if now=='' or now not in data:#Determine the default value
    now=data[0]
wentry.insert(0,now)
entry=self.create_window(pos,window=wentry,width=width,anchor='nw')
Through comments, you should be able to understand the meaning of this code.
Adjustment button
For the input box drawn above, we will draw the adjustment button next.
Because TinUI has provided the function of drawing buttons, the adjustment button of spinbox will directly use the function of TinUI drawing buttons.
But how to draw the adjustment button according to the size and position of the input box?
The first problem is the font. The buttons in TinUI are actually drawn according to the text size, so we need to determine the text size. The text of the input box comes from the parameters, so we can directly obtain the text content and reduce the font size to half of the original, so as to complete the text drawing of an adjustment button. However, according to the test, under the "Microsoft YaHei" font, the font size should be reduced to about one-third of the original size, and can only be half of the original size when drawing. Other fonts need to be tested by themselves.
Next, the position of the button. Since you have published more than ten articles on the TinUI drawing component, there should be a certain foundation for the drawing of the control position. Directly give the code:
If you haven't mastered drawing related canvas objects through the size and position of a canvas object, please check the previous articles of this column to get familiar with the idea of component drawing.
bbox=self.bbox(entry)
height=bbox[3]-bbox[1]#Get total height
font=(font[0],font[1]//3) # set font size
#Up button
button1=self.add_button((pos[0]+width+2,pos[1]+3),text='▲',activefg=activefg,activebg=activebg,font=font)
#Down button
button2=self.add_button((pos[0]+width+2,pos[1]-5+height),text='▼',activefg=activefg,activebg=activebg,font=font,anchor='sw',command=downdata)
#Data record structure to be used later
datanum=TinUINum()
datanum.num=data.index(now)#Record data location
maxnum=len(data)-1#Maximum position
Up / down button method
Now that we have drawn all the components, let's start enriching their functions.
For values obtained directly through the adjustment button, we can first obtain the current value, and then re value and display the content according to the specific adjustment direction.
def updata(event):#Up regulation function
    index=datanum.num-1
    if index<0:
        return
    datanum.num-=1
    wentry.delete(0,'end')
    wentry.insert(0,data[index])
    if command!=None:
        command(data[index])
def downdata(event):#Down regulation function
    index=datanum.num+1
    if index>maxnum:
        return
    datanum.num+=1
    wentry.delete(0,'end')
    wentry.insert(0,data[index])
    if command!=None:
        command(data[index])
#...
button1=self.add_button((pos[0]+width+2,pos[1]+3),text='▲',activefg=activefg,activebg=activebg,font=font,command=updata)
button2=self.add_button((pos[0]+width+2,pos[1]-5+height),text='▼',activefg=activefg,activebg=activebg,font=font,anchor='sw',command=downdata)
#...
Bind the adjustment function for the two adjustment buttons.
Input value and change adjustment
When the value is large, it is impossible for the user to click the adjustment button all the time, otherwise the mouse can't bear it. Therefore, we need to enable the input box to input values directly, and consider the current input values when using the adjustment button.
First, design the function to judge whether the input value meets the requirements:
def check_in_data():
    val=wentry.get()
    if val in data:
        return True,val
    else:
        return False,val
Then add a code before each adjustment function to judge the position of the current value and the position of the selected value for the next adjustment.
def updata(event):
    val=check_in_data()
    if val[0]==True:
        datanum.num=data.index(val[1])
    #...
def downdata(event):
    val=check_in_data()
    if val[0]==True:
        datanum.num=data.index(val[1])
    #...
Complete code function
def add_spinbox(self,pos:tuple,width=150,data=('1','2','3'),now='',fg='black',bg='',activefg='black',activebg='#E5F1FB',font=('Microsoft YaHei ',12),command=None):#Draw selection box
    def updata(event):
        val=check_in_data()
        if val[0]==True:
            datanum.num=data.index(val[1])
        index=datanum.num-1
        if index<0:
            return
        datanum.num-=1
        wentry.delete(0,'end')
        wentry.insert(0,data[index])
        if command!=None:
            command(data[index])
    def downdata(event):
        val=check_in_data()
        if val[0]==True:
            datanum.num=data.index(val[1])
        index=datanum.num+1
        if index>maxnum:
            return
        datanum.num+=1
        wentry.delete(0,'end')
        wentry.insert(0,data[index])
        if command!=None:
            command(data[index])
    def check_in_data():
        val=wentry.get()
        if val in data:
            return True,val
        else:
            return False,val
    if bg=='':
        bg=self['background']
    wentry=Entry(self,font=font,fg=fg,bd=2,bg=bg,relief='groove')
    if now=='' or now not in data:
        now=data[0]
    wentry.insert(0,now)
    entry=self.create_window(pos,window=wentry,width=width,anchor='nw')
    bbox=self.bbox(entry)
    height=bbox[3]-bbox[1]
    font=(font[0],font[1]//3)
    button1=self.add_button((pos[0]+width+2,pos[1]+3),text='▲',activefg=activefg,activebg=activebg,font=font,command=updata)
    button2=self.add_button((pos[0]+width+2,pos[1]-5+height),text='▼',activefg=activefg,activebg=activebg,font=font,anchor='sw',command=downdata)
    datanum=TinUINum()
    datanum.num=data.index(now)#Record data location
    maxnum=len(data)-1#Maximum position
    return wentry,button1,button2
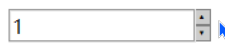
effect
Test code
def test(event):
    a.title('TinUI Test')
    b.add_paragraph((50,150),'This is TinUI The event function reached by the button is echoed. In addition, the window title is also changed and the indent of the first line title is reduced')
    b.coords(m,100,5)
def test1(word):
    print(word)
def test2(event):
    ok1()
def test3(event):
    ok2()
def test4(event):
    from time import sleep
    for i in range(1,101):
        sleep(0.02)
        progressgoto(i)

if __name__=='__main__':
    a=Tk()
    a.geometry('700x700+5+5')

    b=TinUI(a,bg='white')
    b.pack(fill='both',expand=True)
    m=b.add_title((600,0),'TinUI is a test project for futher tin using')
    m1=b.add_title((0,680),'test TinUI scrolled',size=2,angle=24)
    b.add_paragraph((20,290),'''     TinUI Is based on tkinter Canvas development interface UI Layout scheme as tkinter Expansion and TinEngine Exist with the expansion of. At present, TinUI It is still in the development stage. If you want to use the full TinUI,Coming soon.''',
    angle=-18)
    b.add_paragraph((20,100),'The following paragraph is to test the non parallel font display effect of the canvas TinUI A brief introduction to')
    b.add_button((250,450),'Test button',activefg='white',activebg='red',command=test,anchor='center')
    b.add_checkbutton((80,430),'allow TinUI test',command=test1)
    b.add_label((10,220),'This is made of canvas TinUI Drawn Label assembly')
    b.add_entry((250,300),350,30,'This is for input')
    b.add_separate((20,200),600)
    b.add_radiobutton((50,480),300,'sky is blue, water is blue, too. So, what is your heart',('red','blue','black'),command=test1)
    b.add_link((400,500),'TinGroup knowledge base','http://tinhome.baklib-free.com/')
    _,ok1=b.add_waitbar1((500,220),bg='#CCCCCC')
    b.add_button((500,270),'Stop waiting for animation',activefg='cyan',activebg='black',command=test2)
    bu1=b.add_button((700,200),'Stop dot scroll bar',activefg='white',activebg='black',command=test3)[1]
    bu2=b.add_button((700,250),'nothing button 2')[1]
    bu3=b.add_button((700,300),'nothing button 3')[1]
    b.add_labelframe((bu1,bu2,bu3),'box buttons')
    _,_,ok2=b.add_waitbar2((600,400))
    b.add_combobox((600,550),text='How likely are you to go to Mount Everest',content=('20%','40%','60%','80%','100%','1000%'))
    b.add_button((600,480),text='Test progress bar (no event version)',command=test4)
    _,_,_,progressgoto=b.add_progressbar((600,510))
    b.add_table((180,630),data=(('a','space fans over the world','c'),('you\ncan','2','3'),('I','II','have a dream, then try your best to get it!')))
    b.add_paragraph((300,810),text='Above is a table')
    b.add_onoff((600,100))
    b.add_spinbox((680,100))

    a.mainloop()
Final effect
github project
github project address of TinUI
pip Download
pip install tinui
epilogue
Now you can apply TinUI to your own tkinter project.
I opened my own Personal blog , welcome to visit.
🔆 tkinter innovation 🔆