For tkinter controls, see: https://blog.csdn.net/weixin_/article/details/78379523
This is quite comprehensive
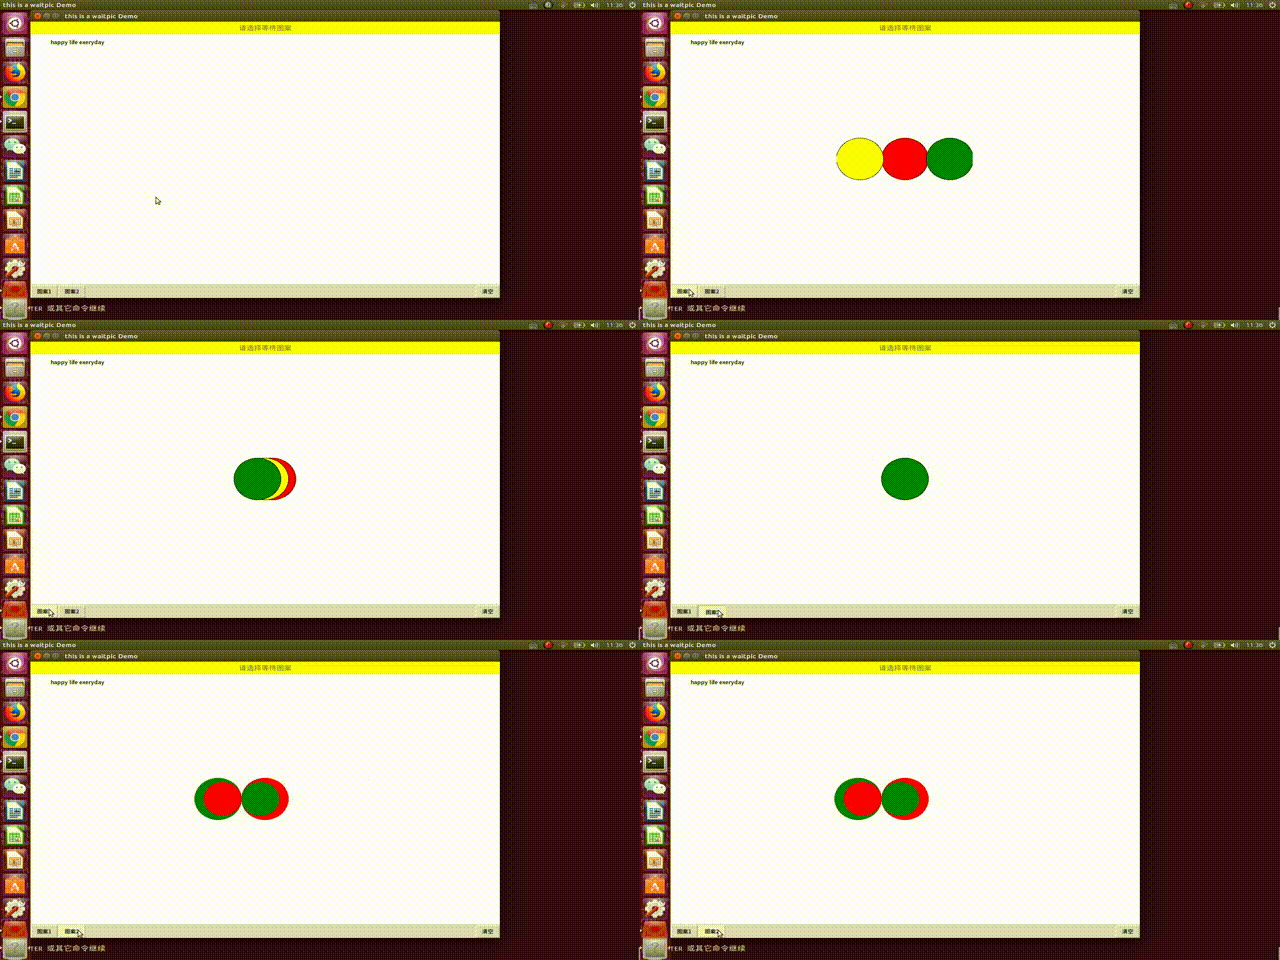
Today, we use tkinter to realize the loading of Baidu, and the construction of wheels. First, let's look at the effect diagram.
Guide Kit:
1 from tkinter import *
2 import time
It should be noted that t in tkinter must be lowercase
Main controls and arguments:
 1      master = Tk()
 2         master.title('this is a waitpic Demo')
 3         title = Label(master, text='Please select a waiting pattern',font='15',bg='yellow',fg='grey')
 4         title.pack(fill=X)
 5
 6         self.canvaswidth = 1000
 7         self.canvasheight = 600
 8         self.centerx = self.canvaswidth // 2
 9         self.centery = self.canvasheight // 2
10         self.topx = self.centerx - 50
11         self.topy = self.centery -50
12         self.bottomx = self.centerx + 50
13         self.bottomy = self.centery + 50
14         self.mycanvas = Canvas(master, width=self.canvaswidth,height=self.canvasheight, bg='White')
15         self.mycanvas.pack()
16         self.mycanvas.create_text(100,20,text='happy life exeryday')
17
18         bt1 = Button(master,text='Pattern 1',command=self.display1)
19         bt2 = Button(master,text='Pattern 2',command=self.display2)
20         btclear = Button(master,text='empty',command=self.clearCanvas)
21         bt1.pack(side=LEFT)
22         bt2.pack(side=LEFT)
23         btclear.pack(side=RIGHT)
The logic of adding controls is as follows:
1. Declare a Tk() object or a frame object
2. For control: control x(tk/frame,**kwargs)
3. Layout the control. See the blog given at the beginning
After adding controls, remember to add them so that they can be displayed
master.mainloop()
For the implementation of Baidu's load box:
1. Implementation idea: alternate three circles, Search API, and see the particularly useful move, update - > get~
 1         olred = self.mycanvas.create_oval(self.topx, self.topy, self.bottomx, self.bottomy, tag='display1', fill='red')
 2         olyellow = self.mycanvas.create_oval( self.topx, self.topy, self.bottomx, self.bottomy, tag='display1', fill='yellow')
 3         olgreen = self.mycanvas.create_oval( self.topx, self.topy, self.bottomx , self.bottomy, tag='diaplay1', fill='green')
 4         ols = [olred, olyellow, olgreen]
 5         movingx , movingy = 0, 1
 6         for count in range(4):
 7             for i in range(100):
 8                 self.mycanvas.move(ols[movingx % 3],-2, 0)
 9                 self.mycanvas.move(ols[movingy % 3],+2, 0)
10                 self.mycanvas.update()
11                 time.sleep(0.01)
12             for j in range(100):
13                 self.mycanvas.move(ols[movingx % 3],+2,0)
14                 self.mycanvas.move(ols[movingy % 3],-2,0)
15                 self.mycanvas.update()
16                 time.sleep(0.01)
17             movingx += 1
18             movingy += 1
For the implementation of the loading frame of the vibrato, because I am too quick to shake the brush, I didn't see it too clearly, so I realized it first.
 1 sizes = [size for size in range(0,100,5)]
 2         ols = []
 3         colors = ['red','green']
 4         cx , cy = 0,1
 5         for count in range(10):
 6             for offset in sizes:
 7                 olleft = self.mycanvas.create_oval(self.topx - 100 + offset,self.topy + offset,self.bottomx -100 - offset,self.bottomy - offset,
 8                                                 fill=colors[cx % 2],outline=colors[cx % 2],tag='display2')
 9                 olright = self.mycanvas.create_oval(self.topx + offset,self.topy + offset,self.bottomx-offset,self.bottomy - offset,
10                                                 fill=colors[cy % 2],outline=colors[cy % 2],tag='display2')
11                 ols.append(olleft)
12                 ols.append(olright)
13                 self.mycanvas.move(olleft,offset,0)
14                 self.mycanvas.move(olright,-offset,0)
15                 self.mycanvas.update()
16                 time.sleep(0.1)
17
18             for ol in ols:
19                 self.mycanvas.delete(ol)
20             cx += 1
21             cy += 1
All codes:
 1 from tkinter import *
 2 import time
 3
 4 class wait_:
 5     def __init__(self):
 6         master = Tk()
 7         master.title('this is a waitpic Demo')
 8         title = Label(master, text='Please select a waiting pattern',font='15',bg='yellow',fg='grey')
 9         title.pack(fill=X)
10
11         self.canvaswidth = 1000
12         self.canvasheight = 600
13         self.centerx = self.canvaswidth // 2
14         self.centery = self.canvasheight // 2
15         self.topx = self.centerx - 50
16         self.topy = self.centery -50
17         self.bottomx = self.centerx + 50
18         self.bottomy = self.centery + 50
19         self.mycanvas = Canvas(master, width=self.canvaswidth,height=self.canvasheight, bg='White')
20         self.mycanvas.pack()
21         self.mycanvas.create_text(100,20,text='happy life exeryday')
22
23         bt1 = Button(master,text='Pattern 1',command=self.display1)
24         bt2 = Button(master,text='Pattern 2',command=self.display2)
25         btclear = Button(master,text='empty',command=self.clearCanvas)
26         bt1.pack(side=LEFT)
27         bt2.pack(side=LEFT)
28         btclear.pack(side=RIGHT)
29
30         master.mainloop()
31
32     def display1(self):
33         olred = self.mycanvas.create_oval(self.topx, self.topy, self.bottomx, self.bottomy, tag='display1', fill='red')
34         olyellow = self.mycanvas.create_oval( self.topx, self.topy, self.bottomx, self.bottomy, tag='display1', fill='yellow')
35         olgreen = self.mycanvas.create_oval( self.topx, self.topy, self.bottomx , self.bottomy, tag='diaplay1', fill='green')
36         ols = [olred, olyellow, olgreen]
37         movingx , movingy = 0, 1
38         for count in range(4):
39             for i in range(100):
40                 self.mycanvas.move(ols[movingx % 3],-2, 0)
41                 self.mycanvas.move(ols[movingy % 3],+2, 0)
42                 self.mycanvas.update()
43                 time.sleep(0.01)
44             for j in range(100):
45                 self.mycanvas.move(ols[movingx % 3],+2,0)
46                 self.mycanvas.move(ols[movingy % 3],-2,0)
47                 self.mycanvas.update()
48                 time.sleep(0.01)
49             movingx += 1
50             movingy += 1
51
52     def display2(self):
53         sizes = [size for size in range(0,100,5)]
54         ols = []
55         colors = ['red','green']
56         cx , cy = 0,1
57         for count in range(10):
58             for offset in sizes:
59                 olleft = self.mycanvas.create_oval(self.topx - 100 + offset,self.topy + offset,self.bottomx -100 - offset,self.bottomy - offset,
60                                                 fill=colors[cx % 2],outline=colors[cx % 2],tag='display2')
61                 olright = self.mycanvas.create_oval(self.topx + offset,self.topy + offset,self.bottomx-offset,self.bottomy - offset,
62                                                 fill=colors[cy % 2],outline=colors[cy % 2],tag='display2')
63                 ols.append(olleft)
64                 ols.append(olright)
65                 self.mycanvas.move(olleft,offset,0)
66                 self.mycanvas.move(olright,-offset,0)
67                 self.mycanvas.update()
68                 time.sleep(0.1)
69
70             for ol in ols:
71                 self.mycanvas.delete(ol)
72             cx += 1
73             cy += 1
74
75     def clearCanvas(self):
76         self.mycanvas.delete('display1','display2')
77
78 wait_()