
Traefik is an open source edge router that makes service publishing easy and interesting. It is responsible for receiving requests from your system and then using the appropriate components to process these requests.
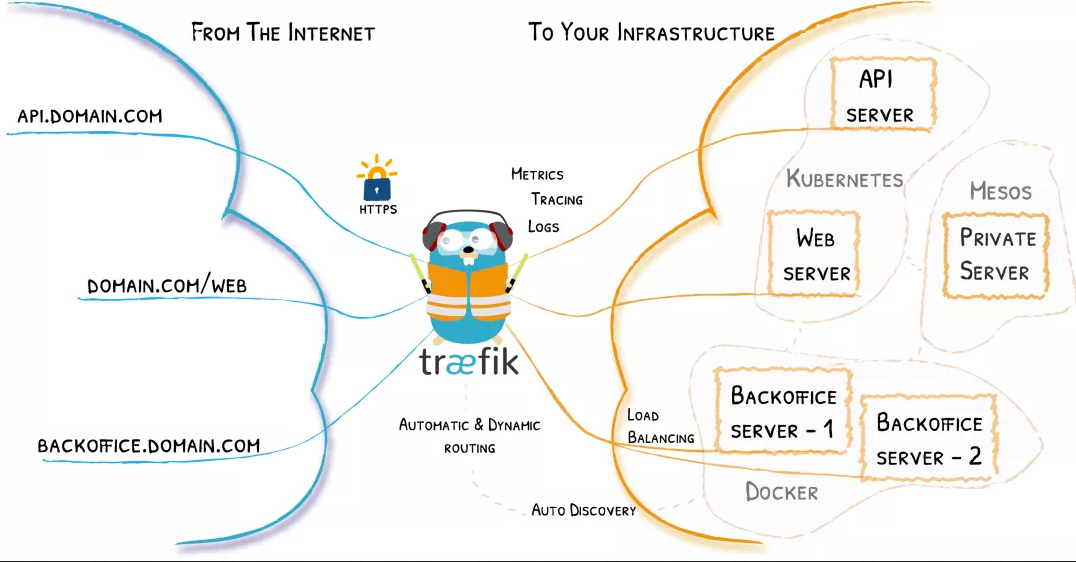
In addition to many functions, traifik is different in that it will automatically find the configuration suitable for your service. When Traefik checks your service, it will find the relevant information of the service and find the appropriate service to meet the corresponding request.
Traifik is compatible with all mainstream cluster technologies, such as Kubernetes, Docker, Docker Swarm, AWS, Mesos, Marathon, etc; And can handle multiple ways at the same time. (it can even be used for older software running on bare metal.)
With Traefik, you don't need to maintain or synchronize an independent configuration file: everything will be automatically configured and operated in real time (without restarting and interrupting the connection). With Traefik, you can spend more time on system development and new functions, rather than a lot of time on configuring and maintaining working status.
Core concept
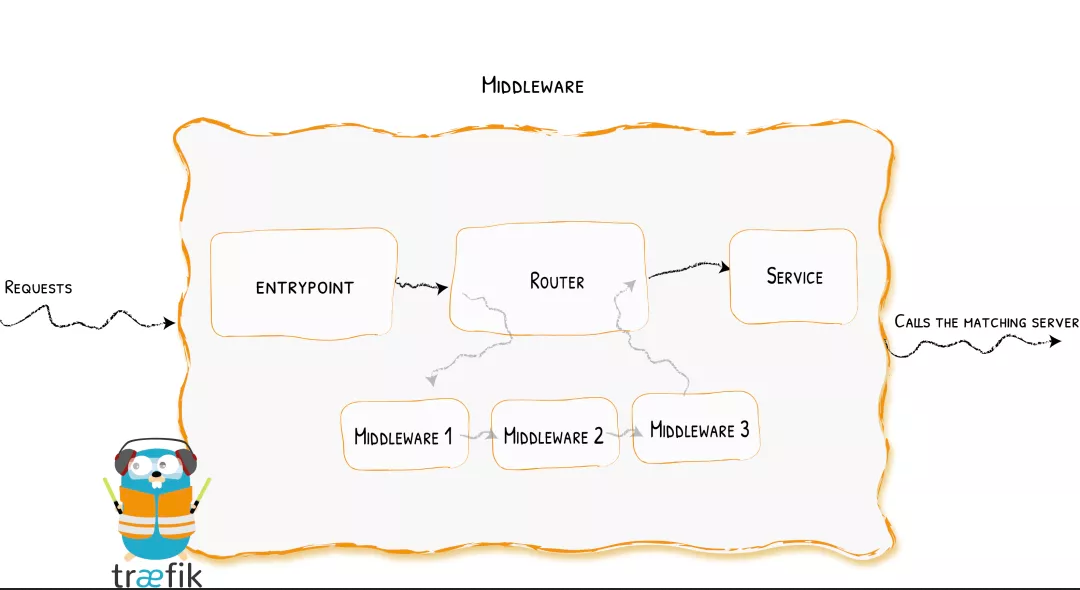
Traefik is an edge router, which is the gate of your entire platform. It intercepts and routes each incoming request: it knows all logic and rules, and these rules determine which services handle which requests; The traditional reverse proxy needs a configuration file, which contains all possible routes to your service. Traefik will detect the service in real time and automatically update the routing rules, which can automatically discover the service.
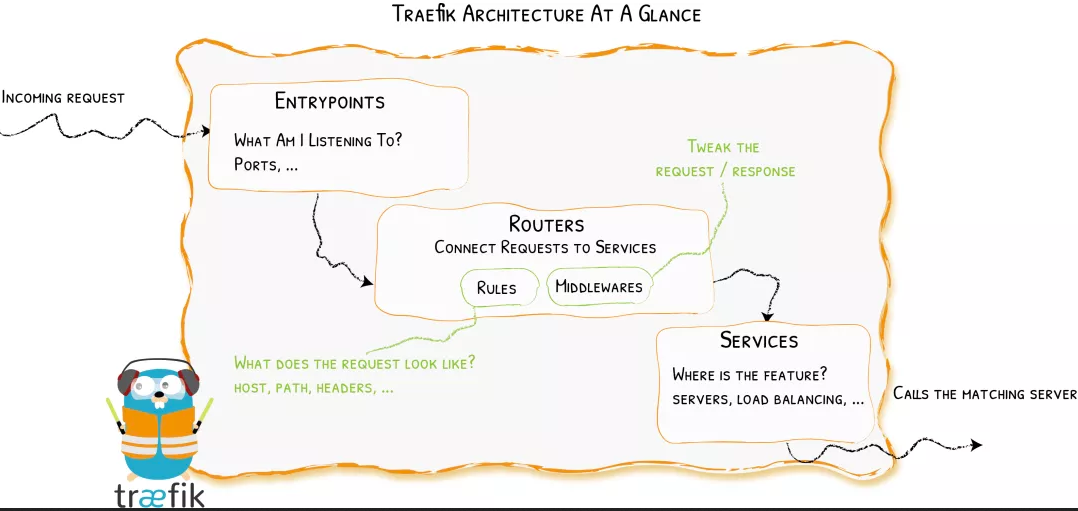
First, when starting traifik, You need to define entry points, and then analyze the incoming requests according to the route connecting to these entry points to see whether they match a set of rules. If they match, the route may forward the requests to your service after being converted through a series of middleware. Before understanding Traefik, we must understand several core concepts:
- Providers are used to automatically discover services on the platform. They can be orchestration tools, container engines or key value storage, such as Docker, Kubernetes and File
- Entrypoints listen to incoming traffic (ports, etc...) and are network entry points. They define the port (HTTP or TCP) to receive requests.
- Routes analyzes requests (host, path, headers, SSL,...) and is responsible for connecting incoming requests to services that can handle these requests.
- Services forwards the request to your application (load balancing,...) and is responsible for configuring how to obtain the actual service that will eventually process the incoming request.
- Middleware is used to modify the request or make some judgments according to the request (authentication, rate limiting, headers,...). The middleware is attached to the route. It is a method to adjust the request before the request is sent to your service (or before the service response is sent to the client).
install
Due to traifik 2 Version x and previous 1.0 The X version is incompatible. We choose the more powerful 2.0 version here X version to explain to you, we use the latest image traefik: 2.3 6.
There are two different ways to configure in Traefik:
- Dynamic configuration: fully dynamic routing configuration
- Static configuration: start configuration
Elements in the static configuration (which do not change frequently) connect to providers and define the entrypoints Treafik will listen on.
In Traefik, there are three ways to define static configuration: in the configuration file, in command-line parameters, and through environment variables
Dynamic configuration includes all configuration contents that define how the system handles requests. These configurations can be changed and are seamlessly hot updated without any request interruption or connection loss.
Here, we still use Helm to quickly install traefik. First, get Helm Chart package:
➜ git clone https://github.com/traefik/traefik-helm-chart
Create a custom values profile:
# values-prod.yaml
# Create an IngressRoute for the dashboard
ingressRoute:
  dashboard:
    enabled: false  # Disable the dashboard rendered in helm and create it manually

# Configure ports
ports:
  web:
    port: 8000
    hostPort: 80  # Using hostport mode
    # Use nodeport if set. This is useful if you have configured Traefik in a
    # LoadBalancer
    # nodePort: 32080
    # Port Redirections
    # Added in 2.2, you can make permanent redirects via entrypoints.
    # https://docs.traefik.io/routing/entrypoints/#redirection
    # redirectTo: websecure
  websecure:
    port: 8443
    hostPort: 443  # Using hostport mode

# Options for the main traefik service, where the entrypoints traffic comes
# from.
service:  # Using the hostport mode, you don't need a Service
  enabled: false

# Logs
# https://docs.traefik.io/observability/logs/
logs:
  general:
    level: DEBUG

tolerations:   # By default, the cluster installed by kubedm has a stain on the master, which needs to be tolerated before deployment
- key: "node-role.kubernetes.io/master"
  operator: "Equal"
  effect: "NoSchedule"

nodeSelector:   # Fixed to the master1 node (this node can access the external network)
  kubernetes.io/hostname: "master1"
Here, we use the hostport mode to fix the traifik to the master1 node. Because only this node has an external IP, we use master1 as the entry point of traffic. Directly use the values file above to install traefik:
➜ helm install --namespace kube-system traefik ./traefik -f ./values-prod.yaml
NAME: traefik
LAST DEPLOYED: Thu Dec 24 11:23:51 2020
NAMESPACE: kube-system
STATUS: deployed
REVISION: 1
TEST SUITE: None
➜ kubectl get pods -n kube-system -l app.kubernetes.io/name=traefik
NAME                       READY   STATUS    RESTARTS   AGE
traefik-78ff486794-64jbd   1/1     Running   0          3m15s
After installation, we can see how Traefik works by viewing the resource list of Pod:
➜ kubectl get pods traefik-78ff486794-64jbd -n kube-system -o yaml
apiVersion: v1
kind: Pod
metadata:
......
spec:
  containers:
  - args:
    - --global.checknewversion
    - --global.sendanonymoususage
    - --entryPoints.traefik.address=:9000/tcp
    - --entryPoints.web.address=:8000/tcp
    - --entryPoints.websecure.address=:8443/tcp
    - --api.dashboard=true
    - --ping=true
    - --providers.kubernetescrd
    - --providers.kubernetesingress
    - --accesslog=true
    - --accesslog.fields.defaultmode=keep
    - --accesslog.fields.headers.defaultmode=drop
...
The entryPoints attribute defines the of the web and websecure entry points, and enables kubernetesindress and kubernetescrd provider s, that is, we can use the original Ingress resource object of Kubernetes or CRD resource object such as the ingresroute extended by traifik.
We can first create an ingresroute resource list for Dashboard access:
➜ cat <<EOF | kubectl apply -f -
apiVersion: traefik.containo.us/v1alpha1
kind: IngressRoute
metadata:
  name: traefik-dashboard
  namespace: kube-system
spec:
  entryPoints:
  - web
  routes:
  - match: Host(`traefik.qikqiak.com`)  # Specify domain name
    kind: Rule
    services:
    - name: api@internal
      kind: TraefikService  # Reference another traifik service
EOF
➜ kubectl get ingressroute -n kube-system
NAME                AGE
traefik-dashboard   19m
Traefik Service is a CRD implementation of TraefikService, which we use here api@internal This traifikservice means that we are accessing the built-in application service of traifikservice.
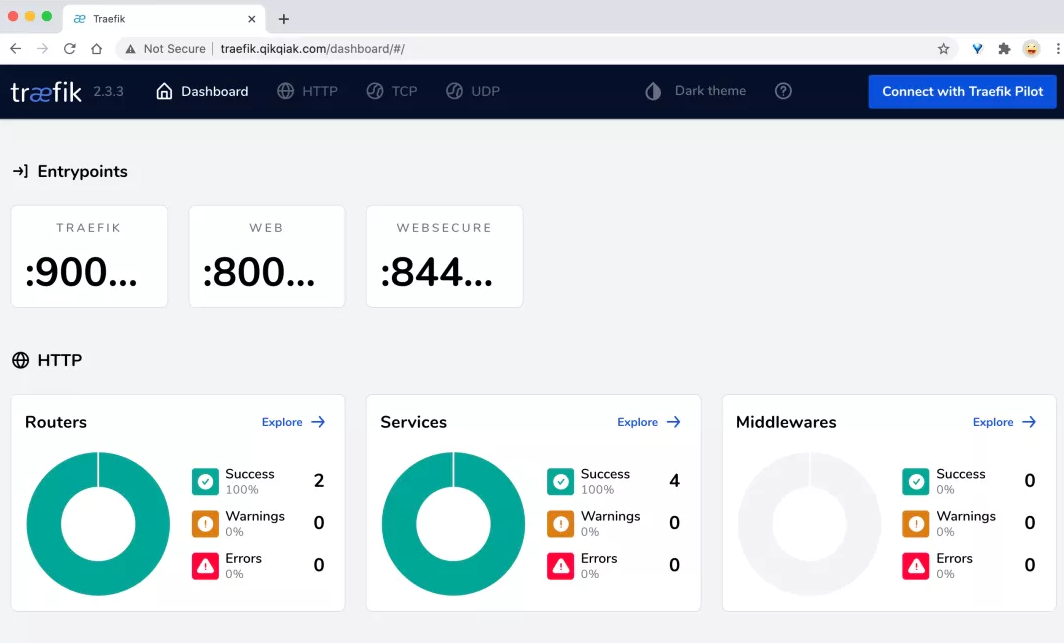
After deployment, we can add the domain name Traefik. In the local / etc/hosts qikqiak. Com to access the Dashboard page of Traefik:
ACME
Traefik extends the function of Ingress by extending CRD. In addition to the default Secret method, it also supports the automatic generation of HTTPS certificates.
For example, we now have a whoami application as follows:
kind: Deployment
apiVersion: apps/v1
metadata:
  name: whoami
  labels:
    app: whoami
spec:
  replicas: 2
  selector:
    matchLabels:
      app: whoami
  template:
    metadata:
      labels:
        app: whoami
    spec:
      containers:
        - name: whoami
          image: containous/whoami
          ports:
            - name: web
              containerPort: 80

---
apiVersion: v1
kind: Service
metadata:
  name: whoami
spec:
  ports:
    - protocol: TCP
      name: web
      port: 80
  selector:
    app: whoami
Then define an ingresroute object:
apiVersion: traefik.containo.us/v1alpha1
kind: IngressRoute
metadata:
  name: simpleingressroute
spec:
  entryPoints:
  - web
  routes:
  - match: Host(`who.qikqiak.com`) && PathPrefix(`/notls`)
    kind: Rule
    services:
    - name: whoami
      port: 80
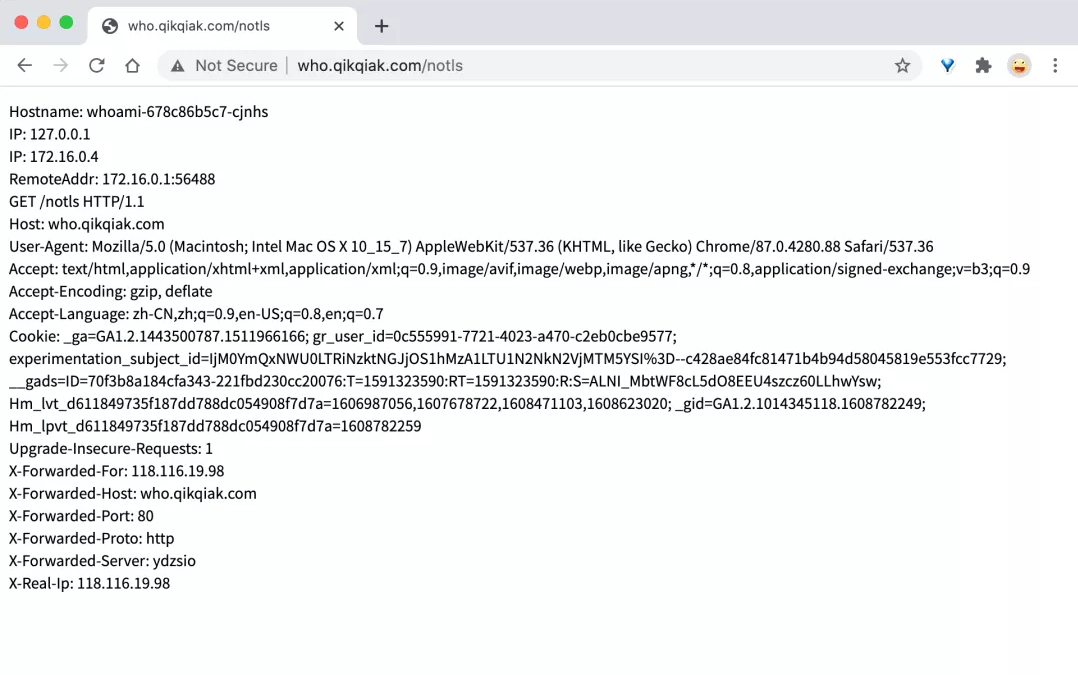
Through entryPoints, we specify that the entry point of our application is the web, that is, access through port 80, and then the access rule is to match who qikqiak. COM domain name, and the request with the path prefix of / notls will be matched by the whoami Service. We can directly create the above resource objects, and then resolve the domain name to access the application:
In the IngressRoute object, we define some matching rules. These rules are defined in the following way in Traefik:
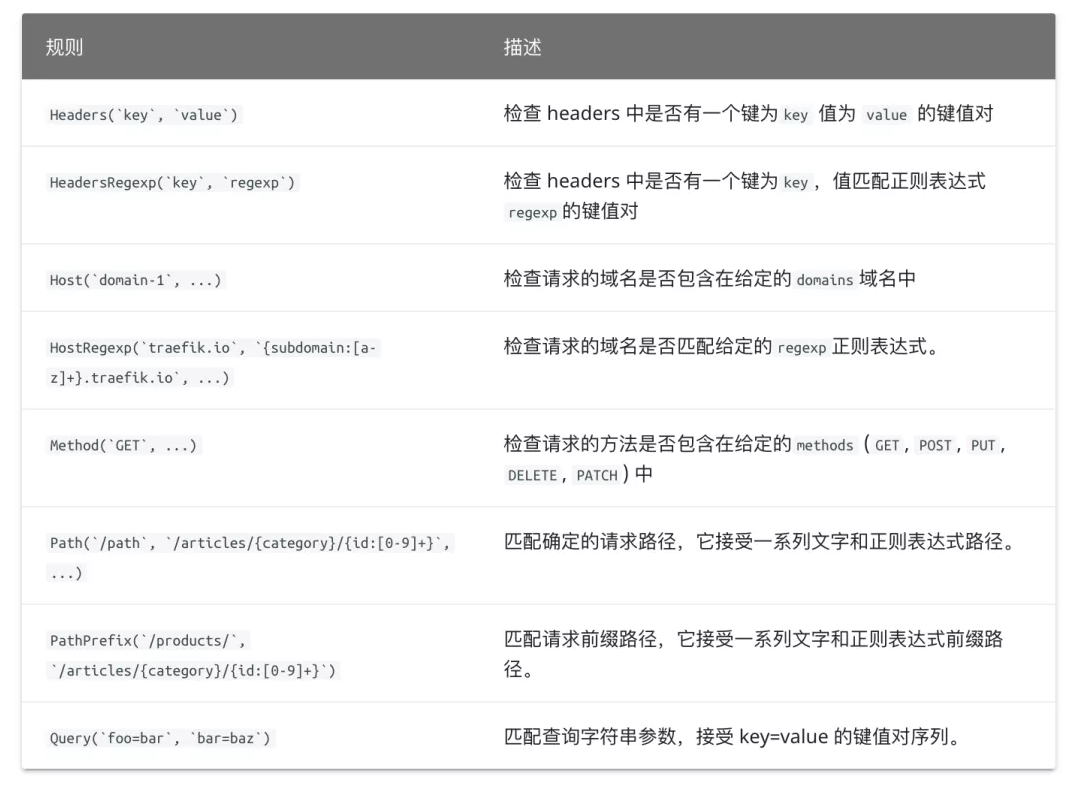
If we need to use HTTPS to access our application, we need to listen to the entry point of websecure, that is, access through port 443. Similarly, using HTTPS to access the application must require a certificate. Here, we use openssl to create a self signed certificate:
➜ openssl req -x509 -nodes -days 365 -newkey rsa:2048 -keyout tls.key -out tls.crt -subj "/CN=who.qikqiak.com"
Then reference the certificate file through the Secret object:
# Note that the certificate file name must be TLS CRT and TLS key
➜ kubectl create secret tls who-tls --cert=tls.crt --key=tls.key
secret/who-tls created
At this time, we can create an ingresroute object for HTTPS access application:
apiVersion: traefik.containo.us/v1alpha1
kind: IngressRoute
metadata:
  name: ingressroutetls
spec:
  entryPoints:
    - websecure
  routes:
  - match: Host(`who.qikqiak.com`) && PathPrefix(`/tls`)
    kind: Rule
    services:
    - name: whoami
      port: 80
  tls:
    secretName: who-tls
After creation, you can access the application through HTTPS. Since we are self signed certificates, the certificates are not trusted:
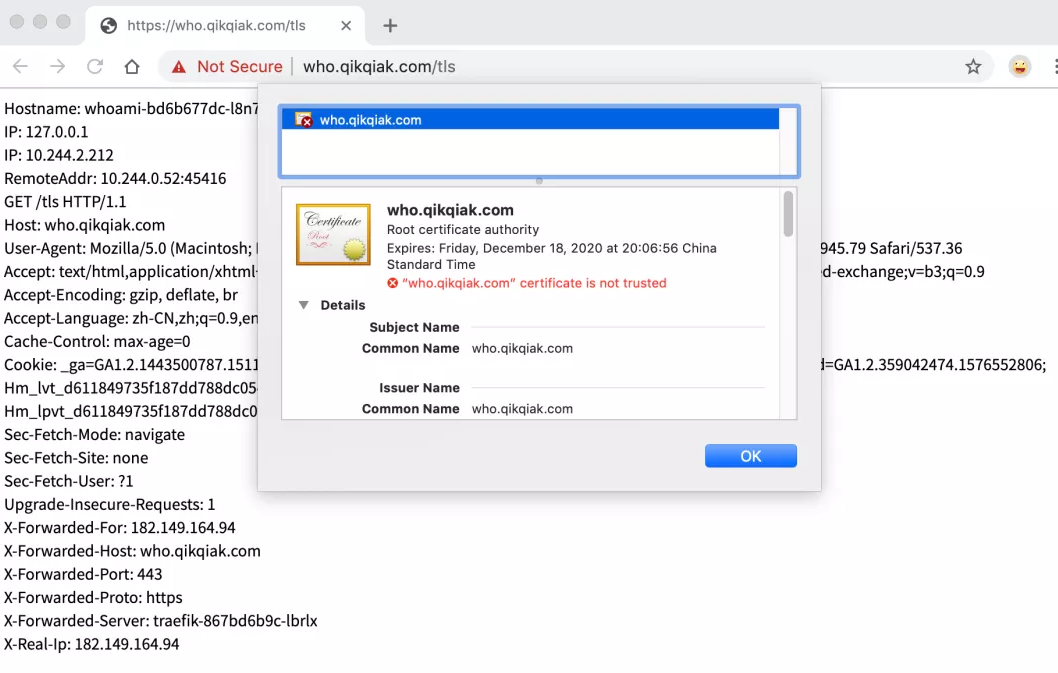
In addition to manually providing certificates, traifik also supports the automatic generation of certificates using Let's Encrypt. To use Let's Encrypt for automatic HTTPS, you need to start ACME first. ACME needs to be started through static configuration, that is, it can be provided through environment variables, startup parameters, etc.
ACME has a variety of verification methods, including tlsChallenge, httpChallenge and dnsChallenge. Previously, http was more commonly used. For the use of these verification methods, you can see the documents: https://www.qikqiak.com/traefik-book/https/acme/ Understand the difference between them. If you want to use tls verification, you need to ensure that the 443 port of Traefik is reachable. DNS verification can generate wildcard certificates. You only need to configure the API access key of DNS resolution service provider for verification. Here we use DNS verification to explain how to configure ACME.
We can modify the values configuration file installed by Helm again and add the following custom parameters:
# values-prod.yaml
additionalArguments:
# Using dns authentication
- --certificatesResolvers.ali.acme.dnsChallenge.provider=alidns
# First use the staging environment for verification, and then use it to remove the configuration in the following line after successful verification
# - --certificatesResolvers.ali.acme.caServer=https://acme-staging-v02.api.letsencrypt.org/directory
# Mailbox configuration
- --certificatesResolvers.ali.acme.email=ych_1024@163.com
# Where to save the ACME certificate
- --certificatesResolvers.ali.acme.storage=/data/acme.json

envFrom:
- secretRef:
    name: traefik-alidns-secret
    # ALICLOUD_ACCESS_KEY
    # ALICLOUD_SECRET_KEY
    # ALICLOUD_REGION_ID

persistence:
  enabled: true  # Enable persistence
  accessMode: ReadWriteOnce
  size: 128Mi
  path: /data

# Since ACME data is persisted above, the following security context needs to be reconfigured
securityContext:
  readOnlyRootFilesystem: false
  runAsGroup: 0
  runAsUser: 0
  runAsNonRoot: false
In this way, we can set -- certificatesresolvers ali. acme. dnschallenge. The provider = alidns parameter specifies alicloud's DNS verification. To use alicloud's DNS verification, we also need to configure three environment variables: ALICLOUD_ACCESS_KEY,ALICLOUD_SECRET_KEY,ALICLOUD_REGION_ID, which respectively corresponds to the key we use when developing Alibaba cloud applications, can be obtained by logging in to the Alibaba cloud background. Because this is relatively private information, we use the Secret object to create:
➜ kubectl create secret generic traefik-alidns-secret --from-literal=ALICLOUD_ACCESS_KEY=<aliyun ak> --from-literal=ALICLOUD_SECRET_KEY=<aliyun sk> --from-literal=ALICLOUD_REGION_ID=cn-beijing -n kube-system
After creation, configure the Secret to the traifik application through the environment variable. It is also worth noting that the verified certificate is saved here in / data / acme In the JSON file, we must persist this file, otherwise it will need to be re authenticated every time Traefik is rebuilt, and the verification times of Let's Encrypt itself are limited. Therefore, we re enabled data persistence in values, but after it is enabled, we need to provide an available PV storage. Since we fixed Traefik to the master1 node, we can create a PV of hostpath type (which will be explained in detail later):
➜ cat <<EOF | kubectl apply -f -
apiVersion: v1
kind: PersistentVolume
metadata:
  name: traefik
spec:
  accessModes:
  - ReadWriteOnce
  capacity:
    storage: 128Mi
  hostPath:
    path: /data/k8s/traefik
EOF
Then update traifik with the following command:
➜ helm upgrade --install traefik --namespace=kube-system ./traefik -f ./values-prod.yaml
Release "traefik" has been upgraded. Happy Helming!
NAME: traefik
LAST DEPLOYED: Thu Dec 24 14:32:04 2020
NAMESPACE: kube-system
STATUS: deployed
REVISION: 2
TEST SUITE: None
After the update, let's modify our whoami application above:
apiVersion: traefik.containo.us/v1alpha1
kind: IngressRoute
metadata:
  name: ingressroutetls
spec:
  entryPoints:
    - websecure
  routes:
  - match: Host(`who.qikqiak.com`) && PathPrefix(`/tls`)
    kind: Rule
    services:
    - name: whoami
      port: 80
  tls:
    certResolver: ali
    domains:
    - main: "*.qikqiak.com"
Everything else remains the same. We only need to change the tls part to the ali certificate parser defined by us. If we want to generate a wildcard domain name certificate, we can define the domains parameter to specify it, and then update the ingresroute object. At this time, we can use HTTPS to access our application (of course, we need to resolve the domain name on alicloud DNS):
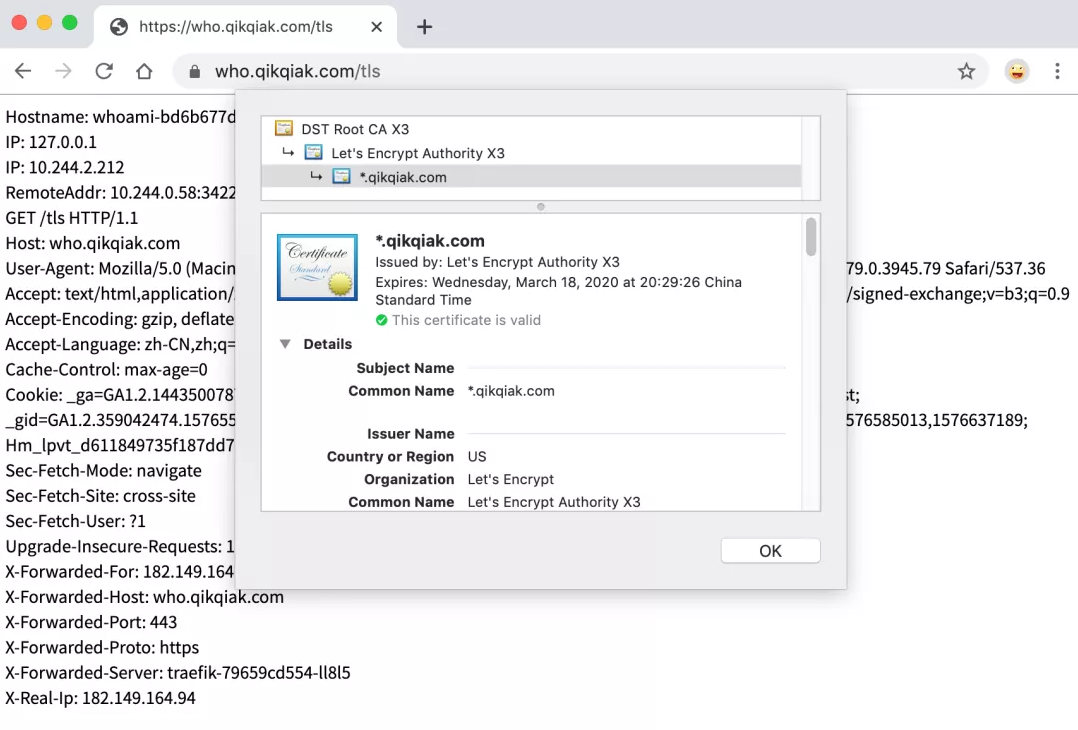
We can see that the access application is already a certificate trusted by the browser. Looking at the certificate, we can also find that the certificate is a wildcard certificate.
middleware
The middleware is traifik2 X is a very distinctive function. We can choose different middleware to meet our services according to our various needs. Traefik has built in many middleware with different functions, some of which can modify the request header information, some are responsible for redirection, some add authentication, etc, Moreover, middleware can also be applied to various situations through chain combination.
Similarly, for example, we can use the whoami application defined above https://who.qikqiak.com/tls To access the application, but if we use http to access it, it won't work, it will 404, because we don't listen to the entry point of port 80 at all, so if we want to access the application through http, we naturally need to listen to the entry point of web:
apiVersion: traefik.containo.us/v1alpha1
kind: IngressRoute
metadata:
  name: ingressroutetls-http
spec:
  entryPoints:
    - web
  routes:
  - match: Host(`who.qikqiak.com`) && PathPrefix(`/tls`)
    kind: Rule
    services:
    - name: whoami
      port: 80
Note that the entryPoints of the IngressRoute we created here are web, and then create this object. At this time, we can access the application through http.
But what if we only want users to access the application through https? According to the previous knowledge, can we force http to jump to https service? Yes, it can also be configured in Traefik, but this function is now provided through middleware. As shown below, we use redirectScheme middleware to create and provide forced jump services:
apiVersion: traefik.containo.us/v1alpha1
kind: Middleware
metadata:
  name: redirect-https
spec:
  redirectScheme:
    scheme: https
Then attach the middleware to the http service, because https does not need to jump:
---
apiVersion: traefik.containo.us/v1alpha1
kind: IngressRoute
metadata:
  name: ingressroutetls-http
spec:
  entryPoints:
    - web
  routes:
  - match: Host(`who.qikqiak.com`) && PathPrefix(`/tls`)
    kind: Rule
    services:
    - name: whoami
      port: 80
    middlewares:
    - name: redirect-https
At this time, when we visit the http service, we will automatically jump to https. For more information about the usage of middleware, please refer to the document Traefik Docs.
Traefik Pilot
Although Traefik has implemented many middleware by default, which can meet most of our daily needs, in practical work, users still have the need to customize middleware, which is the function of Traefik Pilot.

Traefik Pilot is a SaaS platform that links with traefik to expand its functions. It provides many functions to enhance the observation and control of traefik through a global control panel and Dashboard:
- Indicators of network activity of traifik agents and agent groups
- Service health issues and security vulnerability alerts
- A plug-in that extends the functionality of traifik
Before Traefik can use the functions of Traefik Pilot, we must connect them first. We only need to make a few changes to the static configuration of Traefik.
The traifik agent must be able to access the Internet to connect to the traifik pilot and establish a connection on port 443 through HTTPS.
First, we need to be on the traifik pilot home page( https://pilot.traefik.io/ )Create an account, register a new traifik instance and start using the traifik pilot. After logging in, you can create a new instance by selecting register new traifik instance.
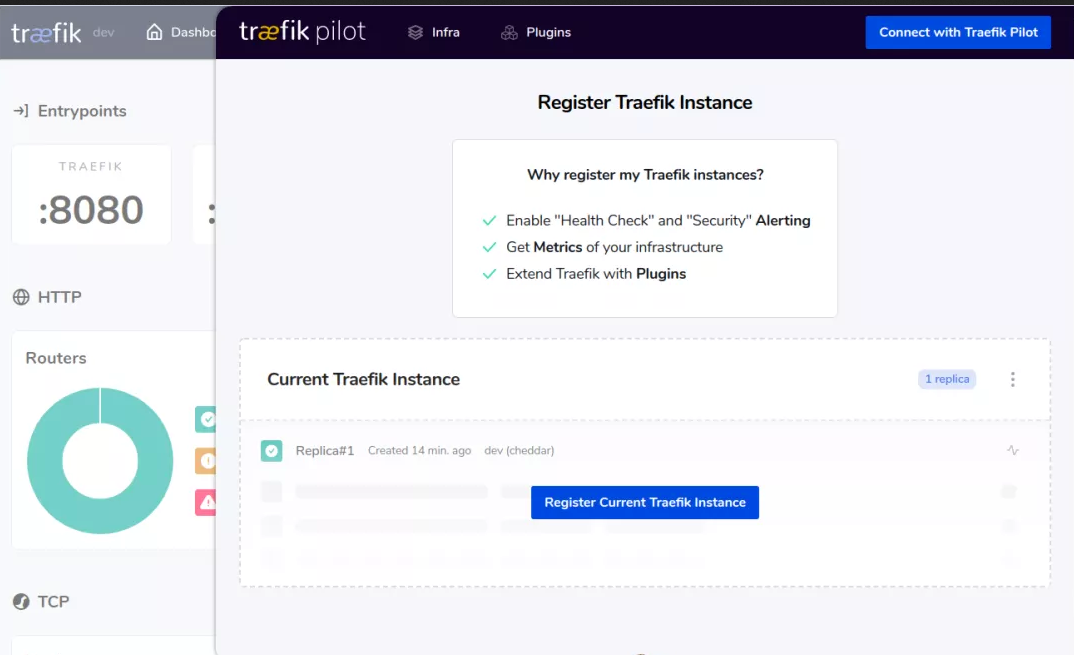
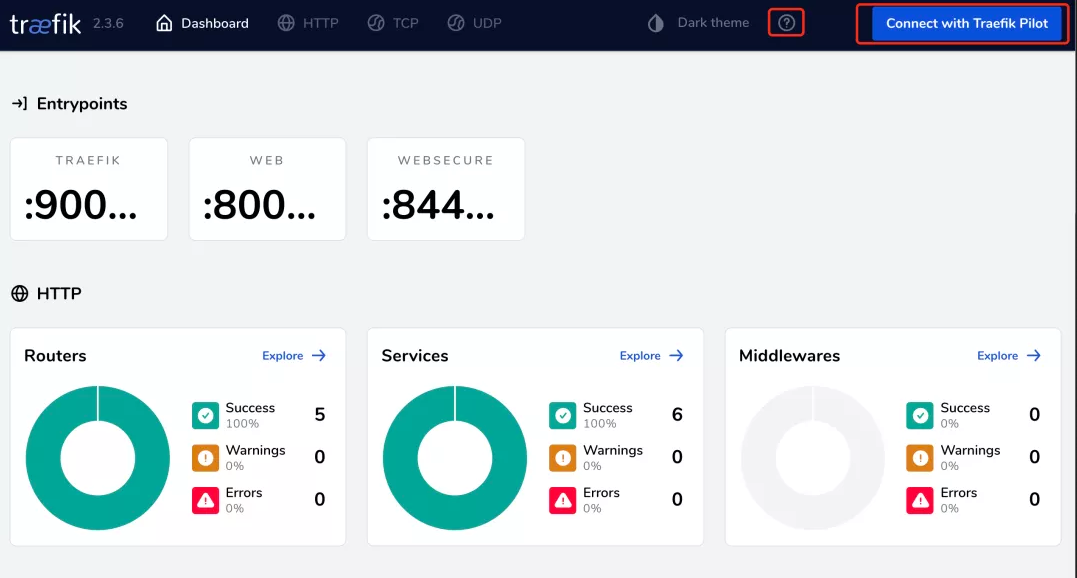
In addition, when our traifik is not connected to the traifik pilot, a ring icon will appear in the traifik Web UI. We can select connect with traifik pilot to navigate to the traifik pilot UI for operation.
After logging in, the traifik pilot will generate a Token for a new instance. We need to add this Token to the traifik static configuration.
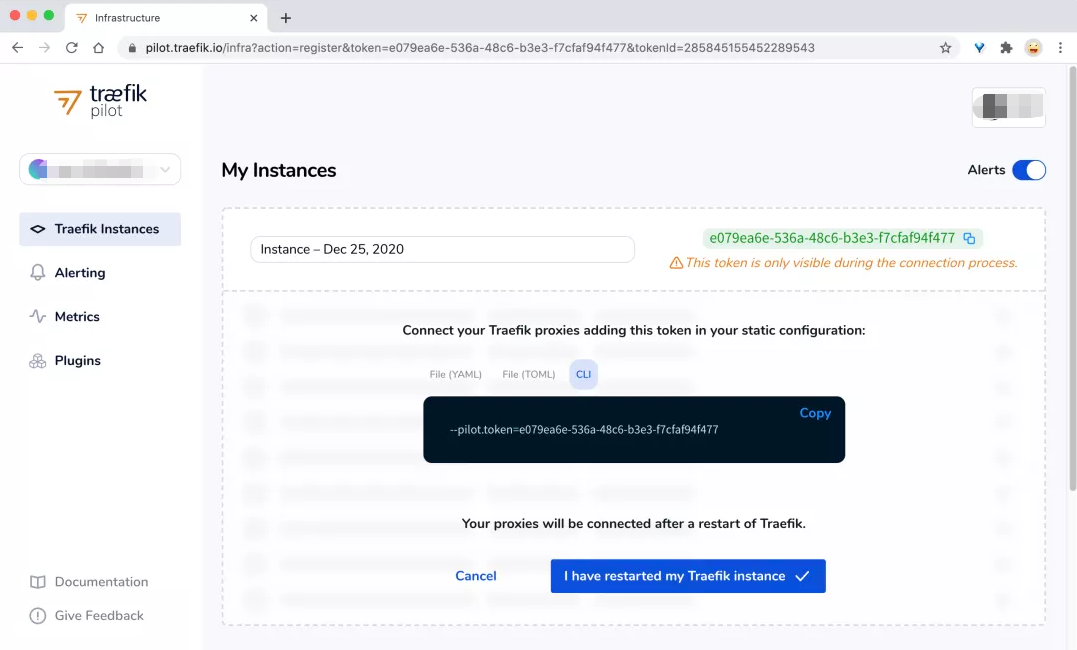
Here is the configuration of enabling Pilot in the values-prod.yaml file:
# values-prod.yaml
# Activate Pilot integration
pilot:
  enabled: true
  token: "e079ea6e-536a-48c6-b3e3-f7cfaf94f477"
Then update traifik again:
➜ helm upgrade --install traefik --namespace=kube-system ./traefik -f ./values-prod.yaml
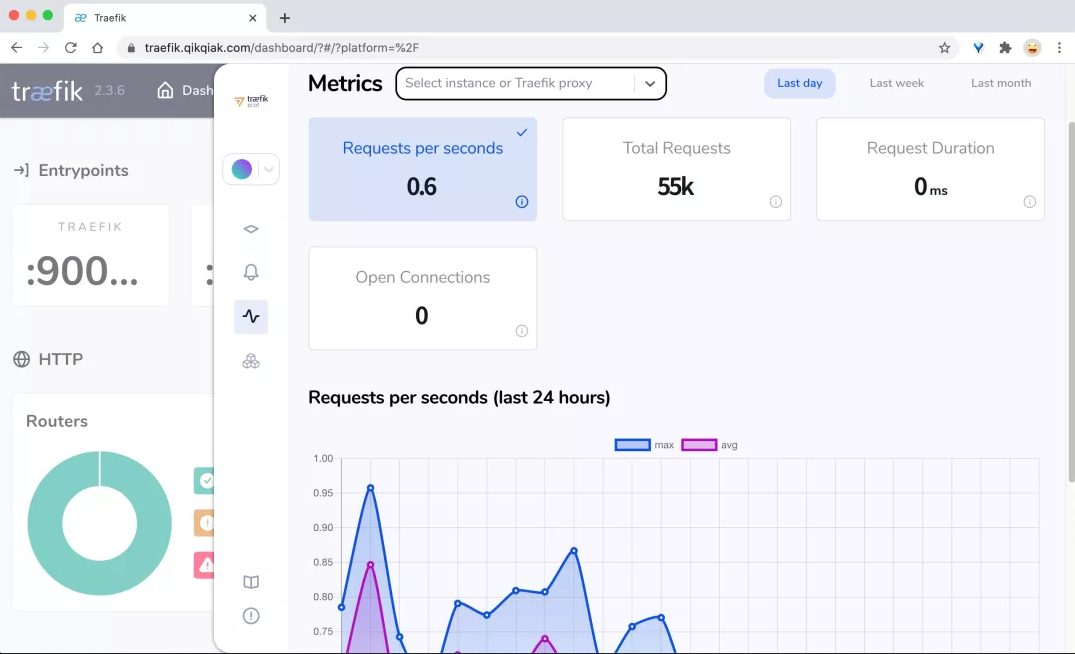
After the update is completed, we can see the information related to Traefik Pilot UI in Traefik's Web UI.
Next, we can select the plug-in we want to use on the plug-in page of Traefik Pilot. For example, we use Demo Plugin here.
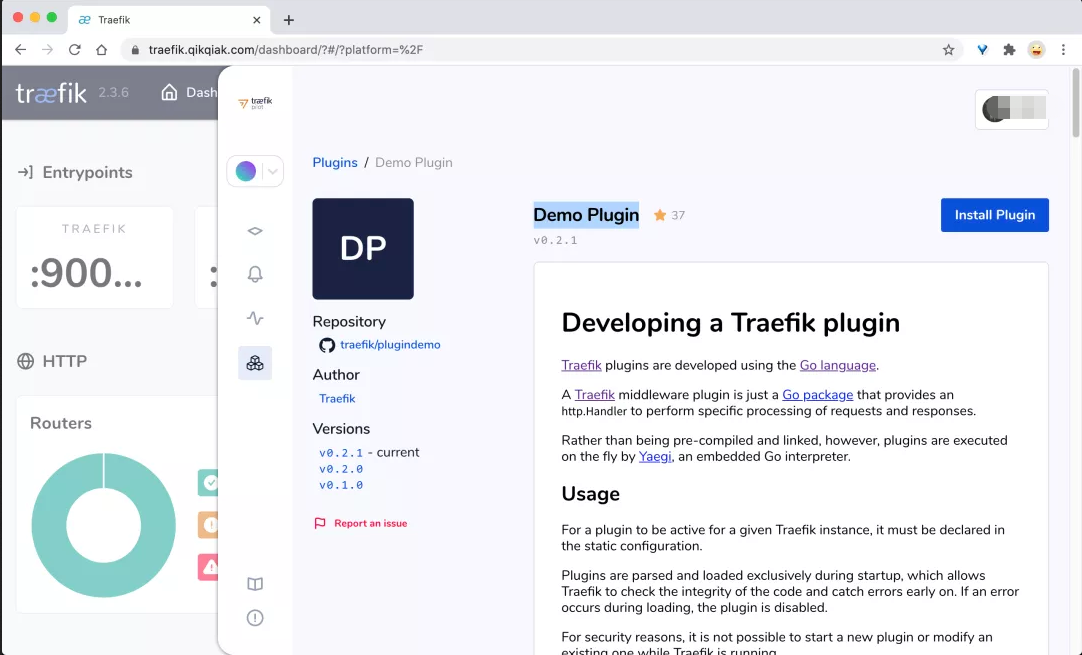
Click the Install Plugin button in the upper right corner to install the plug-in. A dialog box will pop up to prompt us how to install it.
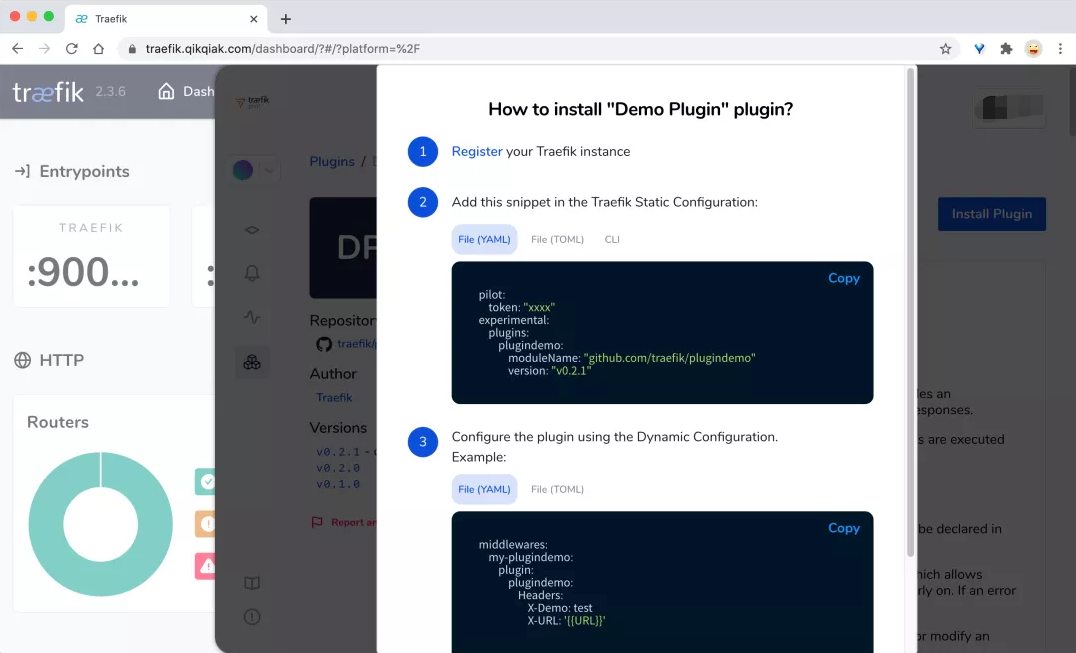
First, we need to register the current traifik with the traifik pilot (completed), and then we need to add this plug-in to traifik in the way of static configuration. Here, we can also update the Values value in the values-prod.yaml file:
# values-prod.yaml
# Activate Pilot integration
pilot:
  enabled: true
  token: "e079ea6e-536a-48c6-b3e3-f7cfaf94f477"

additionalArguments:
# Add support for demo plugin
- --experimental.plugins.plugindemo.modulename=github.com/traefik/plugindemo
- --experimental.plugins.plugindemo.version=v0.2.1
# Other configurations
Also re update traifik:
➜ helm upgrade --install traefik --namespace=kube-system ./traefik -f ./values-prod.yaml
After the update, create a Middleware object as follows:
➜ cat <<EOF | kubectl apply -f -
apiVersion: traefik.containo.us/v1alpha1
kind: Middleware
metadata:
  name: myplugin
spec:
  plugin:
    plugindemo:  # Plug in name
      Headers:
        X-Demo: test
        Foo: bar
EOF
Then add it to the IngressRoute object of the whoami application above:
apiVersion: traefik.containo.us/v1alpha1
kind: IngressRoute
metadata:
  name: simpleingressroute
  namespace: default
spec:
  entryPoints:
  - web
  routes:
  - match: Host(`who.qikqiak.com`) && PathPrefix(`/notls`)
    kind: Rule
    services:
    - name: whoami  # K8s Service
      port: 80
    middlewares:
    - name: myplugin  # Use the middleware created above
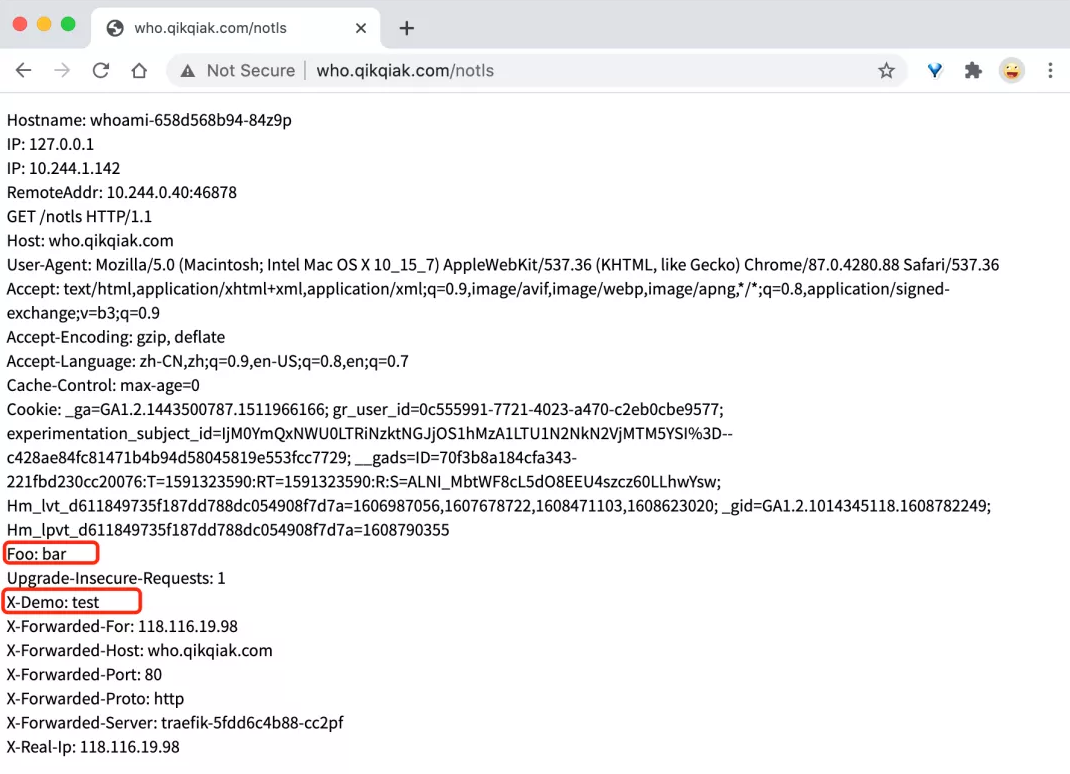
After the update, when we go to visit http://who.qikqiak.com/notls You can see that two headers defined in the plug-in above have been added.
Of course, in addition to using the plug-ins provided by developers on traifik pilot, we can also develop our own plug-ins according to our own needs. We can refer to the following documents: https://doc.traefik.io/traefik-pilot/plugins/plugin-dev/.
Grayscale Publishing
Traefik2. A more powerful function of 0 is grayscale publishing. Grayscale publishing is sometimes called Canary publishing, which mainly allows some tested services to participate in the online. After testing, observe whether the symbol is required to go online.
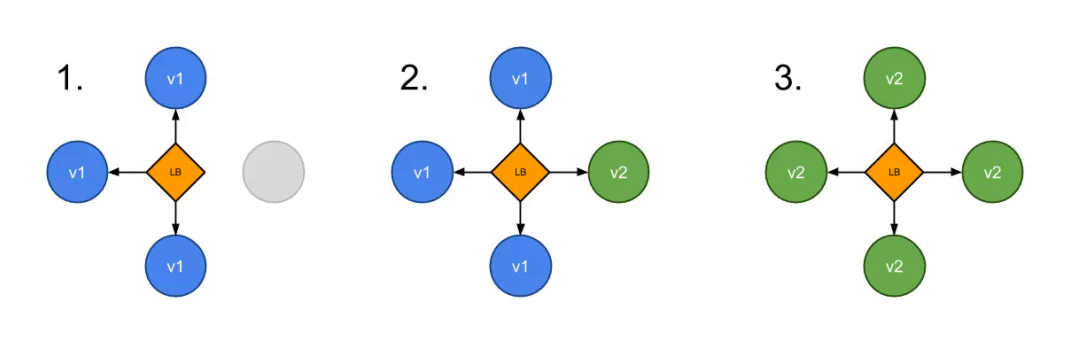
For example, now we have two services named appv1 and appv2. We want to control our traffic through Traefik, route 3 / 4 of the traffic to appv1 and 1 / 4 of the traffic to appv2. At this time, we can use Traefik 2 0. First, deploy the above two services in the Kubernetes cluster. In order to compare the results, we provide two services here, one is whoami and the other is nginx, which is convenient for testing.
The resource list of appv1 service is as follows: (appv1.yaml)
apiVersion: apps/v1
kind: Deployment
metadata:
  name: appv1
spec:
  selector:
    matchLabels:
      app: appv1
  template:
    metadata:
      labels:
        use: test
        app: appv1
    spec:
      containers:
      - name: whoami
        image: containous/whoami
        ports:
        - containerPort: 80
          name: portv1
---
apiVersion: v1
kind: Service
metadata:
  name: appv1
spec:
  selector:
    app: appv1
  ports:
  - name: http
    port: 80
    targetPort: portv1
The resource list of appv2 service is as follows: (appv2.yaml)
apiVersion: apps/v1
kind: Deployment
metadata:
  name: appv2
spec:
  selector:
    matchLabels:
      app: appv2
  template:
    metadata:
      labels:
        use: test
        app: appv2
    spec:
      containers:
      - name: nginx
        image: nginx
        ports:
        - containerPort: 80
          name: portv2
---
apiVersion: v1
kind: Service
metadata:
  name: appv2
spec:
  selector:
    app: appv2
  ports:
  - name: http
    port: 80
    targetPort: portv2
Directly create the above two services:
➜ kubectl apply -f appv1.yaml
➜ kubectl apply -f appv2.yaml
# You can check whether the service runs successfully through the following command
➜ kubectl get pods -l use=test
NAME                     READY   STATUS    RESTARTS   AGE
appv1-58f856c665-shm9j   1/1     Running   0          12s
appv2-ff5db55cf-qjtrf    1/1     Running   0          12s
At traifik2 A CRD resource of TraefikService is added in 1. We can directly use this object to configure WRR. Previous versions need to use the File Provider. It is troublesome to create a new resource list describing WRR: (wrr.yaml)
apiVersion: traefik.containo.us/v1alpha1
kind: TraefikService
metadata:
  name: app-wrr
spec:
  weighted:
    services:
      - name: appv1
        weight: 3  # Define weights
        port: 80
        kind: Service  # Optional. The default is Service
      - name: appv2
        weight: 1
        port: 80
Then create an ingresroute resource object for our grayscale publishing service: (ingresroute. Yaml)
apiVersion: traefik.containo.us/v1alpha1
kind: IngressRoute
metadata:
  name: wrringressroute
  namespace: default
spec:
  entryPoints:
    - web
  routes:
  - match: Host(`wrr.qikqiak.com`)
    kind: Rule
    services:
    - name: app-wrr
      kind: TraefikService
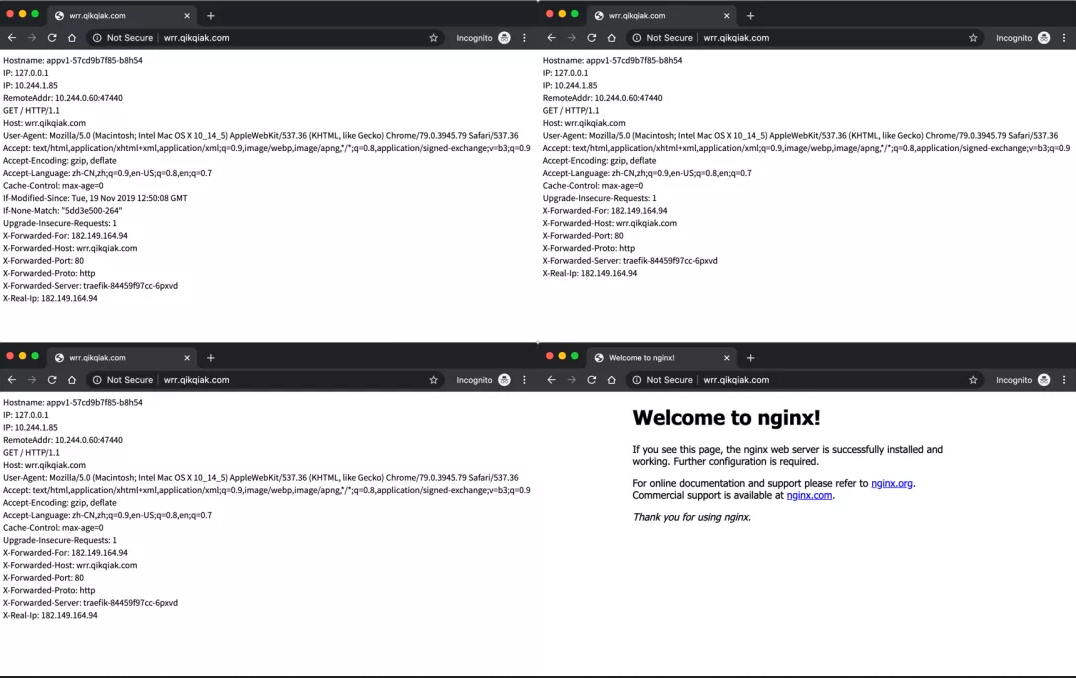
However, it should be noted that the Service we configured is no longer the direct Kubernetes object, but the traifikservice object defined above. We can directly create the above two resource objects. At this time, we will use the domain name WRR qikqiak. COM and visit the browser for four consecutive times. We can observe that appv1 receives three requests, while appv2 receives only one request, which is in line with our 3:1 weight configuration above.
Traffic replication
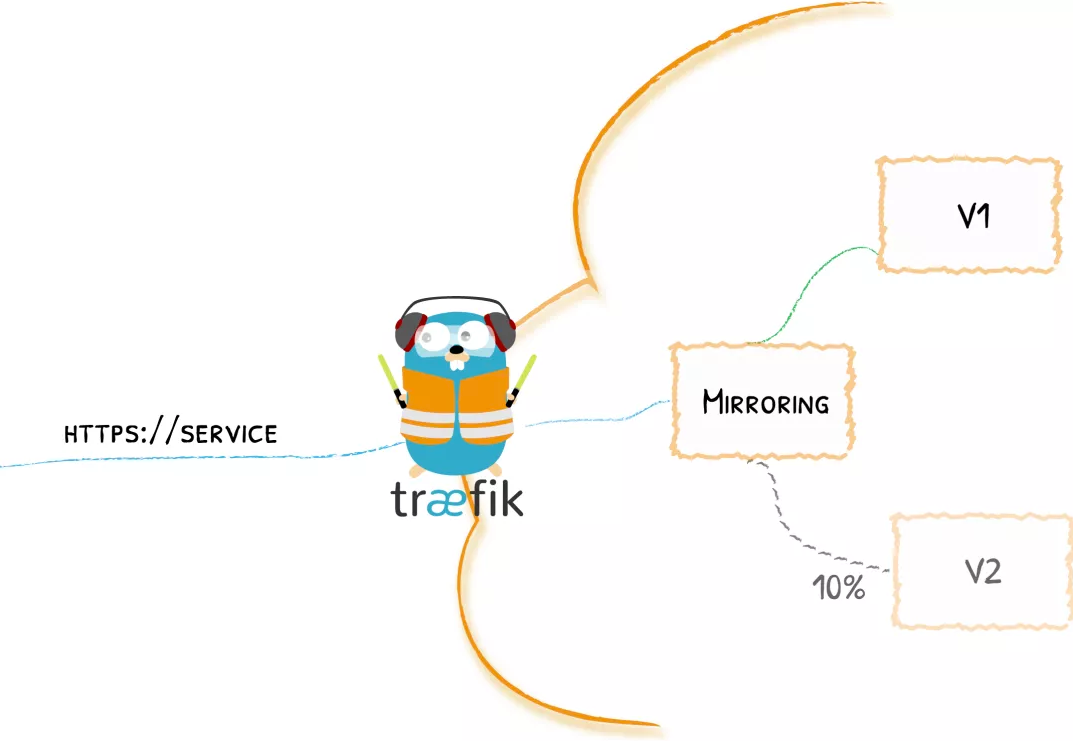
In addition to gray-scale publishing, Traefik 2.0 also introduces traffic mirroring service, which is a method to copy incoming traffic and send it to other services at the same time. The mirroring service can obtain a given percentage of requests and ignore the response of these requests.
Now we deploy two whoami services. The resource manifest file is as follows:
apiVersion: v1
kind: Service
metadata:
  name: v1
spec:
  ports:
    - protocol: TCP
      name: web
      port: 80
  selector:
    app: v1
---
kind: Deployment
apiVersion: apps/v1
metadata:
  name: v1
  labels:
    app: v1
spec:
  selector:
    matchLabels:
      app: v1
  template:
    metadata:
      labels:
        app: v1
    spec:
      containers:
        - name: v1
          image: nginx
          ports:
            - name: web
              containerPort: 80

---
apiVersion: v1
kind: Service
metadata:
  name: v2
spec:
  ports:
    - protocol: TCP
      name: web
      port: 80
  selector:
    app: v2
---
kind: Deployment
apiVersion: apps/v1
metadata:
  name: v2
  labels:
    app: v2
spec:
  selector:
    matchLabels:
      app: v2
  template:
    metadata:
      labels:
        app: v2
    spec:
      containers:
        - name: v2
          image: nginx
          ports:
            - name: web
              containerPort: 80
Directly create the above resource object:
➜ kubectl get pods
NAME                                      READY   STATUS    RESTARTS   AGE
v1-77cfb86999-wfbl2                       1/1     Running   0          94s
v2-6f45d498b7-g6qjt                       1/1     Running   0          91s
➜ kubectl get svc
NAME            TYPE        CLUSTER-IP      EXTERNAL-IP   PORT(S)     AGE
v1              ClusterIP   10.96.218.173   <none>        80/TCP      99s
v2              ClusterIP   10.99.98.48     <none>        80/TCP      96s
Now we create an ingresroute object to copy 50% of the traffic of service v1 to service v2, as shown in the following resource object: (mirror ingress route. Yaml)
apiVersion: traefik.containo.us/v1alpha1
kind: TraefikService
metadata:
  name: app-mirror
spec:
  mirroring:
    name: v1 # Send 100% request to Service "v1" of K8S
    port: 80
    mirrors:
    - name: v2 # Then copy 50% of the requests to v2
      percent: 50
      port: 80
---
apiVersion: traefik.containo.us/v1alpha1
kind: IngressRoute
metadata:
  name: mirror-ingress-route
  namespace: default
spec:
  entryPoints:
  - web
  routes:
  - match: Host(`mirror.qikqiak.com`)
    kind: Rule
    services:
    - name: app-mirror
      kind: TraefikService # Use the declared traifikservice Service instead of the K8S Service
Then directly create this resource object:
➜ kubectl apply -f mirror-ingress-route.yaml
ingressroute.traefik.containo.us/mirror-ingress-route created
traefikservice.traefik.containo.us/mirroring-example created
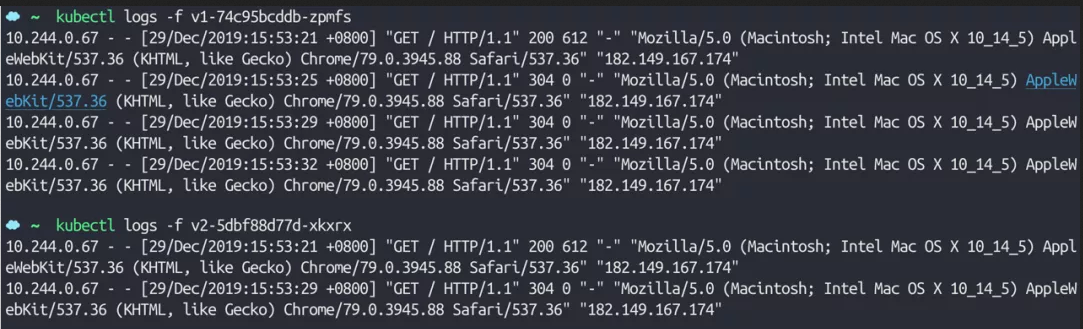
At this time, we visit mirror 4 times in a row in the browser qikqiak. Com can be found that half of the requests also appear in v2 this service:
TCP
In addition, traifik2 X already supports TCP services. Let's take mongo as an example to understand how Traefik supports TCP services.
Simple TCP service
First, deploy a common mongo service. The resource manifest file is as follows: (mongo.yaml)
apiVersion: apps/v1
kind: Deployment
metadata:
  name: mongo-traefik
  labels:
    app: mongo-traefik
spec:
  selector:
    matchLabels:
      app: mongo-traefik
  template:
    metadata:
      labels:
        app: mongo-traefik
    spec:
      containers:
      - name: mongo
        image: mongo:4.0
        ports:
        - containerPort: 27017
---
apiVersion: v1
kind: Service
metadata:
  name: mongo-traefik
spec:
  selector:
    app: mongo-traefik
  ports:
  - port: 27017
Directly create mongo application:
➜ kubectl apply -f mongo.yaml
deployment.apps/mongo-traefik created
service/mongo-traefik created
Once created successfully, you can configure a route for mongo service. Since SNI is required for TCP routing configuration in Traefik, and SNI depends on TLS, we need to configure certificates. If there is no certificate, we can use wildcard * for configuration. Here we create a CRD object of ingresroutetcp type (we have installed the corresponding CRD resource earlier): (mongo ingresroute TCP. Yaml)
apiVersion: traefik.containo.us/v1alpha1
kind: IngressRouteTCP
metadata:
  name: mongo-traefik-tcp
spec:
  entryPoints:
    - mongo
  routes:
  - match: HostSNI(`*`)
    services:
    - name: mongo-traefik
      port: 27107
It should be noted that the entryPoints section here is determined according to the entryPoints in the static configuration of Traefik we started. Of course, we can use the two entry points 80 and 443 we defined earlier, but we can also add a special entry point for mongo service, update the values-prod.yaml file and add the mongo entry point:
# values-prod.yaml
# Configure ports
ports:
  web:
    port: 8000
    hostPort: 80
  websecure:
    port: 8443
    hostPort: 443
  mongo:
    port: 27017
    hostPort: 27017
Then update traifik:
➜ helm upgrade --install traefik --namespace=kube-system ./traefik -f ./values-prod.yaml
The purpose of adding hostPort to the entry point here is to access the service through the port of the node. For more information about entry points, you can see the document entry points for more information.
Then, after updating traifik, we can directly create the above resource object:
➜ mongo-ingressroute-tcp.yaml
ingressroutetcp.traefik.containo.us/mongo-traefik-tcp created
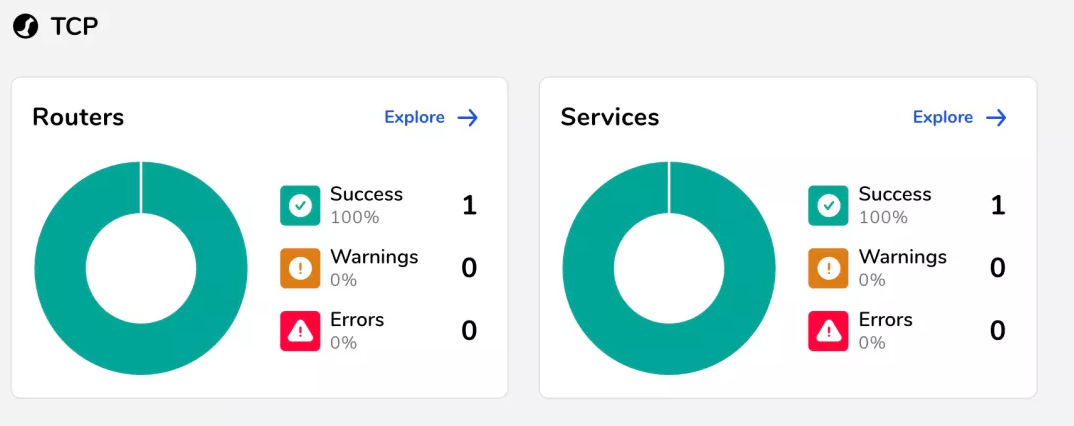
After the creation, we can also go to the Dashboard page of Traefik to check whether it is effective:
Then we configure a domain name mongo Local resolves to the node where Traefik is located, and then connects to mongo service through port 27017:
➜ mongo --host mongo.local --port 27017
mongo(75243,0x1075295c0) malloc: *** malloc_zone_unregister() failed for 0x7fffa56f4000
MongoDB shell version: 2.6.1
connecting to: mongo.local:27017/test
> show dbs
admin   0.000GB
config  0.000GB
local   0.000GB
Here we have finished exposing the mongo (TCP) service to external users.
TCP with TLS certificate
mongo deployed above is a common service, which is then represented by Traefik. However, sometimes for security, mongo itself provides services in the form of TLS certificates. Here is the script file used to generate mongo tls certificates: (generate certificates. SH)
#!/bin/bash
#
# From https://medium.com/@rajanmaharjan/secure-your-mongodb-connections-ssl-tls-92e2addb3c89

set -eu -o pipefail

DOMAINS="${1}"
CERTS_DIR="${2}"
[ -d "${CERTS_DIR}" ]
CURRENT_DIR="$(cd "$(dirname "${0}")" && pwd -P)"

GENERATION_DIRNAME="$(echo "${DOMAINS}" | cut -d, -f1)"

rm -rf "${CERTS_DIR}/${GENERATION_DIRNAME:?}" "${CERTS_DIR}/certs"

echo "== Checking Requirements..."
command -v go >/dev/null 2>&1 || echo "Golang is required"
command -v minica >/dev/null 2>&1 || go get github.com/jsha/minica >/dev/null

echo "== Generating Certificates for the following domains: ${DOMAINS}..."
cd "${CERTS_DIR}"
minica --ca-cert "${CURRENT_DIR}/minica.pem" --ca-key="${CURRENT_DIR}/minica-key.pem" --domains="${DOMAINS}"
mv "${GENERATION_DIRNAME}" "certs"
cat certs/key.pem certs/cert.pem > certs/mongo.pem

echo "== Certificates Generated in the directory ${CERTS_DIR}/certs"
Place the above certificate under the certs directory, and then create a 02 TLS Mongo directory. Execute the following command under the directory to generate the certificate:
➜ bash ../certs/generate-certificates.sh mongo.local .
== Checking Requirements...
== Generating Certificates for the following domains: mongo.local...
The final directory is as follows. Under the 02 TLS Mongo directory, a certs directory containing certificates will be generated:
➜ tree .
.
├── 01-mongo
│   ├── mongo-ingressroute-tcp.yaml
│   └── mongo.yaml
├── 02-tls-mongo
│   └── certs
│       ├── cert.pem
│       ├── key.pem
│       └── mongo.pem
└── certs
    ├── generate-certificates.sh
    ├── minica-key.pem
    └── minica.pem
Execute the following command under the 02 TLS Mongo / certs directory to include the certificate content through Secret:
➜ kubectl create secret tls traefik-mongo-certs --cert=cert.pem --key=key.pem
secret/traefik-mongo-certs created
Then re update the IngressRouteTCP object and add TLS configuration:
apiVersion: traefik.containo.us/v1alpha1
kind: IngressRouteTCP
metadata:
  name: mongo-traefik-tcp
spec:
  entryPoints:
    - mongo
  routes:
  - match: HostSNI(`mongo.local`)
    services:
    - name: mongo-traefik
      port: 27017
  tls:
    secretName: traefik-mongo-certs
Similarly, after the update, if we directly access the application, we will be stopped by hang because we do not provide the certificate:
➜ mongo --host mongo.local --port 27017
MongoDB shell version: 2.6.1
connecting to: mongo1.local:27017/test
At this time, we can bring the certificate to connect:
➜ mongo --host mongo.local --port 27017 --ssl --sslCAFile=../certs/minica.pem --sslPEMKeyFile=./certs/mongo.pem
MongoDB shell version v4.0.3
connecting to: mongodb://mongo.local:27017/
Implicit session: session { "id" : UUID("e7409ef6-8ebe-4c5a-9642-42059bdb477b") }
MongoDB server version: 4.0.14
......
> show dbs;
admin   0.000GB
config  0.000GB
local   0.000GB
You can see that the connection is successful now, which completes the function of using TLS certificate proxy TCP service. At this time, if we use other domain names to connect, we will report an error, because now we specify a specific HostSNI:
➜ mongo --host mongo.k8s.local --port 27017 --ssl --sslCAFile=../certs/minica.pem --sslPEMKeyFile=./certs/mongo.pem
MongoDB shell version v4.0.3
connecting to: mongodb://mongo.k8s.local:27017/
2019-12-29T15:03:52.424+0800 E NETWORK  [js] SSL peer certificate validation failed: Certificate trust failure: CSSMERR_TP_NOT_TRUSTED; connection rejected
2019-12-29T15:03:52.429+0800 E QUERY    [js] Error: couldn't connect to server mongo.qikqiak.com:27017, connection attempt failed: SSLHandshakeFailed: SSL peer certificate validation failed: Certificate trust failure: CSSMERR_TP_NOT_TRUSTED; connection rejected :
connect@src/mongo/shell/mongo.js:257:13
@(connect):1:6
exception: connect failed
Traefik also has many functions, such as UDP, especially the powerful middleware and custom plug-in functions, which provide us with the ability to continuously expand its functions. We can carry out secondary development according to our own needs.