1. Overview:
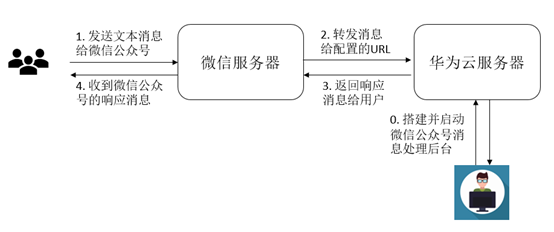
In this tutorial, you will learn how to use Huawei Cloud Elastic Cloud Server (hereinafter referred to as ECS) to build the Wechat Public Number Processing Desk, write the corresponding Wechat Message Processing Logic Code in Python language, receive the messages forwarded from the Wechat server, and return the processing results to the end user. The whole process is shown in the following figure:
The background knowledge you need to know is: CentOS (Linux) operating system, PHP language, Web.py framework, HTTP/XML protocol.
1.1 Preparations
Apply for Wechat Public Number
Wechat Public Number Application Link: https://mp.weixin.qq.com/cgi-bin/loginpage?t=wxm2-login&lang=zh_CN
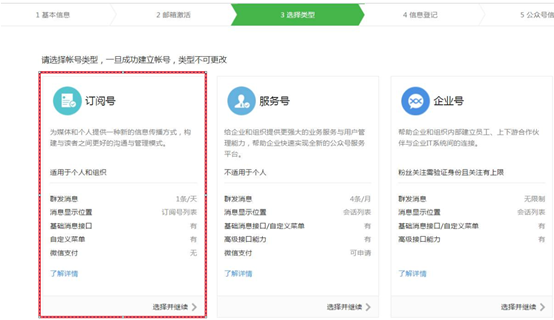
Considering the convenience of application, this tutorial uses the subscription number "cloud theory" as an example.
Buy Huawei Flexible Cloud Service
Huawei Flexible Cloud Service Purchase Link: https://console.huaweicloud.com/ecm/?region=cn-east-2#/ecs/createVm
If there is no Huawei cloud account, you need to register Huawei cloud account and complete the real-name authentication.
In this tutorial, use common mirror CentOS 7.4

It is suggested to purchase flexible IP at the same time, and then configure the service address on the Wechat Public Number to require public IP.

2. Operational steps:
2.1 Basic Software Installation
This tutorial uses Python+Web.py combination to complete the development of Wechat Public Number. The following software needs to be installed:
Upgrade the default Python version
CentOS 7.4 comes with an older version of Python, and it is recommended to upgrade to Python 3.
1. View the Python version and use the command:
python --version

2. Download the Python installation package. Take Python version 3.6.0 as an example, using the command:
wget https://www.python.org/ftp/python/3.6.0/Python-3.6.0a1.tar.xz

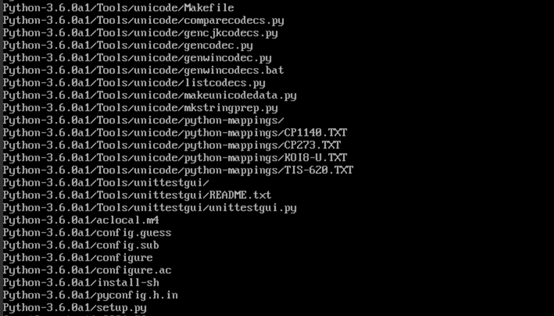
3. Unzip the installation package and use the command:
tar xvf Python-3.6.0a1.tar.xz
4. Execute orders:
./configure
Successful execution is prompted as follows:
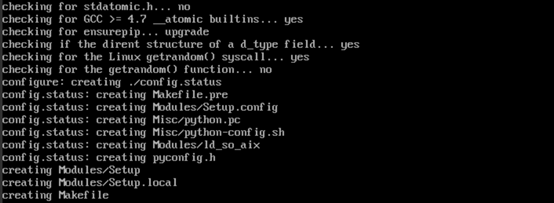
If a prompt like "configure: error: no acceptable C compiler found in $PATH" occurs, it is because the appropriate compiler is not installed.
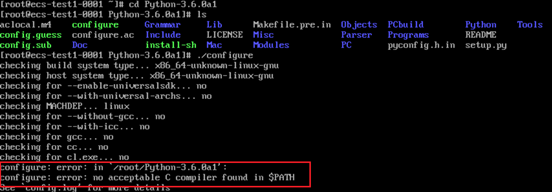
Solution: Install/upgrade gcc and other dependent packages using commands:
sudo yum install gcc-c++
Then prompt the installation package whether OK is, enter y and return. Successful installation of dependent packages is indicated by the following prompts:

Re-execute the. / configure command.
5. Execute orders:
make && make install
Successful execution prompted pip error, because my system is missing the openssl-devel package, can be ignored first.
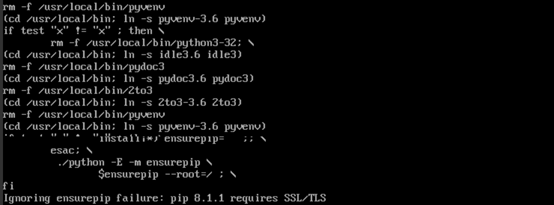
6. View the python 3 version and use the command:
<span style="color:#333333"> python3 --version</span>

7. Reuse commands:
<span style="color:#333333"> python3</span>
Successful installation of Python 3 is indicated by the following prompts.

Upgrade default pip version
The general Python package management tool for pip. Provides the function of finding, downloading, installing and uninstalling Python package. pip3 comes with Python 3 after successful installation, but the version is relatively old. It is recommended to upgrade to the latest version of pip. At the same time, the previous installation of Python 3 prompted "Ignoring ensurepip failure: pip 8.1.1 requires SSL/TLS" error, which resulted in the unsuccessful installation of pip.
1. Install the openssl-devel package first, using the command:
<span style="color:#333333"> yum install openssl-devel -y</span>

2. Re-execute the order:
<span style="color:#333333"> make && make install</span>
Successful installation of pip is indicated by the following prompts:

3. Upgrade pip3 with commands:
<span style="color:#333333"> pip3 install --upgrade pip</span>
The following prompt appears to indicate that pip has been upgraded to the latest version:

Install the Web.py framework
In order to be consistent with the Wechat Public Technology Platform tutorial, we also use the Web.py framework. Web.py official tutorial address: http://webpy.org/ To install web.py, use the following commands:
<span style="color:#333333">pip3 install web.py==0.40.dev0</span>

Install WinSCP
Usually, we edit the code on the local Windows operating system and upload it to the Elastic Cloud Server (CentOS Linux system). WinSCP is an open source graphical SFTP client using SSH in Windows environment and supports SCP protocol. Its main function is to copy files safely between local and remote computers, and to edit files directly.
WinSCP Installation Link: https://winscp.net/eng/docs/lang:chs
2.2 Upload code
1. Create a new main.py file and copy the following code:
# -*- coding: utf-8 -*-
# filename: main.py
import web
from handle import Handle

urls = (
    '/wx', 'Handle',
)

if __name__ == '__main__':
    app = web.application(urls, globals())
    app.run()
2. Create a new handle.py file and copy the following code:
# -*- coding: utf-8 -*-
# filename: handle.py

import hashlib
import web
import receive
import time
import os

class Handle(object):

    def __init__(self):
        self.app_root = os.path.dirname(__file__)
        self.templates_root = os.path.join(self.app_root, 'templates')
        self.render = web.template.render(self.templates_root)

    def GET(self):
        try:
            data = web.input()
            if len(data) == 0:
                return "hello, this is handle view"
            signature = data.signature
            timestamp = data.timestamp
            nonce = data.nonce
            echostr = data.echostr
            token = "Here's the content and the basic configuration of the Public Number Token Keep field values consistent"

            list = [token, timestamp, nonce]
            list.sort()
            s = list[0] + list[1] + list[2]
            hashcode = hashlib.sha1(s.encode('utf-8')).hexdigest()
            print( "handle/GET func: hashcode, signature: ", hashcode, signature)
            if hashcode == signature:
                return echostr
            else:
                return echostr
        except (Exception) as Argument:
            return Argument

    def POST(self):
        try:
            webData = web.data()
            print("Handle Post webdata is:\n", webData)
            #Print message body log
            recMsg = receive.parse_xml(webData)

            if isinstance(recMsg, receive.Msg) and recMsg.MsgType == 'text':
                toUser = recMsg.FromUserName
                fromUser = recMsg.ToUserName
                content = "Welcome to Cloud Map!" + str(recMsg.Content)
                print('Reply message info:\n')
                print('toUser =', toUser)
                print('fromUser = ', fromUser)
                print('content = ', content)
                return self.render.reply_text(toUser, fromUser, int(time.time()), content)
            else:
                print("Unsupported message types:",recMsg.MsgType)
                return "success"
        except (Exception) as Argment:
            return Argment
3. Create a new receive.py file and copy the following code:
# -*- coding: utf-8 -*-
# filename: receive.py
import xml.etree.ElementTree as ET

def parse_xml(web_data):
    if len(web_data) == 0:
        return None
    xmlData = ET.fromstring(web_data)
    msg_type = xmlData.find('MsgType').text
    if msg_type == 'text':
        return TextMsg(xmlData)
    elif msg_type == 'image':
        return ImageMsg(xmlData)
    elif msg_type == 'location':
        return LocationMsg(xmlData)
    elif msg_type == 'event':
        return EventMsg(xmlData)

class Event(object):
    def __init__(self, xmlData):
        self.ToUserName = xmlData.find('ToUserName').text
        self.FromUserName = xmlData.find('FromUserName').text
        self.CreateTime = xmlData.find('CreateTime').text
        self.MsgType = xmlData.find('MsgType').text
        self.Eventkey = xmlData.find('EventKey').text

class Msg(object):
    def __init__(self, xmlData):
        self.ToUserName = xmlData.find('ToUserName').text
        self.FromUserName = xmlData.find('FromUserName').text
        self.CreateTime = xmlData.find('CreateTime').text
        self.MsgType = xmlData.find('MsgType').text
        self.MsgId = xmlData.find('MsgId').text

class TextMsg(Msg):
    def __init__(self, xmlData):
        Msg.__init__(self, xmlData)
        self.Content = xmlData.find('Content').text

class ImageMsg(Msg):
    def __init__(self, xmlData):
        Msg.__init__(self, xmlData)
        self.PicUrl = xmlData.find('PicUrl').text
        self.MediaId = xmlData.find('MediaId').text

class LocationMsg(Msg):
    def __init__(self, xmlData):
        Msg.__init__(self, xmlData)
        self.Location_X = xmlData.find('Location_X').text
        self.Location_Y = xmlData.find('Location_Y').text

class EventMsg(Msg):
    def __init__(self, xmlData):
        Event.__init__(self, xmlData)
        self.Event = xmlData.find('Event').text
4. Create a new template folder and a new reply_text.xml file under the folder. Copy the following code:
$def with (toUser,fromUser,createTime,content)
<xml>
<ToUserName><![CDATA[$toUser]]></ToUserName>
<FromUserName><![CDATA[$fromUser]]></FromUserName>
<CreateTime>$createTime</CreateTime>
<MsgType><![CDATA[text]]></MsgType>
<Content><![CDATA[$content]]></Content>
</xml>
5. The final local code file is formed as follows:
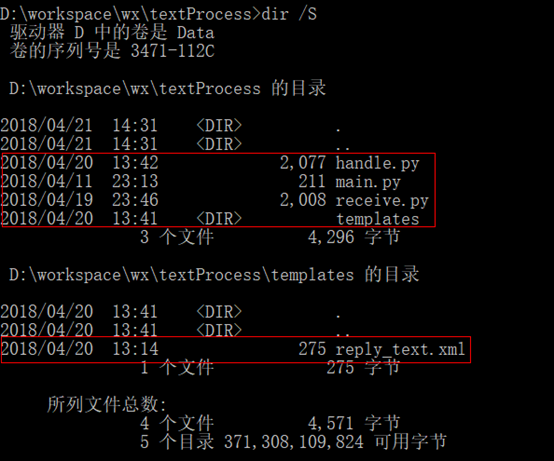
Upload the above files and directories to the specified directory of Elastic Cloud Service through WinSCP tools:

2.3 Startup Services
Start the service with the following command:
python3 main.py 80
If no error is reported, the startup is successful. References are as follows:

2.4 Enabling the Developer Model
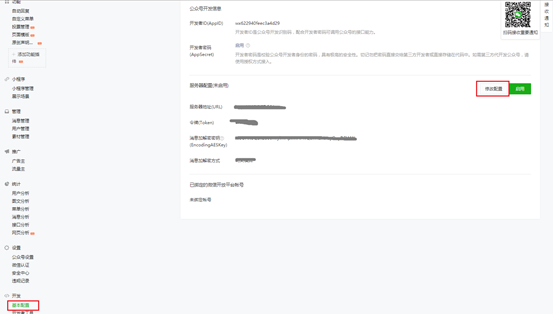
1. After the public platform official website logs in, find the menu bar of "Development" - > "Basic Configuration" and click "Modify Configuration".
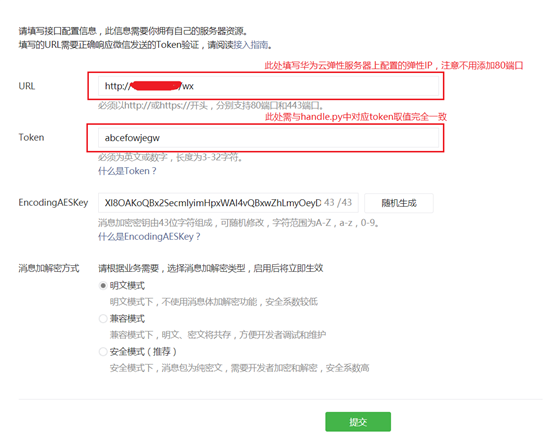
2. Fill in the URL and Token values, Encoding AESKey can be generated randomly. For the sake of simplicity of encryption and decryption, use "plaintext mode" and click "submit". References are as follows:
3. In the pop-up box, click OK.

4. Verify that token is successful and click Enable.
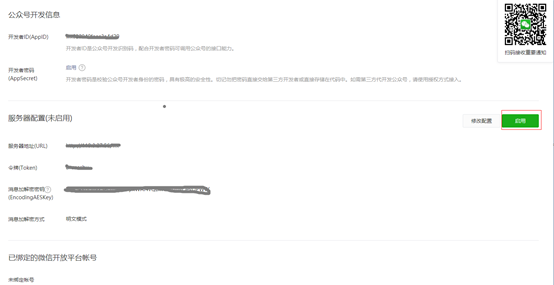
Note: If token validation fails, check Token value configuration and GET message processing code in handle.py.
2.5 Verification
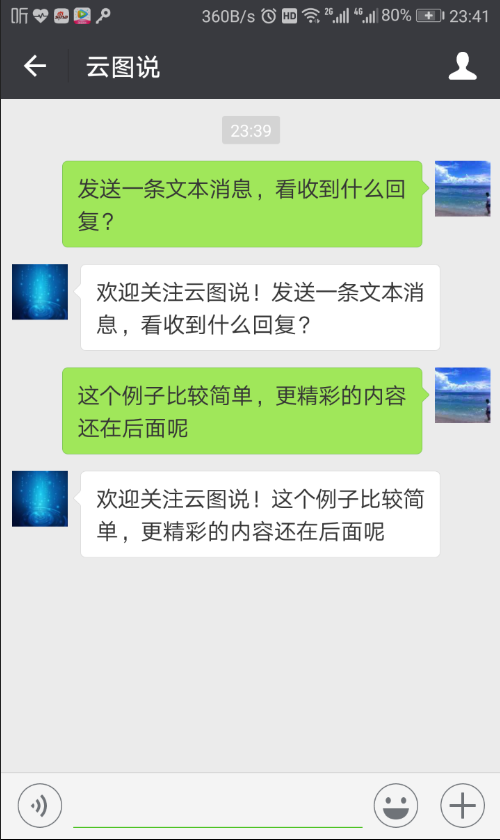
Use Wechat to focus on the public number and send a text message at will to see if you can receive a reply. The following response indicates that the system is working properly.
