A brief overview of Proxy and Reflect
From Mr. Ruan Yifeng's ECMAScript 6 introduction, click http://es6.ruanyifeng.com/#docs/proxy
For example:
var obj = new Proxy({}, {
  get: function (target, key, receiver) {
    console.log(`getting ${key}!`);
    return Reflect.get(target, key, receiver);
  },
  set: function (target, key, value, receiver) {
    console.log(`setting ${key}!`);
    return Reflect.set(target, key, value, receiver);
  }
});
The above code sets up a layer of interception for an empty object, redefining the read (get) and set (set) behaviors of properties. For the time being, we will not explain the specific syntax, but only see the running results. For the object obj with intercepting behavior set, read and write its properties, and you will get the following results.
obj.count = 1
//  setting count!
++obj.count
//  getting count!
//  setting count!
//  2
var proxy = new Proxy(target, handler);
There are two parameters here. The target parameter represents the target object to be intercepted, and the handler parameter is also an object to customize the intercepting behavior.
The Reflect object, like the Proxy object, is a new API provided by ES6 for manipulating objects.
The method of the Reflect object corresponds to the method of the Proxy object one by one. As long as it is the method of the Proxy object, the corresponding method can be found on the Reflect object. This allows the Proxy object to easily call the corresponding Reflect method to complete the default behavior as the basis for modifying the behavior. That is, no matter how the Proxy modifies the default behavior, you can always get the default behavior on Reflect.
Also put the link of teacher Ruan Yifeng http://es6.ruanyifeng.com/#docs/reflect
Initialization structure
See here, I think you have a better understanding of what Proxy is used for, and then let's take a look at the final scam.
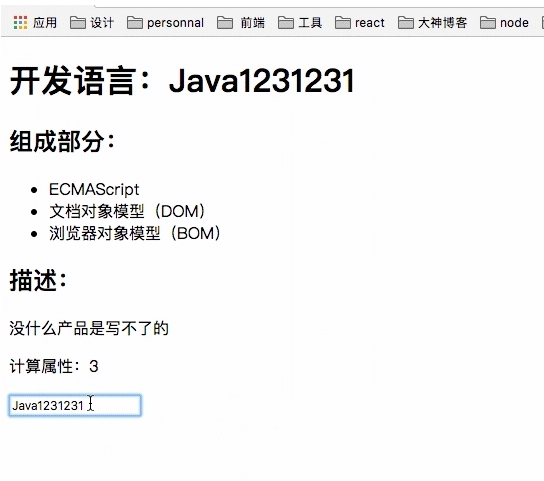
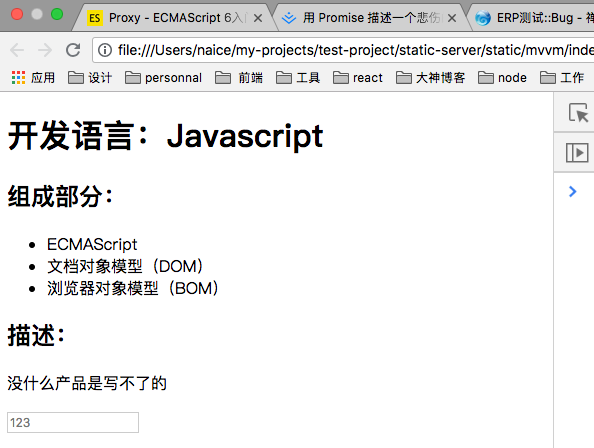
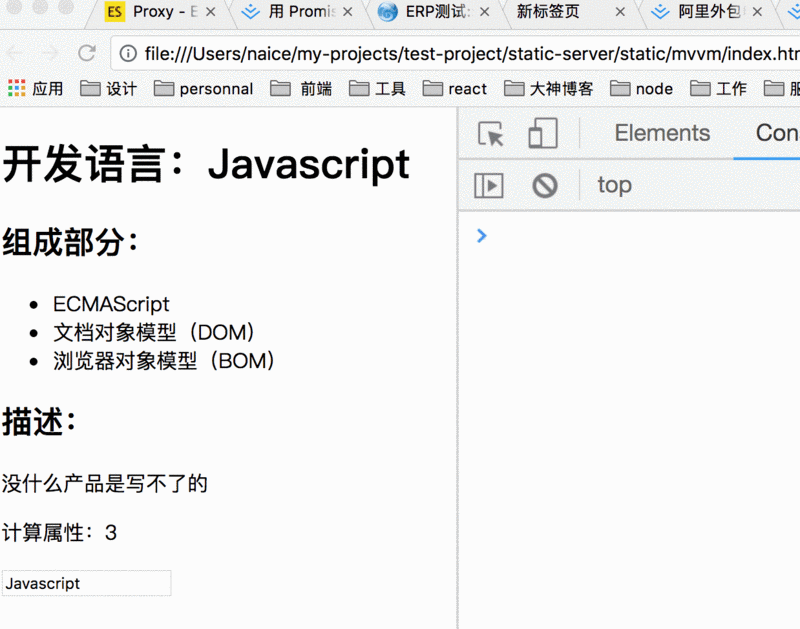
See the picture above. First, let's create a new one index.html , and the code inside is like this. It's simple
<!DOCTYPE html>
<html lang="en">
<head>
    <meta charset="UTF-8">
    <title>Simple Edition mvvm</title>
</head>
<body>
<div id="app">
    <h1>Development language:{{language}}</h1>
    <h2>component:</h2>
    <ul>
        <li>{{makeUp.one}}</li>
        <li>{{makeUp.two}}</li>
        <li>{{makeUp.three}}</li>
    </ul>
    <h2>Description:</h2>
    <p>{{describe}}</p>
    <p>Calculation properties:{{sum}}</p>
    <input placeholder="123" v-module="language" />
</div>
<script>
// It's the same as Vue
const mvvm = new Mvvm({
    el: '#app',
    data: {
        language: 'Javascript',
        makeUp: {
            one: 'ECMAScript',
            two: 'Document object model( DOM)',
            three: 'Browser object model( BOM)'
        },
        describe: 'No product can't be written',
        a: 1,
        b: 2
    },
    computed: {
        sum() {
        return this.a + this.b
    }
})
</script>
</body>
</html>
See the above code. It's about the same as vue. Next, implement the Mvvm constructor
Implement the Mvvm constructor
First, declare an Mvvm function. options are passed in as parameters. options is the configuration of the above code, including el, data and computed~~
function Mvvm(options = {}) {
    // Assign options to this.$options
    this.$options = options
    // hold options.data Assign to this_ data
    let data = this._data = this.$options.data
    let vm = initVm.call(this)
    return this._vm
}
The above Mvvm function is very simple, that is, assign the parameter options to this.$options, and options.data Assign to this_ Data, then call the initialization initVm function, and use call to change the direction of this to facilitate initVm operation. Then return to this_ VM, this is generated in the initvm function.
Continue to write the initVm function,
function initVm () {
    this._vm = new Proxy(this, {
        // Intercept get
        get: (target, key, receiver) => {
            return this[key] || this._data[key] || this._computed[key]
        },
        // Intercept set
        set: (target, key, value) => {
            return Reflect.set(this._data, key, value)
        }
    })
    return this._vm
}
This init function uses Proxy to intercept this object, and then assigns a value to this_ VM, and finally this_ vm,
In the agent, get and set are blocked. In the get function, the value of the key corresponding to this object is returned. If you don't have this, go to this_ Take the corresponding key from the data object, and do not go to this again_ The corresponding key value is removed from the computed object. Set function is to directly return and modify this_ Data corresponds to key.
Do a good job in these interceptions. We can directly access our corresponding value from the strength. (mvvm makes our first code generation instance)
mvvm.b // 2
mvvm.a // 1
mvvm.language // "Javascript"
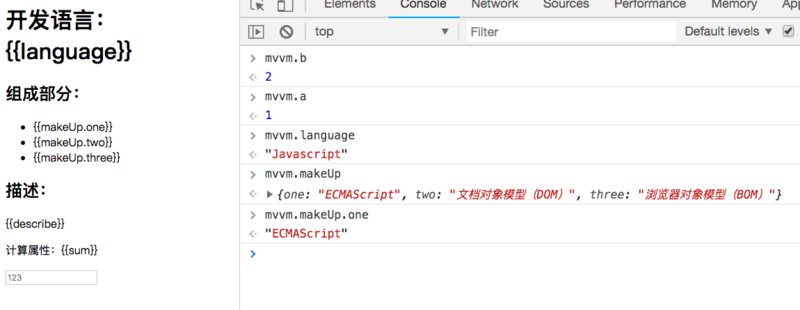
See the console as shown above. You can set values, you can get values, but this is not reactive.
Open the console and have a look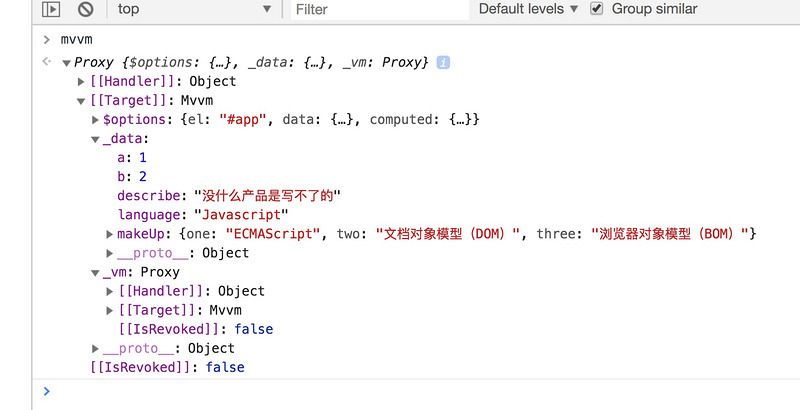
You can see it in detail. Only_ vm, this is proxy. What we need is_ All the data under data has an interception agent; let's implement it.
Implement all data agent interception
We first add an initObserve to the Mvvm, as follows
function Mvvm(options = {}) {
    this.$options = options
    let data = this._data = this.$options.data
    let vm = initVm.call(this)
+   initObserve.call(this, data) // Initialize the Observe of data
    return this._vm
}
The initObserve function is mainly to set this_ Data plus agents. as follows
function initObserve(data) {
    this._data = observe(data) // Assign all observe rs to this_ data
}

// This is separated mainly for the following recursive calls
function observe(data) {
    if (!data || typeof data !== 'object') return data // If it is not an object, return the value directly
    return new Observe(data) // Object call Observe
}
The following mainly implements the Observe class
// Observe class
class Observe {
    constructor(data) {
        this.dep = new Dep() // Subscription class, which will be introduced later
        for (let key in data) {
            data[key] = observe(data[key]) // Recursive call sub object
        }
        return this.proxy(data)
    }
    proxy(data) {
      let dep = this.dep
      return new Proxy(data, {
        get: (target, key, receiver) => {
          return Reflect.get(target, key, receiver)
        },
        set: (target, key, value) => {
          const result = Reflect.set(target, key, observe(value)) // For newly added objects, observe should also be added
          return result
        }
      })
    }
  }
In this way, by adding proxy layer by layer, we can_ Add all data objects, and then look at the console
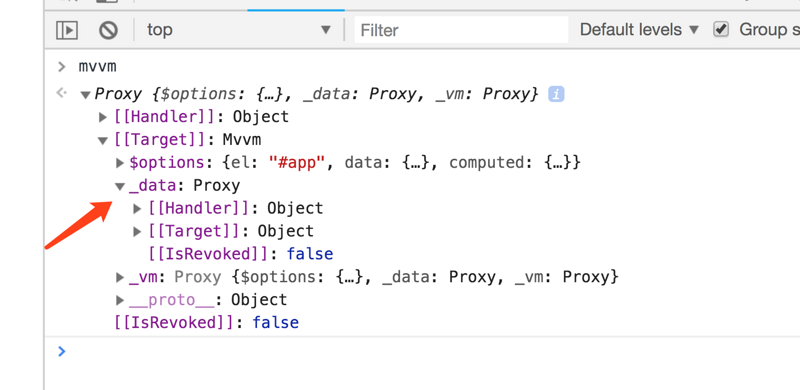
Very good_ data also has a proxy, which is perfect in Wang Zulan's style.
See our html interface, there is no data. We have prepared all the data above, and we will start to combine the data into the html interface.
Set of data to realize hmtl interface
First, annotate the html of calculation attribute, and then implement it
<!-- <p>Calculation properties:{{sum}}</p> -->Then add a compile function to the Mvvm function, A kind of The sign indicates the added function
function Mvvm(options = {}) {
    this.$options = options
    let data = this._data = this.$options.data
    let vm = initVm.call(this)
+   new Compile(this.$options.el, vm) // Add a compile function
    return this._vm
}
We added a Compile constructor above. Send the configured el as a parameter to the machine, and the instance vm that generates the proxy, so that we can get the data under the vm, and then we will implement it. Just read the notes in order. It's easy to understand
// Compile class
class Compile {
    constructor (el, vm) {
        this.vm = vm // Save the vm passed in, because the vm.a = 1 is OK
        let element = document.querySelector(el) // Get the app node
        let fragment = document.createDocumentFragment() // Create fragment code fragment
        fragment.append(element) // Add app node to create fragment code fragment
        this.replace(fragment) // Set of data functions
        document.body.appendChild(fragment) // Finally added to body
    }
    replace(frag) {
        let vm = this.vm // Get the vm saved before
        // loop frag.childNodes
        Array.from(frag.childNodes).forEach(node => {
            let txt = node.textContent // Get the text for example: "development language: {{language}}"
            let reg = /\{\{(.*?)\}\}/g // Define matching regularity
            if (node.nodeType === 3 && reg.test(txt)) {

                replaceTxt()

                function replaceTxt() {
                    // Replace text if it matches
                    node.textContent = txt.replace(reg, (matched, placeholder) => {
                        return placeholder.split('.').reduce((obj, key) => {
                            return obj[key] // For example: to vm.makeUp.one Object get value
                        }, vm)
                    })
                }
            }
            // If there is a word node and the length is not 0
            if (node.childNodes && node.childNodes.length) {
                // Direct recursive match replacement
                this.replace(node)
            }
        })
    }
}
The above compiled function, in a word, does everything possible to replace the placeholder of {{xxx}} with real data through regular.
Then refresh the browser, Dangdang gear Dangdang gear, the data we want appears.
It's very good, but our current data doesn't change. In order to change the data, we need to cooperate with the watcher. Let's implement subscription publishing first.
Implement subscription Publishing
Subscription publishing is actually a common programming pattern, which is simple and straightforward:
For example: a very straightforward example
let arr = []
let a = () => {console.log('a')}

arr.push(a) // Subscribe to a function
arr.push(a) // Subscribe to a function again
arr.push(a) // Double subscription a function

arr.forEach(fn => fn()) // Publish all

// Three a's are printed
It's very simple. Let's implement our code
// Subscription class
class Dep {
    constructor() {
        this.subs = [] // Defining arrays
    }
    // Subscription function
    addSub(sub) {
        this.subs.push(sub)
    }
    // Publish function
    notify() {
        this.subs.filter(item => typeof item !== 'string').forEach(sub => sub.update())
    }
}
Subscription publishing is finished, but when to subscribe and when to publish?? At this time, we subscribe to the watcher during data acquisition, and then publish the watcher during data setting. In the above Observe class, see A kind of Code for. .
... //Omit code
...
proxy(data) {
    let dep = this.dep
    return new Proxy(data, {
        // Intercept get
        get: (target, prop, receiver) => {
+           if (Dep.target) {
                // If you've pushed before, you don't need to push again
                if (!dep.subs.includes(Dep.exp)) {
                    dep.addSub(Dep.exp) // hold Dep.exp .  push to sub array, subscribe
                    dep.addSub(Dep.target) // hold Dep.target .  push to sub array, subscribe
                }
+           }
            return Reflect.get(target, prop, receiver)
        },
        // Intercept set
        set: (target, prop, value) => {
            const result = Reflect.set(target, prop, observe(value))
+           dep.notify() // release
            return result
        }
    })
}
The above code says, what the hell is a watcher? And then release the sub.update() what the hell is it??
We came to the watcher with a bunch of questions
Implement watcher
See detailed notes
// Watcher class
class Watcher {
    constructor (vm, exp, fn) {
        this.fn = fn // Incoming fn
        this.vm = vm // Incoming vm
        this.exp = exp // The passed match to exp for example: "language"“ makeUp.one "
        Dep.exp = exp // Mount an exp to the Dep class
        Dep.target = this // Attach a watcher object to the Dep class, which will be used when updating
        let arr = exp.split('.')
        let val = vm
        arr.forEach(key => {
            val = val[key] // Get the value, which will be issued roughly vm.proxy Add addSub subscription function in get()
        })
        Dep.target = null // After adding a subscription, put Dep.target empty
    }
    update() {
        // Set value will trigger vm.proxy.set Function, and then call the published notify.
        // Finally calling update, update continues to invoke. this.fn(val)
        let exp = this.exp
        let arr = exp.split('.')
        let val = this.vm
        arr.forEach(key => {
            val = val[key]
        })
        this.fn(val)
    }
}
The watcher class is the watcher we want to subscribe to. It has a callback function fn, an update function call FN,
We're all done. But where can I add a watcher?? The following code
In Compile
...
...
function replaceTxt() {
    node.textContent = txt.replace(reg, (matched, placeholder) => {
+       new Watcher(vm, placeholder, replaceTxt);   // Monitor changes, match and replace contents
        return placeholder.split('.').reduce((val, key) => {
            return val[key]
        }, vm)
    })
}
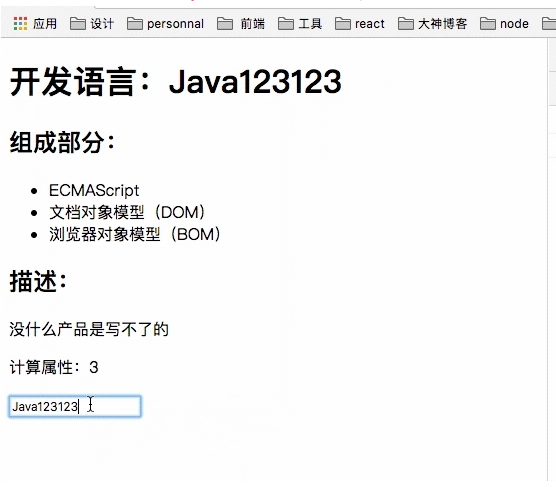
Now that we've added something, let's take a look at the console. The changes worked.
Then we look back at all the processes and see a picture of the old (I also got it from somewhere else).
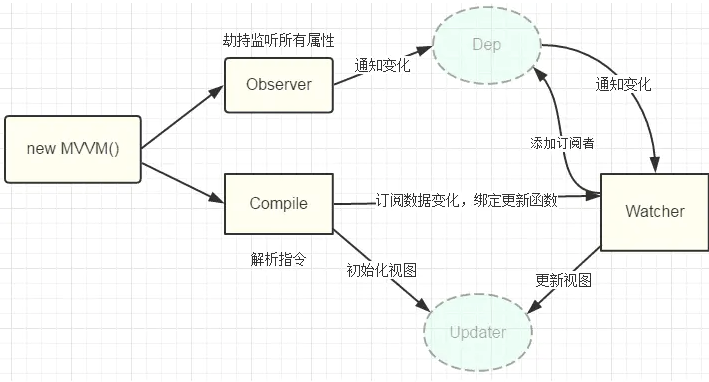 Help understand
We have finished the responsive data. Let's finish the two-way binding.
Implement two-way binding
We see that there is a < input placeholder = "123" v-module = "language" / > in our html. V-module binds a language, and then the replace function in the Compile class. We add
replace(frag) {
    let vm = this.vm
    Array.from(frag.childNodes).forEach(node => {
        let txt = node.textContent
        let reg = /\{\{(.*?)\}\}/g
        // Judge nodeType
+       if (node.nodeType === 1) {
            const nodeAttr = node.attributes // Property collection
            Array.from(nodeAttr).forEach(item => {
                let name = item.name // Property name
                let exp = item.value // Property value
                // If the attribute has v-
                if (name.includes('v-')){
                    node.value = vm[exp]
                    node.addEventListener('input', e => {
                        // Equivalent to this.language Assigned a new value
                        // The change of value calls set, and set calls notify. The update method invoking watcher in notify implements the update operation.
                        vm[exp] = e.target.value
                    })
                }
            });
+       }
        ...
        ...
    }
  }
The above method is to bind our input node to a input event, then change our value when the input event is triggered, and the change of value will call set, and notify will be invoked in set. The update method invoked watcher in notify will update operation.
Then let's take a look at the interface
We have basically completed the two-way data binding. Don't forget that we have a commented out calculation property above.
Calculation properties
First, remove the < p > calculation attribute: {sum} < / P > comment, thinking that in the initVm function at the beginning, we added the code return this [key] | | this_ data[key] || this._ Calculated [key], now that we all understand, we just need to put this_ Just add a watcher to computed.
function Mvvm(options = {}) {
    this.$options = options
    let data = this._data = this.$options.data
    let vm = initVm.call(this)
    initObserve.call(this, data)
+   initComputed.call(this) // Add calculation function, change this point
    new Compile(this.$options.el, vm)
    return this._vm
}


function initComputed() {
    let vm = this
    let computed = this.$options.computed // Get the configured computed
    vm._computed = {}
    if (!computed) return // Return directly without calculation
    Object.keys(computed).forEach(key => {
        // It's equivalent to pointing this in sum to this_ VM, then you can get this.a, this, b
        this._computed[key] = computed[key].call(this._vm)
        // Add a new Watcher
        new Watcher(this._vm, key, val => {
            // It will be calculated every time it is set
            this._computed[key] = computed[key].call(this._vm)
        })
    })
}
The above initComputed is to add a watcher. The general process is as follows:
this._vm change -- > vm.set () --- > notify() --- > update() --- update interface
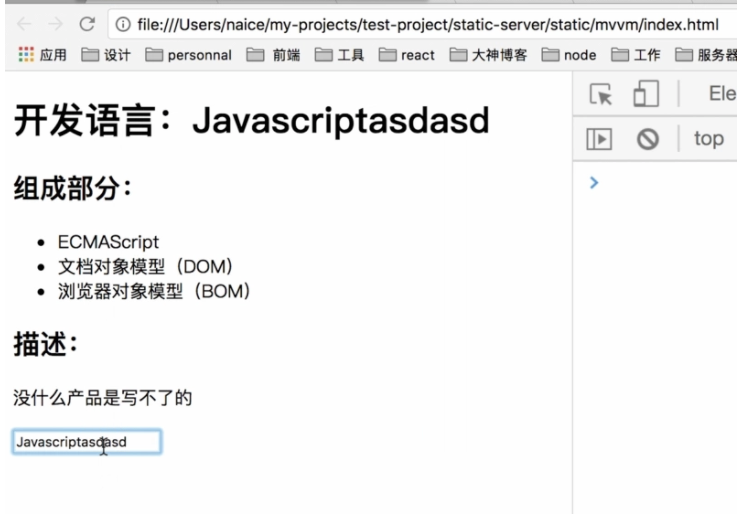
Last look at the picture
Nothing seems to be wrong~~~~
Add mounted hook
It's also easy to add mounted
// It's the same as Vue
let mvvm = new Mvvm({
    el: '#app',
    data: {
        ...
        ...
    },
    computed: {
        ...
        ...
    },
    mounted() {
        console.log('i am mounted', this.a)
    }
})
Add mounted in the new Mvvm,
Then go to function Mvvm and add
function Mvvm(options = {}) {
    this.$options = options
    let data = this._data = this.$options.data
    let vm = initVm.call(this)
    initObserve.call(this, data)
    initComputed.call(this)
    new Compile(this.$options.el, vm)
+   mounted.call(this._vm) // Add mounted, change direction
    return this._vm
}

// Run mounted
+ function mounted() {
    let mounted = this.$options.mounted
    mounted && mounted.call(this)
+ }
Print out after execution
i am mounted 1
End ~ ~ ~ scatter flowers
ps: for the compilation, refer to the operation of the God. @ chenhongdong Thank you
Finally attached, the source code address, download and run it directly.
Source address: https://github.com/naihe138/proxy-mvvm
Preview address: http://gitblog.naice.me/proxy-mvvm/index.html