
Introduction | this paper will introduce two ways of page screenshots in front-end development, including detailed description of its implementation principle and use mode, hoping to provide some experience and help for more front-end developers.
1, Background
Page screenshots are common in front-end development, especially in the needs related to marketing scenarios. For example, screenshot sharing, compared with ordinary link sharing, screenshot sharing has the advantages of richer display and more information bearing. Recently, I encountered relevant functions in requirements development, so I investigated the relevant implementation and principle.
2, Related technology
The front-end needs to realize the function of page screenshots. Now the more common way is to use the open source screenshot npm library. Generally, there are two npm libraries that are widely used:
- dom-to-image: https://github.com/tsayen/dom-to-image
- html2canvas: https://github.com/niklasvh/html2canvas
The above two common npm libraries correspond to two common implementation principles. To realize the front-end screenshot, we usually use the graphics API to redraw the page and generate pictures. Basically, there are two implementation schemes: SVG (DOM to image) and Canvas (html2canvas). The two schemes have the same goal, that is, to turn DOM into pictures. Let's take a look at these two schemes respectively.
3, DOM to image
The DOM to image library mainly uses the SVG implementation method. In short, it is to convert DOM to SVG first, and then SVG to pictures.
(1) Mode of use
First, let's briefly understand the core api provided by Dom to image. There are some methods as follows:
- toSvg (dom to svg)
- toPng (dom to png)
- toJpeg (dom to jpg)
- toBlob (dom to binary format)
- toPixelData (dom to original pixel value)
If you need to generate a screenshot of png, the implementation code is as follows:
import domtoimage from "domtoimage"
const node = document.getElementById('node');domtoimage.toPng(node,options).then((dataUrl) => {    const img = new Image();    img.src = dataUrl;    document.body.appendChild(img);})
The toPng method can pass in two parameters node and options.
Node is the dom node to generate the screenshot; options are the supported attribute configurations, as follows: filter, backgroundColor, width, height, style, quality, imagePlaceholder, cachebus.
(2) Principle analysis
The source code of dom to image is not many, less than 1000 lines in total. Let's take the toPng method for a simple source code analysis and analyze its implementation principle. The simple process is as follows:
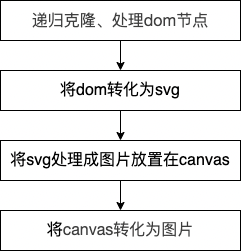
Several functions are used in the overall implementation process:
- toPng (call draw to realize canvas = > PNG)
- Draw (call toSvg to realize DOM = > canvas)
- toSvg (call cloneNode and makeSvgDataUri to realize DOM = > SVG)
- cloneNode (cloning dom and css)
- makeSvgDataUri (implement DOM = > SVG data: URL)
- toPng
The toPng function is relatively simple. The converted canvas is obtained by calling the draw method, and the toDataURL is used to convert it into a picture and return it.
function toPng(node, options) { return draw(node, options || {}) .then((canvas) => canvas.toDataURL());}- draw
The draw function first calls the toSvg method to obtain the dom converted svg, then processes the obtained svg in the form of url into a picture, creates a canvas node, and then puts the generated picture on the canvas canvas with the help of the drawImage() method.
function draw(domNode, options) { return toSvg(domNode, options) // The svg obtained is the image data URL, and further create svg images then(util.makeImage) . then(util.delay(100)) . Then ((image) = > {/ / create a canvas, draw an image on the canvas and return const canvas = newcanvas (domnode); canvas.getcontext ("2D"). DrawImage (image, 0, 0); return canvas;})// Create a new canvas node, Set options parameters of some styles: function newcanvas (domnode) {const canvas = document.createelement ("canvas"); canvas.width = options.width | util.width (domnode); canvas.height = options.height | util.height (domnode); if (options. Bgcolor) {const CTX = canvas.getcontext ("2D") ; ctx. fillStyle = options. bgcolor; ctx. fillRect(0, 0, canvas.width, canvas.height); } return canvas; }}- toSvg
- The toSvg function implements the processing from dom to svg. The general steps are as follows:
- Recursively clone dom nodes (call cloneNode function)
- Process fonts, obtain all styles, find all @ font face and inline resources, parse and download the corresponding resources, and convert the resources into dataUrl for src to use. Put the css rules processed above into < style >, and add the label to the node of the clone.
- Process the image and convert the url of src in img tag and the url in background in css into dataUrl.
- Get dataUrl data transformed by dom node (call makeSvgDataUri function)
function toSvg(node, options) { options = options || {}; // Handle imagePlaceholder, cacheboost value and copyoptions (options); return Promise. resolve(node) . Then ((node) = > / / recursively clone the dom node cloneNode(node, options.filter, true)) / / put the font related csstext into style Then (embedfonts) / / clone processes the picture and converts the picture link into dataurl Then (inlineimages) / / add style in options and insert style then(applyOptions) . Then ((clone) = > / / convert the node node into SVG makesvgdatauri (clone, options. Width | util. Width (node), options height || util. height(node))); // Handle some options style function applyoptions (clone) {... Return clone;}}- cloneNode
The cloneNode function mainly deals with dom nodes. There are many contents. The simple summary and implementation are as follows:
- Recursive clone the original dom node, where if there is a canvas, it will be converted to an image object.
- Handle the style of the node, obtain the values of all CSS attributes of the node element through the getComputedStyle method, insert these style attributes onto the new style tag, deal with the styles of pseudo elements such as ": before,: after", and finally deal with the input content and svg.
function cloneNode(node, filter, root) { if (!root && filter && !filter(node)) return Promise.resolve(); return Promise.resolve(node) .then(makeNodeCopy) .then((clone) => cloneChildren(node, clone, filter)) .then((clone) => processClone(node, clone)); function makeNodeCopy(node) { // Convert canvas to image object if (node instanceof htmlcanvas element) return util makeImage(node.toDataURL()); return node. cloneNode(false); } // Recursive clone child nodefunction clonechildren (original, clone, filter) {const children = original. ChildNodes; if (children. Length = = = 0) return promise. Resolve (clone); return clonechilderinorder (clone, util. Asarray (children), filter). Then (() = > clone); function clonechilderinorder (parent, children, filter) { let done = Promise.resolve(); children.forEach((child) => { done = done .then(() => cloneNode(child, filter)) .then((childClone) => { if (childClone) parent.appendChild(childClone); }); }); return done; } } Function processclone (original, clone) {if (! (clone instanceof element)) return clone; return promise. Resolve(). Then (clonestyle). Then (clonepseudoelements). Then (copyuserinput). Then (fixsvg). Then (() = > clone); / / clone the style on the node. function cloneStyle() {...}// Extract the pseudo class style and put it into CSS function clonepseudoelements() {...}// Handle Input, TextArea tag function copyUserInput() {...}// Process SVG function fixsvg() {...}}}- makeSvgDataUri
First, we need to understand two features:
- Svg has a < foreignobject > element, which is used to use XML elements with other XML namespaces. In other words, with the help of < foreignobject > tags, we can directly embed XHTML elements in SVG. For example:
<svg xmlns="http://www.w3. org/2000/svg"><foreignObject width="120" height="50"><body xmlns=" http://www.w3.org/1999/xhtml "> < p > text. < / P > < / body > < / foreignobject > < / SVG >
You can see that xmlns is set in the < foreignobject > tag=“ http://www.w3.org/1999/xhtml ”The < body > tag of the namespace. At this time, the < body > tag and its sub tags will be rendered according to the XHTML standard, realizing the mixed use of SVG and XHTML.
- The XMLSerializer object can convert or "serialize" an XML document or Node object into a string of unparsed XML tags.
Based on the above features, let's take another look at the makeSvgDataUri function. This method realizes the transformation of node nodes into svg, using the two important features just mentioned. First pass the dom node through XmlSerializer () Serializetostring() is serialized into a string, and then the converted string is embedded in the < foreignObject > tag. foreignObject can embed XHTML in svg, and then process svg as dataUrl data to return. The specific implementation is as follows:
function makeSvgDataUri(node, width, height) { return Promise.resolve(node) .then((node) => { // Convert dom to the string node setAttribute("xmlns", " http://www.w3.org/1999/xhtml "); return new xmlserializer(). Serializetostring (node);}). Then (util. Escapexhtml). Then ((XHTML) = > ` < foreignobject x =" 0 "y =" 0 "width =" 100% "height =" 100% "> ${XHTML} < / foreignobject > `) / / convert to SVG. Then ((foreignobject) = > / / if the xmlns namespace is not specified, it will not be rendered ` < SVG xmlns =" http://www.w3.org/2000/svg "Width =" ${width} "height =" ${height} "> ${foreignobject} < / SVG > `) / / convert to data: URL. Then ((SVG) = > ` data: image / SVG + XML; charset = UTF-8, ${SVG} `);}4, html2canvas
html2canvas library mainly uses the canvas implementation method. The main process is to manually redraw dom into canvas. Therefore, it can only correctly render understandable attributes, and many CSS attributes cannot be rendered correctly.
Complete list of CSS properties supported:
http://html2canvas.hertzen.com/features/
Browser compatibility:
Firefox 3.5+ Google Chrome Opera 12+ IE9+ Edge Safari 6+
Official document address:
http://html2canvas.hertzen.com/documentation
(1) Mode of use
// dom is the node to be drawn. Option is some configurable options. Import html2canvas from 'html2canvas' html2canvas (dom, option) then(canvas=>{ canvas.toDataURL()})Common option configurations:
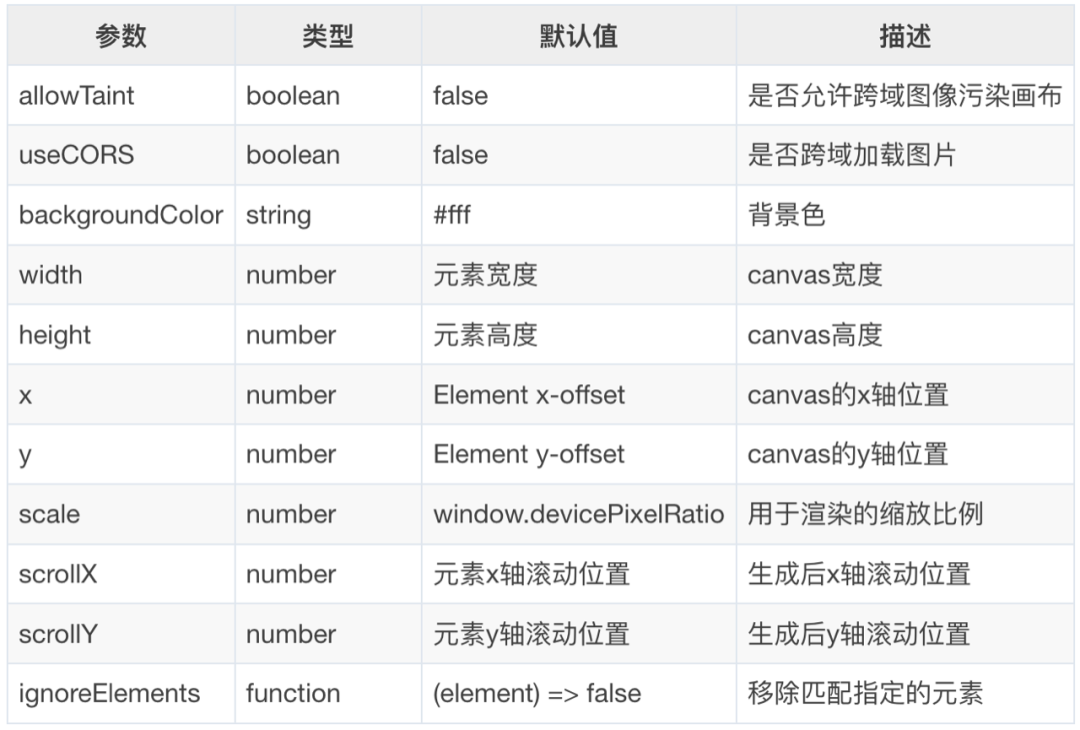
All configuration documents:
http://html2canvas.hertzen.com/configuration
(2) Principle analysis
The internal implementation of html2canvas is more complex than DOM to image. The basic principle is to read the information of DOM elements, build screenshots based on this information, and present them in the canvas. The key point is the process of redrawing DOM into canvas. The overall idea of this process is to traverse the target node and the child nodes of the target node, record the structure, content and style of all nodes in the traversal process, then calculate the hierarchical relationship of the node itself, and finally draw it into canvas according to different priorities.
Due to the large amount of source code of html2canvas, it may not be able to analyze in detail like DOM to image, but you can still roughly understand the overall process. First, you can take a look at the code structure in the src folder of the source code, as shown in the following figure:
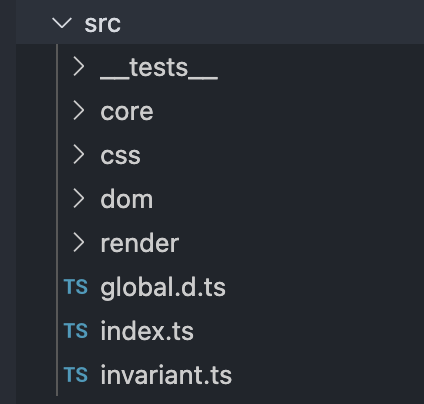
Briefly analyze:
- index: entry file, render the dom node into a canvas and return it.
- core: encapsulation of tool functions, including cache processing function, Context method encapsulation, log module, etc.
- css: handle node styles, analyze various css attributes and characteristics, and handle them.
- dom: the method of traversing dom nodes and the processing of various types of dom.
- render: the processing method of generating canvas based on clone nodes.
Based on the above core files, let's briefly understand the parsing process of html2canvas. The general process is as follows:
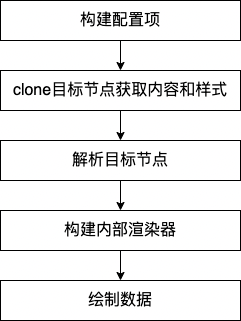
- Build configuration item
In this step, the passed in options and some defaultOptions will be combined to generate the configuration data rendereoptions for rendering. During the process, configuration items will be classified, such as resourceOptions (resource cross domain correlation), contextOptions (cache and log correlation), windowOptions (window width and height, rolling configuration), cloneOptions (configuration of specified dom), renderOptions (related configuration of render results, including various attributes of generated pictures), etc, Then transfer various configuration items to the next steps.
- clone the target node and get the style and content
In this step, the target node will be to the specified DOM parsing method. This process will clone the target node and its child nodes to obtain the content information and style information of the node. The clone dom parsing method is also relatively complex, which will not be expanded in detail here. After obtaining the target node, you need to load the dom of the cloned target node into an iframe for a rendering, and then you can obtain the node style that is truly rendered by the browser view.
- Resolve target node
After the style and content of the target node are obtained, the data information it carries needs to be transformed into the data type that can be used by Canvas. In the analysis method of the target node, the whole DOM tree is recursive and the data of each layer of nodes is obtained. For each node, the part to be drawn includes border, background, shadow and content, while for the content, it includes pictures, text, video, etc. In the whole parsing process, all attributes of the target node are parsed and constructed and transformed into the specified data format. The basic data format can be seen in the following code:
class ElementContainer { // Information after conversion and calculation of styles on all nodes readonly styles: CSSParsedDeclaration// Text node information of the node, including text content and other attributes readonly textNodes: TextContainer [] = []// Child node readonly elements of current node: elementcontainer [] = []// Location information of current node (width / height, abscissa / ordinate): bounds; flags = 0; ...}Specific to different types of elements, such as pictures, IFrame, SVG, input, etc., the extends ElementContainer also has its own specific data structure, which will not be posted in detail here.
- Build internal renderer
After processing the target node into a specific data structure, you need to call the rendering method in combination with canvas. Canvas drawing needs to calculate which elements should be drawn on the upper layer and which on the lower layer according to the style. What is the rule? This involves some knowledge related to CSS layout. By default, CSS is a flow layout, and there is no overlap between elements. However, in some cases, this flow layout will be broken, such as the use of float and position. Therefore, we need to identify which elements are out of the normal document flow and remember their cascading information in order to render them correctly. Elements that break away from the normal document flow form a cascading context.
When rendering elements in the browser, according to W3C standards, all node level layouts need to follow the rules of stacking context and stacking order. The specific rules are as follows:
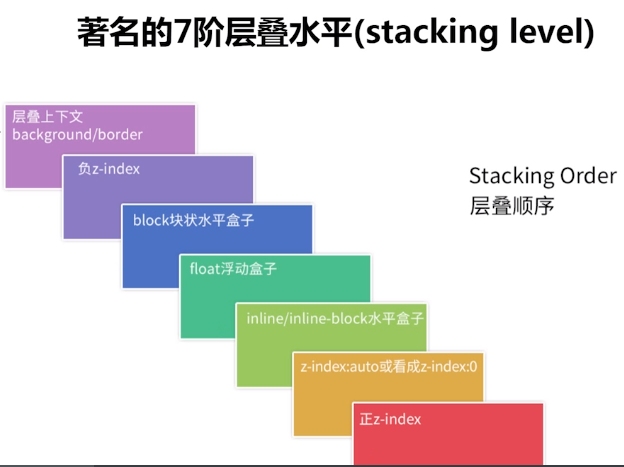
After understanding that the rendering of elements needs to follow this standard, when Canvas draws nodes, it needs to generate the specified stacking data. First, it needs to calculate the different levels displayed by the child nodes in the whole target node during rendering, and construct the internal data structure of the stacking context corresponding to all nodes. The specific data structure is as follows:
// Current element: elementpaint// z-index is negative, forming a cascading context negative zindex: stackingcontext []// z-index is 0, auto, transform or opacity, forming a cascading context zeroOrAutoZIndexOrTransformedOrOpacity: StackingContext []// The stacking context formed by positioning and z-index is posivezindex: stackingcontext []// There is no cascading context formed by positioning and float. nonPositionedFloats: StackingContext []// There is no cascading context formed by positioning and inlining. nonPositionedInlineLevel: StackingContext []// Inline node inlineLevel: ElementPaint []// Non inline node nonInlineLevel: ElementPaint [];
Based on the above data structure, the element sub nodes are classified and added to the specified array. The way of parsing cascading information is similar to that of parsing node information. They all recurse the whole tree, collect the information of each layer of the tree, and form a cascading tree containing cascading information.
- Draw data
Based on the data constructed in the above two steps, you can start calling the internal rendering method for data processing and rendering. Using the cascading data of nodes, the DOM elements are rendered into canvas layer by layer according to the rules of browser rendering cascading data. The core specific source code is as follows:
async renderStackContent(stack: StackingContext): Promise<void> { if (contains(stack.element.container.flags, FLAGS.DEBUG_RENDER)) { debugger; } // 1. the background and borders of the element forming the stacking context. await this.renderNodeBackgroundAndBorders(stack.element); // 2. the child stacking contexts with negative stack levels (most negative first). for (const child of stack.negativeZIndex) { await this.renderStack(child); } // 3. For all its in-flow, non-positioned, block-level descendants in tree order: await this.renderNodeContent(stack.element); for (const child of stack.nonInlineLevel) { await this.renderNode(child); } // 4. All non-positioned floating descendants, in tree order. For each one of these, // treat the element as if it created a new stacking context, but any positioned descendants and descendants // which actually create a new stacking context should be considered part of the parent stacking context, // not this new one. for (const child of stack.nonPositionedFloats) { await this.renderStack(child); } // 5. the in-flow, inline-level, non-positioned descendants, including inline tables and inline blocks. for (const child of stack.nonPositionedInlineLevel) { await this.renderStack(child); } for (const child of stack.inlineLevel) { await this.renderNode(child); } // 6. All positioned, opacity or transform descendants, in tree order that fall into the following categories: // All positioned descendants with 'z-index: auto' or 'z-index: 0', in tree order. // For those with 'z-index: auto', treat the element as if it created a new stacking context, // but any positioned descendants and descendants which actually create a new stacking context should be // considered part of the parent stacking context, not this new one. For those with 'z-index: 0', // treat the stacking context generated atomically. // // All opacity descendants with opacity less than 1 // // All transform descendants with transform other than none for (const child of stack.zeroOrAutoZIndexOrTransformedOrOpacity) { await this.renderStack(child); } // 7. Stacking contexts formed by positioned descendants with z-indices greater than or equal to 1 in z-index // order (smallest first) then tree order. for (const child of stack.positiveZIndex) { await this.renderStack(child); }}In the renderStackContent method, first call renderNodeContent and renderNodeBackgroundAndBorders to render the element itself.
Then process the sub elements of each category. If the sub elements form a cascading context, call the renderStack method. This method continues to call renderStackContent internally, which forms the recursion of the whole tree of the cascading context. If the child element is a normal element and does not form a cascading context, renderNode will be called directly. renderNode includes two parts: render node content and render node border background color.
async renderNode(paint: ElementPaint): Promise<void> { if (paint.container.styles.isVisible()) { // The border and background color of the render node await this renderNodeBackgroundAndBorders(paint); // Render node content await this renderNodeContent(paint); }}The renderNodeContent method is to render the content in an element node, which may be normal elements, text, pictures, SVG, Canvas, input and iframe. Different contents will be processed differently.
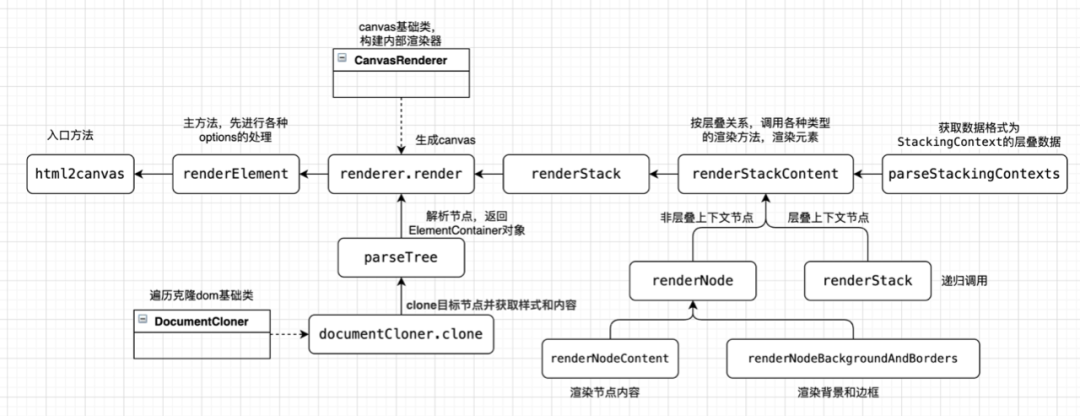
The above process is the overall internal process of html2canvas. After understanding the general principle, let's look at a more detailed source code flow chart to make a simple summary of the above process.
5, Summary of frequently asked questions
In the process of using html2canvas, there are some common problems and pitfalls, which are summarized as follows:
(1) Incomplete screenshot
To solve this problem, just scroll the page to the top before the screenshot:
document.documentElement.scrollTop = 0;document.body.scrollTop = 0;
(2) Picture cross domain
When the plug-in requests pictures, there will be cross domain pictures. This is because if the cross domain resources are drawn into the canvas and the resources are not requested by CORS, the canvas will be considered contaminated. The canvas can be displayed normally, but there is no way to export data using toDataURL() or toBlob(). For details, please refer to: https://developer.mozilla.org/en-US/docs/Web/HTML/CORS_enabled_image
Solution: set crossorigin on the img tag and the attribute value is anonymous to enable the CROS request. Of course, the premise of this method is that the server response header access control allow origin has been set to allow cross domain. If the image server does not support cross domain, you can use canvas to convert it into base64 format. The method is as follows.
function getUrlBase64_pro( len,url ) { //Convert the picture to Base64 var canvas = document createElement("canvas"); // Create canvas DOM element var CTX = canvas getContext("2d"); return new Promise((reslove, reject) => { var img = new Image(); img.crossOrigin = "Anonymous"; img.onload = function() { canvas.height = len; canvas.width = len; ctx.drawImage(img, 0, 0, len, len); var dataURL = canvas.toDataURL("image/"); canvas = null; reslove(dataURL); }; img. onerror = function(err){ reject(err) } img. src = url; });}(3) The screenshot is different from the current page
Method 1: if you want to exclude some elements from the rendering, you can add the data html2cnavas ignore attribute to these elements. Html2cnavas will exclude them from the rendering. For example, if you don't want to capture the part of iframe, you can do the following:
html2canvas(ele,{useCORS: true,ignoreElements: (element: any) => { if (element.tagName.toLowerCase() === 'iframe') { return element; } return false; },})Method 2: you can put the part that needs to be converted into a picture in one node, and then set the transparency of the whole node to 0, and set the level of other parts higher, so as to realize the designated area of the screenshot.
6, Summary
Aiming at the implementation of front-end screenshots, this paper briefly introduces and analyzes the use and principle of two open-source libraries DOM to image and html2canvas.
reference material:
1. DOM to image principle
2. Brief introduction of html2image principle
3. Detailed explanation of browser side web page screenshot scheme
4.html2canvas
5. The principle of html2canvas to realize browser screenshots (including the general method of source code analysis)