What CUDA is is is not described, but how to achieve multiversion coexistence and real-time switching of CUDA.
1. Install multiple versions of CUDA
Here, let's take the cuda9-1 and cuda9-0 versions as examples (it doesn't matter which one you install first)
First, select the version of cuda you want from the cuda version library.(
Then, select the appropriate installation package, where you select the installation file of type runfile to set the installation path for each cuda later.(
After the download is complete, we use the cd command to go to the directory where the cuda_8.0.61_375.26_linux.run file is located, and then run the following command to install (note this file name, the previous cuda_8.0.61 represents the version of cuda, the latter 375.26 represents the corresponding NVIDIA-driven version, where I use the installation process of CUDA 8.0 as an example, 9.0 and 9.1 are the same)
During the installation process, it is important to note that if you are installing CUDA for the first time, you will undoubtedly enter y (yes), but if you are installing an extra version of cuda, the choice of Y (yes) depends on your specific needs. In short, if you want to enable the currently installed version of cuda, you will choose y, if you just want to install this version.If you don't want to enable this version yet, choose n.
#Execute the following command to install the dependencies first.
#Otherwise a `Missing recommended library'error will occur
sudo apt-get install freeglut3-dev build-essential libx11-dev libxmu-dev libxi-dev libgl1-mesa-glx libglu1-mesa libglu1-mesa-dev


sudo sh cuda_8.0.61_375.26_linux.run #Start Installation

#..A bunch of protocol instructions...
#Quit the agreement instructions by pressing q directly.
zerozone@zerozone: accept/decline/quit: accept  #Accept Agreement

Install NVIDIA Accelerated Graphics Driver for Linux-x86_64 375.26?
y)es/(n)o/(q)uit: n  #Whether the graphics card driver package is available, since the graphics card driver is already installed, select n

Install the CUDA 8.0 Toolkit?
(y)es/(n)o/(q)uit: y #Whether to install the toolkit, select y

Enter Toolkit Location
[ default is /usr/local/cuda-8.0 ]: #Toolkit installation address, default return is sufficient

Do you want to install a symbolic link at /usr/local/cuda?
(y)es/(n)o/(q)uit: y #Add a link**Note this connection, if you have previously installed another version of cuda, it is recommended to select no unless you are sure you want to use this new version of cuda, as specifying this link will point the CUDA to this new version**

Install the CUDA 8.0 Samples?
(y)es/(n)o/(q)uit: y #Installation Samples

Enter CUDA Samples Location
 [ default is /root ]:  #Sample Installation Address Default

# ***Installation Information***
Installing the CUDA Toolkit in /usr/local/cuda-8.0 ...

Missing recommended library: libXi.so
Missing recommended library: libXmu.so
#Notice that there was a Missing recommended library error.
#Because the blogger did not add the initial installation-related instructions when he first installed it,
#After I added the dependencies, install them again and there will be no Missing errors

Installing the CUDA Samples in /root ...
Copying samples to /root/NVIDIA_CUDA-8.0_Samples now...
Finished copying samples.

===========
= Summary =
===========
Driver:   Not Selected
Toolkit:  Installed in /usr/local/cuda-8.0
Samples:  Installed in /root, but missing recommended libraries

Please make sure that
 -   PATH includes /usr/local/cuda-8.0/bin
 -   LD_LIBRARY_PATH includes /usr/local/cuda-8.0/lib64, or, add /usr/local/cuda-8.0/lib64 to /etc/ld.so.conf and run ldconfig as root

To uninstall the CUDA Toolkit, run the uninstall script in /usr/local/cuda-8.0/bin

Please see CUDA_Installation_Guide_Linux.pdf in /usr/local/cuda-8.0/doc/pdf for detailed information on setting up CUDA.

***WARNING: Incomplete installation! This installation did not install the CUDA Driver. A driver of version at least 361.00 is required for CUDA 8.0 functionality to work.

To install the driver using this installer, run the following command, replacing <CudaInstaller> with the name of this run file:

    sudo <CudaInstaller>.run -silent -driver

Logfile is /tmp/cuda_install_6388.log
# ***Installation complete***- 1
- 2
- 3
- 4
- 5
- 6
- 7
- 8
- 9
- 10
- 11
- 12
- 13
- 14
- 15
- 16
- 17
- 18
- 19
- 20
- 21
- 22
- 23
- 24
- 25
- 26
- 27
- 28
- 29
- 30
- 31
- 32
- 33
- 34
- 35
- 36
- 37
- 38
- 39
- 40
- 41
- 42
- 43
- 44
- 45
- 46
- 47
- 48
- 49
- 50
- 51
- 52
- 53
- 54
- 55
- 56
- 57
- 58
- 59
- 60
- 61
- 62
- 63
- 64
- 65
Configure CUDA-related environment variables
Modify the ~/.bashrc file (or ~/.zhsrc) to add environment variables at the end of the file
TensorflowThe official installation process requires attention to:To configurePATHandLD_LIBRARY_PATHandCUDA_HOMEenvironment variable.

vim ~/.bashrc #Modify the configuration file (if you are using zsh, you need to modify ~/.zshrc Files)

#Add at the end of the file
export LD_LIBRARY_PATH=$LD_LIBRARY_PATH:/usr/local/cuda/lib64
export PATH=$PATH:/usr/local/cuda/bin
export CUDA_HOME=$CUDA_HOME:/usr/local/cuda
- 1
- 2
- 3
- 4
- 5
- 6
- 7
- 8
- 9
Use the same method to download another version of the cuda toolkit you want to install (note the runfile type), and during the installation process, note the selection of the cuda symbol link (first install, select y, install an additional version, select n)
2. Switching over multiple versions of cuda
After installing multiple versions of cuda, you can view your own installed version of CUDA in the / usr/local / directory, as shown in the following figure: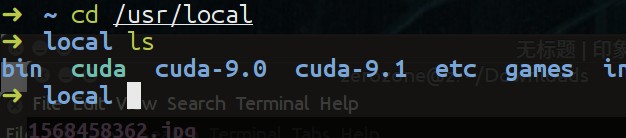
Here, cuda-9.0 and cuda-9.1 are the two versions of CUDA we have installed, and CUDA is a soft link to the version of CUDA we specified (note that when setting environment variables above, CUDA is used instead of cuda-9.0 and cuda-9.1, mainly to make it easier for us to switch between CUDA versions, so we don't have to go to the value of the environment variable every time)
You can use the stat command to see which version of cuda the current cuda soft link points to, as follows: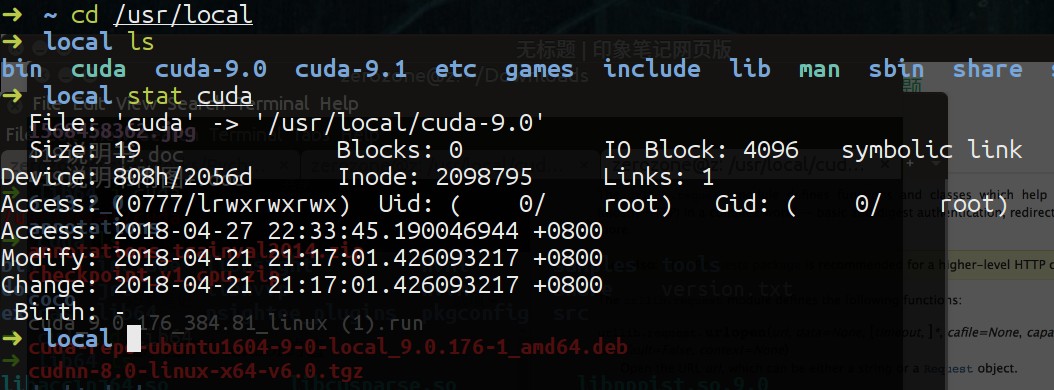
As you can see, the file type is symbolic link and the directory you are pointing to is / usr/local/cuda-9.0. When we want to use the version of cuda-9.1, we just need to delete the soft link and re-establish the soft link to the version of cuda-9.1 (note whether the name is cuda, as it is set in the bashrc file)
sudo rm -rf cuda
sudo ln -s /usr/local/cuda-9.1 /usr/local/cuda- 1
- 2
To switch between other versions of cuda, simply change the correct path to cdua when making soft links