Ubuntu18.04 install and build hadoop-3.3.0 cluster
Reference blog: https://blog.csdn.net/sunxiaoju/article/details/85222290?ops_request_misc=%257B%2522request%255Fid%2522%253A%2522162443354216780261915061%2522%252C%2522scm%2522%253A%252220140713.130102334 …%2522%257D&request_ id=162443354216780261915061&biz_ id=0&utm_ medium=distribute. pc_ search_ result. none-task-blog-2allbaidu_ landing_ v2~default-7-85222290. pc_ search_ result_ control_ group&utm_ term=ubuntu%E6%90%AD%E5%BB%BAhadoop%E9%9B%86%E7%BE%A4&spm=1018.2226.3001.4187
Background introduction
Time: June 2021.
The company wanted to develop big data, so in order to build a simple hadoop cluster for testing, it bought three computers and built a simple cluster test with two computers, all of which used Ubuntu 18 04 system.
This tutorial is to install hadoop cluster under the experimental background of building apache kylin project. Before installing hadoop, you need to install and configure the Java environment.
Cluster allocation
System / Version Description
| Software | edition |
|---|---|
| system | ubuntu18.04 |
| JDK | 1.8.0_291 |
| hadoop | 3.3.0 |
Cluster analysis table
Before setting up the cluster, all computers need to be connected to the same LAN. In this experiment, there are only two computers, so they are connected directly through a network cable. After connection, the IP addresses of the two computers need to be set. After setting, the two computers can ping each other through the ping command.
| Master node | Slave node | |
|---|---|---|
| function | NameNode,DataNode | DataNode |
| IP address | 192.168.1.7 | 192.168.1.8 |
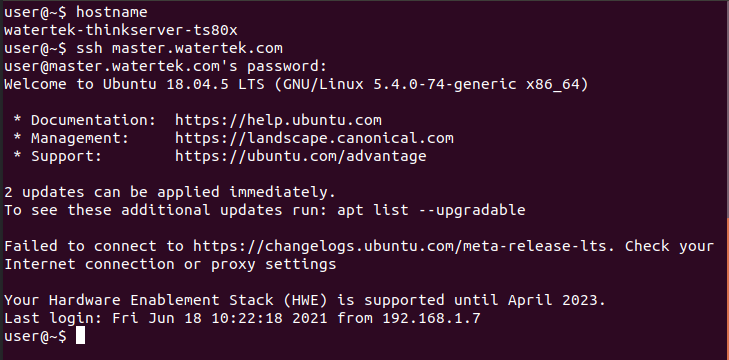
| host name | user-ThinkServer-TS80X | watertek-thinkserver-ts80x |
| domain name | master.watertek.com | slave1.watertek.com |
Networking installation tool
Ubuntu just installed the system without some development environment. Before configuration, the computer needs to be connected to the network in advance to install the required tools, and both computers need to be installed.
| Tool name | Installation command | Functional function |
|---|---|---|
| vim | sudo apt-get install vim | Terminal editor, the initial vim editor of Ubuntu is not used to using, so it will be very convenient to use after installing some of the editors |
| gcc,g++ | sudo apt-get install build-essential | C/C + + compiler, compiler use |
| net-tools | sudo apt-get install net-tools | Network tools, ifconfig,ping and other commands will be used |
| openssh-server | sudo apt-get install openssh-server | Terminal ssh Remote connection tool can remotely access other computers through commands at the terminal, so that it can be operated on one computer. |
network configuration
- The host name can be modified. Just modify the name under the / etc/hostname file. Change the host name of each computer to a different name.
- The / etc/hosts file needs to be modified for domain name definition. As shown in the following code, two lines of domain name definition are added. It should be noted that it cannot be placed at the bottom. ipv6 configuration starts from the comment line and needs to be added to the ipv6 comment. There must be a tab between the ip and the domain name, and there must be no space after the domain name, otherwise it is impossible to ping. Both computers need to be configured the same to ping each other.
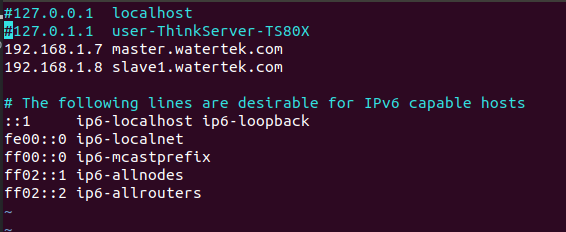
#127.0.0.1  localhost
#127.0.1.1  user-ThinkServer-TS80X
# newly added
192.168.1.7 master.watertek.com
192.168.1.8 slave1.watertek.com

# The following lines are desirable for IPv6 capable hosts
::1     ip6-localhost ip6-loopback
fe00::0 ip6-localnet
ff00::0 ip6-mcastprefix
ff02::1 ip6-allnodes
ff02::2 ip6-allrouters
- After configuration, restart the network.
sudo /etc/init.d/networking restart
After that, the two computers can ping each other.

Establish ssh password free remote login
There are two ways to generate ssh keys: rsa and dsa. rsa is used by default.
- Use rsa to create SSH keys on the hadoop host master (192.168.1.7, which is used directly below). (P is capitalized, followed by "" for five passwords)
ssh-keygen -t rsa -P ""
- Use the same command to generate the key on the hadoop slave slave1 (192.168.1.8, slave1 is used directly below).
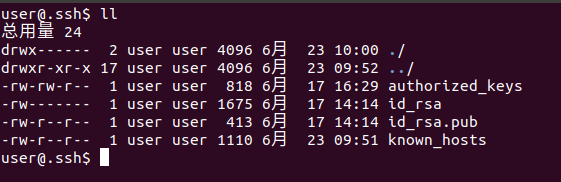
- After passing the command in step 1, it will be displayed in ~ / Two file IDs are generated in ssh directory_ RSA and id_rsa.pub, the two files appear in pairs, and you can enter ~ / View in ssh directory.
- The ID on the master_ rsa. Pub to save1.
// Enter slave1 ~ / ssh directory
cd ~/.ssh

// Pass id_rsa.pub file, because the ID already exists on slave1_ rsa. Pub file, so you can't use the same name.
scp id_rsa.pub master.watertek.com:~/.ssh/slave1_id_rsa.pub
- Set ID on master_ rsa. Pub and slave1_ id_ rsa. Append pub to authorized_ In the keys authorization file, there is no authorized at first_ Keys file.
cat *.pub >> authorized_keys
- Authorized on master_ The keys file is transferred to slave1.
scp authorized_keys slave1.watertek.com:~/.ssh
- Take a look at authorized_keys file permission, - rw-rw-r -- indicates that the permission is normal and does not need to be modified. If not, you need to modify the permission.
// View the file permission information and write down l
ll

// Modify permissions
sudo chmod 664 authorized_keys
- ssh test on the master and log in to slave1 without password.
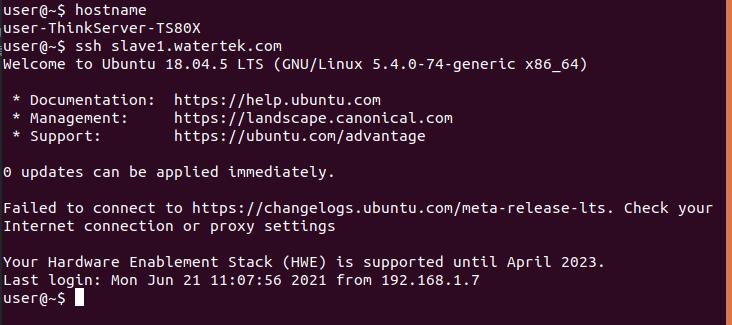
- ssh test on slave1. Log in to the master without password
- If you cannot log in, check whether the user permission under / home is 751. The minimum permission is 751, which can only be high but not low.
hadoop installation configuration steps
In some other installation tutorials, a hadoop user will be created, but it is found in this experiment that it is not necessary to create a user. Of course, creating a user has no impact. Therefore, this step will be omitted in this tutorial. Friends who need to create can see the reference blog of this article.
The following steps are completed on the master, and then the configured hadoop is copied to slave1.
Download and unzip
// 1. Unzip the installation package to / usr/local directory (the installation package is placed in / home/user / download directory)
sudo tar -zxvf hadoop-3.3.0.tar.gz -C /usr/local/

// 2. Enter the / usr/local directory
cd /usr/local

// 3. Modify folder permissions (user is the current user name)
sudo chown -R user:user hadoop-3.3.0
Configure environment variables
// 1. Open and edit ~ /. With vim bashrc file
vi ~/.bashrc

// 2. Shift + G cursor jumps to the end of the file and adds hadoop environment variable
# hadoop
export HADOOP_HOME=/usr/local/hadoop-3.3.0
export HADOOP_CONF_DIR=$HADOOP_HOME/etc/hadoop
export HADOOP_CLASS_PATH=$HADOOP_CONF_DIR
export PATH=$HADOOP_HOME/bin:$HADOOP_HOME/sbin:$PATH

// 3. Save and exit the edit file and run ~ / bashrc validates the configured environment variables
source ~/.bashrc
Modify profile
The following files that need to be modified are in hadoop-3.3.0/etc/hadoop directory.
- core-site.xml
- hadoop-env.sh
- hdfs-site.xml
- mapred-site.xml
- yarn-site.xml
- workers
// Enter / usr/local/hadoop-3.3.0/etc/hadoop
cd /usr/local/hadoop-3.3.0/etc/hadoop
- Edit core site xml
vi core-site.xml
<configuration>
    <property>
        <name>fs.defaultFS</name>
        <value>hdfs://master.watertek.com:9000</value>
    </property>
    <property>
        <name>hadoop.tmp.dir</name>
        <value>/usr/local/hadoop-3.3.0/hdfs/tmp</value>
    </property>
</configuration>
- Edit Hadoop env sh
vi hadoop-env.sh
# hadoop-env. Absolute path is required to configure java environment variables in SH
export JAVA_HOME=/usr/local/jdk1.8.0_291
- Edit HDFS site xml
vi hdfs-site.xml
<configuration>
<configuration>
<property>
<name>dfs.replication</name>
<value>2</value><!--master and slave1 All set to datanode Node, so it is 2-->
</property>
<property>
<name>dfs.namenode.name.dir</name>
<value>file:/usr/local/hadoop-3.3.0/hdfs/name</value>
</property>
<property>
<name>dfs.datanode.data.dir</name>
<value>file:/usr/local/hadoop-3.3.0/hdfs/data</value>
</property>
<property>
<name>dfs.namenode.secondary.http-address</name>
<value>slave1.watertek.com:9001</value>
</property>
<property>
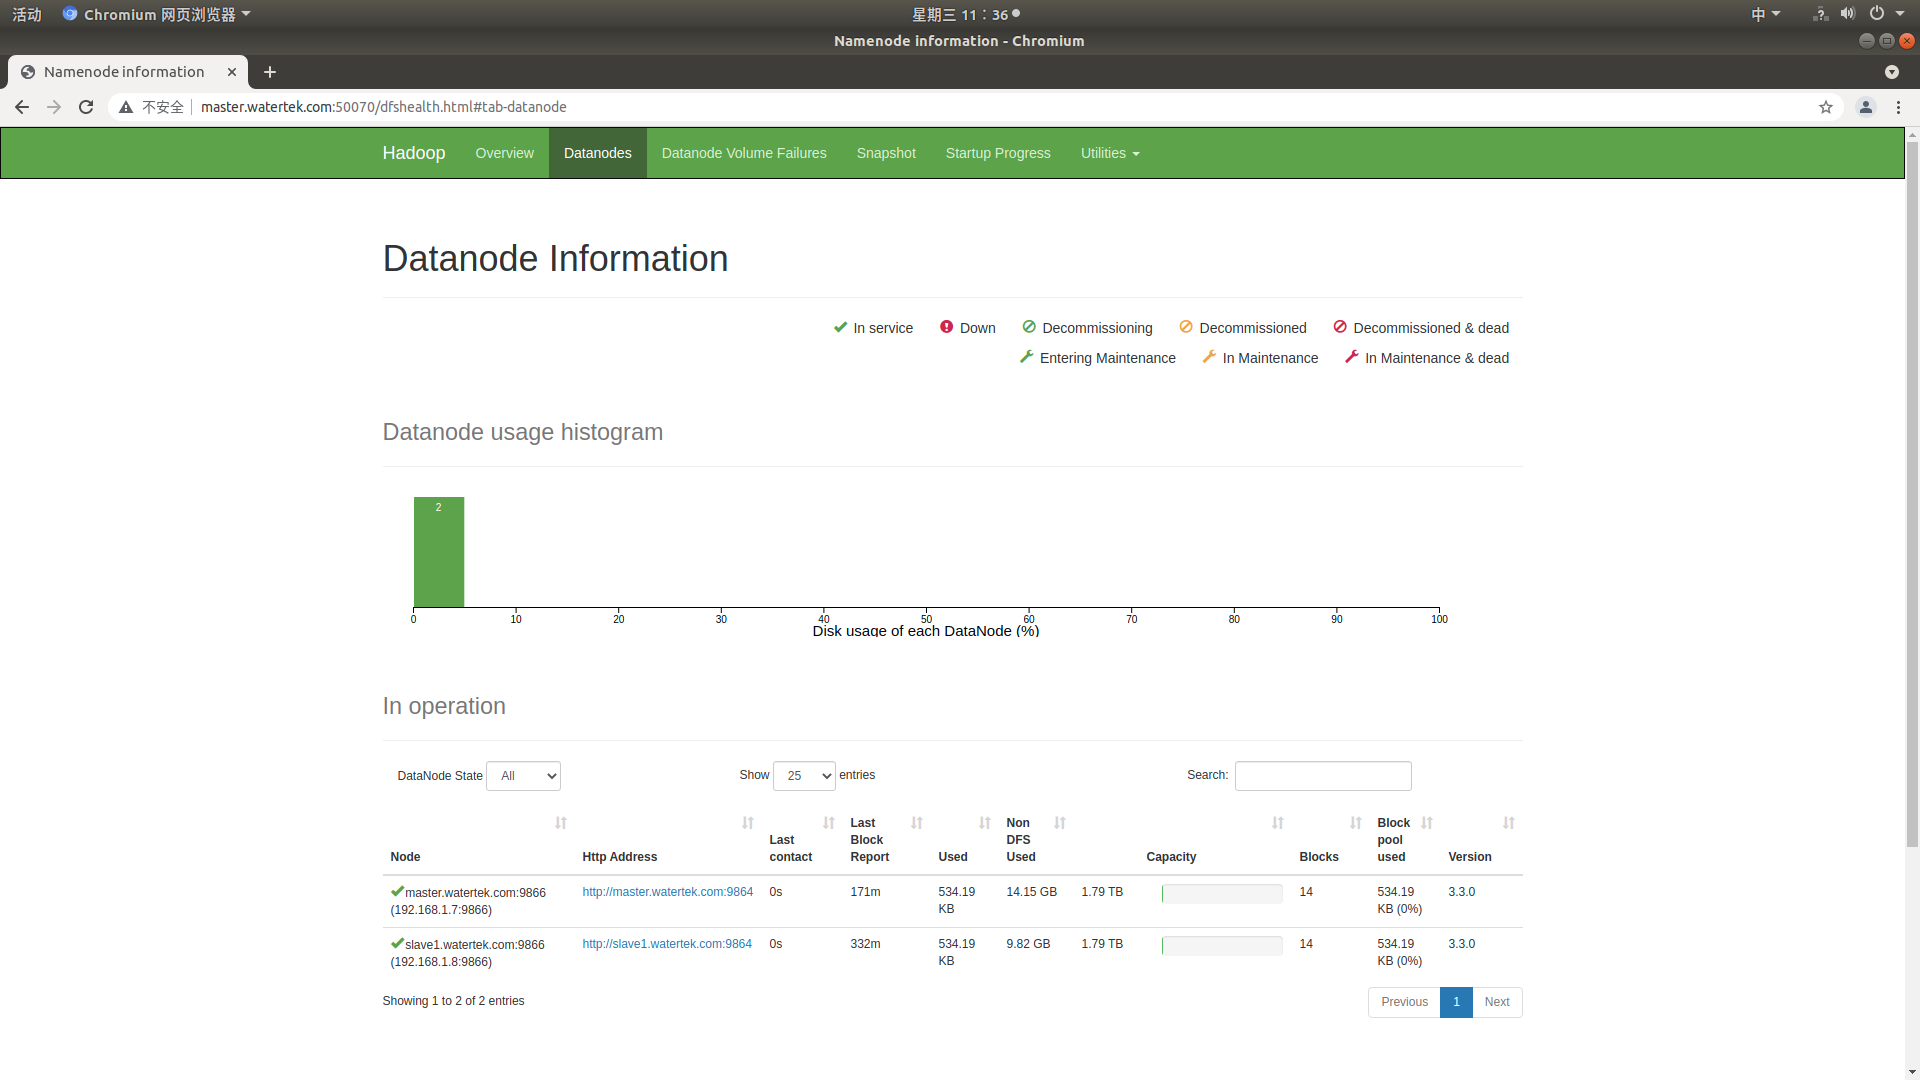
<name>dfs.http.address</name>
<value>master.watertek.com:50070</value>
</property>
<property>
<name>dfs.webhdfs.enabled</name>
<value>true</value>
</property>
<property>
<name>dfs.permissions.superusergroup</name>
<value>staff</value>
</property>
<property>
<name>dfs.permissions.enabled</name>
<value>false</value>
</property>
</configuration>
- Edit mapred site xml
If there is no mapred site in the directory XML is mapred site xml. Template, you need to rename or copy the file first.
cp mapred-site.xml.template mapred-site.xml
 perhaps
mv mapred-site.xml.tempalte mapred-site.xml

// Open mapred site xml
vi mapred-site.xml
<configuration>
    <property>
        <name>mapreduce.framework.name</name>
        <value>yarn</value>
    </property>
</configuration>
- Edit yarn site xml
vi yarn-site.xml
<configuration>

<!-- Site specific YARN configuration properties -->
    <property>
        <name>yarn.nodemanager.aux-services</name>
        <value>mapreduce_shuffle</value>
    </property>
    <property>
        <name>yarn.resourcemanager.hostname</name>
        <value>master.watertek.com</value>
    </property>
</configuration>
- Edit workers
There should be no workers file in the directory. You can create a new file and edit it yourself. Slave files were used before hadoop-3.0.0, and workers files were used after hadoop-3.0.0.
vi workers
master.watertek.com
slave1.watertek.com
- Transfer the hadoop configured on the master to slave1.
// Enter the / usr/local directory
cd /usr/local

/ / Cannot be transmitted directly to due to permission problems slave1 upper /usr/local Directory
scp -r hadoop-3.3.0 slave1.watertek.com:~/

//  Move hadoop to / usr/local directory on slave1
sudo mv hadoop-3.3.0 /usr/local

// Modify folder permissions. User is slave1 user
sudo chown -R user:user hadoop-3.3.0
- Format on master
hdfs namenode -format
- Start hadoop cluster
// Since the hadoop environment variable is configured at the beginning, it can be started directly with the command
start-all.sh
// stop it
stop-all.sh

// Or first enter the / usr/local/hadoop-3.3.0 /sbin directory and start
cd /usr/local/hadoop-3.3.0/sbin
./start-all.sh
// stop it
./stop-all.sh
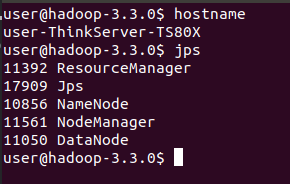
- Check whether the hadoop cluster is running normally
// Use the jps command to view hadoop processes
jps
matters needing attention
After configuration, you may encounter many problems, which need to be solved one by one.
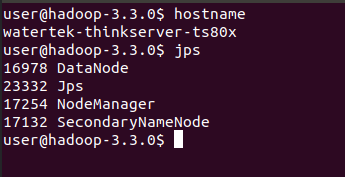
The master starts normally, but datanode cannot be started on slave1
Description: this problem has been bothered for several days. Refer to several blog posts to repeatedly configure each hadoop configuration file several times. After configuration, all processes on the master can start and run normally, but only the SecondaryNameNode process can be started on slave1, but the DataNode and NodeManager processes are not started.
Reason: start to use the slave file in / usr/local/hadoop-3.3.0/etc/hadoop directory. After hadoop-3.0.0, the slave file of the configuration file is changed to the workers file.
Solution: change the slave file name to workers, and it also needs to be modified on slave1.
// Enter / usr/local/hadoop-3.3.0/etc/hadoop directory
cd /usr/local/hadoop-3.3.0/etc/hadoop

// Modify file name
mv slaves workers
datanode on master cannot be started
Description: when hadoop is just configured, the master runs normally. After reformatting, the datanode cannot be started.
Cause: after reformatting, the version number changes, so that datanode cannot be started.
Solution: there are two solutions. One is to delete the / usr/local/hadoop-3.3.0/hdfs folder, reformat it and start it. Instead, modify the version number.
- /The hdfs folder in the usr/local/hadoop-3.3.0 directory is created in the configuration file. Directly delete the entire folder and start it normally after formatting with the hdfs namenode -format command.
- /The clusterID in the usr/local/hadoop-3.3.0/etc/hadoop/hdfs/name/current/VERSION file and / usr/local/hadoop-3.3.0/etc/hadoop/hdfs/data/current/VERSION file are the same.
Error reporting during operation
Description: an error is reported when testing the sample program. The error information is as follows;
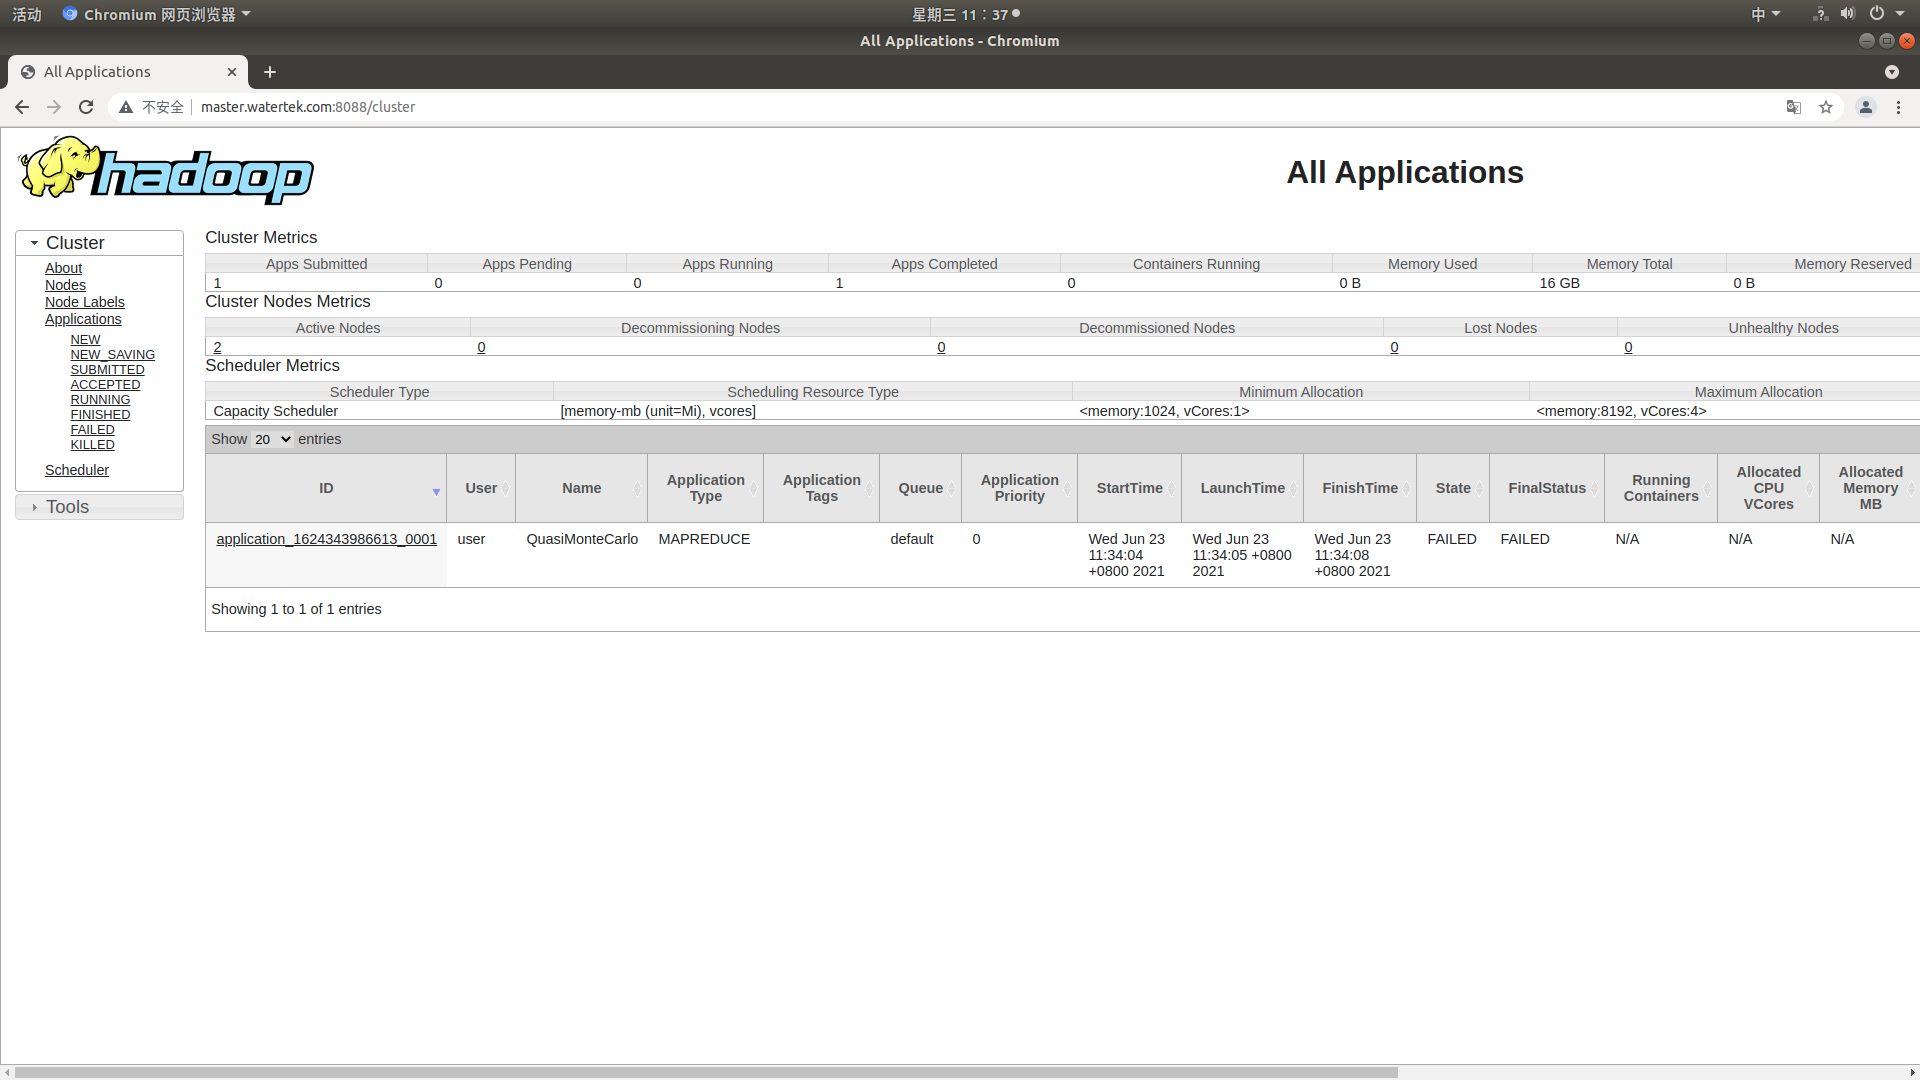
2021-06-23 11:52:11,747 INFO mapreduce.Job: Job job_1624343986613_0002 failed with state FAILED due to: Application application_1624343986613_0002 failed 2 times due to AM Container for appattempt_1624343986613_0002_000002 exited with  exitCode: 1
Failing this attempt.Diagnostics: [2021-06-23 11:52:11.139]Exception from container-launch.
Container id: container_1624343986613_0002_02_000001
Exit code: 1

[2021-06-23 11:52:11.141]Container exited with a non-zero exit code 1. Error file: prelaunch.err.
Last 4096 bytes of prelaunch.err :
Last 4096 bytes of stderr :
error: The main class could not be found or loaded org.apache.hadoop.mapreduce.v2.app.MRAppMaster


[2021-06-23 11:52:11.141]Container exited with a non-zero exit code 1. Error file: prelaunch.err.
Last 4096 bytes of prelaunch.err :
Last 4096 bytes of stderr :
error: The main class could not be found or loaded org.apache.hadoop.mapreduce.v2.app.MRAppMaster


For more detailed output, check the application tracking page: http://master.watertek.com:8088/cluster/app/application_1624343986613_0002 Then click on links to logs of each attempt.
. Failing the application.
2021-06-23 11:52:11,765 INFO mapreduce.Job: Counters: 0
resolvent:
Edit the yarn site in the / usr/local/hadoop-3.3.0/etc/hadoop directory XML configuration file and add yarn application. Classpath attribute and corresponding value. Use hadoop classpath to view the output value.
// command
hadoop classpath

// Output information
/usr/local/hadoop-3.3.0/etc/hadoop:/usr/local/hadoop-3.3.0/share/hadoop/common/lib/*:/usr/local/hadoop-3.3.0/share/hadoop/common/*:/usr/local/hadoop-3.3.0/share/hadoop/hdfs:/usr/local/hadoop-3.3.0/share/hadoop/hdfs/lib/*:/usr/local/hadoop-3.3.0/share/hadoop/hdfs/*:/usr/local/hadoop-3.3.0/share/hadoop/mapreduce/*:/usr/local/hadoop-3.3.0/share/hadoop/yarn:/usr/local/hadoop-3.3.0/share/hadoop/yarn/lib/*:/usr/local/hadoop-3.3.0/share/hadoop/yarn/*
<!--edit yarn-site.xml,Add a property-->
<property>
        <name>yarn.application.classpath</name>
        <value>/usr/local/hadoop-3.3.0/etc/hadoop:/usr/local/hadoop-3.3.0/share/hadoop/common/lib/*:/usr/local/hadoop-3.3.0/share/hadoop/common/*:/usr/local/hadoop-3.3.0/share/hadoop/hdfs:/usr/local/hadoop-3.3.0/share/hadoop/hdfs/lib/*:/usr/local/hadoop-3.3.0/share/hadoop/hdfs/*:/usr/local/hadoop-3.3.0/share/hadoop/mapreduce/*:/usr/local/hadoop-3.3.0/share/hadoop/yarn:/usr/local/hadoop-3.3.0/share/hadoop/yarn/lib/*:/usr/local/hadoop-3.3.0/share/hadoop/yarn/*</value>
    </property>
Testing hadoop clusters
Test example 1
hadoop jar /usr/local/hadoop-3.3.0/share/hadoop/mapreduce/hadoop-mapreduce-examples-3.3.0.jar pi 10 10
Number of Maps  = 10
Samples per Map = 10
Wrote input for Map #0
Wrote input for Map #1
Wrote input for Map #2
Wrote input for Map #3
Wrote input for Map #4
Wrote input for Map #5
Wrote input for Map #6
Wrote input for Map #7
Wrote input for Map #8
Wrote input for Map #9
Starting Job
2021-06-23 14:27:35,336 INFO client.DefaultNoHARMFailoverProxyProvider: Connecting to ResourceManager at master.watertek.com/192.168.1.7:8032
2021-06-23 14:27:35,641 INFO mapreduce.JobResourceUploader: Disabling Erasure Coding for path: /tmp/hadoop-yarn/staging/user/.staging/job_1624428808391_0002
2021-06-23 14:27:35,819 INFO input.FileInputFormat: Total input files to process : 10
2021-06-23 14:27:35,999 INFO mapreduce.JobSubmitter: number of splits:10
2021-06-23 14:27:36,189 INFO mapreduce.JobSubmitter: Submitting tokens for job: job_1624428808391_0002
2021-06-23 14:27:36,189 INFO mapreduce.JobSubmitter: Executing with tokens: []
2021-06-23 14:27:36,312 INFO conf.Configuration: resource-types.xml not found
2021-06-23 14:27:36,313 INFO resource.ResourceUtils: Unable to find 'resource-types.xml'.
2021-06-23 14:27:36,366 INFO impl.YarnClientImpl: Submitted application application_1624428808391_0002
2021-06-23 14:27:36,401 INFO mapreduce.Job: The url to track the job: http://master.watertek.com:8088/proxy/application_1624428808391_0002/
2021-06-23 14:27:36,401 INFO mapreduce.Job: Running job: job_1624428808391_0002
2021-06-23 14:27:41,490 INFO mapreduce.Job: Job job_1624428808391_0002 running in uber mode : false
2021-06-23 14:27:41,492 INFO mapreduce.Job:  map 0% reduce 0%
2021-06-23 14:27:46,627 INFO mapreduce.Job:  map 20% reduce 0%
2021-06-23 14:27:54,701 INFO mapreduce.Job:  map 100% reduce 0%
2021-06-23 14:27:55,712 INFO mapreduce.Job:  map 100% reduce 100%
2021-06-23 14:27:56,735 INFO mapreduce.Job: Job job_1624428808391_0002 completed successfully
2021-06-23 14:27:56,820 INFO mapreduce.Job: Counters: 54
	File System Counters
		FILE: Number of bytes read=226
		FILE: Number of bytes written=2913955
		FILE: Number of read operations=0
		FILE: Number of large read operations=0
		FILE: Number of write operations=0
		HDFS: Number of bytes read=2730
		HDFS: Number of bytes written=215
		HDFS: Number of read operations=45
		HDFS: Number of large read operations=0
		HDFS: Number of write operations=3
		HDFS: Number of bytes read erasure-coded=0
	Job Counters
		Launched map tasks=10
		Launched reduce tasks=1
		Data-local map tasks=10
		Total time spent by all maps in occupied slots (ms)=89286
		Total time spent by all reduces in occupied slots (ms)=7107
		Total time spent by all map tasks (ms)=89286
		Total time spent by all reduce tasks (ms)=7107
		Total vcore-milliseconds taken by all map tasks=89286
		Total vcore-milliseconds taken by all reduce tasks=7107
		Total megabyte-milliseconds taken by all map tasks=91428864
		Total megabyte-milliseconds taken by all reduce tasks=7277568
	Map-Reduce Framework
		Map input records=10
		Map output records=20
		Map output bytes=180
		Map output materialized bytes=280
		Input split bytes=1550
		Combine input records=0
		Combine output records=0
		Reduce input groups=2
		Reduce shuffle bytes=280
		Reduce input records=20
		Reduce output records=0
		Spilled Records=40
		Shuffled Maps =10
		Failed Shuffles=0
		Merged Map outputs=10
		GC time elapsed (ms)=2898
		CPU time spent (ms)=6310
		Physical memory (bytes) snapshot=3237498880
		Virtual memory (bytes) snapshot=29165371392
		Total committed heap usage (bytes)=3401056256
		Peak Map Physical memory (bytes)=333475840
		Peak Map Virtual memory (bytes)=2654306304
		Peak Reduce Physical memory (bytes)=230047744
		Peak Reduce Virtual memory (bytes)=2658615296
	Shuffle Errors
		BAD_ID=0
		CONNECTION=0
		IO_ERROR=0
		WRONG_LENGTH=0
		WRONG_MAP=0
		WRONG_REDUCE=0
	File Input Format Counters
		Bytes Read=1180
	File Output Format Counters
		Bytes Written=97
Job Finished in 21.584 seconds
Estimated value of Pi is 3.20000000000000000000
It can be seen that the final output result is: estimated value of PI is 3.2000000000000000000, indicating that the operation is successful.
Test example 2
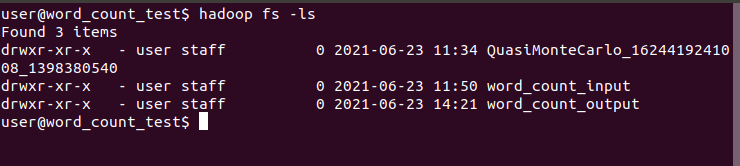
- hadoop comes with an example of wordcount, which is used to count the number of words. First, create a folder in the hdfs system. To view the hdfs system, you can view the files and directories of the hdfs system through hadoop fs -ls, as shown in the figure_ count_ Input and word_count_output is used for my test example, as shown in the following figure:
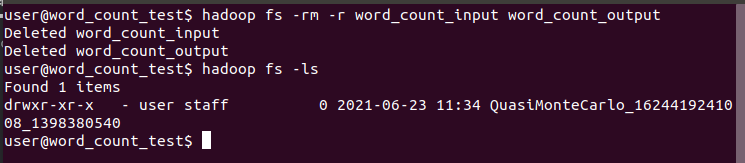
- Using hadoop fs -rm -r word_count_input word_count_output deletes the results of previous tests in the hdfs system.
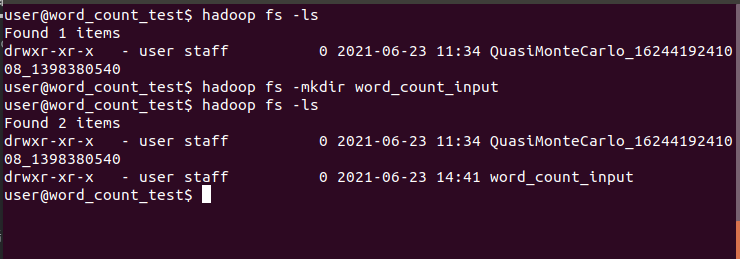
- Using Hadoop FS - MKDIR word_ cout_ The input command creates a folder on the hdfs system.
- Create two files locally. In the example, create a word folder in the / home/user directory_ count_ Test, in / home/user / word_ count_ Create two files in the test directory, file1 Txt and File2 txt.
vi file1.txt
vi file2.txt

// file1.txt content
hello hadoop
hello hive
hello ljj
hello hadoop
good morning
hello hbase
hello hadoop

// file2.txt content
linux window
hello linux
hello window
According to the content in the text, you can count Hello 8, Hadoop 3, hive 1, LJJ 1, good 1, morning 1, HBase 1, Linux 2 and window 2.
- Upload local files to word of hdfs system_ count_ Input folder.
hadoop fs -put *.txt word_count_input

- Run wordcount with the command, where word_count_output is the result output directory.
hadoop jar /usr/local/hadoop-3.3.0/share/hadoop/mapreduce/hadoop-mapreduce-examples-3.3.0.jar wordcount word_count_input word_count_output
Operation output information:
2021-06-23 14:52:51,680 INFO client.DefaultNoHARMFailoverProxyProvider: Connecting to ResourceManager at master.watertek.com/192.168.1.7:8032
2021-06-23 14:52:52,313 INFO mapreduce.JobResourceUploader: Disabling Erasure Coding for path: /tmp/hadoop-yarn/staging/user/.staging/job_1624428808391_0003
2021-06-23 14:52:52,622 INFO input.FileInputFormat: Total input files to process : 2
2021-06-23 14:52:52,819 INFO mapreduce.JobSubmitter: number of splits:2
2021-06-23 14:52:52,991 INFO mapreduce.JobSubmitter: Submitting tokens for job: job_1624428808391_0003
2021-06-23 14:52:52,991 INFO mapreduce.JobSubmitter: Executing with tokens: []
2021-06-23 14:52:53,132 INFO conf.Configuration: resource-types.xml not found
2021-06-23 14:52:53,132 INFO resource.ResourceUtils: Unable to find 'resource-types.xml'.
2021-06-23 14:52:53,182 INFO impl.YarnClientImpl: Submitted application application_1624428808391_0003
2021-06-23 14:52:53,214 INFO mapreduce.Job: The url to track the job: http://master.watertek.com:8088/proxy/application_1624428808391_0003/
2021-06-23 14:52:53,215 INFO mapreduce.Job: Running job: job_1624428808391_0003
2021-06-23 14:52:59,382 INFO mapreduce.Job: Job job_1624428808391_0003 running in uber mode : false
2021-06-23 14:52:59,383 INFO mapreduce.Job:  map 0% reduce 0%
2021-06-23 14:53:03,458 INFO mapreduce.Job:  map 50% reduce 0%
2021-06-23 14:53:04,469 INFO mapreduce.Job:  map 100% reduce 0%
2021-06-23 14:53:09,504 INFO mapreduce.Job:  map 100% reduce 100%
2021-06-23 14:53:09,516 INFO mapreduce.Job: Job job_1624428808391_0003 completed successfully
2021-06-23 14:53:09,593 INFO mapreduce.Job: Counters: 54
	File System Counters
		FILE: Number of bytes read=126
		FILE: Number of bytes written=793862
		FILE: Number of read operations=0
		FILE: Number of large read operations=0
		FILE: Number of write operations=0
		HDFS: Number of bytes read=389
		HDFS: Number of bytes written=72
		HDFS: Number of read operations=11
		HDFS: Number of large read operations=0
		HDFS: Number of write operations=2
		HDFS: Number of bytes read erasure-coded=0
	Job Counters
		Launched map tasks=2
		Launched reduce tasks=1
		Data-local map tasks=2
		Total time spent by all maps in occupied slots (ms)=5645
		Total time spent by all reduces in occupied slots (ms)=3123
		Total time spent by all map tasks (ms)=5645
		Total time spent by all reduce tasks (ms)=3123
		Total vcore-milliseconds taken by all map tasks=5645
		Total vcore-milliseconds taken by all reduce tasks=3123
		Total megabyte-milliseconds taken by all map tasks=5780480
		Total megabyte-milliseconds taken by all reduce tasks=3197952
	Map-Reduce Framework
		Map input records=10
		Map output records=20
		Map output bytes=203
		Map output materialized bytes=132
		Input split bytes=266
		Combine input records=20
		Combine output records=10
		Reduce input groups=9
		Reduce shuffle bytes=132
		Reduce input records=10
		Reduce output records=9
		Spilled Records=20
		Shuffled Maps =2
		Failed Shuffles=0
		Merged Map outputs=2
		GC time elapsed (ms)=222
		CPU time spent (ms)=1800
		Physical memory (bytes) snapshot=747245568
		Virtual memory (bytes) snapshot=7958106112
		Total committed heap usage (bytes)=799539200
		Peak Map Physical memory (bytes)=288419840
		Peak Map Virtual memory (bytes)=2650775552
		Peak Reduce Physical memory (bytes)=216190976
		Peak Reduce Virtual memory (bytes)=2657652736
	Shuffle Errors
		BAD_ID=0
		CONNECTION=0
		IO_ERROR=0
		WRONG_LENGTH=0
		WRONG_MAP=0
		WRONG_REDUCE=0
	File Input Format Counters
		Bytes Read=123
	File Output Format Counters
		Bytes Written=72
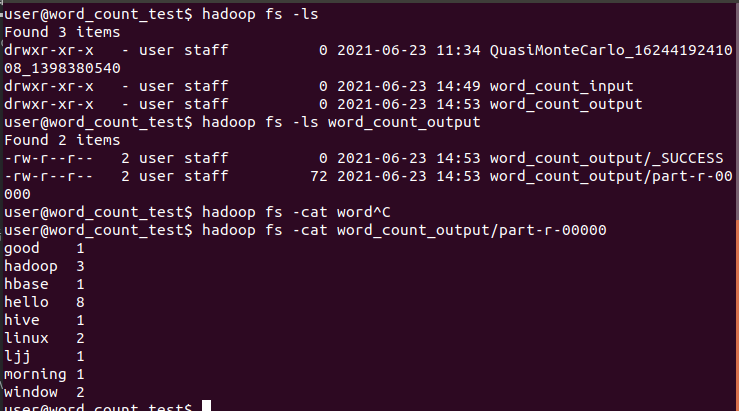
Calculation results:
You can view more words in the directory through the command_ count_ Output folder. There are two files under the folder, including_ The SUCCESS file is empty, indicating that the calculation is successful. The part-r-00000 file saves the calculation results.