1. gitlab
reference resources: Configure ssh key
Why does Gitlub need SSH Key? Because Gitlub needs to recognize that the submission you push is really pushed by you, not pretended by others, and Git supports SSH protocol, Gitlub can confirm that only you can push as long as you know your public key.
1.1 create ssh key
ssh-keygen -t rsa -C "your_email@example.com"
Always enter, and when finished, at ~ / ssh / generates two file IDs_ RSA and id_rsa.pub. These two are the secret key pairs of SSH Key, id_rsa is the private key and cannot be disclosed. id_rsa.pub is a public key that can be confidently told to anyone.
1.2 git configuration ssh key
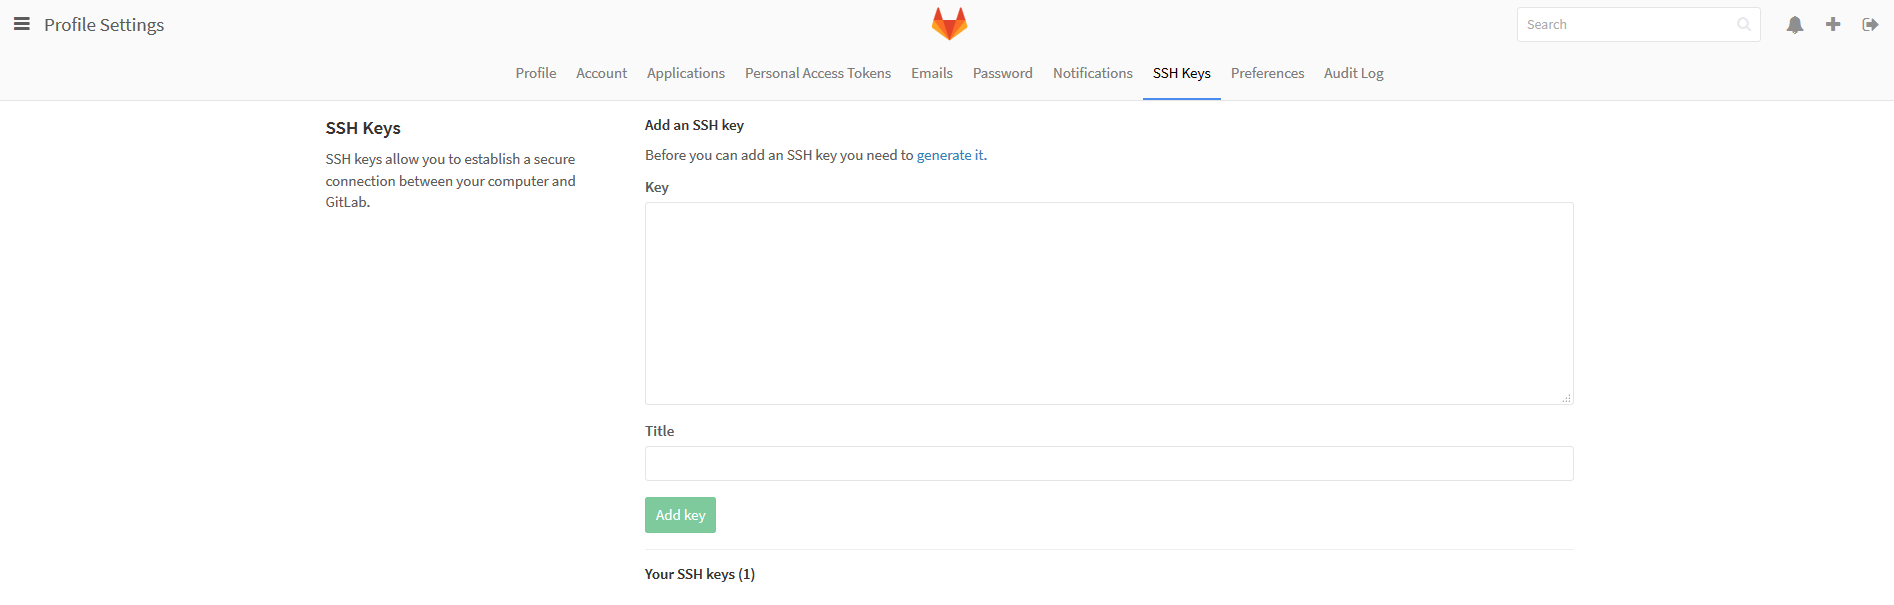
Paste it into the add SSH key interface in github account management.
The steps are as follows:
- Log in to gitlub
- Settings => SSH Keys => Add SSH key
- Fill in the name of your favorite key in the SSH interface, and then fill in the name of your favorite key / ssh/id_ rsa. Paste the contents of the pub file into the key column and click the "add key" button.
1.3 configure Git personal information
Now you can link to gitlub through SSH, and some personal information needs to be improved. Git records submissions based on the user's name and email address. Gitlub also uses this information to handle permissions. Enter the following code to set personal information and replace the name and email with your own
Configure git information
git config --global user.name "username"
git config --global user.email "email"
View git setting information
git config --list
git config user.name
1.4 git common instructions
clone
git clone git@github.com::GitHub Account name/myProject.git  # Clone master branch
git clone -b <Remote designated branch> <Remote warehouse address> <Local folder name>  # Clone the specified branch and rename it
git status  # Check the current status of the warehouse (whether there is anything to be submitted)
git diff xxx.xx  # Check what changes have been made to the file (that is, the difference between the file in the current workspace and the latest version of the file in the version Library)
git log -pretty=oneline  # Displays the most recent to farthest commit log
Local branch management
git branch  # View branches, add the - a parameter to view all branches
git branch <name>  # Create branch
git branch -d <name>  # Delete local branch
git checkout <name>  # Switch branches, or git switch < name >
git checkout -b <name>  # Create + switch branch, or git switch - C < name >
git merge <name>  # Merge a branch to the current branch
Remote branch management
git remote -v  # View remote library information
git push origin --delete  <name>  # Delete remote branch
Push local branch to remote branch
# Scenario 1 The remote branch is opened first, and then pulled to the local
git checkout -b dev origin/dev  #Check out remote dev branch to local

# Scenario 2 The local branch is opened first, and then pushed to the remote
git checkout -b dev    # Create and switch to branch dev
git push origin dev:dev     # Push the local dev branch (before the colon) to the dev branch (after the colon) of the remote origin (if not, it will be created automatically). Note that there are no spaces around the colon.
2. CUDA
Introduction to cuda
CUDA is a parallel computing platform and application program interface developed by Nvidia company. Software developers can use GPU supporting CUDA software for general computing. CUDA can be directly linked to the virtual instruction set and parallel computing unit of GPU, so as to complete the calculation of kernel functions in GPU.
CUDA provides C/C++/Fortran interface, and many high-performance computing or deep learning libraries provide wrapped Python interface. Developers can choose the appropriate programming language according to the actual needs (high-performance computing, deep learning, neural network, etc.).
lspci | grep -i nvidia  # View the GPU model of the current system
sudo dpkg --list | grep nvidia-*  # View driver version
Check whether the graphics card driver is installed
sudo apt-get install mesa-utils  # Install mesa utils
glxinfo | grep rendering   # If the result is "yes", it proves that the graphics card driver has been successfully installed.
Install CUDA Toolkit
Traditionally, the steps of installing NVIDIA Driver and CUDA Toolkit are separated, but in fact, we can directly install CUDA Toolkit, and the system will automatically install the NVIDIA Driver matching its version. Let's talk about how to install CUDA Toolkit.
stay CUDA Toolkit Select the system version and installation method on the download page, download and run runfile
sudo apt update # Update apt
# Download installation package
wget https://developer.download.nvidia.com/compute/cuda/11.1.0/local_installers/cuda_11.1.0_455.23.05_linux.run
#install
sudo sh cuda_11.1.0_455.23.05_linux.run
If:
Existing package manager installation of the driver found. It is strongly     recommended that you remove this before continuing.
 Abort
Continue

Select continue. (you can also exit as suggested and delete the old driver first: sudo apt get -- purge remove NVIDIA *)
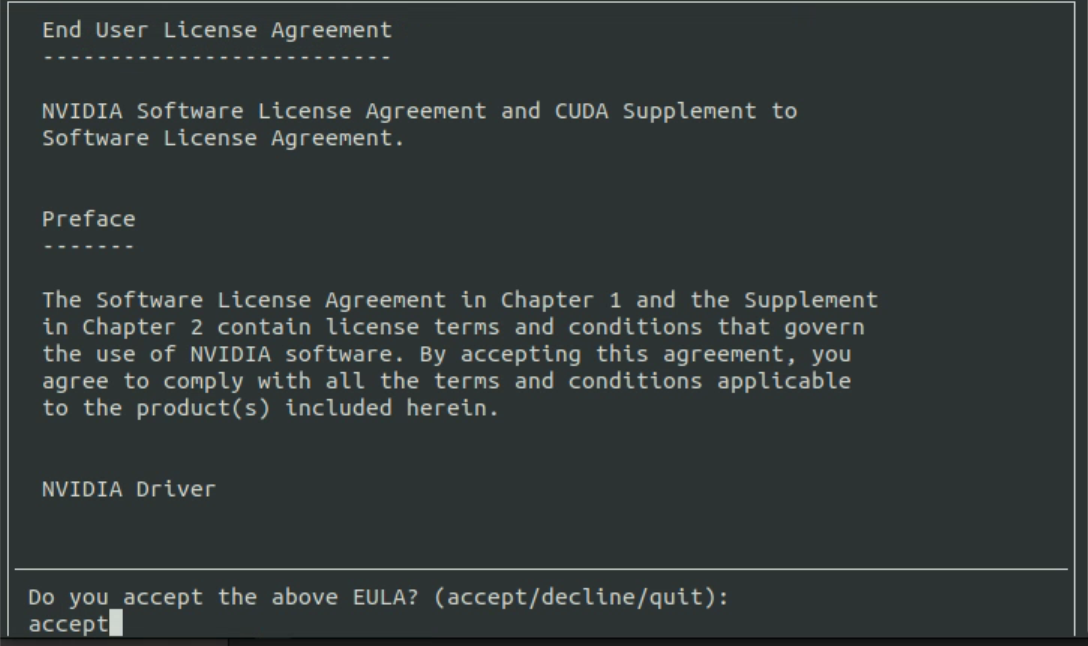
Enter accept.
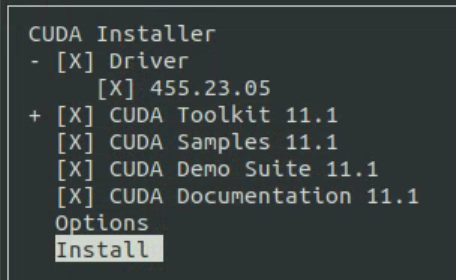
If the Driver has been installed, put the in front of the Driver × Take it off and don't install it. Then select Install and enter.
After installation, GEDIT ~ / Bashrc, add at the end
# add nvcc compiler to path
export PATH=$PATH:/usr/local/cuda-11.1/bin
# add cuBLAS, cuSPARSE, cuRAND, cuSOLVER, cuFFT to path
export LD_LIBRARY_PATH=$LD_LIBRARY_PATH:/usr/local/cuda-11.1/lib64:/usr/lib/x86_64-linux-gnu
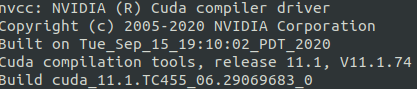
Restart the computer. Check for successful installation: nvcc -V
Attachment: how to install the graphics card driver
If you want to install the graphics card driver yourself, please uninstall the old driver first
sudo apt-get --purge remove nvidia*
sudo apt autoremove
# To remove CUDA Toolkit:
$ sudo apt-get --purge remove "*cublas*" "cuda*"
# To remove NVIDIA Drivers:
$ sudo apt-get --purge remove "*nvidia*"
Installing the graphics card driver
ubuntu-drivers devices  #  View graphics card model
sudo ubuntu-drivers autoinstall  # Automatically install the recommended version of the graphics card driver
Attachment:
sudo apt install nvidia-cuda-toolkit --fix-missing # This command is not usually installed with the latest version of cuda and is not recommended.
3. conda
Installation method and common instruction link
Method of quickly entering conda virtual environment
Every time you enter the virtual environment, you have to conda activate envName, which is quite laborious. You can use alias to define your own instructions:
gedit ~/.bashrc  # Open bashrc file
# Find CONDA The path of SH, such as "/ home/name/miniconda3/etc/profile.d/conda.sh"
# Add a line of instructions at the end of the file:
alias envName='. "/home/name/miniconda3/etc/profile.d/conda.sh" && conda activate envName'
After that, you can enter envName directly into the environment at the terminal.
conda replication environment / export environment / import environment / export base environment
How to clone an environment natively:
conda create --name newEnvName --clone oldEnvName
How to move the local environment configuration to another computer:
conda env export > environment.yaml # Export the current environment configuration to environment Yaml file
The scp command copies the file to the target computer, and cd the target computer to environment Directory of yaml file
conda env create -f environment.yaml # Installation environment
conda may miss some pip installed packages. Therefore, export with pip:
pip freeze > environment_pip.txt
 After copying to the target machine,
pip install -r   environment_pip.txt
4. pip
Source change
Domestic image sources are relatively fast, such as pip Tsinghua source.
Temporary use
pip install -i https://pypi. tuna. tsinghua. edu. Cn / simple some package # note that simple can't be less. It's https instead of http
Set as default
Upgrade pip to the latest version (> = 10.0.0) and configure it:
pip install pip -U
pip config set global.index-url https://pypi.tuna.tsinghua.edu.cn/simple # Tsinghua source
pip config set global.index-url https://mirrors.aliyun.com/pypi/simple / # or Alibaba source
Or GEDIT ~ / pip/pip. Conf (macos is gedit ~/.config/pip/pip.conf) add:
[global]
timeout = 6000
index-url = http://pypi.douban.com/simple/
[install]
use-mirrors = true
mirrors = http://pypi.douban.com/simple/
trusted-host = pypi.douban.com
If the network connection of the default source of pip is poor, temporarily use this mirror station to upgrade pip:
pip install -i https://pypi.tuna.tsinghua.edu.cn/simple pip -U
pip common instructions
pip install Package  # Install Package
pip install -r requirements.txt

pip install xxxx -U # Update installed packages
5. Configure deep learning environment
After you install pyconda and pyconda in the new environment, install them in the new environment. Some bags
pytorch
It is best to specify the version during installation, Official website The best match version can be found.
conda install pytorch=1.8.1 torchvision cudatoolkit=11.1 # Note the version of cudatoolkit specified
The unloading method is attached. If you cannot install or uninstall, it is likely to be a network problem. Try again with a stable network.
conda uninstall --force pytorch  # Force uninstall pytorch
conda update pytorch  # Upgrade pytorch
opencv-python
pip install opencv-python  # Recommended method
conda install --channel https://conda.anaconda.org/menpo opencv3
6. pycharm Professional
1. Activation
Install from ubuntu store
Professional version of the hidden link
Pay attention to official account with permanent pojie method.
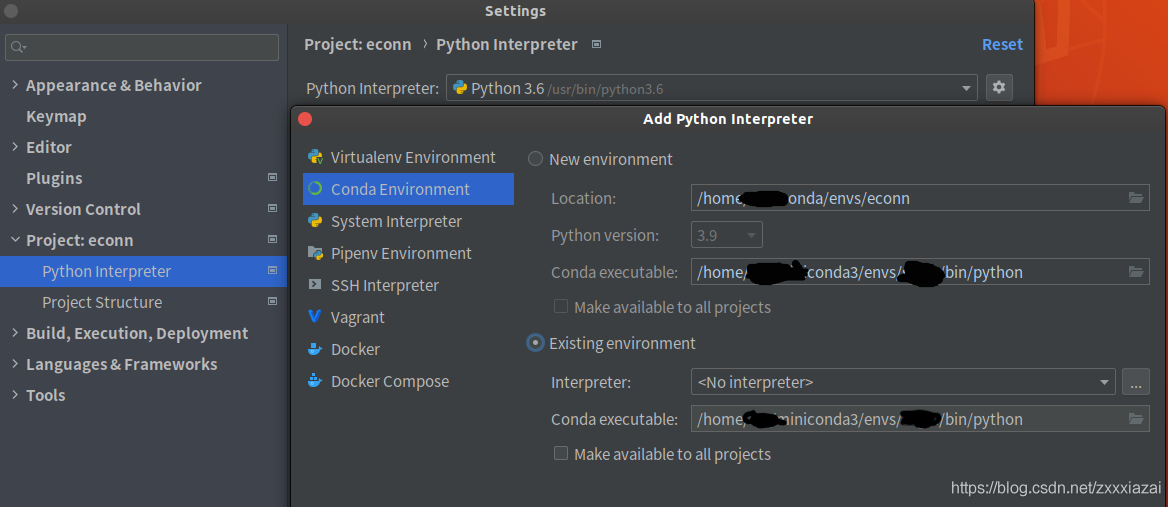
2. Debug with python interpreter in local conda environment
File - Settings - Project - Python interper - asterisk - Add - Conda Environment - Existing environment
Select / home/name/Anaconda3/env/yourEnvName/bin/python
3. Debugging with remote interpreter
pycharm professional edition can debug code locally with the python interpreter of the remote server, and write and modify code locally, which can be easily synchronized to the remote server.
Remote code synchronization
Tools-> Deployment -> Configuration... -> + -> SFTP
Set Connection and Mappings
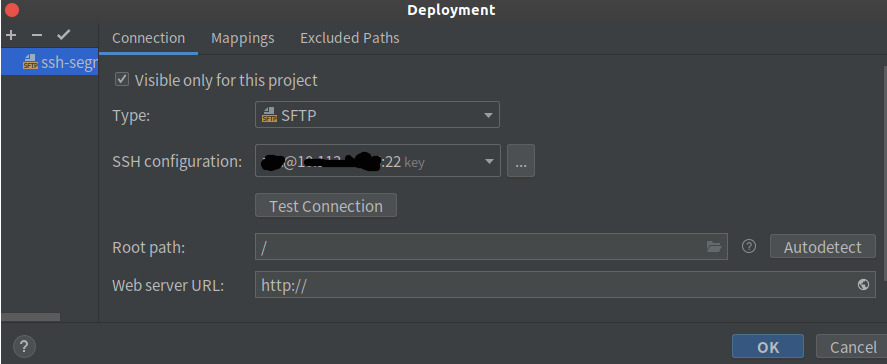
Then you can tools - > deployment - > upload to upload the code.
Remote interpreter
File - Settings - Project - Python interpreter - asterisk - Add - SSH Interpreter - Existing Server configuration
Select the configured SSH - > next,
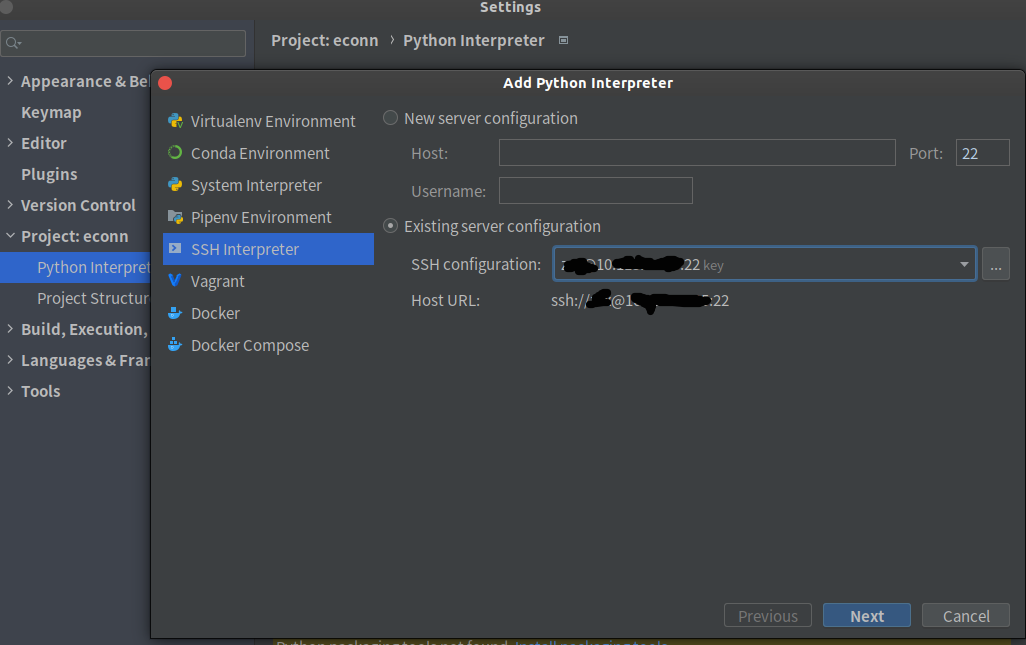
Configure Interpreter and Sync Folders.
4. git
To install the gitlab plug-in:
Settings - plugins - browse repositories below - search for gitlab projects installation and restart the IDE;
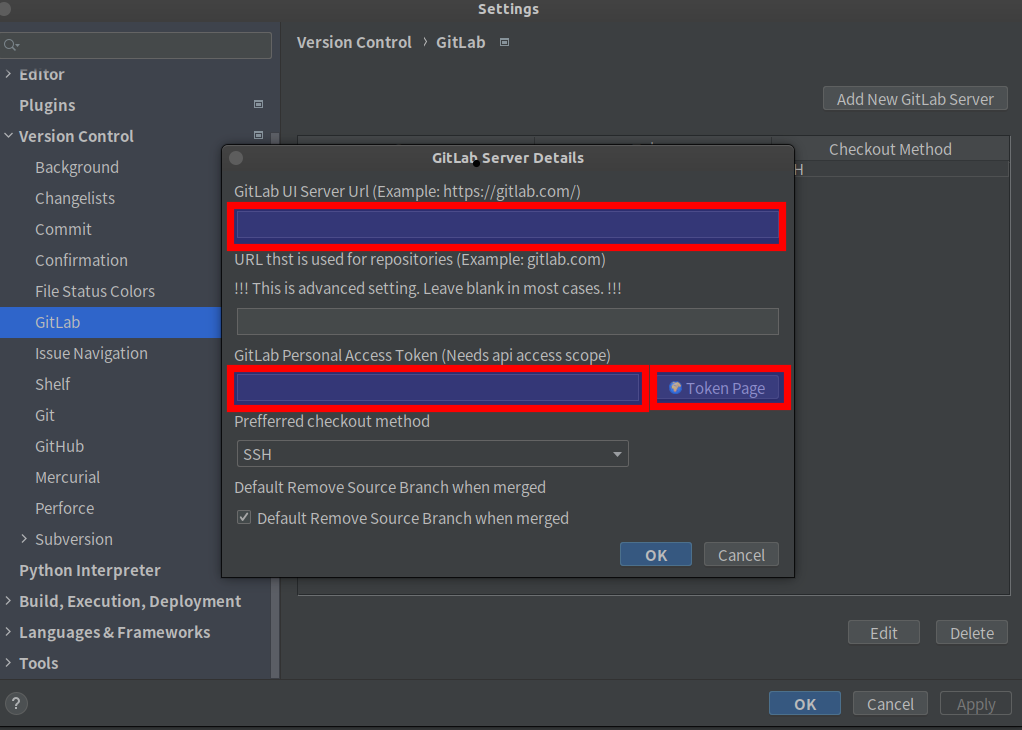
Configure gtlab settings:
gitlab server Url: paste your company's gitlab address;
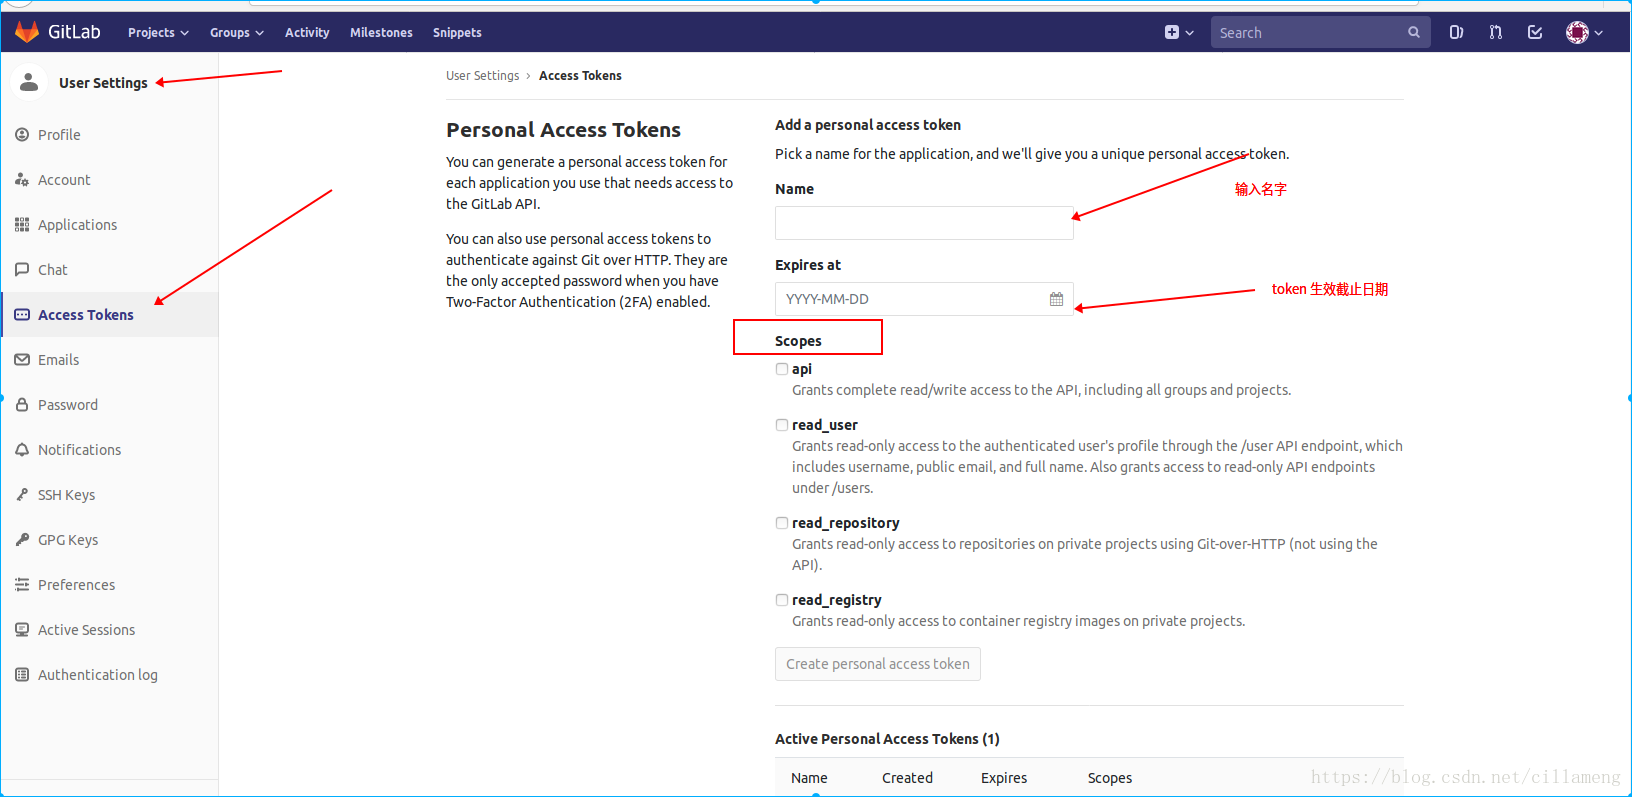
Click the token page and access the company's gitlab website to enter user settings; Generate private access token
Paste in py token column
Alternative box following problem of PyCharm using Sogou Chinese input method under Linux (unresolved)
The temporary solution is that the pycharm display box does not occupy the whole screen, and the input method alternative box will be displayed in the lower left corner.
7. vscode
install
Just install it in the app store, or Download vscode . deb installation package, double-click and Install.
Open file in new tab
VSCode has a default setting. Clicking a file in the right sidebar is preview mode (in preview mode, the file name in the title bar is italicized). When a new file is opened in preview mode, the second one will occupy the first window.
How do I turn off preview mode? Set workbench in the settings file editor. If enablepreview is false, this is a global setting, and a new tab is opened every time.
But there is another simple way:
Double clicking a new file does not open it in preview mode.
If it is already open, double-click the file name in the title bar or ctrl+s.
Modify font size
Ctrl + Shitf + p, enter settings, select and open the JSON system configuration file, and select "preferences: Open Settings(JSON)". The configuration is as follows:
{
    "editor.fontSize": 14,
    "editor.accessibilityPageSize": 14,
    "debug.console.fontSize": 14,
    "window.zoomLevel": 2
}
Sinicization
Install the Chinese (Simplified) Language Pack for Visual Studio Code extension
Remote-ssh
ubuntu local platform vscode remote SSH connection remote server password free login
Installing python extensions
git
GitLens extension
python interperter
ctrl + shift + p enter python:selsect interperter to select the desired environment.
8.jupyter notebook
pip3 install jupyter  # install
jupyter notebook # start-up
Performance monitoring tool
htop
netdata
Neither of the above tools can monitor GPU. Netdata has a configuration tutorial for monitoring GPU, but I failed to configure it successfully.
How to quickly view gpu:
At ~ / Add shortcut instruction statement to bashrc:
alias gpu="watch -n 1 nvidia-smi"
Later, inputting gpu in the terminal is equivalent to inputting Watch - N 1 NVIDIA SMI.
The following is useless. Toss around for a long time and record it.
zsh terminal
Install and configure Oh My Zsh theme settings for Ubuntu 18.04
https://www.sysgeek.cn/install-zsh-shell-ubuntu-18-04/
https://segmentfault.com/a/1190000015283092
sudo apt install zsh  # Install zsh
cat /etc/shells   # View your installed shells
display
/bin/sh
/bin/bash
/bin/rbash
/bin/dash
/bin/zsh
/usr/bin/zsh
Set zsh as the default shell
chsh -s /bin/zsh
or
chsh -s `which  zsh`
echo $SHELL # View the shell currently in use
When you don't want to take zsh as the default shell and want to use it, you can enter and exit through zsh.
oh-my-zsh
github
The official method download failed.
git clone https://github.com/robbyrussell/oh-my-zsh
Usually, zsh configuration is very troublesome and complex, so oh my zsh is developed to simplify the configuration of zsh, so oh my zsh is the configuration of zsh.
After installing oh-my-zsh, the environment variable entry will be from/ bashrc becomes/ zshrc, you should be very careful when configuring environment variables
Uninstall oh my Zsh
cd .oh-my-zsh/tools
chmod +x uninstall.sh
./uninstall.sh
rm -rif .zshrc
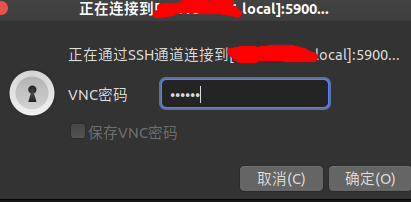
Remote desktop Remmina
reference resources
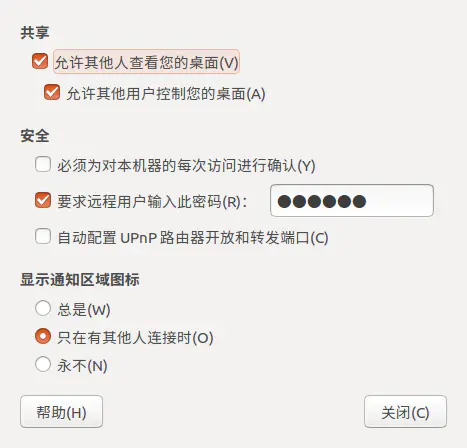
1. First, open the desktop sharing of the remote server
2. Open remmina locally
3. The plus sign creates a new remote link,
4. Protocol selection: VNC virtual network link
5. Click... Behind the server box, select remote desktop, OK - connect (this step can also directly enter the server IP)
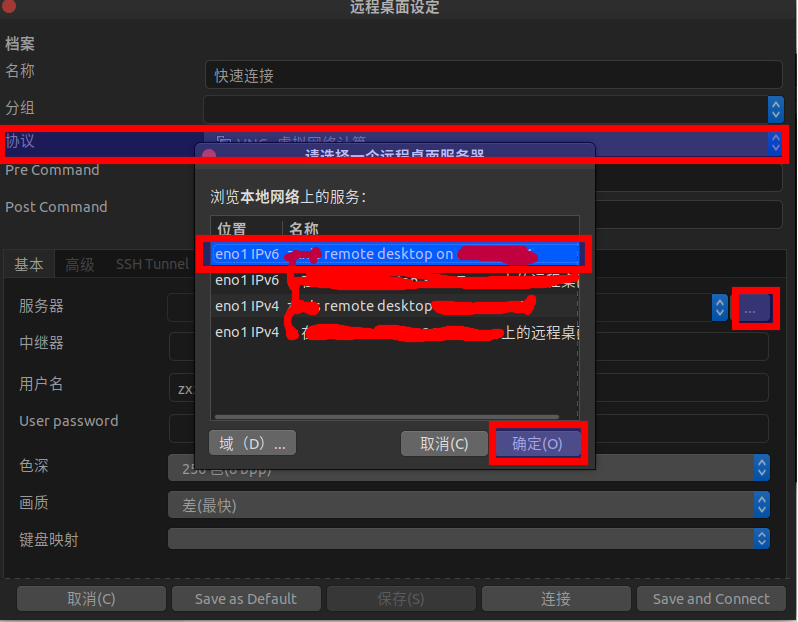
VNC password is the password set by the remote server.