Autoware1 was installed some time ago In the 14 GPU version, I found that the Demo couldn't run. Later, I checked other people's blogs and found a BUG in the following comments. It was solved, but it wasn't completely solved. I reinstalled autoware1 12. No, the tutorial of 1.12 is coming.
This time, because the industrial computer installation environment is used, there is no GPU. Let's directly issue the first phase CPU.
If you do not have a GPU, refer to the following configuration Version (you do not need to install Nvidia driver without a GPU):
Ubuntu: 18.04
Autoware: 1.14
Opencv: 3.4.0 and above (I don't know if it is feasible for a lower version, but 3.4.0 is certainly OK)
cmake: 3.12.2 and above
Protobuf: 3.0.0 (this version can only be used, usually comes with the system)
Eigen: 3.3.7 and above
Configure installation:
1 cmake
Download cmake package:
wget https://cmake.org/files/v3.12/cmake-3.12.2-Linux-x86_64.tar.gz
tar zxvf cmake-3.12.2-Linux-x86_64.tar.gz #decompression
sudo ln -sf /home/luo/cmake-3.12.2-Linux-x86_64/bin/* /usr/bin/  #Pay attention to your cmake installation path
Here, my cmake installation path is / home/luo. You can modify the third line of code according to your installation path, and then check whether the installation version is correct:
cmake --version #Check version
2 Eigen
Download the Eigen package:
cd && wget http://bitbucket.org/eigen/eigen/get/3.3.7.tar.gz
mkdir eigen && tar --strip-components=1 -xzvf 3.3.7.tar.gz -C eigen   #decompression
cd eigen && mkdir build && cd build && cmake .. && make && suido make install   #Compile and install
cd && rm -rf 3.3.7.tar.gz && rm -rf eigen
The above focuses on the third step. If you can't succeed at one time, run it separately. Don't use the "& &" symbol. It's not very recommended to write this;
The other is that the above only says that Eigen version 3.3.7 is installed, but the system actually uses version 3.3.4 (the system comes with version), so we need to change the soft link:
To view the Eigen version of the system:
vim /usr/include/eigen3/Eigen/src/Core/util/Macros.h
See the following figure for the built-in version of the system:
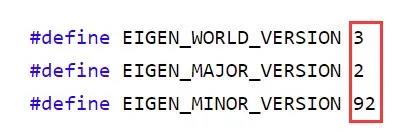
It means that the version is 3.2.92, and the change soft link is as follows:
sudo rm -rf /usr/local/include/eigen3
sudo rm -rf /usr/local/include/Eigen    #Delete the eigen version of the system
Put the version of Eigen-3.3.7 we installed in / usr/include:
sudo cp -r /usr/local/include/eigen3/Eigen /usr/include
sudo cp -r /usr/local/include/eigen3 /usr/include
Pay attention to your own Eigen installation location here. The installation location here is / usr/local/include, or it may be installed in the path of / home/luo;
Create a soft link:
sudo ln -s /usr/include/eigen3 /usr/local/include/eigen3
sudo ln -s /usr/include/Eigen/ /usr/local/include/Eigen
cd /usr/lib/cmake/eigen3   #Update cmake library links
sudo rm ./*    #Delete legacy cmake configuration
sudo cp /usr/local/share/eigen3/cmake/* ./   #You should also pay attention to your Eigen installation path here
sudo updatedb   #Update system database
Finally, check the version again, which is 3.3.7:
vim /usr/include/eigen3/Eigen/src/Core/util/Macros.h
3 Opencv
Install dependent packages:
sudo apt install build-essential git pkg-config libgtk-3-dev
sudo apt install libavcodec-dev libavformat-dev libswscale-dev libv4l-dev libxvidcore-dev libx264-dev
sudo apt install libjpeg-dev libpng-dev libtiff-dev gfortran openexr libopenblas-dev
sudo apt install python3-dev python3-numpy libtbb2 libtbb-dev libdc1394-22-dev
Download and unzip the source code:
mkdir ~/opencv_build && cd ~/opencv_build
wget https://github.com/opencv/opencv/archive/3.4.0.zip -O opencv-3.4.0.zip
wget https://github.com/opencv/opencv_contrib/archive/3.4.0.zip -O opencv_contrib-3.4.0.zip
unzip opencv-3.4.0.zip
unzip opencv_contrib-3.4.0.zip
Pay attention to opencv here_ Contrib is unzipped to the opencv-3.4.0 folder. They have a "parent-child" relationship;
However, there is a problem to note that we do not use GPU, so there is no CUDA, so dwith needs to be used in the cmake process_ CUDA = off, that is, turn off CUDA, otherwise an error will be reported when compiling to 97%, and CUDA cannot be found hpp;
Compile and install:
cd ~/opencv_build/opencv-3.4.0 && mkdir build && cd build
cmake ../ -DWITH_CUDA=OFF  -DCMAKE_BUILD_TYPE=RELEASE -DBUILD_EXAMPLES=ON  -DBUILD_DOCS=OFF -DBUILD_PERF_TESTS=OFF -DBUILD_TESTS=OFF
sudo make install
View Opencv version:
pkg-config opencv --modversion
Solutions to errors reported during compilation refer to:
https://blog.csdn.net/weixin_44570248/article/details/118630357?spm=1001.2014.3001.5501
4 Autoware
Installation dependency:
sudo apt update
sudo apt install -y python-catkin-pkg python-rosdep ros-$ROS_DISTRO-catkin
sudo apt install -y python3-pip python3-colcon-common-extensions python3-setuptools python3-vcstool
pip3 install -U setuptools
Create workspace:
mkdir -p autoware.ai/src
cd autoware.ai
Download Autoware:
wget -O autoware.ai.repos "https://gitlab.com/autowarefoundation/autoware.ai/autoware/raw/1.14.0/autoware.ai.repos?inline=false"
vcs import src < autoware.ai.repos
In the second sentence, I will report an error if I use the vcs command. The specific reason is that vcs needs to be installed through sudo apt install Python 3-vcstool (note that vcstool is not vcstools. These are two tools! Really pit);
rosdep update
rosdep install -y --from-paths src --ignore-src --rosdistro $ROS_DISTRO
Personally, I don't think this step of rosdep update is necessary. Anyway, I didn't run this sentence;
compile:
colcon build --cmake-args -DCMAKE_BUILD_TYPE=Release
There are more or less errors in compiling Autoware. For solutions, refer to:
https://blog.csdn.net/weixin_44570248/article/details/118463028
Finally, download the official Demo to see the effect:
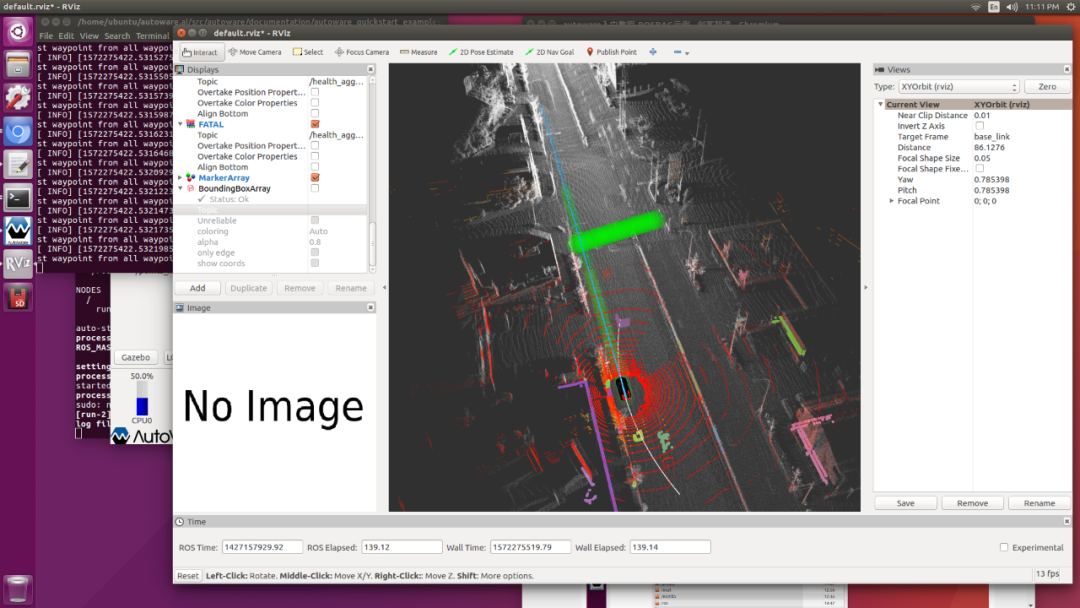
Running autoware1 There will be a problem of flower screen at 12. This problem will be solved later. I will send a blog to teach the solution tutorial.