Must see
-
Summary of note catalogue and acquisition of data source code
-
This is a note from Day1 to Day2
-
If you feel good, you can give me three links Oh ~ welcome to study and exchange, my official account: richGirlyyy)
catalogue
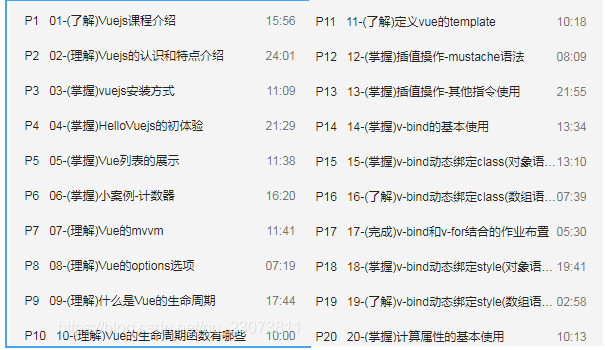
1, (understanding) Course Introduction
(3) (Master) Vue JS installation
(4) (Master) Vue initial experience
(5) , (understand) MVVM in Vue
Implementation principle of MVVM: the implementation of MVVM mainly includes three core points:
(6) , (understand) options in Vue
1. Create the options passed in by Vue instance
(2) , (understand) define the template in Vue
(3) (Master) interpolation operation
(4) . binding attribute (v-bind)
? 3.v-bind dynamic binding class
4. (Master) v-bind binding class – (object syntax)
5. (understand) v-bind binding class – (array syntax)
6. (complete) homework: combination of v-bind and v-for - click which item, and the item turns red
8. (Master) v-bind binding style – object syntax
9. (understand) v-bind binding style – array syntax
1. (Master) what is a calculation attribute? Basic use of calculated attributes
? 2. Master the complex operation of calculating attributes
3. (understand) setter s and getter s for Calculating Properties
1. (Master) block level scope – let/var
2. (understand) comparison of three schemes (ES5 has no closure - let with closure - ES6)
3. Master the use and precautions of const
4. Master the enhanced writing method of ES6 object literal quantity
(7) (Master) event monitoring v-on
? (8) Conditional judgment v-if, v-else-if, v-else
3. Conditional rendering case - login switching
4. (understand) small problem of the case - reuse of login switching input
5. Master the use of v-show and the difference between v-show and v-if
1. (Master) v-for traversal array
2. (Master) v-for traversal object
? 4. (Master) which methods in the array are responsive?
5. (mastery) stage case - book shopping cart
6. (Master) the use of JavaScript high-order functions
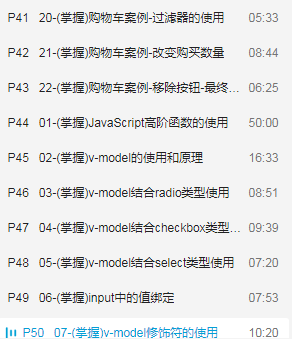
(10) (Master) form binding v-model
? 3.v-model is used in combination with radio type
4.v-model is used in combination with checkbox type
? 5.v-model is used in combination with select type
1, (understanding) Course Introduction
-
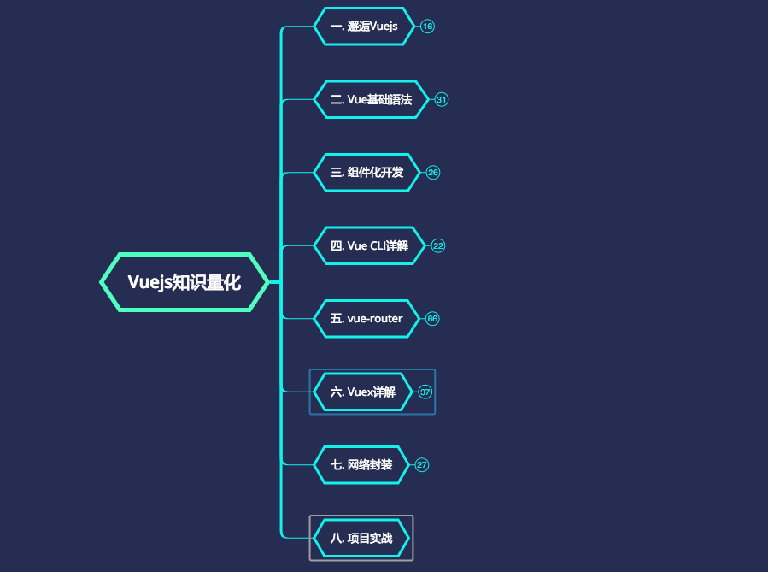
Course introduction
(please refer to the xmind file in the data for details)
-
Project introduction


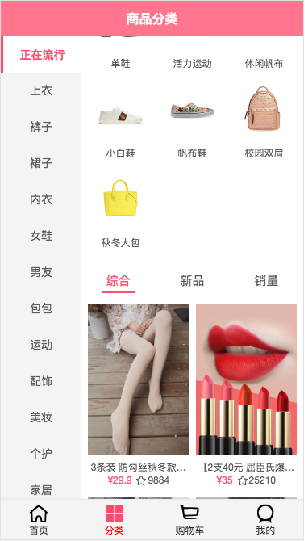
(the interface of this project needs to be obtained from the teacher)
2, Meet Vuejs
(1) I. content overview
- Meet Vuejs
- Why study Vuejs
- Take a brief look at Vuejs
- Vuejs installation method
- CDN introduction
- NPM installation management
- Download and import
- First experience Vuejs
- Hello Vuejs
- Vue list display
- Case: counter
- MVVM for Vuejs
- MVVM in Vue
(2) (understand) know Vue js
1. Why learn Vue js
- I believe everyone has the same purpose of learning Vue.
- Maybe your company is about to refactor the original project with Vue.
- It may also be that your company's new project decides to use Vue's technology stack.
- Of course, if you are changing jobs now, you will find that 8 out of 10 front-end recruitment requirements have more or less requirements for Vue.
- Of course, as learners, we know that Vuejs is very popular at present, which can be said to be a necessary skill for the front end.
2. Get to know Vuejs briefly
(attachment: Vue official website)
- Vue (pronunciation / vju /, similar to view), don't read it wrong.
- Vue is a progressive framework. What is progressive?
- Progressive means that you can embed Vue as part of your application to bring a richer interactive experience.
- Or if you want to use Vue to implement more business logic, Vue's core library and its ecosystem.
- For example, core + Vue router + vuex can also meet your various needs.
- Vue has many features and advanced functions common in Web development
- Decoupling views and data
- Reusable components
- Front end routing technology
- State management
- Virtual DOM
- You don't need to remember these characteristics one by one. We will gradually realize them in the later learning and development. I will explain some technical points later.
- The premise of learning Vuejs?
- Learning Vue development from scratch does not require you to have other experience similar to Angular, React, or even jQuery.
- But you need to have a certain foundation of HTML, CSS and JavaScript.
(3) (Master) Vue JS installation
-
Using a framework, what should we do first? Install and download it
-
There are many ways to install Vue:
- Method 1: direct CDN import. You can choose to import the development environment version or the production environment version
(development environment: the source code is not compressed. You can view the source code directly. It is slower to use CDN in the learning stage)
- Method 2: Download and import (use this in early learning and NPM in subsequent learning)
- Mode 3: NPM installation
- Later, we use this method through the use of webpack and CLI.
(4) (Master) Vue initial experience
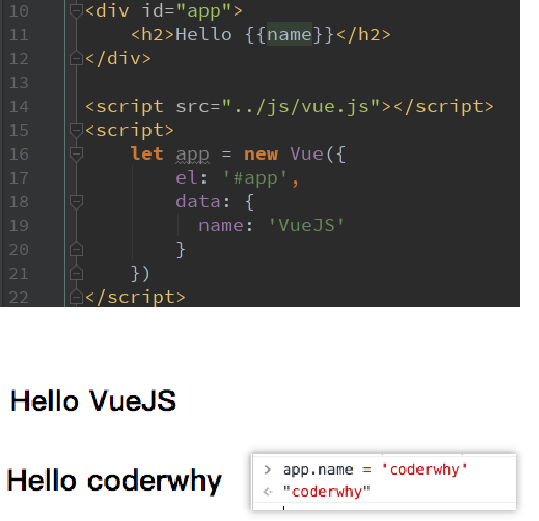
1.Hello Vuejs
- Let's do our first Vue program and experience the response of Vue
- What does the code do?
- When we read the JavaScript code, we will find that a Vue object is created.
- When creating some objects, Vue: {options}
- {} contains the el attribute: this attribute determines which element the Vue object is attached to. Obviously, we are attached to the element with id app here
- {} contains the data attribute: this attribute usually stores some data
- These data can be directly defined by us, such as the above.
- It may also be from the network and loaded from the server.
- Browser code execution process:
- Execute to 10 ~ 13 lines of code, which obviously shows the corresponding HTML
- Execute the code in line 16 to create a Vue instance, and parse and modify the original HTML.
- Moreover, at present, our code can be responsive.
code:
<body>

<div id="app">
    <h2>{{message}}</h2>
    <h1>{{name}}</h1>
</div>

<div>{{message}}</div>

<script src="../js/vue.js"></script>
<script>
    // There are things like this in the source code. There is a Vue class that can pass some parameters. The parameters of Vue are object types
    function Vue(){

    }
</script>
<script>
    // Let / const

    // Programming paradigm: when a declarative programming instance manages a div, it only needs to declare what is displayed
    const app = new Vue({
        el: '#app ', / / used to mount elements to be managed
        data: { // Define data
            message: 'How do you do,Li Yinhe!',
            name: 'coderwhy'
        }
    })

    // The original js approach (programming paradigm: imperative programming) clearly tells you what to do step by step
    // 1. Create div element and set id attribute

    // 2. Define a variable called message

    // 3. Display the message variable in the previous div element

    // 4. Modify the data of message: the weather is good today!

    // 5. Replace the modified data with div element again


    // Vue's response -- > you can modify the app on the printing desk name='yyy'
</script>

</body>
2.Vue list display
- Now let's show a more complex data: data list.
- For example, we now request a list from the server
- Want to show it in HTML.
- In HTML code, use the v-for instruction
- This instruction will be explained in detail later. Learn to use it first.
- Is it So Easy? We no longer need to complete DOM splicing related operations in JavaScript code
- And, more importantly, it is responsive.
- In other words, when the data in our array changes, the interface will change automatically.
- Let's still open the console in developer mode and try it

code:
<div id="app">
    <ul>
        <li v-for="item in movies">{{item}}</li>
    </ul>
</div>

<script src="../js/vue.js"></script>
<script>
    const app = new Vue({
        el: '#app',
        data: {
            message: 'How do you do',
            movies: ['Interstellar crossing', 'Westward Journey', 'Juvenile school', 'Inception']
        }
    })
</script>
3. Case: counter
- Now let's implement a small counter
- Click + counter + 1
- Click - counter - 1
- Here, we are going to use new instructions and attributes
- New attribute: methods, which is used to define methods in Vue objects.
- New instruction: @ click, which is used to listen for the click event of an element and specify the method to execute when a click occurs (the method is usually the method defined in methods)
- You might wonder?
- What are these @ click things?
- Vue objects define el/data/methods. What can be defined and what are their functions?
- These doubts will be solved one by one in the follow-up study.
(5) , (understand) MVVM in Vue
1. MVVM in Vue
- What is MVVM?
- Usually, the best way for us to learn a concept is to look at Wikipedia (yes, don't look at Baidu Encyclopedia)
- https://zh.wikipedia.org/wiki/MVVM
- We will not repeat the official explanation of Wikipedia here.
- Let's look directly at Vue's MVVM (model view view model)
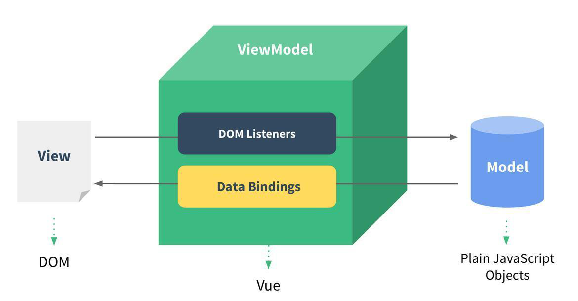
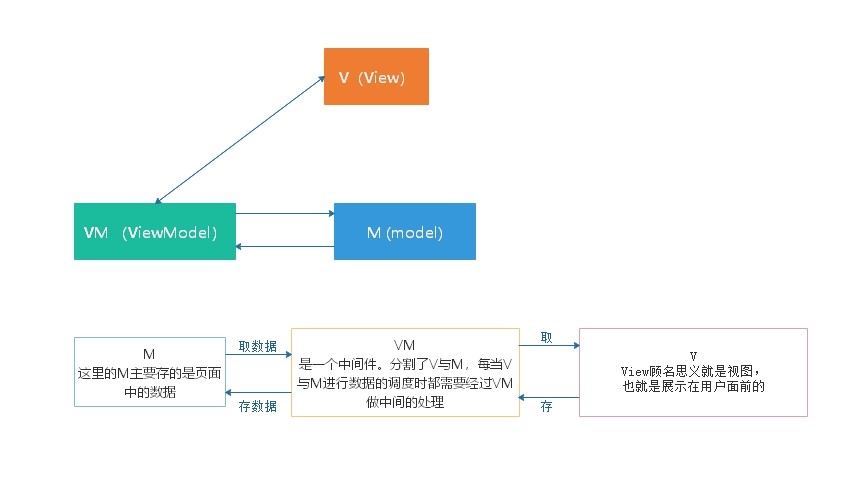
- View layer:
- View layer
- In our front-end development, it is usually the DOM layer.
- The main function is to show users all kinds of information.
- Model layer:
- Data layer
- Data may be our fixed dead data, but more data is requested from our server from the network.
- In the case of our counter, it is the obj extracted later. Of course, the data in it may not be so simple.
- VueModel layer:
- View model layer
- The View Model layer is the bridge between View and Model.
- On the one hand, it implements Data Binding, that is, Data Binding, which reacts the changes of the Model to the View in real time
- On the other hand, it implements DOM Listener, that is, DOM listening. When some events (click, scroll, touch, etc.) occur in the DOM, it can listen and change the corresponding Data if necessary.
Implementation principle of MVVM: the implementation of MVVM mainly includes three core points:
Responsive: how vue listens for data attribute changes
Template resolution: how is the template of vue resolved
Rendering: how vue templates are rendered to HTML
- Recommended articles:
2. MVVM in counter
- MVVM for counter
- There is a strict MVVM idea in our counter
- View is still our DOM
- Model is the obj we pulled out
- ViewModel is the Vue object instance we created
- How do they work?
- First, ViewModel enables the data in obj to be displayed in DOM in real time through Data Binding.
- Secondly, ViewModel listens to DOM events through DOM Listener, and changes data in obj through operations in methods.
- There is a strict MVVM idea in our counter
- With Vue to help us complete the task of VueModel layer, we can focus on data processing and DOM writing in subsequent development.
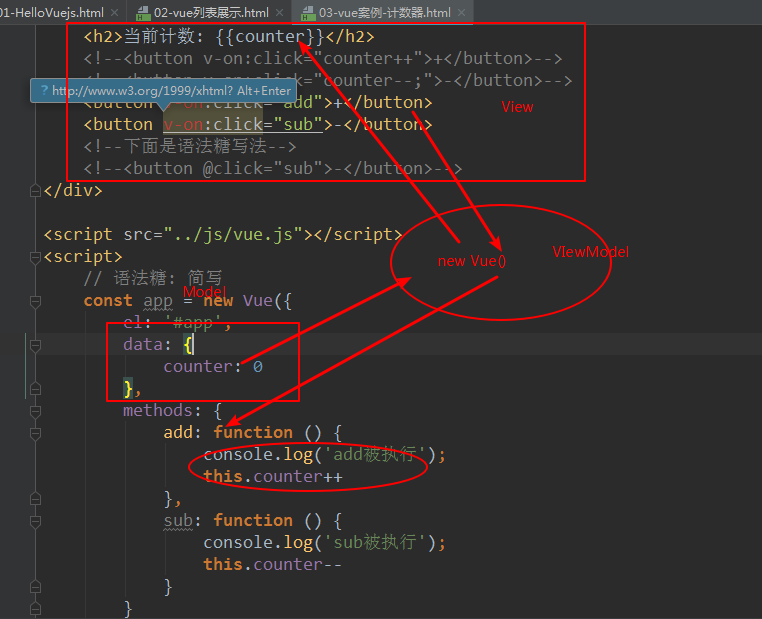
code:
<!-- Vue Medium MVVM -->

    <!----1.This is ours View---->
    <div id="app">
        <h2>Current count: {{counter}}</h2>
        <!--<button v-on:click="counter++">+</button>-->
        <!--<button v-on:click="counter--;">-</button>-->
        <button v-on:click="add">+</button>
        <button v-on:click="sub">-</button>
        <!--The following is the grammar-->
        <!--<button @click="sub">-</button>-->
    </div>

    <script src="../js/vue.js"></script>
    <script>
        // Grammar: short for sugar
        // proxy

        /* ---2.This is our Model--- */
        const obj = {
            counter: 0,
            message: 'abc'
        }

        new Vue()

        /*
            3.Create a Vue instance or "ViewModel"
            It connects View and Model
            ViewModel The core of the layer is two-way data binding in Vue
        */
        const app = new Vue({
            el: '#app',
            data: obj,
            methods: {
                add: function () {
                    console.log('add Be executed');
                    this.counter++
                },
                sub: function () {
                    console.log('sub Be executed');
                    this.counter--
                }
            },
            beforeCreate: function () {

            },
            created: function () {
                console.log('created');
            },
            mounted: function () {
                console.log('mounted');
            }
        })

        // 1. Take the button element

        // 2. Add listening event
    </script>
(6) , (understand) options in Vue
1. Create the options passed in by Vue instance
- You will find that when we create the Vue instance, we pass in an object options.
- What options can be included in this options?
- Detailed analysis: https://cn.vuejs.org/v2/api/#%E9%80%89%E9%A1%B9-%E6%95%B0%E6%8D%AE
- These options are now available:
- el:
- Type: string | HTMLElement
- Role: decide which DOM Vue instance will manage.
- data:
- Type: Object | Function (data in the component must be a function)
- Function: the data object corresponding to the Vue instance.
- methods:
- Type: {[key: string]: Function}
- Function: define some methods belonging to Vue, which can be called in other places or used in instructions.
- el:
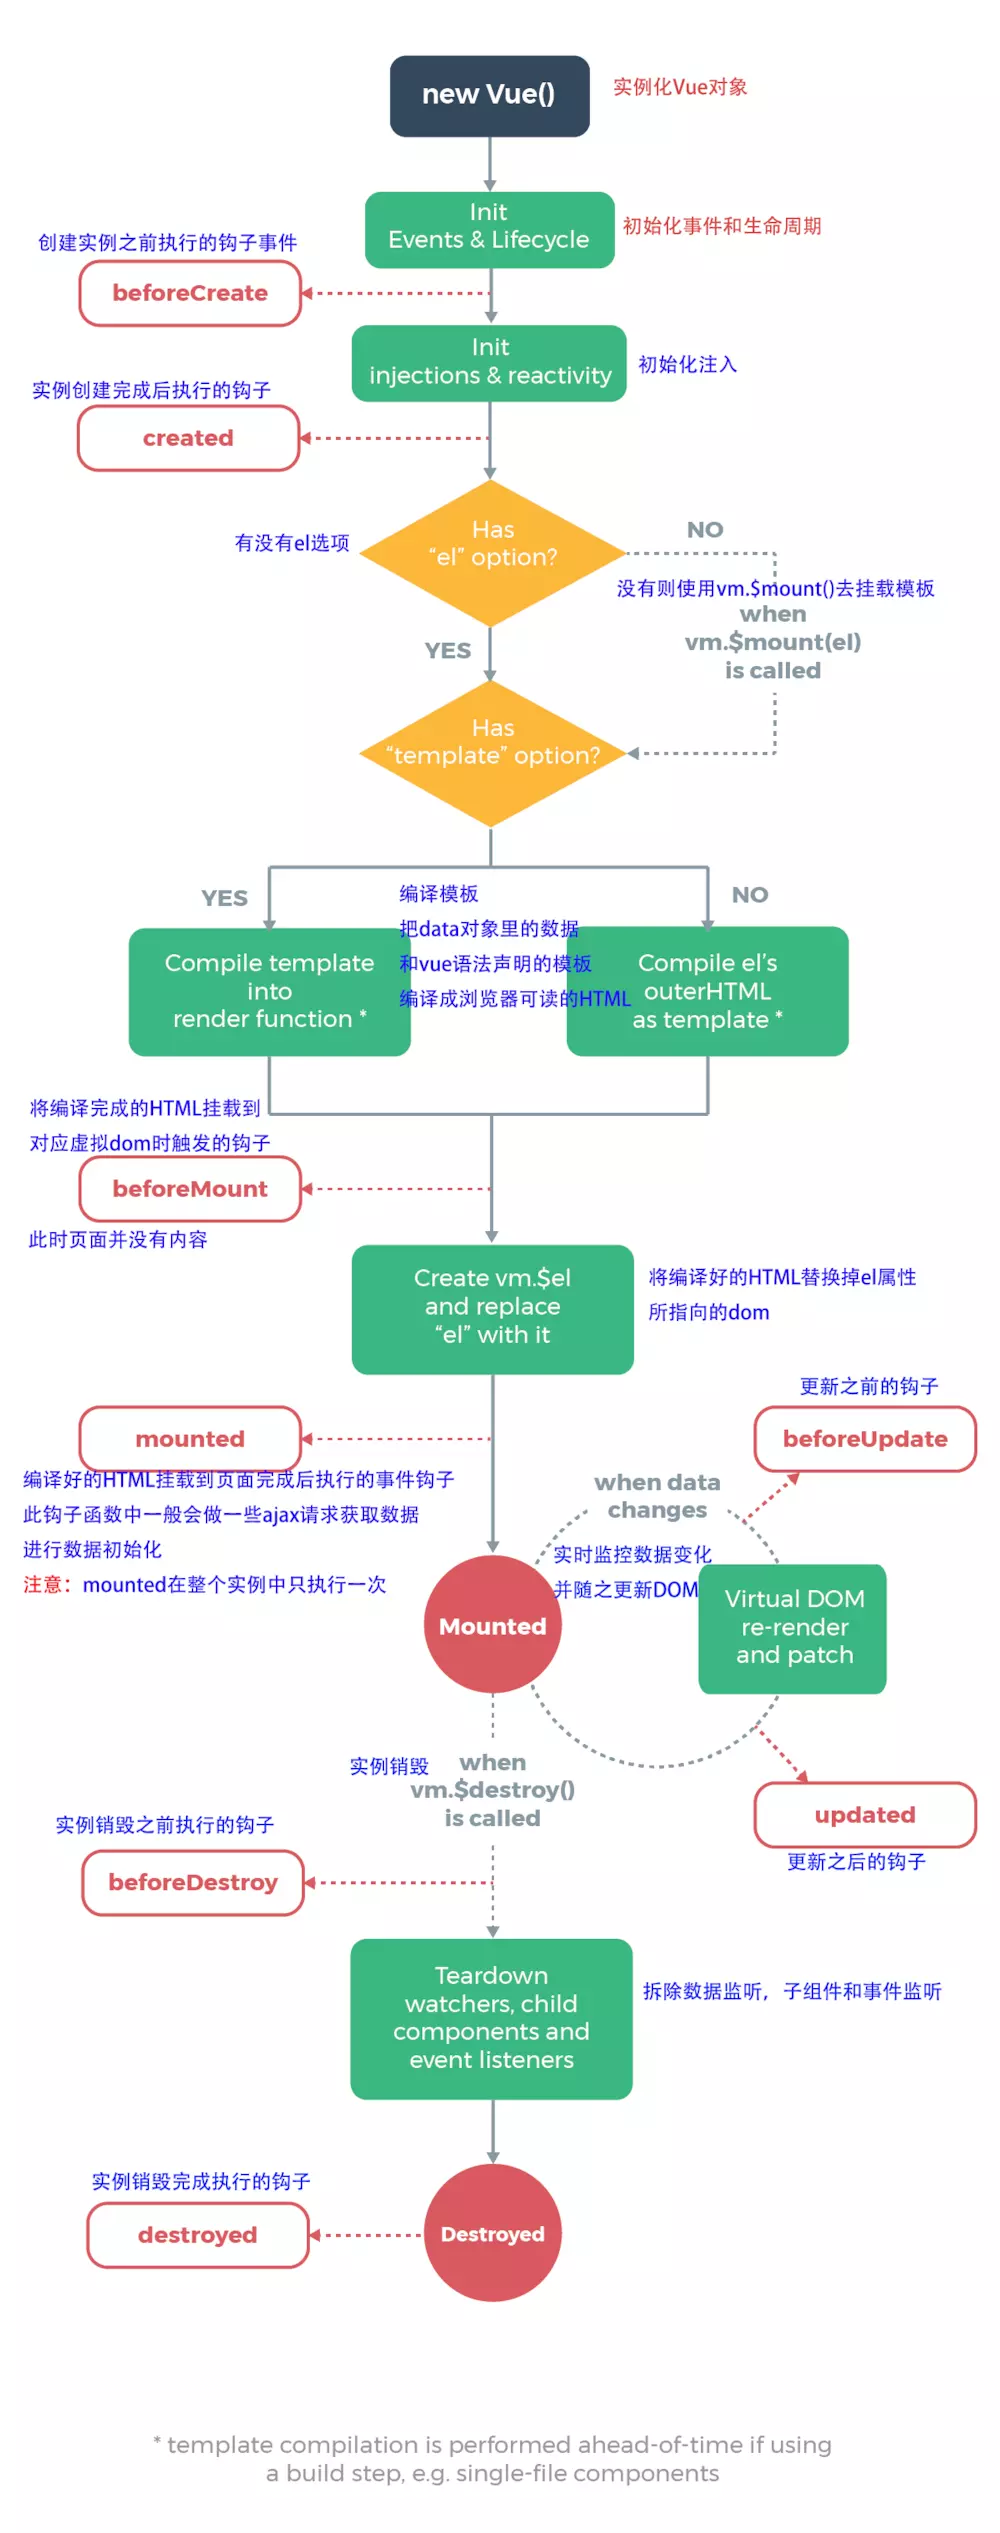
2. Life cycle of Vue
-
Life cycle: the whole process of things from birth to death
-
Life cycle diagram of Vue
- English version
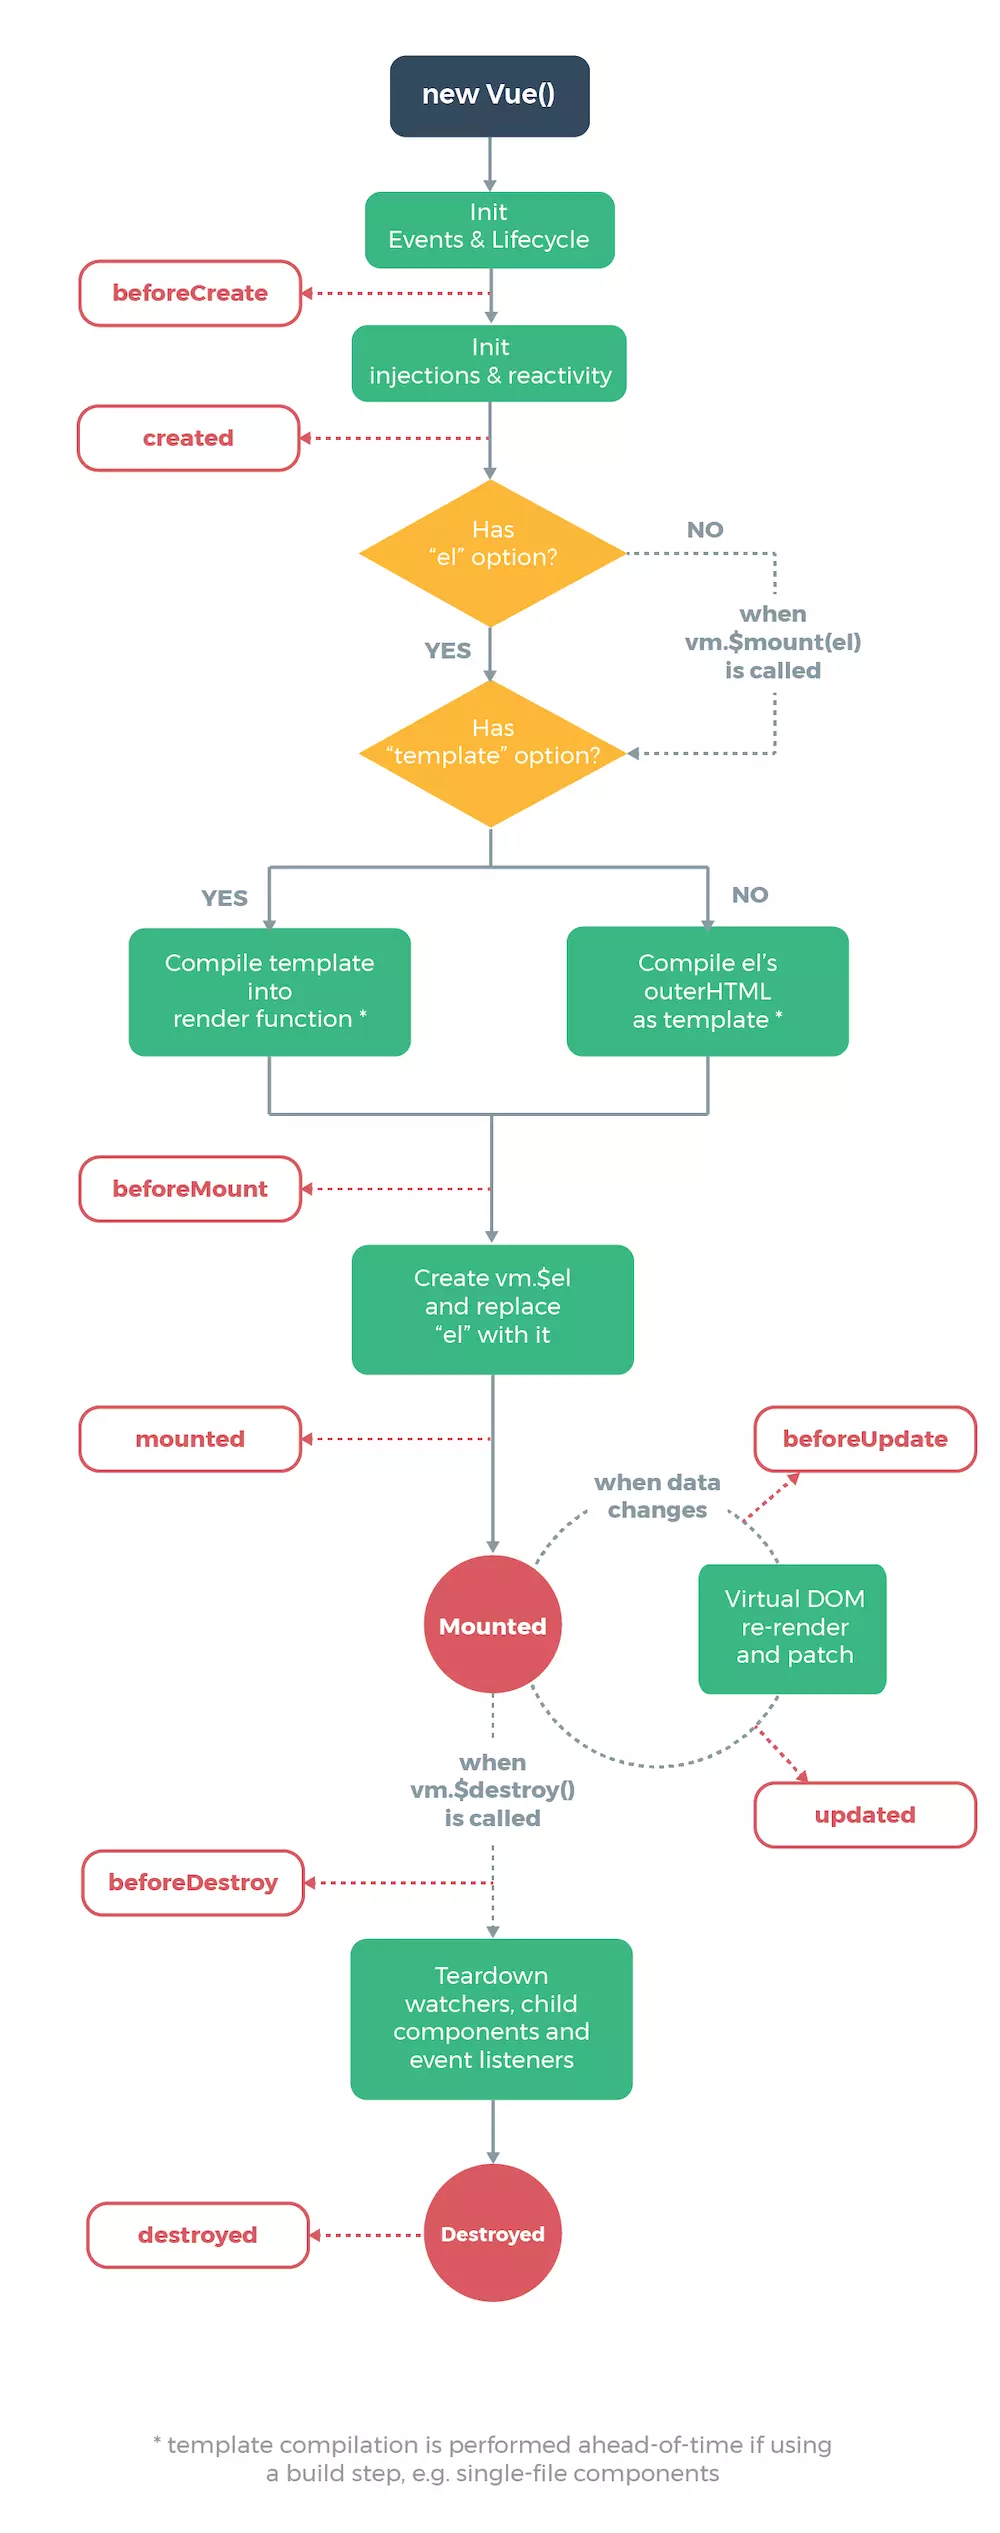
- Chinese version
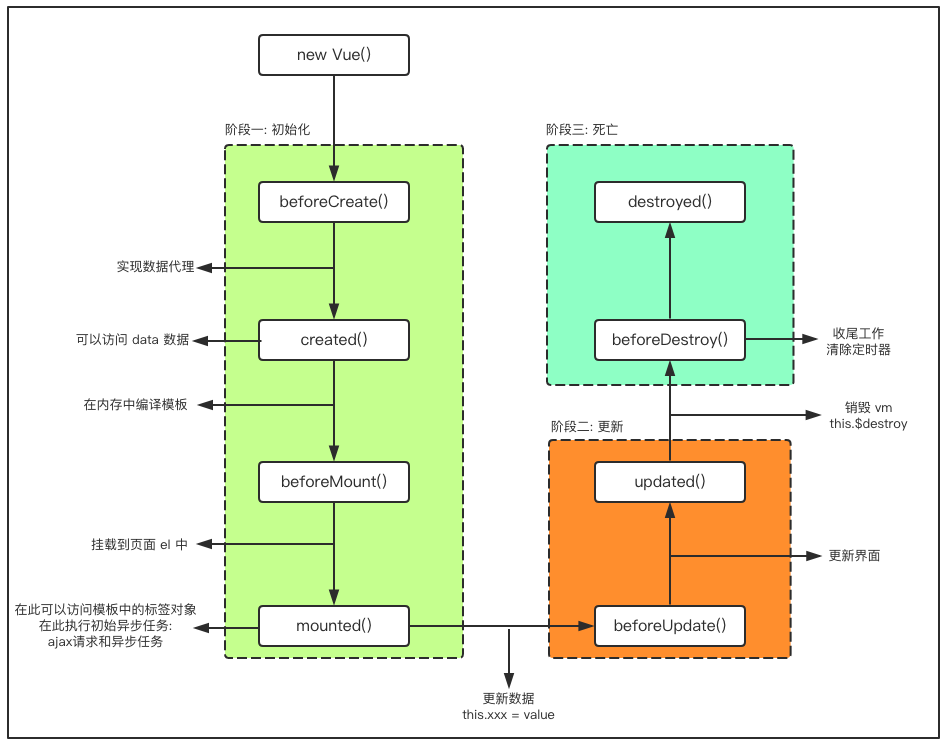
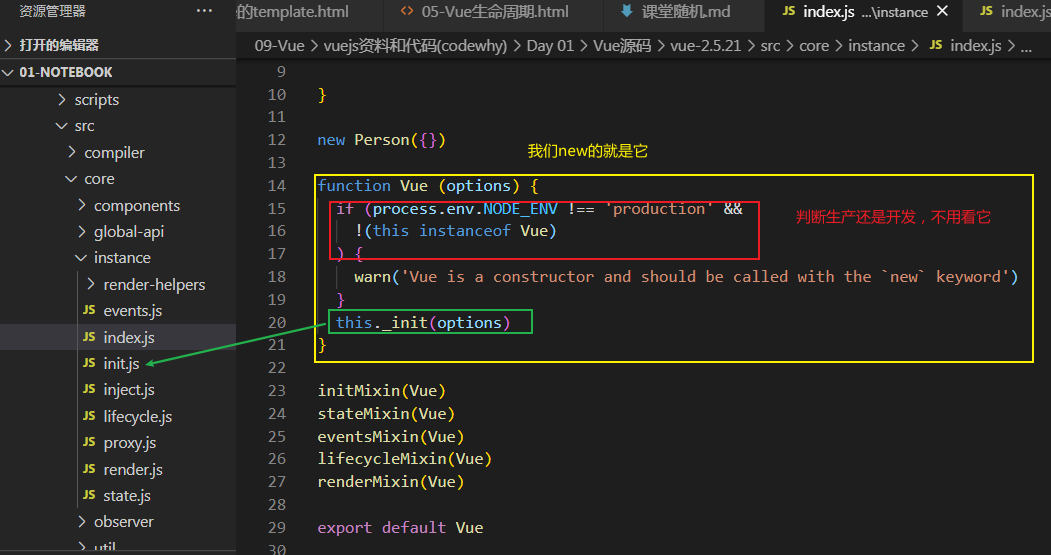
- View the life cycle in Vue source code
- vue-2.5.21srccoreindex.js entry function to find instance/index
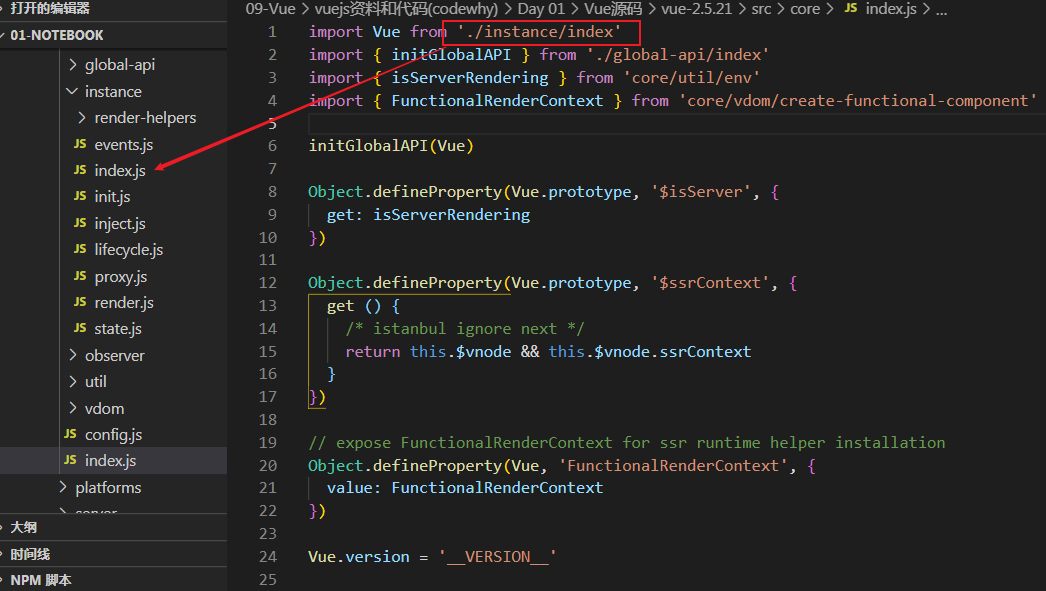
- Vue source code ue-2.5.21srccoreinstanceindex js
- The meaning of Vue life cycle: I can do the corresponding things for the callback after the execution of which step
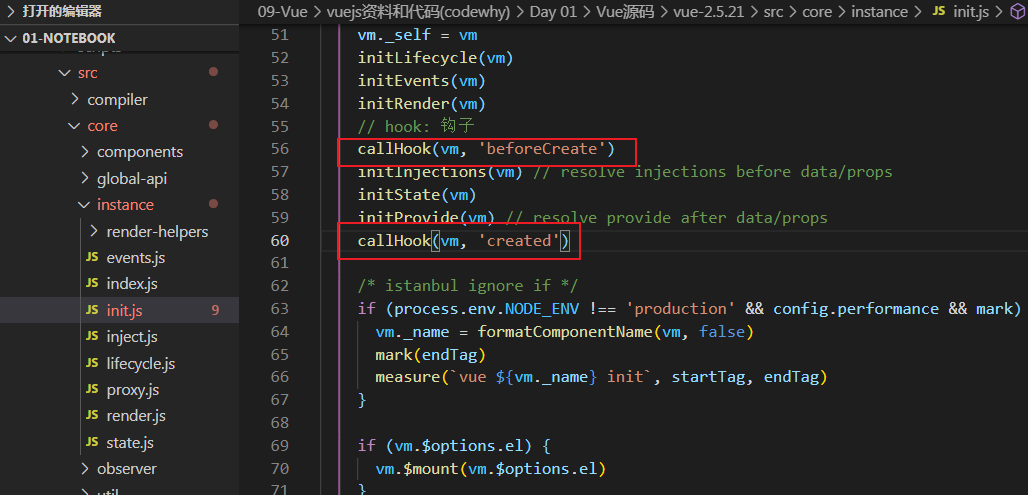
- Life cycle functions are also called hook functions
- It may be difficult to understand just watching the video. You can understand it with code experience. Some articles are recommended:
???Super detailed vue life cycle analysis (detailed explanation)
Detailed explanation of vue life cycle hook function
???Vue life cycle (11 hook functions)
3, Basic grammar
(1) I. content overview
- Interpolation operation
- Binding properties
- Calculation properties
- event listeners
- Conditional judgment
- Loop traversal
- Stage case
- v-model
(2) , (understand) define the template in Vue
-
template in VScode
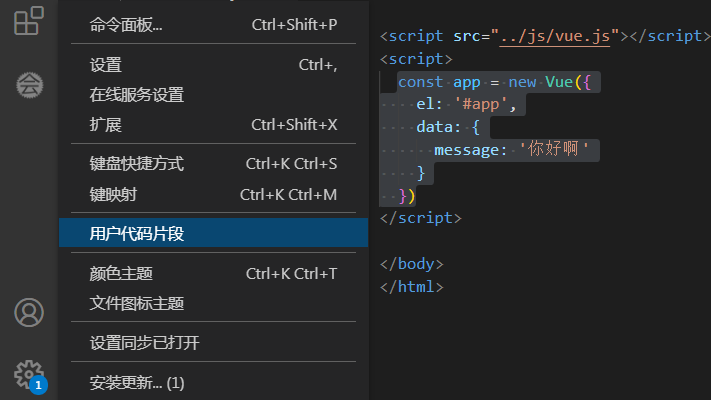
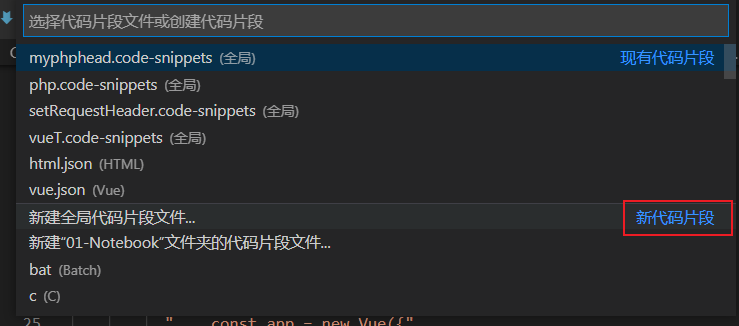
establish
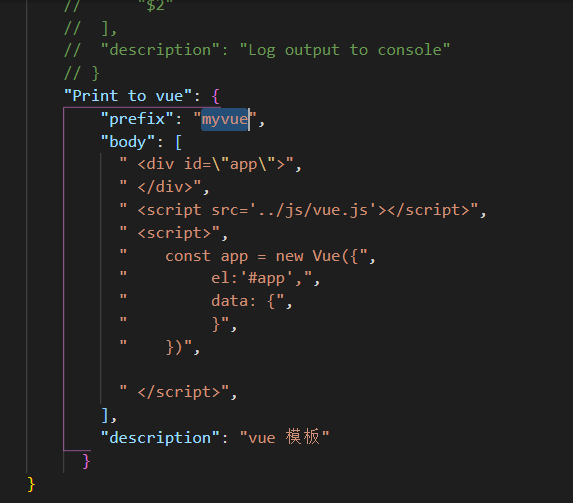
Use (press enter to display the defined template)

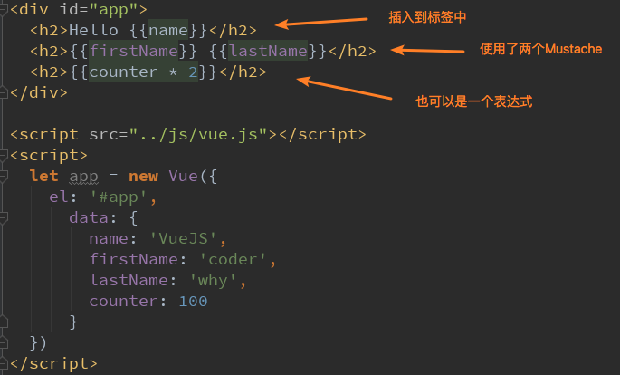
(3) (Master) interpolation operation
1. Mustache
- How to insert the text data in data into HTML?
- As we have already learned, we can use Mustache Grammar (that is, double braces).
- Mustache: beard / beard
- We can use it like this, and the data is responsive
code:
<div id="app">
  <h2>{{message}}</h2>
  <h2>{{message}}, Li Yinhe!</h2>
<!-- Mustache: Beard/beard -->
  <!--mustache In grammar,You can not just write variables directly,You can also write simple expressions-->
  <h2>{{firstName + lastName}}</h2>
  <h2>{{firstName + ' ' + lastName}}</h2>
  <h2>{{firstName}} {{lastName}}</h2>
  <h2>{{counter * 2}}</h2>
</div>

<script src="../js/vue.js"></script>
<script>
  const app = new Vue({
    el: '#app',
    data: {
      message: 'How do you do',
      firstName: 'kobe',
      lastName: 'bryant',
      counter: 100
    },
  })

  // When the code is written according to the specified grammar, it means to write the code according to the template
2.v-once
- However, in some cases, we may not want the interface to follow changes at will
- At this time, we can use a Vue instruction
- v-once:
- This instruction does not need to be followed by any expression (for example, the previous v-for is followed by an expression)
- This instruction indicates that elements and components (which will be learned later) are rendered only once and will not change with the change of data.
- The code is as follows:

<div id="app">
  <h2>{{message}}</h2>
  <h2 v-once>{{message}}</h2>
</div>
<!-- v-once:
This instruction does not need to be followed by any expression(Like before v-for Followed by an expression)
This instruction represents elements and components(Components will be learned later)Render only once and will not change with the change of data -->
<script src="../js/vue.js"></script>
<script>
  const app = new Vue({
    el: '#app',
    data: {
      message: 'How do you do'
    }
  })
  // The essence of an instruction is a custom attribute
</script>
3.v-html
-
In some cases, the data we request from the server itself is an HTML code
- If we output directly through {}}, the HTML code will also be output.
- However, we may want to parse in HTML format and display the corresponding content.
-
If we want to parse the HTML presentation
- You can use the v-html instruction
- This instruction is often followed by a string type
- The html of string will be parsed and rendered
{{url}}
4.v-text
- The function of v-text is similar to Mustache: it is used to display data in the interface
- v-text normally accepts a string type
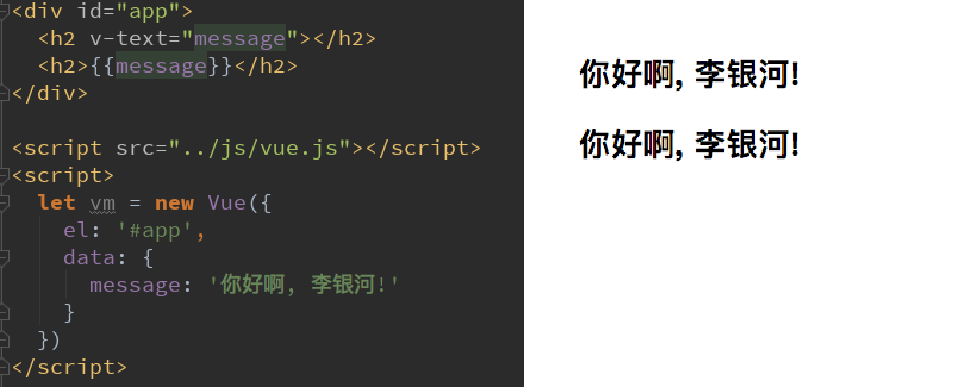
<div id="app">
  <h2>{{message}}, Li Yinhe!</h2>
  <h2 v-text="message">, Li Yinhe!</h2>
</div>
<!--
  v-text Function and Mustache Similar: they are used to display data in the interface
v-text Usually, accept one string type

 -->
<script src="../js/vue.js"></script>
<script>
  const app = new Vue({
    el: '#app',
    data: {
      message: 'How do you do'
    }
  })
</script>
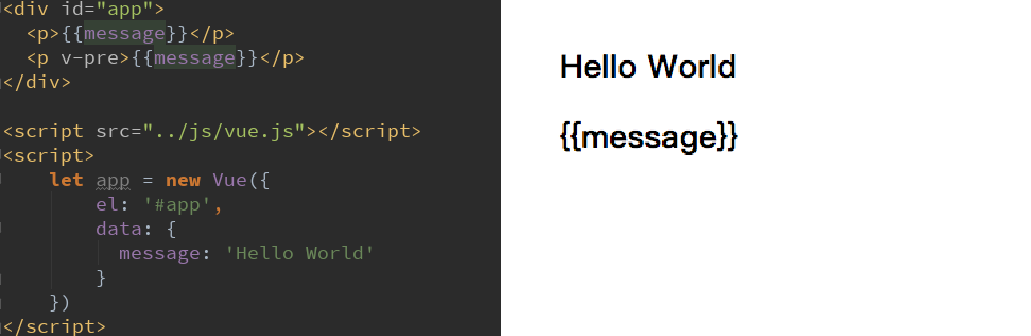
5.v-pre
- v-pre is used to skip the compilation process of this element and its child elements, and to display the original Mustache syntax.
- For example, the following code:
- The content in the first h2 element will be compiled and parsed to the corresponding content
- The second h2 element displays {{message}} directly
<div id="app">
  <h2>{{message}}</h2>
  <h2 v-pre>{{message}}</h2>
</div>
<!--
  v-pre Used to skip the compilation process of this element and its child elements, and to display the original Mustache Grammar.
 -->
<script src="../js/vue.js"></script>
<script>
  const app = new Vue({
    el: '#app',
    data: {
      message: 'How do you do'
    }
  })
</script>
6.v-cloak
- In some cases, our browser may directly display the uncompiled Mustache tag.
- cloak: cloak
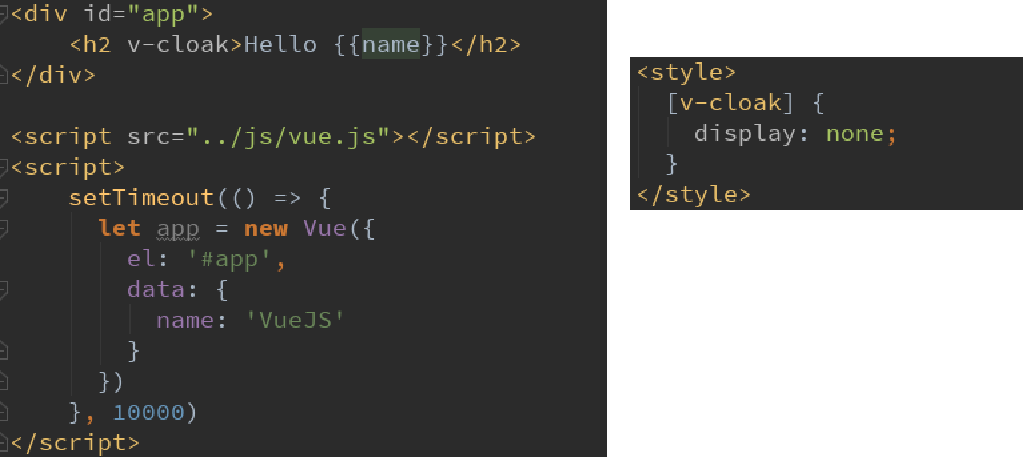
<style>
    [v-cloak] {
      display: none;
    }
</style>

  <div id="app" v-cloak>
    <h2>{{message}}</h2>
  </div>
  <!--
  Obviously, in some cases, we may not compile directly Mustache label.
cloak: cloak
 Need and css Use together
v-cloak Instruction usage
(1)Problem with "flashing expression"
(2)How to solve this problem: use v-cloak instructions
(3)The principle to solve this problem: first hide and replace the value, and then display the final value
 -->
  <script src="../js/vue.js"></script>
  <script>
    // Before vue parsing, div has an attribute v-cloak
    // After vue parsing, there is no attribute v-cloak in div
    setTimeout(function () {
      const app = new Vue({
        el: '#app',
        data: {
          message: 'How do you do'
        }
      })
    }, 1000)
  </script>
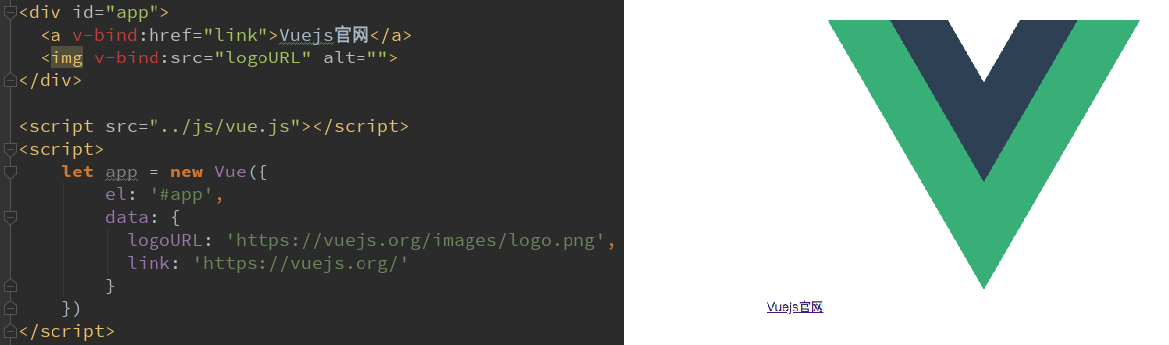
(4) . binding attribute (v-bind)
1.v-bind introduction
- The main function of the instruction we learned earlier is to insert values into the contents of our template.
- However, in addition to the dynamic determination of content, we also want to bind some properties dynamically.
- For example, dynamically bind the href attribute of a element
- For example, dynamically bind the src attribute of the img element
- At this time, we can use the v-bind instruction:
- Role: dynamically bind attributes
- Abbreviation:
- Expected: any (with argument) | Object (without argument)
- Parameter: attrOrProp (optional)
- Next, let's learn about the use of v-bind.
2. (Master) v-bind Foundation
- v-bind is used to bind one or more attribute values, or pass props values to another component (this will be introduced when learning the component)
- In development, what attributes need to be bound dynamically?
- There are still many, such as image link src, website link href, dynamic binding of some classes, styles and so on
- For example, bind the src and href of the element through the data in the Vue instance. The code is as follows:
  <!--
    v-bind Used to bind one or more property values or pass them to another component props value
   -->

<div id="app">
  <!-- Wrong practice: It can't be used here mustache grammar-->
  <!--<img src="{{imgURL}}" alt="">-->

  <!-- Right approach: use v-bind instructions -->
  <img v-bind:src="imgURL" alt="">
  <a v-bind:href="aHref">use Baidu Search</a>
  <!--<h2>{{}}</h2>-->

  <!--Grammar writing-->
  <img :src="imgURL" alt="">
  <a :href="aHref">use Baidu Search</a>
</div>

<script src="../js/vue.js"></script>
<script>
  const app = new Vue({
    el: '#app',
    data: {
      message: 'How do you do',
      imgURL: 'https://img11.360buyimg.com/mobilecms/s350x250_jfs/t1/20559/1/1424/73138/5c125595E3cbaa3c8/74fc2f84e53a9c23.jpg!q90!cc_350x250.webp',
      aHref: 'http://www.baidu.com'
    }
  })
</script>
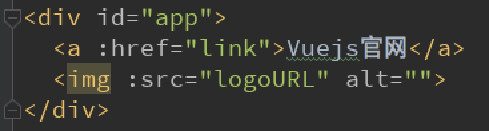
- v-bind syntax
- v-bind has a corresponding syntax sugar, which is abbreviated
- In development, we usually use the form of syntax sugar because it is more concise.
- The abbreviation is as follows * *:**
3.v-bind dynamic binding class
- Many times, we want to dynamically switch class es, such as:
- When the data is in a certain state, the font displays red.
- When the data is in another state, the font is displayed in black
- There are two ways to bind a class:
- Object syntax
- Array syntax
4. (Master) v-bind binding class – (object syntax)
-
Binding method: object syntax
-
The meaning of object syntax is: class is followed by an object.
- Object syntax has the following uses:
Usage 1: bind a class directly through {}
Hello World
Usage 2: you can also pass in multiple values through judgment
Hello World
Usage 3: it exists at the same time as ordinary classes and does not conflict
Note: if both isActive and isLine are true, there will be three classes: title/active/lineHello World
Usage 4: if it is too complex, it can be placed in a methods or computed
Note: classes is a calculated attributeHello World
code:
-
Note: when the key contains special characters such as "-" (not underscore), spaces and other variables that js does not support, quotation marks are required. Because vue will apply the content in "{}" to js for processing!
<!--<h2 v-bind:class="{key1: value1, key2: value2}">{{message}}</h2>-->
<!--<h2 v-bind:class="{Class name 1: true, Class name 2: boolean}">{{message}}</h2>-->
<h2 class="title" v-bind:class="{active: isActive, line: isLine}">{{message}}</h2>
<h2 class="title" v-bind:class="getClasses()">{{message}}</h2>
<button v-on:click="btnClick">Button</button>
5. (understand) v-bind binding class – (array syntax)
-
Binding method: array syntax
- The meaning of array syntax is: class is followed by an array.
-
Array syntax has the following uses:
Usage 1: bind a class directly through []
Hello World
Usage 2: you can also pass in multiple values
6. (complete) homework: combination of v-bind and v-for - click which item, and the item turns red
<head>
  <meta charset="UTF-8">
  <title>Title</title>
  <style>
    .active {
      color: red;
    }
  </style>
</head>

<body>

  <!--Job requirements: Click which item in the list, Then the text of the item turns red-->
  <div id="app">
    <ul>
      <li v-for="(m, index) in movies"
      :class="{active:index==currentIndex}"
      @click="itemClick(index)">
        {{index}}-{{m}}
      </li>
    </ul>
  </div>

  <script src="../js/vue.js"></script>
  <script>
    const app = new Vue({
      el: '#app',
      data: {
        movies: ['dominant sea power', 'Haier brothers ', 'Naruto', 'Attacking giants'],
        currentIndex: 0
      },
      methods: {
        itemClick(index) {
          this.currentIndex = index;
        }
      }
    })
  </script>

</body>
7.v-bind binding style
- We can use v-bind:style to bind some CSS inline styles.
- When writing CSS attribute names, such as font size
- We can use camel case fontsize
- Or kebab case (remember to enclose it in single quotation marks) 'font size'
- There are two ways to bind style s:
- Object syntax
- Array syntax
8. (Master) v-bind binding style – object syntax
:style="{color: currentColor, fontSize: fontSize + 'px'}"
-
style is followed by an object type
- The key of the object is the CSS attribute name
- The value of the object is the specific assigned value. The value can come from the attribute in data
{{message}}
{{message}}
{{message}}
9. (understand) v-bind binding style – array syntax
<div v-bind:style="[baseStyles, overridingStyles]"></div>
-
style is followed by an array type
-
Multiple values can be divided by
{{message}}
(5) . calculation attribute
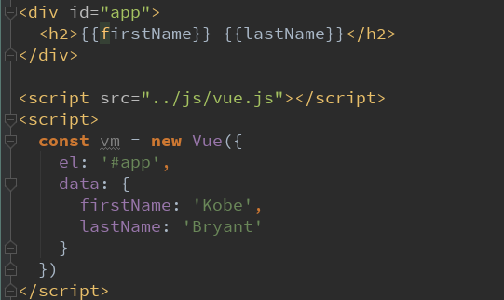
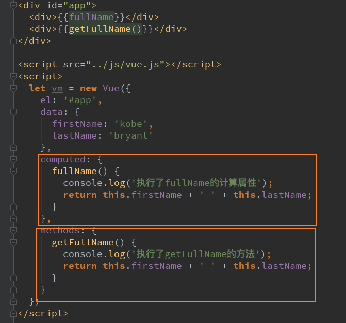
1. (Master) what is a calculation attribute? Basic use of calculated attributes
- We know that in the template, some data in data can be displayed directly through interpolation syntax.
- However, in some cases, we may need to display the data after some transformation, or we may need to combine multiple data for display
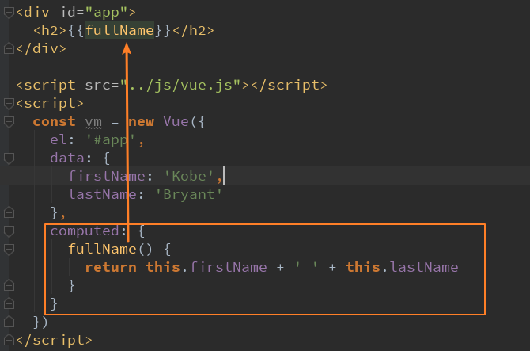
- For example, we have two variables: firstName and lastName. We need to display the full name.
- However, if multiple places need to display full names, we need to write multiple {{firstName}} {{lastName}}
- We can replace the above code with calculation attribute:
- OK, we found that the calculated attribute is written in the calculated option of the instance.
code:
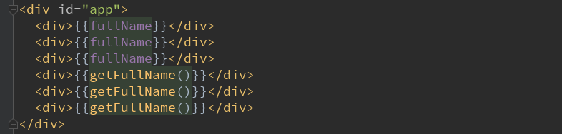
  <div id="app">
    <h2>{{firstName + ' ' + lastName}}</h2>
    <h2>{{firstName}} {{lastName}}</h2>
    <!-- {{}} Methods can also be called inside, which needs to be added() -->
    <h2>{{getFullName()}}</h2>

    <!-- {{}} It usually uses variable names, and the method has a() It may be a little awkward. You can use the calculation attribute at this time -->
    <!-- !!Calculate attributes without parentheses -->
    <h2>{{fullName}}</h2>
  </div>

  <script src="../js/vue.js"></script>
  <script>
    const app = new Vue({
      el: '#app',
      data: {
        firstName: 'Lebron',
        lastName: 'James'
      },
      // computed: calculated attribute ()
      computed: {
         // The function defined in calculated is also a function, but the function name generally does not add a verb similar to get
        //  However, it is called a calculated attribute, so it is generally named like an attribute

        fullName: function () { // In fact, it is also a syntax sugar. There are setter s and getters in it. This is getter
          return this.firstName + ' ' + this.lastName
        }
      },
      methods: {
        getFullName() {
          return this.firstName + ' ' + this.lastName
        }
      }
    })
  </script>
2. Master the complex operation of calculating attributes
- Some more complex operations can also be performed in calculating attributes, such as the following example:
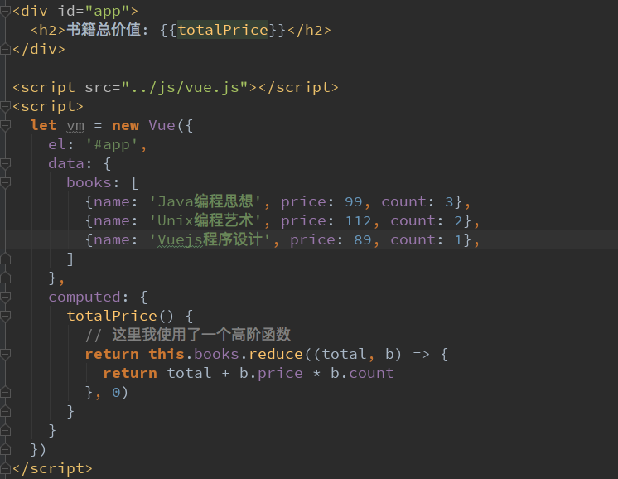
Attachment: Supplement of higher order function reduce
code:
<div id="app">
  <h2>Total price: {{totalPrice}}</h2>
</div>

<script src="../js/vue.js"></script>
<script>
  const app = new Vue({
    el: '#app',
    data: {
      books: [
        {id: 110, name: 'Unix Programming art', price: 119},
        {id: 111, name: 'Code Complete ', price: 105},
        {id: 112, name: 'Deep understanding of Computer Principles', price: 98},
        {id: 113, name: 'Modern operating system', price: 87},
      ]
    },
    computed: {
      totalPrice: function () {
        let result = 0;
        for (let i=0; i < this.books.length; i++) {
          result += this.books[i].price
        }
        return result;

        // 1. The first method
        /*
        let total = 0
        this.books.forEach(book => {
          total += book.price * book.count
        })
        return total
        */

        // 2. The second way
        // let total = 0
        // for (let i in this.books) {
        //   const book = this.books[i]
        //   total += book.price * book.count
        // }
        // return total

        // 3. The third way
        // Higher order function filter/reduce/map
        return this.books.reduce((preValue, book) => {
          return preValue + book.price * book.count
        }, 0)

        // Supplement to reduce
        // https://www.cnblogs.com/amujoe/p/11376940.html
      }
    }
  })
</script>
3. (understand) setter s and getter s for Calculating Properties
- Each calculated property contains a getter and a setter
- In the above example, we just use getter s to read.
- In some cases, you can also provide a setter method (not commonly used).
- When you need to write setter, the code is as follows:
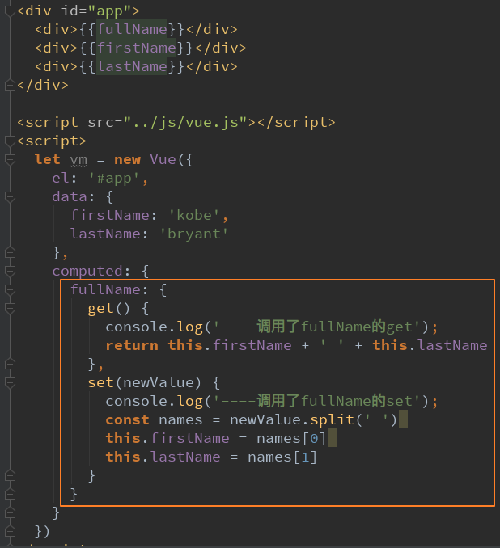
set is used
 code:
code:
<div id="app">
  <h2>{{fullName}}</h2>
</div>

<script src="../js/vue.js"></script>
<script>
  const app = new Vue({
    el: '#app',
    data: {
      firstName: 'Kobe',
      lastName: 'Bryant'
    },
    computed: { // The essence of computed is that an object can have attributes, and the attributes in it are an object, in which methods can be written
      // Abbreviation
      // fullName: function () {
      //   return this.firstName + ' ' + this.lastName
      // }
      // name: 'coderwhy'


      // Complete writing
      // The calculated attribute is generally a read-only attribute without set method

      // The calculation attribute generally implements the get method, but does not implement the set method. Generally, you do not want others to set values for the calculation attribute, and generally delete set directly
      // Therefore, there is no need to add () when calling the calculation attribute. In essence, it is to call get in the attribute fullname
      fullName: { // object
        set: function(newValue) { // If you want to implement the set method, there is a parameter here
          // You can try app on the console Fullname = "Yang" will call set
          console.log('-----', newValue);
          const names = newValue.split(' ');
          this.firstName = names[0];// assignment
          this.lastName = names[1];
        },
        get: function () {
          return this.firstName + ' ' + this.lastName
        }
      },

      // fullName: function() {/ / this function is the get method
      //   return this.firstName + ' ' + this.lastName
      // }
    }
  })
</script>
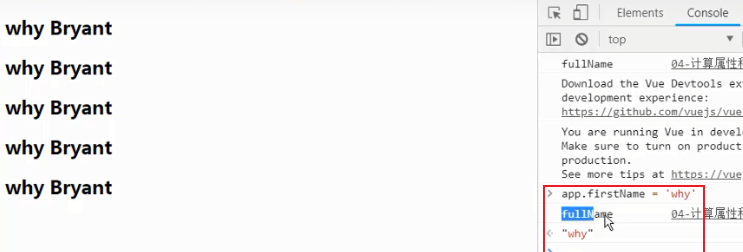
4. (Master) cache of calculation attributes (comparison between calculation attributes and methods)
- We may consider such a question:
- Both methods and computed seem to be able to implement our functions,
- So why do we need one more calculation attribute?
- Reason: the calculated attribute will be cached. If it is used multiple times, the calculated attribute will only be called once.
- Let's look at the following code:
To view the cache in the browser console:
(fullName is called once without changing)

(if fullName changes, call again)
code:
<div id="app">
  <!--1.Direct splicing: The grammar is too cumbersome-->
  <h2>{{firstName}} {{lastName}}</h2>

  <!--2.By definition methods-->
  <h2>{{getFullName()}}</h2>
  <h2>{{getFullName()}}</h2>
  <h2>{{getFullName()}}</h2>
  <h2>{{getFullName()}}</h2>

  <!--3.adopt computed-->
  <h2>{{fullName}}</h2>
  <h2>{{fullName}}</h2>
  <h2>{{fullName}}</h2>
  <h2>{{fullName}}</h2>
</div>

<script src="../js/vue.js"></script>
<script>
  // angular -> google
  // Typescript (Microsoft) - > TS (type detection)
  // flow(facebook) ->
  const app = new Vue({
    el: '#app',
    data: {
      firstName: 'Kobe',
      lastName: 'Bryant'
    },
    methods: {
      getFullName: function () {
        console.log('getFullName');
        return this.firstName + ' ' + this.lastName
      }
    },
    computed: {
      fullName: function () {
        console.log('fullName');
        // It will observe whether there is any change. If there is no change, it will directly return to the original result instead of recalculating. If there is any change, it will be called again
        // Browser console app Fullname ='Why 'will be called again
        return this.firstName + ' ' + this.lastName
      }
    }
  })

</script>
(6) (Master) ES6 supplement
1. (Master) block level scope – let/var
- In fact, the design of var can be regarded as an error in the design of JavaScript language, but most of this error can not be repaired and removed, thinking that it needs backward compatibility
- Brendan EICH (author of JS) decided to fix this problem about ten years ago, so he added a new keyword: let
- let can be seen as a more perfect var
- Block level scope
- When using var to declare a variable in JS, the scope of the variable is mainly related to the definition of the function
- There is no scope for other block definitions, such as if/for, which often causes some problems in our development
-
1. Variable scope: in what range are variables available
//Here is a code block. {} is a code block. Whether {} has no meaning for defining variables can use name both inside and outside
{
var name = 'why';
console.log(name);
}
console.log(name); // You can use name
Supplement: JS: code block {}, and what is the function of code block?
-
2. Problems caused by no block level scope: block level of if
if (true) {
var name = 'why';
}
console.log(name);// Can printif (true) {
var name = 'why';
}
console.log(name);// Can printvar func; if (true) { var name = 'why'; func = function () { // This variable is used to print the name here console.log(name); } // func();// Can print } name = 'kobe'; // The variable is changed here. It should not be changed func(); // Printing is still OK // console.log(name); -
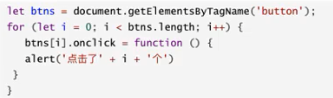
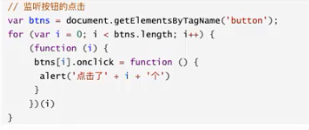
3. Problems caused by no block level scope: block level of for
- Click the monitor button
Button 1
Button 2
Button 3
Button 4
Button 5
To sum up, there is no block level in if and for
-
To solve this problem, we usually use a closure
- **Closure: * * an internal function can always access the parameters and variables declared in its external function, even after its external function is returned (end of life).
var btns = document.getElementsByTagName('button');
for (var i = 0; i < btns.length; i++) {
(function (num) { // 0
btns[i].addEventListener('click', function () {
console.log('the '+ num +' button clicked ');
})
})(i)
}
Supplement: execute function immediately
 // Execute function now
    (function () {

    }())
    (function () {

    })()
-
Why closures solve the problem: a function is a scope
    var name = "yyyy";

    function abc(name) {
        console.log(name);
    }
    name="why";
    abc('aaaaaa');// No matter how the external name is changed, the printed name is aaaa
var name = 'why'
function abc(bbb) { // bbb = 'why'
  console.log(bbb);
}
abc(name);// There will be no conflict. name or why
name = 'kobe'
Supplement: articles on some closures
??? [JS] function closure (key)
??? Front end interview question: closure
-
summary
-
Before ES5, because if and for did not have the concept of block level scope, we must use the scope of function to solve the problem of applying external variables
-
In ES6, let is added, which has block level functions of if and for
-
Anyway, remember
-
var in ES5 has no block level scope (if/for)
-
The let in ES6 is block level (if/for)
-
//es6 writing method
const btns = document.getElementsByTagName('button')
for (let i = 0; i < btns.length; i++) {
btns[i].addEventListener('click', function () {
console.log('the '+ i +' button clicked ');
})
} -
-
ES6 why let can? It has its own scope. i only belongs to the scope in for (leti = 0; i < BTNs. Length; i + +) {}
{ i = 0 btns[i].addEventListener('click', function () { console.log('The first' + i + 'A button was clicked'); }) } { i = 1 btns[i].addEventListener('click', function () { console.log('The first' + i + 'A button was clicked'); }) } { i = 2 btns[i].addEventListener('click', function () { console.log('The first' + i + 'A button was clicked'); }) } { i = 3 btns[i].addEventListener('click', function () { console.log('The first' + i + 'A button was clicked'); }) } { i = 4 btns[i].addEventListener('click', function () { console.log('The first' + i + 'A button was clicked'); }) } -
And ES5
// ES5
var i = 5
{
  btns[i].addEventListener('click', function () {
  console.log('The first' + i + 'A button was clicked');
})
}

{
  btns[i].addEventListener('click', function () {
    console.log('The first' + i + 'A button was clicked');
  })
}


{
  btns[i].addEventListener('click', function () {
    console.log('The first' + i + 'A button was clicked');
  })
}


{
  btns[i].addEventListener('click', function () {
    console.log('The first' + i + 'A button was clicked');
  })
}

{
  btns[i].addEventListener('click', function () {
    console.log('The first' + i + 'A button was clicked');
  })
}
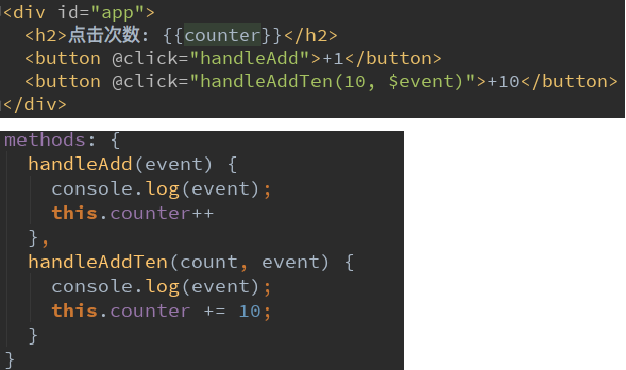
2. (understand) comparison of three schemes (ES5 has no closure - let with closure - ES6)
  <button>Button 1</button>
  <button>Button 2</button>
  <button>Button 3</button>

  <script>
    // 1. Problems caused by no block level scope: block level of for
    // Why closures solve the problem: a function is a scope
    var btns = document.getElementsByTagName('button');
    for (var i = 0; i < btns.length; i++) {
      btns[i].addEventListener('click', function () {
        console.log('The first' + i + 'A button was clicked');
      })
    }

    // Pseudo code:
    // 1. Case 1: closure is not used in ES5 (wrong way)
    i = 2
    { // The definitions inside and outside are the same
      // i = 0
      btns[i].addEventListener('click', function () {
        console.log('The first' + i + 'A button was clicked');
      })
    }

    {
      i = 1
      btns[i].addEventListener('click', function () {
        console.log('The first' + i + 'A button was clicked');
      })
    }

    {
      // i = 2
      btns[i].addEventListener('click', function () {
        console.log('The first' + i + 'A button was clicked');
      })
    }

    // 2. Case 2: closures are used in ES5
    var btns = document.getElementsByTagName('button');
    for (var i = 0; i < btns.length; i++) {
      (function (i) { // 0
        btns[i].addEventListener('click', function () {
          console.log('The first' + i + 'A button was clicked');
        })
      })(i)
    }

    i = 100000000

    function (i) { // i = 0
      btns[i].addEventListener('click', function () {
        console.log('The first' + i + 'A button was clicked');
      })
    }(0)

    function (i) { // i = 1
      btns[i].addEventListener('click', function () {
        console.log('The first' + i + 'A button was clicked');
      })
    }(1)

    function (i) { // i = 2
      btns[i].addEventListener('click', function () {
        console.log('The first' + i + 'A button was clicked');
      })
    }(2)

    // let in ES6
    const btns = document.getElementsByTagName('button')
    for (let i = 0; i < btns.length; i++) {
      btns[i].addEventListener('click', function () {
        console.log('The first' + i + 'A button was clicked');
      })
    }
    i = 10000000 {
      i = 0
      btns[i].addEventListener('click', function () {
        console.log('The first' + i + 'A button was clicked');
      })
    }

    {
      i = 1
      btns[i].addEventListener('click', function () {
        console.log('The first' + i + 'A button was clicked');
      })
    }

    {
      i = 2
      btns[i].addEventListener('click', function () {
        console.log('The first' + i + 'A button was clicked');
      })
    }
  </script>
3. Master the use and precautions of const
-
const keyword
- It already exists in many languages. For example, in C/C + +, the main function is to modify a variable into a constant
- The same is true in JavaScript. The identifier decorated with const is a constant and cannot be assigned again
-
When to use const
- When the modified identifier will not be assigned again, const can be used to ensure the security of data
-
Suggestion: give priority to const in ES6 development and use let only when an identifier needs to be changed
-
const's attention
-
const note 1
-
  ?const a=20;
   a=30;// Error: cannot be modified
-
-
const note 2
-
const name; // Error: const decorated identifier must be assigned
-
// 1. Note 1: once the identifier modified by const is assigned, it cannot be modified
// const name = 'why';
// name = 'abc';// 2. Note 2: when using const to define the identifier, it must be assigned
// const name;// 3. Note 3: constant means that the object pointed to cannot be modified, but the internal properties of the object can be changed
const obj = {
name: 'why',
age: 18,
height: 1.88
}
// obj = {}
console.log(obj);obj.name = 'kobe';
obj.age = 40;
obj.height = 1.87;console.log(obj);
-
4. Master the enhanced writing method of ES6 object literal quantity
const obj = new Object()

  const obj = {  // This {} is the literal of the object
    name: 'why',
    age: 18,
    run: function () {
      console.log('Running');
    },
    eat: function () {
      console.log('In the second thing');
    }
  }
-
1. Enhanced writing of attributes
const name = 'why';
const age = 18;
const height = 1.88
ES5 is written as follows:
// Writing method of ES5
  const obj = {
    name: name,
    age: age,
    height: height
  }
 console.log(obj);
ES6 is written as follows:
// Writing method of ES6
  const obj = {
    name,
    age,
    height,
  }

  console.log(obj);
- 2. Enhanced writing of functions
Writing method of ES5
 // Writing method of ES5
  const obj = {
    run: function () {

    },
    eat: function () {

    }
  }
Writing method of ES6
// ES6
  const obj = {
    run() {

    },
    eat() {

    }
  }
(7) (Master) event monitoring v-on
1. Event monitoring
- In front-end development, we often need to interact with.
- At this time, we must monitor the user's events, such as click, drag, keyboard events and so on
- How to listen for events in Vue? Using the v-on instruction
- v-on introduction
- Function: bind event listener
- Abbreviation:@
- Expected: Function | Inline Statement | Object
- Parameter: event
- Let's use v-on to learn.
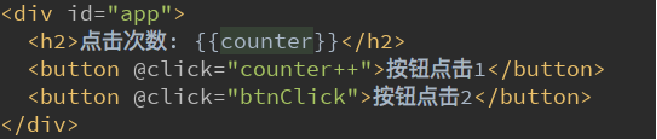
2.v-on Foundation
- Here, let's take a look at the use of v-on by using the click event of a monitor button
- In the following code, we use v-on:click="counter + +"
- In addition, we can point the event to a function defined in methods

- Note: v-on also has corresponding syntax:
- v-on:click can be written as @ click
code:
<!--
v-on introduce
Function: bind event listener
abbreviation:@
-->
<div id="app">
<h2>{{counter}}</h2>
<!--<h2 v-bind:title></h2>-->
<!--<h2 :title></h2>-->
<!--<button v-on:click="counter++">+</button>-->
<!--<button v-on:click="counter--">-</button>-->
<!--<button v-on:click="increment">+</button>-->
<!--<button v-on:click="decrement">-</button>-->
<button @click="increment">+</button>
<button @click="decrement">-</button>
</div>
<script src="../js/vue.js"></script>
<script>
const app = new Vue({
el: '#app',
data: {
counter: 0
},
methods: {
increment() {
this.counter++
},
decrement() {
this.counter--
}
}
})
</script>
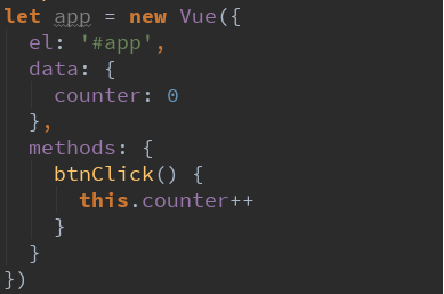
3.v-on parameters
- When defining methods in methods for calling @ click, you should pay attention to the following parameters:
- Case 1: if the method does not require additional parameters, the () after the method may not be added.
- But note: if there is a parameter in the method itself, the event parameter of the native event will be passed in by default
- Case 2: if you need to pass in a parameter and event at the same time, you can pass in an event through $event.
code:
<div id="app">
  <!--1.The method called by the event has no parameters ()Can not add-->
  <button @click="btn1Click()">Button 1</button>

  <button @click="btn1Click">Button 1</button>

  <!--2.When defining an event, Parentheses are omitted when writing methods,
    But the method itself requires a parameter, At this time, Vue The browser will be produced by default event The event object is passed into the method as a parameter-->
  <!--<button @click="btn2Click(123)">Button 2</button>-->

  <!--Call without passing in parameters,Then the parameter is undefined-->
  <!--<button @click="btn2Click()">Button 2</button>-->
  <button @click="btn2Click">Button 2</button>

  <!--3.Method definition, We need event object, At the same time, other parameters are required-->
  <!-- In call mode, How to get browser parameters manually event object: $event-->
  <button @click="btn3Click(abc, $event)">Button 3</button>
</div>

<script src="../js/vue.js"></script>
<script>
  const app = new Vue({
    el: '#app',
    data: {
      message: 'How do you do',
      abc: 123
    },
    methods: {
      btn1Click() {
        console.log("btn1Click");
      },
      btn2Click(event) {
        console.log('--------', event);
      },
      btn3Click(abc, event) {
        console.log('++++++++', abc, event);
      }
    }
  })

  // If the function requires parameters but is not passed in, the formal parameter of the function is undefined
  // function abc(name) {
  //   console.log(name);
  // }
  //
  // abc()
4.v-on modifier
- In some cases, the purpose of getting event may be to handle some events.
- Vue provides modifiers to help us handle some events conveniently:
- . stop - call event stopPropagation().
- . prevent - call event preventDefault().
- . {keyCode | keyAlias} - the callback is triggered only when the event is triggered from a specific key.
- . native - listens for native events of the component root element.
- . once - only one callback is triggered.

<div id="app">
  <!--1. .stop Use of modifiers to stop bubbling-->
  <div @click="divClick">
    aaaaaaa
    <button @click.stop="btnClick">Button</button>
  </div>

  <!--2. .prevent The use of modifiers prevents default behavior-->
  <br>
  <form action="baidu">
    <input type="submit" value="Submit" @click.prevent="submitClick">
  </form>

  <!--3. .Monitor the key cap of a keyboard-->
  <input type="text" @keyup.enter="keyUp">

  <!--4. .once The use of modifier and click callback will only trigger once-->
  <button @click.once="btn2Click">Button 2</button>
</div>

<script src="../js/vue.js"></script>
<script>
  const app = new Vue({
    el: '#app',
    data: {
      message: 'How do you do'
    },
    methods: {
      btnClick() {
        console.log("btnClick");
      },
      divClick() {
        console.log("divClick");
      },
      submitClick() {
        console.log('submitClick');
      },
      keyUp() {
        console.log('keyUp');
      },
      btn2Click() {
        console.log('btn2Click');
      }
    }
  })
</script>
(8) Conditional judgment v-if, v-else-if, v-else
1.v-if,v-else-if,v-else
- v-if,v-else-if,v-else
- These three instructions are similar to the conditional statements if, else and else if of JavaScript.
- Vue's conditional instructions can render or destroy elements or components in the DOM based on the value of the expression
- Simple case demonstration:

- Principle of v-if:
- When the condition after v-if is false, the corresponding element and its child elements will not be rendered.
- That is, there is no corresponding tag in the DOM at all.
code:
○ use of v-if
<div id="app">
  <h2 v-if="isShow">
    <div>abc</div>
    <div>abc</div>
    <div>abc</div>
    <div>abc</div>
    <div>abc</div>
    {{message}}
  </h2>
</div>

<script src="../js/vue.js"></script>
<script>
  const app = new Vue({
    el: '#app',
    data: {
      message: 'How do you do',
      isShow: true
    }
  })
</script>
○ use of v-if and v-else
<div id="app">
  <h2 v-if="isShow">
    <div>abc</div>
    <div>abc</div>
    <div>abc</div>
    <div>abc</div>
    <div>abc</div>
    {{message}}
  </h2>
  <h1 v-else>isShow by false Time, Show me</h1>
</div>

<script src="../js/vue.js"></script>
<script>
  const app = new Vue({
    el: '#app',
    data: {
      message: 'How do you do',
      isShow: true
    }
  })
</script>
○ use of v-if, v-else-if and v-else
<div id="app">
  <h2 v-if="score>=90">excellent</h2>
  <h2 v-else-if="score>=80">good</h2>
  <h2 v-else-if="score>=60">pass</h2>
  <h2 v-else>fail,</h2>

  <h1>{{result}}</h1>
</div>

<script src="../js/vue.js"></script>
<script>
  const app = new Vue({
    el: '#app',
    data: {
      score: 99
    },
    computed: {
      result() {
        let showMessage = '';
        if (this.score >= 90) {
          showMessage = 'excellent'
        } else if (this.score >= 80) {
          showMessage = 'good'
        }
        // ...
        return showMessage
      }
    }
  })
</script>
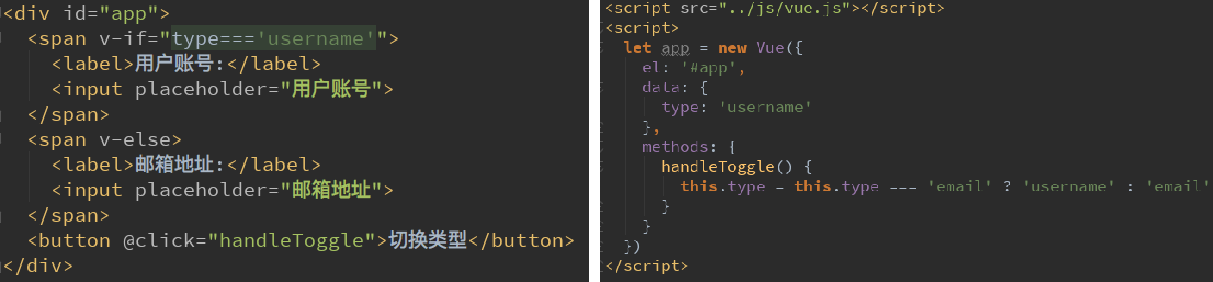
3. Conditional rendering case - login switching
- Let's take a simple case:
- When users log in again, they can switch between logging in with user account or email address.
- Similar to the following scenario:

code:
  <div id="app">
    <span v-if="isUser">
      <label for="username">User account</label>
      <input type="text" id="username" placeholder="User account">
    </span>

    <span v-else>
      <label for="email">User mailbox</label>
      <input type="text" id="email" placeholder="User mailbox">
    </span>
    <button @click="isUser = !isUser">Switching type</button>
  </div>

  <script src="../js/vue.js"></script>
  <script>
    const app = new Vue({
      el: '#app',
      data: {
        isUser: true
      }
    })
  </script>
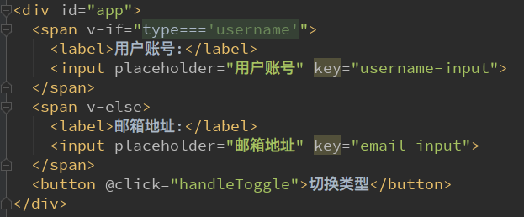
4. (understand) small problem of the case - reuse of login switching input
-
a minor question:
- If we switch the type when there is input content, we will find that the text still displays the previous input content.
- But in principle, we should switch to another input element.
- In another input element, we have no input.
- Why is this problem?
-
Problem solving
-
This is because when Vue performs DOM rendering, for performance reasons, it will reuse existing elements as much as possible instead of re creating new elements.
-
In the above case, Vue will find that the original input element is no longer used, but directly used as input in else
-
-
Solution
-
If we don't want Vue to have similar reuse problems, we can add a key to the corresponding input
-
And we need to make sure the key is different
-
code:
<div id="app">
  <span v-if="isUser">
    <label for="username">User account</label>
    <input type="text" id="username" placeholder="User account" key="username">
  </span>
  <span v-else>
    <label for="email">User mailbox</label>
    <input type="text" id="email" placeholder="User mailbox" key="email">
  </span>
  <button @click="isUser = !isUser">Switching type</button>
</div>

<script src="../js/vue.js"></script>
<script>
  const app = new Vue({
    el: '#app',
    data: {
      isUser: true
    }
  })
</script>
5. Master the use of v-show and the difference between v-show and v-if
- The usage of v-show is very similar to that of v-if. It is also used to determine whether an element is rendered:
- Comparison between v-if and v-show
- Both v-if and v-show can decide whether an element is rendered or not, so how do we choose in development?
- v-if when the condition is false, there will be no corresponding element in the DOM at all.
- v-show when the condition is false, it just sets the display attribute of the element to none.
- How to choose in development?
- When you need to switch between display and hide frequently, use v-show
- When there is only one switch, by using v-if
code:
<div id="app">
  <!--v-if: When the condition is false Time, contain v-if Element of instruction, It won't exist at all dom in-->
  <h2 v-if="isShow" id="aaa">{{message}}</h2>

  <!--v-show: When the condition is false Time, v-show Just add an inline style to our element: display: none-->
  <h2 v-show="isShow" id="bbb">{{message}}</h2>
</div>
<!--
  Use when you need to slice between show and hide frequently v-show
 When there is only one switch, by using v-if

 -->

<script src="../js/vue.js"></script>
<script>
  const app = new Vue({
    el: '#app',
    data: {
      message: 'How do you do',
      isShow: true
    }
  })
</script>
(9) Loop traversal v-for
1. (Master) v-for traversal array
- When we have a set of data to render, we can use v-for to complete it.
- The syntax of v-for is similar to the for loop in JavaScript.
- The format is as follows: item in items.
- Let's take a simple case:
- If you do not need to use index values during traversal
- v-for="movie in movies"
- Take out movies from movies in turn, and in the content of the element, we can use Mustache syntax to use movies
- What if in the process of traversal, we need to get the index value of the element in the array?
- Syntax format: v-for=(item, index) in items
- The index represents the index value of the extracted item in the original array.

code:
<div id="app">
  <!--1.In the process of traversal,Index value not used(Subscript value)-->
  <ul>
    <li v-for="item in names">{{item}}</li>
  </ul>

  <!--2.In the process of traversal, Get index value-->
  <ul>
    <li v-for="(item, index) in names">
      {{index+1}}.{{item}}
    </li>
  </ul>
</div>

<script src="../js/vue.js"></script>
<script>
  const app = new Vue({
    el: '#app',
    data: {
      names: ['why', 'kobe', 'james', 'curry']
    }
  })
</script>
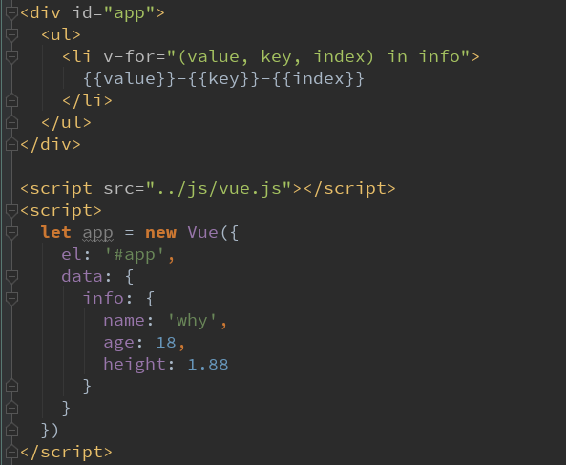
2. (Master) v-for traversal object
- v-for allows users to traverse objects:
- For example, your personal information is stored in an object, which we want to display in the form of a list.
code:
<div id="app">
  <!--1.In the process of traversing the object, If you just get a value, So what you get is value-->
  <ul>
    <li v-for="item in info">{{item}}</li>
  </ul>


  <!--2.obtain key and value format: (value, key) -->
  <ul>
    <li v-for="(value, key) in info">{{value}}-{{key}}</li>
  </ul>


  <!--3.obtain key and value and index format: (value, key, index) -->
  <ul>
    <li v-for="(value, key, index) in info">{{value}}-{{key}}-{{index}}</li>
  </ul>
</div>

<script src="../js/vue.js"></script>
<script>
  const app = new Vue({
    el: '#app',
    data: {
      info: {
        name: 'why',
        age: 18,
        height: 1.88
      }
    }
  })
</script>
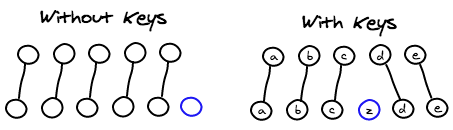
3. (understand) the key attribute of the component – the difference between v-for binding keys and unbound keys
- It is officially recommended that we add a key attribute to the corresponding element or component when using v-for.
- Why do you need this key attribute?
- This is actually related to the Diff algorithm of Vue's virtual DOM.
- Here we use a diagram in React's diff algorithm to briefly explain:
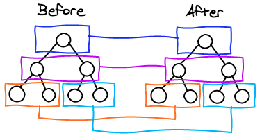
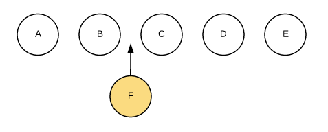
- When there are many same nodes in a layer, that is, list nodes, we want to insert a new node
- We hope to add an F between B and C. the default execution of Diff algorithm is like this.
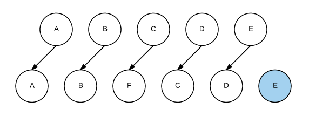
- Is it inefficient to update C to F, D to C, E to D, and finally insert E?
- Therefore, we need to use key to make a unique identification for each node
- Diff algorithm can correctly identify this node
- Find the correct location area and insert a new node.
- In a word, the function of key is mainly to update the virtual DOM efficiently.
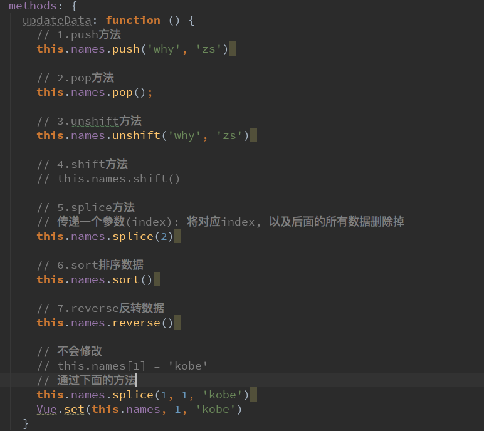
4. (Master) which methods in the array are responsive?
- Because Vue is responsive, when data changes, Vue will automatically detect data changes and the view will be updated accordingly.
- Vue contains a set of methods to observe the compilation of arrays. Using them to change the array will also trigger the update of the view.
- push()
- pop()
- shift()
- unshift()
- splice()
- sort()
- reverse()
code:
  <div id="app">
    <ul>
      <li v-for="item in letters">{{item}}</li>
    </ul>
    <button @click="btnClick">Button</button>
  </div>

  <script src="../js/vue.js"></script>
  <script>
    const app = new Vue({
      el: '#app',
      data: {
        letters: ['a', 'b', 'c', 'd']
      },
      methods: {
        btnClick() {
          // 1.push method
          // this.letters.push('aaa')
          // this.letters.push('aaaa', 'bbbb', 'cccc')

          // 2.pop(): delete the last element in the array
          // this.letters.pop();

          // 3.shift(): deletes the first element in the array
          // this.letters.shift();

          // 4.unshift(): adds an element to the front of the array
          // this.letters.unshift()
          // this.letters.unshift('aaa', 'bbb', 'ccc')

          // 5.splice function: delete elements / insert elements / replace elements
          // Delete element: the second parameter is passed in. How many elements do you want to delete (if not, delete all the following elements)
          // Replace element: the second parameter indicates how many elements we want to replace. The latter is used to replace the previous elements
          // Insert element: the second parameter, passed in 0, followed by the element to be inserted
          // splice(start)
          // splice(start):
          this.letters.splice(1, 3, 'm', 'n', 'l', 'x')
          // this.letters.splice(1, 0, 'x', 'y', 'z')

          // 5. Sort
          // this.letters.sort()

          // 6. Reverse
          // this.letters.reverse()

          // **Note: modify the elements in the array through the index value
          // Vue does not listen internally. This method is not responsive. The array changes and the interface is not updated
          // this.letters[0] = 'bbbbbb';

          // In other ways
          // Method 1
          // this.letters.splice(0, 1, 'bbbbbb')

          // Method 2
          // Set (object to be modified, index value, modified value)
          // Vue.set(this.letters, 0, 'bbbbbb')
        }
      }
    })


    // function sum(num1, num2) {
    //   return num1 + num2
    // }
    //

    // function sum(num1, num2, num3) {
    //   return num1 + num2 + num3
    // }

    // function sum(...num) {/ / variable parameters
    //   console.log(num);
    // }
    //
    // sum(20, 30, 40, 50, 601, 111, 122, 33)
  </script>
5. (mastery) stage case - book shopping cart
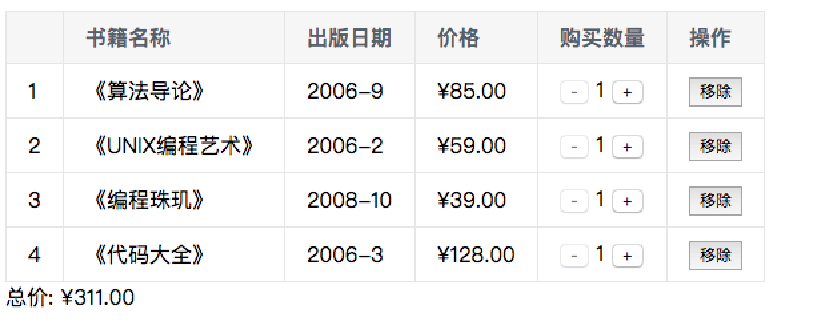
- Code implementation: HTML, CSS
- Code implementation: JS code
- a key:
- Price reserved two decimal places ---- Vu
- Click the quantity button to change the corresponding quantity - distinguish with index
- The minimum number can only be reduced to 1 - dynamically bind the disabled attribute
Supplement:
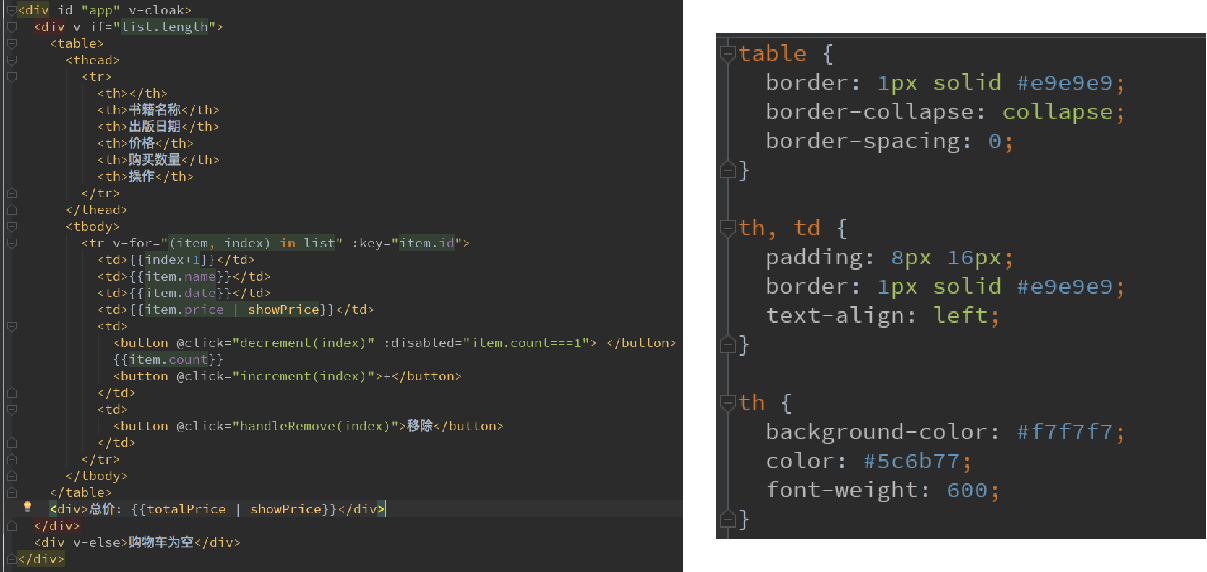
HTML code:
  <div id="app">
    <div v-if="books.length">
      <table>
        <thead>
          <tr>
            <th></th>
            <th>Book name</th>
            <th>Publication date</th>
            <th>Price</th>
            <th>Purchase quantity</th>
            <th>operation</th>
          </tr>
        </thead>
        <tbody>
          <tr v-for="(item, index) in books">
            <td>{{item.id}}</td>
            <td>{{item.name}}</td>
            <td>{{item.date}}</td>

            <td>
              <!-- The price shall be spliced with two decimal places ¥ -->
              <!-- The total price of method 1 also needs this, so it's not very good to write this -->
              <!-- {{item.price.toFixed(2)}} -->

              <!-- Method 2 calling method -->
              <!-- {{getFinalPrice(item.price)}} -->

              <!-- Method 3 filter -->
              {{item.price | showPrice}}

            </td>
            <td>
              <!-- v-bind Dynamic binding property if true It means that there is this attribute v-bind:disabled="true" The rendering is disabled So all you need here is a Boolean value -->
              <button @click="decrement(index)" v-bind:disabled="item.count <= 1">-</button>
              {{item.count}}
              <button @click="increment(index)">+</button>
            </td>
            <td><button @click="removeHandle(index)">remove</button></td>
          </tr>
        </tbody>
      </table>
      <h2>Total price: {{totalPrice | showPrice}}</h2>
    </div>
    <h2 v-else>Shopping cart is empty</h2>

  </div>

  <script src="../js/vue.js"></script>
  <script src="main.js"></script>
CSS code:
table {
  border: 1px solid #e9e9e9;
  border-collapse: collapse;
  border-spacing: 0;
}

th, td {
  padding: 8px 16px;
  border: 1px solid #e9e9e9;
  text-align: left;
}

th {
  background-color: #f7f7f7;
  color: #5c6b77;
  font-weight: 600;
}
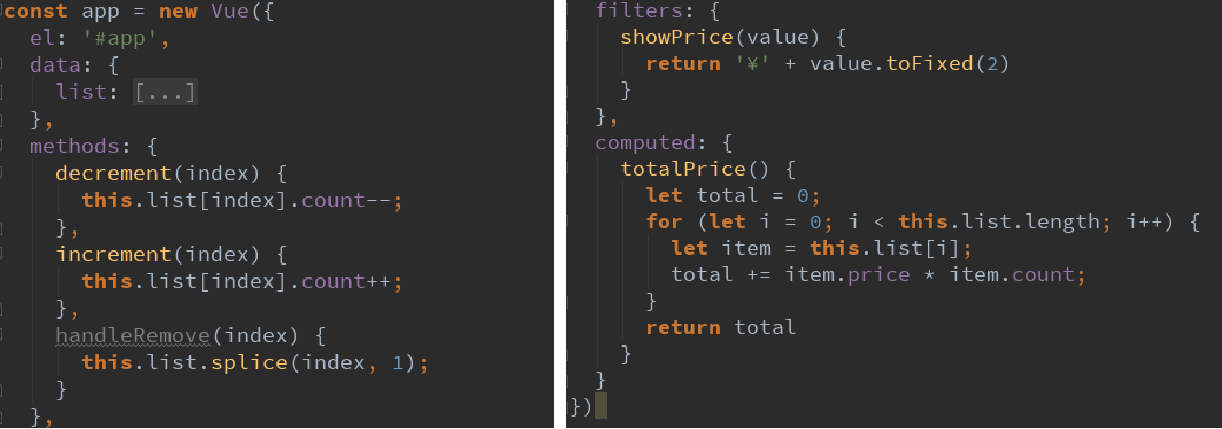
JS code:
const app = new Vue({
  el: '#app',
  data: {
    books: [
      {
        id: 1,
        name: '<Introduction to Algorithms',
        date: '2006-9',
        price: 85.00,
        count: 1
      },
      {
        id: 2,
        name: '<UNIX Programming art',
        date: '2006-2',
        price: 59.00,
        count: 1
      },
      {
        id: 3,
        name: '<Programming Pearl',
        date: '2008-10',
        price: 39.00,
        count: 1
      },
      {
        id: 4,
        name: '<Complete code',
        date: '2006-3',
        price: 128.00,
        count: 1
      },
    ]
  },
  methods: {
    // getFinalPrice(price) {
    //   return '¥' + price.toFixed(2)
    // }

    increment(index) {
      this.books[index].count++
    },
    decrement(index) {
      this.books[index].count--
    },
    removeHandle(index) {
      this.books.splice(index, 1)
    }
  },
  computed: {
    totalPrice() {
      let totalPrice = 0
      for (let i = 0; i < this.books.length; i++) {
        totalPrice += this.books[i].price * this.books[i].count
      }
      return totalPrice

      // Other methods for calculating the total price
      // for (let i in/of this.books)
      // reduce
    }
  },
  filters: { // filter
    showPrice(price) { // Parameters are what you want to filter
      // toFixed keeps two decimal places
      return '¥' + price.toFixed(2)
    }
  }
})
Other methods for calculating the total price:
  computed: {
    totalPrice() {
      // 1. Ordinary for loop
      // let totalPrice = 0
      // for (let i = 0; i < this.books.length; i++) {
      //   totalPrice += this.books[i].price * this.books[i].count
      // }
      // return totalPrice

      // 2.for (let i in this.books)
      // let totalPrice = 0
      // for (let i in this.books) {
      //   const book = this.books[i]
      //   totalPrice += book.price * book.count
      // }
      //
      // return totalPrice

      // 3.for (let i of this.books)
      // let totalPrice = 0
      // for (let item of this.books) {
      //   totalPrice += item.price * item.count
      // }
      // return totalPrice

      return this.books.reduce(function (preValue, book) {
        return preValue + book.price * book.count
      }, 0)
    }
  },
You can also use the higher-order function reduce, which is described below
6. (Master) the use of JavaScript high-order functions
-
filter/map/reduce
//Programming paradigm: imperative programming / declarative programming
//Programming paradigm: citizen (object-oriented) / programming paradigm: citizen (function first)// filter/map/reduce
//The callback function in filter has a requirement: it must return a boolean value
//True: when true is returned, the n of this callback will be automatically added to the new array inside the function
//False: when false is returned, the internal function will filter out this n
const nums = [10, 20, 111, 222, 444, 40, 50]//The parameter of higher-order function itself is also a function
// let total = nums.filter(n => n < 100).map(n => n * 2).reduce((pre, n) => pre + n);
// console.log(total);let total = nums.filter(function (n) {
return n < 100
}).map(function (n) {
return n * 2
}).reduce(function (prevValue, n) {
return prevValue + n
}, 0)
console.log(total);// 1. Use of filter function
// 10, 20, 40, 50
let newNums = nums.filter(function (n) {
return n < 100
})
// console.log(newNums);// 2. Use of map function
// 20, 40, 80, 100
let new2Nums = newNums.map(function (n) { // 20
return n * 2
})
console.log(new2Nums);// 3. Use of reduce function
//The reduce function is to summarize all the contents in the array
let total = new2Nums.reduce(function (preValue, n) {
return preValue + n
}, 0)
console.log(total);//First time: preValue 0 n 20
//Second time: preValue 20 n 40
//Second time: preValue 60 n 80
//Second time: preValue 140 n 100
// 240//Common writing
// 1. Demand: take out all numbers less than 100
let newNums = []
for (let n of nums) {
if (n < 100) {
newNums.push(n)
}
}// 2. Requirement: convert all numbers less than 100: all * 2
let new2Nums = []
for (let n of newNums) {
new2Nums.push(n * 2)
}console.log(new2Nums);
// 3. Requirement: add all new2Nums numbers to get the final demerit
let total = 0
for (let n of new2Nums) {
total += n
}console.log(total);
(10) (Master) form binding v-model
1. Form binding v-model
- Form controls are very common in practical development. Especially for the submission of user information, a large number of forms are required.
- Vue uses the v-model instruction to realize the two-way binding of form elements and data.
- Case analysis:
- When we enter something in the input box
- Because the v-model in the input is bound with message, the input content will be delivered to message in real time, and the message will change.
- When the message changes, because we use the Mustache syntax above to insert the value of the message into the DOM, the DOM will respond to the change.
- Therefore, two-way binding is realized through v-model.
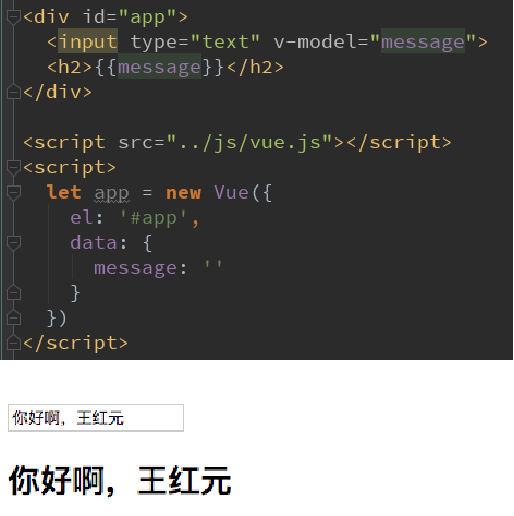
- Of course, we can also use v-model for textarea elements

<div id="app">
  <input type="text" v-model="message">
  {{message}}
</div>

<script src="../js/vue.js"></script>
<script>
  const app = new Vue({
    el: '#app',
    data: {
      message: 'How do you do'
    }
  })
</script>
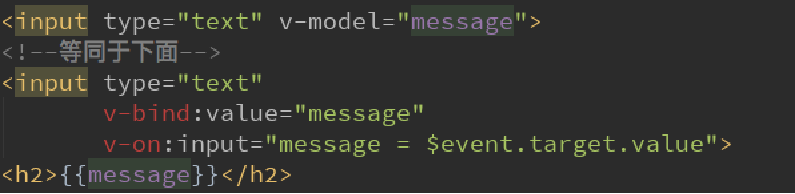
2.v-model principle
-
v-model is actually a syntax sugar, which essentially contains two operations:
- 1.v-bind binds a value attribute
- 2. The v-on instruction binds the input event to the current element
-
In other words, the following code:
-
Equivalent to the following code:
  <div id="app">
    <!--<input type="text" v-model="message">-->

    <!-- The above is equivalent to -->
    <!--<input type="text" :value="message" @input="valueChange">-->

    <!-- that is -->
    <input type="text" :value="message" @input="message = $event.target.value">
    <h2>{{message}}</h2>
  </div>

  <script src="../js/vue.js"></script>
  <script>
    const app = new Vue({
      el: '#app',
      data: {
        message: 'How do you do'
      },
      methods: {
        valueChange(event) {
          this.message = event.target.value;
        }
      }
    })
  </script>
3.v-model is used in combination with radio type
- When there are multiple radio boxes
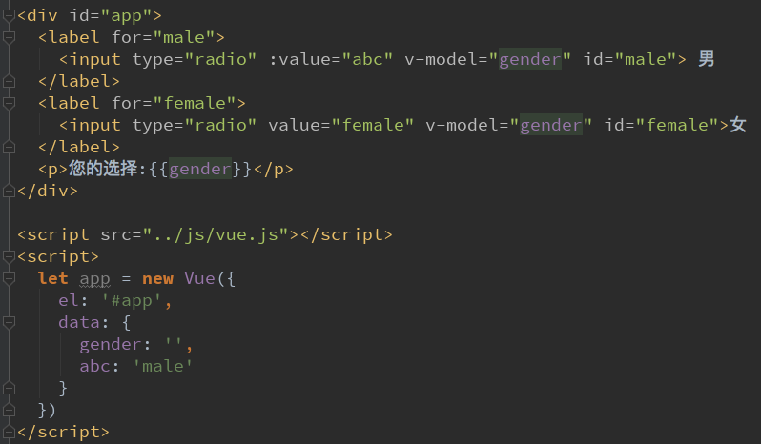
-
The value of the radio button will affect the value of the v-model (the input must have the value attribute, and the value is what you get)
male female otherThe gender you selected is: {{sex}}
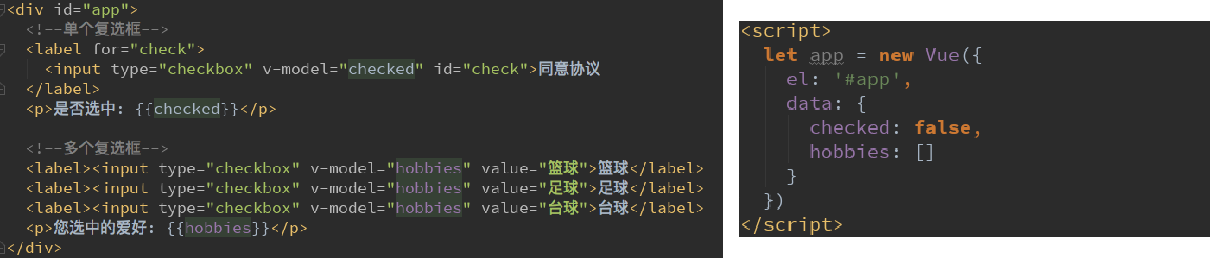
4.v-model is used in combination with checkbox type
- There are two kinds of check boxes: single check box and multiple check boxes
- Single check box:
- v-model is a Boolean value.
- At this time, the value of input does not affect the value of v-model.
- Multiple check boxes:
- When there are multiple check boxes, because multiple can be selected, the attribute in the corresponding data is an array.
- When one is selected, the value of input will be added to the array.
code:
  <div id="app">
    <!--1.checkbox Radio  -->
    <!--
      v-model Boolean value true/false.
      here input of value Does not affect v-model Value of
 -->
    <label for="agree">
      <input type="checkbox" id="agree" v-model="isAgree">Consent agreement
    </label>
    <h2>You have chosen: {{isAgree}}</h2>
    <button :disabled="!isAgree">next step</button>

    <!--2.checkbox Checkbox -->
    <!--
      When there are multiple check boxes, because multiple check boxes can be selected, the corresponding data The property in is an array.
      When one is elected, it will input of value Add to array.
   -->
    <input type="checkbox" value="Basketball" v-model="hobbies">Basketball
    <input type="checkbox" value="Football" v-model="hobbies">Football
    <input type="checkbox" value="Table Tennis" v-model="hobbies">Table Tennis
    <input type="checkbox" value="badminton" v-model="hobbies">badminton
    <h2>What are your hobbies: {{hobbies}}</h2>

     <!-- Dynamic value binding value assignment -->
    <label v-for="item in originHobbies" :for="item">
      <input type="checkbox" :value="item" :id="item" v-model="hobbies">{{item}}
    </label>
  </div>

  <script src="../js/vue.js"></script>
  <script>
    const app = new Vue({
      el: '#app',
      data: {
        message: 'How do you do',
        isAgree: false, // Radio

        hobbies: [], // Multiple selection boxes,
        originHobbies: ['Basketball', 'Football', 'Table Tennis', 'badminton', 'Billiards', 'Golf']
      }
    })
  </script>
5.v-model is used in combination with select type
- Like checkbox, select can be divided into single selection and multiple selection.
- Single choice: only one value can be selected.
- v-model is bound with a value.
- When we select one of the option s, we will assign its corresponding value to mySelect
- Multiple selection: multiple values can be selected.
- v-model is bound to an array.
- When multiple values are selected, the value corresponding to the selected option will be added to the array mySelects

code:
  <div id="app">
    <!--1.Select one-->
    <!--
    Single choice: only one value can be selected.
    v-model Bound is a value.
    When we choose option When one of them is selected, its corresponding value Assign to mySelect in

   -->
    <!-- v-model Bind in select label -->
    <select name="abc" v-model="fruit">
      <option value="Apple">Apple</option>
      <option value="Banana">Banana</option>
      <option value="Durian">Durian</option>
      <option value="Grape">Grape</option>
    </select>
    <h2>What fruit do you choose: {{fruit}}</h2>

    <!--2.Select multiple-->
    <!--
    v-model Bound is an array.
    When multiple values are selected, the selected option Corresponding value Add to array mySelects in

   -->
    <!-- add multiple You can select multiple attributes by ctrl You can choose more than one -->
    <select name="abc" v-model="fruits" multiple>
      <option value="Apple">Apple</option>
      <option value="Banana">Banana</option>
      <option value="Durian">Durian</option>
      <option value="Grape">Grape</option>
    </select>
    <h2>What fruit do you choose: {{fruits}}</h2>
  </div>

  <script src="../js/vue.js"></script>
  <script>
    const app = new Vue({
      el: '#app',
      data: {
        message: 'How do you do',
        fruit: 'Banana',
        fruits: []
      }
    })
  </script>
6. Value binding in input
- When I first saw the Vue official value binding, I was very confused: what the hell is that?
- However, after careful reading, it is found that it is very simple to dynamically assign value:
- We can look back at the values in the previous value, which are given directly when defining input.
- However, in real development, the values of these input s may be obtained from the network or defined in data.
- Therefore, we can dynamically bind value to value through v-bind:value.
- Isn't this v-bind?
- Isn't this the application of v-bind in input? I watched it for a long time and couldn't figure out what he wanted.
- The corresponding code will not be given here, because if you can use v-bind, you will use value bound applications.
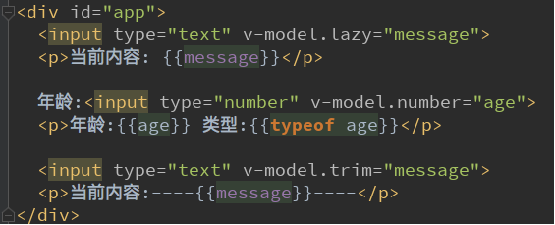
7. Use of V-model modifier
- lazy modifier:
- By default, v-model synchronizes the data of the input box in the input event by default.
- In other words, once the data changes, the data in the corresponding data will change automatically.
- The lazy modifier allows the data to be updated only when it loses focus or returns
- number modifier:
- By default, whether we enter letters or numbers in the input box, it will be treated as a string type.
- However, if we want to deal with digital types, it is better to deal with the content directly as digital.
- The number modifier can automatically convert the content entered in the input box to a number type
- trim modifier:
- If there are many spaces at the beginning and end of the input, we usually want to remove them
- The trim modifier can filter the space on the left and right sides of the content
code:
<div id="app">
  <!--1.Modifier : lazy Let the data be updated only when it loses focus or enters-->
  <input type="text" v-model.lazy="message">
  <h2>{{message}}</h2>


  <!--2.Modifier : number Let the content entered in the input box be automatically converted to digital type-->
  <input type="number" v-model.number="age">
  <h2>{{age}}-{{typeof age}}</h2>

  <!--3.Modifier : trim Filter the left and right spaces of the content-->
  <input type="text" v-model.trim="name">
  <h2>The name you entered:{{name}}</h2>
</div>

<script src="../js/vue.js"></script>
<script>
  const app = new Vue({
    el: '#app',
    data: {
      message: 'How do you do',
      age: 0,
      name: ''
    }
  })

  var age = 0
  age = '1111'
  age = '222'
</script>
Video corresponding directory