Ultra simple starter example for Vue based on vue-cli, elementUI
March 03, 2018 23:14:16 The sea monster in the bottle Read 26911 More
Category Column: Vue
Copyright Statement: This is an original blogger article that follows CC 4.0 BY-SA Copyright Agreement, reproduced with a link to the original source and this statement.
Links to this article: https://blog.csdn.net/csdnear/article/details/79426915
- This example is relatively simple. When you finish it independently, you will probably know what vue is for. You can write a small example of todoList.
- Before you start writing examples, give a brief introduction to the deployment of the environment, which is actually similar to the official Vue.
#If vue-cli has not been installed, install vue-cli globally first
$ cnpm i -g vue-cli
#Create a new project based on the webpack template in your favorite directory
$ vue init webpack my-project
#
#
#The following questions will follow
? Project name (my-project) #Enter
? Project description  #Enter or write a point item description
? Author #Enter the car or enter the author
? Vue build standalone #Enter
? Install vue-router? (Y/n) #Here's the official route, yes
? Use ESLint to lint your code? #No
? Set up unit tests #No
? Setup e2e tests with Nightwatch? #No
? Should we run `npm install` for you after the project has been created? (recommended)
> Yes, use NPM #You can select by pressing the up and down arrow keys. Here I select the first NPM and press Enter to confirm
  Yes, use Yarn
  No, I will handle that myself
#Waiting for completion
- 1
- 2
- 3
- 4
- 5
- 6
- 7
- 8
- 9
- 10
- 11
- 12
- 13
- 14
- 15
- 16
- 17
- 18
- 19
- 20
There may be a warning when it's finished. It's OK, not ERR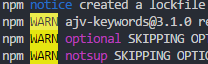
$ cd my-project #Enter the newly created folder
$ cnpm install  #Here is the NPM image of Taobao, I don't know I can search cnpm by myself
$ npm run dev
###I  Your application is running here: http://localhost:8080
- 1
- 2
- 3
- 4
** Make sure the port is not occupied, open it localhost:8080 see see **
Open our project as follows: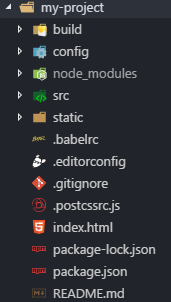
| Name | Explain |
|---|---|
| build | Some code for project building |
| config | Configuration of development environment |
| node_modules | Some dependent packages |
| src | Source code, we write code in this folder |
| static | Static File |
| .babelrc | Some configurations compiled by ES6 |
| .editorconfig | Code style profile |
| .gitignore | Some files ignored when git is uploaded, such as the article node_modules |
| .postcssrc.js | Hear about converting CSS styles |
| index.html | Entry Page |
| package-lock.json | I heard it's a more detailed package.json |
| package.json | Project information, project name, development dependent records, etc., a JSON file |
Now open src\componnets\HelloWorld.vue and delete most of the code, leaving as follows:
<template>
    <h1>{{ msg }}</h1>
</template>
<script>
export default { //ES6 syntax, used for output to the outside so import input can be used inside other files
  name: 'HelloWorld',
  data () {    //Since it is a component, data must be a function, which is written in ES6, followed by parentheses equivalent to data: function () {}
    return {   //Remember to return or you won't receive data
      msg: 'Welcome' //The msg above is the output here
    }
  }
}
</script>
<style>
h1 {
  font-weight: normal;
}
a {
  color: #42b983;
}
</style>
- 1
- 2
- 3
- 4
- 5
- 6
- 7
- 8
- 9
- 10
- 11
- 12
- 13
- 14
- 15
- 16
- 17
- 18
- 19
- 20
- 21
You have used some ES6 syntax here. If you are not familiar with export and import, it is recommended that you take a look at the introduction. You can also tap the code if you do not want to.But it's a good idea to look at export and import in just 10 minutes-- Introduction to Ruan Yifeng ECMAScript 6
- As you can see, the previously opened page has changed:

#####Now let's install element-ui (search for element-ui details yourself)
- Installation can be done using the NPM I element-ui-S command in an official manner
- You can also add it in package.json and install it via cnpm install
Here we choose 2, open package.json, find devDependencies, and add "element-ui" at the end: "^2.2.1"
"devDependencies": {
...
...
"element-ui": "^2.2.1"
- 1
- 2
- 3
- 4
Open the command line to stop the service, install it through cnpm install, and start npm run dev after the installation is complete
Open main.js to add three lines inside
import ElementUI from 'element-ui' //New Add
import 'element-ui/lib/theme-chalk/index.css' //New additions to avoid different post-packaging styles, before import App from'. /App';
import Vue from 'vue'
import App from './App'
import router from './router'


Vue.use(ElementUI)   //New Add
Vue.config.productionTip = false

/* eslint-disable no-new */
new Vue({
  el: '#app',
  router,
  components: { App },
  template: '<App/>'
})
- 1
- 2
- 3
- 4
- 5
- 6
- 7
- 8
- 9
- 10
- 11
- 12
- 13
- 14
- 15
- 16
- 17
- 18
With these three lines added, we can use element-ui
Next, create a new NewContact.vue file in the components folder, adding the following code
<template>
  <el-row>
    <el-button type="success">1</el-button>
  </el-row>
</template>
<script>

</script>
<style>

</style>
- 1
- 2
- 3
- 4
- 5
- 6
- 7
- 8
- 9
- 10
- 11
- 12
Open the previous HelloWorld.vue to modify the content (router is the official routing plug-in, router-link to is the syntax of router):
<template>
<!-- Here router-link to="newcontact"Will navigate the route to http://localhost:8080/#/newcontact   -->
    <router-link to="newcontact"><h1>{{ msg }}</h1></router-link>
</template>
- 1
- 2
- 3
- 4
Open router/index.js and add a new route (router is the official routing plug-in, learn more please View Documents)
import Vue from 'vue'
import Router from 'vue-router'
import HelloWorld from '@/components/HelloWorld'
import NewContact from '@/components/NewContact'//Add new before the following component: NewContact takes effect
Vue.use(Router)
export default new Router({
  routes: [
    {
      path: '/',
      name: 'HelloWorld',
      component: HelloWorld
    },
    {
      path: '/newcontact',//Corresponding to router-link to navigate to/newcontact
      name: 'NewContact',
      component: NewContact
    }
  ]
})
- 1
- 2
- 3
- 4
- 5
- 6
- 7
- 8
- 9
- 10
- 11
- 12
- 13
- 14
- 15
- 16
- 17
- 18
- 19
When you open the page after saving, you can see the following:
The previous welcome became a clickable link, click and jump to the following page

So far, we have completed the introduction of dependencies, simple configuration of routing, and use of simple components
Next, we'll focus on NewContact.vue, which is almost the same component as the rest of the code
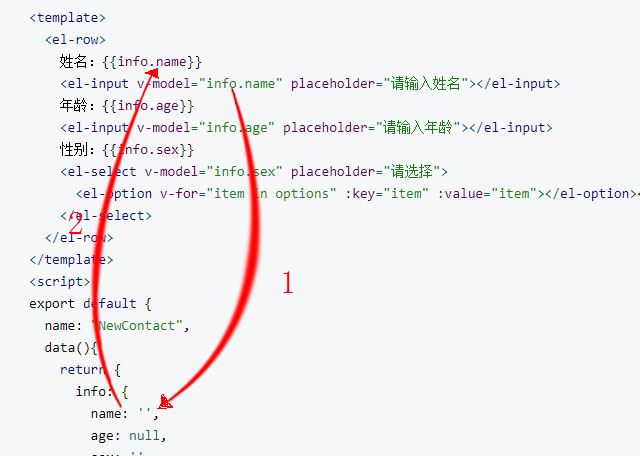
Open NewContact.vue and type the following code:
<template>
  <el-row>
    //Name: {{info.name}}
    <el-input v-model="info.name" placeholder="Please enter your name"></el-input>
    //Age: {{info.age}}
    <el-input v-model="info.age" placeholder="Please enter your age"></el-input>
    //Gender: {{info.sex}}
    <el-select v-model="info.sex" placeholder="Please select">
      <el-option v-for="item in options" :key="item" :value="item"></el-option><!-- There key Official Recommendation at v-for When used, otherwise warning will be given, but use will not be affected -->
    </el-select>
  </el-row>
</template>
<script>
export default {
  name: "NewContact",
  data(){
    return {
      info: {
        name: '',
        age: null,
        sex: ''
      },
      options: [
        'female','male','secrecy'
      ]
    }
  }
}
</script>
<style>

</style>
- 1
- 2
- 3
- 4
- 5
- 6
- 7
- 8
- 9
- 10
- 11
- 12
- 13
- 14
- 15
- 16
- 17
- 18
- 19
- 20
- 21
- 22
- 23
- 24
- 25
- 26
- 27
- 28
- 29
- 30
- 31
- 32
<el-input v-model="info.name"></el-input>
el-input is a component of element-ui, which starts with el-
v-model Here, v-model is the Vue's directive, which is officially called creating a two-way binding on a form control or component.
= "info.name" is the data bound by v-model, info.name corresponds to''in the return ed content of the data; info.age corresponds to null
return {
      info: {
        name: '',
        age: null,
        sex: ''
      }
- 1
- 2
- 3
- 4
- 5
- 6
When we open http://localhost:8080/#/newcontact
As you type in the input box, the name: {{info.name}} The contents in the double curly brackets also change, which is the two-way binding.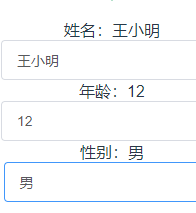
<el-option v-for="item in options" :key="item" :value="item">
v-for="item in options" is the content of this array of circular options
options: [
        'female','male','secrecy'
      ]
- 1
- 2
- 3
If you add content to it, the contents of the drop-down menus change together, one-to-one
: value="item" will pass your choice ('female','male','secret') to <el-select v-model='info.sex')>
v-model="info.sex" is passed to info.sex in the data
return {
      info: {
        name: '',
        age: null,
        sex: ''
      }
- 1
- 2
- 3
- 4
- 5
- 6
Next, add the new code, and NewContact.vue now has the following code:
.....
    </el-select>
    <el-button @click="create">Establish</el-button>
    <template>
      <el-table :data="tabledata" align="left">
        <el-table-column prop="name" label="Full name"></el-table-column>
        <el-table-column prop="age" label="Age"></el-table-column>
        <el-table-column prop="sex" label="Gender"></el-table-column>
        <el-table-column label="operation">
          <template slot-scope="a">
            <el-button size="mini" type="danger" @click="del(a.$index)">delete</el-button>
          </template>
        </el-table-column>
      </el-table>
    </template>
  </el-row>
</template>
<script>
export default {
  name: "NewContact",
  data(){
    return {
      info: {
        name: '',
        age: null,
        sex: ''
      },
      options: [
        'female','male','secrecy'
      ],
      tabledata:[
        {name: 'Leo', age: 12, sex: 'man'},
        {name: 'Lei', age: 22, sex: 'women'},
        {name: 'Lii', age: 65, sex: 'men'}
      ]
    }
  }
}
</script>
<style>

</style>
- 1
- 2
- 3
- 4
- 5
- 6
- 7
- 8
- 9
- 10
- 11
- 12
- 13
- 14
- 15
- 16
- 17
- 18
- 19
- 20
- 21
- 22
- 23
- 24
- 25
- 26
- 27
- 28
- 29
- 30
- 31
- 32
- 33
- 34
- 35
- 36
- 37
- 38
- 39
- 40
- 41
- 42
- 43
<el-button @click="create" type="success">create</el-button>
Here you create a button, @is the abbreviation of v-on, clicking will start the create function
<el-table :data="tabledata">
Is the data the table is bound to
<el-table-column prop="name">
prop is used for data transfer when tabular data is bound, name in tabeldata
<template slot-scope="a">
It's the scope slot after Vue2.5.0 instead of the previous scope slot, "a" is a casual name, just use the status of the table to go after, get row, column, $index and store, here we just need to get index, related details Click here
@click="del(a.$index)
@is an abbreviation for v-on, which means the del function is called after clicking, and a.$index indicates the index value obtained by slot-scope
tabledata:[//Here's what makes it easy to see how tables change, so you can see that tables on the page have the following content
        {name: 'Leo', age: 12, sex: 'man'},
        {name: 'Lei', age: 22, sex: 'women'},
        {name: 'Lii', age: 65, sex: 'men'}
      ]
- 1
- 2
- 3
- 4
- 5
Open the page to see
We didn't respond to clicking the Create and Delete buttons, so we're going to add methods, adding two methods inside, one to create and one to delete
data(){
...
},
  methods: {//Add after data(){...}
    create(){
      this.tabledata.push(this.info)//Add an object to tabledata (info we created earlier)
      this.info =  {name: '', age: null, sex: ''}//After clicking Create, let option restore instead of staying on the selected item
    },
    del(index){
      this.tabledata.splice(index,1)//Delete the clicked object, index is passed in from lot-scope="a". $index
    }
  }
- 1
- 2
- 3
- 4
- 5
- 6
- 7
- 8
- 9
- 10
- 11
- 12
Now that we've finished adding and deleting, we can use the localStorage to store the data locally in order to keep it after we refresh the page
About localStorage you can Click here to learn
Next, we create a new store folder in src, at the same level as App.vue and components, with a new store.js inside, as follows
const STORAGE_KEY = 'tabale-vuejs'//Any name you want
export default {//Output yearning for component reception
	fetch() {//The method we defined to get data
		return JSON.parse(window.localStorage.getItem(STORAGE_KEY)
		 || '[]')
	},
	save(items) {//The method we defined to save the data
		window.localStorage.setItem(STORAGE_KEY, JSON.stringify(items))
	}
}
- 1
- 2
- 3
- 4
- 5
- 6
- 7
- 8
- 9
- 10
getItem and setItem are ways to get and save data for window.localStorage
We use JSON.stringify and JSON.parse to convert the data into strings and parses so that we can write tabledata easily
Next let's add new code
<script>
import Storage from '../store/store'//Add, import the localStorage you just wrote
export default {
name: "NewContact",
  data(){
    return {
      info: {
        name: '',
        age: null,
        sex: ''
      },
      options: [
        'female','male','secrecy'
      ],
      tabledata: Storage.fetch()//Write previous deletions to this method of getting data
    }
  },
  methods: {
    create(){
      this.tabledata.push(this.info)
      this.info =  {name: '', age: null, sex: ''}
    },
    del(index){
      this.tabledata.splice(index,1)
    }
  },
  watch:{//Newly added, watch is the monitor for vue, once the listener object changes it will do so
    tabledata{//New added, monitored object
      handler(items){Storage.save(items)},//New additions, listens for changes to objects, a function, saves data
      deep: true//Deep listening to avoid too many levels of nested data, use deep listening to prevent too many levels of data from being listened to
  }
- 1
- 2
- 3
- 4
- 5
- 6
- 7
- 8
- 9
- 10
- 11
- 12
- 13
- 14
- 15
- 16
- 17
- 18
- 19
- 20
- 21
- 22
- 23
- 24
- 25
- 26
- 27
- 28
- 29
- 30
- 31
Tabledata: Since fetch() gets an array, writing directly to tabledata: is similar to writing later
tabledata:[{...},{...}]
- 1
When we add deleted data, we can open F12>Application>Local Storage in chrmoe browser to view it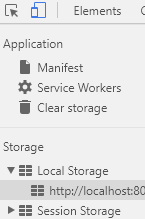
In general, when we click the Create button on the page, watch listens for changes in tabledata and executes savedata(items){Storage.save(items)} for data saving. When we click Delete, tabledata also changes and so does Save.
Perhaps the previous writing will inadvertently misspell letters. Finally, after slightly modifying the style of NewContact.vue, copy the complete content below:
NewContact.vue
<template>
  <el-row>
    <el-col :xs="24" :sm="18" :md="14" :lg="10" id="main">
    <label>Full name:</label>
    <el-input v-model="info.name" placeholder="Please enter your name"></el-input>
    <label>Age:</label>
    <el-input v-model="info.age" placeholder="Please enter your age"></el-input>
    <label>Gender:</label>
    <el-select v-model="info.sex" placeholder="Please select">
      <el-option v-for="item in options" :key="item" :value="item"></el-option><!-- There key Official Recommendation at v-for When used, otherwise warning will be given, but use will not be affected -->
    </el-select>
    <el-button  class="btn-auto" @click="create" type="success">Establish</el-button>
    <template>
      <el-table :data="tabledata" align="left">
        <el-table-column prop="name" label="Full name"></el-table-column>
        <el-table-column prop="age" label="Age"></el-table-column>
        <el-table-column prop="sex" label="Gender"></el-table-column>
        <el-table-column label="operation">
          <template slot-scope="a">
            <el-button size="mini" type="danger" @click="del(a.$index)">delete</el-button>
          </template>
        </el-table-column>
      </el-table>
    </template>
    </el-col>
  </el-row>
</template>
<script>
import Storage from '../store/store'
export default {
  name: "NewContact",
  data(){
    return {
      info: {
        name: '',
        age: null,
        sex: ''
      },
      options: [
        'female','male','secrecy'
      ],
      tabledata: Storage.fetch()
    }
  },
  methods: {
    create(){
      this.tabledata.push(this.info)
      this.info =  {name: '', age: null, sex: ''}
    },
    del(index){
      this.tabledata.splice(index,1)
    }
  },
  watch:{
    tabledata:{
      handler(items){Storage.save(items)},
      deep: true
    }
  }
}
</script>
<style>
    #main{
      float: none;
      margin: 0 auto;
  }
  .el-input{
    padding-bottom: 5px;
  }
  .el-select {
      display: block;
  }
  .btn-auto{
      width: 100%;
      margin-top: 12px;
  }
</style>
- 1
- 2
- 3
- 4
- 5
- 6
- 7
- 8
- 9
- 10
- 11
- 12
- 13
- 14
- 15
- 16
- 17
- 18
- 19
- 20
- 21
- 22
- 23
- 24
- 25
- 26
- 27
- 28
- 29
- 30
- 31
- 32
- 33
- 34
- 35
- 36
- 37
- 38
- 39
- 40
- 41
- 42
- 43
- 44
- 45
- 46
- 47
- 48
- 49
- 50
- 51
- 52
- 53
- 54
- 55
- 56
- 57
- 58
- 59
- 60
- 61
- 62
- 63
- 64
- 65
- 66
- 67
- 68
- 69
- 70
- 71
- 72
- 73
- 74
- 75
- 76
- 77
- 78
Here is the localStorage:
const STORAGE_KEY = 'tabale-vuejs'
export default {
	fetch() {
		return JSON.parse(window.localStorage.getItem(STORAGE_KEY)
		 || '[]')
	},
	save(items) {
		window.localStorage.setItem(STORAGE_KEY, JSON.stringify(items))
	}
}
- 1
- 2
- 3
- 4
- 5
- 6
- 7
- 8
- 9
- 10
When we're done, we'll package it to run directly in the browser
Open/config/index.js
  build: {
    // Template for index.html
    index: path.resolve(__dirname, '../dist/index.html'),

    // Paths
    assetsRoot: path.resolve(__dirname, '../dist'),
    assetsSubDirectory: 'static',
    assetsPublicPath: './',//Add. Avoid production path errors

    /**
     * Source Maps
     */

    productionSourceMap: false, //Change to false
- 1
- 2
- 3
- 4
- 5
- 6
- 7
- 8
- 9
- 10
- 11
- 12
- 13
- 14
Then run $npm run build
Wait for completion, a dist folder will be generated, and the index.html inside will open directly and run in the browser
It's fine too Click here to see the effect