catalogue
- What is HMR
- Configure to use HMR
- HMR principle
- debug server source code
- debug client source code
- problem
- summary
What is HMR
HMR (Hot Module Replacement) means that when you modify and save the code, webpack will repackage the code and send the changed module to the browser. The browser will replace the old module with a new module to update the page locally rather than refresh the page as a whole.
Usage scenario
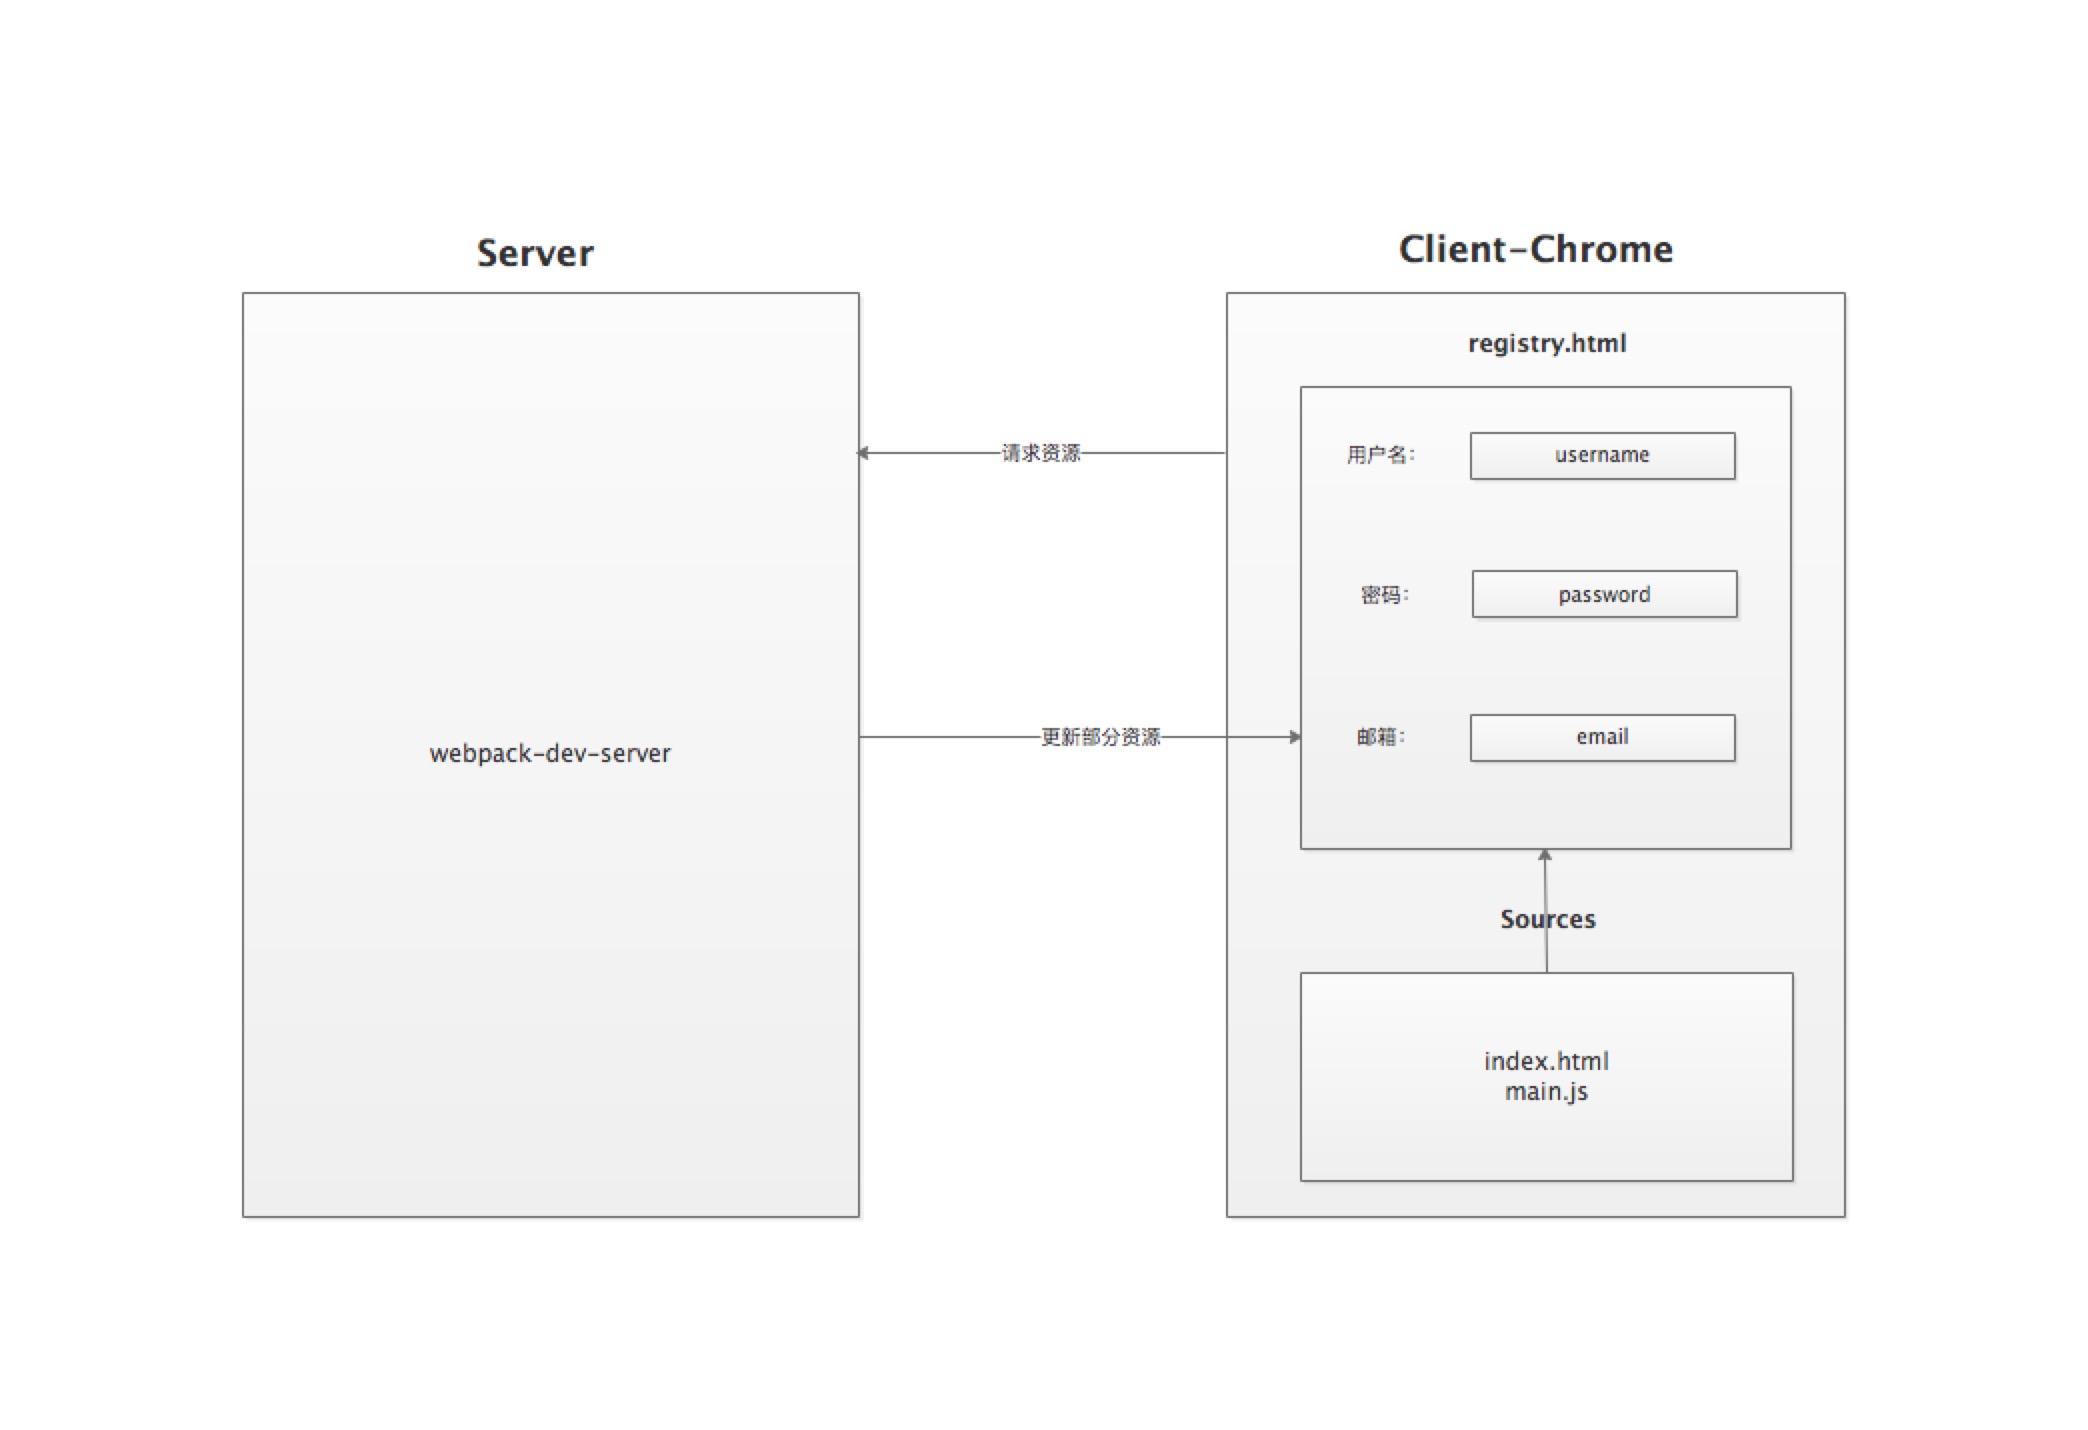
As shown in the above figure, a registration page contains three required input boxes: user name, password and email, as well as a submit button. When you change the code in the debugging email module, the whole page will be refreshed without any processing. Frequent code changes will waste you a lot of time to fill in the content again. The first mock exam is to keep the user name and password input, instead of replacing the mailbox. This demand requires the hot module update function of webpack dev server.
Compared with the live reload scheme, the advantage of HMR is that it can save the application state and improve the development efficiency.
Configure to use HMR
Configure webpack
First, build the project with the help of webpack
- Get to know the project and import dependencies
mkdir webpack-hmr && cd webpack-hmr
npm i -y
npm i -S webpack webpack-cli webpack-dev-server html-webpack-plugin
- Configuration file webpack config. js
const path = require('path')
const webpack = require('webpack')
const htmlWebpackPlugin = require('html-webpack-plugin')

module.exports = {
  mode: 'development', // The development mode does not compress the code, which is convenient for debugging
  entry: './src/index.js', // Entry file
  output: {
    path: path.join(__dirname, 'dist'),
    filename: 'main.js'
  },
  devServer: {
    contentBase: path.join(__dirname, 'dist')
  },
  plugins: [
    new htmlWebpackPlugin({
      template: './src/index.html',
      filename: 'index.html'
    })
  ]
}- New Src / index HTML template file
<!DOCTYPE html>
<html lang="en">
<head>
  <meta charset="UTF-8">
  <meta name="viewport" content="width=device-width, initial-scale=1.0">
  <meta http-equiv="X-UA-Compatible" content="ie=edge">
  <title>Webpack Hot Module Replacement</title>
</head>
<body>
  <div id="root"></div>
</body>
</html>
- New Src / index JS entry file to write simple logic
var root = document.getElementById('root')
function render () {
  root.innerHTML = require('./content.js')
}
render()- Create a new dependency file Src / content JS export characters for index rendering page
var ret = 'Hello Webpack Hot Module Replacement'
module.exports = ret
// export default ret
- Configure package json
  "scripts": {
    "dev": "webpack-dev-server",
    "build": "webpack"
}- Then npm run dev can start the project
- Package and generate static resources to dist directory through npm run build
Next, analyze the files in the dist directory
Parsing the contents of the file packaged by webpack
- Explanation of a set of commonjs specifications implemented by webpack
- Distinguish between commonjs and esmodule
dist directory structure
.
├── index.html
└── main.js
Including index The HTML content is as follows
<!-- ... -->
<div id="root"></div>
<script type="text/javascript" src="main.js"></script></body>
<!-- ... -->
Use the HTML webpack plugin plug-in to introduce the entry file and its dependencies through the script tag
First yes JS content remove comments and irrelevant content for analysis
(function (modules) { // webpackBootstrap
  // ...
})
({
  "./src/content.js":
    (function (module, exports) {
      eval("var ret = 'Hello Webpack Hot Module Replacement'\n\nmodule.exports = ret\n// export default ret\n\n");
    }),
  "./src/index.js": (function (module, exports, __webpack_require__) {
    eval("var root = document.getElementById('root')\nfunction render () {\n  root.innerHTML = __webpack_require__(/*! ./content.js */ \"./src/content.js\")\n}\nrender()\n\n\n");
  })
});
It can be seen that webpack will produce a self executing function after packaging, and its parameter is an object
"./src/content.js": (function (module, exports) {
  eval("...")
}
The key is the relative path of the entry file or dependent file relative to the root directory, and the value is a function in which eval is used to execute the content characters of the file.
- After entering the self executing function body, it can be seen that webpack has implemented a set of commonjs specifications
(function (modules) {
  // Module cache
  var installedModules = {};
  function __webpack_require__(moduleId) {
    // Determine whether there is a cache
    if (installedModules[moduleId]) {
      return installedModules[moduleId].exports;
    }
    // If there is no cache, create a module object and put it into the cache
    var module = installedModules[moduleId] = {
      i: moduleId,
      l: false, // Is it loaded
      exports: {}
    };
    // Execute module function
    modules[moduleId].call(module.exports, module, module.exports, __webpack_require__);
    // Set status to loaded
    module.l = true;
    // Return module object
    return module.exports;
  }
  // ...
  // Load entry file
  return __webpack_require__(__webpack_require__.s = "./src/index.js");
})
If you are interested in the commonjs specification above, you can go to another article of mine Touch and take you to realize the commonjs specification
Given the above code, you are familiar with the output file of webpack first. Don't be afraid. In fact, no matter how complex a thing is, it is composed of smaller and simpler things. Cut it open, know it, love it.
Configure HMR
Next, configure and feel the convenient development brought by hot update
webpack.config.js configuration
  // ...
  devServer: {
    hot: true
  }
  // ...
./src/index.js configuration
// ...
if (module.hot) {
  module.hot.accept(['./content.js'], () => {
    render()
  })
}
When changed/ content. When the content of JS is saved, you can see that the page has not been refreshed, but the content has been replaced.
This is of great significance to improve development efficiency. Next, we will open it layer by layer and understand its implementation principle.
HMR principle
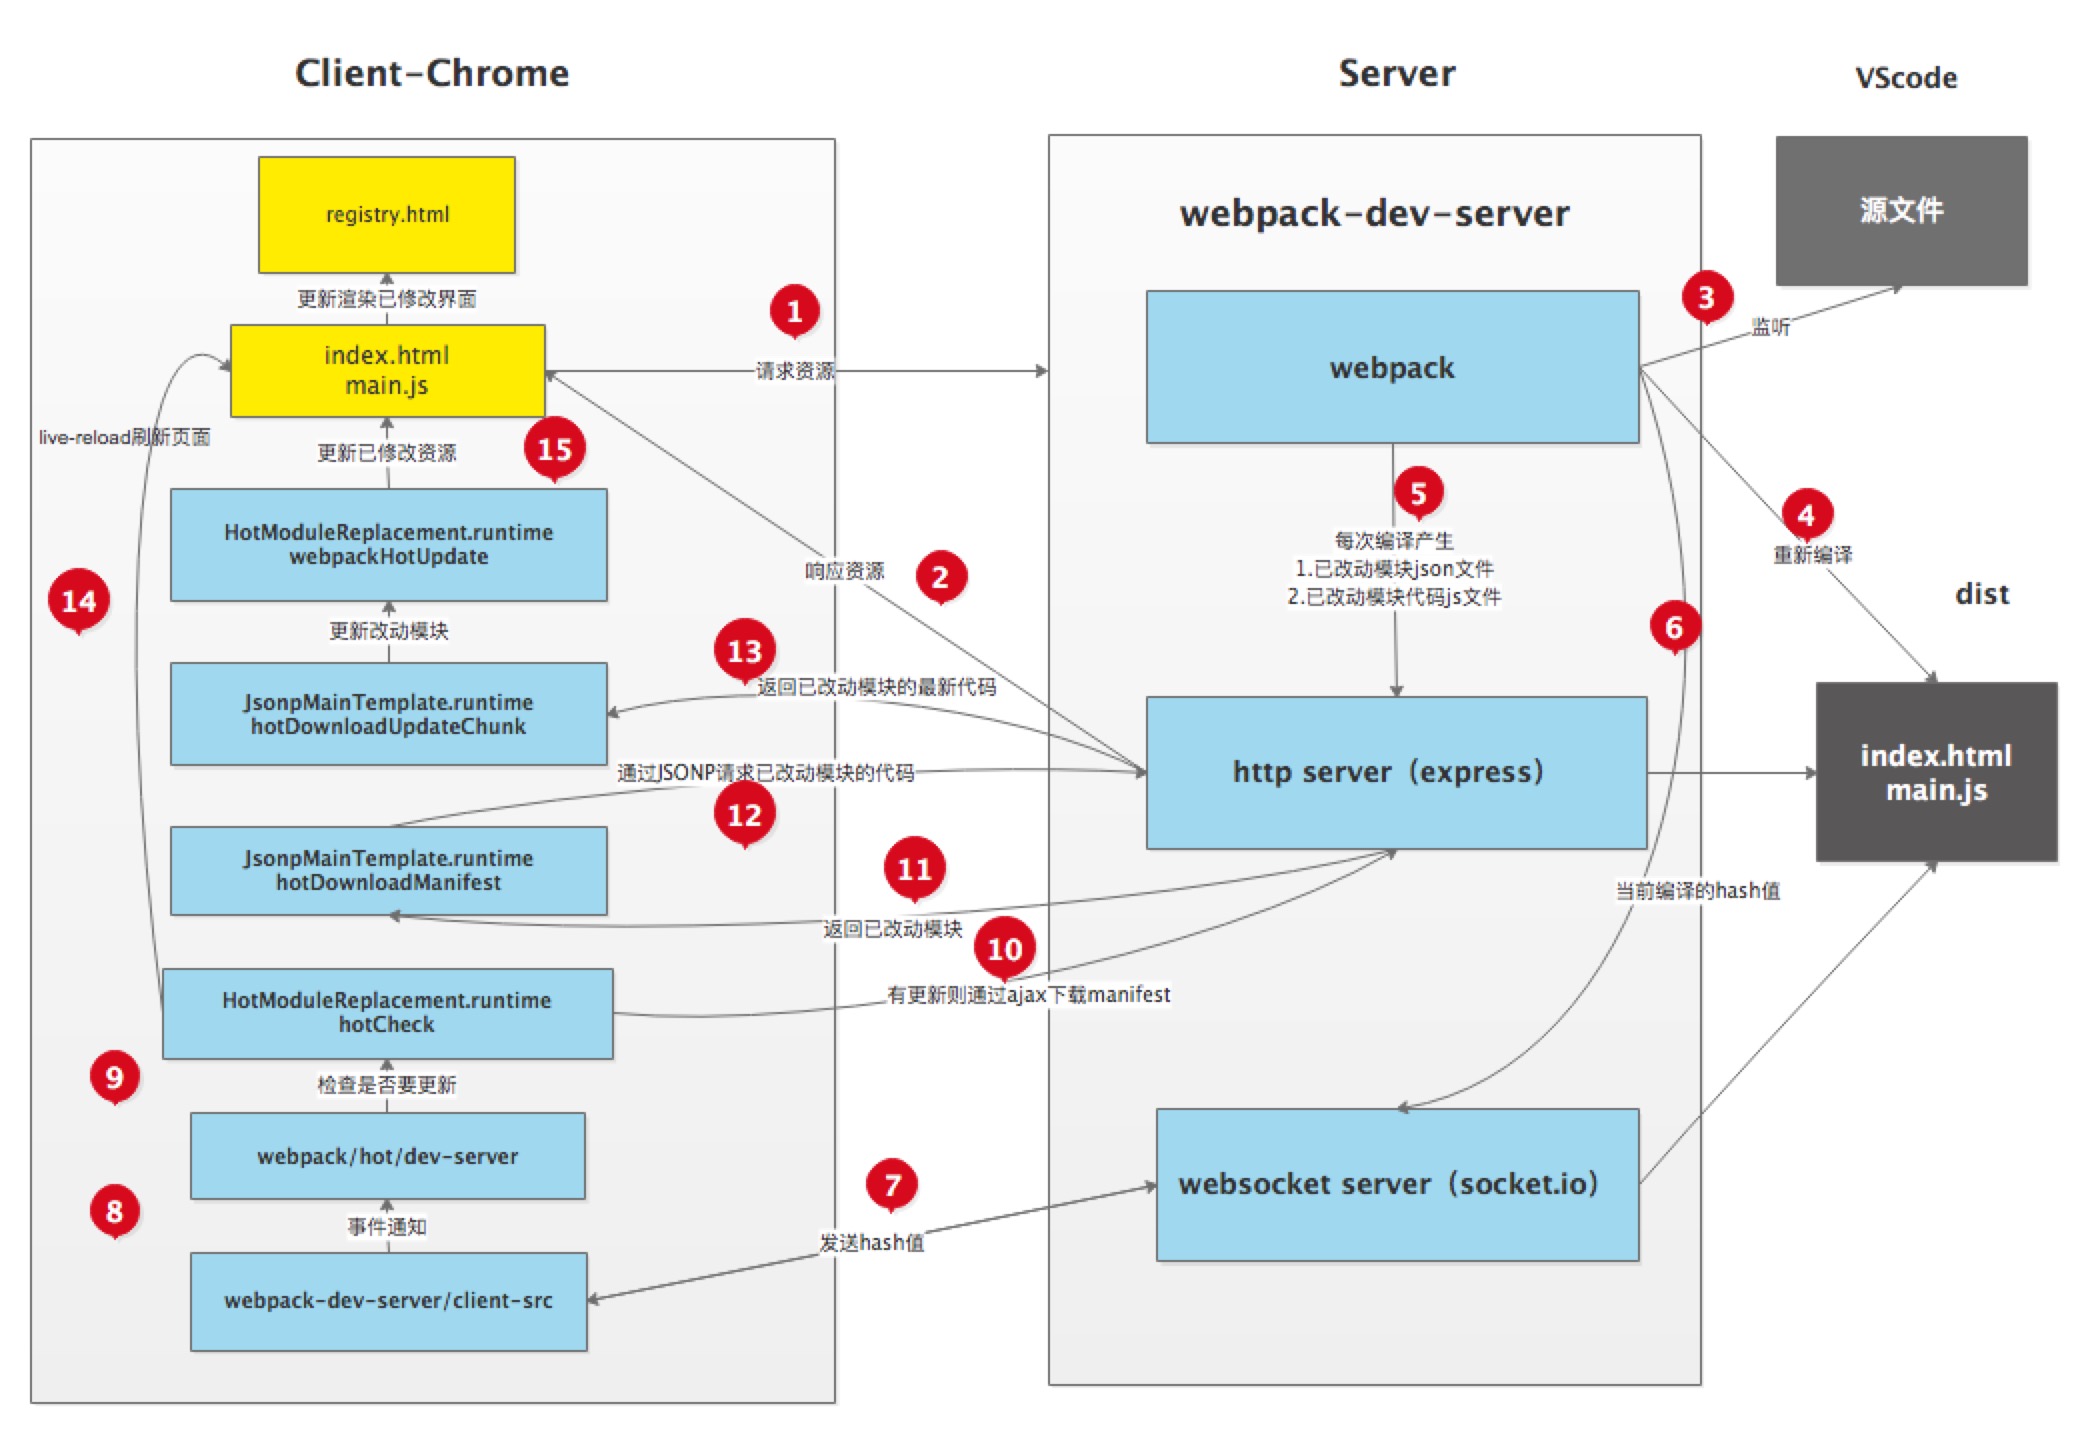
As shown in the figure above, the Server side on the right uses webpack dev Server to start local services, and the internal implementation mainly uses webpack, express and websocket.
- Use express to start the local service and respond to it when the browser accesses the resource.
- The server and client use websocket to realize long connection
- Webpack listens for changes in the source file, that is, when the developer saves the file, it triggers the recompilation of webpack.
- Each compilation will generate hash value, json file of changed module and js file of changed module code
- After compilation, push the currently compiled hash stamp to the client through socket
- The client's websocket listens to the hash stamp pushed by file changes, which will be compared with the last time
- Cache if consistent
- In case of inconsistency, obtain the latest resources from the server through ajax and jsonp
- Use the memory file system to replace the modified content to achieve local refresh
The above figure only gives an overview, and the following will make a detailed analysis from the two aspects of server and client
debug server source code
Now you only need to pay attention to the server part on the right in the figure above, and the left can be ignored for the time being. The following steps are mainly to analyze the source code of the debug server, analyze its detailed ideas, and also give the specific location of the code. Those interested can first locate the following code, set breakpoints, and then observe the changes of the data. You can also skip reading this step first.
- Start the webpack dev server server with the source code address @webpack-dev-server/webpack-dev-server.js#L173
- Create a webpack instance with the source code address @webpack-dev-server/webpack-dev-server.js#L89
- Create Server, source code address @webpack-dev-server/webpack-dev-server.js#L107
- Add the done event callback of webpack, and the source code address @webpack-dev-server/Server.js#L122
- After compilation, send a message to the client, including the source code address @webpack-dev-server/Server.js#L184
- Create an express app with source code address @webpack-dev-server/Server.js#L123
- Set the file system to memory file system, source code address @webpack-dev-middleware/fs.js#L115
- Add webpack dev middleware, source code address @webpack-dev-server/Server.js#L125
- The middleware is responsible for returning the generated file, source code and address @webpack-dev-middleware/middleware.js#L20
- Start webpack compilation, source code address @webpack-dev-middleware/index.js#L51
- Create http server and start service, source code address @webpack-dev-server/Server.js#L135
- Use sockjs to establish a long websocket connection between the browser and the server, and the source code address @webpack-dev-server/Server.js#L745
- Create socket server, source code address @webpack-dev-server/SockJSServer.js#L34
Simple implementation of server
The above are the core points of the dev server running process obtained by me through debug, which are listed below Integrate abstractions into one file.
Start the webpack dev server server
Import all dependencies first
const path = require('path') // Resolve file path
const express = require('express') // Start local service
const mime = require('mime') // Get a static file type
const webpack = require('webpack') // Read configuration file for packaging
const MemoryFileSystem = require('memory-fs') // Using the in memory file system is faster, and files are generated in memory rather than real files
const config = require('./webpack.config') // Get webpack configuration file
Create a webpack instance
const compiler = webpack(config)
The compiler represents the entire webpack compilation task. There is only one compiler in the whole world
Create Server
class Server {
  constructor(compiler) {
    this.compiler = compiler
  }
  listen(port) {
    this.server.listen(port, () => {
      console.log(`The server is already running ${port}Started on port`)
    })
  }
}
let server = new Server(compiler)
server.listen(8000)
After that, you can start the service through express
Add done event callback for webpack
  constructor(compiler) {
    let sockets = []
    let lasthash
    compiler.hooks.done.tap('webpack-dev-server', (stats) => {
      lasthash = stats.hash
      // A message is sent to the client whenever a new compilation is completed
      sockets.forEach(socket => {
        socket.emit('hash', stats.hash) // Send the latest hash value to the client first
        socket.emit('ok') // Then send an ok to the client
      })
    })
  }
After compilation, webpack provides a series of hook functions for plug-ins to access its various life cycle nodes and modify its packaged content. compiler.hooks.done is the last node where the plug-in can modify its content.
After compilation, send a message to the client through socket and push the hash generated by each compilation. In addition, if it is a hot update, two patch files will be produced, which describe what chunk s and modules have changed from the last result to this result.
Use the let sockets = [] array to store the socket instance of each Tab when multiple tabs are opened.
Create an express app
let app = new express()
Set file system to memory file system
let fs = new MemoryFileSystem()
Use MemoryFileSystem to package the output file of compiler into memory.
Add webpack dev Middleware
  function middleware(req, res, next) {
    if (req.url === '/favicon.ico') {
      return res.sendStatus(404)
    }
    // /index.html   dist/index.html
    let filename = path.join(config.output.path, req.url.slice(1))
    let stat = fs.statSync(filename)
    if (stat.isFile()) { // Judge whether this file exists. If it exists, read it out and send it to the browser directly
      let content = fs.readFileSync(filename)
      let contentType = mime.getType(filename)
      res.setHeader('Content-Type', contentType)
      res.statusCode = res.statusCode || 200
      res.send(content)
    } else {
      return res.sendStatus(404)
    }
  }
  app.use(middleware)
After using expres to start the local development service, the middleware is used to construct a static server for it, and the memory file system is used to store the read file in memory, improve the reading and writing efficiency, and finally return the generated file.
Start webpack compilation
  compiler.watch({}, err => {
    console.log('Another compilation task completed successfully')
  })
Start a webpack compilation in the monitoring mode, and execute the callback after the compilation is successful
Create an http server and start the service
  constructor(compiler) {
    // ...
    this.server = require('http').createServer(app)
    // ...
  }
  listen(port) {
    this.server.listen(port, () => {
      console.log(`The server is already running ${port}Started on port`)
    })
  }
Use sockjs to establish a long websocket connection between browser and server
  constructor(compiler) {
    // ...
    this.server = require('http').createServer(app)
    let io = require('socket.io')(this.server)
    io.on('connection', (socket) => {
      sockets.push(socket)
      socket.emit('hash', lastHash)
      socket.emit('ok')
    })
  }
Start a websocket server, wait for the connection to arrive, and store it in the sockets pool after the connection arrives
When there are two events to recompile the webpak and webpak files to the client
Server debugging stage
Interested can be based on the above debug server source code And set breakpoints in the browser's debugging mode to view the values of each stage.
node dev-server.js
Use our own compiled dev server JS start the service, you can see that the page can be displayed normally, but the hot update has not been realized.
The following will analyze the implementation process of the source code of the modal client.
debug client source code
Now you only need to pay attention to the client part on the left in the figure above, and the right can be ignored for the time being. The following steps are mainly to debug the client source code, analyze its detailed ideas, and also give the specific location of the code. Those interested can first locate the following code, set breakpoints, and then observe the changes of data. You can also skip reading this step first.
debug client source code analysis, its detailed ideas
- The webpack dev server / client side will listen to this hash message and the source code address @webpack-dev-server/index.js#L54
- After receiving the ok message, the client will execute the reloadApp method to update the source code address index.js#L101
- In reloadApp, it will judge whether hot update is supported. If yes, it will launch webpackHotUpdate event. If not, it will directly refresh the browser and the source code address reloadApp.js#L7
- In webpack / hot / dev server JS will listen for webpackHotUpdate events and the source code address dev-server.js#L55
- Module will be called in the check method hot. Check method, source code address dev-server.js#L13
- HotModuleReplacement.runtime request Manifest, source code address HotModuleReplacement.runtime.js#L180
- It calls jsonpmaintemplate hotDownloadManifest method of runtime, source code address JsonpMainTemplate.runtime.js#L23
- Call jsonpmaintemplate The hotDownloadUpdateChunk method of runtime obtains the latest module code and source code address through JSONP request JsonpMainTemplate.runtime.js#L14
- After the patch JS is retrieved, it will call jsonpmaintemplate runtime. JS webpackHotUpdate method, source code address JsonpMainTemplate.runtime.js#L8
- Hotmodulereplacement. Is then called runtime. JS hotAddUpdateChunk method dynamically updates the module code and the source code address HotModuleReplacement.runtime.js#L222
- Then the hotApply method is called for thermal update, source code address. HotModuleReplacement.runtime.js#L257,HotModuleReplacement.runtime.js#L278
Simple implementation of client
The above are the core points of the dev server running process obtained by me through debug, which are listed below Abstract integration into a file.
The webpack dev server / client side will listen to this hash message
Before developing client-side functions, you need to use Src / index Introducing socket.html io
<script src="/socket.io/socket.io.js"></script>
Next, connect the socket and accept the message
let socket = io('/')
socket.on('connect', onConnected)
const onConnected = () => {
  console.log('Client connection succeeded')
}
let hotCurrentHash // lastHash last hash value
let currentHash // hash value this time
socket.on('hash', (hash) => {
  currentHash = hash
})
Cache the hash generated by each compilation of the server webpack
After receiving the ok message, the client will execute the reloadApp method to update
socket.on('ok', () => {
  reloadApp(true)
})
Determine whether hot update is supported in reloadApp
// After receiving the ok event, the app will be refreshed again
function reloadApp(hot) {
  if (hot) { // If hot is true, follow the logic of hot update
    hotEmitter.emit('webpackHotUpdate')
  } else { // If hot update is not supported, reload directly
    window.location.reload()
  }
}
In reloadApp, it will judge whether hot update is supported. If yes, it will launch webpackHotUpdate event. If not, it will refresh the browser directly.
In webpack / hot / dev server JS will listen for webpackHotUpdate events
First, you need a publish subscribe to bind the event and trigger it at the right time.
class Emitter {
  constructor() {
    this.listeners = {}
  }
  on(type, listener) {
    this.listeners[type] = listener
  }
  emit(type) {
    this.listeners[type] && this.listeners[type]()
  }
}
let hotEmitter = new Emitter()
hotEmitter.on('webpackHotUpdate', () => {
  if (!hotCurrentHash || hotCurrentHash == currentHash) {
    return hotCurrentHash = currentHash
  }
  hotCheck()
})
It will determine whether it is the first time to enter the page and whether the code has been updated.
The above publication and subscription is relatively simple, and only supports the function of publishing before subscription. For some complex scenarios, you may need to subscribe before publishing. At this time, you can move @careteen/event-emitter . The implementation principle is also very simple. You need to maintain an offline event stack to store the events subscribed before publishing. When subscribing, you can take out all events for execution.
Module will be called in the check method hot. Check method
function hotCheck() {
  hotDownloadManifest().then(update => {
    let chunkIds = Object.keys(update.c)
    chunkIds.forEach(chunkId => {
      hotDownloadUpdateChunk(chunkId)
    })
  })
}
As mentioned above, each compilation of webpack will generate hash value, json file of modified module and js file of modified module code,
At this point, first use ajax to request Manifest, that is, which module s and chunk s the server has changed from the previous compilation.
Then get the code of these changed module s and chunk s through jsonp.
Call the hotDownloadManifest method
function hotDownloadManifest() {
  return new Promise(function (resolve) {
    let request = new XMLHttpRequest()
    //hot-update. The JSON file stores the differences from the last compilation to this compilation
    let requestPath = '/' + hotCurrentHash + ".hot-update.json"
    request.open('GET', requestPath, true)
    request.onreadystatechange = function () {
      if (request.readyState === 4) {
        let update = JSON.parse(request.responseText)
        resolve(update)
      }
    }
    request.send()
  })
}
Call hotDownloadUpdateChunk method to obtain the latest module code through JSONP request
function hotDownloadUpdateChunk(chunkId) {
  let script = document.createElement('script')
  script.charset = 'utf-8'
  // /main.xxxx.hot-update.js
  script.src = '/' + chunkId + "." + hotCurrentHash + ".hot-update.js"
  document.head.appendChild(script)
}
Here's an explanation of why we use JSONP to get the latest code instead of using socket directly? This is mainly because the code obtained by JSONP can be executed directly.
Call hotwebupdate method
When the client pulls the latest code to browse
window.webpackHotUpdate = function (chunkId, moreModules) {
  // Cycle the newly pulled module
  for (let moduleId in moreModules) {
    // Fetch the old module definition from the module cache
    let oldModule = __webpack_require__.c[moduleId]
    // parents which modules refer to this module children which modules this module refers to
    // parents=['./src/index.js']
    let {
      parents,
      children
    } = oldModule
    // Update cache updates the latest code cache
    let module = __webpack_require__.c[moduleId] = {
      i: moduleId,
      l: false,
      exports: {},
      parents,
      children,
      hot: window.hotCreateModule(moduleId)
    }
    moreModules[moduleId].call(module.exports, module, module.exports, __webpack_require__)
    module.l = true // When the state changes to load, it is given to module Exports has been assigned
    parents.forEach(parent => {
      // parents=['./src/index.js']
      let parentModule = __webpack_require__.c[parent]
      // _acceptedDependencies={'./src/title.js',render}
      parentModule && parentModule.hot && parentModule.hot._acceptedDependencies[moduleId] && parentModule.hot._acceptedDependencies[moduleId]()
    })
    hotCurrentHash = currentHash
  }
}
Implementation of hotCreateModule
In the implementation, we can define the modules and callback functions that need hot update in the business code and store them in hot_ Accepteddependences.
window.hotCreateModule = function () {
  let hot = {
    _acceptedDependencies: {},
    dispose() {
      // Destroy old elements
    },
    accept: function (deps, callback) {
      for (let i = 0; i < deps.length; i++) {
        // hot._acceptedDependencies={'./title': render}
        hot._acceptedDependencies[deps[i]] = callback
      }
    }
  }
  return hot
}
Then it is called in webpackHotUpdate
    parents.forEach(parent => {
      // parents=['./src/index.js']
      let parentModule = __webpack_require__.c[parent]
      // _acceptedDependencies={'./src/title.js',render}
      parentModule && parentModule.hot && parentModule.hot._acceptedDependencies[moduleId] && parentModule.hot._acceptedDependencies[moduleId]()
    })
Finally, the hotApply method is called for thermal update.
Client debugging phase
Through the above implementation of a basic version of HMR, you can change the code to save and view the browser. Instead of refreshing the whole, you can update the code locally and then update the view. When it comes to the needs of a large number of forms, it greatly improves the development efficiency.
problem
- How to implement the commonjs specification?
Interested parties can go to debug CommonJs specification Understand its implementation principle.
- What is the role of webpack implementation process and each life cycle?
webpack mainly uses a series of synchronous / asynchronous hook functions provided by the tapable library to run through the whole life cycle.
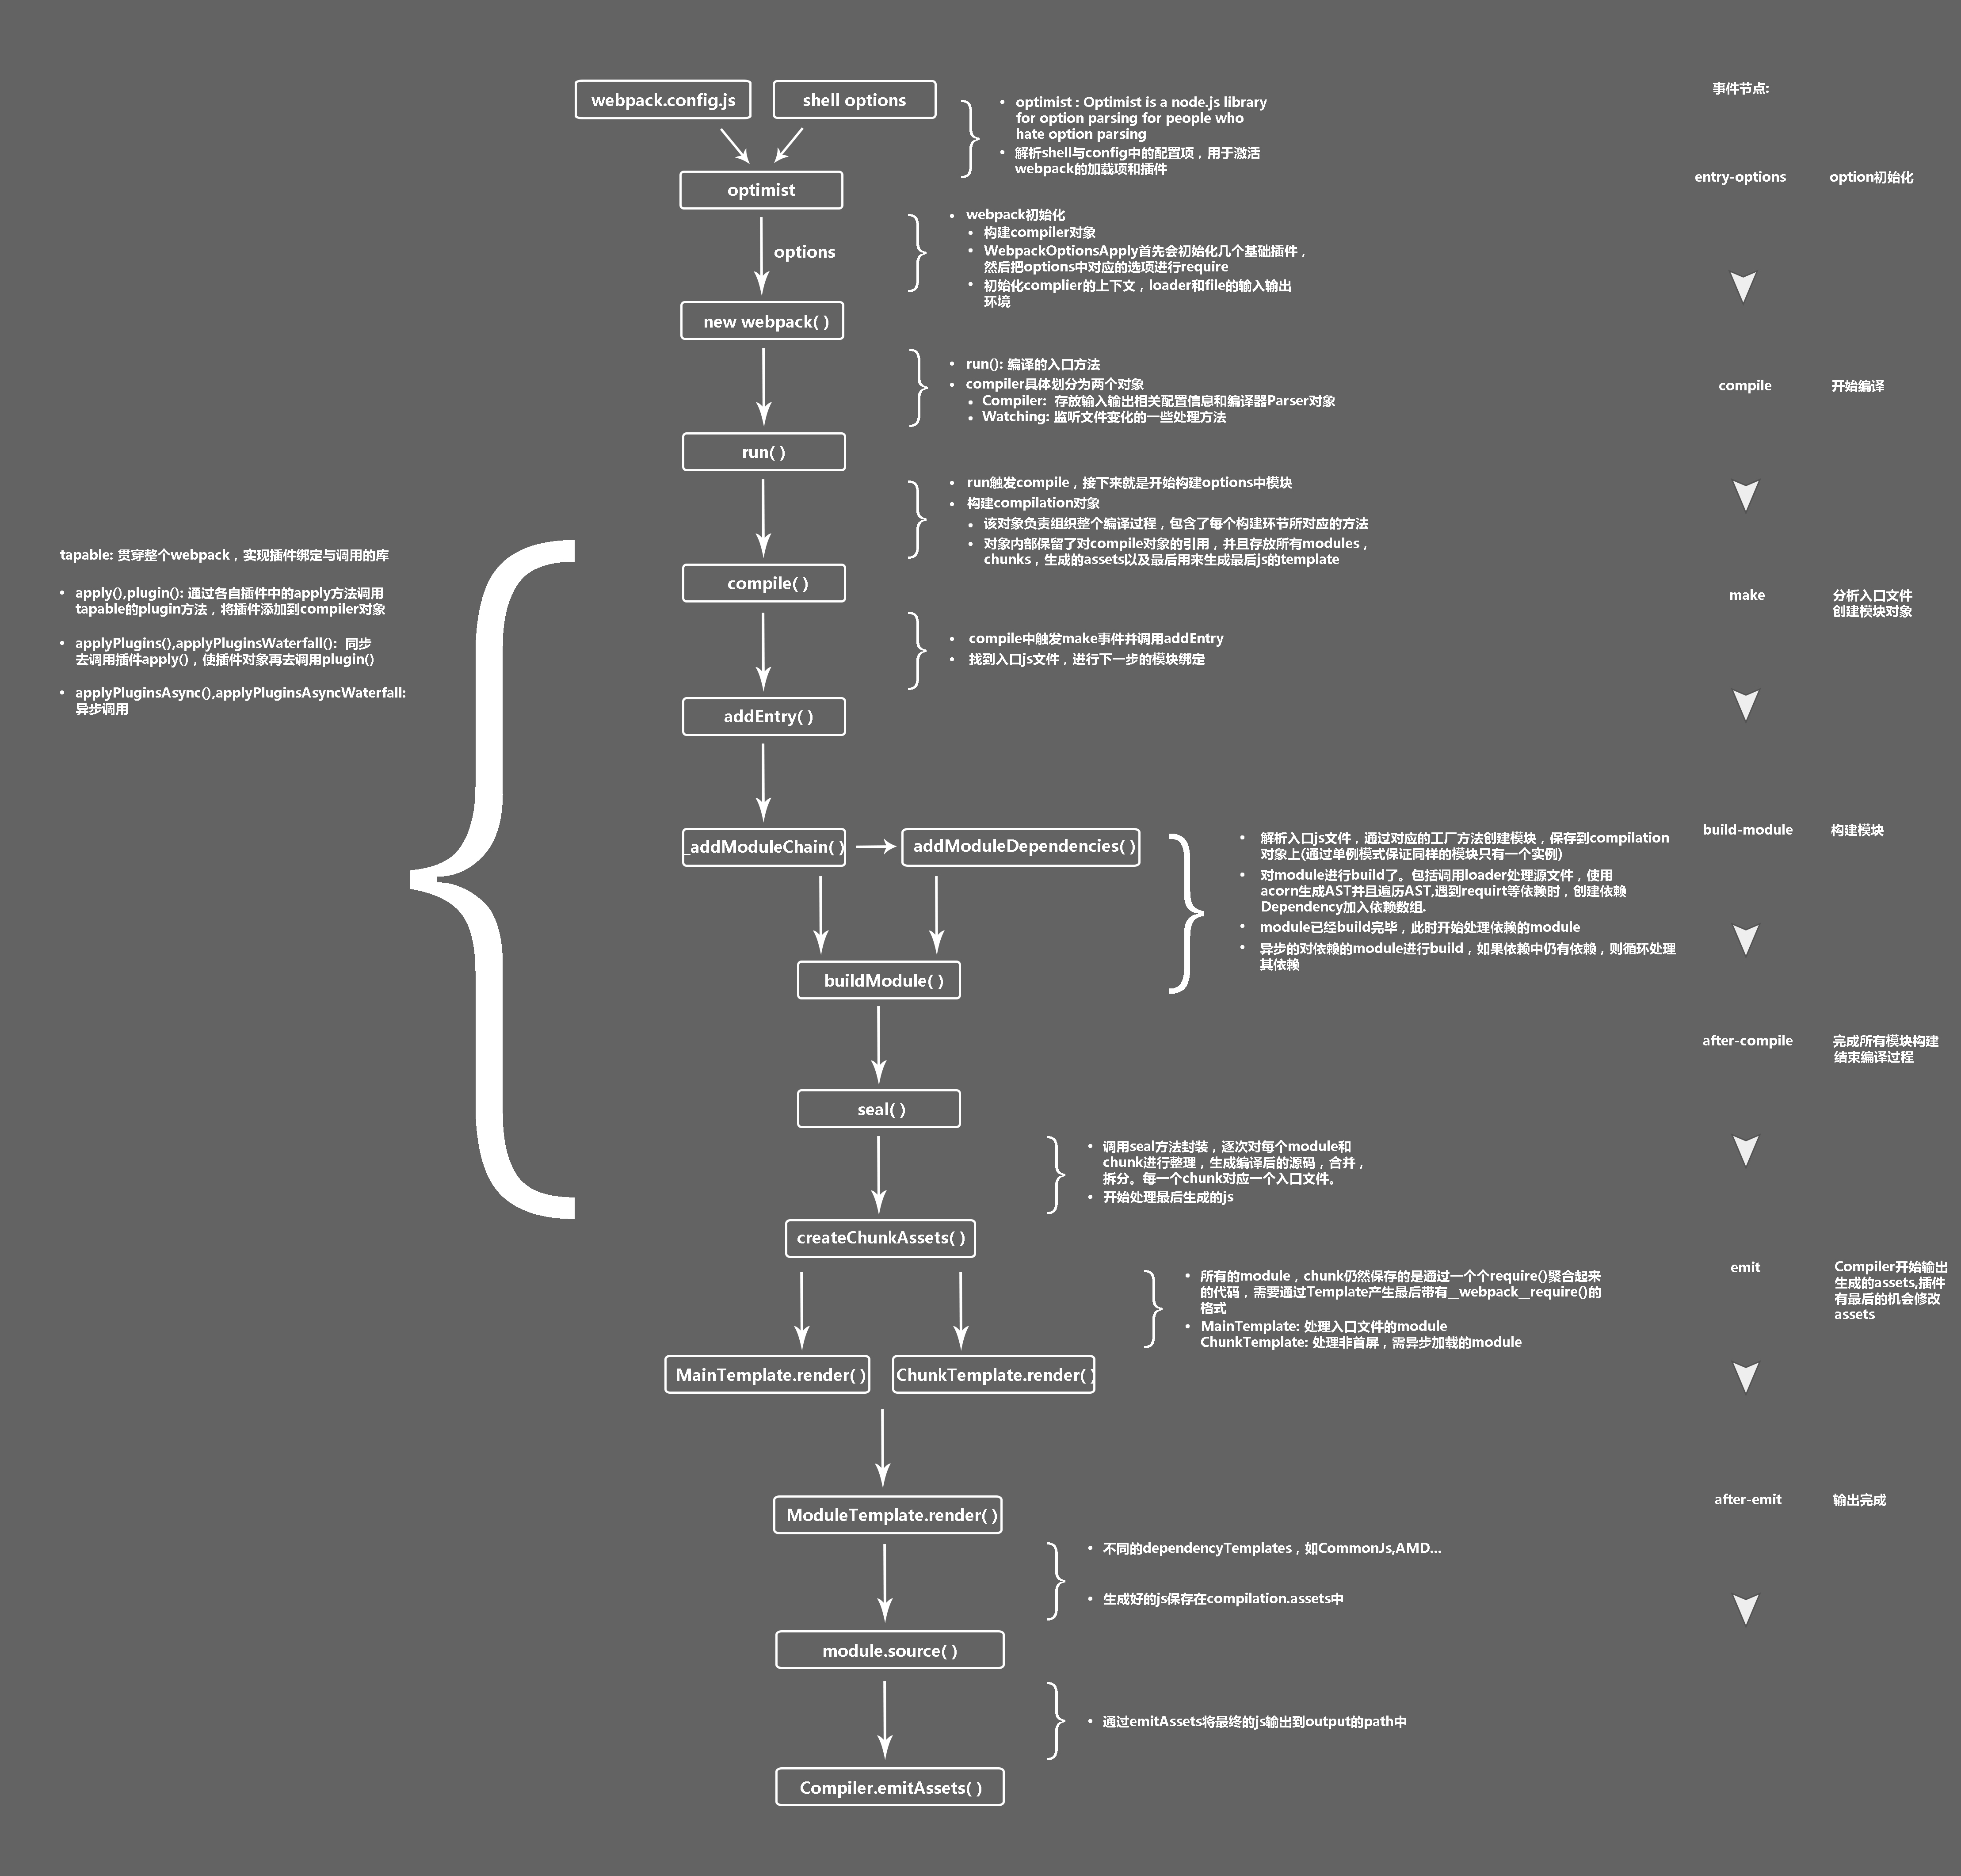
Based on this, I realized a simple version of webpack The source code is 100 + lines. It's easy to digest when eating with notes. Those who are interested can go and have a look.
- The use and implementation of publish and subscribe, and how to implement a mechanism that can subscribe before publishing?
It is also mentioned above that the publish subscribe mode needs to be used, and only the publish before subscribe function is supported. For some complex scenarios, you may need to subscribe before publishing. At this time, you can move @careteen/event-emitter . The implementation principle is also very simple. You need to maintain an offline event stack to store the events subscribed before publishing. When subscribing, you can take out all events for execution.
- Why use JSONP instead of socke communication to get updated code?
Because a string of strings is obtained through socket communication, it needs to be processed again. The code obtained through JSONP can be executed directly.
summary
TODO: add
- Possible pit
- You may not need it!
- Under what circumstances do you really need it?
- There is a large amount of code above. The main purpose is to learn the implementation idea. debug the details by yourself.